Harmonographs
How to make and use harmonographs.

Harmonographs are machines that use pendulums connected to a pen to draw beautifully complex images.
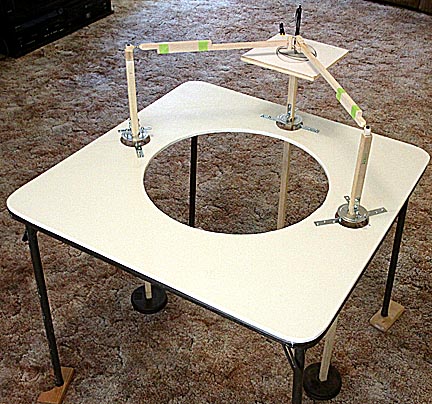
This page uses the the machine shown above to replicate the motions of several of the most common harmonographs to show how they work and what sorts of images each can make. When using this device the operator stands next to the drawing platform where the pen is located. From that position the two arms attached to the pen point away from the operator forming a wide "V." For the sake of discussion, the arm and pendulum on the operator's right side will be referred to as the "right" pendulum or arm. Regrettably, the orientation of the picture above is such that the right arm and pendulum appear on the left.
Brief
History:
Harmonographs first started showing up in the mid 1800s and reached their peak of popularity around 1890. A popular parlor entertainment device, many were elaborate in design and boasted work by the finest cabinet makers of the time. Many references claim Hugh Blackburn, a professor of mathematics at the University of Glasgow, was the originator of these drawing machines. The images they produce are called lissajous curves. Technically, a harmonograph is the machine. Harmonograms are the pictures they draw.
How
To Build A Harmonograph:
My design started with a card table whose top had been replaced with a piece of 1/2-inch plywood.
(Note: The large hole in the center of the table has nothing to do with the design of this harmonograph. It's there because this table also functions as the base of my Bubble Storm 2000 bubble machine, which you can read about on my BUBBLE BLOWING page.)
The harmonograph in the image above uses three pendulums, each of which can be locked in place, set up to swing in straight lines (1-dimensionally) or in circles (2-dimensionally.) This gives it the unique ability to produce an incredible range of images. However, this is only one type of harmonograph. There are many more varieties that use a wide range of pendulum/linkage combinations.
Three foot long square dowels with 5-pounds of dumbbell weights form the pendulums. A 1 x 3-inch metal plate at the bottom of the dowel keeps the weights in place. By adding pieces of shim wood between these plates the height of the weight and therefore the frequency at which each pendulum swings can be adjusted. The higher the weights, the faster the pendulum swings. For height adjustments greater than 2 inches a clamp is used to raise the weights close to the desired position...
![]()
...then shims are once again used to fine tune the pendulum's period.
The pivots for the three pendulums consist of small bolts with their ends ground to points resting in dimples stamped into large metal washers.

In the configuration above, the pair of points attached to the table push up against the washer while a similar set of points push down 90-degrees from the first set. This allows the hinge to move freely in two dimensions to create circles. For those times when the arm needs to move in a single dimension the metal disk is removed and the pendulum rotated 90-degrees so that the points on the arm rest in dimples in the plates attached to the table.

The pendulum arm extends 10 inches above the pivot. At the top a hinge made from a pair of high strength magnetic spheres permits a full range of motion with minimal drag.

Unlike regular hinges they have no backlash, or play, which can create unattractive jiggles in the lines as a hinge changes from being pushed to being pulled. The two arms come together at the center of the drawing platform and held together by another magnetic joint. The wood for the arms is 3/4-inch balsawood. Light wood is used so that there is as little weight as possible pressing the pen on the paper.

Two magnetic joints here are required to keep the pen from falling over. The pen is held to the end of one arm by a rubber band stretched around the end of one arm.
The platform that holds the paper is an 8x8 inch piece of 1/2-inch plywood screwed to the top of the pendulum.
The two drawing arms are segmented to allow adjustments.
How
To Use A Harmonograph:
Harmonographs create drawings by moving the pen over a piece of paper that may or may not itself be moving. The pendulums driving all this motion move in smaller and smaller circles as drag dissipates their energy. More weight on the end of the pendulums means more energy can be stored and they will swing longer. This creates pictures with lines that are very close together. Care must be taken not to get them too close or they'll blend together and much of the detail will be lost. Using lighter weights causes the pendulums to lose amplitude faster, with the result that the lines on the drawing will be farther apart. Make the weights too light and the lines will end up so far apart that the drawing won't be interesting. For this harmonograph 5 pounds at the end of each pendulum work well.
The primary source of drag comes from the pen as it moves over the paper. I found the lowest drag was from using Kodak Ultra Glossy photo paper and fine point (207) Uni-Ball Gel Pens from Walmart. This photo paper is expensive but I've found that some glossy papers clog up the pens. I use regular typing paper for test runs then switch to the more expensive photo paper for a finish drawing. To make a drawing, place several pieces of paper on the drawing board with the second piece from the top being the good photo paper, get the pendulums in motion and once the pen has settled into its pattern, slide off the top piece of paper to start the drawing. This avoids the erratic lines that always occur when the pendulums are started in motion. To get the pen in motion, grasp the arm near the pen and slowly start moving it in the desired shape or hold the top of the pendulums and start them swinging. Using the pen allows you to more accurately define the trace's starting shape. Using the tops of the pendulums allows you to control the relative amplitudes and shapes they follow to create more unusual harmonograms. Build amplitude gradually so the magnetic joints don't pull apart.
One
Dimensional Pendulum Drawings:
This first drawing shows what happens with both pen arms limited to straight line (1-dimensional) motion and the drawing table locked in place. The two arms swing in lines that are perpendicular to each other to produce ellipses. In this configuration the washers have been removed from the pendulums.

If both pendulums have the same period and start off swinging with the same amplitude the result should be a tightly wound circular spiral. Since it's almost impossible to get both arms swinging identically the result is usually an ellipse. The direction and thinness of the ellipse is determined by the pattern with which the pen is started. The pen begins drawing at the outside of the image and as drag slowly reduces the amplitude of the pendulums the pen moves in ever diminishing circles. Once it gets to the center the pen moves so little that the ink starts creating a solid smudge so lift the pen before that happens.
If we now shim one weight up just 1/2-inch so that its pendulum swings slightly faster than the other pendulum things get interesting very quickly.
![]()
What's happening is that because the pendulums have different periods they oscillate in and out of phase as the faster one first pulls away from the slower then catches up to it again. It's like a faster race car getting more and more ahead of a slower car until it eventually catches up from behind and laps it. The complexity of the images increases rapidly with remarkably small changes in the shim height. The next harmonograph image has the shim increased from 0.5 inches to 0.67 inches:
![]()
Here's what it looks like with a 1-inch shim:
![]()
The difference in the periods of the two pendulums in all of the examples above is very small. Unshimmed the pendulums oscillate on my harmonograph at 1.6 seconds per cycle. A 1/2-inch shim reduces this by only 0.01 seconds.
We can make things even more interesting by releasing the drawing platform arm and starting it moving back and forth (1-dimensionally.)

Now if we place the washer in the drawing platform's hinge so its pendulum can be set moving in a circle we get this:

The last two images were created by starting the drawing platform and pen arm both in motion. Different results are obtained by starting off with the drawing table motionless and letting the drag of the pen on the paper transfer energy to it so that it slowly starts moving in larger and larger circles. Here's what happens:

Things begin with the pen moving in a spiraling ellipses. But eventually the drawing platform collects enough energy so that its motion starts influencing the drawing. Compare the last two images and you can see that they are similar. The difference is that in the red image the drawing platform was set in motion so that the denser ring started off right away. In the second image the denser ring didn't show up until the drawing platform had absorbed enough motion from the arms to start influencing the pen's motion.
As we did earlier, the weight on the drawing platform's arm can also be shimmed up to change it's period relative to the two arm-pendulums. Just as when the drawing platform was locked and one pendulum raced ahead of the other until it caught up to it, or more correctly came back in synchronism with it, so the drawing platform will now create a series of in-sync and out-of-sync sections in the drawing. Here's what happens with a 1-inch shim:
![]()
... and a 2-inch shim:
![]()
At this point I need to explain that in the interests of managing the bandwidth of my website I've been forced to reduce the size of the images. Sadly, this means that much of the fine detail some of these images is lost.
So far we've been experimenting by adding more freedom and complexity to the motion of the pendulums. For the last test with the arm-pendulums constrained to move 1-dimensionally, one arm was locked so only the other could move back and forth as the drawing table moved in a circle.

This configuration mimics one of the most common harmonograph designs, which has one arm moving back and forth pushing a pen that rests on a platform that's free to move 2-dimensionally. A little imagination shows that the image above is a distorted version of an earlier image made with the table locked and the two arms moving 1-dimensionally with one arm slightly shimmed.
![]()
One of the biggest problems with using a harmonograph is trying to repeat an image. Take another look at the green image:

Believe it or not, it's the same as this next image:

The harmonograph was set up the same for both images. The only difference was that the pendulums for the second image had slightly different amplitudes. Harmonographs are notoriously temperamental in how they respond to small changes in initial conditions. Two other factors that have a strong effect on the image are when the top sheet of paper is pulled away to start creating the image and when the pen is raised to stop it. In the red drawing the image started after the initial spiral had decayed to the point where it was smaller than the inner image and the pen was lifted earlier to create the more open elliptical area in the center.
Two-Dimensional
Arm-Pendulum Motions:
All of the following images have the drawing tabled locked so it can't move, both arm pendulums set to move 2-dimensionally and both started with clockwise circular motion of the same amplitude. The only differences are that each picture has the right hand pendulum shimmed to gradually increasing heights. The first image is without any shimming so both pendulums have the same period.

Just like the 1-dimensional version the resulting figure is a slowly contracting spiral. Next the right pendulum is shimmed up 0.17 inches.
![]()
The shim is increased to .37 inches.
![]()
And now to 0.5 inches. As the differences in the period of the two pendulums increases so does the complexity of the resulting image. This is because over the time it takes to make a drawing the pendulums come in and out of sync more often.
![]()
The next step is to increase the right shim to 0.62 inches...
![]()
... followed by 0.87 inches.
![]()
By this time the drawings begin changing very fast. Small increments in shimming produces a large change in the appearance of the image. Using a 1.0 inch shim produced the last image in this section.
![]()
Its heart is so convoluted it's difficult to decide what it looks like.
Combining
a 1-Dimensional Pendulum Driving One Arm and a 2-Dimensional
Pendulum Driving the Other:
While a harmonograph with one 2D arm and one 1D arm would seem to be simpler than one with two 2D arms, in fact many of the images it produces are more complex. The reason is that while a machine with two, 2D arms has more freedom of motion, the fact is that both arms move with similar types of movements. With a harmonograph with a 1D/2D combination of pendulums each arm follows a fundamentally different path. It's true that a harmonograph with two, 2D arms could be started with one arm moving in a straight line. However, friction in the joints quickly transfers energy from the arm moving in a circular path into the arm moving in a straight line. In short order they are both moving in circles.
The following images all have the drawing platform locked so it doesn't move. One pendulum is started swinging in a circular motion while the other is constrained to move in a straight line. The 1D pendulum is shimmed by varying amounts to create a range of traces.
The first image has the 1D arm shimmed 0.37 inches.
![]()
When I concentrate on the outer lines it reminds me of an apple. Let's see what happens when the shim is increased to 0.62 inches.
![]()
The resulting harmonograph trace is flatter not so much because to the change in shim height but because of some inadvertent change in the relative amplitudes of the circular motion of the first pendulum and the line length of the second. Controlling these parameters is extremely difficult and this often overpowers the effect of shimming.
Next the shim is increased to 0.75 inches.
![]()
Now a 0.93 inch shim.
![]()
In addition to the difficulty of controlling the dimensions of the first pendulum's circle is the problem of moving it in a circle as opposed to an ellipse. The magnitude of these problems is exemplified in the following five traces, all of which used a 1.3 inch shim and were attempts to produce the same image:
![]()
![]()
![]()
![]()
![]()
As mentioned earlier, when the drawing is started and stopped also influences the outcome. The point is that when using a harmonograph with many degrees of freedom you can never be sure what you're going to get.
The last three images were made using a 0.19 inch shim on the 1D pendulum.
![]()
![]()
![]()
A Harmonograph With All Three Arms Enabled To Move In Two Dimensions:
If some of these images look less complicated than earlier ones with the harmonograph configured more simply, it's because the relative motions can sometimes end up complementing and even cancelling each other to produce unexpectedly simple results. Because replicating these images is strictly a hit-and-miss proposition, for the most of them I'm not going to bore you with details about how they were created.


The images above resulted from an attempt to make the same image two different ways. The trace on the left was made by starting only the drawing platform moving in a circle while the arms were left free to move but were still at the beginning of the drawing. On the right the drawing platform was free to move but left still while the arms were set into motion to move the pen in a circle. Note how both images look similar to earlier traces obtained with the arm pendulums limited to one dimensional motion.

Another apple

The core of this image reminds me of a dolphin swimming to the right.

This
one makes me think of a flying saucer. It was important to stop the
trace as soon as
it
got to the center. Left any longer and a complex pattern would start
developing in the
center
of the saucer and ruin the effect.

I'm still trying to figure out what this looks like.

I
see this as a modern art impression of a quail.
The
point on the upper right corner is the beak.

It's common for the human mind to interpret two dimensional shapes as three dimensional solids. Line drawings of boxes sometimes look as if they are bulging out of the paper as solid shapes, other times the same image will appear to be an empty box burrowing into the paper. So it is with many harmonograph traces, like the one above. Most of the time I see two scoops facing opposite directions. What do you see?
Not All Harmonograms Are Beautiful:
Because this page is mostly about entertainment it's understandable that only the most attractive harmonograph traces are posted. The reality is that many harmonograms are down right ugly, as the following image demonstrates:

It's
too convoluted and the line density is too great. It just isn't
appealing. Unfortunately this sort of thing happens all the time. The
more degrees of freedom a harmonograph has the more often this sort
of messy drawing happens.
4/3
And 3/2 Harmonics:
Several references extol the virtues of shimming one pendulum enough to have it oscillate at either a either a 4-to-3 or 3-to-2 ratio of periods relative to the other pendulum. Attractive butterfly shaped traces often accompany this advice. I tried both ratios and believe it's a waste of time. The images are so sensitive to minute adjustments in weight height that it's difficult to get close enough to the harmonic point to get an attractive picture. Immediately above or below this point the images become messy. If you're able to find the point, here's what you'll get:

This
is from a 3/2 harmonic ratio. I think it looks like a cobra.
Using
a 4/3 ratio results in a very similar image that looks more like a butterfly.
Add
2D motion or a moving drawing platform and it's almost impossible to
create an interesting image.
Conclusions
And
Suggestions:
After working with my harmonograph many hours I've come to the conclusion that it's really a case of over kill. While having all three pendulums free to move in two dimensions is interesting, the fact is that a much simpler machine with a 2D drawing platform and a 1D pendulum to drive the pen is all that's needed for a wide range of trace designs. Almost all of the most entertaining images on this page came from the harmonograph configured with a 2D and 1D arm and the drawing platform locked. More complicated configurations quickly become so difficult to control that the one good trace obtained from ten failures doesn't justify the hassle.
Besides building the simplest harmonograph possible, the next most important recommendation is to be careful to always write down on the corner of each trace a description of what motions and shims were used to create that image and keep these in a folder for future reference. It's hard enough trying to replicate an attractive trace even with this information. Without it, it's almost impossible.
If your pen skips or puts blots on your traces, check to make sure it's perpendicular to the paper. I've noticed that if gel pens are angled even a little they tend to make erratic traces.
Above all, research alternative harmonograph designs. There are dozens available on the Internet. The simplest is just a funnel filled with sand and hung by a long string hooked into the ceiling. Set in motion, it'll produce remarkable traces. Other concepts are similar in concept but have weights attached at different heights to create complex shapes. There are harmonographs with pens attached at the ends of the arms, others with the pens in the middle. I've even seen a giant harmonograph with 12-foot long arms that drew giant images. If mechanical construct doesn't interest you, on-line sources offer computer generated harmonogram software.
Watching a harmonograph draw is strangely hypnotic. The almost painful precision with which the pen traces smooth curves impossibly close to each other irresistibly draws the eye. You find yourself leaning closer and closer, mesmerized as the image takes form. As it does, the blending curves take on three-dimensional aspects that create the illusion of depth. There are moments when the motions of the pendulums fall into sync so that the pen's motion seems to have completely stopped. Then, mysteriously, it starts moving again in ever larger circles as the pendulums fall out of phase. I've lost hours working with the harmonograph. As one image is completed I get the itch for just one more attempt to see what the next one will be. Like snowflakes, no two are exactly alike. Building a harmonograph isn't easy, but its unique ability to entertain is well worth the effort.
Pintographs are harmonographs with the pendulums replaced with electric motors. They are much more compact and and easier to build. If you'd like more information about them please click on Pintographs to open my page about them.
I'd like to close this page with images of some of the best looking harmonograms I've made. I hope you enjoy them as well as this page. If so, then you may also like some of the other topics on my HOMEPAGE. There you'll find over 100 topics: everything from how to use a Knitting Nancy to the strange world of Lucid Dreaming. If nothing else the 30 pages of jokes should be good for a laugh.


NEW!!!
The following video shows an easy way to convert a harmonograph into a harmonolight: a device that creates images in a camera:
ALSO NEW!!!
Mr. Joe Freedman has opened a kickstarter project for a new drawing machine. I highly encourage anyone interested in such machines to pay his page a visit at:
http://www.kickstarter.com/projects/1765367532/cycloid-drawing-machine
Please note: I have not used Mr. Freedman's machine so I can't endorse investing in it or even purchasing one when they become available. Having said that I also have to say that I've requested to be put on the potential purchaser's list as soon as it's available.
![]()
Please click HERE to visit my main site and browse 90 other pages covering everything from the lost art of knitting Nancies to metal detecting.