Wayne Schmidt's Lightsaber Blade Research Page: Experiments in developing the brightest possible lightsaber blade.
Introduction:
Whether you are Star Wars fan or not, it has to acknowledged that any fandom that endures through three generations deserves respect. The ultimate icon for these films has to be the lightsaber and for 33 years thousands of people have devoted themselves to creating realistic representations of these weapons. The result has been swords with motion sensors, sound effects and light displays that not only dazzle the eye but can stand up to the rigors of hard contact duels. High end lightsabers demand a melding of many complex technologies: efficient light production, energy storage, computerized sound cards, special effects electronics and multi-sensor motion detectors. Designing and building a lightsaber from scratch is a daunting challenge that many attempt but very few complete. Professionally made lightsabers are finely crafted works of functioning art that can cost hundreds of dollars and are worthy of anyone's respect.
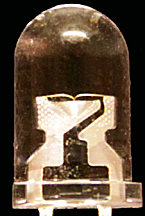
My involvement came from purchasing a Master Replicas Yoda Lightsaber for my grandsons.

The light in the blade scrolls up from the handle and lightsaber sounds from the original movie emanate from the realistic handle. As an engineer I was intrigued by how the light in the blade worked and wondered if I could use my expertise to improve its brightness since it fades considerably in normal lighting. That thrust me into a complex, and many times bewildering, universe of lightsaber illumination techniques, LED (light emitting diode) selection, blade architecture and lighting effects controllers. As I researched high-end lightsabers, I began to get glimmerings of how to build a lightsaber with unprecedented brightness. This page chronicles my research and presents the final result of my efforts to construct the next generation of ultrabright lightsaber blades.
Types
of Lightsabers:
As of 2010, lightsabers are dominated by two lighting techniques: flashlight and LED string.
Flashlight lightsabers have a bright light in the handle shining down the length of the blade. Early toy flashlight lightsabers used mass market flashlights capped with expandable segmented colored plastic cones. The light from the flashlight passed down the cone to illuminate it. These were simply hand help airport guidance flashlights with very long plastic cones. Modern versions feature state of the art ultra high power LEDs and blades filled with complex waveguide and diffusing materials. Diffusers in the blade help channel light along its length to provide more even lighting. Because there are no components in the blade, this technology enables the creation of extremely durable lightsabers that can be used in hard-contact dueling. Because only one light, or a tight group of lights, is used the electric connection system is simple. Since the light source is in the handle, changing blades is easy. These blades are brightest near the hilt. Because they have a single light source they can't be made to create a scrolling effect when the lightsaber's blade turns on. However, because the brightness of the blade dims from the hilt toward the tip, a scrolling-down-like effect can be created by dimming the light over a short interval of time. As the light dims, the point along the blade at which it's bright enough to see appears to retract toward the hilt. Reversing the dimming process creates a similar scrolling-out effect.
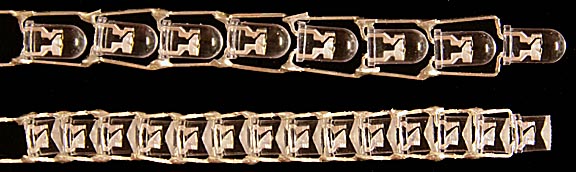
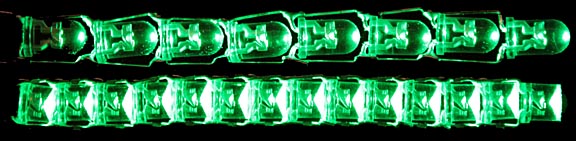
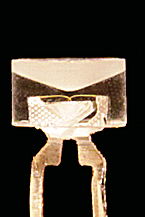
LED string lightsabers use a line of 50 to 70 small LEDs connected in parallel down the length of the blade. This provides a light source from within the blade itself so the illumination is more uniform than with flashlight type lightsabers.

A
typical LED string. Printed electrical traces on the support
ladder
carry power from the handle to each bulb.
The string can be divided into several, usually six, individually powered segments which can be turned on in sequence to create a scrolling effect very similar to lightsabers in movies. The LED string is usually wrapped with some type of diffusing material to even out the small dark zones between individual bulbs and to provide support and cushioning. Because the bulbs run down the length of the blade many duelists feel that these are too fragile for hard-contact dueling. Other people have experimented with them and found that a well-made string will hold together even if the polycarbonate tube encasing it shatters. The individual LEDs can be either 5mm or 3mm diameter types. Some manufacturers feel smaller bulbs create more uniform lighting. Although LED string blades are more complex than flashlight type lightsabers, they too can be made to be removable. The greatest downside to LED string lightsabers is that the are much more time consuming to manufacture than flashlight type sabers.
There is a continuing battle between these two technologies to see which produces the brightest blade. Flashlight type lightsabers are boasting ever more powerful lamps, some over 5-watts, which is enormous for a single LED. Others are experimenting with multiple high power LEDs in the handle and various lens systems to focus the light down the tube. LED string lightsaber enthusiasts are responding with testing every LED source for the highest power LEDs and linking them in every tighter strings. The famous lightsabers of Makoto Tsai are leading the charge in this area.
Which technology will be the victor is yet to be decided. It is my hope that this page may play an important part in determining the winner.
The
Type
of Lightsaber I Decided to Develop and Why I Chose It:
I chose the LED string lightsaber because it creates the most realistic scrolling effect. It's complexity also opens the door for more creativity in its optimization. I also feel that its distributed light system has a greater potential for producing more over all light. The end of a lightsaber's handle has less than one square inch of area on which the light source can be mounted. With LED string lightsabers, then entire blade can be used, providing over 36 square inches of lighting real estate. Energy density considerations suggest LED string technology may have the edge over flashlight systems.
Developing
the SUPERNOVA Blade Lighting System:
Part
1: Finding the Best LED:
The first order of business is to find the brightest LED. To do so I obtained the ten brightest LEDS (after correcting for luminance/output angles) I found from seven different sources. While 3mm LEDs are used by some makers with the theory that the smaller size allows more of them to be used to increase overall brightness, my research suggested that 5mm LEDs provide more light per unit bulb length. This suggests that an LED string made with them should be brighter if constructed properly. For this reason I decided to look at only 5mm LEDs. The string architecture I will be using makes the LED's output angle unimportant. Since I was going to compare them to the green MR Yoda lightsaber pictured earlier, I focused on green LEDs. These were tested using the following brightness meter:
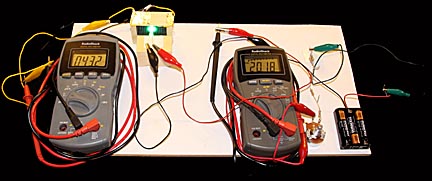
Current
from three AAA batteries travels through a resistor string and potentiometer
on
the right through the right hand meter to set the current through
the LED on the
test
stand in the upper middle left. Light from the LED falls on a
photocell connected
the
meter on the left, which measures the LED's brightness.
Initial
testing verified that this simple tester reliably and accurately
measures LED output regardless of output angle. Ambient light levels
are subtracted from each reading to ensure that environmental changes
don't influence readings or throw off brightness comparison
percentages. The following chart provides the results of my testing:
(Note: since the units of brightness are only used for comparison,
their absolute meaning is unimportant. Also, the cost per bulb does
not reflect shipping costs, which vary widely depending on the
retailer and number of bulbs ordered.)
LED
Name.............Source................Current.Brightness..Current.Brightness.Cost...Comments
Matoko Tsai...thecustomsabershop.com...20 ma.......270........''27 ma.....'.'.286.......$.90...Brightest, purest green
Flat 14000.....ledssuperbright.com.........'.20 ma.....''.245.........27 ma........259.......$.24..
RL-G8045..'....superbrightleds.com........''.20 ma.....'..239.........27 ma......'.255.'.'....$.99
RL-G16120.....superbrightleds.com........''.20 ma.....'..251.........27 ma......'.266.'.'....$.59
540PG2C.....'..leading-leds.com........../.''.20 ma..'/'''..260.........27 ma....''.'.271.'...'..$.23 ..Second brightest.
40-50DG-GN.'.theledlight.com............'..''.20 ma.....'..252.........27 ma......'.267.'..'...$.85
W20BA30.....'.besthongkong.com..........''.20 ma.....'..235.........27 ma......'.249.'..'...$.45
W70BC21.....'.besthongkong.com..........''.20 ma.....'..241.........27 ma......'.257 .'..'..$.45
W100BC15..'.'.besthongkong.com.......''.'''.20 ma......''233.........27 ma......''.245.'..'...$.43
While
the famous Makoto Tsai LEDs are the brightest, the 540PG2Cs are only
7-percent dimmer and cost one-quarter as much. This could be
significant since an LED string could have over 100 bulbs in it.
Using Makoto Tsai bulbs would increase the cost by $67.00. Also,
Makoto Tsai LEDs are notoriously difficult to obtain (I got the last
9 available from The Custom Saber Shop in 2010). The 540PG2Cs, on the
other hand, are readily available. Unless something better turns up
I'll be using the 540s.
Note: A second order of 540s turned out to be brighter than the first, only 4-percent dimmer than the Makoto Tsai's. While this is good it creates the problem that the new LEDs operate at a different voltage than the first order. This means if used in the same blade there will be uneven lighting. I talked to a representative at Leading-LEDs and he said there's no way they can insure that an order of 540s will be filled with matching LEDs, though in one order for 400 LEDs, one of the three packages that made up the order had 250 perfectly matched LEDs. My solution is to order twice the number I need and match them myself, a process called "binning" in the LED world.
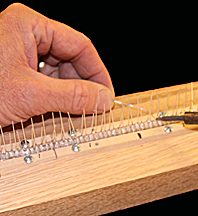
To sort my LEDs I made a bin board.

It's two strips of trailing-edge balse wood from a hobby store glued to a piece of wood. A strip of aluminum tape down each side provides electrical continuity. LEDs are slipped on to the balsa and sorted by brightness and color. This allows me to to use only LEDs that are perfectly matched so the blade color comes out even.
(Note:
I found the Nichia USA sells green LEDs (NSPG520AS) that are
virtually identical to Makoto Tsai LED in terms of brightness, color
and voltage. However, a minimum order it 100 and the cost is $70.)
Part
2: A Novel Lighting Architecture:
Take a second look at the LED string shown earlier:
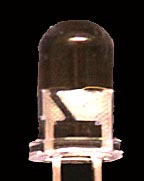
Length-wise, there is a lot of wasted space that could be filled up with more bulbs to make the blade brighter. Tightening things up seems like a good way to make a brighter blade but there are two problems. First, if the bulbs butt up against each other the light, which in LEDs is focused directly forward at varying angles, hits the bottom of the next LED and much is lost in various absorption modes as it reflects around the insides of the bulbs. Second, even if the LEDs touch front to back their bulb lengths limit how densely they can be packed. Solving both problems turned out to be easy: cut their heads off.
Consider the following section of an LED string using the Makoto Tsai string technique as presented by Eastern57 on the FX Lightsaber Forum (http://www.fx-sabers.com/forum/index.php?topic=13487.0):

I made it using real Makoto Tsai V.3 green 5mm LEDs. The LEDs are packed closer together than Makoto's 2.5 LEDs per inch strings and much closer than the commercially manufactured string in the last picture so the string should be brighter per unit length than either of them. Eliminating the support ladder of the commercial string also reduces the light it absorbs and the shadows it creates, which increases the amount of diffusing needed to even the brightness across the blade. But, if we take a standard 540 bulb:
And drill it out like this:
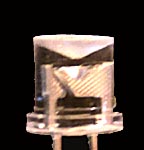
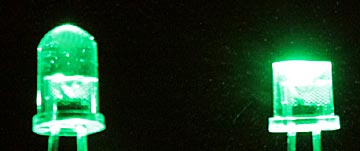
Two things happen at once. First, the bulb is 3mm shorter enabling almost three LEDs per inch along the string instead of two. Second, the point of the concave cone intercepts the light from the LED and directs it radially outward so that it immediately exits the string rather than bouncing around inside neighboring LEDs. Here's a comparison with a normal LED on the left and a coned LED on the right being driven by the same 20 ma:
Unlike flat headed wide angle LEDs, this coned LED throws most of its light out to the side. (I found one source of coned LEDs on-line but the company requires a minimum order of 500 bulbs. This wouldn't be bad because there were a good price but the bulbs were the same length as regular LEDs and there was no assurance that they would be as bright as the 540PG2Cs.
As drilled, the surface of the cone is rough creating a diffuse reflector. Polishing the cone might increase its reflectivity at the cost of allowing the clearer surface to transmit more light straight forward. This could be fixed by painting the cone with a reflective paint. I tried a mirror-like spray paint but it only produced a dull gray coating. Vacuum-deposition of aluminum for a true mirror effect is not feasible so the best alternative is bright white paint. Visually the differences between rough, polished and painted LEDs was too difficult to evaluate. Using the brightness meter shown earlier I was able to determine that polishing the cone increased the amount of light reflected out of the LED's side by 27-percent over the LED left rough. (A second test showed the rough cone reflected 5-percent "more" light than the polished cone. The polished cone seemed to permit more light to escape forward. One possible explanation between the two different results is that the second test used a resharpened drill bit with a much sharper point. I can't imagine why it would make a difference but based on these more recent results I will not be polishing the cones.) Painting both LED cones with bright white paint only increased radial brightness by 2-percent in both rough and polished cones and was judged smaller than the measuring error so I have elected to not paint the cones.
The next question to be addressed is how can a hundred or more LEDs be accurately drilled and polished in reliable and fast manner? My technique was to permanently mount a block of wood with a channel in it to hold the LED on a drill press.
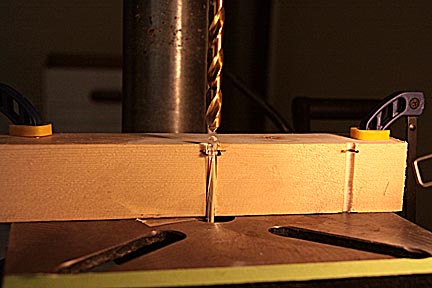
A 3/16 inch diameter drill creates a hole that securely holds a 5 mm LED. Using a dremel tool, I cut a groove across the hole for the LED's collar. This groove also sets the height at which the LED is locked into position relative to the top of the block. A pointed bamboo skewer pushed up through the hole from the bottom ensures that the LED is seated properly. Then a second block with a matching half-hole is clamped to the first to secure the LED.
Alignment is critical. It took several tries before I got the drill bit dead center on the LED. That's why the rear wood block is never removed: it preserves the alignment.
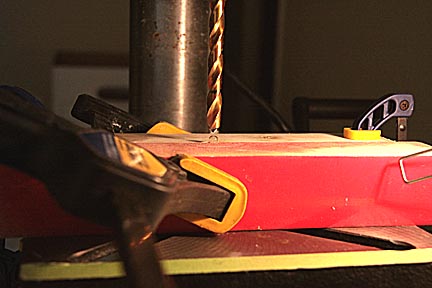
Experimenting with cone angles from 30 to 120 degrees showed that an angle of 100-degrees provided an optimum compromise between the amount of light reflected off to the side and reduction of LED length. Using a belt sander and dremel tool with a small diameter grinding tool, I reshaped the end of a 3/8th inch bit to the proper angle and brought the tip to a sharp point. Bits have a small flat area at the tip, which would produce a flat zone directly over the LED's light emitting area. This would reflect too much light axially back toward the LED's anvil resulting in overheating and light loss. I found that using thinner drills caused flexure problems leading to off-center cones.
The depth of the cone was set to be slightly less than 1 mm above the anvil. (I have not yet performed any optimization studies to determine what the best depth should be.) Drill presses come with depth locks, which was used to ensure that each LED was drilled to the same depth. Care must be taken not to go too deep or the working structures inside the LED could be destroyed. It's important to check the centering of the LED before drilling. Tightening the holding clamp can shift the permanent block enough to create an off center cone.
Once the cone is drilled, I place a drop of Novus 2 Fine Scratch remover on a small piece of paper towel, place it over the just-drilled cone and lower the rotating bit back down for 20 seconds. This produces a glossy surface on the cone.
I takes one minute to drill and polish a cone into a LED. In as much as a SUPERNOVA blade takes over 100 LEDs this represents a considerable investment in time.
Note: ledtronics.com sells a concaved LED (CL200CWG3). The problem is that it is still the standard length so the number of LEDs per inch isn't increased over standard LEDs. Also, although they are very cheap, $.12 each, a minimum order is 500. Finally, the odds are against the LED being as bright as the Makoto Tsai's or 540s.
(Note: No matter what I did some LEDs would come out with the cone drilled off center. I discovered the problem was that the drill bit was flexing. I switched to a 120-degree countersink, available from McMaster Carr (mcmaster.com) for $10. It's much shorter and stiffer and drills a much sharper cone. This cone reflects the most light if left unpolished. Also, I found that the clamp concept above was too slow and inconsistent. A better way to hold the LEDs in place is to drill two holes slightly smaller than the leads and their same distance apart in a piece of wood and simply push the LED leads into the holes. If the holes are the right size they will hold the LEDs very firmly and you don't have to go through the clamping/unclamping hassle.)
Part
3: Assembling the First Test String:
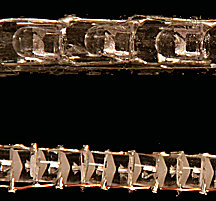
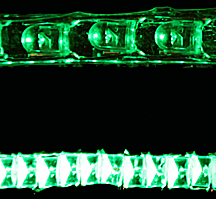
To test the SUPERNOVA LED string concept I constructed three inch sections of an increased density Makoto Tsai-type string (8 LEDs) following eastern57's design and a SUPERNOVA string (10 LEDs.)
Makoto
Tsai on top, SUPERNOVA below
The shorter coned LEDS allow two more LEDs to be used, increasing the overall brightness by 25 percent. However, The Makoto Tsai-type string uses LEDs that are 7 percent brighter so the overall difference should only be 18 percent. In the image below each LED has 20 ma driven through it: totalling 160 ma for the Makoto Tsai string on top and 200 ma through the SUPERNOVA string below it.
The SUPERNOVA string made with 540PG2C LEDs measures 85-percent brighter then the Makoto Tsai-type string. Since the 25-percent increase in the numbers of LEDs can't account for the 85-percent brightness increase, I'm assuming that the cause is that as planned, the coned design directs light out of the LED string before much of it can be absorbed and reradiated as thermal energy. The price paid for this is an increased current load of 40 ma for the same length of LED string. This 25-percent power increase could be enough to put this type of string beyond the power rating of available sound/light controllers.
Makoto
Tsai-type string on top, SUPERNOVA
string below
While the SUPERNOVA string is brighter, I was hoping to do better. The problem is that the reduction in length of each bulb from coning wasn't as much as I'd hoped because the legs on a 540 LED extend far into the plastic body. This can't be removed. However, one possibility was to use a different LED, which after coning, is much shorter than the LEDs used so far. The Flat 14000 LEDs from ledssuperbright.com have their light emitting anvils much closer to the bottom of the LED than the 540 bulbs. Calculations suggest that after coning, 14 LEDs would fit into a 3-inch section. This is 75-percent increase over the Makoto Tsai-type strings. Fortunately, the Flat 14000s are also reasonably priced at only $.24 each. This is important because at 14 LEDs every three inches a 36-inch blade will need 168 bulbs.
The following image shows the second generation SUPERNOVA string on the bottom compared to an increased density Makoto Tsai-type string on top:
The next images shows the SUPERNOVA string on the bottom being driven by 280 ma (20 ma per LED) and the Makoto Tsai-type string at 160 ma:
Although the SUPERNOVA string once again looks bright, in fact it measured the same as the 540PG2C string even though it used 80 ma more. I think what happened is that the Flat 14000 LEDs aren't as efficient and in this string they are so crowded that their internal structures are starting to absorb a measurable amount of light and reradiate it as thermal energy.
As before, the lower image is the SUPERNOVA string.
It was clear that if I wanted the super-bright blade I'd dreamed of I needed to employ drastic measures. I did.
I started with standard 540s:
And not only drilled out the top but filed down the bottom to get this:
...
Bending the leads flat against the LED's bottom allowed my to pack them at an unbelievable 7 LEDs per inch. They were so small that I locked them in a rack before soldering the leads to a copper wire strung down each side.
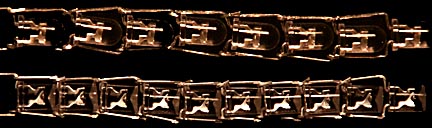
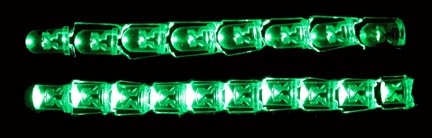
The images below compare this latest Supernova string to an actual Makoto Tsai string with 2.4 LEDs per inch:
At last I had the sort of brightness increase I'd been looking for. I reshaped enough LEDs to make a full size string... then the fun started.
This first completed prototype string had 233 LEDs in it. To power it I needed 3.25 volts and 6 amps. After experimenting with many different types of batteries and various parallel/series methods of connecting them I discovered that three parallel lines of 4 AAA rechargeable NiMH batteries provided the best match to the string's requirements. A fresh charge tends to overdrive the string so I plan on installing a 0.05-ohm current limiting resistor, made by connecting 20, 1-ohm resistors in parallel. The final power to the LED string ended up being 22.3 watts.
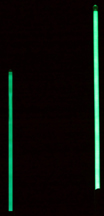
With the power problem solved it was time to assemble a complete prototype. It worked out better than I hoped. The image below shows a MR Yoda lightsaber on the left and a Matoko Tsai lightsaber on the right. Both have fresh batteries.
Now for comparison, I turned on the Supernova saber in the middle:
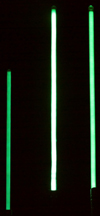
The small size of the pictures weakens the effect but it's clear that Supernova is much brighter than the Makoto Tsai. Using a photometer I determined it's 3.4 times as bright. Since the Makoto's are general recognized as one of the brightest lightsaber around, I'd say Supernova is a success.
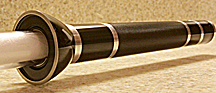
So much time went into the LED string that I only had enough energy left for a very simple hilt made from a 4 C-cell Maglite:
UPDATE!!!
The following video shows the latest development in the Supernova blade concept: adding the Starburst support system, which greatly increases brightness:
That concludes the Supernova/Starburst lightsaber project. There's still more work to do, particular in refining the power system and adding flash and sound effects. But these are ordinary lightsaber issues that others have dealt with much better than I.
ULTIMATE POWER BREAKTHROUGH!!!
In late 2017 I discovered a new type of component LED: Filament LEDs. Using them, I was able to build a lightsaber with a revolutionary architecture that enables unpresidented brightness. The following video explains it:
INTRODUCING THE LIGHT-WHIP!
Using a new type of LED I was able to make a scrolling light-whip. The following YouTube video shows what it looks like in operation and how it's made:
...and this video shows how I improved its whipping action:
Electroluminescent Blades: A Second Look at an Out-of-Date Technology:
Electroluminescent wire (EL wire) consists of a strand of wire covered with a thin layer of phosphorescent paint, then wrapped with a spiral of very fine wire and finally over coated with protective plastic. When alternating current is applied to the wires the paint glows. EL lightsabers were an early development soon surpassed by the much brighter high power LED flashlight and LED string technologies. By 2010, EL lightsabers were considered anachronisms. But times change and I got to wondering if recent improvements in EL technology might enable it to make a comeback. I decided to test the latest and greatest EL wire system to see how it does.
Searching the Internet turned up 2.6mm super-high brightness wire that was supposed to be twice as bright as earlier high brightness wires. I don't know what type of drivers were used in EL blades but research taught me that the higher the frequency the brighter the wire glows. The highest frequency driver I could find was a 4000 HZ unit. El wire brightness is also determined by the length of wire connected to the driver. The shorter the wire the brighter it'll glow. For this experiment I attached 3 feet of 2.6mm super bright glow wire to a driver rated for 15 feet. This under-loading of the driver guarantees that the wire will glow as brightly as possible. In combination these factors should provide the brightest EL system available in 2010.
How bright an EL lightsaber looks is dependant not only on the brightness of the wire but also on how much of it is visible. A lightsaber with a single strand running up the middle of its blade isn't going to be as bright as one with two strands. Three would be brighter still and so on. A limit occurs when the wires on the outside of the bundle shadow those on the inside. These considerations suggest that the brightest EL lightsaber will be one with the wires located as far from the blade's core as possible so that the maximum possible surface area can be filled with light producing wire. While a central rod with wires strung along its length would work, a better technique would be to wrap a tight spiral of EL wire around the core. This has the advantage that if the spiral was separated into segments they could be turned on in sequence to create scrolling effects.
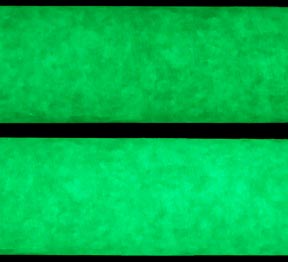
The following picture compares a section of a spiral wound EL blade using the best 2010 technology (bottom) to a MR Yoda lightsaber (top):
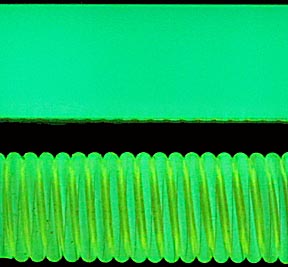
To my eye the EL spiral isn't as bright. Even if it was, in this picture we're seeing it without a diffuser, which would further reduce its brightness.
It would seem EL technology hasn't made enough advancement to be competitive with today's high powered LED flashlight and LED string type blades. Although the EL lightsaber is close in brightness, it has the advantage of not losing light to diffusers. Since the object of this webpage is to develop a system much brighter than a standard LED string lightsaber, EL wire technology is not one that will be pursued.
Conclusions:
Although the SUPERNOVA lighting system developed on this page requires an enormous amount of work to replicate, it nonetheless offers a significant increase in lightsaber brightness to anyone determined enough to brave the demands of its construction. As a side note: I also conducted several experiments with more radically modified LEDs mounted on a central core and facing outward. No matter how I modified the or arranged them, the result was an unevenly illuminated sword that every diffuser I tried actually made worse.
I sincerely hope that visitors to this page have found it useful or at least interesting.
![]()
(Click on main site to browse 100 other topics ranging from ultra high speed photos of nuclear explosions to exotic electric rocket propulsion systems being developed by the US Air Force.)