
The venerable gasoline-fueled military immersion water heater has been around in various forms for almost a century and is still in use in many countries. Reliable and tough, they can run on any type of combustible liquid or even mixtures of different types of fuels. The basic design was optimized in 1943 and updated to use off-the-shelf parts in 1967, when it was given the formal designation of M67 Immersion Heater. So many thousands of them have been produced that even to this day they still sold brand new in their original factory crating.
How they work is that gasoline drips out of a gasoline tank (not shown above) located above the shorter, 4-inch diameter tube on the right. Three quarters of the way down the pipe it strikes a metal grid that shatters it into tiny droplets, which are ignited by a flame at the bottom. The gas burns producing heat. Flame and hot air move clockwise around the torus and exhaust upward through the taller pipe on the left. The heater stands three feet tall, is 14 inches in diameter across the torus and weighs 35 pounds. Placed in a barrel it will bring 30 gallons of water to the rolling boil in one hour. Because the bottom of the heater isn't protected from corrosion, the water in the barrel quickly becomes polluted with rust so it isn't useful for cooking or showers, but it can be used to heat water or food in a secondary container in contact with the heated water. They are often used for heating small greenhouses.
Restoring and operating one of these old soldiers is an interesting activity, and remarkably inexpensive. Even in 2016 they can be found for as little as $50 used and $72 new. Because they are large and heavy, shipping costs can be as much as the heater so locating a military surplus store that has them and driving to get it in person can save a lot of money. I got mine from www.military-tent.com.
The following articles provide a few hints about setting one up:

M67 immersion heaters usually arrive in their original wood packing crates as shown above on the left. Most that are on the market today have been in storage 30 years or more so don't be surprised if much of the wood is rotten and the nails rusted or missing. Inside you should find a large, heavy duty cardboard box that may be in almost new condition, proof that the military crate was made well enough to protect it. The heater will be inside the cardboard box along with a smaller box containing the exhaust flu in four sections and the fuel can on the side. They will probably be taped together with strapping tap that has mostly fallen apart. Inside the heater's shorter inlet pipe will be the manual and the diffuser plate.
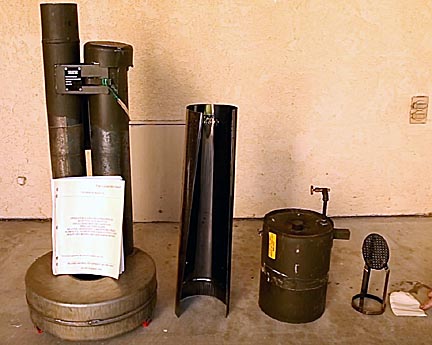
Above is what it looks like unpacked. From right to left: a cloth bags containing the rivets used to hold the flu tubes together, the diffuser plate, one section of the exhaust flu, the heater and manual.

The first task is to assemble the exhaust flu. The sheet metal is extremely stiff and the groove designed to hold the sides together tight, which makes putting them together difficult. Rolling the tube into approximate shape and tying it, I used a bungy cord, makes assembly easier. Force the seam together at one end then press the seam together working your way down the tube. Once the entire seam is fitted together the seam should snap tight. The ends of the seam may not line up. If so, stand the tube on end and tap the high side down using a soft mallet.
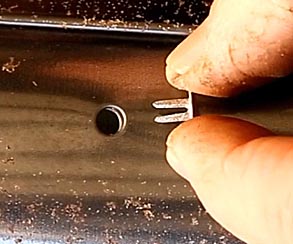
Bifurcated rivets are supplied to be pushed through two holes in each section from the inside, then the prongs spread and hammered down to secure the tube. I found this to be difficult and recommend using small nuts and bolts instead. Once all four sections are complete, slide the male ends into the female ends to create an 8-foot long exhaust flu. It the sections don't fit together, try using pliers to slightly widen the female openings and reduce to male end diameters. This will facilitate pushing them together.
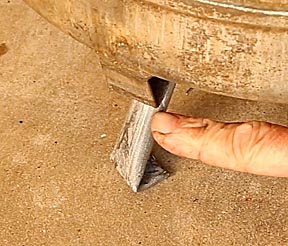
The heater has three stubby feet on the bottom to facilitate circulation. I was not comfortable with the 1-inch clearance they provide so I bent longer legs out of 1/2-inch diameter electrical conduit and connected them with heavy tie wire.
Expect your heater to come with considerable surface rust. I recommend thoroughly wire brushing all the rust off, scrubbing with a scratcher and something like 409 cleaner to remove any remaining rust or surface protectant, then carefully rinsing and drying. It will look better and slow the inevitable progression of future rust. It's a good idea to dry the heater off immediately after each use.
And that's it for the assembly! Let's start some fire and see how it works.
How To Use An M67 Military Immersion Heater:
It is very easy to accidentally let gasoline drip down into the bottom of the heater before it's started. If this happens, when the heater is ignited the accumulated gas fumes in the bottom will explode, sending a plume of fire into your face. The following starting instructions reflect those in the manual and are designed to reduce the chance of this happening.
Step 1: After filling the gas tank and sliding its holder onto the post designed to hold it and opening the air valve at the top of the tank, swing the starter cup outward, open the gas valve slightly and let it drip enough gas into the starter cup to fill it 1/4 to 1/2 full. Close the valve and tap off any drips before moving the starter cup away from the valve spigot. You don't want even a single drop to fall into the heater.
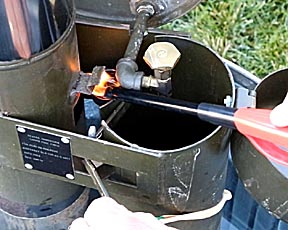
Step 2: Partially close the starter cup and ignite it with a fire started. Always wear eye protection. Gently allow the starter cup to swing closed into the exhaust pipe. Let it burn for one minute to start a draft.
Step 3: With the valve still closed, hold a lit fire starter under the fuel spigot.
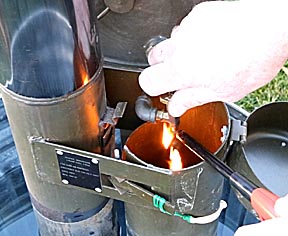
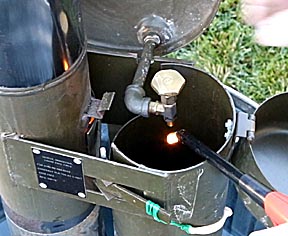
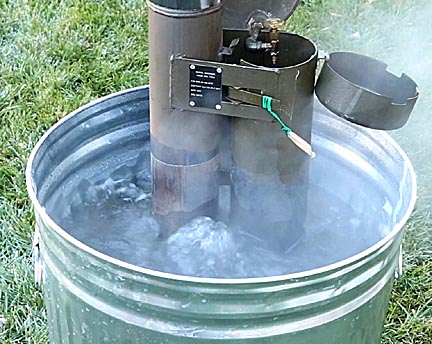
Step 4: Slowly open the valve to start a slow drip. The gasoline will ignite. Remove the fire starter and let the slow drip continue for a few seconds until you hear the heater start to make a sound like a rocket engine. This sound tells you the fire is burning in the base of the heater and the draft is doing its job of circulating the heat and flame around the torus and up the flu. From a safe distance, blow out the flame near the valve then open the valve to produce a stream that looks like a string of pearls... and your heater is working! Adjust the flow rate so there is a hint of smoke coming out of the flu, then reduce the flow slightly. This is the most efficient operating flow rate for the heater. Opening the valve to produce a solid stream will produce 50-percent more heat but at three times the flow rate. This decreased efficiency can be seen in the increase of smoke and soot emitted from the flu.
At the string-of-pearls, or no-smoke, setting, the heater will consume 0.6 ounces of gasoline per minute, equal to 33,000 BTUs per hour. The 2.2-gallon tank should be good for 5 to 10 hours depending on how lean you run it. M67 immersion heaters have been measured at 60-percent efficiency, so out of the 33,000 BTUs per hour input you should expect 19,000 BTUs of heat into the water.
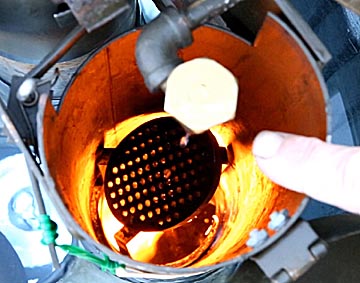
Never, ever look down the burner tube. There is always the chance of a blowback that can burn you. If you did, here's what you'd see:
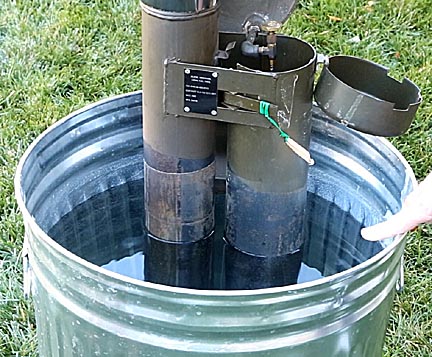
One problem with these heaters is that they float. They come with a clamp designed to hold them down, but it was designed for heavy duty straight sided metal barrels. The angled sides of most metal trash cans causes the heater to be held at an angle, which results in the gas dripping on the side of the inlet tube instead of the diffuser. Even worst, the light metal bends because of the heaters buoyancy increasing the angle even more. The easiest way to hold an M67 immersion heater upright in a lightweight can with angled sides is to place 20 pounds of iron weights on the torus. I got mine from some barbells I wasn't using.
None of the 31 gallon trash cans I could find were water tight. A thick bead of silicone sealant over all of the seams eliminated all the leaks and has withstood many hours of boiling water.
The greatest hazard is starting the heater when there's gas in the bottom of it. This can happen when the tank is almost empty and the flow slows to the point where the drips aren't coming fast enough to maintain the fire. The fire goes out but the drips continue, filling the torus with gas. The fumes can reach up to the opening of the inlet and when the fire starter gets close to the starter cup they ignite.
How To Modify An M67 Military Immersion Heater For Natural Gas:
Filling the gasoline can is messy. Letting gas drip into the heater before starting is easy and dangerous. Having to constantly adjust the drip rate because it reduces as the tank empties gets to be a hassle. Having to shut down to refill the tank repeatedly takes time. Gasoline gets expensive. To eliminate all of these problems I decided to convert my M67 immersion heater to run on natural gas. It turned out to be ridiculously easy.
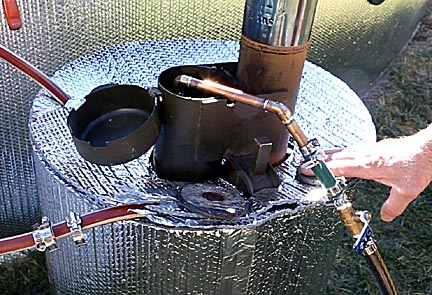
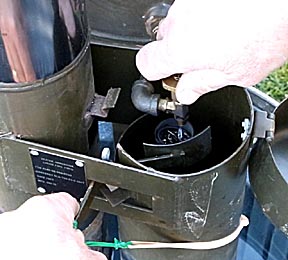
All it took was a length of 1/2-inch inside diameter copper pipe extending ten inches down the inlet pipe. All of the hardware you see in the image above is just fittings and hose clamps. They could be eliminated by using a length of soft copper pipe and bending it into a rough "U" shape. I put a valve near the pipe because the hose was 35 feet long to get the gas from my barbecue to where the heater is located. Having a valve at each end prevents air from getting into the line.
That's the same 31-gallon barrel seen before. It's just been insulated to reduce heat loss.

I bent three wire fingers in two places on the pipe to keep it centered in the inlet tube. The only trick I had to figure out was how to prevent the draft from blowing the flame off the end of the tube. A 3-inch diameter spoiler cut out of light aluminum and mounted on the end solved that problem.
The heater draft is initiated with the starter cup as before. Once the draft is established, I open the gas valve, ignite the gas and slide the tube down the inlet tube. Here's what it looks like in operation:
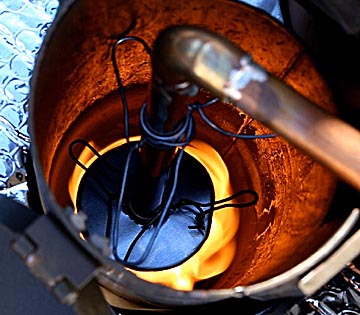
The first attempt used a nozzle that premixed air with the gas to produce a blue flame. It looked nice but produced a hot spot in the inlet tube and reduced the heater's efficiency. Blowing raw gas out of the end of a simple tube produces a long orange flame that creates more uniform heating. Note: a yellow flame does not mean that the gas is being burned less efficiently. Blue flames are hotter, but shorter and preferable for confined combustion situations such as residential heating.
Running on natural gas, I find the heater can be driven much harder without producing any smoke. I'm currently using it in an experiment to heat a swimming pool and found an M67 immersion heater plumbed for natural gas produces twice as much heat at one-third to fuel cost of one using gasoline. Better still, it operates indefinitely and can't build up fuel in the bottom of the heater.
I hope you found this page interesting and helpful. If you'd like to see my heater in operation, please click on the following videos:

Return to my main page to browse 60 other subjects