Ferrocells are easy to make optical devices that portray the effects of magnetic fields. Great for school science projects, one of them can be put together in under and hour by anyone who can use an exacto knife safely. Here's how:
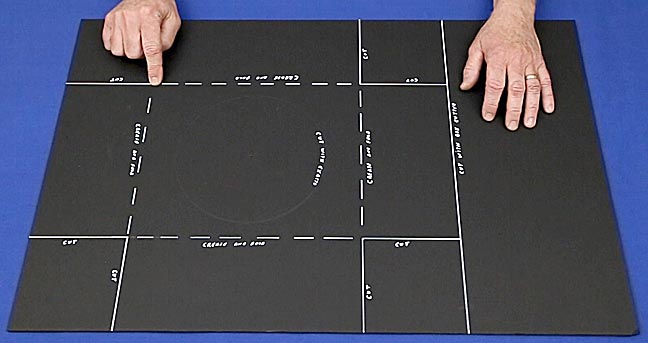
Start by cutting out a 20 x 22-inch rectangle from a sheet of black foamboard. Remove 5 x 5-inch squares from each corner. After cutting out an 8-inch diameter circle from the center of the 10 x 12-inch central rectangle, crease on the dashed lines and fold up the sides. Secure them with tape to form an open-bottom box with a large hole in it like the following:
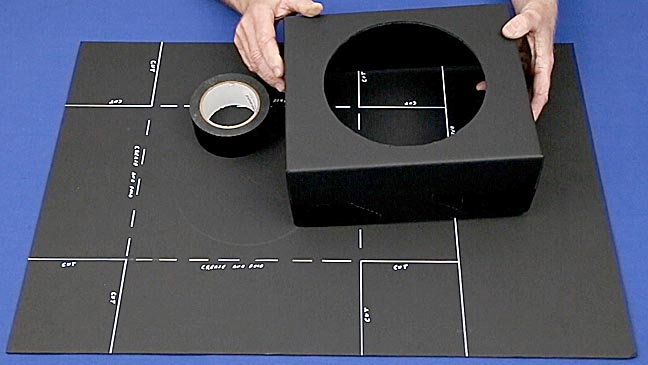
From a second piece of foamboard, cut out a 9 and 7/8ths by 11 and 7/8ths inch rectangle with an 8-inch circle in its center. This rectangle goes inside the box made in the first step and needs to be slightly smaller to fit.
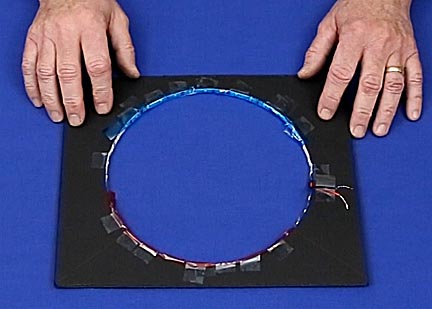
Line the inside of the circle with adhesive-backed LED lighting strip (Under cabinet light strip, $12 from Amazon.com.) The adhesive on these strips is pretty strong, but for more security use clear tape in several places to make sure it stays in place. Only one layer is required so LED strip needs to be cut to length. Make sure to do so only where there are small scissors marked on the tape or the wrong wires will be cut and it won't work. These tapes come with a jack at one end for use with the supplied transformer and loose wires at the other for battery power. Use the plug end if your ferrocell is for home use only. Use the loose wire end with batteries for science displays where running an extension cord might be a problem.
To dress the ferrocell up, cover half of the LEDs with one color cellophane and the other half a different color.
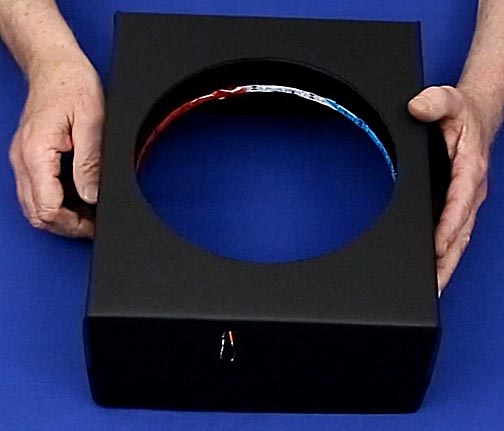
Push the rectangle with the LEDs into the bottom of the box so that the LEDs are 1 and 1/2-inch below the top of the box. Feed the plug or wires through a small hole cut in the side.
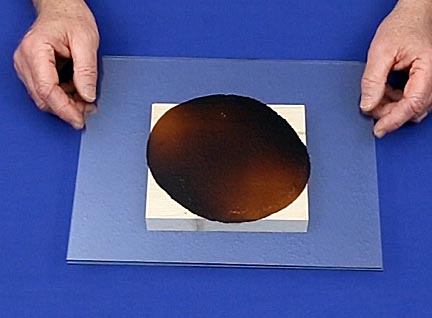
Next we'll make the actual ferrocell. Take a clean sheet of 10 x 12-inch glass ($2 from most hardware stores) and place it on a support that raises it up far enough to get your fingers under it. This will make lowering a second sheet of glass down on it easier. In the center of the glass sheet, place 20 drops of a mixture of 1 part ferrofluid ($10 for 15 ml from Amazon.com) and 1 part WD40. I've experimented with many different mixtures and this one works the best. Hold the eyedropper close to the surface so bubbles don't form. Next, position the edge of a second clean glass sheet 1/2-inch in from the edge of the bottom sheet and hold it there. This 1/2-inch margin helps control what comes next.
Very slowly lower the other end of the upper sheet while keeping an eye on the ferromixture. As soon as the upper sheet barely makes contact with it, slow down how fast the upper sheet is being lowered. Moving too fast can create voids that can reduce the ferrocell's effectiveness. Once the upper sheet is laying flat on the lower sheet, let the ferrocell sit for ten minutes to let the ferro mixture spread. Avoid pressing down on the sheets to speed the spreading process. More often than not it leads to a more uneven layer of ferro mixture than if it's left to spread by itself.
The ferro mixture may spread to the edges but once there it seems to stop and not bleed out.
Semantically, the glass sheets with the ferro mixture are the ferrocell. What we're making should more properly be referred to as a ferro viewer or ferroscope, but viewers like this have been called ferrocells so long that it's the accepted term.
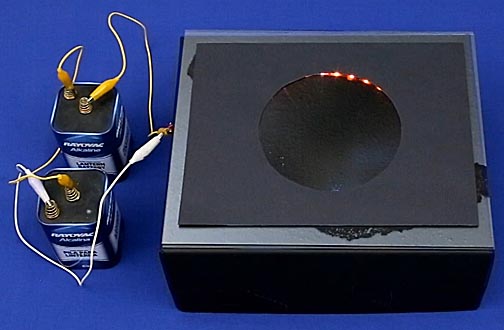
Place the glass sheets on top of the box, connect the LED strip to its power source, in this case two 6-volt batteries hooked in series, and place a sheet of black construction paper with a 5 and 1/2-inch diameter hole in it on top. This acts as a mask to block excess light around the edge of the 8-inch circle that would wash out the ferroimage.
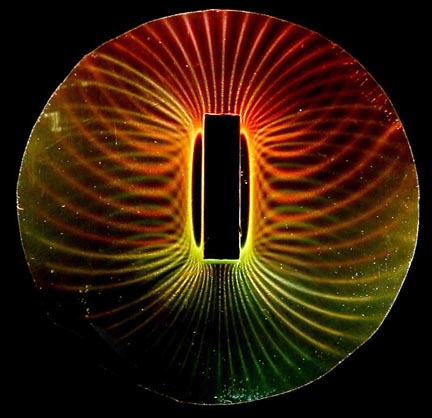
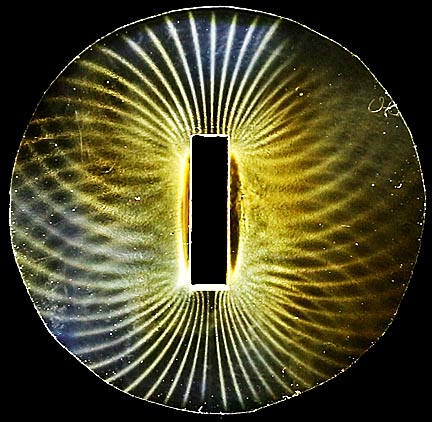
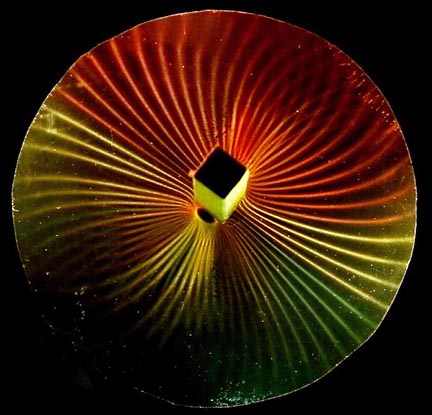
Turn off the room lights, place a magnet on the ferrocell and you should be greeted with a matrix of lines indicating the presence of a magnetic field. Using the most powerful magnets possible, like N52 rare earth magnets, will provide the largest and most complex traces.
Bar magnet on an un-colored ferrocell.
The same magnet on a colored ferrocell.
Bar magnet on end.
Using different magnets in a variety of orientations will produce a wide range of traces. The most complex are made with combinations of magnets.
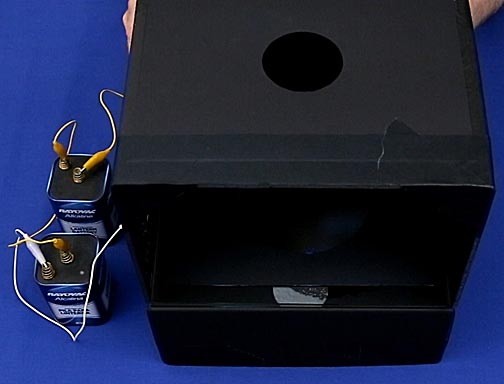
If the ferrocell is to be used in a brightly lit room, glare from overhead lights will wash out the image. Building a covering box 9-inches tall with a 3-inch hole in the center will block this glare. Leave one side open so you can reach in to change the magnet.
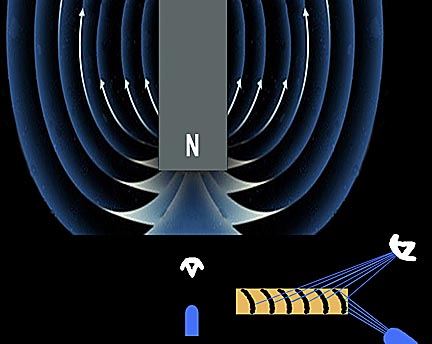
How A Ferrocell Works:
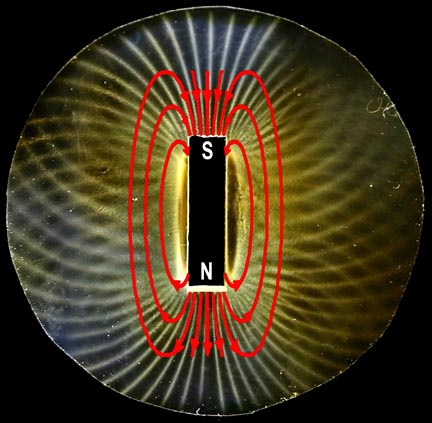
It's tempting to assume the rays of light are showing the magnetic lines of force around the magnet. But, if we superimpose the paths of the real lines of force, while the pole end rays look about right it's clear that the rays around the sides are completely wrong.
The problem with figuring out what's going on is that the 39 LEDs in this ferrocell produce a total of 195 intersecting rays. To make things simpler, here's a ferrocell with only one LED:

This is the pole end closest to the LED. There are two more faint line perpendicular to the other pole end, meaning each light produces 5 rays.
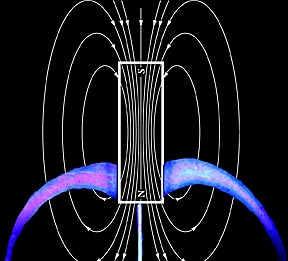
Here's the lower ray pattern superimposed on the magnet's field lines.
I've read through dozens of articles about ferrocells and watched just as many videos and none of them offer a good explanation as to how ferrocells work. So I came up with my own.
Unfortunately, the explanation, while simple in concept, can't be explained without the help of live action visual aids. To understand it, please log onto my YouTube video about ferrocells and fast forward to the second half of the video.
The gist of the theory is that in the presence of a magnetic field, the particles of magnetite in the ferrofluid form long chain-like structures along the lines of magnetic field which reflect, or at least preferentially scatter, light from the LEDs in a way that is consistent with the observed patterns and how they change as the observer moves left or right. These chain-like structures are formed of magnetite particles close enough together so that the Raleigh scattering their size of 1/100th the average wavelength of visible light that normally dominates how they disperse light no longer applies.
Ferrocells are interesting, cheap and easy to build and provide stunning images that reflect, if not mimic magnetic fields. Try one and I'm sure you'll find it fascinating.

Return to my main page to browse 60 other subjects