While commercial wave motion machines can cost hundreds of dollars, one can be build for as little as $50.
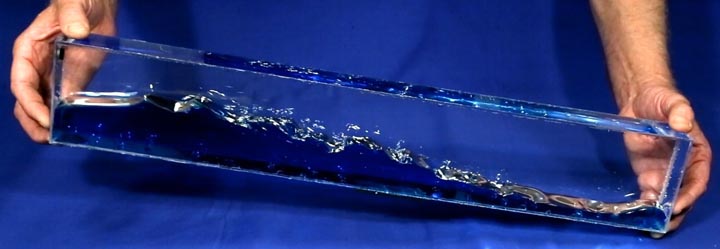
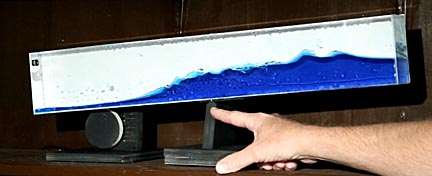
The classic wave motion machine or cell is a clear container with a layer of colored water covered with clear oil. While any container works, long rectangular vessels provide the best wave action.
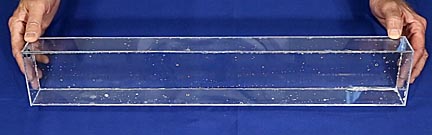
To build one, start by cutting an 18 by 24 inch sheet of 1/8th inch thick Plexiglass into six pieces.

The two side pieces are 24 by 4 inches, the top and bottom pieces 24 by 2 inches and the end caps 4 by 2.25 inches. The end caps need to be wider than the bottom and top pieces to accommodate the thickness of the sides. I found the cleanest cuts are made with a jig saw and a 21 tooth per inch metal cutting blade. Make sure the cuts are straight. The solvent cement used to connect the pieces isn't effective at filling gaps. Sand the cut edges with 120 grit sandpaper to remove burs and any grooves from the blade's teeth. Drill a hole in one of the endcaps to fit a rubber stopper.
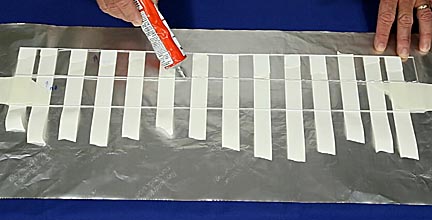
Use a solvent cement like Weld-On 4 or Weld-On 16 to glue the pieces together. Make sure to tape the edges together tightly so that as the cement softens the Plexiglass the joint is pushed together so the parts weld together.
Let the cement cure at least 24 hours.
Start by filling the cell 1/3 full with water. Add food coloring to achieve the desired color and density. For this wave motion machine, six drops of blue looked great. Let the cell sit undisturbed for several days to let dissolved air in the water come out of solution. If this step is skipped and the cell is immediately filled with oil and sealed, unattractive air bubbles will form. Once the air has left the water, fill the remainder of the cell with clear oil. The clearest I could find was baby oil. This can be expensive if a name brand is used because around 70 fluid ounces will be required. I found Walmart sells an inexpensive brand for $2.00 for 14 ounces.
Fill the cell to overflowing so no air bubbles are trapped, then insert the stopper, carefully wipe off any spilled oil and cover the end with the stopper with aluminum foil tape so the stopper doesn't come out. Trimming the end of the stopper shorter will help.
And you're done!
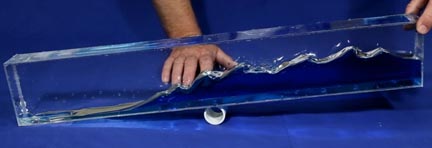
The wave motion cell can be held in hands and rocked to produce waves, but because it's heavy and the sides of the Plexiglass slippery it's all too easy to drop. If this happens and the cell ruptures, all that oil and dyed water would make a terrible mess. Building a motor driven base is both safer and less tiring on the arms.
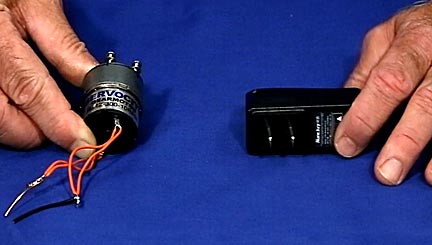
The waves in this 24 inch long cell flow back and forth at a rate of 10 cycles per minute. Therefore a motor with a speed of 10 RPM is ideal. The one pictured below is a 12 volt DC gear motor that can be run off of a battery pack or in this case, an old 12 VDC power plug. Such motors can be purchased from Amazon or ServoCity.com for anything from $12 to $25 depending on the model selected.
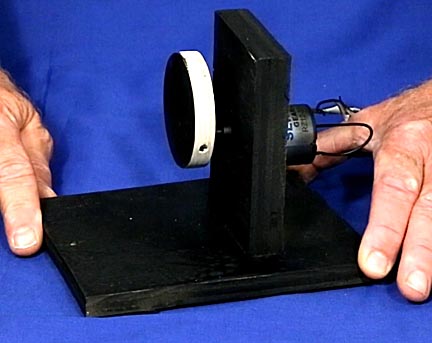
Cut a very smooth circle that's 2.5 inches in diameter out of wood. Drill a hole to receive the motor's shaft 1/2 inch from the edge of the circle. This forms the cam that will move one end of the wave motion cell up and down. Construct a base to hold the motor and disk. The bottom plate of the base should extend out far enough so that the weight of the wave motion cell doesn't cause it to tip over. Mount the motor on the upright support. I just cut a hole in it that held the motor's head tightly. Push the disk onto the motor shaft and secure it with a set screw. Connect the motor to a power source and the drive is complete!
Make a second base for the wave motion cell to pivot on. Its height should be the same as the top of the offset disk when it's positioned sideways. This ensures that the cell rocks up and down by the same amount at both ends. Add rubber friction pads to the bottoms of both drive components so they stay in place.
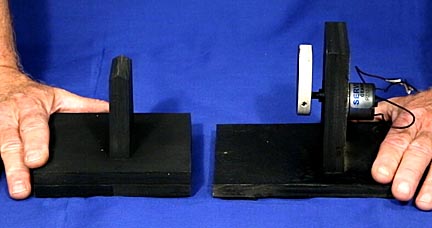
To prevent the cell from sliding around on the pivot, I attached a thin strip of foam rubber to the bottom of the wave cell for the pivot to rest against. Move the cell back and forth until it reaches a point when it's always pushing down as lightly as possible on the disk. Move the drive disk unit back and forth to achieve the desired amount of wave action.
I experimented with various dry lubricants and materials to find the combination with the least amount of drag between the disk and the Plexiglass and learned that I couldn't do better that clean, sanded wood on plain Plexiglass.
Because my wave motion is located in a dark bookcase, I had to tape a sheet of white paper to the back surface so the waves showed up better.
I hope this page helps anyone interested in building a wave motion machine to do so. For those preferring to view a live action version on this page, I invite them to click on the following two videos:

Return to my main page to browse 60 other subjects