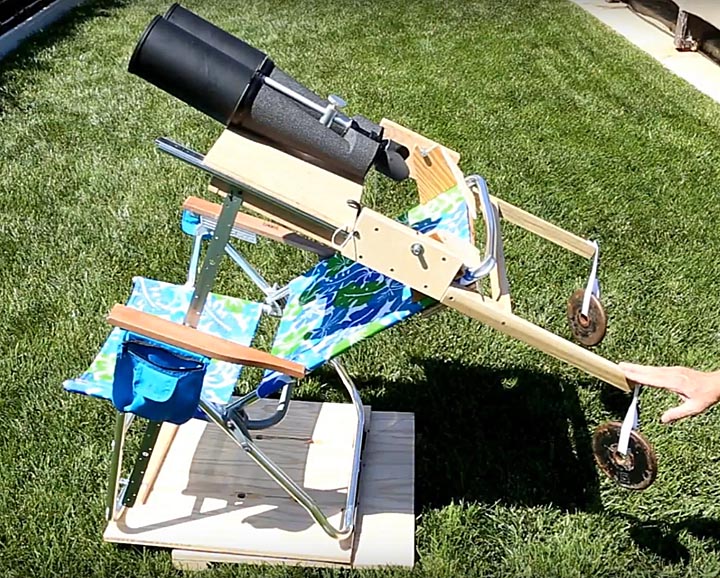
Astronomical binocular chairs offer the ultimate in comfort and convenience. The erect images provided by binoculars make star hopping quick and easy. Using both eyes reduces eye strain and provides more absorbing views of the heavens. The chair enables the observer to sit in comfort without having the stretch to reach the eyepiece. While the comparatively small apertures and magnifications available in binoculars limit what can be seen, for astronomers interested in comfortable fun, binocular chairs beat traditional telescopes hands down. Here's how I built one:
The concept for this chair is that a frame holds the binoculars and allows them to be tilted up and down as the observer also tilts his head. With the chair reclined all the way back to 45-degrees, this allows the sky to be viewed from 20-degrees above the horizon to almost the zenith without changing the chair's tilt.
The ground board is a 2 x 2-foot sheet of 3/4-inch plywood with a short piece of 2x4 screwed to each corner to act as feet. A 12-inch diameter lazy Susan (or pancake) bearing is mounted to the center of the ground board to enable the chair to swivel left and right.
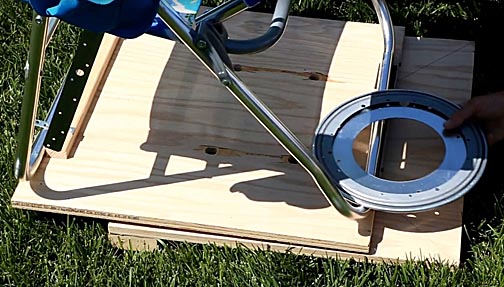
While it's tempting to mount the top side of the bearing to the center of the 2x2-foot sheet of 3/4-inch plywood on which the chair rests, doing so creates a problem. Because the chair is leaned back in use and the binoculars and counter weights have their center of mass toward the rear of the chair, the center of pressure isn't in the center of the board on which the chair rests but towards the rear of it. Mounting the bearing as far toward the rear of the upper sheet of plywood places the bearing closer to the center of pressure, which enables it to rotate more freely.
The chair itself is a folding aluminum lounge chair. I sorted through many different types until I found one that tilted back far enough, was comfortable, and folded up for storage in a manner that could accommodate all the hardware I was going to attach to it. Since everyone is different, each person needs to select the chair that suits their physique.
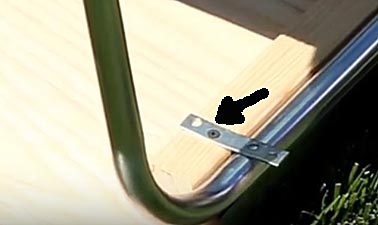
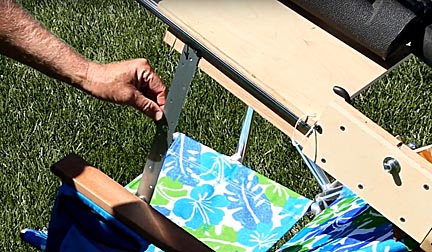
When assembling the chair, the weight of the binocular assembly tends to make the chair tip over backward. To prevent this, I mounted two pieces of steel strapping with a single screw so they could be rotated. In the image above the one indicated by the arrow has been rotated forward to hold the front of the chair down. For disassembly, the strapping is rotated 90-degrees to allow the front of the chair to lift up.
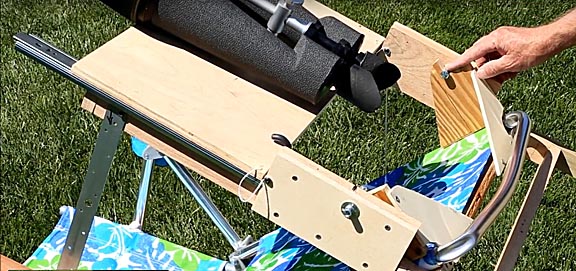
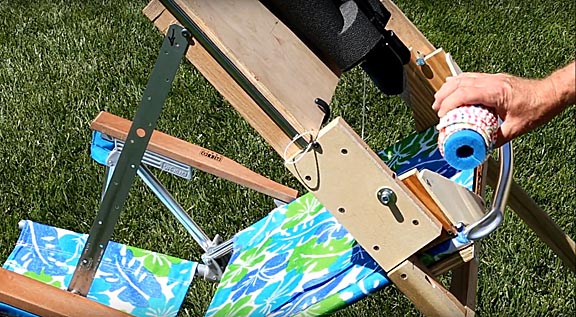
For the binocular's eye pieces to track in a circle that matches the arc your eyes follow as you tilt your head back, the frame holding the binoculars has to pivot around a point located where your ears are. This ends up being approximately 4.5-inches above the back of the chair. To provide pivots at this point, I bolted a 3/4-inch thick sheet a plywood to the frame of the chair under the place where my head rests. Two, 3/4-inch thick pieces of plywood screw into the back board on each side of the chair. A 90-degree notch centered on the pivot point provides a wide jaw to receive the binocular frame's pivot pin, a 3/8 diameter bold screwed into the frame. Its head acts as a keeper to prevent the pin from sliding off the pivot. Gussets greatly increase the stability of the plywood uprights forming the pivot points.
The binocular frame is a square made of 1x2-inch, 2-foot long pieces of red oak, which is a very strong, stable wood. On both sides of the top front of this frame I mounted a linear bearing. On top of this is a 1/2-inch thick piece of plywood, on which the binoculars are mounted. The bearings allow the binoculars to be pushed forward out of the way when getting into or out of the chair, or when they need to be moved forward slightly to look down to study a star chart. On either side of this frame is a 4x6-inch plywood extension that acts as stop to prevent the binoculars from sliding too far back and press against the observer's eyes and positions two pivot bolts three inches above the frame so the eyepieces are placed in the proper location for viewing. Exact dimensions aren't given because each chair has to be tailored to the observer and accommodate the design of the chair used.
I made a neck support out of a piece of swimming pool noodle wrapped with a towel to create a 3-inch diameter soft cylinder. This provides greater comfort and helps your head move in a smooth circle when rotating back to view objects higher in the sky.
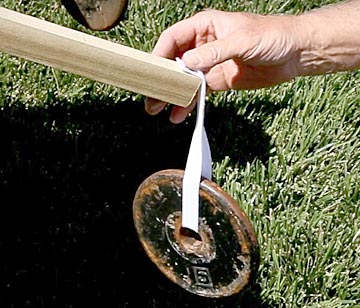
Because the binoculars are well in front of the pivot point, counter weights are required to balance the binocular assembly. I added 18-inch long 1x2-inch extensions to the rear of the frame and screwed a length of double faced Velcro to the ends of each. The Velcro holds a five pound weigh on each side, which is enough to balance the binoculars.
It's convenient to lock the angle of the binoculars so they hold their position when they are pushed forward to refer to a star chart. To do so, I attached a 4-foot long piece of steel strapping to the side of the binocular's frame with a single screw so it can rotate. On the arm of the chair, I attached a strong magnet and screwed a bolt in on each side to act as guides. The steel strap slides easily over the magnet, yet the magnet provides enough holding power so that the binocular frame holds its angle when the binoculars are pushed forward.
A bungy strap mounted on the frame and hooked over the plywood sheet on which the binoculars are mounted takes up half the weight of the binocular, making it easier to push them forward..
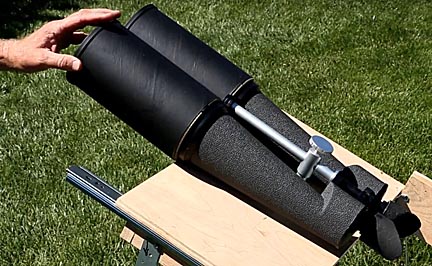
I found that oatmeal boxes lined with black velvet made effective light shields. With them, and a good pair of eye cups to prevent stray light from leaked in around the eyepieces, the limiting magnitude of the stars I could see with my 25 x 100 binoculars increased one full magnitude. They also make the chair look a little sexier.
And that's it! The chair breaks down into three pieces: the base, the chair and the binocular assembly. Putting it together only takes a few minutes.
Binocular chairs may not enable you to see the faintest objects in the sky, but for just plain astronomical fun they can't be beat. Try one and I'm sure you'll agree.
For a live action version of this page, please click on the following video:

Return to my main page to browse 60 other subjects