The Lumiscope drawing machine creates glowing images that grow before your very eyes. Here's how to build one:
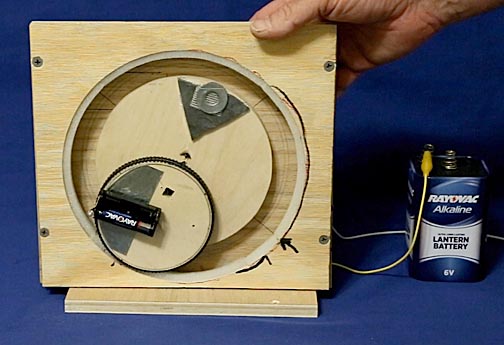
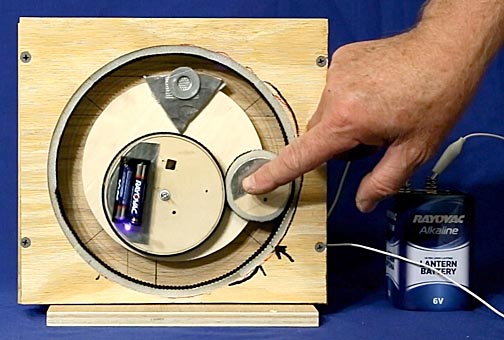
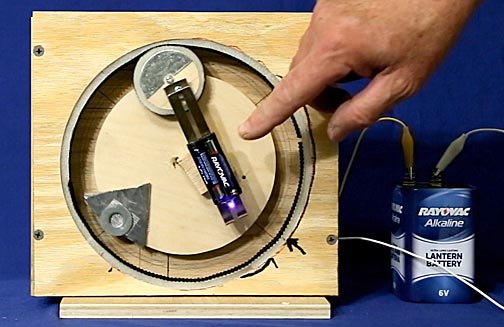
This Lumiscope drawing machine was built out of scraps of half-inch thick plywood in just a few hours. Start by cutting two, 10-inch by 9-inch rectangles. Cut an 8-inch diameter hole in one and line the circle with foam rubber as shown. Drill a hole in the center of the other board sized to hold a 5 RPM gear motor in the exact center. This Lumiscope used a 12-VDC, 10 RPM gear motor powered by a 6-volt battery to provide the 5 RPM that seems to work best for this drawing machine. If I were to rebuild it, I'd use a larger motor with more torque, such as the drive for an electric rotisserie. Attach the two boards together with half-inch thick spacers and mount them on a third board to act as a base. The large circle and drive shaft of the electric motor need to be concentric.
Cut out a 6-inch diameter disk and mount it on the motor's drive shaft. Use a set screw to make sure the disk can't slip. Cut a 3.75-inch diameter disk and line it with foam rubber. Use a screw to mount it on the larger disk so that the smaller disk is free to rotate yet not so loose that it wobbles. The smaller disk needs to press against the outer, stationary ring so that when the main drive disk rotates and drags the smaller disk around, the smaller disk rotates against the outer ring. Gears would work better, but this friction drive is much easier and faster to make.
Mount a piece of thin steel on the smaller disk.
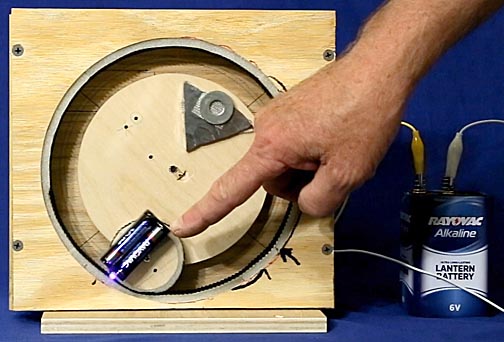
Purchase a two-AAA battery holder and solder a 3mm purple/UV LED to it so that the LED sticks out away from the wood disks. (The LEDs can be purchased from several sources, including Amazon.com, for as little as $7.00 for 100 of them.) Attach a magnet to the bottom of the battery holder and use it to hold the battery to the metal plate on the smaller disk.
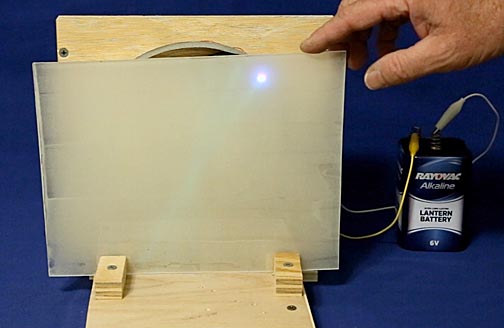
Take a 10 x 8-inch sheet of Plexiglass, sand the back with 400-grit sandpaper, and coat the sanded side with an even layer of phosphorescent paint. MX 24 green paint by Glowmania works great. It's available from Amazon.com for $10.00 for a 1-ounce bottle, which is enough to cover the Plexiglass. Once the paint is dry, mount the coated Plexiglass close to one edge of a piece of wood to act as a base. Insert batteries into the battery holder to turn on the LED, turn on the electric motor. place the unit in a dark room and slide the Plexiglass as close to the LED as possible without having the LED touch it. Make sure the painted side of the Plexiglass faces the LED because the if the light from the LED goes through the Plexiglass to excite the phosphorescent paint, the Plexiglass will block some of the ultraviolet light.
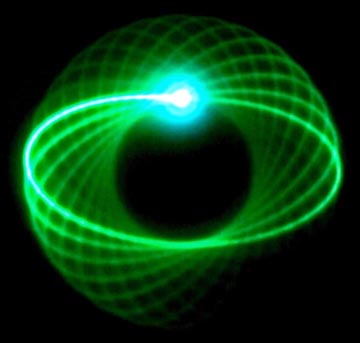
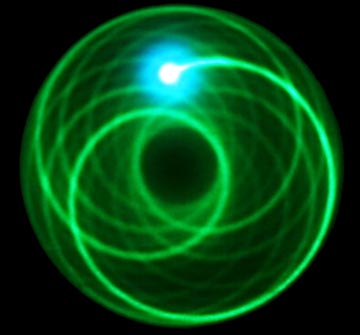
What you will see is a bright point of light trailing a comet-like tail. The longer the Lumiscope runs, the more pronounced the pattern will become.
Sliding the LED outward produces longer, thinner ellipses. Moving it inward creates shorter, fatter ellipses.
Using a smaller secondary disk and moving the LED so that it reaches the edge of the outer stationary ring produces...
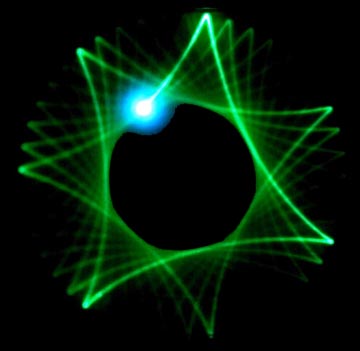
... star shaped patterns!
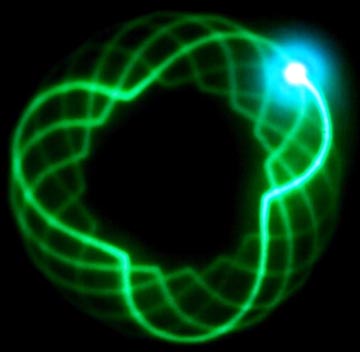
Using a small disk as a pinion gear creates overlapping cycloid traces.
Making an armature that has one end rotated while the other slides through a fixed pin creates images like the following:
I found that attempting to use more disks and/or linkages didn't produce cleam images. The reason was that the increased drag caused the friction drive to slip and skip, producing uneven traces. Switching to gears would resolve this problem.
I hope you enjoyed this page. Lumiscopes are interesting to make and use and capable of many more patterns than the examples on this page. Try one and you'll have something that will amaze everyone who sees it. To view videos of the Lumiscope in action, please click on the following:

Return to my main page to browse 60 other subjects