ANTIBUBBLES
What they are and how to make them.
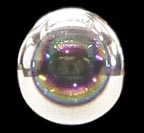
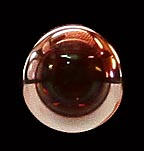
An antibubble, seven times actual size
Introduction:
A regular bubble is a thin spherical shell of liquid with air on the inside and air on the outside.
Normal bubble
An antibubble is the exact opposite: a thin shell of air with liquid on the inside and liquid surrounding it.

Antibubble.
Their behaviors are also reverses of each other. A normal bubble slowly falls because the liquid shell makes it slightly denser than the surrounding air. An antibubble rises because the shell of air makes it slightly lighter than the surrounding liquid. In both cases the movement is slow because the slight density differences are so small compared to the size of the bubble that fluid dynamic drag prevents rapid movement. Unfortunately, another feature that distinguishes them is that while normal bubbles, such as soap bubbles, are easy to make of almost any size, antibubbles are difficult to make and are limited to very small size, usually 1/5-inch in diameter.
In spite of their small size, antibubbles are fascinating and fun to make. This page explains the easiest way to make them.
How
They Are
Created:
Imagine
releasing a drop of water from an eyedropper over a glass of water.
If the drop is released from the correct height it should have enough
energy to splash down through the surface of the water fast enough to
carry a thin shell of air around it.
The water's surface could close over it creating an antibubble.

The problem is that water molecules have such a strong attraction for each other that the pull between the drop and the surrounding water is great enough to push the air out of the way to allow the drop to merge instantly with the water. To prevent this from happening something has to be added to the water that reduces this attraction. Fortunately, there is a commonly available material that not only does this but actually creates a slight repulsion force that prevents the drop from merging with the surrounding water: soap.
Soap is an emulsifying agent, something that allows two antagonistic liquids, such as oil and water, to mix. Soap molecules are like bars, one end of which attracts water while the other attracts oil. When mixed into a mixture of water and oil, each bar grabs water at one end and oil at the other creating a liquid with compound molecules.
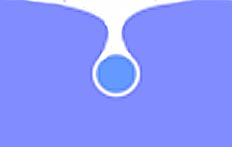
When soap is mixed into pure water, water molecules are attracted to the water-attracting end of the soap molecules. Water is also repelled by the oil-attracting end. This repulsion reduces the average attraction between water molecules in soapy water, thereby reducing the surface tension of the liquid. Imagine soap molecules as looking like a sphere at the end that attracts water and a small line at the other that repels water. The following drawing shows how adding soap to water allows for the creation of antibubbles:
Antibubble formation in soapy water
As the drop falls toward the water it forms a sphere. On the surface of the sphere the water attracts the water-attracting end of the soap molecules and repels the oil-attracting end, with the result that the molecules on the surface get oriented so that all the oil-attracting, or water-repelling, ends of the soap molecules point outward. The same thing happens on the surface of the water toward which the drop is falling. The surface is covered with the water-repelling ends of the soap molecules pointing upwards. Under the right conditions, as the drop strikes the water these two layers of water-repelling molecules prevent the drop from merging with the surrounding water. A thin layer of air is trapped around the drop as the water's surface closes over it. The repulsive forces working on the water stabilize the antibubble.
How
To Make Antibubbles:
The soap makes it possible for an antibubble to form, but it doesn't make it easy. If the drop is released too close to the surface it won't have enough energy to break though and will either form a water globule floating on the surface or spread out and merge with the water in spite of the soap. Released too high and the impact will will be so strong that the drop shatters. As if that's not bad enough, even if dropped at the perfect height it's extremely rare for an antibubble to form. The reason is that fluid dynamic forces that cause a thin layer of air to be dragged along with the droplet are so weak that the impact with the water's surface is enough to push the air out of the way allowing the drop to merge with the liquid. A more productive technique is to shoot a small stream of water at a 45-degree angle to the water. The horizontal motion of the stream compresses air ahead of it enough to enable the drops in the stream to hang onto the air as they collide with the surface. But even this technique produces very few antibubbles. Fortunately, there is an easy and reliable way to produce lots of antibubbles.
The trick is to use a small straw to cover the surface of the liquid with a single layer of small bubbles and release individual drops of soapy water into the intersection of three bubbles.
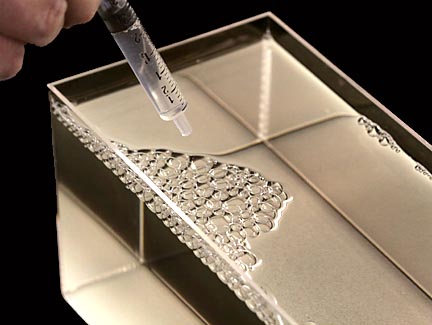
The bubbles should be small, on the order of 1/4-inch across. As the drop hits them, the surface of the bubble gently enrobes it with a layer of soapy water with much less impact than if the drop were to strike the water directly. This thin layer of soapy water then merges with the real surface of the water enclosing the antibubble. The ideal release height depends on the size of the bubbles and the concentration of soap in the water. For the concentration discussed in the next section, that height is about one inch. It's necessary to move around to find a spot that produces antibubbles. Once it's found, they can be created in an almost constant stream.
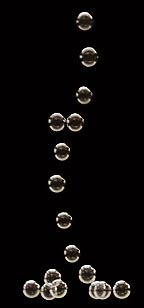
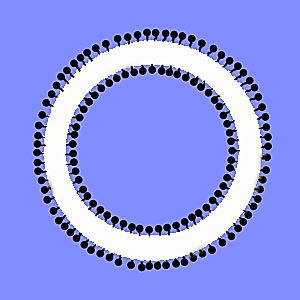
A string of antibubbles created using the surface-bubble technique.
The following video shows this technique in action:
When using this technique it's important refresh the surface bubbles every two minutes. After three minutes too much liquid has drained out of them for them to work properly.
Another
technique calls for dripping solution onto the surface to form a
floating globule of water then gently squirting more solution onto it
forcing the globule under the surface to create an antibubble. I've
tried this and found that the globules tend to move around so fast
and are so short lived that once one forms it's almost impossible to
hit it a second time. Even when successful, the production rate is so
low that I found this technique to be extremely frustrating.
How
To Make Antibubbles Last Longer:
Antibubbles are very short lived, typically lasting only 10 seconds. Because they float they rise and contact the surface, where the thin shell of air can merge with the air above the water and collapse. Even if they persist, they're hard to observe when floating just under the surface. Contact with almost any particle floating in the water can pierce the thin shell of air, which is typically only 100 nanometers thick. The same holds true for them contacting any surface such as the bottom of the container.
The first technique to increase lifetime is to prevent them from rising to the surface. There is a small range of drop heights that will produce antibubbles. If dropped from the maximum height, the greater speed doesn't give air time to get pushed out of the way so a thicker shell is created. More air means the antibubble rises faster. Released from the lowest allowable height give the air more time to get pushed away from the drop so the shell is thinner. Less air means the antibubble rises more slowly and is likely to last longer. However, this technique only adds a few seconds. Something more dynamic is needed.
More effective is to use two containers for the soapy water: one in which the antibubbles will be created and the other to fill the eyedropper used to releases the drops that will become antibubbles. This second container has something added to it that makes it slightly denser than the water in which the antibubbles will be created. Its increased density is enough to overcome the buoyancy created by the shell of air so that instead of rising the antibubble hovers below the surface. I've experimented with corn syrup, salt, glycerine and table sugar and found that by far plain table sugar works the best. Adding four teaspoons of sugar to one cup of soapy water is ideal. Varying the drop height as explained in the previous paragraph allows you to create antibubbles that will rise, fall or hover in mid solution.
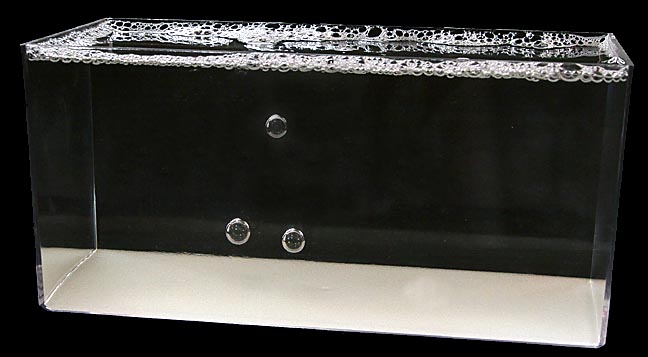
Hovering is ideal, but hard to achieve. Most antibubbles will fall to the bottom of the container. While they last longer than those that rise to the surface, and are easier to observe, they still pop in 20 seconds. But, if sugar is poured into the container in which the antibubbles are formed and it's allowed to rest undisturbed on the bottom until it dissolves, then a saturated layer of sugar water will form on the bottom. As an antibubble falls into this layer, it will only penetrate it to the point where the layer's density matches the antibubble's density. The antibubble will float at this level for long periods of time because nothing is touching it.
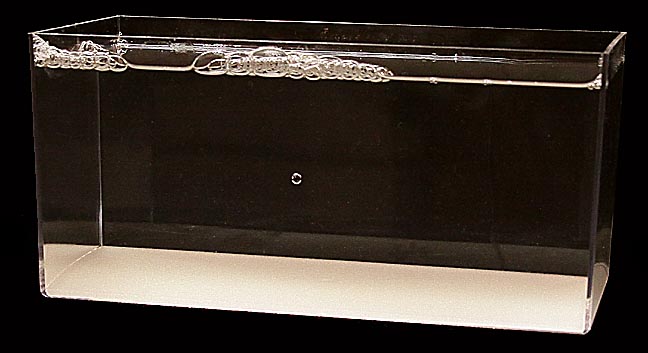
In
the image above, the antibubble stopped falling in the center of the
tank because that's where it encountered a sugar water density equal
to its own density.
It
hovered motionless there for 2 minutes and 7 seconds before popping.
Eventually,
the buoyancy of the air in the shell will cause it to seep upward
until the thickness of the shell at the bottom is so thin that that
the bubble collapses. When this happens a tiny bubble can be seen
shooting to the surface from where the antibubble used to be.
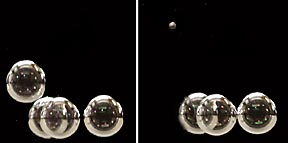
In
the left frame is a cluster of four antibubbles. A second later the
antibubble on the far left burst.
The
thin shell collapsed into a tiny bubble racing to the surface, as
captured in the right frame.
My Antibubble Setup:
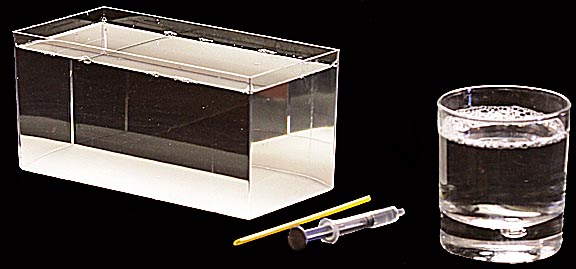
My antibubble system uses a clear plastic box with six cups of water, half a cup of clear dish soap mixed in and half a cup of sugar allowed to settle undisturbed on the bottom. I've experimented with several different brands of clear dishwashing soap and they all work the same. The box is covered and allowed to sit overnight. By morning the bottom half of the container has a layer of high density sugar water on which antibubbles will float. The box I use is an eight inch long plastic collector's display box from Michael's craft stores. Next I have a small diameter straw to blow surface bubbles, a small eyedropper or syringe for releasing individual drops and a glass for the antibubble solution containing one cup of water, 4 teaspoons of clear dish soap and four teaspoons of sugar, all mixed together until the solution is clear. The amount of soap is not critical. I've had success using as little as one teaspoon per cup of water to ten teaspoons per cup. Less than four and the surface bubbles don't last long enough to be convenient. More is a waste since it doesn't work any better.
With this system I've made an antibubble that lasted an incredible 3 minutes and 16 seconds. Better still, it hovered exactly in the middle of the container so I could get pictures of it.
While
researching antibubbles on the Internet, I discovered a webpage
(deanostoybox.com/hot-streamer/antibubbles/setup2/index.htm) that
advocated a complex system of pumps and electrical connections to the
tank solution to produce antibubbles up to 2-inches across. I
replicated the proposed system. Here's what I learned:
1. The author emphasizes the importance of having a perfectly clean liquid surface to facilitate antibubble formation. To this end he uses a filter and pump to constantly recirculate the solution so that the generating tank is always slowly overflowing and as a result, constantly swept clean of any debris. I compared the antibubble production rate with the pump on and off and did not notice any significant difference in the rate of production or size of the antibubbles.
2. The author recommends using distilled water because it has fewer impurities that could burst antibubbles. I could not measure any difference in the rate of production, size or longevity of antibubbles made with his formula using distilled water or using tap water. However, it may be that my tap water was particularly clean when I ran this test. People in areas with harder or more debris filled water may see a difference.
3. The author states that any electric potential difference between the antibubble forming solution in the squeeze ball and the solution in the tank in which the antibubbles are being formed discourages antibubble formation. The prevent this he suggests using a wire in contact with both solutions to keep them at the same potential. I did not find any difference in the rate, size or longevity of antibubbles produced with the wire in or out of the tank solution. He also states that connecting a 5 to 20 microfarad nonpolarized capacitor between the forming solution in the squeeze ball and the tank solution helps even more. Again, I did not note any difference between the antibubbles formed with and without the capacitor.
4. Using a squeeze ball, like those available in infant care centers, does permit the creation of larger antibubbles.
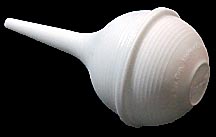
Squeeze
ball
But, it is much harder than using a syringe and the surface bubble technique, young children find it almost impossible to use and it's nearly impossible to prevent the antibubbles from rising very quickly to the surface and bursting. Having said that I found it possible to produce antibubbles often 1/2-inch across and occasionally 3/4-inch across.
Three
half-inch diameter antibubbles produced using a squeeze ball
One particular issue with ball-made antibubbles is that many are produced with an excess of air, which can be seen as a sharp point at the top of the bubble. These rise very rapidly and often burst instantly.
5. I found the author's solution to be better than mine if a squeeze ball is used. Mine works better with the surface bubble/syringe technique. The author's recipe is:
4 gallons distilled water, 1 tablespoon salt, 1 ounce glycerine and 2 ounces clear dish soap.
The author provides ample examples that his system works. I'm not stating that it doesn't, just that I could not verify it.
Colored Antibubbles?
Food color can be added to the solution used to make the drops that turn into antibubbles so that colored antibubbles are created. Add enough red food color to make the water almost opaque. In the following image red dye was used:
The effect can be heightened by viewing them with a light background. Next are two blue antibubbles.
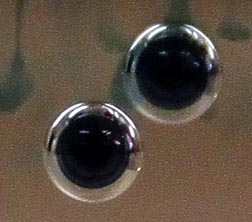
This images show the antibubbles seven times their actual size. The blurred bluish streaks behind them are remnants of burst antibubbles.
Taking a Closer Look:
Take a second look at the two close up images of the antibubbles on this page.
The first important thing to note is that the thick bright ring around the dark center is not the shell of air. That bright ring is the result of light being bent and reflected. At the scale of this image the shell of air is so microscopically thin that it wouldn't be visible even if it wasn't being hidden by optical effects.
Second, unlike soap bubbles in air, antibubbles are egg shaped instead of spherical. The reason is that the inner sphere of water is dragging the bubble down while the shell of air is trying to pull it to the surface. The resulting tug-of-war stretches the bubble vertically.
In
Conclusion:
Antibubbles are interesting and fun to make. Their unusual behaviors make them entertaining enough to be well worth the negligible expense and effort. While this page covers most of the issues related to making them, there are still many areas worthy of exploration. Does increasing the sugar concentrate make antibubbles last longer? Can antibubbles be made in pure soap? Do cloudy soaps cause antibubbles to pop faster than clear soaps? Can they be made using oil and soap instead of water and soap? If so, how are they different? Do they last longer?
The list goes on. Antibubbles would make an excellent middle or high school science project. But even if you just make them for fun they are well worth doing. Good luck!
![]()
(Click
on main site
to browse 100 other topics ranging from exotic kaleidoscope designs
to the strange world of lucid dreaming.)