MISTAKES I'VE MADE AND HELPFUL HINTS: A list of a betta breeder's blunders and their fixes
(Click
on Bettas to return to the main
betta page or on main site
to browse 70 topics ranging from exotic kaleidoscope designs to the
strange world of lucid dreaming.)
It's said that we learn from our mistakes. If that's the case then I'm learning about betta-keeping at an alarming rate because I'm continually making mistakes. Here are some of them in all their glory so that anyone reading this page might be able to avoid my blunders. I've also mixed in a few helpful hints that were inspired by these mistakes.
NEW!!!
(Hint) Try
this trick if you have a male that's reluctant to spawn.
I received an email from Suzy who mentioned she'd heard that if a
male is reluctant to spawn, put him in a bowl with another male and
let them fight for five minutes. Then put him back in the spawning
tank (this assumes the male and female have already been in it a day
or so and not spawned) and he should get right into the act. Suzy
tried it on a male that wouldn't cooperate and he immediately got
down to business. A short time later there were eggs in the nest. (Thanks
for the idea,
Suzy!)
(Hint) Mini measuring spoons! Wal-Mart carries a set of 1/18, 1/12, and 1/6 teaspoon measuring spoons that are great for scooping small quantities of brine shrimp eggs.

(Blunder) Not thinking about all the possible causes for cloudy water This blunder was one of my biggest because it killed 100 of the fry out of the eleventh spawn.
At the end of the first week I noticed that the water in the fry tank was cloudy. I thought that it was just something the filter couldn't take out. I let it go thinking the activated carbon would eventually clean things up. Big mistake. I should have thought that activated carbon is so effective at cleaning that anything that got through it is something I should worry about. A week later I noticed a fry with a bacterial infection and failed to connect it to the cloudy water. Even with treatment the fish continued to get sick. Finally, I woke up and realized that the cloudy water was a bacterial bloom. Why I didn't think of it sooner I'll never know. The saddest part is that the fry are paying for my mistake. At the three and a half week point over 100 had died.
From now on, if the water turns cloudy I'm going to assume it's a bacterial infection, do a complete water change and nail the little killers with a buckshot dose of Kanacyn or tetracycline.
(Hint) Jar covers! I've noticed a fine powdery build up in the bottom of my betta jars after three days. I siphon the jars daily so it couldn't be decaying fish waste or rotting food. The source, when I finally figured it out, surprised me: dust from the air. Dust settles on water at the same rate it settles on dry surfaces so it's no wonder that after several days it shows up on the bottom of the jar. The hint here is that keeping jars covered will help cut down on dust dirtying the water.
However, be careful to us covers that permit easy air flow (bettas are air breathers and need a constant supply of fresh air) and don't collect to much heat from overhead lights.
(Hint) Advice for People Considering Their First Betta Spawn! Spawning bettas is interesting and rewarding. But, it is also enslaving. It's like having to do three loads of wash everyday for two months. The actual working time isn't that great, about an hour and a half a day, but it's broken up into many widely-spaced tasks that make it a day-long process.
(Hint) Why you should spawn bettas! In spite of the time and effort it takes to spawn bettas, there is one good reason why you should try it at least once. Most bettas are 7 to 8 months old when purchased. This means that they are past the most dynamic and playful periods of their lives. A betta at three months is a feisty ball of unstoppable energy, always flaring and zooming around his jar. In contrast, even active store bought bettas are lethargic. Imagine what it would be like if you could only purchase cats or dogs that were at least seven years old. You'd miss out on most of the playful years. That's what it's like purchasing a grown betta. About the only way to see this, other than purchasing a young fish from someone like Faith at BettaTalk, is to raise your own.
(Hint) A new emergency fry food! Imagine the worst of all possible scenarios: your fry are only a week old and hooked on live food, your vinegar eel culture dies, your microworm culture dies, the electricity went out and your brine shrimp didn't hatch. You have 400 starving fry that refuse to eat anything that's not alive... what do you do?!!!
Well, if you have a good Grindal worm culture going all is not lost. Collect a small batch of worms and release them into a tall clear glass filled with still water. The worms will quickly drift to the bottom. Now look close at the chalky-looking cloud they left behind and you should see hundreds of small, white, microworm sized worms swimming around. Siphon these small Grindal worms off and feed them to the fry. Strain out the large worms on the bottom and return them the the Grindal worm culture box. The day is saved!
Actually, since Grindal worms are more nutritious than vinegar eels or microworms, this would be a good thing to do for fry during those first three days after they start eating but aren't large enough for brine shrimp.
(Hint) 78 Degrees! Most references on betta spawning suggest a water temperature of 75 to 80 degrees. I'd like to nail this down a little tighter and suggest 78 to 80 degrees. Who told me? My fry from the 11th spawn. I usually keep the tank at 76 degrees and noticed that the fry tended to huddle under the overhead light. When I slowly raised the water temperature to 78, they stopped huddling and disbursed throughout the tank. I assume this is their way of telling me that 78 is what they want.
(Hint) Scavengers, not Hunters! Although the term Siamese Fighting Fish suggests bettas are aggressors, I've noticed that when feeding they don't appear to hunt for food. Rather, they drift around and when something comes within an inch of their noses they gobble it up. The hint I take from this is that when I add food to the fry tank, I always give it a gentle stir to distribute it throughout the tank. This way all the fish get access to it instead of only those who happen to be where the food was added.
(Hint) Siphon After Feeding! At three weeks old, fry start taking an interest in anything you stick in the tank... like the end of the siphoning tube. With them swimming around and nibbling on it, thinking it's something to eat, it's difficult to avoid siphoning them up. I found that if I wait until right after they've eaten a large meal they are much less interested in food and will leave the end of the siphoning tube alone.
Scrubbing the bottom and sides of the tank is also done best after a feeding. That way the fish are less likely to eat stirred up debris that might not be good for them.
(Hint) Use Warm Water for Mixing Brine Shrimp Eggs! When you mix a new batch of brine shrimp eggs for hatching, use warm water instead of cold. That way the water bath doesn't cool off when you place your hatching container in it and the shrimp will hatch up to one hour faster.
(Hint) Vinegar Wash! I use clear plastic jars to hatch brine shrimp. After several batches a white chalky coating builds up from the baking soda used to get the alkalinity up to the appropriate range. This coating is hard to scrub off with water, but using a little vinegar dissolves it quickly.
(Blunder) Following the Hint Above With a Cut on Your Hand Ouch! that vinegar stings!
(Blunder) Jarring The Wrong Fish To save having to wash jars, I left the females from the tenth spawn in a community tank that was heated and filtered. The males got jarred. While this sounds okay, it was a big blunder. Since I was planning the spawn the best orange male with the best orange female, it makes sense that I'd want the male slightly larger than the female. But, the females were in larger, cleaner, warmer quarters so naturally they grew faster. If I hadn't spotted this problem, all the females would have been too large to spawn with the males. As it is I had to cut back on the females' food and place them in jars with the hope it slows their growth. The four best males went into the not vacant female tank after I divided it into four areas. Hopefully the males will catch up to the females.
(Blunder) Impatience The fish for the eleventh spawn had been jarred next to each other and courting for a month. I decided to see if I could get away with eliminating the two days of having the female isolated in the spawning tank so I simply dumped them into the tank. They proceeded to dance around each other in a normal courting pattern. Then I realized that in rushing things, I hadn't given the male any time to start a bubble nest. Next time I'll have curb my impatience.
(Blunder) Adding Dirt to a Sterilized Tank Actually, I'm classifying this as a semi-blunder because I doubt (hope) that any problems will result from it.
While setting up the spawning tank for the 11th spawn, I carefully sterilized the tank and all the internal parts with a chlorine solution. The blunder was that after sterilizing the pump, grass, thermometer and filter, I promptly set them on the sink counter. I FORGOT TO STERILIZE THE SINK COUNTER FIRST!
It's as if a surgeon dropped a sterile scalpel on the floor then picked it up and proceeded to operate.
I'm hopeful the mistake won't be serious because the counter was clean and I doubt it had any aqueous pathogens lurking on it. Still, next time I'll wash it down with bleach first or cover it with fresh aluminum foil.
(Hint) Bathe your Grindal Worms! I noticed my fry tank was getting milky and the filter wasn't clearing it up. It turned out the source was liquified flake cereal transfered to the tank with Grindal worms. I fixed the problem by putting the Grindal worms in a worm feeder then pouring a little water over them and letting it run back into the worm's culture box. This not only washed away the white muck, it also washed most of the baby worms back into the box so that they had a second chance to grow to full size.
(Hint) Fish Net Hint! Normally, the bettas one catches are large enough so that the shape of the net isn't critical. Not so with small bettas, as I found out while trying to catch them during jarring. No matter how hard I tried they always managed to escape. The problem turned out to be that the wires forming the net's frame were bent so that the face of the net wasn't flat (the fish could escape because I couldn't get a tight seal against the glass) and the edges were bowed outward (so I couldn't get tight into corners.) Fixing these two problems made catching the little guys much easier. I also discovered that bending the handle back made it easier to hold the face of the net against the glass.
(Hint) Try Keeping A Feeding Chart! Several of my grown fish were eating erratically with the result that a lot of food ended up rotting on the bottom of their jars. I got the idea of making a record of how much the fish ate. This was easy because I feed them Beta Bio-Gold pellets. The results were surprising.
My older fish, who hardly ever move, seem to do fine on as little as four pellets a day. Very young, active, growing fish like Ariel and Carl think nothing of downing 18 pellets a day. More interestingly, some fish go through cycles where they'll eat ten pellets a day for several days followed by several more days of self-imposed fasting.
Try keeping an eating chart on your fish, it's not as much work as it sounds and is another way to enjoy bettas as a hobby. Besides the obvious benefit of learning how much your fish are eating so you don't add more food than needed, with very little additional effort you can siphon uneaten food and waste after every feeding. This keeps the jars much clearer and reduces the possibility of disease.
An excellent reason to maintain a feeding chart is that it identifies which fish are in the best condition for spawning. For example, I was pondering whether to pair Elena and Snow or Ariel and Carl for the 11th spawn. The feeding chart indicated that both Elena and Snow were eating very poorly (less than 4 pellets a day) so they probably wouldn't be in shape for the strain of a spawn. On the other hand, Ariel and Carl had been wolfing down 18 pellets each every day for over a week. Obviously, they'd have much greater energy reserves and would more likely have a productive spawn. (And they did!)
(Hint) Fry
Counting Trick! Take a picture of
the tank and count the fry on the picture. Using a digital camera
makes this easy because you can zoom in close using whatever photo
processing software you have at hand.
(Hint) Tank Dividers Someone sent me an email once about using the long plastic edges from sliding bar report covers to stiffen plastic needlepoint sheets so they could be used for tank dividers. I finally got around to trying it and was amazed at how easy they are to make and how well they work.
They only cost $3 to make and allow water to move around much more easily than the transparent dividers sold in pet stores. I used hot glue to cement the corners.
(Hint) In-tank Male Cages If you have a few males that you want to keep in a heated, filtered tank instead of jarring them, try using the plastic needlepoint mesh mentioned above to fabricate cages for them. The mesh is so open that water flows through without hindrance. I use thin plexiglass from a cheap poster frame on the front side so I can view the fish kept inside more clearly.
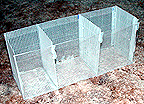
The good thing about these in-tank cages is that the fish are kept in a heated and filtered tank, which should encourage fast growth. The down side is that they get in the way of siphoning the bottom of the tank. I've also made four single cages. They tended to wander around the tank a lot.
(Blunder) Not listening to my mother When I was young, one of my chores was dusting the furniture. Mom would constantly admonish me to not forget the corners... mainly because I always did. I should have listened to her because my habit of missing the corners back then ended up causing problems with my bettas.
The jars I use for housing my bettas have sharp edges. For years I'd been scrubbing them clean with one of those sponges on a stick sold for aquariums, assuming that it was getting them clean. I noticed that the jars' water seemed to be fouling faster as time went on. Then one day I happened to reach into a jar I'd just washed and a finger touched one of the inside corners... and came away coated with scum. Whatever the stuff was, it was clear and hard to see. The problem was that the corners were too tight for the sponge to reach, even though it looked like it was. This scum was reinfecting the fresh water. Now I use a small hand sponge and make sure to get the corners. My bettas are happier because the water's staying clearer and mom's happy because she got to say, "I told you so."
(Blunder) Failing to have ALL my tanks ready at the beginning of a spawn I started my tenth spawn assuming that I'd have plenty of time to get the second and third grow-out tanks up and running long before I needed them. Wrong. Day by day, things popped up that kept me from getting the equipment for additional tanks ready. All of a sudden I found myself with an over-crowded spawning tank and no place to put the extra fish. Lesson learned: from now on I'll have everything I need for a spawn on-hand at the very beginning.
(Blunder) Failing to read all the instructions on medications. When a bacterial infection attacked my tenth spawn, I immediately dosed the water with Kanacyn. The problem was that I was in such a hurry I didn't read all the instructions... specifically that activated carbon removes it from the water. I lost an entire day's treatment due to this oversight.
(Hint) Don't buy all your bettas at once. This could almost be considered a blunder. But, since I've been commiting so many blunders lately, I decided to spin-doctor it into a hint.
The problem with purchasing a large number of bettas at once is that it's likely they are all about the same age... meaning they will all start dying about the same time. That's what I did two years ago and all those fish are dying in rapid order, which is excedingly depressing. Purchasing them over a longer period of time would even out the misery.
(Blunder) Don't Experiment with Live Food Cultures During a Spawn My tenth spawn produced many more hungry fry than I'd expected. To keep them fat and sassy, I increased the amount of brine shrimp cysts I was adding to each batch. BIG MISTAKE! All of a sudden the number of brine shrimp I was collecting dropped to zero and the hatching water had a thick milky appearance.
What had happened is that I'd added so many cysts (eggs) that the discharge given off as they hatched soured the water and either killed the shrimp or prevented them from hatching. After a lot of research, I discovered that the highest density rate is 1/8 teaspoon per cup of water. Above this you court complete hatching failure. I'm now using 1/16-teaspoon of cysts per cup of water and it's working great.
(Hint) Screen your Grindal Worms Gnats were breeding in the soil for my Grindal worms. I found I could eliminate the problem simply by covering the plastic container for the worms with a piece of very fine-mesh drapery shear material. As small as gnats are, they can't get through this cloth.
(Blunder) Don't use all the fry from a spawn on an experiement I made this mistake on Snow and Bianca's only successful spawn and lost all the fry. Because of this, I lost the opportunity to preserve Snow's beautiful finnage and color.
NEW!!! (Blunder) Don't wash activated charcoal in Corian sinks Some of the ultra-fine powder that comes off the charcoal is fine enough to get trapped in the microscopic pores of Corian counter tops and sinks. It comes out, but only with a lot of scrubbing.
(Blunder) Don't think small and shallow for Grindal worm cultures My Grindal worm culture had been going great for several months when I started to notice a sour odor coming from it. This didn't surprise me because any organic matter kept warm and moist is bound to go off eventually. As I started breaking the worm bed down, prepatory to transferring the worms to fresh bedding material, I noticed that the sour material producing the odor consisted of a thin layer on the bottom of the container. Gardening experience with compost piles told me that the problem was that the bed was thick enough to prevent oxygen from getting to the lowest layers. Consequently, instead of aerobic decomposition (rich and sweet smelling, think clean woods in spring) I had anaerobic decomposition (without-oxygen, think putrefying meat).
My idea to solve this problem was to use several shallow beds instead of one deep one. The shallow beds would allow air to reach the lowest layers and prevent anaerobic decomposition from spoiling it. Sounds good. Right? Wrong.
The shallow beds dried out faster than I could conveniently keep them moist. I lost half my Grindal worms. Also, the number of gnats around the beds skyrocketed. It seems their ability to reproduce is a function of available breeding surface area. More beds = more surface area = more gnats. This last development was particularly distracting to my wife. I tried to get her to think of them not as gnats, but as tiny birds. (She loves birds.) She didn't buy it.
I've since gone back to a single deep bed and am taking care to keep the material a little drier than before. It's not drying out and the worms are recovering quickly. Oh well, live and learn!
(Hint) Avoid Aquarium Pharmaceuticals Activated Carbon This is the cheap stuff sold in quart or half-gallon cardboard containers that look like milk cartons. The problem I had with this stuff is that it contains ten times the amount of fine powder that has to be washed out than any other brand. Worse still, the carbon particles appear to be fragile so any stirring of the carbon causes more powder to be created.
(Hint) Use large eye droppers for brine shrimp After siphoning the bottom of a brine shrimp tank, it's common to find that several live brine shrimp have been siphoned up as well. Rather than using a net, I find a large eyedropper, the type used to administer oral medication to babies, works easier, faster, and clearer than trying to net them.
(Hint) If your Grindal worms are climbing the sides of their container... the most likely cause is that the growing medium is too wet. Don't add dry medium on top of it... that will only speed the wet medium to souring. Rather, gently mix in more dry medium.
(Blunder) Stretching a communal betta tank Since there were only three fish from the fifth spawn and I had plenty of grass in the 10-gallon spawning tank, I decided to leave them in there and save myself some jar cleaning. I figured the tank gave them enough room so the wouldn't fight. Boy, was I wrong. Everything went fine until the ninth week, then suddenly by biggest, prettiest male had his fins all but destroyed by the two smaller fish. Needless to say, they are jarred now. Still, in a way it was an interesting experiment because they did get alone together right up until the ninth week without and real problems.
(Blunder) Wrong Grindal worm feeding technique This is a new class of blunder: the hint-blunder. I say this because the blunder developed out of the Grindal Worm Feeding hint three articles down this page. In it I mentioned that I discovered that wetting the glass cover plate and pressing it onto Grindal worm food caused an even, thin layer of food to be deposited onto the plate. A week's testing indicated that this was a good technique. I shouldn't have tested it two weeks. What happens is that the worms don't eat all the food located at the very edge of the plate. After two weeks, this builds up into a thick layer and can go bad. So, my hint is to avoid this blunder by not following my original hint. (Hmmm.... this is getting confusing.)
(Hint) Blackworms for 4-week-old fry I forgot to feed my Grindal worms one day so naturally they all dug down into the growing medium where I couldn't collect them for my fry. In desperation, I dumped some blackworms into the fry tank but they were much too large for the 4-week-old fry to eat. Then I got an idea. I placed some blackworms in a shallow dish and used a Q-tip cotton swab to collect only the smallest of them, most of whom were only 1/4-inch or so long. These small worms I put in the fry tank and the fry gobbled them right up.
(Hint) Surface skimmer Just as the bottom of a tank accumulates debris and has to be siphoned clean from time, the surface of the water also collects a layer of scum and floating waste that needs to be removed. To accomplish this task quickly and easily I made a scoop by attaching a shallow pocket made from filter cloth, obtained from a local pet store, and a length of coat hanger. Two quick swipes and the surface of my fry tank is free of all debris. All I have to do is be careful of using it in the fry tank or I may scoop up some fry by mistake. (This could be a future blunder.)

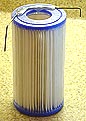
(Hint) Water replacement filter I've noticed that when topping off the water in my fry tank, the new water many times introduces a lot of dust. While the tank's filter will eliminate it, waiting for the tank to clear is annoying. I've figured out how to avoid this by using a cartridge filter that I hang in one corner of the tank and add the new water through it. The filter prevents any dust in the new water from getting into the tank. The cartridge is removed after filling and washed out. The cartridge I used is a swimming pool filter for $6.00 from Wal-Mart. I used hot glue and a piece of scrap plastic to seal the bottom and a section of coat hanger hot-glued to the top to act as that hanger. Works great!
(Hint) Grindal worm feeding Like most people, I feed and collect Grindal worms by sprinkling some flaked baby food (I use Gerber's Mixed instead of Gerber's Oatmeal) onto a glass plate, spritzing it with water, and placing it on the growing medium. The problem with this technique is that the flakes tend to come out in clumps and piles resulting in an uneven layer of food. Consequently some areas last longer than others and can start to rot. An easy solution to this is to place all the food in a flat layer in a wide plastic container, spritz the glass plate first, then place it on the food to pick up an even layer of flakes.
(Blunder) Maroxy Mistake While researching water treatment for spawning tanks, I used a reference that recommended adding three drops of Maroxy for five gallons water. I did but in spite of this I've had several spawns plagued with fungus. My blunder was not double-checking the dosage. On closer examination I discovered that the correct dosage is 30 drops, or 1/2 teaspoon for five gallons. I used this higher amount in my last spawn and had much less mold.
(Hint) Feeding hint It happens all the time at feeding time: a betta will be asleep or in a fight with his neighbor and doesn't see the food until it's waterlogged and unpalatable. Taking a hint from the "How to Train a Betta to do a Trick" page, I started turning on the fish lights one minute before feeding and kept it off the rest of the time. The idea was to train the bettas to recognize that when the like comes on, it's time to eat. It worked! By the third day, when I tuned the light on all the fish swam to the tops of their jars and waited for the food. Less wasted food, fresher water, fatter bettas... what more could anyone ask for?
(Hint) How Long it Takes to Care for a Betta I recorded all the time it took to care for my bettas for one week, divided that time by the number of bettas, and discovered that one betta requires ten minutes per week. That includes one water change, jar cleaning, and feeding using a pelleted or flake food. About half of the time goes to feeding the fish. Ten minutes per betta doesn't sound like a lot and it isn't. But, if you decide to build up a collection of bettas the total time they will take goes up with the number you have. Twenty bettas will eat up over three hours every week. If you work and have any sort of family, it can be taxing to lose that much time. So, I'd recommend deciding first how much time you want to invest in bettas, divide that by ten minutes and the resulting number will give you the optimum number of fish to match your schedule.
(Hint) Watch out for that air freshener! I received an email from JoAnn Snow who mentioned that the bettas she was keeping in a hotel while her new house was being built began to die. She discovered that the industrial-strength air freshener the maid was using was poisoning them. A similar thing happened to me. I noticed my bettas would swim oddly for several hours after I changed the water in their jars. It turned out that during my last step, cleaning the fronts of the jars with glass cleaner, I wasn't being careful enough about where I was spraying.
(Hint) Check that pH! I received another email from someone who was having trouble getting her bettas to spawn. She tried everything and discovered that the pH of her water averaged 8.5 and sometimes got higher! Correcting that problem helped.
(Hint) Bettas like peas!? Still another betta fan mentioned that her bettas loved eating peas. She cut them into small bite-sized pieces and the fish would gobble them right up. She said the peas also seemed to enhance the fish's color. If you've got some finicky eaters you might want to give this a try.
(Hint) Clearing the water. As nice as the Shrimpery is at hatching baby brine shrimp, the fact that many unhatched eggs find their way into the collection vial and from there into the fry tank is annoying. Fry will mistakenly eat some of the eggs and it can take a week or more for them to clear out of their systems. This can't be very comfortable. (Who'd want to walk around with a stomach full of golf balls for a week?) One way to reduce the number of eggs that get into the collection vial is to very gently pour a tablespoon of clean water in the opening where the vial is placed into the Shrimpery. This clear water pushes away most of the eggs and cuts down on the number that sneak into the vial. It's not perfect, but it helps.
I'm working hard to figure out a way to completely eliminate this problem but so far the solution is eluding me.
(Hint) Sponge siphon! Even after flattening it, the small tube I use for siphoning my fry tank left a lot of debris on the tank bottom and walls. The reason is that this debris is, by nature, sticky and clings to whatever it contacts. I don't like using a normal sponge because it stirs most of the debris into the water and the sponge creates currents which knock the fry around. My solution was to use a razor blade to cut a very small (1/8 x 1/4 x 1/2-inch) piece of sponge and hot glue it to the underside of the siphon tube. It worked great! Without disturbing the fry I can now scrub and siphon the tank crystal clean.
(Blunder) Almost a UV light disaster! The ultraviolet sterilizer in the fry tank's filter system is supposed to have water running through it at all times while it's on to keep it from overheating. The last time I turned of the pump, I didn't press down hard enough on the light's switch to turn it off and it was on most of the day. Fortunately, the unit was full of water which helped conduct heat to the outside and the unit's very low power rating, 4 watts, didn't cause enough of a buildup of heat to hurt it. At least the light still goes on. I'm preventing this from ever happening again by wiring both the pump and the light into the same plug so that it's impossible to have the light on while the pump's off.
(Hint) Plants for stress relief! I had twenty small bettas in a ten gallon tank and noticed that many of them spent a good deal of time swimming frantically back a forth. I added a double handful of floating plastic plants and the fish instantly swam into it and calmed down. I figure the plants enabled me to keep the fish in that tank another three weeks before they had to be jarred.
(Blunder) Heaters get hot quickly! The fry tank heater was in the way one day as I was scrubbing the walls so I took it out for a second. At most, one minute later, I was done and replaced the heater. SNAP! CRACKLE! POP!!! That's right... I'd forgotten to unplug it and in those few seconds it got so hot the glass shattered when I dipped it into the water. Fortunately, none of the fry were injured.
(Blunder) Watch out for those labels! I was siphoning the bottom of the fry tank when I noticed a lot of white cloudy stuff floating around the tank. I siphoned it all up but a few minutes later there was even more of it. This cycle repeated itself several times before I finally figured out that the white stuff was paper from the price label on the tube I'd purchased for siphoning. It had been slowly dissolving every time it got dipped into the tank water. Needless to say, from now on I'm going to be more careful about removing labels.
(Blunder) Only having one Grindal worm culture box. One morning I awoke to discover that the Grindal worms I'd been feeding my fry were killing themselves climbing the sides of their culture box. The reason was that the bedding material had gotten too wet and soured. I got some new potting soil (organic, of course) and moved the worms into a new container with the new bedding. They loved it... too much. The worms were so happy with the new quarters that they wouldn't come up to feed on the baby food sticking to the bottom of the cover. This meant I couldn't harvest them. My fry were going to starve!
Fortunately,
enough did cling to the bottom of the cover to sustain the
fry. After three days the worms had rediscovered that food was
available on the cover and I'm now able to harvest plenty. The lesson
I learned from this is that even though one small box can produce
plenty of worms, it's a good idea to have two so that when one slows
down the second can pick up the slack.
(Hint) Don't dump fish directly from a net into new quarters: When a betta is netted, the net usually scoops up a lot of debris with the fish. If the fish is placed in new quarters by immersing and reversing the net, or even inverting the net over the jar, all that dirt will soil the new jar. By first moving the betta to your hand, gently and only after making sure they are clean, and then dropping the fish into the clean water, getting all that dirt into the clean jar will be avoided.
(Hint) How to get a finicky female to change her diet: Juliet, my little red female, is my only betta that refused the eat Betta Bio-Gold pellets. It wasn't that she didn't like them, it was more that she couldn't recognize them as food. I solved this problem by putting her in a tank with other females that loved the pellets. Within two feeding she was shouldering the others aside to get her share. All she needed was to see other fish eating the pellets to understand that they were food. Obviously, and regrettably, this won't work for males. Fortunately, all 13 of my males love Betta Bio-Gold.
(Hint) Keep a pitcher of treated water handy: Every time I do a water change, I make up extra treated water and store it in a covered gallon pitcher in the fish room. It constantly comes in handy for rinsing brine shrimp, filling the clear vial to my brine shrimp hatchery, moistening Grindal worm media, and topping off tanks.
(Hint) A cheap source of large-diameter, thin-walled, transparent tubing: I needed some clear, thin-walled tubing for a new filter design and remembered that hardware stores carry 4-foot long plastic tubes for protecting florescent lights. I discovered they come in two diameters: 1 & 1/8-inch for $2 and 1 & 5/8-inch for $2.50. These can be cut with scissors. While not applicable for below-tank or pressurized use, they are useful for many in-tank ducting tasks.
(Hint) Shake that salt: If you use powdered aquarium salt (see hint below) you'll notice that it has the annoying habit of clumping. A quick way to break these clumps up is to store the salt in a container that's twice as big as the amount of salt and give it a couple of quick, sharp shakes. The extra space allows the big chunks to slam into the walls when shaken and break up.
(Blunder) Handling fish medicine capsules with wet hands: Guess what? Those things dissolve in water!
(Blunder) Miscalculating water additive amounts: Some how I managed to figure out that there were only 12 drops of AmQual or NavAqua in 1/4 teaspoon, the amount prescribed for 2 & 1/2 gallons. In truth, there are 28 drops in 1/4 teaspoon. I was under dosing by over half! In spite of this my fish have done well fro many months. This is a testament to either betta toughness and/or these chemical's effectiveness.
(Blunder) Failing to throw out the siphoning tube: One of the things I did to fight a bacterial infection that attacked my second spawn was to make a complete change of all the hardware that had come in contact with the contaminated water: tank, airlines, heater, thermometer, and filter. The one thing I forgot about, mainly because it wasn't attached to the tank, was the siphoning tube I had been using to vacuum the bottom of the tank. After all the work of changing everything else, I went right on using the contaminated siphon tube. There were even droplets of contaminated water still resting inside it. I ended up having to repeat the entire changing-process again. Next time I'll remember to throw the old contaminated tube away before it can reinfect the clean tank.
(Blunder) Failing to clean the outside of the tank before setting it up: The bottom, back, and one side that I can't reach of the fry tank have fingerprints that glare at me every time I look at the tank. It's irksome to have an otherwise sparkling-clean tank marred by these. Next time I set up for a spawn, I'm going to make sure that that tank is carefully cleaned.
(Big Blunder) Not having a complete set of medications on hand: My second spawn has had three diseases attack it. Each time I discovered I didn't have the correct meditation on-hand for immediate treatment. Twice this resulted in delays of over a day before I could find the right medicine. Fry are so delicate that these short delays could have meant the difference between life and death. From now on my fry's medicine chest is stocked better than my own.
(Big Blunder) Transferring cycled tank water into the fry tank: One fungal and two bacterial infections broke out in my second spawn tank almost immediately after transferring water into it from a never-occupied tank that had been cycled using Stress-Zyme by Aquarium Pharmaceuticals. I can't help but think that there might have been a connection and that the cultures in the Stress-Zyme caused at least the bacterial problems. Needless to say, I won't do this again.
(Blunder) Failing to keep my air lines balanced: When I added a larger filter to the fry tank of my second spawn, I turned the air to it to maximum. What I forgot to notice was that in so doing, I stopped the flow of air to the brine shrimp tank. Two ounces of brine shrimp used up all the oxygen in a few minutes and died. (Services for the departed are scheduled for the coming Sunday.)
(Blunder) Placing the spawning tank too high: I built my spawning cell so that the fry tank was at eye level for easy observing. What I failed to consider was that this placed the tank so high that my holding the siphoning tube is held so high it falls asleep from lack of blood.
(Hint) Spray paint power cords to keep them sorted: My power cords were hopelessly tangled and it was almost impossible to figure out which went where. A simple solution was to spray paint each cord a different color. Now they're easy to sort.
(Blunder) An in-tank brine shrimp hatchery - almost: The idea was to weight a shrimp hatchery with a lead sinker and place the unit under the light in the fry tank. This way as the brine shrimp hatched they would swim up out of the hatchery to supply the fry with a steady supply of food. It might even allow the tank to be left unattended for a day in case an emergency came up and the owners had to leave. I had two problems with it: first, the brine shrimp didn't hatch; second, most of the eggs escaped into the fry tank and ended up being almost impossible to clean out. They stick everywhere and as water is siphoned off are attracted to the tank walls where they stick. Then when the tank is refilled they float free. They're not hurting anything but they make the tank look messy.
(Hint) Fill in the front edge of the fry tank with a shallow bevel: Because the bottom area close to the front tank wall is hidden from view by the frame, it's impossible to see to safely clean without siphoning fry and fry seem to like hiding there, which makes them difficult to count. I found that filling in that corner makes cleaning safer and counting easier.
(Blunder) Watching what I'm doing... too carefully: Siphoning the fry tank is a risky business because you never know when a fry will suddenly dart too close and get sucked up into the tube. Holding a finger over the far end of the tube can save a lot of fish but it's still a traumatic experience for the fry if one slips by. I was siphoning away one day with my eyes simultaneously glued to the end of the tube and watching all the fry within range of the suction. The tank bottom was clean, the water level was down and no fry had disappeared up the tube. This was going to be the day I earned a zero-fry-siphoned award! Just when a smile of victory spread across my features, I noticed a change in the sound of the water flowing into the bucket. I looked down and discovered I'd been paying such good attention to the fry that I'd forgot to watch the water level in the bucket. Oh well, that area of carpeting needed washing anyway.
(Blunder)
Opps!
Forgot to watch that
water level!: As
the fry from my second spawn grew, I slowly added water to the tank.
As time went on, I noticed the temperature in the tank became
erratic. This surprised me because I figured that with more water in
the tank the temperature would even out. One day I was checking the
temperature and noticed that the heater light was madly blinking on
and off in some cryptic semaphore trying to tell me something. I
reached into the tank to turn the adjusting knob on top and was
surprised when I felt warm tank water close in around my fingers
before I'd reached the knob. Oh, no! All the time I'd been adding
water to the tank, I'd forgotten to move the heater up! The last
addition had covered the entire unit and water had leaked inside it
and played havoc with the thermostat. Fortunately, the manufacturer
foresaw such a possibility and designed it so I didn't electrocute
myself or, more importantly, the fry.
(Blunder) Wash the spice mill!: Several hints lower on the page, I suggest using a spice mill to grind aquarium salt to a powder so that it dissolves faster. One thing I forget to mention, and do, was thoroughly clean the mill before using it for grinding spices. Needless to say, the next time I used it, the dish I was preparing came out very salty.
(Half-blunder) This
one's so minor it only rates as half a blunder:
I'd
slowly filled the fry tank to full and was very self-satisfied with
myself because I was diligent enough to do a bottom-siphon every four
days and change about 1/5 of the water. But after a couple of weeks I
noticed the tank water had turned cloudy. A little math clarified
things. Changing 1/5 of the water every four days means that I was
changing all the water every 20 days, which really isn't all that
good considering I invariably over feed the fry. Also, although the
fry are small they eat much more proportional to their size than
adult bettas. That creates more waste which, when combined with
uneaten food, means the water in even a 10-gallon tank can go bad
quicker than one might think. I'm now changing a larger portion of
the water and things seem to be staying clearer.
(Hint)
Don't trust
that thermometer: I
discovered one of mine was reading three degrees higher than the
others. I could have cooked my fry! Now I check all new thermometers
against several others to verify if I have to add or subtract a bias factor.
(Hint) Count fry in the morning: Like most first-time betta spawners I spend a lot of time counting fry. Mine lay on the bottom while they sleep at night. Rather than trying to count them during the day while they're swimming around, I found it easier and more accurate to do it in the morning before I turn the room or aquarium lights on while the fry are holding still.
(Hint) Turn the heater up two degrees at night: I've noticed that the fry tank picks up a lot of heat from ambient light and the tank light. When these lights go off at night the heater in the tank falls behind on the job. By morning, the tank has typically dropped two degrees. I found that turning the heater up two degrees at night then down two degrees in the morning helps keeps the tank temperature more constant. (Note: the room housing the fry tank averages 68 degrees. Fry tanks in warmer rooms might not need to have their heaters adjusted.)
(Hint) Have two sets of jars for your bettas: The process of taking a betta out of its jar, putting the fish in a holding tank, emptying and cleaning the jar, refilling it, and transferring the betta back to it gets tedious when there are many fish to change. Also, repeated handling of the fish increases the risk of trauma. To make things easier on my and my bettas, I use two complete sets of jars. When it's time to change jars, I set the unused ones up with fresh water and transfer the fish directly into them. Then I clear the old jars and store them until needed a week later. I find this much easier and faster than working with one set because it lends itself to assembly-line efficiency. Also, it gives the unused jars a chance to thoroughly dry out in the hope that any lingering pathogens will die. The only problem is that the unused jars take up storage room, but I find the advantages outweigh this.
(Blunder) Erroneous brine shrimp math: I decided to see if my five-day old fry could eat baby brine shrimp. The question was: How many baby brine shrimp to put in the spawning tank? Well, I though to myself, I know from a previous test that an adult betta can easily eat ten adult brine shrimp so surely a baby betta should be able to eat ten baby brine shrimp... right? (No kidding folks, as stupid as this sounds now it seemed reasonable at the time.) So I figure I need 2000 baby brine shrimp. I know my hatching rate and using the quick-count technique available on the main betta page, whip up a batch of brine shrimp and add them to the tank. "That's odd," I say to myself as a dense orange cloud of baby brine shrimp expands in the spawning tank, engulfing everything it encounters. "That looks like a lot more than 2000 shrimp." It was. I'd accidentally picked up the wrong vial from the hatchery and dumped in ten times the number of shrimp than intended. Two hours later I checked the tank. The tank is still orange with baby brine shrimp and all my fry are stuffed to the point where their cheeks are bulging. My first blunder was failing to realize that the size difference between baby and adult betta is much greater than between adult and baby brine shrimp, so much so that one bbs is enough to fill a fry's stomach. My second was grabbing the wrong vile and having it be one that produced ten times as many brine shrimp than needed. Consider this confession to be two blunders for the price of one! The fry finally ate all the bbs and survived the experience but wow, did they ever have a growing spurt!
(Hint) Make spotting fry easier: Fry are almost transparant when they hatch and if the wall behind the lank is light, they are difficult to see. I found that taping black construction paper to the wall behind the tank made the fry ten times earier to spot.
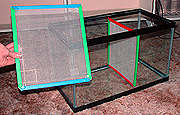
(Blunder) Watch out for those electric power cords. No, I didn't electrocute myself or the fish, but this blunder is just as foolish. Take a look at my Betta Spawning Cell. It's 8-feet long, 6-feet tall, and weighs 500 pounds. After I'd assembled it and filled the tanks with water, I stood back to proudly survey my work, spotted something, and began beating my head against the wall.
In the interest of keeping everything as compact as possible, I'd pushed all the cabinets tight against the wall, trapping all the electrical cords behind them. Now, if a pump breaks down or heater fails, I have to take the entire spawning cell apart and move it forward to get the cord out and replace the whatever broke. If anyone out there builds anything like this, I highly recommend they leave at least a two-inch clearance between the unit and the wall.
Side issue: none of the sites I've visited or books I've read about spawning bettas have warned new hobbyists how many electrical plugs are needed. My small system has three main tanks with three cords each (heater, power pump, and light), another cord for an air pump, and heater and light cords for the brine shrimp hatchery. Granted, none of these units draw much power but still, it adds up to 12 things that need plugging into a wall outlet.
(Blunder) Don't dry small polished aquarium rocks in the oven: I figured a little heat couldn't hurt them and might go a long way towards sterilizing them. So, I spread all the small poliched rocks, still damp from changing the fish jars, out on a cookie sheet and popped them in a 225 degree oven. Half an hour later I notice a strange chemical odor, not unlike the aroma inside a new car, that's been in the sun, where the seats get hot... hot plastic... oh my God! I run to the ovven and jerk the door open, Smoke boils out of the oven, the fire alarm goes off, people start calling 911... you get the picture. Well, the truth wasn't quite that bad but was embarassing. My mistake was assuming that the shiny little rocks I had weren't polished, but only coated in some sort of epoxy to make them look pretty. Heat and epoxy don't get along well. I checked the bag and sure enough, it states, and not even in small enough print that I could excuse this mistake as having overlooked it, that they were epoxy coated. They also say that it's non-toxic... I hope they're right.
(Hint) Flashlights help spot eggs in bubblenests: I found that shining a flashlight up through the bottom of a bubble nest makes it much easier to spot the cream-colored eggs. If you use a clear plastic container instead of a foam cup, shining the light down through the top works even better.
(Blunder) Don't use Plexiglass for tank covers: I thought I could save some money by cutting Plexiglass sheets into tank covers. It didn't work. Either the warmth of the water or the humidity caused them to bow downward. After a week, the covers had warped so much that the edges were 1 & 1/2 inches higher than the centers.
(Hint) Use a wand blender to dissolve aquarium salt: I needed a tank of brine for a batch of brine shrimp I'd just purchased. I mixed the specified amount of aquarium salt into the water, gave it a stir, and left it to dissolve. An hour later the large salt crystals still hadn't dissolved and the brine shrimp were starting to swim around with their eyes crossed from being confined too long in a small bag. In a fit of imaginative genius, I realized I could speed things up by using a electric wand, or stick, blender. It worked great. The bender chewed the salt crystals up into quickly-dissolving pieces. I was able to add the brine shrimp right away... and in so doing killed many of them. (Please see mistake number 3.)
(Blunder) Don't add brine shrimp to brine immediately after using an electric stick blender to dissolve the salt: The stick blender makes the water look cloudy because besides mixing in the salt it also mixes in countless microscopic bubbles. These bubbles lodge in the wavy hairs with which the shrimp propel themselves. The result is that they float to the surface and because they are unable to free the bubbles, die of starvation.
(Hint) Do use an electric spice mill or coffee mill to grind aquarium salt crystals up into a fine powder. This only takes a few minutes to grind up a pound of salt for future use. These small salt particles dissolve almost instantly. Note: powdered salt weighs 14 grams per tablespoon instead of the 16-18 grams per tablespoon for large-crystal salt so use proportionally more.
(Blunder) Don't store water-aging tanks in the washroom. The shelves in the room that houses our washer and dryer seemed to be the perfect place to store the 2 & 1/2 gallon water bottles in which I age water. One day I moved them to the kitchen, filled them with water and let them sit over night. The next day I started filling my betta jars and noticed the water was cloudy. Some of whatever was in there was so fine even passing it through a coffee filter wouldn't clear it up. It turns out that lint dust, thrown out of the dryer, had found it's way into the water bottles. Needless to say, I don't store them in the washroom anymore.
![]()