BILLIARDS! Dozens of articles on pool and billiard equipment
(Click here to browse 70 topics on my main site ranging from exotic kaleidoscope designs to the strange world of lucid dreaming.)
NINE
NEW ARTICLES!!!
1.
My new shaft by Dennis Dieckman has arrived! To read how it measures
up to the other shafts I've tested, click on: An
easy-to-build shaft tester and 11 cue shafts compared for straightness.
2. I've updated my pool room with a new table and more appropriate wall decorations. See My Pool Room for details.
3. Looking under the skirts of two tables. Comparing Olhausen to Brunswick construction.
4. Examining the accuracy of Brunswick's Centennial balls. Please click on Three types of billiard balls measured and compared
5. Why I trashed my Sardo rack! Please see: I take the Sardo Tight Rack for a test drive
6. A close look at Simonis 860 cloth A little history, close-up photographs, what happens over time to cause this cloth to slow down and how to restore it.
7. Cue ball wear See the bottom of the ball comparison article for what I discovered.
8. Click on Spot Touch-up Fix for the best way to pick up small bits of dirt off table cloth!
9. Pro 8-ball stats!
Please
scroll down to browse through all the articles or use the following
list of bookmarks to jump to a specific topic:
My
Pool Room
Spot
Touch-up Fix
Looking
under the skirts of two tables
Quantifying
table aging
What
Tune is Your Cue Playing?
My
Custom Cue
My
Meucci Nightmare
Read
this if you want to order a cue from Meucci Originals
Five
Meucci Blackdot Bullseye shafts tested for straightness
An
extreme cure for sweaty palms
A
Very Strange Cue Tip
Billiards
Newgroups
Shaft
Cleaning
Joseph
Picone Jump Tips
Get
to know your taper
A
comparison of APA and BCA 8-ball rules
Check
your pockets! NEW!!!
Pocket dimensions revisted
How
good is your wood?
Meucci's
Myth Destroyer
robot versus Predator's Iron
Willie
Links
to 89 cue makers
Deep
cleaning a pool table
Three
types of billiard balls measured and compared
Testing
a billiard ball cleaner
Two
quotable billiard quotes
An
easy-to-build shaft tester and 11 cue shafts compared for straightness
Experiements
in shaft straightening NEW!!! Shaft
straightening problem!!!
How
to measure your breaking speed
Four
chalks compared
To
drill or to stoke: comparing two chalking techniques
Learning
to jump
Billiards
after LASIK eye surgery
I
take the Sardo Tight Rack for a test drive
Electrify
your Sardo
NEW ARTICLE!!!
Four
cue tips compared Why Pool is the Hardest
Game in the World
The
Secret to Getting Better
Conquer
8-ball dread
Another
hint to help you shoot better
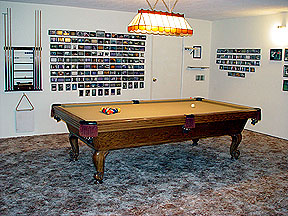
This room is a completely finished garage with windows, full-length drapes, wall-to-wall carpeting, and best of all my nine-foot Olhausen Provincial pool table. The room measures 20 feet by 17 feet so there's plenty of room to play without hitting the end of a cue on anything. I have the table recovered every three years with Simonis 860 cloth. It's great to have a quiet, dedicated room to work on the game. (Now... if I could just find more time to play!)
In case you were wondering, all of the small pictures on the walls, and there are many more out of sight, chronicle many of the engineering projects I've undertaken.
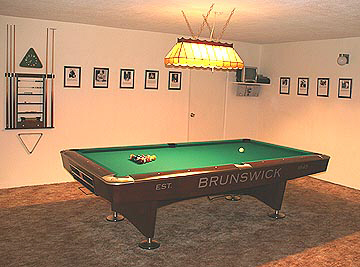
My New Pool Room!!!
After 19 years of use I decided to retire the old Olhausen, get a new table, and redecorate the room to reflect a more pool related theme.
But which table to get?
For several years I've wanted a table with the pockets cut exactly the same way as the tables used in nationally televised professional tournaments so I could see just how much harder they were to use. I also wanted the very best table I could get. The solutions to both problems were resolved by purchasing one of the Brunswick Gold Crown IV tables used in the WPBA San Diego 9-ball professional championship tournament held at the Viejas Casino. These tables are donated by Billiards and Barstools and then sold to the public. Officially the tables are used, but since each of the nine tables used only have a few hours of play they hardly deserve the adjective. Best of all, they aren't just as good as ones used in a professional tournament; they are the ones used. You can't get any closer than that.
With such a high-end table I needed to redo the room's decor. All the little pictures of my engineering projects came down, the room was repainted, and new photos of the top women and men hall-of-fame players with short biographies below them were put up. The effect is to make the room look larger and more completely a serious "pool" room. Here's how it turned out:
So, how does the Gold Crown IV play? Like a dream... and a nightmare
It's a dream because the table is rock solid. The Olhausen was steady, but if you bumped it hard enough it would creak a little, though not move enough to cause the balls to move. The Gold Crown IV? Bumping it is like running into a block of concrete. The rails are also great. Their extra-wide depth provides plenty of room for a solidly anchored bridge no matter how close the cue ball is to the rail. Even better, the curve cut into the rails, which extends through the sloped top of the cushions, perfectly matches the natural curve of a relaxed hand.
But... it's a nightmare because:
1. The extended rail depth cuts into the distance you can stretch and still reach a shot. I find myself having to grab the mechanical bridge about 10-percent more than on the old table.
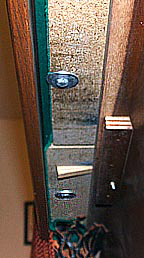
2. The curve put into the top of the rails causes problems for shots where the cue ball is frozen to the rail. Take a look at the following image and you'll see the problem:
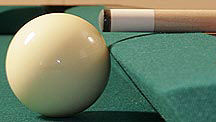
Because the nose of the cushion slopes downward, a level cue places the tip so high on the cue ball that a miscue is almost certain. To avoid this it's necessary to angle the cue and hit down on the cue ball, always a dangerous thing to do because it can cause masse' effects. This isn't a problem with typical designer tables like the Olhausen because the top of the cushion is flat and level with the top of the rail. On these tables hitting with a level cue strikes the cue ball perfectly. It's interesting to speculate why Brunswick designed the rails this way. I conjecture that professional players have enough control that they seldom leave the cue ball frozen to the rail so it's not an issue for them. In trade off the downward sloping cushion provides a more comfortable and secure bridge anchor.
3. The extra-large ball cups (capable of holding up to 10 balls each) are made of a soft, rubbery plastic and don't give off the same satisfying "thunk" of a traditional leather and wood pocket cup when a balls falls in them. It's a small thing but noticeable. After all, it's a sound we all love to hear. I'm thinking of placing a small, flat wood sound box on the bottom of each pocket to improve the table's acoustics. Another problem with these pocket cups is that they are so large and smooth that the first ball in rolls around for several second before coming to rest. This can be as distracting as an under-the-table ball return where you've got balls rattling around while you're trying to focus on the next shot.
4. Pocket openings on consumer tables average 5-inches wide for corner pockets and 5 and 1/2-inches for side pockets, at the large end of the BCA's sanctioned legal limits. This makes sense because table manufacturers want their customers to be happy and making pockets large so more people can make balls is one way to do this. For professional tournaments, pockets are smaller so the pros miss a ball once in a while making the matches more interesting. The pockets on the table I purchased from the Viejas WPBA pro tournament (held April 19, 2006) has corner pockets that are 4 and 5/8-inches wide and side pockets that are 5-inches wide. These tighter pockets make the game much more challenging. I'd estimate that they reduced my average run in 8-ball from 5 to 4 balls.
5. The sloped rails tend to make chalk cubes slide off and onto the floor.
6. The smooth Formica-like rail surfaces and nickel-plated pocket surrounds show up smudges and fingerprints much more noticeably that the real wood rails and leather pocket surrounds of the Olhausen.
Don't get me wrong. In spite of the previous few nit-pickss I love the table and look forward to enjoying it and the new room for many years to come.
![]()
From time to time a bit of lint, a flake of dandruff, or a small area of chalk mars the look of the table's bed cloth. The spot is too small for the hassle of brushing or vacuuming, yet you want a quick and safe way to pick it up. Using tape, sticky rollers, or even trying to scratch it up with a fingernail can raise the nap of the cloth in that area, potentially creating an uneven roll. What's needed is something that's tacky enough to just barely pick up the debris, yet not sticky enough to raise the cloth's nap. I found it.
Silly putty. It has the perfect amount of tackiness to pick up small bits of anything, including chalk, yet it won't pull up the nap. I've tested it by rolling it over the same small area of a piece of test cloth, virgin Simonis 860, 100 times and under a 10-power magnifier could not detect the slightest raising of the nap or the leaving of a residue. The trick is to remember to very lightly roll the silly putty over the area to be cleaned, never rub, drag, or press hard.
Looking
under the skirts of two pool tables
While waiting for the new Brunswick table to arrive, I got the idea that it might be interesting to see how differently it's constructed from a regular table. First up: let's take a look under the Olhausen to see how it's put together.
Looking along down the length of the underside of the table shows that the three slate sheets are supported by the outer box frame, made of 3/4-inch plywood, and two ribs placed under the slate joints. These ribs are 1-inch plywood. The entire box frame is stapled and glued together at the factory to form a single monolithic structure.
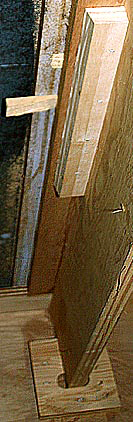
There is a strip of particle board between the slate and the top of the rib. Wedge-shaped shims are used to level the pieces of slate so that they create a smooth surface. Since only the area under the shims are in supportive contact with the slate and there are only nine shims visible, that means that there are only nine adjustment points on the bed. Worse still, as the shims dry out, expand, or overwise shift the slate can shift. This doesn't strike me as a very stable system. Yet, the table has worked perfectly for 19 years so it must be a better system than it looks.
The corners surprised me because they didn't have any additional bracing. After all, 1500 pounds of table is supported at these four points.
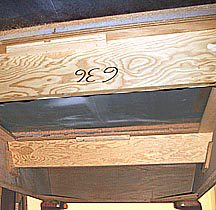
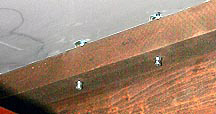
The underside of the rails show the bolts that attach the rails to the rest of the table. The bolts that hold the slate to the table screw through the slate and into the thick wood brace piece on the middle right of the picture above. here are four of these screws on each side of the table and two on each end. The side screws are far enough under the cushion that a ball can never reach it. But, the ones on the end rails are far enough out so that under certain conditions they could influence the ball's rebound.
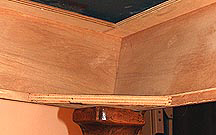
Next: The Brunswick Gold Crown IV:
The Crown is built on site from eight sections bolted together.

This bothers me a little because as an engineer I know that bolts can loosen up over time. However, the bolts in the table are very large there are a lot of them.
The frame is made of 3-inch thick, built-up lumber, quite a bit beefier than the Olhausen's plywood.
Another interesting difference is that the Brunswick's slate is whitish-gray whereas the Olhausen's is very dark gray, almost black. Brunswick gets it's slate from Brazil, Olhausen from Italy. (Table experts will be debating forever the relative merits of Brazilian versus Italian slate. All I know is that they are both flat, heavy and hard. That's good enough for me.)
Because of it's essentially single-piece construction the Olhausen can be put up in two hours. The extensive on site construction required for the Brunswick resulted in its taking over 5 hours to assemble.
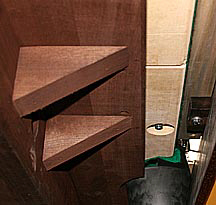
Instead of shims, the Brunswick uses 22 screw-type slate levelers. After assembly I examined these and found that less than half were used. Evidentially only the ones needed to level the slates are used and the rest left in the lowered position. I had expected them all to be raised to be in contact with the slate to provide the most even possible support.
This image of the bottom of the rail shows that the Brunswick has a more finished and solid look than the Olhausen.
The real question is whether or not the Brunswick is better than the Olhausen and if so, is it better enough to justify the price difference?
As an average player I have to confess that my game isn't good enough to tell the difference between the two tables. The Brunswick's rails are much more comfortable but the Olhausen looks better. The cushion action is so close that I don't see any difference in banking. The Brunswick's MSRP is $8500. The Olhausen's is around $4000. (I had to estimate this from comparing prices of several different Olhausen tables because they no longer make the Provincial.) Having a Brunswick competition table carries with it a certain value prestige-wise, especially as the one I got was used in a national professional tournament, but I'm not sure that's worth $4500.
NEW!!! A
close look at Simonis 860 cloth
A Little History:
The Simonis weaving mills were established in 1680 by William Simonis in Verviers, Belgium. This location was selected because the unusual calcium content of the local water made it the best possible for washing the wool. The company was a success from the start and focused on producing only the highest quality woolen fabrics. Simonis mills passed from generation to generation until 1790 when the then current owner, Iwan Simonis, renamed it after himself. To this day the mills still go by the name Iwan Simonis.
With the increased interest in billiard and pool tables over the last two centuries, the company decided to concentrate on producing only the highest quality cloth for these tables. They don't make any other cloths. This specialization has enabled the company to establish itself as the premier manufacturer of cue sports cloth. They currently advertise 14 different types:
Snooker cloths: 5000 (thickest), 7000 (thinner) 4000 (thinner yet but still heavier and thicker than standard 860 pool cloth.)
English Pool: 4000 (same as snooker 4000), 3000 and 2000 (Each progressively thinner and faster. The 3000 is about the same thickness as 860. But, all snooker and English pool cloths are 100-percent wool.)
Pool: 860 ( about 3/4-pound per square yard - the most popular pool cloth, specifically developed for 9-ball but the highest regarded all-around cloth), 760 (thinner and faster, 70-percent wool, 30-percent nylon) 725 (thin economy cloth.)
Carom: 300 Rapide (for 3-cushion billiards), 300 International (for serial carom games) 7219 Super Croise Champion (slower) and 585 (especially for cushions.)
Pyramid: 950 Rus Pro (same as 760, for Russian Pyramid Pool games) 930 Rus and 920 (progressively thinner versions of the 950.)
By far, the most popular cloth is Simonis 860: an all purpose cloth used in more professional tournaments than any other brand or type. Simonis 860 is a blend of 90-percent wool and 10-percent nylon. It's woven of worsted yarn ("worsted" means the yarn is made from the longest fibers and tightly twisted so that it resists fraying that could interfere with and slow down the ball as it rolls.)
Simonis 860
cloth. The weave is 40 threads
per inch by 30
threads per inch.
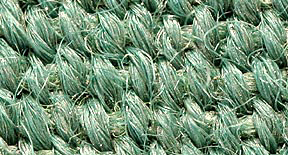
After weaving, the cloth is passed through a shaver that clips off any fuzz on the playing side of the cloth. This provides a hard, smooth surface for the ball to roll or slide on. The back side, which is unshaved, looks like this:
It's so fizzy that it's hard to make out the cloth's weave pattern.
Aging:
Playing on brand new Simonis, or any top-quality non-nap cloth, is an empowering experience. The surface is so smooth that long draws are easy and slow hits allow object balls to roll far enough to make it all the way to the pocket instead of stalling an inch short. This cloth speed increases the range of speeds over which the cue can be stroked, expanding play options. But, in time the table invariably slows down.
Two influences cause the cloth to slow down: abrasion of the cloth and chalk build up.
Every time the cloth is brushed the bristles of the brush drag across the cloth, pulling up some of the individual fibers twisted into the cloth's threads. In time this fuzzes up the surface.
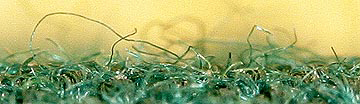
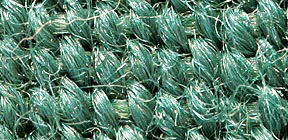
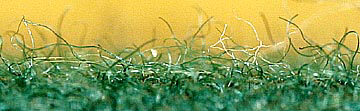
An edge-up view of brand new Simonis 860 cloth.
The same cloth after 300 strokes with a brush, 2 year's worth of brushing.
As the ball rolls over the fuzzier cloth, it loses energy faster than a smooth cloth because it has to push more fuzz out of the way.
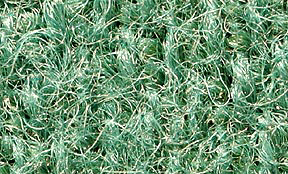
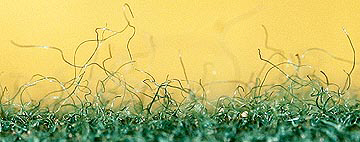
Even worse than brushing is using a sticky roller to pick up lint or dust off the table. Here's what new Simonis 860 looks like after just a few rolls:
Does this mean
tables shouldn't be brushed? No. Brushing is necessary to reduce the
build up of chalk, which doesn't reduce ball speed so much as it
kills sliding spin (English.) Here's a top-down view of a chalked
surface after it's been brushed off:
It's obvious that the color is lighter than the new cloth, indicating that there still remains chalk on the surface. Without brushing, which really just massages most of the chalk deeper into the choth where it can't interfere with the sliding of a cue, the surface chalk would build up to the point where shots using English would be very difficult.
This build-up of chalk and fuzziness is what slows a table down over time. What can be done?
Cloth
maintenance and restoration:
Note: I am not a cloth or table expert. I suggest the following only based on my experiences and am not recommending anyone else follow these procedures. I only know they have worked well for me over the last 20 years of taking care of my own table.
Since brushing pushes chalk into the fibers of the cloth, I reduce this by always vacuuming the table before brushing. This removes 90 percent of the chalk and greatly slows its build-up. I use a small head attachment without bristles that is glass smooth on the bottom so that it can't abrade the surface. I never us a vacuum with any sort of beater-bar.
Once or twice a year after vacuuming the table I gently dampen the bed cloth and use a wet-dry vacuum to suck up the water. This draws the chalk-ladened water out, deep-cleaning the cloth.
If the cloth is in otherwise good condition but it's obvious that it's frizzed up over time, I use a clean electric razor and shave the fuzz off. This sounds a little strange, and I admit it looks odd, but consider the following edge-up photos of heavily brushed cloth and the came cloth after shaving:
After a good wash and shave the cloth plays like new.
Is
this
much care worth it?
I've found that vacuuming before brushing easily doubles the length of time a table remains in good playing condition. One or two washes doubles it again and makes it look a lot better. Shaving is probably a waste of time because by the time the surface has been abraded enough by brushing to need it, wear spots under the rack's head ball and around the cue ball's break position will require the cloth to be replaced.
I watched the 2005 IPT 8-ball tournament with clip-board in hand to kept track of how often the top pros got balls in on the break. Combining this with the run-out statistics available on the IPT site provided some interesting statistics about how good the pros are.
First, the top 20 8-ball pros in the world get one or more balls in on the break 50-percent of the time.
Second, they break and run out an average of 14-percent of the time. (The top few players (Reyes, Bustamonte, etc) break and run out 25-percent of the time.
Combining these two statistics discloses that the top pros run out, if they get a ball in on the break, 50-percent of the time. The average of the top 20 pros is 25-percent.
What this tells me is that pro-level players (top 100-200 players on the circuit) only average one break and run out in every ten racks they break. This astounded me because I'd always assumed they almost always broke and run out and that it was rare for them to not do this. (Mind you, I'm not saying they aren't good or implying that I'm almost as good as them. I'm not even close.)
I posted these numbers so that serious amateurs who may not have access to tournaments in which to play can use them to rate their own play.
What
Tune is Your Cue Playing? NEW!!!
This seemed like a good idea in concept... oh well, you can't win them all.
Everything has a natural frequency at which it wants to vibrate. In the case of pool cues the frequency is audible and can be heard by lightly holding the cue hang vertically tip down with two fingers and tapping the cue. Let the butt slowly slip between your fingers until the vibrations are the loudest and you can hear its natural tone or pitch.
It's at its loudest when you're holding it at one of the minimum nodes of vibration. At this point, like the rest spots on a xylophone, your hand doesn't interfere with the vibrations traveling up and down the cue. Move your fingers further up or down from this point and the vibrations die out more quickly because your fingers are now located at a point where the cue is physically moving and your hand is dampening the vibrations.
My idea was that this might be one way to characterize a cue. Cues with high pitched tones might feel more lively than low-pitched cues... or perhaps the other way around. The problem is that while each of my cues has a slightly different pitch they are all so close that differentiation isn't possible, at least to my tin ears. My daughter thinks my playing Meucci sounds like it's resonating a D and the breaking Meucci a G.
Still, it's an
interesting exercise.
The only cues I've used for the last fifteen years were the one-piece Dufferins that came with my table. Then for Christmas of 2002, my bother in law, with whom I've shared many a hard fought battle over the last 30 years, gave me a better quality two-piece Dufferin. This cue helped me play better and made the game more fun. Because of this experience, in 2003 I decided to get highest quality cue I could find.
My only criteria was performance. I wanted a cue from a manufacturer that could prove that his cues were better than any other. With this in mind I began searching the Internet for cue performance comparisons... and found absolutely nothing (with one exception.) Every manufacturer, except one, at most made some vague statement that his cues were the best but provided no empirical proof to back up this claim. Cuetec and Predator offered explanations why they thought theirs were the best, but neither offered quantitative testing to substantiate these claims. The vast majority of manufacturers focused their sales efforts on showing off the attractiveness of their cues. A good looking cue is nice but I'd rather have one that'll help me win games. (I don't want a work of art... I want a weapon.)
Out of the 145 manufacturer sites I found, only one provided both lengthy explanations about the engineering reasons why his cues were made the way they were and quantitative, repeatable, verifiable experiments that validated his claim that they are the best performing cues in the world: Meucci. The shear mass of scientific information available on the Meucci site is far too great to repeat here. I urge visitors to use the link at the top of the cue maker link list below and see for themselves. What I came away with from the Meucci site was that Bob Meucci approached designing and developing his cues as an engineer would: define what cue performance means and figure out how it can be quantified; develop a cue to maximize this performance; thoroughly test it to verify that the cue performs as it's supposed to, and most importantly present this information to the public for peer review. Meucci is the only company to do have done this and for that it earned my respect... and my money.
(Annie O's site also has numerical data on cue performance but all of it comes from Meucci research.)
Comments
about reputation and endorsements:
When I started thinking about getting a good cue the first name that popped into my mind was Balabushka. Then I realized that the only reason this happened was that I remembered hearing that name in the movie The Color of Money. At the time I didn't know anyone who had owned one and had compared it to other top line cues to determine if it was better than them. Reputations are often like this. We hear something from somewhere and for some reason it sticks and we think that it must be a good product. Perhaps it is. But word of mouth isn't acceptable as fact in scientific circles and isn't good enough for me. I may have heard somewhere that such-and-such is a great cue but I want more. I need the manufacturer to prove it with hard numbers. Meucci was the only company that does so.
(Interesting point: The writeup on the Joss website claims that while the cue in The Color of Money was said to be a Balabushka, it was really a Joss.)
Another problem with purchasing anything based on it's reputation is that a good reputation can persist long after quality declines.
I completely ignored professional endorsements when selecting my cue for two reasons. First, I doubt the objectivity of any endorser who's being paid thousands of dollars to say the product they endorse is better than another. Does the fact that Allison Fisher endorses Cuetec mean that Cuetec is better than Viking or Predator? I honestly think that if Viking offered her twice the endorsement fees as Cuetec she'd switch the moment her contract with Cuetec was up. Second, I do not believe that the cues endorsing professionals use are the cues the public can purchase. It's a safe assumption that out of a production run of hundreds of shafts the manufacturer sets aside the few that are the cream of the crop to save for their endorsing pros, then has them custom tapered to the pro's specifications.
The cue I ordered:
After weighing all of the above, I decided Meucci was the way to go and ordered a custom cue which started out as a MTC-4 with a power piston butt and Blackdot Bullseye shaft. (Click on Meucci and scroll down 2/3 of the page to see what a stock MTC-4 looks like.) To satisfy my particular (some might say peculiar) aesthetic preferences, I had the butt modified as follows: the white linen wrap was changed to black, the chrome joint collar and butt cap were replaced with black units, the point and butt sleeve designs were replaced so that the butt was solid black from cap to joint, and the ring designs from a Meucci FR-1 cue were added to the top and bottom of the butt and to the bottom of the shaft. The cue weighs 18 ounces and has a 12.5 mm ferrule. I requested that the linen wrap be polyurethane coated because I found that after a few months of play linen absorbs enough sweat and oil from the hand to make it feel sticky, hindering a smooth stroke. Washing the linen doesn't get all of the oil and chalk stains out and runs the risk of having the moisture warp the butt.
The cue was ordered on 13 October, 2003 and was delivered on 10 February, 2004.
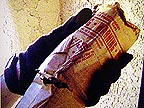
How the cue was packed:
The cue was shipped in a single strength triangular cardboard box. Inside, it was bagged in a plastic sleeve and wrapped in single strength corrugated paper.
The cue: A plain but deadly weapon. (Black is the hardest of all colors to get a perfect surface. Nothing else shows up defects as much. The entire butt was perfect without a single scratch, bubble, or defect of any kind. The finish was like glass. The inlays were razor sharp and tight and smooth.)
![]()
The
tip: (Meucci uses a medium-hard, modified, Le Professional tip from
Tweeten Fibre. Bob Meucci was used as a consultant in the development
of this tip in 1969 while employed by National Tournament Cues in
Chicago, IL. I asked how the LePro was modified and was told that it
is radially compressed to increase the density on the sides.)
![]()
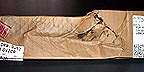
Ferrule:
(Meucci uses a soft, flexible ferrule that resists cracking,
splitting, chalk, and is designed to minimize cue ball deflection. It
is more translucent than most ferrules and has a slightly lower ring
when tapped. Both these characteristics reflect the softer nature of
the material used in it's construction. Meucci specifically designed
the ferrule to reduce cue ball deflection. The ferrule is 1 and 1/4
inches long.)
![]()
A
closeup of the 35 layer Black Dot Bullseye shaft: (The Northern Hard
Rock Maple veneers used are so thin and the 200 pound per square inch
laminating force so great that unlike other built-up shafts, those
made by Meucci have the adhesive driven into every pore in the wood,
saturating it to the point where the glue and wood form a single
monolithic structure. There are no zones where there is only wood or
only glue.) Actually, the lamination rate is 35 layers per inch.
The number of laminations in any particular shaft depends on the
diameter of the shaft at the joint. The picture below is at ten-times
magnification. In actual viewing the layers are so small as to be
almost invisible. Careful inspection shows that the laminations
appear to be laid down with the direction of the grain reversed at
each layer to maximize the homogeneity of the shaft.

This shaft tested out with only a 0.002 warp, which is outstanding.
Joint: (Meucci uses a 5/16 by 18 tpi union.)

open

closed
The butt end and cushion: The details of the design are razor sharp. The apparent softness of them in this picture is the result of reducing the image to 72 dpi for the Internet. (The design may seem plain to most players, but because I prefer understatement it suits me perfectly. Also, I could have paid $2,000 more for a fancier design but it won't play any better.)

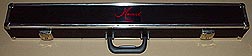
My cue case:
A
closeup of the case's logo:

How
does the Meucci feel?
Compared to my old one-piece and two-piece Dufferins, the Meucci feels very slightly heavier in the butt, which I find more comfortable. The Blackdot Bullseye shaft is extremely slick and slides through a bridge without the slightest drag. The biggest difference is that unlike the Dufferins, the Meucci has a much longer pro taper so the shaft doesn't choke in the bridge at the end of the stroke. The Meucci modified Le Pro tip feels hard, almost brittle. But it holds chalk well and doesn't miscue so I don't intend changing it. (Though I have to admit I miss the mellow feel of a Triangle tip.) The only negative observation I have about the cue concerns the coated linen wrap.
I have very dry hands and can shoot for hours with a cue with uncoated linen without having to wipe perspiration off them or use talc. Yet I find that the polyurethane coating plays very warm and causes my right hand to sweat a little. It's not a big problem for me but for people with a sweaty-hand problem this could become a nightmare.
I had expected to go through a period of adjustment with the Meucci, especially considering all I'd read about how flexible Meucci shafts are. This turned out not to be the case. I was able to play better with it the first time I tried it. Although the balance was slightly further back, it felt fine and this was such a minor point that I doubt I would have noticed it without switching back and forth several times between the Meucci and the two-piece Dufferin. I did notice that the first time I played with the Meucci I completely missed the object ball on several very thin cuts. I couldn't understand this at first but later it occurred to me that these misses were probably the result of the reduced squirt the Meucci exhibits. This is a miner issue that I'll adjust to after playing with the cue a while. All together, I'd say the Meucci improved my game starting with the very first stroke. Holding a cue of this quality makes me feel better and play with more confidence. Even if it only improves my game fractionally, it makes the game more fun and in the end that's what it's all about. In time, and with diligent practice, I hope to become a good enough player to be worthy of this cue. Until then I'll simply enjoy it for the great weapon it is.
I also ordered and all-black cue with a power piston butt and a black dot bullseye shaft to use as a break cue. Like the playing cue, it's finish is perfect. The shaft had a 0.009 inch warp, which is at the low end of excellent.
I've read many posts on various billiards newsgroups claiming that the quality of Meucci cues has been very poor for many years. The most common problems relate to shafts warping over time, inlays coming loose and extremely long repair times for returned products. The problem with such claims is that the only people who report them are those who have received defective cues. People who never have any problems are much less likely to mention it. For myself, I intend to monitor my own cues closely to see if I have any such problems. If I do, I will be sure to report them here.
I understand that after an absence of a few years Mr. Bob Meucci has retaken control of his company and is trying to improve the quality of his products. I sincerely hope this is so and that he was successful before the order for my cues was filled.
Important warning! If you are thinking about ordering a cue from Meucci Originals, please be sure to read the following two articles regarding my order.
(You won't believe this horror story but it's true.)
While I have nothing but praise for the cues Meucci made for me, in fairness to anyone reading the account above and considering ordering a Meucci cue based on my experience I have to state that all did not go smoothly with the order. It was, in fact, a nightmare.
When I placed my order I was careful to have the sales representative (Mark) read back my description of what I wanted: an 18 ounce FR-1 with a Blackdot Bullseye shaft, a Power Piston butt and solid black shoulders (no points). I also ordered an 18 ounce solid black breaker with a Power Piston butt and Blackdot Bullseye shaft. He told me that these cues would be easy to manufacture and should be done in three to four weeks. He then took my credit card number and I made sure to have him read it back to me to make sure he had it correct.
After three weeks I called to see how things were going. This time I was told the cues would take six weeks. The breaker might be a little earlier.
A week later I called again and was told the breaker was shipped on 28 October. When I asked for a UPS tracking number the lady I was speaking to said she couldn't find it. She said she'd locate it and call me back. She never did. I called the next day to inquire about the tracking number and was told the person was out, please call back the next day. I did and she still wasn't available, I had to try again tomorrow. I did and this time was told she simply couldn't find the tracking number. I waited another week and when the breaker hadn't arrived I called and was told it hadn't been shipped on October 28 after all but on November 4th instead. She had no explanation for the confusion.
I observed something in the second and third calls that began to make me feel uneasy about the order. The receptionist answering the phone sounded lethargic to the point of being half asleep. Additionally, she often spoke with such a lazy drawl that she was difficult to understand. This did not instill in me the sense of confidence and pride that I would expect from a prestigious company like Meucci. My concern was that if the person charged with giving customers the most-important first impression of Meucci Originals didn't care enough to put forward a positive impression, then other employees working out of sight of the public, like those in production and shipping, might be even more apathetic. As I was shortly to discover, events transpired indicating that this was the case.
I received a call shortly after this telling me the credit card number I'd given was invalid and that the solid black break cue hadn't been shipped after all. After having the woman who called read the card number back to me I discovered that they had dropped one digit from the number and hadn't noticed that the card number was one digit short. This surprised me because as stated earlier when I placed the order I made sure to have the sales representative read the card number back to me, and he had it correct. This problem was quickly resolved... or so I thought, but more on that later.
The all-black breaker arrived on 11 November... in a box with eight inches of one end crushed and all but broken off by UPS's not-so-gentle handling.
As I opened it I discovered packing was extremely light, too light in my opinion for a valuable cue. There was only a single-strength outer cardboard box and a single wrapping of one-sided corrugated paper inside. Also, there were no "Fragile" or "Handle with Caution" labels on the box. This made me think that if Meucci valued their cues so little as to provide minimal protection then they also might have a similarly low value for their production standards. Also, the joint pin was not protected in any way. In fact there was a small hole in the end of the box the same size as the pin indicating that it had been dropped and the pin had perforated the box. Fortunately, the pin and joint appeared unharmed.
The damage to the box resulted in a scratch to the butt so I decided to avail myself of Meucci's return policy. I called and was told they would send me a UPS tag for free return. Before repacking the breaker I assembled the cue and rolled it on my table. I was shocked to see a large wobble. I took the cue apart and rolled the butt, it was straight. I rolled the shaft and it wobbled. On my shaft tester I measured a warp of 0.022 inches. This is worse than all of the 16 year old one-piece Dufferins I got free with my table. The warp was gradual and smooth along the full length of the shaft, indicating it occurred during production and was not the result of being damaged in shipment. I called the person I placed the order with and let him know I was greatly disappointed. He directed me to return the breaker with a letter detailing all of the problems with the cue.
On 24 November, six weeks after placing my order and when I had been told the playing cue should be done, I called Meucci to get a status on it. At first I was told they hadn't even started on the playing cue. When I commented that I had been told it would be done six weeks after placing the order I got put on hold for several minutes and was then told it was somewhere "on the floor" being made. The person I was talking to could not give an estimated completion date.
I called on December 15th about the playing cue and was told it still wasn't done and wouldn't be shipped until the 22nd.
The cue still hadn't arrived by December 30th so I called again. The first lady I talked to couldn't find any information on the order. She transferred me to a man who said the order had been completed but not shipped. He didn't know why. After being transferred to a third person I was informed the shipment was on hold because my credit card number was invalid. (Remember the problem with this I mentioned earlier? That's right, Meucci still hadn't corrected their records, the missing digit had not been added as I had asked them to earlier.) I explained the correction a second time and was told the cue would be shipped today.
While I had them on the line I asked to speak to the repair department about the all-black cue I'd returned. The man I was transferred to said it had been sent "to the floor" for repair and even though they had had it for five weeks, he couldn't tell me when it would be finished and shipped. He did promise that the warped shaft would be replaced.
On January 7th things really got bad... the playing cue arrived. The box was uninjured so I foolishly thought things were finally starting to go my way. Was I wrong. I opened the invoice and my heart dropped to my gut. I'd ordered a FR-1 with a power piston butt and a solid black forearm, no points. The invoice only said FR-1 with solid black forearm. I'd paid extra for the power piston butt and didn't get it. When I opened the box I got a second shock: they hadn't even sent the cue on the invoice! The cue in the box was a pure FR-1 with points; no power piston butt and no solid black forearm.

The cue on top is what I ordered and at least looked like the cue described on the invoice. The cue on the bottom is what I got. I can't understand how anyone could fail to see the difference.
The bottom line is that Meucci charged extra money and didn't deliver on either of the two modifications I paid for. Also, the people packing the order failed to notice that the cue they shipped wasn't the cue on the invoice.
I called Meucci Originals the next day and after getting shuffled around several people I ended up talking to Deron in the Repair Department. He had no idea why I had been transferred to him but was willing to help resolve the problem. He talked to the people in the Production Department and discovered... (Are you ready for this?) ... that the cue I ordered and paid for and had waited three months for HAD NEVER BEEN BUILT! I explained that when I placed the order with Mark in Sales I had him read back what he had written on the order to make sure he'd gotten it correct. He had. Deron apologized for the confusion and told me that he would speak to the people in Production and have them start work on the cue today (January 8, 2004) and he would personally expedite it. He also said that instead of starting with a FR-1 they would start with an MTC-4 and make the butt solid black. That way I'd be certain to get the power piston butt I wanted. Deron also promised me that the replacement cue should be done much quicker than the first one. He explained that once they received the returned FR-1 from me they would credit my credit card and then would rebill me once the new cue was sent to me.
I was reluctant to return the FR-1 because it had the straightest shaft I'd ever tested up to that time. I asked Deron if I could arrange to have it put on the new cue and he said that all I had to do was request it in the letter returned with the FR-1 explaining why I was returning the cue. I did this and went a step further. I attached a separate tag to the shaft itself and wrote on the tag my request to have it put on my new cue. As it turned out this was a waste of time. My request was ignored and I wasn't even given the courtesy of an explanation why. I'd hoped the company would have granted my request in consideration of everything I'd been put through on this order. In this Meucci once again disappointed me.
During the last call to Deron, someone named Karen told me a UPS call tag would be sent to return the stock FR-1. These usually take two days to arrive. When, after a week, it still hadn't gotten here I called and talked to Gail Wicker who told me it had never been sent. She promised to do so immediately.
The tag arrived three days later.
Three weeks after Deron had said that the cue would be started, I called him to get a status on both cues (They'd had the returned breaker for nine weeks by this time.) He said he remembered me and had given the follow up letter about our conversation I'd sent him to the production manager. Deron said everyone was clear about exactly what the playing cue was supposed to be. He also said he had no idea about the status of the cue and that the plant manager wasn't in the building so he couldn't ask him about it. Deron read my telephone number back to me off the order paperwork, which gave me the impression that he was going to find out that afternoon what was going on and call me back. He never did.
I called a week later on 2 February. Deron was out so I asked to speak to anyone who could help me find out the status of my cues. The receptionist, who once again sounded more asleep than awake, put me on hold. After a few minutes someone picked up the phone and asked for my name. I gave it and she said the records indicated that the solid black cue was still "on the line" being made and that it should be shipped by the end of the week. This statement concerned me because I'd heard similar statements like, "it's in production and should ship in a week," so often I've become to think it's a stock stall used anytime a customer calls and no one really knows what's going on.
Then I made a mistake... I asked about the playing cue. The response? "I'm sorry sir, I can't find any record of it. What type of cue was it?"
I counted to ten and as calmly as possible said I'd call back later when Deron was in.
I called again on 3 February and this time Deron was available. He said that the playing cue was getting its final finishing coat today and should be in the mail to me by 6 February. He said he didn't know what the status of the all-black cue was.
The playing cue finally arrived on 10 February... in a box half-crushed with tire marks all over it.
Someone at UPS had driven over it. Worse still, since it was delivered while I was out it had been left leaning against my front door in full view of anyone who wanted to walk away with it. I'd think Meucci would direct UPS to only deliver if they could get a signature to make sure it got into the owner's hands.
Fortunately, the cue survived unharmed. It plays great but I have to admit that the nightmare of getting it has been so bad that I cringe a little every time I go to play with it.
But, I was about to learn that the nightmare was far from over.
Remember when Deron explained that when they received the FR-1 sent to me by mistake they would credit my credit card account and rebill me once the new cue was sent out? They never did. Instead they kept the money for the FR-1 and sent an invoice with the new cue with a zero cost. This actually made things simpler. But, the fact that they didn't do it the way they said they were going to do it was one more example that the people at Meucci either don't know how transactions are handled or arbitrarily change them without informing their customers.
I called on 19 February to get a status on the all-black breaker cue. Again, the receptionist sounded asleep and apathetic. (FYI, all my calls were placed at 11 am in the Meucci time zone so it wasn't like I was calling first thing in the morning.) I asked to be transferred to Deron in Repair, got connected to Karen instead, who finally got me transferred to Deron. He explained that he had checked on the status of the all-black cue three days earlier and could find no record of it and was afraid that it had, "fallen through the cracks." I explained that I had already been waiting three months since it had been returned (four and a half months from when it had first been ordered) and admitted to getting a little impatient about getting it. He promised to talk to the production manager when he got in.
I called again on 20 February and after being put on hold three times for a total ten minutes, was informed that the all-black cue was complete and would be shipped on 23 February. Deron promised to inspect it himself before packing and use a larger, heavier shipping box for added protection. I appreciated this but it made me wonder why, since they have heavier shipping boxes, they don't use them to protect all their cues? This question is significant because someone I talked to at Meucci mentioned that cues damaged in shipping were a chronic problem. Doesn't it make sense to invest an extra dollar or two on padding and shipping to make sure cues arrive undamaged and don't have to be returned? Meucci Originals could even offer an extra-heavy-packing option to customers that the customer could pay for. I know I'd certainly have availed myself of such a service.
I called on 25 February to see if the cue had been shipped on the 23rd as promised. It hadn't. The receptionist told me that it had been shipped one day late, on the 24th. When I asked for a UPS tracking number, she put me on hold for five minutes. When she came back she said the cue hadn't been shipped on the 24th after all as she had originally said. Instead, she said they hoped to get it out today, on the 25th.
I called on February 27 to find out if the cue had been shipped. I was put on hold for six minutes then someone hung up on me. I called back and this time was put on hold for only three minutes before someone came back on the line. They told me the cue had been shipped as promised and I was given a UPS tracking number.
The breaker finally arrived on 2 March, 2004... and the nightmare started all over again. I'd ordered an 18 ounce solid black cue. (The damaged one I'd received back in November was solid black as promised.) When I opened the box I discovered the cue they'd sent me had ugly off-white plastic collars near the joint and the bumper. Making matters worse, the cue was a 19 ounce, not the 18 I'd ordered. The shaft had an unacceptable 0.014 inch warp and the amount of wobble at the joint when the cue was rolled across my table suggested that there was something wrong with the joint. Finally, Deron had promised that this cue would be shipped in a heavier box in consideration of the two previous crushed boxes. It hadn't. The box it was in was the same as all the others.
That was the last straw. I was too tired to fight any more. I called Deron and asked him to send me a UPS tag so I could return the wrong and defective cue I'd just received and get a refund.
And that was that... or so I thought.
On 5 March I got a call from Deron. He said that he had been so concerned about the mix-up over what was supposed to have been a top-grade all-black cue that he'd spent several days tracking down the problem. He explained that the day my cue was shipped was one of those days where everything goes wrong. While he was busy at the plant with two dealers, one of the people working with him called to say that there were two cues marked for Wayne Schmidt and wanted to know which one to send. He told them to send the best one, which I assume the person interpreted as the one with the most decoration, i.e. the white collars. (At this point I was wondering why there were two cues with my name on it, especially when one of them wasn't the cue I'd ordered.) The cue that person sent turned out not to be the one Deron had intended for me. He further explained that he'd secured the all-black cue that was supposed to be sent and had personally checked it to make sure it was what I had ordered and that the shaft was straight. He offered that if I got this cue and wasn't at all satisfied with it I could tell him so and he would credit my credit card account for a full refund and I could keep the cue for free.
As tempting as this offer sounded, I was so disappointed with my Meucci experience that I said, "Thank you, but no thank you." I simply didn't want to suffer through another round of endless waiting only to get the wrong cue, one damaged in shipping, or one with a warped shaft. Deron emphasized that the cue was absolutely perfect and was one he felt I really should see. In the end I acquiesced and accepted his offer. He mentioned sending it out two-day express so I should have it by 8 or 9 March.
I should have known better... the cue never came. I called Deron on 15 March and asked for the UPS tracking number so I could find out where it was. He'd never sent it. He was very apologetic and promised to get it in the mail immediately via UPS Air so I would have it in two days.
I'm happy to say that it arrived two days later in a much heavier box. The cue was in good condition and the shaft had a warp of 0.009 inches, which is very good.
Finally, thankfully, I can now consider my Meucci nightmare over.
Nit Picking
Added to all of the above was the irritation of repeatedly being placed on hold for over five minutes. In as much as these were long distance calls during the high rate period this did nothing to endear Meucci's customer relations to me. In total I paid 60 dollars in long distance calls to get the mess with Meucci resolved.
Additionally, each time I spoke to someone regarding the playing cue I'd ask what they had on the order form. Every time they said it was a FR-1. I stopped them each time and explained that that was not what I had ordered and preceded to re-describe the cue I wanted. This happened a dozen times yet in spite of all the times I corrected the person reading the order to me none of them ever changed the order form. This suggests that they weren't really listening to their customer. They had something on paper and no matter what the customer said they were going to follow what was written down.
Over half of the time the person answering the phone sounded apathetic or half-asleep and had such poor enunciation that several times I had to have her repeat what she said so I could understand it. This weakened the company's credibility. The receptionist's voice provides customers with their first impression of Meucci Originals. Since first impressions are always the most important, it would be helpful to have someone who reflected a positive attitude and had a clear voice that is easy to understand.
One final complaint is that in June of 2003, November of 2003 and early February of 2004 I called Mark in Sales and requested a copy of the videotape of the Myth Destroyer in operation. Each time I was told it would be in the mail shortly. It's now late March, 2004 and I still don't have one.
All the delays and poor customer relations soured my entire Meucci experience. Had they told me from the start that the playing cue would take four or more months I wouldn't have minded so much, but their repeatedly changing the completion date gave me the impression that they didn't have enough grasp of their own production schedule to know when they were going to complete a given cue. If they can't be sure about a simple matter like this, how can I be sure they are any more competent when it comes to the much more complicated task of making a cue?
As my positive articles on the Meucci Originals website and the quality of the playing cue I eventually received prove, I am a staunch advocate for Meucci cues. Yet my experiences in dealing with Meucci Originals was horrendous enough to completely alienate a pro-Meucci supporter like myself. I will never ever order another cue from Meucci Originals.
Bob
Meucci's Response:
On the same day I received the second all-black cue and arranged for it to be returned for a refund, I sent Mr. Bob Meucci the following letter expressing my gratitude for the outstanding playing cue his company made for me and the problem I had obtaining it:
Mr. Bob Meucci, President
Meucci Originals, Inc.
#1 Meucci Center Drive
Sledge, MS 38670
Re: Letter of Appreciation and Concern
Dear Mr. Meucci,
I wanted to thank you and everyone at Meucci Originals for the outstanding cue they made for me. Right out of the box, this cue enabled me to shoot better than I'd been able to with many other brands.
One of the pages on a website I maintain is dedicated to billiards. I've added two articles about your company in recognition of Meucci Originals outstanding work. The first is an evaluation of the excellent technical content on your website and a link from my site to it, which I've posted in the number one position of a link list to 145 online cue makers I've assembled. I've also posted an article on the great cue you made for me. Hard copies of both articles are attached to this letter as a courtesy. If you have any changes or additions you'd like, please let me know what they are and I will be happy to accommodate your wishes.
While I have nothing but praise for Meucci cues, I regret to say that I have serious concerns about the many ordering problems and production errors that occurred during the processing of my order. I appreciate that a large company that's geared towards manufacturing twenty thousand cues a year can't always accommodate individual small orders in an efficient manner. However, in my particular case my experience ordering from and dealing with Meucci Originals was nothing sort of a nightmare. Attachment 3 chronicles everything that went wrong with the order. I'm not sending it as a complaint, but as feedback so that you might see what dealing with Meucci Originals looks like from one customer's perspective. I have attached a self addressed and stamped envelope to this letter and would be very interested in your comments about my experience.
I greatly appreciate your taking the time to read this letter and once again, thank you very much for making my cue. I will value it for a lifetime and will be proud to show it off where ever I play.
Sincerely and with deepest respect,
Wayne Schmidt...................................4
Attch:
...........................................................1.
Copy of the Meucci website link
...........................................................2.
Copy of the Meucci cue article
...........................................................3.
Meucci order problems
...........................................................4.
Response envelope
The letterhead on the cover letter had my address and telephone number on it. The letter and attachments were sent certified mail on March 2, 2004, with a return acknowledgement so I'd be informed by the post office when it was received and by whom. Melanie Gregory signed for the package on March 8, 2004.
As of February 1, 2005 I have not heard from Mr. Meucci or anyone else at Meucci Originals in response to this letter. I can only assume from this that he, or his representative, doesn't care enough about his customers to send even a simple form letter of apology.
I did receive, finally, a copy of the Myth Destroyer robotic cue testing machine on 24 March. It came with no note or communication of any kind.
I want to make it absolutely clear that these are only my experiences and are far too limited to use as an indicator of Meucci's overall quality and customer service. Meucci provides thousands of great cues to satisfied customers every year. If it didn't, Meucci wouldn't still be in business. It is not my intent to dissuade anyone from purchasing a Meucci cue.
NEW!!! Please read this if you want to order a cue from Meucci Originals
If, after reading the article above about My Meucci Nightmare you still wish to order a cue from Meucci Originals, I highly recommend you do the following to help make sure you get the cue you ordered:
1. When you call in your order be sure to have the person taking the order read it back to you and confirm that what he says is exactly what was written down on the order form. (Note: Meucci shafts come in 13 and 14 mm diameters. Be sure to specify which you want.) Also ask for the cue's completion date. Get the salesman's name and business address. Ask that the cue be shipped in the heaviest box available, that the box be labeled "Fragile," and that someone has to sign for it when it's delivered. (If these extra shipping requests cost extra, consider paying it. It could worth it, especially if you're order a cue or cues worth thousands of dollars.)
2. Write a letter to the salesman that reiterates everything that was agreed upon when you called in your order and mail it to him. Include a self address and stamped envelope and request that he use it to send you confirmation that everything in the letter is what's recorded on the order form. If you are ordering a custom or modified cue, send a drawing or picture of what you want with the letter. (One way to make a good picture of a cue that doesn't exist is to take a picture from the Meucci site of a cue that's similar to what you want and use a graphics program like Adobe Photoshop to modify it to look like the cue you want.)
3. Send a copy of the above letter to the Plant Manager (Mr. Randy Wicker as of Spring, 2004) and again ask him to use the enclosed self addressed and stamped envelope to let you know that he's received your order, understands what you want, and verifies the completion date.
5. Cross your fingers, don't break any mirrors, start going to church and hopefully you'll do better than me.
Good luck!
NEW!!! Five Meucci Blackdot Bulleye shafts tested for straightness
During the process of getting the two cues I ordered from Meucci Originals, I had the opportunity to test five 35 layer per inch laminated Blackdot Bullseye shafts. Two were outstanding with warps of only 0.002 and 0.004 inches. One was excellent with a 0.009 inch warp. The fourth shaft had a very noticeable warp of 0.014 inches and the fifth a grossly unacceptable warp of 0.022 inches. Both of these last cues exhibited an obvious wobble as they were rolled across a pool table.
(Note: I conducted a survey of several custom and production cue manufactures and they told me that custom builders strive to keep the shaft warp to 0.005 inches or less. Production companies work to keep it below 0.010. From my own experiences testing 20 shafts from half a dozen manufactures I've come to believe that 0.000-0.005 inches of warp is outstanding, 0.006-0.010 is excellent and 0.011-0.013 is tolerable. These assessments are based on the rarity of truly straight shafts. At around 0.014 inches of warp you can begin to see the cue wobble when it's rolled across a pool table. I consider this unacceptable because even if it were proven that such a warp does not effect shooting accuracy it looks so bad it makes the cue's owner look foolish.)
A
sample space of five shafts out of the many thousands Meucci
produces every year is far too small to be significant. However, the
badly warped shafts shows that Meucci's quality control system can
let bad shafts slip through. Fortunately, Meucci has a
no-questions-asked
return policy.
I asked a representative how Meucci tests their shafts prior to shipment. He stated that the company has a flat, glass-topped table on which the shafts are rolled as the tester observes light passing through the gap between the table and the shaft. My own experience with this system indicates that it can detect warps as small as 0.004 inches. How the two shafts I got that had warps over three and five times as great got through is a mystery.
One curiousity about the shafts with the 0.002 and 0.009 inch warps is that when I tested them for roundness they turned out to be slightly oval. The 0.002 inch shaft was 0.005 inches greater in diameter parallel to the lamination layers than it was perpendicular to them. The 0.009 inch shaft was 0.002 inches greater in diameter parrallel to the layers than perpendicular to them.
One explanation for this is that as the shafts are turned on a lathe, the friction of cutting heats them up and causes the wood to expand. If the expansion rate is greater perpendicular to the laminations, then that diameter will expand more that the diameter parallel to them. Assumeing that the shaft, while warm, is turned perfectly round, then as it cools the diameter with the greater expansion will shrink more than the other, creating an out of round shaft.
Since these differences are so small and symmetric I doubt, though I confess I don't have any way to confirm it, that these out-of-roundnesses will not significantly effect play.
What this very limited sampling suggests is that Meucci Originals can make very straight shafts. They can also pass very warped ones. If I ever purchase another Meucci cue I will be sure the test it carefully before paying for it.
Six
Month Shaft Update: I've received
three emails from people claiming that they had purchased Meucci
Black Dot Bullseye shafts and that they had warped after several
months. Because of this I decided to see if this happened to my two shafts.
Six months after I got them, I tested both shafts again. The playing shaft (13 mm with an outstanding 0.002 initial warp) now had an unacceptable 0.017 inch warp. This is enough to plainly see wobble as it's rolled over a table. The shaft from the breaker cue (14 mm with a very good 0.009 initial warp) was exactly the same as it was when I got it.
Meucci shafts come with a one year warranty but I am not going to return it. After enduring all the harrowing experiences of dealing with Meucci to get the cues, I have no taste for working with them again. Instead, I'm using the cue to develop a new cue straightening technique.
The bottom line is that if you purchase a Meucci, make sure you have the guaranty in writing and that you keep the receipt... you may be needed both in the future.
![]()
Have a question about billiards? Want to chat with fellow pool players? Try one of the following newsgroups:
Each of these forums has its own look and atmosphere. Some of these links take you to a listing of several billiards groups, such as Equipment, Instruction, Rules, Chat and so on, to make it easier to select a group that most specifically caters to individual player's interests.
In February,
2004, I received an email from Alex who suggested that I test several
shaft cleaning and conditioning products. His request reminded me
that I had begun doing such an evaluation but decided not to pursue
it. After posting questions
about such
products on both the Inside Pool forum and another
billiards
forum I found in a Google search, I discovered that two-thirds of
the comments
about these sorts of products were negative. Most people
stated that
over time these products leave a residue builds up on the shaft which
hinders smooth motion. With so many negative comments I decided this
was one test I
wasn't
interested in pursuing.
This got me thinking about other options for cleaning shafts and made me realize that I'd never had a problem with dirty or sticky shafts. I think the reason is that many years ago I adopted Byrne's recommendation for cleaning shafts: simply rub them gently with a soft green kitchen scrub pad like the one in the picture below.

Although these pads feel rough, they are much softer than the wood cue shafts are made of, so unlike sandpaper it can't abrade the surface and slowly wear down the shaft's diameter. I used pads like this on my old cue for 15 years and it kept it clean and smooth and didn't change the taper by the slightest amount. I cut a 2 x 4 inch strip from one of the pads to make it easier to handle. One such piece will last for years and through use softens so it's even gentler on the shaft. These pads seem to accomplish two things. First, they remove any dirt and oil deposited on the shaft. Second, they burnish the wood so that it becomes smoother. I've never seen a trace of sawdust from using one of these pads.
One nice thing about trying a goofy idea is that even if it doesn't work it's still entertaining to read about the failure. What follows is such a case.
Thinking that an ultra resilient cue tip might generate more spin, I got the idea to carve one out of a super ball, one of those high density plastic balls that bounce much higher than normal rubber balls.
I began by purchasing eight of the smallest super balls I could find and testing them to select the one that bounced the highest, then used a razor blade to slice off a section.
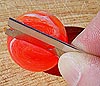
Next, I traced
around an real tip to create a cutting guide for trimming the tip to the
13 mm diameter
of the test cue.

The completed tip was rough and the curvature was the diameter of a quarter instead of the preferred nickle (or dime if you're one of those.)
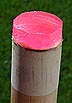
The pink color looked odd, but chalking should hide most of that. I glued the tip to the test cue (I'm crazy enough to think up something like this but not crazy enough to put it on my good playing cue) using Tweeten's 10 minute tipping cement.
How did it play? Strange... very strange. All shots generated a vibration that ran up and down the cue. This makes sense because the plastic tip would naturally deform more then spring back slower than a leather or phenolic tip. Without chalk, English shots easily put two to three times the amount of spin on the cue. But, they also had a sticky feel as if the tip didn't want to let go. Chalking eliminated this but also reduced the spin. Weirder still was the fact that squirt went through the roof. I believe this was because the edge of the tip deformed it creating a significantly sharper angle of contact with the cue than with a harder leather tip. Then when it bounced back it pushed to cue ball sideways at this increased angle. The greatly increased spin and squirt would make controlling a cue with a tip like this a nightmare.
Even worse was the fact that the tip self-destructed. Bits of the edge started flying off with the first stroke. I remember when super balls first came out (Yes, I'm old enough to recall that happening.) they had a tendency to explode if thrown down too hard. Once they were cut, this problem became much worse. I believe that slicing the ball created many fracture lines that easily tore loose. The final problem was that the entire tip ended up flying off the cue. The cement I used wasn't formulated to hold this type of plastic.
Oh well, back to the drawing board.
NEW!!! An extreme cure for sweaty hands
For anyone plagued by palms that sweat so much that it makes shooting pool a nightmare, I've heard of a possible cure. Please note that I am not a doctor or in any way connected with the medical profession. I am not recommending any of the following medical procedures.
The following article about excessive sweating contains a reference to a surgical procedure in which the nerve that triggers palms to perspire is cut or cauterized so that the associated palm no longer sweats. However, I don't know what is meant by "palm" in this article. If a "palm" does not include the inside of the fingers and they still perspire after the operation, then this may not be enough of a cure for billiard players. Mention is also made of some medicines that may reduce sweating.
(Note: If you live in hot moist area like Florida, your problem may be related more to environmental humidity than excessive perspiration.)
The following was copied from http://www.sts.org/doc/4097#6, a US government medical information service. Once you get to this site, roam around a little and you may find some other non-surgical options.
HYPERHIDROSIS
Description By: Keith Naunheim, MD
WHAT IS HYPERHIDROSIS?
Hyperhidrosis is a disorder
characterized by excessive sweating that occurs
in up to 1% of the population. The
excessive sweating can occur in the hands
(palmar hyperhidrosis), in the
armpits (axillary hyperhidrosis), or in the
feet (plantar hyperhidrosis).
Although nobody understands the exact cause of
this excessive sweating in
specific individuals, it is known that the
sweating is controlled by the
sympathetic nervous system.
WHAT IS THE SYMPATHETIC NERVOUS SYSTEM?
The human body possesses two
different sets of nerves: the somatic nervous
system and the autonomic system.
The somatic nervous system is the system of
voluntary nerves that give us
sensation (pain, heat, and touch) as well as
the control of our muscles that
allow us to move the different portions of
our body at will. The autonomic
nervous system, on the other hand, is the
involuntary nervous system. Many
of our bodily functions occur without
conscious control such as the rate
at which we breathe, the beating of our
heart, and the production of
sweat, which is important for regulating body
temperature. The autonomic nervous
system is made up of two components: the
sympathetic and the
parasympathetic systems. It is the sympathetic nervous
system that controls the sweating
throughout our bodies.
WHAT CAUSES THE SYMPATHETIC SYSTEM TO MALFUNCTION?
Although there is ongoing research
investigating this abnormality, it is not
known what specific defect occurs
that results in excessive sweating.
Whether it is the over activity of
the sympathetic nervous chain or the
sweat glands themselves is uncertain.
WHAT ARE THE SYMPTOMS?
Patients with hyperhidrosis have
excessive sweating that hampers their
activities of daily living. It is
sometimes brought on by stress, emotion,
or exercise, but can also occur
spontaneously. Patients with palmar
hyperhidrosis have wet, moist
hands that sometimes interfere with grasping
objects. Most patients with palmar
hyperhidrosis also consider it a
difficult social problem since
every time they shake hands, they leave the
other person's palm very moist, a
sensation most people find unpleasant.
Those who suffer from axillary
hyperhidrosis sweat profusely from their
underarms causing them to stain
their clothes shortly after they dress. Once
again, this proves to be very
unsightly and a social disadvantage. Plantar
hyperhidrosis is the excessive
sweating of the feet and leads to moist socks
and shoes as well as increased
foot odor.
WHAT IS THE TREATMENT FOR HYPERHIDROSIS?
The initial treatment for
hyperhidrosis is usually medical and does not
involve surgery. There are
ointments and salves available (i.e., Drysol)
that are astringents that tend to
dry up the sweat glands. Another treatment
is iontopheresis. This consists of
a treatment of electrical stimulation,
usually in the hands. Patients
place their hands in a bath through which an
electrical current is passed. This
treatment tends to "stun" the sweat
glands and can decrease the
secretion of sweat for periods of 6 hours to one
week. One of the most recent
treatments proposed is the injection of
botulinum toxin (Botox) into the
area of excessive sweating. This is a toxin
that affects nerve endings and
decreases the transmission of the nerve
impulses to the sweat glands thus
resulting in decreased sweating. It
generally requires several
injections in the palms or underarms and it
remains effective from one to six
months. Repeated injections are nearly
always required to maintain an
adequate level of dryness.
In addition to the above
treatments, many medicines have been utilized with
varying success. These include
both sedatives (in those patients with
stress-induced hyperhidrosis) and
medications that affect the nervous
system. A family practitioner or
internist often begins the initial
treatment for hyperhidrosis. Cases
not responding to simple treatment
regimens are often then referred
to a specialist such as a dermatologist or
neurologist. In general, surgery
is contemplated only when the less invasive
medical treatments have failed to
provide adequate treatment.
WHAT SURGERY IS PERFORMED TO TREAT THIS CONDITION?
The surgical treatment of
hyperhidrosis involves destroying or removing a
specific portion of the main
sympathetic nerve. As noted above, the
sympathetic nerves are part of a
separate and parallel nervous system. Their
anatomic location is separate from
the somatic (voluntary) nerves that
control sensation and motor
function. The sympathetic nerve "chain" is
formed by a plexus of nerves
located next to the ribs in the chest. The
spine is made up of vertebra,
which are blocks of bone stacked one on top of
another like building blocks. The
branches that form this sympathetic
"chain" come from
between these building blocks and end in a bundle of cells
called a ganglion. There is a
ganglion at each vertebral level of the spine
and all these ganglions are
attached one to another longitudinally to form
the "sympathetic chain."
A sympathetic nerve branch then comes off each of
these ganglions and travels out to
enervate blood vessels and sweat glands
in the body. The surgical therapy
for hyperhidrosis entails removing or
destroying the specific ganglion
that cause sweating in the arm and the
axillae. There are a variety of
ways of dealing with the sympathetic
ganglions including removing them,
cauterizing them, cutting the branches,
and clipping them. Different
surgeons have been trained in different
techniques and all appear to be
effective in a high percentage of cases. No
specific technique has proven
definitively to be superior to the others.
In order to treat palmar (hand)
hyperhidrosis, the T2 ganglion is removed or
destroyed. Many surgeons will also
remove the third ganglion to maximize the
chance of completely preventing
sweating of the hands. In order to treat the
armpit, the second and third
ganglia are removed or destroyed. Similarly,
some surgeons will also destroy
the fourth ganglion to once again maximize
complete relief from armpit sweating.
In the past, this often required a
moderate to large sized incision in thechest
which required cutting muscles and
separating ribs to expose the
sympathetic chain. However, recent
advances in technology have produced less
invasive methods, such as the
so-called endoscopic thoracic sympathectomy
(ETS), also known as thoracoscopic
sympathectomy. This entails general
anesthesia for the patient. Once
asleep, two or three small (5-10 mm)
incisions are made below the
armpit. Through these holes, a telescope is
passed which is attached to a
miniature video camera. Thus, the sympathetic
chain can be identified. Through
the remaining one or two incisions,
instruments are placed to allow
the surgeon to remove or destroy the
specific ganglions as dictated by
the patient's symptoms. To perform this
operation, the patient's lung must
be collapsed to allow adequate space for
the surgeon to maneuver. Following
completion of the operation, the lung is
re-expanded and the incisions are
closed. Occasionally a small tube is left
inside the chest to allow
evacuation of air, however, this is usually
removed within hours of the
surgery. After one side is completed, the
surgeon then turns his/her
attention to the opposite side and an identical
procedure is performed.
Typically, the patient remains in
the hospital for a period of 12-24 hours
following surgery. There is
post-operative pain following surgery and most
patients will require some oral
pain medication for a period of 7-10 days
following surgery.
WHAT ARE THE RISKS OF SURGERY?
There are certain risks that are
common to all forms of surgery. These
include allergic reaction to
anesthetic agents or drugs, or infection at the
site of operation. Because the
telescope and instruments are passed between
the ribs, it is possible to damage
the artery, vein or nerve which run
beneath each rib. This could
potentially lead to bleeding or inflammation of
the nerve with chronic irritation
or pain. Finally, although the majority of
these operations are performed on
young adults, occasionally older patients
will undergo the procedure. These
patients are subject to the risks of
cardiac problems (heart attack,
abnormal rhythm), stroke, pneumonia, blood
clots, and urinary tract
infections. The incidence of any of the above
potential complications is very
low (1% or less) but such problems can arise
with any form of surgery, and
patients must be aware of all the risks no
matter how small.
There are some potential side
effects of the surgery. The most common of
these is compensatory sweating
which occurs in up to 50-60% of patients. One
must remember that sweating is one
form of regulating the body's heat. If
the operation prevents sweating in
the upper chest, back and arms, it is
possible that patients will notice
a greater amount of sweating elsewhere in
their body in order to compensate
for the lack of sweating in the upper
extremities. This is called
"compensatory sweating" and can occur on the
face, abdomen, back, buttocks,
thighs, or feet. While this appears to be
merely a nuisance for most
patients, occasionally (5-10% of the time) it can
be severe and interfere with the
patient's lifestyle.
A second potential side effect is
gustatory sweating. Patients who develop
this problem note increased
sweating when they are eating. This occurs in
approximately 5-10% of patients
but is rarely severe.
Finally, there is a small but real
incidence of Horner's syndrome (1%). This
occurs when the highest
sympathetic ganglion (the first ganglion or
"stellate" ganglion) is
damaged during the operation. When this occurs, the
patient notes three findings on
the side of the face where the stellate
ganglion was injured. These
include a slight droop in the eyelid, a small or
narrow pupil, and the lack of
sweating on that side of the face. This
syndrome is sometimes reversible
over a period of weeks to months, but may
also prove to be permanent.
Although the incidence of this is quite low
(1%), it is a potential
complication of which all patients should be aware.
Overall, with the exception of
compensatory sweating, the incidence of
complications or side effects
remains gratifyingly low.
WHAT ARE THE CHANCES OF SUCCESS?
The probability of success varies
with the anatomic location of the
excessive sweating. ETS will cure
approximately 95-98% of excessive hand
(palmar) hyperhidrosis and
approximately 75-80% of armpit (axillary)
hyperhidrosis. Approximately 25%
of patients with hyperhidrosis of the feet
(plantar) will note some
improvement, however, the operation is not designed
to treat this disorder and should
not be used primarily if this is the only
complaint.
SUMMARY
Although ETS is overall a safe and
highly effective method of treatment for
the hyperhidrosis syndrome, it
must be realized that it remains a surgical
procedure with the inherent risks
described above. As with most disorders,
non-invasive medical forms of
therapy should be tried prior to surgery. It
is only when these prove to be
unsuccessful or impractical for long-term use
that a surgical procedure should
be contemplated. Once the decision to
pursue surgery is made, patients
would best be served looking for a board
certified thoracic surgeon
experienced in performing video-assisted thoracic
surgery (VATS) otherwise known as thoracoscopy.
[Patient Information Home]
Last revised Jan-20-2000
© 2000 The Society of Thoracic Surgeons.
If you skip down to my Learning to jump article, you'll discover I am not a natural jumper. It took a lot of practice to finally make my first one and that took all my strength. Thinking that part of the problem might be related to the soft thin tip on my Scorpion jump cue I searched around for an alternative. Several visits to billiards newsgroups indicated that phenolic tips are best for jumping. I found three offered by Joseph Picone (Picone Cues) for ten dollars and ordered them.
These tips are very hard and very thick, promising a long life. The first time I jumped with one the cue ball jumped twice as high as I'd ever been able to make it go in the past. After a few more practice jumps, I discovered I could ease off on the amount of power I put into the stroke and still get a safe jump. This provided more flexibility and accuracy. I am totally satisfied with Mr. Picone's jump tips. However, in fairness to other tip makers I have to state that because these are the only jump tips I've tried I can't comment on how well they preform compared to other jump tip brands.
Next to the tip, the shaft is the most important part of a cue. What gives a cue its feel is largely the shape of the taper turned into the shaft. Tapers come in all shapes from straight cone-shaped tapers that tend to be stiff to complex tapers with as many as six different curvatures. Knowing the details of the taper of your favorite cue adds to your overall appreciation of it and enables you to more intelligently predict how a differently shaped shaft might play. Here's any easy technique for measuring your shaft.
1. Use a child's crayon to mark the shaft every inch. (Crayon rubs off very easily.)
![]()
2. Measure the shaft's diameter at each mark with a micrometer or caliper. (Tool stores and hardware stores often care cheap but accurate plastic calipers for as little as six dollars.) If you are concerned about scratching the shaft cover the jaws with scotch tape.
3. Plot the results on graph paper with the diameter on the vertical axis drawn full size and the distance along the shaft where each diameter was measued on the horizontal axis drawn at the scale of one-quarter inch (or one square) per inch. By plotting the diameter instead of the radius you effectively double the curvature making it easier to see. Reducing the length by one quarter helps do the same thing.
4. As you can see from this plot of the taper taken from a Dufferin shaft, the taper follows a complex pattern starting out as a cylinder then turning into a hill that drops off as it merges with the butt's slope. (Please note that the apparent curvature of the bottom line on the left side is an artifact from scanning the graph. It's really a straight line.)
![]()
A comparison of APA and BCA 8-ball rules:
While it's easy to obtain official copies of either APA (American Poolplayers Association) or BCA (Billiard Congress of America) 8-ball rules, comparing them is tricky because each lists the rules in different order and format. What follows is a compilation of both sets of rules. Where the rules are the same for both organizations, no comment is made. Where there is a disagreement, I make a statement to the effect that players need to decide which rule to use prior to the first break then I indicate in boldfaced lettering which rule is APA and which is BCA.
8-Ball Rules
(Consistent
with both APA and BCA officially sanctioned guidelines,
with no
referee present.)
Fouls: A foul occurs when any of the following takes place:
1. Any time the cue ball goes into a pocket (scratches) or permanently leaves the playing surface. (If the pocket is full of balls and the cue ball touches one of them it is considered a scratch.)
2. Failure of a player to contact one of his object balls before hitting an opponent's ball or the eight ball.
3. A player not hitting one of his object balls.
4. Failure to drive a ball (numbered or cue) to a rail after the cue ball makes contact with a legal object ball. Pocketing a ball counts as a contacting a rail. (If the object ball is frozen to a rail, that rail shall not count as being struck.)
(One of the following two rules shall be adopted by the players prior to the first break:)
5a. Accidentally moving the cue ball in any way other than in the execution of a shot or in the case of a player having ball-in-hand. It is not a foul to accidentally move any other ball unless it contacts the cue ball. If another ball is moved, it shall be replaced as closely as possible to its original position. If a numbered ball is accidentally moved and it then touches the cue ball, it is a foul. (APA rule.)
5b. Touching any ball in any way is a foul, other than the cue ball by the tip of the cue in the execution of a stroke or while positioning the cue with ball-in-hand. Moved balls shall be returned to their original position. (BCA rule.)
6. Jumping the cue ball into the air by miscuing under it.
7. While positioning the cue ball during ball-in-hand, it is a foul to have it, or the hand holding it or any instrument used to position it, contact another ball.
8. Receiving coaching from anyone during a player's turn at play, except from an official coach when permitted.
9. Jumping a numbered ball permanently off the table. If the eight ball is jumped off the table it is loss of game.
(The players shall elect one of the following two rules prior to the first break.)
a. Numbered balls permanently jumped off the table are not respotted. (APA rule.)
b. Numbered balls permanently jumped off the table are respotted. (BCA rule.)
10. Striking the cue ball with the cue twice (double hit) because the cue ball rebounds off an object ball or the rail and back into the cue.
11. If the cue ball is pushed by the cue, with contact being maintained longer than the momentary time commensurate with a stroked shot.
12. Two intentional fouls, such as striking a ball in anger after missing a shot, shall result in forfeiture of match. (BCA rule.)
13. The table shall be considered "set" five seconds after the last ball moving comes to a complete stop. Any ball hanging in a pocket that falls in after that time shall be replaced as closely as possible to its original position. If a hanging ball falls into a pocket after the cue ball is stroked but before the cue balls touches it and the cue ball travels through the place previously occupied by the ball, both balls, and any other hanging balls that might have fallen in, are to be replaced and the shot replayed. (BCA rule.)
14. Shooting with both feet off the floor.
All balls pocketed on a foul remain pocketed.
Foul Penalty: When any of the above fouls take place, the penalty shall be loss of turn and cue-ball-in-hand for the incoming player. The only exception shall be on the break, in which case the incoming player has ball-in-hand behind the head string.
Fouls must be called prior to the next shot. If it isn't, then the foul shall not count.
Only one foul is counted for any shot. In the case of multiple fouls, the most severe will be counted.
The Breaking Player: The first breaking player shall be determined by lagging. Thereafter, subsequent breakers shall be one of the following: the winner of the last rack, the loser of the last rack, alternate breaking regardless of the outcome of previous racks, or the player trailing in the number of games won, as agreed upon by the players prior to the first break.
Prior to the first break, the players shall agree on which of the following break rules will be in effect:
a. If the break does not qualify as legal, the balls are reracked and the same player breaks again. This continues until a legal break occurs. If the break is not legal and results in a scratch, the balls are reracked and the opposite player breaks. (APA rule.)
b. If the break does not qualify as legal. it is considered a foul. The opposite player has the option of playing the table as is exists or having the balls reracked with the option of breaking or having the original player break. (BCA rule.)
The Rack: The balls shall be racked with the one ball on the foot spot and alternating pairs of striped and solid balls down both sides of the rack. The eight ball shall be in the center of the rack. The two rear corner balls shall be one stripe and one solid ball. The rack shall be such that all the balls are in contact. The breaker has the right to inspect the rack and request a rerack.
The Break: A legal break shall consist of the following: The cue ball shall be placed behind the head string, the breaker shall strike the cue ball with a cue and drive it directly (without first contacting a rail) into either the one ball or one of the two second balls, at least four balls (not counting the cue ball) shall be driven to a rail or at least one ball (not counting the cue) shall be pocketed.
After the Break:
A foul on the break results on ball-in-hand behind the head string for the non-breaking player.
(Prior to the first break the players shall elect one of the following two rules:)
a. If the breaker pockets a ball on the break he continues shooting the same category of balls he just made. If one of each category is made, the player has choice of category. If one ball of one category and two of the other are pocketed, the player still has choice of which category to shoot. If on the next shot one ball of each category is pocketed, the player retains choice of category regardless of the order in which the balls fell into the pockets. (APA rule.)
b. If the breaker pockets a ball on the break he continues shooting and is free to select either category of balls to shoot regardless of which balls were pocketed on the break. (BCA rule.)
If no balls are pocketed on the break the other player has the table.
Prior to the first break the players shall elect one of the following rules:
a. If the eight ball is pocketed on the break the breaker wins that rack, unless the cue ball is also pocketed in which case he loses. (APA rule.)
b. If the eight ball is pocketed on the break, the breaker may ask for a rerack or request that the eight ball be spotted and continue shooting. If the eight ball and cue ball are both pocketed the breaker loses his turn. The incoming player has the right to have a rerack or have the eight ball spotted and continue shooting with ball-in-hand behind the head string. (BCA rule.)
Call Shot: Prior to the first break the players shall agree on whether it is required to call their shots. If they do, all that is required is to state the object ball and the pocket into which it shall go. Obvious shots need not be called aloud. Bank shots and combination shots are not considered obvious. When calling a shot it is not necessary to state the details; caroms, kisses, banks, etc.; of the shot. The opening break shall not be considered a call shot. If the called ball goes into any pocket other than the called pocket, it is loss of turn for that player. The pocketed ball is not spotted.
Play and winning: Players shall continue shooting as long as they make legal shots that result in pocketing one or more of their category of balls. After all of their balls are pocketed they may shoot on the eight ball. The intended pocket shall be indicated by placing an object other that the chalk by that pocket. If the shooting player makes it without scratching he wins the game. If the eight ball goes into a pocket other than the indicated pocket it is loss of game.
Ways to lose:
1. Your opponent legally pockets all of his balls followed by a legal pocketing of the eight ball.
2. You pocket the eight ball out of order (except on the break) or knock it permanently off the table.
3. You pocket the eight ball in a pocket other than the called pocket.
Prior to the first break the players shall elect one of the following two rules:
4a. You lose if you scratch while shooting at the eight ball whether or not the eight ball is pocketed. (APA rule.)
4b. You lose only if you scratch and the eight ball is pocketed. (BCA rule.)
5. You foul the cue ball then pocket the eight ball. (Note: If you foul the cue ball, such as the cue ball not contacting the eight ball, it is considered a non-losing foul. You lose your turn and your opponent has ball-in-hand. This is not loss of game.)
6. While pocketing the last ball of your category you also pocket the 8 ball.
While considering having new cloth put on my table (Simonis 860, of course) I started wondering about having the pocket openings cut as tight as they are for the professional tournaments shown on television. The problem was finding out the dimensions of pro pockets. I emailed Olhausen and Brunswick with this question and neither offered an answer. I wrote into three billiard newsgroups and no one there could say for sure what they were supposed to be. I even got on Allison Fisher's website and asked her, not really expecting an answer. I was very pleased to hear back from her in just a few days. She didn't know the dimensions but did say that they were cut on the small end of the legal range. Finally, a table recoverer at Billiards and Barstools dug out his master set of directions and found the following pocket dimensions:
Corner
pockets:...
jaws . = 4.875
to 5.125 inches
........................
throat = 4.000 to 4.250
Side
pockets: .....
jaws ..= 5.375
to 5.625
........................
throat = 4.375 to 4.875
He then explained that pro pockets are cut to the smallest of the above dimensions and most private, club, and pool hall tables are cut to the maximum dimensions.
On March 10, 2005, Mr. Sam Spector emailed me the BCA's URL for official pocket dimensions. It turned out the information I'd been given by Billiards and Barstools was wrong in that whereas they said the maximum corner pocket jaw spacing was 5.25 inches, the BCA rules state that it is 5.125 inches. I would like to hank Mr. Spector for helping me correct this mistake. (Thanks, Sam!)
Anyone wishing a complete set of BCA equipement dimensions can obtain them from http://bca-pool.com/play/tournaments/rules/equip.shtml.
I decided to see what I had on my 9-foot Olhausen Provincial table. The corner pockets are cut with 4.875 inch jaws (the minimum) and the throats are 4.250 inches (the maximum.) This means the sides of the corner pocket openings are almost parallel, which explains why so many balls tend to bobble in the opening. It could be worse. If they had the widest legal jaw spacing with the minimum throat spacing incoming balls hitting the sides would tend to deflect outward.
The side pockets were even tighter:
jaws:
= 5.125 inches
throats:
= 4.5 inches
The jaws are slightly undersized.
This means that my table has pockets cut as tight or tighter than those used in professional tournament tables. This is good for two reasons: first, it forces me to play a very tight game; second, it gives me a good excuse when I miss a shot.
I've heard of temporary wedges that can be placed in pocket openings to reduce them to professional dimensions. Depending on how the pockets are cut, these wedges might make the pockets much smaller than even Karen Corr would want to shoot.
Read the wood quality section in several custom cue maker sites and it becomes obvious that many makers are lamenting the scarcity of old, slow-growth hard rock white maple for making cue shafts. Prized for its beauty and strength, this wood has long been the first choice of wood workers, cue makers in particular. The best shafts, laminating not withstanding, are make from those sections of old trees that grew very slowly, resulting in a high number of very straight grains, or layers, per inch. Pedestrian quality shafts like those found in bulk produced cues may have as few as eight grains per inch. Good quality shafts may have up to 16. The very best woods can go as high as 32 grains per inch. Also important is the straightness of the grains. Cheap shafts made from poor quality lumber will have grains that wave up and down along the length of the cue's shaft. Top end cues should have shafts with arrow-straight grains.
It's easy to determine the quality of the wood in a cue shaft. Start by looking at the shaft as it's slowly rotated. When the darker lines that represent the boundaries of the grain look like "V"s, you are looking down perpendicular to the layers of wood, like looking down on a stack of papers, as shown below.
Rotate the shaft 90 degrees and you will be looking at the edges of the grains.

The picture above shows the grain pattern for an inexpensive cue. The grain count is only ten per inch and as can be seen the grains are not straight. This is a shaft that will be much more likely to be warped or become so over time.
I am not an expert on wood or cue making, but it seems to me that the best made cues are likely to be made with the best materials. Inquiring about the quality of wood used for making the shafts might provide purchasers with valuable information for selecting which cue maker to buy from. Many custom cue makers possess private reserves of top quality shaft wood with high grain counts that are arrow straight. Talk to them and with a little coaxing they might break free with some of it for you.
Meucci's Myth Destroyer robot versus Predator's Iron Willie
Jim Collins sent me an email with a discussion between himself and Tony Mathews regarding cue ball deflection and how it may be effected by the nature of the mechanical bridges on the Meucci and Predator robotic cue testing machines. I spent some time looking at each machine and reading the descriptions of them to see how they might bias shaft performance.
First, let's look at a real bridge. The human hand is composed of soft tissues, hard bones and flexible joints which permit the cue shaft to move sideways when a stroke contacting the cue ball off center creates a sideways force on the bridge. The amount of sideways motion depends on how tightly the shaft is gripped by the bridge fingers. In my case (I suspect I have a loose bridge) an estimated 3 ounces of sideward force on a cue shaft deflects the tip 1/8 inch. If I tighten down, 6 ounces of force is required to produce the same amount of tip deflection. The amount of tip deflection varies greatly from person to person and even with the same person as his or her bridge changes to accommodate different strokes. If a slight change in the bridge causes the shaft to rest against hard bone and the hand is locked into position the amount of sideways motion will be less than a loose fleshy grip. Making things even more complicated is the fact that because the fingers grip the shaft nonsymmetrically, the amount of sideways motion caused by bridge flexure and compression varies depending on which direction the sideways force pushes against the hand.
Next I considered shaft bending. The test cue I used was a Dufferine Rainbow Blue. It took approximately 12 ounces of bending force to produce 1/8 inch of cue tip deflection.
These admittedly unscientific tests suggest that 60 to 80 percent of the cue tip deflection results from compression and/or flexure of the bridge. Under these conditions, a light weight tip would reduce the cue's sideways inertia and permit it to move more easily to the side. This should reduce cue ball squirt because the cue moves away from the cue ball and therefore can't push on it sideways as hard as if it were heavy.
What does this mean for the robots? It's hard to tell. Neither the Meucci site nor the Predator site explains their bridge mechanisms well enough to clarify how well they simulate a human hand. The clearer and more detailed pictures on the Meucci site permit some speculation, but that's all.
Meucci doesn't say anything about the bridge on his robot. However, careful examination of several of the pictures of the machine suggest that the cue is held in a holder that is both non-flexing and massive. This suggests that most of the cue tip deflection is the result cue flexure. This does not seem to accurately represent real world shooting.
The Predator site provides even less information on their robot's bridge. The one picture they offer is so indistinct and poorly lit that details are impossible to distinguish. Their written description states that the bridge's tension and grip can be adjusted, but they don't explain what this means so it doesn't really say anything. If this statement means to imply that the amount of side pressure (tension) and the softness or compressibility (grip) can be adjusted to approximate the human hand, then all else being equal their machine might better replicate a human bridge than Meucci's. However, if that were so then they'd have to explain how the tension and grip were set and how closely this matches a human hand. They could adjust these parameters to be either much tighter and harder or looser and softer than a real human bridge. Being set too tight would over emphasize shaft bending as the Meucci machine appears to do.
In the end I'd have to say that neither site provides enough information for anyone to judge which is using a robot that honestly models a human bridge and hence, which shafts perform as advertised when placed in human hands. I can understand why these companies want to keep the buying public as ignorant as possible. They both want to convince people to purchase their products and slanting tests and test results, even if unintentional, to favor their particular products is the best way to do this. An informed public would be able to see through their biases and be free to select the best cue on actual performance.
As a research engineer I'm frustrated by the lack of objective data on cue performance and how it relates to actual play. It's almost enough for me to want to build my own robot and publish the results. Since I don't have any brand preferences it would be unbiased and most importantly, open to public criticism and modification.
Important
update!
I am deeply grateful that Ms. Mayes took the time to review this article and send me her thoughts. In appreciation of this, I sincerely hope that everyone visiting this page gives her excellent site a look. It is one of the two best sites of the 145 on the link list below. Ms. Mayes has her own robotic testing machine, which she frequently takes to the Fast Eddies Tour in the Houston, Texas area. She uses it to test players' ques with their shafts and with one of her AO shafts to show how much her shafts reduce cue ball delection.
No matter how often you brush or vacuum a pool table, eventually stains and chalk marks will build up to the point where the cloth is just plain ugly to look at. Worse still, excessive chalk imbedded in the cloth may begin to effect play. For my own table I've found I can achieve a deep cleaning that gets all chalk marks, most stains, and any imbedded chalk out of the cloth. Since this involves completely wetting the cloth I am not recommending it because there is always the possibility that such a treatment could damage the cloth, the table, or the filler used to smooth slate joints. I would definitely not recommend it for any table that does not have a slate bed. Having thus warned you, I have to say that I've used this technique dozens of times on both the pedestrian cloth that my table came with and Simonis 860 without damaging the table or cloth.
In essence, I steam clean it.
The first step is to thoroughly brush and vacuum the cloth. While vacuuming I'm careful to use a head without bristles that has a smooth face so that the cloth is not abraded.
Next I use a soft hand towel to work hot water into the table cloth, soaking it thoroughly. This isn't as easy as you might think. Chalk on the cloth tends to repel water so it doesn't penetrate quickly. Stains and heavy chalk marks get a very gentle rubbing, but I go lightly to prevent roughening the surface.
Next I use a wet vacuum to suck up the water, moving slowly to draw as much liquid up as possible.

Afterward the table looks like a battlefield because the amount of remaining moisture isn't uniform. Worse still, the room smells like a sheep farm after a warm rain.

The right hand glass above shows what the water looked like going onto the table. The left shows what it looks like after it's been drawn off, proof that even after brushing and vacuuming there's a lot of dirt left on and in the cloth. It takes over a gallon of water to clean a nine-foot table.
After letting the table dry for 24 hours, being careful not to put anything on it because that would create a dent in the wet cloth, I give it one last brushing to make sure any nap is laying in all in the same direction and the table is ready for play.
One nice thing about this procedure is that any crushed spots on the cloth from jump shots or where the cue ball is placed for breaking tend to be erased.
The only stains this technique doesn't seem to be able to lift are those caused by the oil from the tips of my fingers where I position a Sardo Tight Rack. In striving to precisely position the rack in exactly the same location every time, it's inevitable that my fingers rub that same spots on the cloth, depositing oils which lock up chalk and dirt. Another stain that resists this process is a chalk mark left by green or blue Master chalk. I swear they put something in that stuff that glues it to the cloth. Adding a little wool-safe soap eliminates both of these problems. After suctioning the soapy water up, I soak the cloth with clear water and repeat the suctioning process to make sure no soap residue it left on the cloth.
I've done this to my present cloth six times and it hasn't stretched. Each time that cloth plays like new.
Note: I've tried some spray-and-wipe pool table cleaners and have not been impressed. None of the ones I tried did a good job of cleaning the cloth, they can leave rings if sprayed too heavily, and they tend to leave a residue which builds up over time.
Three
types of billiard balls measured and compared
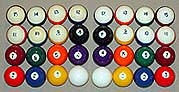
After sixteen years of service I decided to retire the set of balls (left) I got when I purchased my table and replace them with Brunswick Heritage balls (right). While there are better sets available, I'm used to the colors and design of these. Although it may not be obvious in the picture, the new balls on the right appear noticeably larger than the old balls. In point of fact they are. The Brunswicks measure 2.236 inches in diameter whereas the old balls are only 2.222. (Please note that both are below the 2.25 inch diameter balls are supposed to be.) It's hard to believe the human eye can pick out such a slight difference. The old balls average 264 grams each and the new balls average 265 grams.
One of the things immediately obvious is that the new cue ball holds onto it's spin much longer than the old one. I attribute this to the simple reason that even when both are equally clean, the Brunswick is significantly smoother.
The salesperson from whom I purchased stated that the old balls I got with the table were probably cheap balls manufactured in China, which is why they were so small.
I tried to sense any difference in "feel" during play between the old and new balls but couldn't. However, I did notice a marked difference in the amount of throw and push that could be transfered to the balls. The new balls threw and pushed one half as much as the old balls, even after the old balls were thoroughly cleaned. I assume the reason for these differences is that the surfaces of the old balls have become roughened over the years.
Important note: While I expected that the new cue balls would have a greater tendency to miscue because it was smoother, I was surprised at how often it still happened. The old cue ball was still shiny and smooth but I could strike it a good one and three-quarters of a tip diameter off to the side and still hold it. With the new cue ball it's dangerous to venture out much further than one tip diameter.
NEW!!! A third set of balls is tested!
With the purchase of my new Gold Crown IV table I decided to upgrade to professional-grade Centennial balls by Brunswick. I really wasn't expecting any significant physical difference, but in this I was pleasantly surprised. Using a dial caliper I discovered the the Centennial balls are exactly 2.25-inches in diameter, not undersized like the previous sets. Second, the variation from ball to ball is almost nil. Whereas the other two sets varied by plus or minus 0.005-inches, the Centennial balls were plus or minus only 0.001 inches. This is outstanding.
The one oddity about the Centennial balls is that the red #3 ball was 0.005-inches smaller than all the other balls. Since I was in the store while measuring them, I checked two other sets of Centennials and in each case the #3 ball was undersized by 0.004 or 0.007-inches. Perhaps there is something about the red dye that causes the balls to shrink after molding. (Funny thing: somehow the sets got mixed up and I accidentally ended up with the best balls from each set. Hmm...)
The Centennial balls averaged 271 grams, slightly heavier than the previous sets.
It may not seem like such small differences matter, but consider that because the Centennial balls are 6-grams heavier than the Heritage balls they will have 2-percent more linear inertia. Combine this with a 6-percent greater rotational inertia (the greater increase is the result of both the weight and diameter being larger) and the total 8-percent increase in inertia means that starting at the same speed the Centennial balls will roll 8-percent farther, that's 17-inches more travel when a lagging on a 9-foot table.
NEW!!! Cue ball wear!
Before using my new Centennial balls, I carefully examined the cue ball. After shooting 80 racks I did so again and discovered a couple of interesting things:
1. Although I'd hit 80 hard breaks with it there weren't 80 abraded spots on it. This suggests that straight-on shots, even when they are very hard, do not wear on the ball.
2. But, I did miscue three times during these 80 racks and sure enough, there were three small abrasions on the cue, suggesting that sliding hits are potentially damaging. Closer examination of these three abrasions showed that in each case there were several parallel scratches, prove that the worse damage results from the cuetip violently sliding over the surface of the cue.
Besides being unattractive, abrasions on the cue can greatly increase the drag on cue balls stroked with English. I found that most of these abrasions can be removed by using a finger with a small amount of toothpaste on it to polish out the rough spot. Taking the cue to a professional ball polisher is preferred, but his is something I found that works in a pinch.
Testing
a billiard ball cleaner
When I purchased a new set of balls, the clerk mentioned that they needed to be cleaned with a special cleaning/polishing solution that supposedly deposited a smoothing coat on the balls. This gave me some concern because this coating might come of on the table cloth. This product is named "Aramith Billiard Ball Cleaner" and is made by Saluc. It's a white creamy liquid that's as thick as hand cream. As it's rubbed on a ball you can feel a few specks of grittiness that quickly dissipate. While I thought the breaking down of the particles of grit indicated that they are much softer than the balls, I got concerned that it could abrade them. I tested it on a piece of plexiglas. After rubbing a little on a scratch-free area, I washed it off and could easily see that a hazy area had been worn into the surface indicating abrasion had taken place. Perhaps billiard balls are so much harder than plexiglas that the grit in the cleaner won't scratch them, but that's not a risk I'm willing to take.
Once while having my table recovered, one of the technicians noticed that I was using Windex to clean my billiard balls. He commented that such products, especially if they contain ammonia, tend to open up the pores in the plastic's surface and can cause warping. He recommended a liquid car wax, making sure to buff off all the wax so it doesn't get transfered to the cloth.
I'm sure someone somewhere has said this before, but in case they haven't here it is:
GOD CREATED BILLIARDS TO KEEP MAN HUMBLE.
And another:
It's
more
important to practice good shot making
than
it is to practice making shots.
An easy-to-build shaft tester and 11 cue shafts compared for straightness
While rolling a cue on a table is the time honored way to test for straightness, it suffers from the weaknesses of the assumption that the table is flat and that rolling can only detect large warps. A much more sensitive test is to preform the same roll test but instead of looking down at the cue, look at it from a low angle with bright light shining down on the opposite side of the cue. Observe the thin line of light between the tabletop and the shaft. Because this wedge of light passes under the cue at a sharp angle and is reflected toward you by the table, the apparent width of the line of light is magnified. This magnification easily quadruples the appearance of any shaft warp, making it easier to spot. Again, this test is limited by how even the table is.
Both of these tests also suffer from the fact that the end of the shaft rolls on the edge of the leather tip. If the tip has mushroomed and isn't perfectly round and symetric with the ferrule it can make a straight shaft appear warped.
I decide to design a cheap but accurate shaft tester.
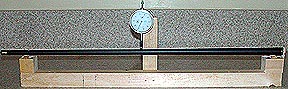
I built this simple shaft straightness tester in only 1/2 hour at a cost of twenty-two dollars. The frame is 2 x 2 inch kiln dried douglas fir. The shaft rests in grooves filed into soft pine holders spaced twenty-five inches apart. These holders are positioned so that the measuring shaft of a twenty-dollar dial indicator contacts the centerline of the shaft. There is a wooden stop at the right end against which the joint end of the shaft is pushed. With a shaft in place, I slowly rotate it and note the difference between the high and low readings, which tells provides the magnitude of the warp in thousandths of an inch.
As crude as this setup sounds, and I freely admit that in person it looks even cruder, the tester can easily detect shaft curvatures of less than one-thousandth of an inch.
The spring load of the indicator's measuring shaft is too small to effect measurements.
So, what does this tester have to say about various shafts? Some very interesting things. Here are the results of testing the shafts I had access to:
The five one-piece Dufferins I got with my table were all bowed, with warps ranging from 0.020 inches to one with an incrediable 0.056 inch warp over the 25-inch length of shaft that the tester spans.
The shaft of a two-piece Dufferin had a 0.016 inch warp. This was interesting because this was barely detectable in a roll-the-cue-on-the-table-while-looking-down-on-it test. This indicates that the basic cue rolling test is only good for warps greater than 0.015 inches. Rolling the cue while looking at the light passing under it made the 0.016 warp very easy to spot, suggesting that this more sensitive test is good down to warps of 0.004 inches.
The next shaft I tested was from my Scorpion jumping cue... and I was in for a surprise. As I rotated the shaft the dial indicator jumped all over the place. At first the readings made no sense, but then I discovered a pattern. What it told me was that in addition to a 0.007 inch warp, the shaft was also out of round by 0.008 inches in diameter. It was oval shaped with the warp bending along the small diameter of the oval.
A Cuetec had a 0.027 inch warp.
A Viking had a 0.010 inch warp.
A Schmelke had a 0.011 inch warp
A Balabushka had a 0.006 inch warp. (This is outstanding.)
(Important note: The cue sampling above is far to small to be statistically significant. You would have to test dozens of cues from each manufacturer and do it over a long period of time to characterize the average straightness of their shafts.)
Another note: After several months the Viking shaft warped so badly it was unplayable.
I have also been able to test five Meucci black dot shafts: They tested out at 0.002, 0.004, 0.009, 0.014 and 0.022-inches of warp. The first three looked outstanding, but within 6 months the 0.009 shaft had warped to an unacceptable 0.017-inches. Two straightening attempts have brought it back to playability but I have little confidence in its stability.
NEW!!! The Dieckman shaft has arrived! Read how it tested out!
In January of 2006 I decided to see how much a shaft from a custom cue maker would cost and how much better it was than shafts from production houses. After an extensive search through all the cue makers in my link list, it was clear that Dennis Dieckman (Dieckman Cues) provided the most complete explanation of how he selects shaft wood, ages it, and slowly (over a period of years) turns it into a shaft. I contacted him and after several conversations he helped me decide on the best shaft for me. Once this was done, he checked his stock of nearly-complete shafts and suggested two that sounded like they'd fit my needs. After another discussion we decided on a proto-shaft made from 10-year wood (related to the fineness of the grain structure). He said it would take 6-months for the final turnings, aging, and finishing. When I asked how much it would cost I was amazed that it was less than what many production companies charge for their shafts.
The shaft arrived ahead of schedule heavily padded inside doubled-boxes to keep it safe. It was in perfect condition and even came with two extra water buffalo leather tips.
So how good is this shaft by Dennis Dieckman? Simply put, it is without question the finest shaft I have ever seen, measured, or handled. The warp is less than 0.001-inches. This is so straight that it challenged my ability to measure it. In fact it's more likely that what I measured has more to do with the inaccuracies of my equipment or technique. That anyone is able to achieve this high a quality starting with a piece of natural product is unbelievable.
The wood itself is perfectly straight-grained the entire length of the shaft.
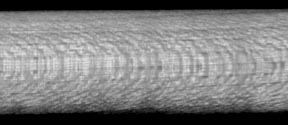
The greatly-magnified image above of the shaft taken near the tip shows a grain count of 10 layers over a 13mm diameter. (I had to turn it into a black-and-white image and increase the contrast to make the grains visible. In person they are so fine and uniform that they are almost impossible to see.) This works out to an incredible 20 grains per inch. This means that the tree from which this piece of wood came from grew very slowly and evenly, ideal for the highest quality shaft. What this proved to me was that not only is Mr. Dieckman a first-class artisan, he also knows good wood when he sees it.
All this sounds great but how does the shaft feel and play? The combination of the shaft and tip are perfect for me in that they provide a very solid, mellow sensation when stroking the cue ball. It fills me with a sense of confidence that I've never felt with any other shaft. I couldn't be more pleased with the shaft and if I ever need another one I will purchase it only from Dennis Dieckman.
Experiements in shaft straightening
It occurred to me that with the application of a clamp the shaft tester could be converted into a shaft straightener. Such a device might be useful for someone with an faithful old shaft which, for reasons of age or climate change, has developed an unacceptable amount of warp.
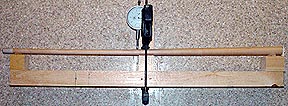
I started with the shaft from a two-piece Dufferin. I positioned the shaft so that it warped up then used a clamp to apply a sufficient downward force to bend the shaft 0.200 inches opposite to the direction. (This is what is pictured above. As you can see, the amount the shaft is bent is less than I've seen professional players bend their shafts after breaking as they press them against the table. I use rubber pads to make sure the shaft doesn't get dented.) Afterward, retesting showed that the warp had been reduced from 0.016 to 0.005 inches. This sounds good but six hours later the warp had crept back to 0.013 inches.
The next test used the same amount of antiwarp, but this time it was maintained for ten hours. The immediate result is that an anti-warp, or reverse warp, of -0.005 inches had been introduced. This is good because as the wood relaxes this will dissappear. It did. Two hours after being released the shaft had a positive warp, in the original direction, of 0.006 inches.
I returned the shaft to the straightener, this time with enough force to bend it 0.300 inches in the opposite direction as the warp. I left it there for two hours. After six hours of relaxing the cue leveled out with a 0.005 inch warp. I decided this was acceptable.
Twenty-four hours later the warp was back to 0.010 inches. After several days of experimentation I came to the realization that shaft straightening is like using orthodontics to straighten teeth: it takes time. After a week of nightly straightening sessions I've gotten the shaft stable at 0.004 inches of warp.
Heat is often used to speed the straightening or bending of wood. I did not employ it here because there was a chance it could damage the finish.
It's doubtful whether this technique would work on composite shafts if the warp was built into them during the manufacturing process.
Additional
test results
I regret to report that my studies of shaft straightening have shown that using a reverse-flexure technique, at least without heating the shaft, is not an effective technique. While repeated nightly reverse bendings can reduce and even eliminate a warp, it's only for a short period of time.
My second test shaft started with an initial warp of +0.016 inches. After ten hours of bending the shaft in the opposite direction I recorded how the shaft responded after being released from the frame. Immediately after being released from the bending jig the shaft had a warp in the same direction that it was bent, that is to say in the opposite direction of the initial warp, of -0.005 inches. Over the next ten minutes the shaft slowly relaxed until the warp was +0.005 inches. After that I thought it had stabilized. Further measurements over the next 12 hours showed that the warp slowly increased to +0.010 inches. I then returned to shaft to the bender. The following day the shaft started out with a -0.007 inches of warp, relaxed in ten minutes to +0.004 inches, and by the end of the day was back to 0.009 inches. I repeated this process two more nights in the hopes of overcoming the shaft's tendency to return to it's original warped condition. In the end, I was able to have the shaft remain at a warp that was essentially zero for most of the day. By the end of the day a few thousandths of an inch would creep back. I then stopped the nightly bendings and let the shaft relax over the next two months. When I retested it the original 0.016 inches of warp had returned.
What these experiments suggest is that without heating a shaft to straighten it, I doubt that a warped shaft can be fixed. Even if someone was willing to go through the hassle of placing his or her cue shaft in a bending jig every night in an attempt to keep it straight, they would end up with a shaft that would slowly increase the amount of warp while they were playing.
Since the amount of heat required to cause wood to accept a permanent bend is likely to be enough to damage the finish and perhaps even the stabilizers most cue makers use, I doubt that this is a viable option.
I'm considering my experiments into shaft straightening at an end. It's unfortunate that they didn't produce useful results.
A second attempt at shaft straightening
Six months after I got my Meucci Blackdot Bullseye shaft I retested it for straightness and discovered that its once outstanding warp of only 0.002 inches had grown to an unacceptable 0.017 inches. That's bad enough to be seen easily as a wobble when it's rolled across a table. Although Meucci offers to exchange any shaft that warps within one year, I'd had so many problems with the Meucci factory that I didn't want to have any more dealings with them. Besides, considering the number of marginal shafts they'd sent me in the past it was doubtful that the new one would be any better than the old one. I decided to attempt to straighten the shaft.
I repeated the process of reverse bending the shaft every night for between 3 and 12 hours. After two weeks the warp had only been reduced to 0.013 inches. A more drastic procedure was needed: heat.
The question is: How much heat? Too much and the finish could be ruined or the glue between the laminations might soften. I was also worried about the effect of heat on the inlays, ferrule and tip. For starters I decided that I wanted to stay below the temperature of boiling water. Even though the wood had been dried before laminating, there is still some water in the tissues. If it turned to steam it could blister the finish.
In the end my oven decided for me. It's lowest operating point is 170 degrees F. I'd start here and see what happened.
I locked the shaft in the tester, located the point of maximum warp, applied an antiwarp of 0.300 inches and left the shaft in the oven for 20 minutes. I took it out, let it cool, and measured the warp... and discovered that I now had a warp of 0.094 inches in the opposite direction of the original warp. It would seem that applying heat is a very effective tool, almost too effective. (I'm glad I hadn't left it in the oven for three hours as planned.)
After several more experiments, I discovered that the best technique was to warm the shaft up by itself in the oven for ten minutes being careful to place it on a thick layer of soft, oven-safe insulating material so that it doesn't come in contact with the sides or bottom of the oven, which can get much hotter than the air. Then take it out, place it on the tester, locate the position of maximum warp, and apply an antiwarp of 0.400 inches and hold it for two to five minutes depending on the amount of correction needed. After working with the shaft for an hour the warp had been reduced to an amazing 0.0015 inches. Best of all it was stable and didn't rewarp over time.
I repeated the process with the Blackdot shaft of the breaker and the solid wood shaft to my old Dufferine. In both cases I was able to quickly and easily effect an improvement in the shaft's straightness. Since the Dufferine was not laminated it would seen the process works for all wood shafts.
While working on these experiments I noticed two oddities. First, even though a heat-straightened shaft appears stable (I've only been playing with the cues a couple of days as of the posting of this report) if it's reheated when it comes out of the oven the original warp will have returned. Second, sometimes the direction of the maximum warp rotates as much as ninety degrees from it's original vector. It's rather like a gyroscope, you push it in one direction and it turns in the other.
Since I've only worked on three shafts I have to warn anyone thinking of attempting this technique that I consider it very experimental and potentially hazardous to the shaft. Although I have not noticed any change in the shaft's smoothness, the finish, ferrule, tip, or inlays, I may have just been lucky.
NEW!!! I've discovered a problem with the shaft-straightening technique just discussed. While it's true that it can remove the warp measured on a shaft tester, that does not mean that the shaft is straight. When a shaft warps it does so evenly along the entire length of the shaft. But, when a heated shaft is bend to remove this warp it bends the greatest amount where the shaft is the thinnest: in the forward half of its length. This means that while a straightened shaft may test perfectly straight on a tester, it may actually have a an "S" shape where the center, or null, of the "S" is the location of the tester's sensor. Such shafts may or may not show a wobble when rolled on a table. How such a shallow "S" curve affects play and if it is better or worse than a smooth warp is something I haven't been able to determine. I have made 15-ball runs with the cue so the problem, if it affects play, is probably not significant.
Important warning!!! The shaft straightening technique mentioned above is strictly experimental. I don't encourage anyone to try it on their shafts.
Cue
manufacturer's link list and site review (Comments
like "No technical data" mean I couldn't locate any
numerical data on performance after looking through all pages on that
site. I apologize to any site owner who has this information and I
missed it. I will be more than happy to correct my comments if such
is the case. All of these sites feature great pictures of beautifull
cues and are worth taking a look at. As of 1 February, 2004 I've
located URLs to 149
cue manufactures.)
I located approximately 100 of these sites using MSN, Yahoo, and Google search engines. The remaining 40 I found on the http://www.easypooltutor.com/cuemakers.html site. This is an outstanding site and I recommend it to everyone.
(Note: a site containing what appears to be great technical data does not necessarily mean anything about the playing quality of the cues that maker manufactures.)
The first three sites are the only ones I found with a significant amount of technical data on performance.
Meucci: An outstanding site! The best on the Internet! Dozens of pages presenting in depth explanations of why their cues are made the way they are, how they test their cues, and scientifically verifiable data comparing their cues to all the other major cue manufacturers. As a minimum I recommend you look at the Black Dot Bullseye shaft comparison chart (chart), the construction notes on the FAQs page (FAQ), the deflection, accuracy, cue power, the spine articles on the Lectures page (Lectures), the spine gauge page (Spine) and the outstanding article about Meucci's laser guided robotic cue testing machine (Myth.)
Meucci Originals, Inc. employs 25 people who produce 15,000 to 20,000 cues a year. In addition to a main lineup of 46 cue designs varied enough to satisfy anyone's desires, Meucci periodically produces special edition models limited to small production runs to insure the uniqueness and collectability of these cues. The company sells not only to wholesale and retail dealers but also to individuals. They will even work with customers to produce custom, one-of-a-kind cues. Bob Meucci still runs the company and is active in all cue designs.
1) Most conventional shafts use a 3 point taper. The NT-Lam35 uses.Annie O's own 6 point taper.
2) Laminated with 35 layers per inch of Hard Rock Maple.
3) The NT-Lam35 uses Annie O's proprietary ferrule design as an aid to.reduce deflection.
4) The NT-Lam35 has
an additional aid to reduce deflection, which
....Annie
O cannot divulge.
I've exchanged emails with Annie several times regarding technical aspects of cue shafts. She has been extremely gracious and helpful and I wish to thank her publicly for all her help.
The third best site. It offers explanations of performance and
claims that their shaft designs maximize it. But, and this is a big but,
unlike the Meucci
site they offer no data to support their claims. They have one small bar
chart that supposedly shows that their cues cause less cue ball
deflection than other shafts, but unlike the much more extensive Meucci
chart, which compares its cues against
17 named competitors,
the Predator chart only compares their cues against 1 competitor and
they don't disclose who that was (A Wal-Mart special?) Worse still,
the Predator site provides no hard numbers on how much deflection
took place in each case or how the tests were conducted. (Meucci
provides extensive data on both the amount of deflection and test
methodology.) Additionally, I couldn't find any mention of shaft
spine, which can be as important as warp, or spine indexing marks
anywhere on the Predator site. These two important topics are covered
in depth on the Meucci site.
(An interesting point about the Predator and Annie O's pages are that their explanations of performance are identical to Meucci's, which serves to validate the Meucci definition.)
The following sites are in alphabetical order by company name or the last name of the maker:
Arnot Cues: No technical data on performance but very detailed construction information. Uses a 26 layer laminated shaft called the TerminatorShaftT3. Also runs a cue making school.
BCM Cues(Bryan Mordt): No technical data.
Richard Black: No technical data.
Jim Buss: No technical data but a very nice shop tour.
Richard Chudy Cues: No technical data. Just one page with a phone number, an email address and a picture of sample cues.
Cue Components: Cue making materials, machines and custom cues.
Paul Dayton: No technical data on performance but excellent construction details on the "techniques" page.
Kevin Deroo: No technical data.
Dieckman Cues: No technical data but an indepth description of the wood selection, treatment and machining for his shafts.
Dan Dishaw Cues: No technical data.
Falcon: No manufacturing or performance data. Note: this link worked for two days but then began failing after 24 November. I assume it's a server or site problem.)
Extensive pictures of his equipment and detailed, in depth descriptions of how he makes his cues and what materials he uses in the "Interview" page. The only thing I didn't like about this site was the pictures of the land around his country house, they were too good to stand. I want to live there!
Hercek: Pages load extremely slowly on a 56K dial up modom. No technical data.
Wes Hunter Classic Custom Cues: No technical data.
Jackson Custom Cues: No technical data.
Jacoby: No construction information or performance data.
J & J Cues: No technical data. This is a store that sells many brands of cues but also carries their own line called J & J Cues.
Keith Josey Cues: No technical data.
Joss: No performance or manufacturing information.
Mike Lambros: No technical data but a nice "anatomy of a cue" in the "Design" page.
Layani Cues: A very interesting site with many pages that appear to explain some of the complex issues involved in cue design. There are also detailed explanations of how and why their cues are constructed the way they are. It all looks great but sounds a little "techy." For example, repeated use is made of made-up words like vibratory. It looks good in print but doesn't exist in any of the dictionaries I have at home. Also, and this isn't meant to wave my own flag, I have Bachelors and Masters degrees in Mechanical Engineering and most of the technical jargon used on this site didn't make much sense. It could very well be that everything they are saying is true and accurate, it's just that they are using nonstandard terms.
Sheldon LeBow Cues: No technical data.
McDermott: No manufacturing or performance data.
Jerry McWorter: No technical data.
Nitti Custom Cues: No technical data.
Jerry Oliver: No technical data.
Omen Cues: No technical data.
Pechauer: Provides plenty of information on how their cues are made but nothing on why they are made that way. No quantitative performance numbers.
PFD Cues (Paul Drexler): No technical data.
Picone Cues (Joe Picone): No technical data.
Prather Cues: No technical data.
Raven Cues: No performance data but the "Inside a Raven" page contains the most complete step-by-step description, with close-up pictures, of making a custom cue that I've seen on any site.
Robinson Cues: No technical data.
Schmelke: No technical data. Only a few words about construction.
Schon: Only pictures and descriptions of their butt designs. Never mention performance.
Ray Schuler Cues: No technical data but offers ten different shaft options. This is more than any other cue maker on this list.
Showcase Cues: (Takes many clicks to work your way to their cues.)
Shurtz Custom Cues: No technical data.
Tiger: Offer five piece laminated shafts.
Trogdon Cues: No technical data.
Viking: Extensive information about their cues but no data on performance.
Woodworth Cues: No technical data.
Zac Cues: No technical data. Main page is slow to load at 56K.
5280 Cues
AC Cues
Action
Gary Allen
Balabushka (This was disappointing. They have such an outstanding reputation that I was looking forward to reading about their history and cue making techniques.)
Cory Barnhart
Bender
Benson
Black Boar
Black Creek
Blackheart
Blaze
Dan Breggin
Carmeli
Churchill
Tom Coker
Dodson Cues
Andy Gilbert
Ginacue
John Guffey
Gunn-McEniry
Ron Haley
Danny Hathcock
Greg Hearn
Helmstetter
It's George
Janes
Kaiser
Ron Kitzmiller
Knott
R/T
Libra
Lucasi Searches turn up http://www.lucasi-cues.com, but this URL only results in a "Cannot Fine Webpage" notice.
John Madden
Dennis Malvarose
Manzino
Marquetry
Ernie Martinez
Mezz
Midwest
Military Cues
Millennium
Ned Morris
Bob Moss
Mueller
Niemira
Nova
Omega
Panther
Palmer
Peterson
Players
Rambow Cues
Al Romero
Rubino
Bob Runde
Bert Schreger
Scianella
Scorpion
Dennis Searing
Shaman
Showman
Sierra
South West
Burton Spain
Sterling
Stroud
Szamboti
Tad
Tascarella
Tasker
Tempest
University
Vintage Brand Cues
Viper
Vogal
Walton
Thomas Wayne
James White
How to measure your breaking speed
If you have a digital camera with a timer release and your own table (or an understanding pool hall owner) you can measure how fast the cue travels when you break. Since placement is as important as power, this value won't tell you how effective your break is, but it's a fun number to banter about.
Place the camera on a tripod so that it looks at the far long rail. Position the tripod so the camera is as far from the rail as possible. Focus as much light as possible on the rail and set the camera's shutter wide open and adjust the shutter speed to 1/25 of a second. Trigger the camera several times using the automatic timer release shutter to get a feel for when the shutter is going to be released. Digital cameras usually have an audio alert to help you judge this.
Using whatever ball provided the most amount of contrast between with the cloth on the table, set up as close to the ruler as possible to hit the ball using your break stroke. (Being close to the ruler is important to reduce parallax effects which would make the ball appear to be moving faster than it is.) Trigger the time release on the camera, take your position, and try to stroke the ball at the same moment the shutter releases. Repeat this several times until you capture the ball as it leaves the tip of your cue. This takes some patience. (It took me 8 tries to get it.)

The picture above is what I got. You can see the tip of my cue on the right and a very faint shadow on the table cloth in the middle of the picture. That shadow is the eight ball moving fast enough to create a blur while the shutter was open. Since I know the length of time the shutter was open (1/25 of a second) and I can measure the length of the blur created by the ball as it moved during that time, all that has to be done to get the ball's speed is divide the length of the blur by the time it took to travel that length, in other words the shutter speed.
To make measuring the length of the blur easier, I increased the contrast and darkness to create the following image.

The blur covers from 58 inches on the left to 69 inches on the right. (The numbers and blur were easier to see on the original high resolution picture. This thumbnail is greatly reduced so it loads faster over the Internet.) The total distance is 11 inches.
Dividing 11 inches by 0.04 seconds (1/25 of a second) yields a speed of 275 inches per second.
Dividing this by 12 inches per foot gives 22.92 feet per second.
Multiplying this by 3600 seconds per hour gives 82,500 feet per hour.
Dividing this by 5280 feet per mile gives 15.63 miles per hour.
The question now is how does this compare to other players? I'm embarrassed to admit not very well. After perusing David Siltz's site (the link in article number 4) I came away with the impression that he's a very good player. He mentioned being timed with a speed gun as having a break speed of 21 miles per hour, 34 percent faster what I achieved. (In my own defense, it's doubtful that the one stroke I captured was as fast as a break under normal conditions.) Even with my measly 16 mph break speed it's surprising how much ball action I get. Most times the balls are well scattered across the table and the rack area completely cleared.
Final note: While watching a men's world billiard championship one year, the announcers mentioned that the man breaking, I forget his name, had one of the most powerful breaks anyone had every seen. The speed of his cue ball was measured at 28 miles per hour.
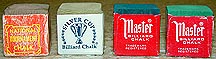
While perusing the posts of a billiard forum I noticed a debate taking place about which chalk was best. As expected, each brand had its supporters and opponents. What surprised me is that no one mentioned the effect of environment on the chalk. A chalk that plays well in the humid south east might be terrible in my dry high desert location. Additionally, tip variations might play an important role in chalk performance. The softer, coarser texture of a Triangle tip might be able to hold one type chalk better than a very hard, fine-grained tip. Lastly, chalking technique has to be considered. Someone who drills their chalk is going to deposit chalk in a different thickness and pattern than someone who strokes it on.
To address these issues I collected all the different types of chalks I could find to make a comparison. I could only find three: National, Silver Cup, and Master. (While Master has been bought out by Silver Cup, as of Novemeber 2003 it's still commonly available.) Because the debate on the forum suggested there was a difference between Master Blue and Master Green I got both of them.
Texture: Compared by applying a sample of each onto a thoroughly dry thumb and index finger and rubbing them together.
National: Felt slightly coarser than the others and the grains seemed to resist breaking down.
Silver Cup: Felt the same as both Masters, finer grained than National.
Blue and green Masters: Felt the same as Silver Cup, finer grained than National.
Application
rate: Compared by rubbing a cotton
towel one stroke across each sample to see how much chalk was
deposited on the cloth. I was careful to apply the same pressure over
the same area. Care was taken to ignore color, which can influence
the appearance of how much chalk was deposited.
National: Middle of the road: it deposited more chalk than Silver Cup and less than the two Master chalks.
Silver Cup: The stingiest: it deposited the least of all the chalks. This might be a good choice for players who chalk long and hard and tend to get so much chalk on their tips that it makes a mess on the table.
Master: Both green and blue deposited the same amount of chalk and in both cases it was more than the other brands. If you have a short light application stroke, using Master might help insure you get enough chalk.
Adhesion: For this comparison I heavily chalked a freshly dressed, meduim Triangle tip with each chalk, struck the cue ball with hard low draw and afterward looked to see which had left the largest mark on the table. I used a red cover cloth because I found it provided balanced contrast between the different chalk colors. (The problem with this test is that it addresses two issues: adhesion and amount of chalk. One chalk might have greater adhesion yet leave a larger stain because it also deposited an even greater amount of chalk on the tip.) I ran the comparison twice, once using a drilling motion to apply the chalk and the second using a stroking motion. Any excess chalk was not blown or tapped off.
National: Very little residue deposited on the cloth indicating that it has good adhesion.
Silver Cup: The least amount deposited.
Master: Both the blue and green deposited the most amount a chalk, several times as much as either National or Silver Cup. Additionally, the residue was much coarser and grainier, increasing the chance it could influence a ball rolling over it.
Playablility: I am neither a professional nor a superior amateur player so my sensitivities are not finely tuned enough to tell the playing differences between these chalks. They all seemed to provide the same amount of grab on the cue ball and miscued at the same point.
My choice: I've decided Silver Cup is the chalk I will use. It grabs the cue ball as well as the others and leaves the least residue on the table.
I would appreciate a message from anyone with a source for other brands of chalk so I can compare them as well. Thank you.
UPDATE!!! For the last two months I've been switching back and forth between National Tournament chalk and Silver Cup. I've come away with the impression that I miscue more often with Silver Cup so I've switched back to National Tournament.
To drill or to stoke: comparing two chalking techniques
NEW!!! Chalking caution (Please see bottom of article)
Are you a driller or a stroker? Look at the picture below to find out.
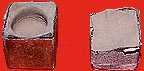
If your chalk has a steep sided hole bored into it like the cube on the left the odds are you're a driller. That means you rotate the cue or chalk as the cube is pressed against the tip. If your chalk cube is worn evenly across it's entire face, as on the right cube, you are a stroker.
Which technique is best? Byrne, in his Standard Book of Pool and Billiards recommends a rocking or stroking motion. I used to have a Minnesota Fats video wherein he recommends using a careful stroking motion saying, "You should apply chalk with as much care as a lady applying lipstick.) Mike Sigel uses a rocking or stroking motion on all of his videos. Finally, every professional I've observed on television uses a stroking motion. These endorsements suggest stroking it to be preferred.
Another point in favor of stroking is dust production. I ran several comparison tests between the amount of chalk residue deposited on the table after chalking using both drilling and stroking motions and found that drilling left two to three times as much. This is something to consider because excess chalk residue can effect the play of the cloth, especially if it is a felty cloth instead of a worsted and polished cloth like Simonis.
NEW!!! Chalking caution
Another
problem with drilling is that it can end up staining the shaft of
your cue with chalk. Watch someone who drills their cue into the
chalk and you're likely to see that they do so with the tip of the
cue upward and the chalk and ferrule cradled in their bridge hand.
What happens is that the excess chalk that flakes out of cube falls
onto the shaft and into the player's bridge hand. Then, when he or
she makes a stroke all that chalk gets rubbed into the shaft,
staining it. I have a friend whose Viking cue got a permanently
stained shaft after only e few months because he drills his chalk in
this manner.
When it comes to jumping the cue ball I'm vertically challenged. I've repeatedly attempted this shot and always failed. Studying the little information available on the Internet didn't help. I have come to belief that jumping a cue ball is like whistling or wiggling your ears, until you've done it once you can't do it.
My solution was to find something to lay on the table that would make it so easy to jump the cue ball that I could do it no matter how flawed my technique. One page on the Internet suggested using a piece of felt, but I found that it was so soft it absorbed too much of the stroke's energy to make the cue ball jump. After several experiments, the best material I found was a 9" x12" plastic cutting board by Fiskars. I purchased one from Wal-mart for six dollars.

It has the perfect combination of hardness and resiliency to jump the cue high in the air.
With this mat laid on the table, I was finally able to make a cue ball jump. Once I'd achieved that goal, I quickly figured out what I'd been doing wrong, how do do it better, and eventually graduate to jumping on table cloth.
The first thing I learned is that I was attempting to strike the ball from too high an angle. What I was guessing to be 45 degrees was really closer to 60. Hand-in-hand with this discovery came the realization the jumping difficultly increases exponentially with increasing angle. At thirty degrees it's easy, at forty it's hard, forty-five is very difficult and fifty and above still impossible for me. The main reason I wasn't able to jump the cue before using the mat is that I was attempting to jump in the above-fifty degree zone, dooming me to certain failure. If you are having trouble jumping the cue ball try using a protractor to measure the angle at which you're holding your cue. It may be too high.
The second thing I found out was that I was hitting the cue too high above center. I found that by aiming so that the top edge of the cue tip appeared to be aimed to strike the center of the cue, the cue ball jumped as it was supposed to. I suspect that the odd angle of shooting and awkward position made it appear that when I thought I was aiming at the center I was really aiming too high and trapping the cueball.
After playing around with jumping for an afternoon, I discovered that I could get the greatest height by striking the cue ball at 35 degrees. Using an elbow stroke gave me more height than a wrist stroke and using an overhand dart stroke worked better than a standard underhand pendulum stroke. I found I had the habit of setting my bridge much closer to the cue than needed. Moving it back just an inch enabled me to get much more power into the stroke.
The jumping mat almost doubles the height of the jump over what the same stoke generates on Simonis 860. When I transferred back to jumping the cue on table cloth the highest I could get was 1 and 3/4 inches, just short of clearing a ball. But, after years of not being able to get the cue to hop even a small fraction of an inch, I felt I'd made good progress for one day.
I plan to do most of my cue ball jumping practice using the mat so that I don't tear up the cloth on my table. When I can get the cue ball to jump two ball heights using the mat I'll know I'm good for jumping a ball on the cloth.
One final point, everyone knows that the jump shot is rough on table cloth, but no one I've read comments that it's also hard on the cue ball. The force with which it is struck is so great that grains of chalk can be driven deep into its surface. After half an hour's practice my cue ball looked like it had been through a war. It took a lot of gentle scrubbing to clean it off.
To summarize: I get the highest jump by using an overhand dart stroke with the cue held 35 degrees from the table, using a stroke where the elbow joint is employed more that the wrist, setting my bridge as far away from the cue as the cue angle permits, and using the hardest, crispest, short stroke I can deliver.
(I can't emphasize enough that I am a beginner at this game. The account above is not meant for instruction, but only to recount my own experiences as I learn how to shoot.)
After a little more practice I finally managed to jump a ball one diamond away from the cue without using the jump sheet. I really had to slam the cue hard to do it. Then I changed the tip on my jump cue from the thin Triangle tip to a much harder phenolic tip by Joseph Picone and the height of my jumps immediately doubled. I could now clear balls easier, more accurately, and at both closer and greater distances. From this I conclude that a hard phenolic tip really helps jumping.
Update In January, 2005, I received an email from someone who pointed out that I had forgot to mention an important point: that using the lightest possible cue (7 oz or less) helps a lot. The reasons are that the lighter cue permits you to accelerate the cue to higher speeds and that it also bounces off the cue and out of the way faster so that it doesn't trap the cue. If you're having jump problems, check to see how much the cue you're using weighs.
Billiards after LASIK eye surgery
Because my eyes used to be 20/400 I had to wear very strong prescription glasses to see the balls. This caused two problems: looking through the tops of the lenses caused considerable distortion making it difficult to line up a shot and they limited how low I could place my head to line up the shot. (I know, Karen Corr wears glasses and shoots great, but she's the only player on the circuit I've seen who does.)
For these and other reasons I decided to undergo LASIK eye surgery so I would no longer need glasses. Here's how it effected my game:
The first thing I noticed is that the cue ball and sometimes the object ball, when they are both less then four feet from my eye, were many times out of focus. I asked the doctor about this and he explained that the closer a corrective lens is to the eye, in the case of LASIK it's the cornea, the further away an object has to be to be in focus. This is contrary to how he'd answered a related question I asked him prior to the operation. I made it clear that the main reason I was having the operation was so I could shoot pool without having to wear glasses. I asked him if the operation would effect my range of focus. He said, "No. Your depth of focus should be the same as it is now with your glasses." (I have too high a regard for him to believe he mislead me. I think he simply misunderstood my question.) The out-of-focus problem is simply the result of my older (I'm 52) eyes losing their ability to focus. I don't think a young person would not have this problem. I wish I had discussed this more completely with my doctor before going ahead with the LASIK. Oddly, the soft focus doesn't seriously seem to effect shot making. Fortunatley it seems to be getting better as I enter my third week of healing.
The next thing I noticed was on long shots I constantly hit the object ball too far on the left. I believe this was a habit developed while I wore glasses to compensate for some prism effect of the lenses. It was quickly and easily corrected.
After learning to compensate for the above, or rather unlearning the habit of compensating for the error caused by glasses, my shot making immediately improved by at least ten percent above what it was before the surgery. The main contributor to this improvement was elimination the distortion caused by looking through the top of my glasses. It also helps that I can get lower to line up a shot because I'm no longer limited by having to look through glasses.
One additional benefit is that I no longer have a glare problem caused by overhead lights shining on my glasses.
All in all I'd say that having LASIK helped my game. It's also more comfortable without glasses. The biggest down side is that I now have one less excuse for missing a shot.
Disclaimer: These statements only relate to my own experiences having LASIK. I am not an expert at LASIK or eye care. Nothing I say should be taken as a recommendation.
I take the Sardo Tight Rack for a test drive
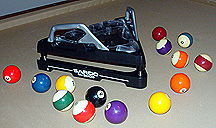
The proliferation of the use of the Sardo Tight Rack on mANY televised billiard matches seduced me into purchasing one to see how well it works. The $189.00 price tag gave me pause, but I decided since every game starts with the break and ensuring a solid rack increases the odds of the game getting off to a good start, that it was worth it.
My first impression was not good. The gray handles you push down to cause the Sardo to press the balls into a rack are flimsy light plastic. They flex too much and one end of the right handle on mine was broken. (Naturally, I didn't discover this until I got home.) Fortunately, a drop of super glue took care of IT. These handles should be metal and securely screwed to the frame. There are two arrow markers on the rear of the rack that are used to position it on the table. Since the body is all black plastic, it's necessary to have these arrows painted white so they can be seen. Neither of these had been painted all the way down to the tips of the arrows. This made exact alignment impossible. I had to finish the painting myself.
My second impression was equally disappointing. To set up the rack the instructions state that a felt alignment guide is needed. This guide was not supplied with the rack and no instructions were provided on where to obtain one or how to make it. By studying the rack and the instructions, I was able to make one out of paper in half an hour. Also, indexing marks have to be put on the cloth, which some people may not like. I used a black permanent marker which left an almost invisible dot which was easily ignored during play. Unfortunately, it was difficult to see when aligning the rack.
The Sardo did not impress me when I tried using it prior to conditioning the rack area (more on that later.) The rack has two sets of spring loaded pins: one set pushes each ball down and the other pushes them all together. The set that pushes the balls together is positioned so that the rack will work with balls that are on the outside of the 2.245 to 2.255 inch diameter range for legal billiard balls. As it turns out, the set of balls I got with my table measure out at 2.222 inches. The 0.023 difference for each ball, when summed across the five-ball depth of the rack, means that the pushing pins never make contact with the rear balls so the Sardo can't push them into a tight rack. The amount of spring motion intended to compensate for this problem was insufficient. I have to manually push in on the corner balls to make sure the rack is tight.
The Sardo Tight Rack requires that the table be "conditioned" for proper use. "Conditioning" means tapping the balls as they are racked the first time to create a dimple in the cloth that will hold the balls in place. I balked at this because I thought these dimples would affect play. But, since the professionals don't seem to object I assumed the effect was negligible. In actual play I found this was not a major issue unless the balls were rolling axtremely slowly and happened to pass over slightly to one side of one of the dimples. Even then the deflection was almost to small to be significant. Balls hit that softly would probably suffer as much deflection from cloth English.
The instructions are simple to follow but grossly understate the delicacy required to accomplish the conditioning. Instead of simply tapping the balls as instructed, I found it was necessary to roll each ball into the rack by a very small fraction of an inch prior to tapping to achieve true contact after release. This process is extremely delicate and has to be performed without error. An out-of-line ball dimple is extremely difficult to correct. It's like trying to redrill a hole in soft wood almost in the same place the first hole went; the drill keeps wanting to drift into the old hole. In this case, the ball keeps wanting to fall into the first dimple.
All in all it took a full hour to get the rack set up, aligned, and the cloth conditioned. I rolled the balls into the Sardo, pressed down, removed the rack... and still spotted some gaps between balls. However, in fairness to the Sardo, I admit that all the hassles involved in setting it up and using it made me more critical than I would have been for a normal rack. There were only a few gaps and they were extremely small. The rack broke very cleanly. With additional use I discovered that I could remove almost all the gaps by using my fingers to tighten the rack by pushing inward through the gap between the top and bottom frames. Jiggling the rack also helped, as long as care is taken to realign the guide arrows on the positioning marks you draw on the cloth for that purpose.
My final evaluation is that the Sardo Tight Rack can provide consistently tight racks and place them precisely in the same spot every time. It looks impressive and is enjoyable to use. The fact that the rack is removed by first pushing it forward instead of lifting eliminates messing up a good rack by accidently bumping it. (This is a common and irritating problem caused by racks that are too small. A good rack should have an inch of clearance between the rear of the rack and the balls.) But, the Sardo is not an auto-racker. It takes thought and constant attention to the racking process to use properly. If players paid as much attention to the racking process when using a normal rack they could get comparable results, especially if they added index marks on the rack and cloth and conditioned the table.
Important Sardo Tight Rack discovery!
After several days of use I was surprised to see that the Sardo was positioning the racked balls crooked. I traced the problem to the fact that since the positioning markers are on the cloth, if the cloth shifts the markers shift. If your get a Sardo rack, make sure to check the positioning marks after each brushing. The cloth has enough stretch that they can shift out of alignment.
NEW!!! I dumped my Sardo!
After several years of use I decided to get rid of the Sardo and go back to a regular wooden rack. The problem was that the Sardo, when used with positioning marks, is so accurate that over time the balls create dimples in the cloth that are deep enough to cause balls that roll over them to be deflected. The dimple under the front ball is particulary deep. Another problem was that the weight of the Sardo and the pressure of pushing down on it caused the cloth under the rack to become crushed down to the point where it had a unattractive polished look.
Electrify
your Sardo
NEW ARTICLE!!!
As mentioned above, the indexing marks on the cloth that are used to align the Sardo can be difficult to see, particularly if the table is lit with a centered overhead light. The main problem is that the indexing dots on the cloth are in the shadow cast by the rack.
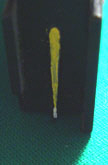
My solution was to wire the Sardo with two small lights to illuminate these dark areas.
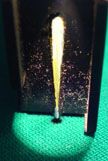
The system is simple. I used two penlight lamps (the type with lenses molded into them) and screwed them into a pair of holders mounted above the indicator arrows. Then I wired the lamps to a switch and a battery holder for two AA batteries. The whole thing only took half an hour to put together.
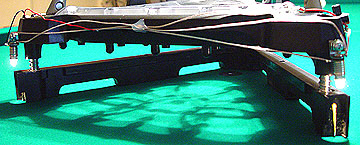
I admit it looks a little Rube-Goldbergish, but it works great.
Three
cue tips compared (See below for
a fourth!)
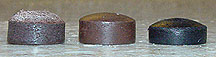
The cue tips shown above are, from left to right, Triangle, Le Pro, and Chandivert: $6, $3.50, and $15 respectively.
If it looks as if the Triangle tip isn't square, it isn't. Look closely at its left side and you can see a noticeable slant. Also, compare the bottom with the top edge and you can see they aren't parallel. I purchased another Triangle tip from a different store three months before this tip and it was off-square as well. (Since the original write-up, I have visited a billiards store and checked several Triangle tips. Half of them were not properly square.) It took ten minutes correct this and the problems didn't end there. The first time I used it this tip left a dark brown streak on my cloth. It seems the stain the manufacturer uses to darken the side of the tip comes off easily, but sticks to cloth with a vengeance. I had to scrub the sides of the tip for five minutes to eliminate this problem. The end was fully rounded and unglazed so it could be used with only a few seconds of shaping with a carbide tool. The leather texture was coarse and large flakes had to be sanded off. (This may be more the fault of my shaper, which has very coarse cutting grains on it.) But, after that the tip played well. I'd rate its feel as mellow. Also, having used Triangle tips for several months I can attest to the fact that they hold their shape well and aren't prone to chalk glazing.
The Le Pro tip was square but so hard and deeply glazed and had such a shallow curve that it took fifteen minutes of hard work with a carbide tool to get the correct shape. Some stain came off of the sides but the problem wasn't nearly as bad as with the Triangle tip. This tip has a firm, but not brittle, feel in play.
(I've heard from one player who explained the LePros are usually thought of as softer than Triangles. I don't mean to claim otherwise here. All I'm claiming is that my cue felt mellower with a Triangle tip than with a LePro. I can't explain why.)
The Chandivert tip was the thinnest and had a soft spot off to one side. Like the Le Pro, it took a lot of work to figure a proper curve on it. This tip did not have a stain problem. In play it seemed flat and dull. This may be the fault of the soft spot but for $15 I expected more. (By the way, at 0.3 grams for the tip's weight, the Chandivert tips costs $22,700 per pound... five times the price of gold.)
I compared ball grab by seeing at what distance from the center of the cue a thoroughly-chalked tip mis-cued in both side English and follow. The Triangle tip seemed to hold onto the cue the best but the difference between the tips was difficult to tell.
In spite of the problems with the Triangle tip, I find I prefer its mellow feel over the others. However, I must qualify this recommendation by confessing that I am an extremely poor player. Also, how a tip feels may be strongly effected by what cue it has been mounted on.
A fourth tip tested
I found a store that carried laminated tips (leather plywood) and for $15 purchased one called Stingray.
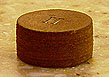
This tip had no staining problem because the maker doesn't color the sides of the tip, I assume to show off the many layers. Once shaped, the tip shows three or four concentric rings which, in profile, actually stick up above the rest to the tip. I assume these rings are formed from the glue plains. The tip felt stiff and miss-cued much easier than any of the first three tips. The problem was so bad I completely reformed the tip and gave it a second try. Again, miss-cuing was a problem. I won't use this tip again.
NEW INFORMATION!!!
On 16 May, 2004, I received the following email from a gentleman named Alex who has much more experience with cue tips than myself. I'm posting it here so that visitors have access to as much information as possible. I am deeply indebted to Alex for contributing to this page. (Thanks, Alex!)
Hi Wayne,
I decided to check out your site on billiards again. I came to the article on the 4 different cue tips you tried, and how you found that the layered/laminated tip (Stingray) tended to miscue a lot more in comparison to the 3 previous single layered tips.
Personally, I think laminated tips are much better in terms of playability and consistency than block tips. Maybe it would help if I gave you examples of the different kinds of tips, so as to facilitate your understanding, just in case you do not already know.
Laminated tips include tips by Moori, Molavia, Tiger, and Leo, to name a few. Block tips consist of LePro, Triangle, WB, etc. Laminated tips can be distinguished by the numerous layers which can be observed from the side of the tip, as you have already described in your article. Block tips are single layered, i.e. they aren't thin pieces of leather glued together.
Let us assume that the hardness of the tips which we wish to compare is fixed at Medium. The logic behind the advantage that laminated tips possess over block tips is that because they consist of many layers glued together, they will tend to misshape or mushroom less over a certain period of time, whereas for block tips, their chances of mushrooming are much higher. Hence, less maintenance will be required for laminated tips than block tips.
I, myself, like the Moori (Medium) tip. It is made in Japan, and consists of 11 layers of genuine pig skin leather. I have it installed on my current playing cue shaft, and it plays very well, and never miscues. There is a noticeable increase in the amount of spin that results from the change of the tip alone.
I think the reason you found the Stingray tip to be poor in performance may be due to the Stingray tip being an entry-level tip, hence it isn't in the higher end range. Maybe when the tip on your playing cue wears away, you can try a Moori. That would be my recommendation, if asked for one. :)
Sincerely,
Alex
Why
Pool is the Hardest Game in the World
The most difficult challenge in sports is to hit one sphere with another sphere at precisely the right spot to make the second go where you want it. Consider: first you have to figure out where to hit the second ball, then you have to add in a correction for the physical size and curvature of the first ball. Then you have to compensate for the fact that as the distance between the two balls increases, the appearance of the amount of correction decreases. This two-ball accuracy is far above that required for baseball, basketball, or any other sport. BUT! Someone shooting pool also has to simultaneously consider where the cue's going to go to line up the next shot, decide on the sequence of cue-ball placements to run the table, calculate the use of top, bottom, and side spin on the cue, deal with cue-ball squirt and curvature on shots with English, throw on object balls when English is used, push or carry, and how hard to hit the cue ball. THEN THINGS GET REALLY TOUGH!
Humans are geared to predict events that are linear in nature. We evolved solving problems like how to throw a rock at a rabbit for dinner: if a rabbit is running twice as fast as the last one, we throw the rock twice as fast or give the rabbit twice as much lead. Simple. But in pool, many effects are non-linear, meaning that something done twice as hard may result in an effect that is four or five times as great.
Finally, to get better at anything it's necessary to develop a connection between aiming, action, contact point, and result. In pool this is difficult because the moment of contact between the cue and object ball is so quick that most times it is impossible for the human eye to detect.
Combine all of these factors and it's a wonder that anyone can learn to play this game. Maybe it's the challenge of trying the impossible that spurs us on.
Here's yet one more idea why pool is so hard: it's almost impossible to practice many missed shots. Why? because when you miss, the cue or object ball disturbs the rest of the balls on the table. It's impossible to get all of them back in the same locations to re-do the shot.
The Secret to Getting Better Fast
The secret to shooting better pool is the same boring secret to getting better in almost every sport: keep your eye on the ball. Specifically, for pool, focus your eye on the contact point between the cue ball and the object ball when they make contact. The reason is simple.
The human mind wants pleasure and is geared to automatically learn what it needs to maximize pleasure. All your brain needs to do this is to establish an unbroken chain of events from something you do to the end result that provides the pleasure. In pool, what you do is aim and stroke the cue. What brings pleasure is the sweet thunk the object balls makes when it drops into the pocket. If you see the cue strike the object ball, you establish a connection between where you aim and where the cue goes. In so doing you help key in your aiming. Most people make the mistake of turning their eyes away from their stroke to see where the object ball goes. In doing that they short-circuit their mind's automatic learning process because they never see where the cue strikes the object ball. Discipline yourself to stay down and see where the cue contacts the object ball.
We've all had this happen: you run all your balls in an eight-ball rack, then as soon as you sight in on the ominous black ball you freeze and miss an easy shot. One way to reduce this 8-ball dread is to make use of an old cliche: "Familiarity breeds contempt."
Every time you practice a particular shot, use the eight ball as the object ball. By getting used to it being the object ball you won't be as easily shaken when you have to shoot at it in a game.
Another trick to learn how to shoot better
One of the problems with practicing pool is that you shoot so many shots that they all start to blur together. Try this: work to remember one important shot out of each rack. Recall what you did right or wrong and focus your attention on it long enough to fix it in your memory.
Think about it. If you learned just one thing from each rack and shot a few racks a day in one year you'd have learned 1000 shots!
If you have
any comments, suggestions, or questions about these articles please email
them to me. I look forward to hearing from you.
![]()
Please click HERE to visit my main site and browse 90 other pages covering everything from metal detecting to rocket engines.