WAYNE SCHMIDT'S BOOKBINDING 101: How to turn your fan fiction novel or short story into a paperback that looks as good as those in bookstores.
(Click here to browse 70 topics on my main site ranging from exotic kaleidoscope designs to the strange world of lucid dreaming.)
Only one out of every 500 people who write a novel see their story published. For the rest of us 499 writers, we still long to hold something that looks like it was professionally published. Yes, you can print your work on standard-sized paper and staple it together, but trust me... it's not nearly as satisfying. If you have a computer and a photo-quality color printer you really can make a professional-looking book. All it takes is a couple of hours. Here's how:
They say you can't tell a book by its cover, but a cheap-looking black-and-white cover is a sure sign of an amateur-printed book. So, the first step in printing your book, after writing the story of course, is to create the cover.

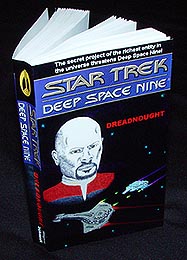
Above are samples of the eight books I've made. (For sharper images of what the covers look like, please go to my X-Files, DS9, or Retief pages.) Each of these covers consists of four parts: artwork, front title, rear page, and spine title. In the case of the X-Files books, Regina Payton, who owns the Vespers site, created dustcovers for the stories in my X-Files section. (Thank you Regina!) I was able to incorporate these into the covers to be printed. The artwork for the Retief of the CDT book came from a published book which I scanned and modified (Of course, I gave the original artist the coverart credit inside.), the Star Trek Deep Space Nine cover I drew from scratch (except for the Star Trek Deep Space Nine title block which I scanned from a published book), and the simple cover to Amateur to Amateur, my text on writing fan fiction, I made completely myself. Here's an example of a complete cover laid out flat:
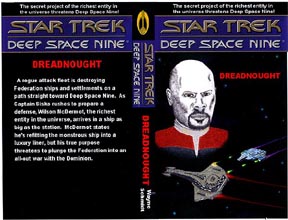
The actual cover is much sharper than this scanned image indicates. (I admit to being artistically-challenged, but when printed out this cover doesn't look too bad.) I scanned the "Star Trek - Deep Space Nine" titles from an actual paperback and sized them to fit the cover and spine. The short teasers at the top of the front and back, the long teaser on the back cover, title and author name placements shown in this example are in the standard format for paperbacks. I found it best to import the artwork into MS Word 97 and use WORD's text-addition software to add the teasers, novel titles, and author name. WORD is nice for this sort of work because it allows you to resize pictures without introducing digital interference patterns that can occur with some imaging software. Also, text is saved as an image file that can be resized and moved as a block to fit with the rest of the cover. Actually, this cover consists of several dozen small pieces, most of which are black lines and blocks to act as spacers between the picture and various titles. The height is fixed at the industry standard of 6 and 3/4 inches and the width is 4.25 inches. the thickness will vary depending on the thickness of your book. Dreadnought is 68,000 words long and requires a spine that's 11/16-inch wide. A longer book would required a wider spine. This is something that is determined after the book is printed. Once you've finished the cover, I recommend printing it on medium-weight glossy paper. Heavy-weight paper may sound better, but I've had problems with the emulsion cracking on the heavy-weight when folded to form the spine. Once the ink is dry, spraying it with a transparent photograph-protecting coating will prevent streaking and smudging. I use Sureguard, available from photographic supply stores.
Once the cover is done, it's time for the fun part of book binding: printing!
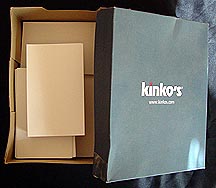
The first printing step is to get the correct sized paper: 4 & 1/8 wide by 6 & 3/4 inches tall is standard. I discovered that most large stationary/copier centers like Kinkos have a paper-cutting service. For a modest fee they'll cut a ream of paper to any size you want. Two thousand sheets of paperback-sized paper cost me $20.00. Ask for the lightest-weight paper available. If heavy paper is used, the pages won't have enough flexibility and the finished book will feel stiff and be hard to open. At Kinko's, where I had mine done, they even up it in a nice storage box. There is one caution: they'll make two cuts from one ream of paper and sometimes the second cut will be a small fraction of an inch different than the first. When you go to print your novel, be sure to stack the paper on edge to see that all of the pages are the same size.
I found the best formatting was to set paper size to 4.2 inches wide and 6.8 inches high; top margin = 0.7 inches, bottom = 0.6, left and right margins = 0.4, header = 0.2 and footer = 0.4. I use a 11-point Times New Roman for the body of the novel and 8-point Arial for the header (author's name on odd-numbered pages and book title on even-numbered pages) and Times New Roman 11-point for the footer (page number.)
Make sure all chapters begin on a new page with the text beginning halfway down the page. Chapter numbers and titles go above this, usually boldfaced and in a different font. I use Arial 14-point bold.
Some series books have logos associated with them. In the case of Star Trek - Deep Space Nine, it's a vertical oval with an icon in its center. You can give your book a professional "kick" by copy-and-pasting such icons above the title of each chapter and on the spine of the book. For example:
![]()
So, you've got your paper, the printer's warmed up, and you've got the formatting corrected. You're ready to print! Well... not quite. Look at a paperback and you'll see that there are several pages of front matter before the story begins. The first page is a teaser, one or two paragraphs from the book to capture the reader's interest. This is usually taken from a suspenseful passage. On the back of that page, at the bottom, is the publisher's name. I usually use the following statement in a bordered box:
This
book is part of a limited edition published by the author. Individuals
interested in obtaining a copy of this novel can do so from his
website at:
.
Centered on the next page is the title in large bold-faced print; I use an 18-point Arial. If the book is part of a series such as Star Trek or The X-Files, this series title goes above the book title and is in a slightly smaller font. Below the main title is the author's name.
On the back of that title page is the disclaimer and copyright page. I use the following for my X-Files novels:
This book is a work of fiction. Names, characters, places, and incidents are products of the author's imagination or are used fictitiously. Any resemblance to actual events or locales or persons, living or dead, is entirely coincidental.
This book was printed for not-for-sale, not-for-profit purposes, and as such, does not intend to infringe on any legally-held rights, including, but not limited to, those held by Fox Television, 1013 Productions, or Chris Carter.
Copyright October, 2001, by:
Wayne Schmidt
(Here
I place my address)
Cover art by Regina Payton, 2001
The last line identifies the person who created the cover's artwork.
The next page has the Acknowledgement, the author's statement of gratitude to anyone who supported or helped him or her write the story. This page can also be the Dedication page. On the back of that page is the Foreword, a brief statement that helps the reader establish the context of the story. In the case of a story written for an established series like The X-Files, it would indicate in which season or between which episodes the story takes place. Finally, the next page has the title again in a large bold-faced font.
Every publisher has a different pattern of front pages. The sequence I've provided is an average of what many use. For the purposes of printing your own paperback it may be tempting to skip these pages. Please don't. They give the book a finished, professional look. Because these pages, unlike the pages of the story, don't have page numbers, I keep them in a separate file. It simplifies the printing.
Okay, that's it! Load the printer up with paper and start printing. WAIT! Because paperbacks are printed on both sides of the paper, you have to tell your printer to print only odd-numbered pages first. Once they are done, check through them and reprint any that are smudged or crooked, reverse them consistent with your printer's protocols, and print all the even-numbered pages. I recommend starting with the front pages first to make sure everything is working correctly. Also, when printing the second, or even-numbered, pages, do so in small batches of 20 pages. That way if something goes wrong you can catch it before the entire first odd-numbered printing is ruined. Don't forget to change the header to your name when printing the even pages. Also, some printers tend to print crooked when the paper stack gets low so keep at least 1/4-inch of paper under the last page you intend to print. Finally, some printers have exiting options for where the printed pages leave the printer. If yours does, experiment with both and use the one that keeps the pages the flattest.
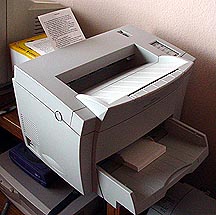
Off and running! When printing the second side (even number pages) it's best to take the time and watch each sheet come out of the printer and check to make sure it's alright. The second-side printing is where most problems pop up. By watching it, you can catch problems before they mess up half of what you've already printed. Note that I'm using the rear exit on the printer. I do so because it doesn't curl the paper as much as the front exit and also puts them in the proper order for the second printing.
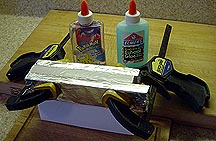
Once the novel is printed you can start gluing the spine. Begin by wrapping two short pieces of 1x2 wood in aluminum foil. Next, add three blank sheets of paper to the front and back of the book. These sheets usually get damaged during the gluing process so using blank sheets protects the printed sheets. Finally, clamp the book, making sure the pages are even, between the two pieces of wood and apply a thin layer of glue. (Use a flexible-when-dry glue. I found Elmer's sells several transparent glues like this in the stationary section of almost every grocery store.) Rub the glue into the paper to ensure that the edges of all of the pages get covered. Try to work the glue into the fibers of the pages. Let the book stand for an hour to let the glue dry. Add two more thin coats, letting it dry between each layer. The total drying time is less this way than trying to do it all in one thick layer.
While the book is drying, there's one more thing you can do to dress up the cover. Many publishers print a list of other books by the novel's author on the inside of the front cover. If you've written other stories, make such a list yourself and print it on the left side of a sheet of plain paper in landscape. Publishers also use the inside of the back cover for the author's biography and picture. Scan a picture of yourself and paste it into a WORD page and below it add a very brief biography. Space the picture and biography so that it prints on the right side of the same sheet that has the list of your other books. Play with the spacing until these pages line up with the inside pages of the front and back of the cover. Make a clean printing and use a light coat of spray adhesive to glue this inside cover page to the back of the glossy cover. If you like the story list and biography idea but don't feel comfortable gluing the two sheets together, you can always print the list and bio out as separate pages and add them to the front pages, although the bio typically comes after the story.
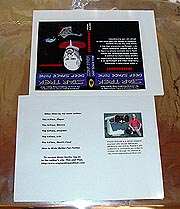
I get the two pages aligned, then tape their edges together so that I maintain the alignment when they are flipped over. Then I give them a light spray with 3M Super 77 spray adhesive, fold the sheets together and use a clean dry cloth to wipe from the center to the outside to squeeze out any air pockets.
Okay, three hours have gone by and your glue on the spine of your novel is dry. TIME TO MAKE A BOOK! Fold the cover so that the book fits snuggly inside it, carefully remove the book from the clamps and cut off the blank pages added to protect the printed pages, add a bead of glue to the spine of the book and push it into the folded cover. Block the book between two upright supports so that the book is pressed into the cover as it dries. Once the glue is dry, use a ruler and single-edged razor blade to trim the cover to fit the book. THAT'S IT! YOU'RE DONE!
This may seem like a lot of work and it is. (It takes me two hours to make one book, not counting glue-drying time.) But, once done you'll have a professional-looking copy of your book that will last for decades. Believe me, it's a wonderful feeling to pick it up and read your own work in standard format.
The finished book.
(It's fanned
out here to make it stand up. Normally it's flat like any other book.)
Here's my latest effort:
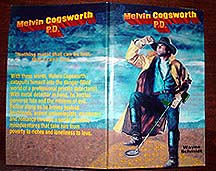
It's a copy of my Melvin Cogsworth series of comic short stories about a man who uses his metal detecting hobby to solve mysteries. There are only five stories in this volume for a total of 20,000 words. That makes the book too thin to place printing on the spine. What I like about this cover is that I was able to use image cloning to wrap the background scene all the way around the book from the front to the back. Please don't let the soft focus of this image lead you to think that the original looks fuzzy. Every detail is pinpoint sharp.
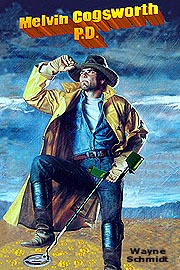
The image of Melvin was interesting to construct. I borrowed a picture from the cover of a western novel (giving the artist credit, of course) and used cloning in Adobe Photoshop to remove the gun in a holster he was wearing and a rifle in his hand. Then I had to add a left hand (it was hidden in the original by the rifle, and a left foot, which was off the lower border in the original. After that I placed him on a pile of gold coins. The trickiest part was putting a metal detector in his left hand. To do that I took a picture of an actual metal detector, used a trace select option to capture it, pasted it onto the picture, scaled it, then used the clone device to move his arm, which was under the pasted detector, to the area above it. All in all this cover took me 10 hours to make. Here's a sharper image of the front cover:
Is a paperback
book not good enough? No problem! Just click on BOOKBINDING
201
to learn how to make a hardback book that's even more impressive!
![]()
Click
here to go to my main page and browse 30 other subjects