EXPERIMENTS WITH BABY BRINE SHRIMP:
How to hatch and collect brine shrimp to feed to bettas.
(Click on Bettas to return to the main betta page or on main site to browse 70 topics ranging from exotic kaleidoscope designs to the strange world of lucid dreaming.)
Brine shrimp are tiny shrimp-like creatures that grow in salty water such as the great salt lake. Their nearly microscope eggs can remain dormant for years then suddenly burst to life when added to water. They are commonly sold as "sea monkeys" in kits for children. They are aurguably the best food for baby bettas.
This page was written with the most recent updates at the top of the page. If you wish to follow my progess as it happened, then please scroll down to the bottom of the page and work your way up.
Brine
shrimp hatch in a very peculiar way. They extrude an envelope out of
the cyst (egg) and mature in this sack. The following images at 160X
show this process:
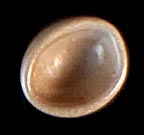
As they come out of the container, dry brine shrimp cysts look like ping pong balls with one side crushed in.
Soaking
in water for one hour rehydrates them into perfect spheres 0.008
inches in diameter.
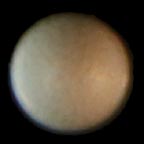
While
the lighting makes this one look white, they are really dark brown.
If decapsulated with bleach they change from brown to white and finally to orange.
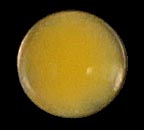
After several more hours in the hatchery, the hatching process starts by the extrusion of a sack in which the brine shrimp grows.
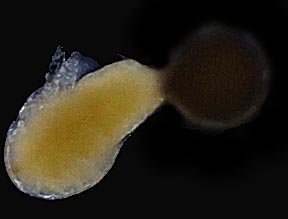
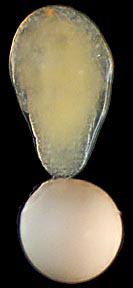
After 10 to 20 hours the brine shrimp starts breaking out of the sack.

A
fully hatched brine shrimp napuli. They are 15 to 20 thousandths of
an inch long whether they hatched from San Fransisco brand cysts,
Salt Lake cysts or decapsulated cysts.
I
have not been able to measure any significant size difference
between these three types.
The following short video shows the process:
NEW!!! My Latest Brine Shrimp Hatchery System
The little test tube hatchery system mentioned further down this page works fine, but once I started having more successful spawns with 100 or more fry, I quickly learned this system could never produce the number of baby brine shrimp required. The complicated collection system it used also turned out to be too awkward and slow. I needed something that reliably pumped out tens of thousands of fresh brine shrimp at least twice a day. Here's what I came up with:
First and most important: I do not decapsulate the eggs. I found it to be too tedious a procedure for producing large quantities of brine shrimp.
I start by taking one of the 3/4 gallon square plastic jars I use for holding my bettas and fill it one inch from the top with 80 degree water. (These jars were used because I had them in abundance, not because they were ideal. Any tapered container of similar size would due as well.) To this I add 2 tablespoons of baking soda. (My tap water's PH is neutral, 7.0. If yours is acidic or alkaline, you will have to adjust the amount of baking soda accordingly.) I do not add salt. I haven't measured any reduction in hatching rates from not doing so and brine shrimp hatched in none-salted water last longer in the fresh water of the fry tank than shrimp from salted water because they do not suffer an osmotic shock. I then add anywhere from 1/16 to 1/2 teaspoon of brine shrimp eggs. The amount depends on the number and size of the fry. The smaller amount is sufficient for a single feeding of 100 fry that are in their first week. The larger amount provides enough shrimp for 100 fry that are up to seven weeks old. Next I cover the jar with a plastic snap-on lid that has a hole near one edge and insert a rigid bubble line through the hole so that it reaches into one of the corners of the jar. This jar is placed in a ten gallon tank filled with enough water so that when two of these brine shrimp hatchery jars are in it, the water level in the tank is the same as inside the jars. The jars are placed in bowls resting on the bottem of the tank that hold the jars so that the corner with the bubbler in it is pointing down. This helps prevent the eggs from settling. The tank is equipped with a 25-watt heater and insulated on the top, bottom, and sides with 1-inch thick foam insulation. (The insulation helps maintain an even water temperature, which is important for consistant hatchings.) The tank water is maintained at 80 degrees. A small pump attached to the bubble line is used to provide enough bubbling to just barely keep the eggs in motion. Eggs give off a gummy discharge and any that are allowed to rest on the bottom of the jar will form a clump and not hatch.
Twenty-four hours later the jar is teaming with shrimp.
I maintain two hatching jars in the tank at all times, starting a new one in the morning and the second 12 hours later at night.
My hatching day begins in the morning. I start by removing the jar that I'd set up the previous morning and is now full of swimming brine shrimp. I place it under a bright light fitted with a collar that directs a 1-inch diameter beam of light down into the jar. I then cover the jar with a cardboard box so that no outside light can get in. The inside of the box is painted flat black. There's a 1-inch hole in the top of the box to let the lamp light in. The shrimp are attracted to the light and congregate in it. They bunch together in such concentrations that their own swimming will, after 30 minutes to an hour, push most of the unhatched eggs away from them. I then use a simple 1/8-inch diameter siphon to draw them out of the hatching jar. By keeping the end of the siphon tube positioned in the middle of the highest density of shrimp, I am able to collect almost pure brine shrimp with a minimum of water and unhatched eggs. During this step it's important to move slowly and be careful to not stir up the water. Doing so will mix brine shrimp with unhatched eggs and you'll have to wait another hour for them to separate. The siphoned water is strained through a paper coffee filter and the brine shrimp so collected are fed to the fry simply by dipping the filter paper into the fry tank.
While waiting for the brine shrimp to gather in the light, I mix up a new batch in another jar and place it in the tank for the next morning's feeding.
This process is repeated in the evening.
The morning collection of brine shrimp invariably leaves several thousand uncollected brine shrimp in the jar. I leave the jar under the light and do a second collection an hour or so later if it appears the fry didn't get enough shrimp from the first collection. Once experience has taught you how many eggs to start with for the fry you have to feed, this second step usually isn't necessary.
While some unhatched eggs will invariably be collected with the shrimp, I've found that the numbers are so low that it doesn't hurt the fry. I haven't seen a single case of swim bladder disease in the three spawns I raised using this system.
The jars tend to become crusted with baking soda deposits that are hard to wash off. I found that using a little vinegar quickly dissolves this crust.
The cardboard box I cover the jars with while collecting shrimp has a small door cut in it on one side. This allows me to observe the shrimp to see if they have congregated into a tight enough swarm for collecting. When I'm not spying on them, I close the door.
I feed my fry at least twice a day, giving them enough brine shrimp each time so that the fry's stomach's look rounded and full. Sometimes this takes up to half an hour. I've never once had a betta fry die because he'd overeaten. Once they get full, they ignore the brine shrimp. During feeding time I turn the filter off to the fry tank.
That's it! It may sound complicated but once the system's in operation it doesn't take long to maintain. Taking a jar out for collection and replacing it with a fresh jar in the tank only takes a few minutes. Siphoning the brine shrimp out and feeding them to the fry again only takes a few minutes.
NEW!!! I discovered that the highest density rate for successful hatching is 1/8 teaspoon per cup of water. Above this you court hatching failure. The eggs give off a discharge that makes the water cloudy and either kills the shrimp or prevents them from hatching. I'm now using 1/16-teaspoon of cysts per cup of water and it's working great.
FEEDING TEST It's said that feeding fry only BBS results in swim bladder problems. I tested this with three fry and none of them developed any problems. Neither did they eat themselves to death even though many more BBS were provided than they could eat. I believe the idea that BBS cause bladder problems results from the fry eating unhatched eggs which mechanically damage the fry's insides. In my experiment I was careful to avoid introducing eggs into the fry tank.
I repeated this test with a spawn of 153 fry. For eight weeks all but half-a-dozen feedings consisted of baby brine shrimp (no cysts) and not a single fry developed swim bladder problems.
PH test! Brine shrimp need alkaline water to hatch. The question is: how alkaline? To answer this, I set up three small (6-fluid ounce) hatcheries and doped them with 1/8, 1/4, and 3/8ths teaspoons of baking soda. They were all kept at the same temperature, given the same amount of eggs, and provided the same amount of bubbling air. The 1/8th-teaspoon batch had very low hatching and it took 12 hours longer to happen. The 1/4-teaspoon hatchery had much better hatching. The 3/8ths-teaspoon experiment hatched the most bring shrimp. This last test corresponds to 2 teaspoons of baking soda in one quart of water.
I followed this experiment with another where the hatching solutions had 3/8ths, 1/2, and 5/8th teaspoon of baking soda. The goal was to see if there was an upper limit to how alkaline the water could be and if increasing alkalinity encouraged either quicker or more hatchings. All three jars hatched the same number of baby brine shrimp at the same time. For myself, I'll use 1/2 teaspoon per 6 ounces simply because it works well and is an easy quantity to measure.
As a side issue, I covered the test setup with some Styrofoam insulation to help the temperature remain at 80 degrees through the night, it had been falling to 72 degrees in spite of a heater. The results were very satisfying. Instead of the brine shrimp requiring 28 hours to hatch as before, the new system had some hatching in 15 hours and almost 100 percent hatching by the 19-hour mark. Constant warm temperatures quicken hatching.
Collection breakthrough! One of the annoying problems with every brine shrimp hatching technique I've tried is that when the shrimp are collected, dozens of unhatched eggs are also collected. These end up in the fry tank, making it messy and worse still, getting eaten by the fry. These eggs, cysts actually, aren't digestible and can damage fry. (I suspect that it's eating these eggs, rather than eating too many baby brine shrimp, that is the reason some people claim feeding fry mostly brine shrimp causes swim bladder problems.) Decapsulating helps, but is a messy, time-consuming procedure that is too much trouble for someone interested in smaller quantities of shrimp.
My solution to this problem was to improve upon the system used by the San Francisco Brand brine shrimp hatcheries. (There's a description with a picture of one of these a few articles farther down the page.) The problem with these is that when the plastic vial is placed in its holder to collect newly-hatched shrimp, unhatched eggs are also draw up into the vial in such numbers as to make them impractical to remove. My system uses clear water to wash eggs out of the area close to the clear vial so that any water that's drawn into the vial is devoid of eggs. Here's a picture of the system:
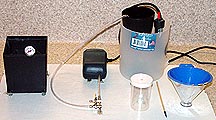
The black box on the left is the bottom of a Frisco hatchery. I use it to hold a thermometer, a tube of eggs, measuring cups, etc., needed to run the system. The smaller black box in the middle is an air pump. Immediately to its right is the bottom half of a plastic pitcher equipped with a small electric heater (the small black cylinder with a red shaft sticking out of it). This is the hatchery's water bath to maintain 80 degrees. The large black container inside the pitcher is a wine glass painted black. This is filled two-inches deep with water and 1/20th of a teaspoon of brine shrimp eggs. The tube from the pump to the wine glass provides aeration.
Twenty-four hours after the eggs are added the shrimp have started hatching and can be collected so the air line is removed. On the far right is a blue plastic funnel. A translucent plastic cap with a 1/8th-inch diameter hole in the center was attached to the bottom of the funnel. The funnel's outside is covered with aluminum tape to block light. Next to the funnel is a wood skewer with a tapered end. The skewer is jammed into the hole in the bottom of the funnel to seal it and 1-inch of water is added to the funnel. The funnel is then placed into the wine glass and the skewer gently removed. Since the water in the funnel is at a higher level than that in the glass, the clear water in the funnel flows out into the wine glass pushing any eggs away. While this is going on, the clear plastic collection vial, which has previously been filled with water and capped, is inverted and gently placed into the funnel. A bright light overhead attracts baby brine shrimp up through the opening in the funnel, to the opening in the vial, and up into the vial. After ten to twenty minutes, the vial can be removed and the shrimp fed to the fry.
I've repeatedly tested this system and have yet to see a single egg get into the collection vial. I plan on using this system to feed the fry from my fifth spawn to test whether they will over eat to the point where they injure themselves or if they get swim bladder problems.
Converting a hatchery from batch operation to continuous mode: Instead of cleaning out my San Francisco Bay Brand hatchery after each batch, I'm adding 1/20th of a teaspoon of eggs (about 17,000 eggs) every night without bothering to change the water. I then remove the top and add a slowly-bubbling air line. In the morning the air line is removed and the top replaced to start collecting brine shrimp. So far it's been working well with a couple of thousand brine shrimp hatching every day. My concern is that wastes will build up in the hatchery to the point where they compromise hatching. This may take several weeks to happen so please check back from time to time to see how this test is progressing. Even if it only works a couple of weeks it's a useful method because it greatly reduces the amount of work involved in hatching eggs.
After two weeks of operation, the continuous hatching mode for the hatchery presented above continues to pump out baby brine shrimp at a constant rate. Oddly, there doesn't appear to be a built up of dead eggs of egg fragments from hatched shrimp. While absolute numbers are impossible to determine, I'd estimate that the hatchery is producing at least one thousand baby brine shrimp three times a day. I will continue to monitor production rates to see if waste products build up to the point where hatching efficiency drops off. However, as it stands right now, the continuous hatching mode is a success in that it is the easiest, most convenient, and least time-consuming way to hatch baby brine shrimp that I have ever tried or read about.
NEW!!! The hatchery suddenly stopped producing brine shrimp one month into the experiment. It's my guess that waste materials slowly built up to the point where the eggs either couldn't hatch or, if they did, the newly-emerged brine shrimp quickly died.
However, I don't consider the experiment a failure. For almost a month the continuous-hatching technique produced a steady supply of clean baby brine shrimp for almost no effort. In the future I will use this technique. The only thing that will be changed is that at the three-week point I will change the water.
Baby brine shrimp for adult bettas?
It
works! I fed three of my adult bettas a couple of hundred baby brine
shrimp each. The adults happily snapped them up as they came across
them. It took a couple of hours but they eventually got them all. It
wasn't the feeding frenzy adult brine shrimp inspire. It was more
like this was merely something to occupy some time. Still, in an
emergency this is something that might be useful to know.
I
test drive the San Francisco Bay Brand Brine Shrimp Hatchery!
I prefer to place new articles at the top of my pages so that visitors don't have to scroll down to get to the newest material. I almost hate to do that in this case because this article reduces the value of the decapsulization and hatching technique articles further down the page. Anyway, here goes:
In early March, Mary Whitington Worth very kindly emailed me to recommend I try a baby brine shrimp hatchery marketed by the San Francisco Bay Brand company, the same people who sell the small vials of brine shrimp eggs we all love to pay exorbitant prices for. I took Mary's advice and am glad I did because it's revolutionized how I hatch brine shrimp. Here's what the hatchery looks like:
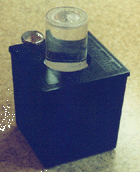
The lower black box is four inches square and five high. The clear vial is 1 & 1/2 inches in diameter and 2 high. The vial has a white, snap-on lid with a 1/4-inch hole in the center. (The thermometer is not included. I added that myself to monitor temperature and block light from entering a hole I ended up drilling in the top.) This unit is called "The Shrimpery." The instructions say to fill the bottom with water, and add the contents of one of three identical packets sent with the hatchery. (Each packet contains eggs, salt, and something to correct the water's PH to above 8.0.) The clear vial is then filled with plain water, capped, and pushed down into a holder in the top of the black box. A bright light over the entire unit attracts any brine shrimp that hatch into the clear (non-salty) water in the vial. After 24 hours, depending on temperature, the clear vial is removed and the water, with baby brine shrimp, dumped into the fry tank. No decapsulitzation, egg shells, washing, or straining necessary! It sounded too good to be true but I was intrigued, so I decided to give it a couple of test drives.
The first thing I did was to set it up with a batch of newly-hatched brine shrimp to see how fast they would find their way up into the clear vial. I was delighted when it was teeming with shrimp in only a few minutes. What this told me was that they move into it quickly, which implies that newly-hatched shrimp aren't likely to wait around for hours in the lower tank. This means that if harvested regularly, the shrimp in the upper vial are new and in prime condition to be fed to fry.
The second test I ran was to set it up with eggs. That's when things went a little wrong. I noticed that because the eggs float, many of them were pushed up into the clear vial when I pushed it into its holder and tapped out the bubbles. Two things fixed this problem. First, I drilled a small hole in the top of the black lower container. After setting up the unit, I funneled eggs into the container through the hole. The water level is above the bottom of the indentation that holds the clear vial so none of the floating eggs could find their way up into it. The second change was how I push the clear vial into its holder. Instead of quickly pushing it straight down and tapping out the bubbles that can block the hole and stop the brine shrimp from swimming into the top, I slowly eased it into place at an angle then gently pushed it level. The angled approach allows the bubbles to clear without gurgling up into the vial. This helps prevent eggs being carried in after they've soaked for a while and drift into the depression that holds the vial.
I placed a 40-watt light above it and closed the new hole with a thermometer. The light kept the tank at an even 80 degrees. Twenty-four hours later, there were 100 or so baby brine shrimp in the upper vial. I harvested them, refilled and replaced the vial. Two hours later there were another 100 shrimp, as so on every 2 - 3 hours. For 36 hours the hatchery pumped out brine shrimp are a steady pace. When I harvested the last vial, I looked into the lower container and could see no lingering brine shrimp, proof that the collection system works efficiently.
What surprised me the most was that aeration is not needed. In an article below, the hatching rate for non-aerated systems is virtually nil. The only explanation I can offer is that aerated hatcheries are funnel shaped and if un-aerated, the eggs remain in a tight cluster. In this hatchery, they are allowed to spread out over a large volume. Perhaps the eggs don't hatch well in tight clusters. In any event, the hatchery worked without having to blow a single bubble into it.
In other brine shrimp hatching experiments, I found that they don't need salt to hatch. They do, however, need to have alkaline water. So, when I set my hatchery up I add one teaspoon of baking soda to the water in the lower tank. This raises PH of neutral water to 8.3, perfect for hatching shrimp. I've tested the PH of the upper and lower sections after ten hours of undisturbed operation and measured no increase in the PH of the upper vial. This proves that the two waters do not mix, which is important since if it did it could affect the fry tank's PH when the vial's water is dumped into it.
My final judgment on this hatchery is that with the minor modification of a hole drilled in the top, it is an outstanding little unit that's well worth its $9.00 price. (I found mine at a PetsMart store.) Best of all, it eliminates decapsulization and straining. Care-free baby brine shrimp! What more could any aquarist ask for?
The secret to how the hatchery works without aeration: inefficiency. I set the hatchery up with one-eighth of a teaspoon of brine shrimp eggs. From this I collected 1,000-2,000 brine shrimp. But wait! There are 45,000 eggs in one-eighth of a teaspoon. That means that the hatching efficiency is only 2-4 percent. Ninety-six to ninety-eight percent of the eggs are not hatching and being wasted. The cost of the convenience of not having aeration is very steep.
Still, I'm not complaining. The hatchery is so easy to use and shrimp eggs are so inexpensive that it's still a good way to hatch shrimp. One thing I noticed in this test is that with one-eighth of a teaspoon of eggs, which was more than used in the earlier tests, the hatchery produced shrimp for two full days.
The effect of adding aeration to the hatchery: For one thing it's messier. The turbulence from the bubbles cause many more eggs to work their way up into the clear collection vial. By placing the tube carrying the air into the hatchery in one corner as far from the vial as possible, I've limited the number eggs forced into the vial to about a dozen. I found that the aeration quadrupled the number of baby brine shrimp hatched from the same amount of eggs.
Aeration test
I've come across many things that people say have to be done a certain way, yet when tested, it turns out that's not the case. For example, every source I've read about brine shrimp states that they have to be hatched in salt water. My own experiment (please see farther down the page) indicate this isn't so.
This got me wondering if the recommendation for aerating brine shrimp eggs was necessary so I set up two identical vials of brine shrimp eggs except that one didn't have aeration. After 24 hours, the vial with aeration teamed with baby brine shrimp, the one without only had ten. It would seem aeration is a must.
Brine shrimp hatching solutions
Would you believe fresh-water brine shrimp? This sounds like a contradiction in terms but it works. I tried hatching both decapsulated and regular brine shrimp eggs in water without salt and discovered that they hatch just fine in plain, unsalted water, as long as there is some baking soda added to incease the PH enough to help an enzyme they release to dissolve a hole in their cysts. The advantage of doing so is that when they are added to the fry tank, they don't experience a large osmotic shock from going form salt to fresh water. The brine shrimp hatched in fresh water tend to last longer in the fry tank, which seems to confirm the advantage.
I also tried hatching brine shrimp in water with no baking soda (used to bring the PH up into the 8-9 point range). It didn't work. The high alkalinity is needed to help them dissolve part of their egg case. Decapsulating does not help.
Decapsulation techniques
I won't repeat the decapsulation process because it's available on most sites. What I would like to share are some techniques that make it simpler if, like me, you only need a thousand or so baby brine shrimp.
Most directions have you decapsulating a teaspoon or more of brine shrimp cysts or eggs. This can represent as many as 400,000 eggs. Since I only raise one spawn at a time I never need anywhere near this number. Not only do these usual directions result in hatching hundreds of times as many shrimp as I need, it also does so with them mixed, at various stages, with large (cups to quarts) volumes of water, which can take a long time to filter through the fine mesh needed to catch the tiny shrimp. Here's how I simplify and speed things up.
1. Limit the number of eggs. I only decapsulate 1/40th or less of a teaspoon of brine shrimp at a time. I measure them out using the quick-counting technique on the main betta page or by making a small measuring scoop using a knife to cut a flat surface on the end of a bamboo skewer.
2. Limit the amount of soaking water and decapsulation solution. Instead of using cups of soaking water, I add the eggs to the small test tube from my ammonia test kit (after thoroughly washing it of course) and fill it with only 1/2 inch of water. After an hour's soaking, I add 3/8ths inch of bleach to it to decapsulate the cysts. Shaking the test tube is easier than stirring a larger container and there isn't the problem of eggs getting pushed up on the sides of the larger container. The test tube technique also has the advantage of keeping the eggs more concentrated so that it's easier to see the color change that tells you that the process is complete. Lastly, the small amount of liquid makes straining the eggs quick and easy.
3. Don't pour the eggs into the vinegar-water neutralization solution. This disburses the eggs into a large amount of liquid and slows the straining process. Instead, simply pour the neutralization liquid over them while they are still in the strainer after being strained from the decapsulization liquid.
4. Use paper towel to blot the last of the water out of the strainer. I use a fine cloth strainer. While it catches all of the eggs, the last few drops of liquid can take forever to drain. Until it does the eggs can be difficult to pick up. I found that placing the bottom of the strainer in contact with paper towels causes the last of the water to be sucked out leaving the eggs high and dry and easy to collect with a small scrapper. This may not be an issue for people decapsulating large numbers of eggs but when you only do small quantities, you want to make it easy to collect as many as possible.
My
hatching system
Just like my decapsulization system is designed to deal with smaller, one-spawn quantities of brine shrimp, so too is my hatching system. Instead of large funnel-shaped containers like inverted 2-liter soda bottles, I use a test tube. Actually, it's the glass vial from one of those watering tubes for birds - the type where you fill the tube up with water, slip the slotted cap over the end, turn it upside down and wedge it into the bars of a bird's cage. In my case, I throw away the plastic bottom and just use the glass tube. I fill it with three tablespoons of water, add 1/8th teaspoon of baking soda, add decapsulated eggs, a gently-bubbling air line, and place it in a 3/4-gallon plastic jar filled with water. A 40-watt light overhead heats everything up to 80 degrees and provides the light the eggs need to hatch. Twenty-four hours later I've got a test tube full of baby brine shrimp. I move the light closer or farther away to keep the temperature at 80 degrees. The nice thing about this set up is that I get just the correct amount of shrimp for a single feeding and the small amount of liquid strains quickly.
Here's what it looks like:

The square jar is 6-inches on an edge. The test tube with the eggs is 7-inches tall. One tube is enough because I only feed my fry brine shrimp every other day. If I needed more, there is plenty of room for more tubes or I could easily hatch more eggs in a single tube. This setup cost less than ten dollars.
The pros and cons of decapsulization
Pros: Unhatched cysts and the shells from hatched brine shrimp do not have to be separated from the brine shrimp before feeding and the decapsulization process sanitizes the eggs.
Cons: It's a hassle, plain eggs are so close to neutrally buoyant that it takes much less air to keep them moving - decapsulated eggs require more with the result that many are thrown up onto the dry sides of the tube and airline and don't hatch.
For me the advantages outweigh the disadvantages. Undecapsulated eggs are almost impossible to separate from live baby brine shrimp because they don't settle out or rise to the surface. I've never found the trick of using a bright light effective for attracting the brine shrimp. They seem to prefer falling to the bottom of the tube.
Why
do some people have success feeding baby brine shrimp to fry while
others claim the shrimp are far too large?
I was surprised that many sources disagree on this issue. After looking into it, I think I discovered the reason for the disagreement: there are two sizes of brine shrimp eggs. Eggs from the Salt Lake strain of brine shrimp are large, averaging 190,000 per teaspoon. Those from the San Francisco strain are half the volume and count out at 375,000 per teaspoon. The smaller eggs produce baby brine shrimp which are just barely small enough for some three-day-old fry to eat. Baby brine shrimp from the larger Salt Lake strain are too large until the fry are a week or two older. Even the small type are a strain. Eating just one of them made the cheeks on my five-day-old fry bulge.
NEW!!! Microwaving Brine Shrimp Eggs!
In early December of 2004, I received an email from William Harrington saying he took his decapsulated brine shrimp eggs, placed them in a cup of water and microwaved them on high for 3 minutes or so until they exploded like popcorn and turned bright red. He then feeds them to his guppy fry and they go crazy for them, scouring the tank to get every last one. He also said that the fish seem to grow much faster when fed this way than with any other food including freshly hatched brine shrimp. I have not tried this yet myself and would be interested to hear from anyone who has.
![]()