CLOUD CHAMBERS
Introduction:
Building a cloud chamber is simple and enables anyone to witness in real time many of the subatomic particle interactions that drive the universe in which we live.
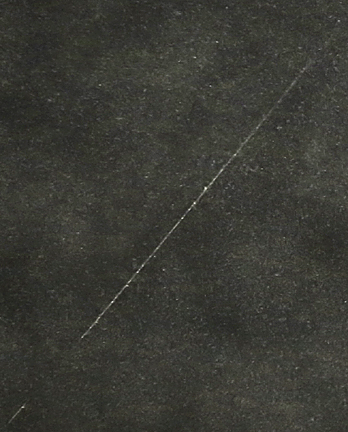
A diagonal
view into a cloud chamber in operation
All of the
videos on this page are so short that before Youtube's
automatic
resolution sensor kicks it up to 1080 the video is over.
For that
reason I recommend pausing the videos right away, resetting
the
resolution to 1080, resizing to full screen then restarting them.
Besides being fascinating in their own right, cloud chambers are excellent teaching tools and science projects. The addition of digital cameras enable users to reopen the door to the earliest days of particle discovery. In so doing anyone can experience the same excitement of discovery the greatest minds the world had when they saw for the first time the mysterious tracks of collision events.
This page provides all the information needed to build and use a high performance cloud chamber capable of detecting alpha particles, beta particles, muons, positrons, delta rays, gamma rays and even primary cosmic rays. It also provides the most detailed explanation available on the Internet of how to identify each of these particles by the appearance of the tracks they produce.
The first cloud chamber was developed by Charles Wilson in 1894. By quickly pulling out a piston in a cylinder, he reduced the pressure in an attached glass vessel enough to establish the conditions for cloud or fog formation. This version was named an expansion cloud chamber because it was through expanding the atmosphere in the vessel that it created the required conditions. Any charged particle moving though the vessel left a visible track that could be photographed and analyzed. The appearance of the track, how it moved and how it responded to magnetic fields enabled early researchers to calculate its mass, energy and charge.
As useful as Wilson's cloud chamber was it had one weakness: it only worked for a few seconds. It wasn't until 1936 that Alexander Langsdorf developed the diffusion cloud chamber to overcome this shortcoming. His chamber created the necessary conditions by cooling the vessel's atmosphere. It was much easier to build, simpler to operate and best of all could run indefinitely. It was called a diffusion cloud chamber because vapors diffused downward from a warm zone at the top of the chamber to a cold one in the bottom. This is the type of cloud chamber presented on this page.
Cloud chambers ruled supreme for decades as the premier tool for particle discovery. Although they have since been replaced with more advanced detectors, they have justifiably earned a permanent place of respect as the device that opened the door to the science of particle physics.
Oddly enough, the easiest way to understand how cloud chambers work to to understand how rain forms.
Rain droplets form when water molecules in the atmosphere are concentrated enough to stick together to form droplets that fall to earth. But before that can happen a rain drop needs to have a small particle on which to grow, in the same way a crystal needs a seed or nucleation site to start. In the atmosphere, dust, pollutants and even pollen provide most of the seeds upon which rain drops form. Without them, the pressure, temperature and water vapor concentration can actually exceed what's needed to form rain, yet none will form. This state of affairs is called a supersaturated solution. It wants to form droplets but can't.
This is the situation in a cloud chamber. Whether by expansion or cooling, the conditions are ripe for droplet formation but there are no particulates available for it to do so. Then, all of a sudden a charged particle flies through the chamber leaving a stream of ionized atoms in its wake. Even more effectively than specks of dust, these charged atoms attract all the surrounding neutral atoms to them and in so doing precipitate the formation of a line of droplets tracing the path the particle took through the chamber.
This image of a violent particle collision occurred in the cloud chamber built for this web page.
The appearance and shape of these tracks make them very easy to understand. By the end of this page you'll be able to look at a track and tell whether it's a low energy beta particle or a muon with no more effort than it takes to tell the difference between chocolate and vanilla Oreo cookies.
The diffusion cloud chamber is little more than a transparent vessel with felt saturated with alcohol in its top. Place it on a block of dry ice and in as little as ten minutes it'll be operating. The alcohol evaporates and because it's heavier than air it falls to the bottom of the vessel. Near the bottom plate, the alcohol gets cold enough to form a supersaturated zone. Any charged particles traveling through this zone will leave a track that can be seen if a bright light shines through the side of the chamber. Diffusion chambers can be made out of nothing more than a discarded plastic cup and a scrap of felt. But, such chambers produce very few, hard to see tracks. With surprisingly little more in the way of effort and expense, a high performance cloud chamber can be build that produces dozens of easily observed tracks every second.
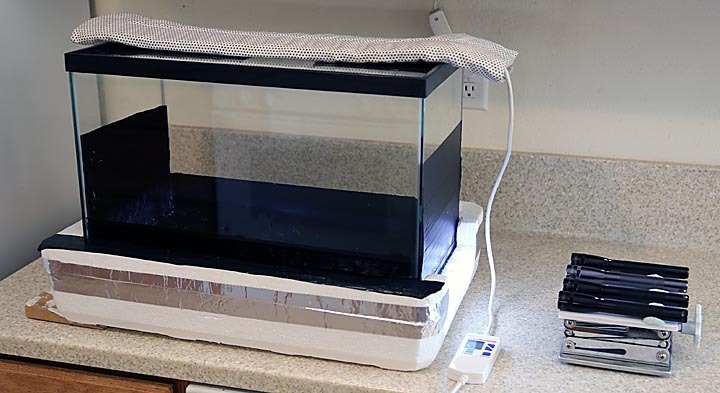
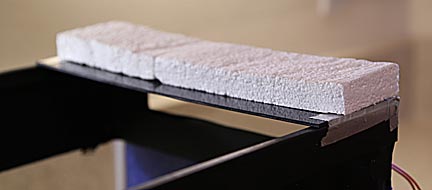
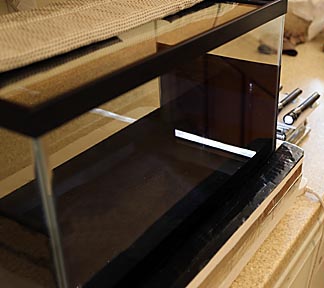
Let's take a second look at the cloud chamber made for this page:
It's a ten gallon fish tank sitting on a layer of dry ice in an insulted base. The lower sides of the tank are painted black to help particle tracks stand out. Felt glued to the inside top of the chamber holds alcohol and the electric heating pad on top keeps it warm enough to evaporate. A bank of flashlights on the right illuminate the tracks. A wood shim, lower left, is used to level the bottom of the tank to prevent currents that can distort tracks.
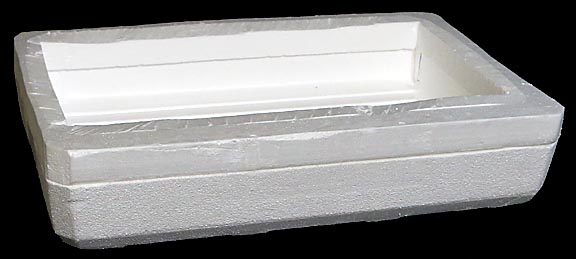
The first step is to make the insulted base. A forty-five quart, thick walled foam cooler chest is perfect.

Cut the sides off leaving a depth of 1.5 inches. Next, cut a 20.5 x 10.5 hole in the lid to fit the fish tank and tape the lid to the cut-down base.
Cut an 8-inch wide section out of the center of the right side of the top to act as a window for illuminating the chamber. Lastly, cover the top of the front edge in black tape to reduce reflections on the front of the chamber.
To work efficiently, the bottom of the cloud chamber needs to be as cold as possible. The glass bottom acts as an insulator, slowing transfer of heat across it and in so doing reduces the thickness of the track-producing zone. Another problem is that the glass's insulating properties also create uneven temperature zones across it because the dry ice is not in even contact all the way across it. These hot and cold spots create currents that distort tracks.
These problems are solved by removing the bottom piece of glass and replacing it with a thin aluminum sheet. (Be extremely careful when removing the glass. It's almost impossible to do so without producing many razor sharp broken pieces of glass.) A flat, 20-inch wide heavy duty cookie sheet is an inexpensive source for this sheet.
Sanding one side with 220 grit sandpaper allows it to be spray painted flat black to make tracks easier to see. Use aquarium glue to attach this sheet to the bottom.
To see tracks a bright light has to be projected through the side of the tank close to the bottom. The aluminum base conducts so much heat away from the glass that water condenses and eventually freezes on the outside of it. This layer of frost diffuses the light beam so much that the first few inches into the chamber are over illuminated and the rest of the chamber is too dark to see tracks. To reduce this problem, before gluing the aluminum sheet to the bottom of the tank, cut two inches off the end of it and replace it with a piece of Plexiglass insulated with a 1/2-inch layer of foam cut from the scraps left over from making the insulated base.
This reduces the frosting problem enough so that the heat from the flashlights will be enough to keep the glass clear.
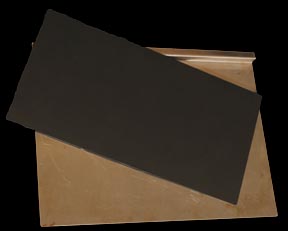
Using aquarium glue, attach a black felt to a sheet of glass sized to fit the top of the aquarium. The felt should cover the rear two-thirds of the glass. A four-inch square cut out of the felt's center provides a window for a camera. The front third is left uncovered so people can look straight down at the tracks.
To provide as much dark background as possible for viewing particle tracks, the bottom three inches of the inside of the tank were spray painted flat black. Be careful to mask both the inside and outside areas of the tank before painting. Leave a 1.5-inch high area near the bottom of one side unpainted. This is needed as a window to allow light into the chamber.
The light window near the bottom of the tank
If the cloud chamber is only going to be viewed from one side, the entire inside except the front, top and light window can be painted. It's important to paint the inside because if the outside's painted then light can reflect off inside glass surfaces and reduce trail contrast.
Any focusable, bright source of light works well for the chamber. The goal is to produce a one-inch thick, brightly illuminated plain through the chamber one-half inch off the bottom. Any higher and the descending fog will be bright enough to reduce visibility. Closer than 1/2 inch to the base and light hitting it will be reflected up and reduce contrast.
Four LED minimaglites work well when focused for maximum spot intensity at 20 inches. If used, these will be the single greatest expense in building a cloud chamber.
While this chamber will work very well, taping a square of black velvet to the inside of the end opposite the flashlights will reduce contrast-reducing reflections. Additionally, a 1/2-inch high, flat black strip of aluminum glued to the seam between the aluminum and Plexiglas will act like a light baffle, blocking light that would otherwise reflect off the bottom of the cloud chamber and make tracks harder to see.
How to Use an Diffusion Cloud Chamber:
Now that you've built a cloud chamber, it's time to fire it up.
The first step is to saturate the felt glued to the glass top with 99.9 percent pure methyl alcohol and cover the chamber with it. High purity isopropyl alcohol can also be used, but methyl alcohol has a lower vaporization temperature that helps produce a thicker track producing zone. Ninety-one percent pure isopropyl alcohol is available very cheaply and can also be used.
WARNING! Methyl alcohol and its fumes are dangerous. In addition to being extremely flammable they are poisonous. Isopropyl alcohol is slightly less dangerous but both must only be used under well ventilated conditions with knowledgeable, adult supervision.
Next, fill the insulated base with dry ice.
WARNING! Dry Ice is so cold, -79 degrees C, that it will quickly destroy skin. Always wear heavy gloves, protective clothing and eye protection.
In Europe, dry ice commonly comes in small pellets. Spread these evenly and tamp them down with a wood block to form an even, solid layer 1 to 1.5 inches thick. The goal is to have as much of it in contact with the aluminum base as possible. The one exception is the end where the light window is. Leave a 2-inch wide empty zone there to minimize heat being pulled out of the glass.
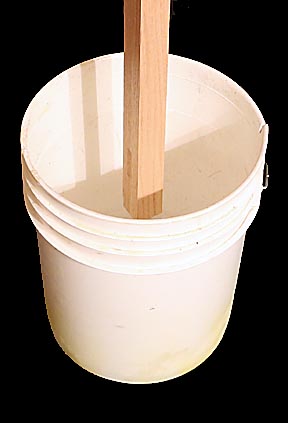
In the United States, most dry ice comes in blocks or sheets. I prefer sheets because they are usually already the 1.5 inch thickness needed. If blocks are all that are available, they'll needed to be broken up into small pieces the size of marbles. I found the easiest and safest way to do this is to place the block in the bottom of a 5-gallon bucket and pound it with a length of 2x2 inch wood.
Again, after pouring the crushed dry ice into the base tamp it down level.
Use aluminized bubble wrap insulation as shims to make sure all the slabs are level.

Place the chamber on the dry ice, making sure the base makes as much contact as possible with it. After ten minutes the active layer should have built up enough to start seeing tracks. Wipe off any condensation on the light window, turn on the flashlights, push them up so they are tight against the window and watch the show. The track-producing layer will continue to thicken for the next half hour. As it does, more and more tracks will become visible. Left on its own, in time the top of the chamber will get so cold the alcohol evaporation rate will decrease to the point where the track zone will start to collapse. To prevent this a mild heat source needs to be placed on top of the tank. An electric heat pad set to 126 degrees is perfect but any heat source will work. Hot water bottles are often recommended.
Keep an eye on the flashlight window. If it frosts up it'll diffuse the light and make seeing tracks difficult.
The best direction to look into the chamber to see as much of what's going on as possible is through the front, at a low angle and looking in the direction at the light source. Focus on the middle of the chamber. At this angle you get the maximum amount of light scattered off trails and the minimum off unrelated droplets. Getting closer to the end opposite the light source seems to brighten the noise more than the tracks. Looking straight in the side is better for seeing individual tracks but they won't be as bright. Here's the video from the top of the page again to show what the action looks like at the optimal viewing angle:
Unfortunately, while this angle provides the most entertaining scene, there are so many tracks they overlap in a confusing tangle. This makes it difficult to appreciate and identify individual events.
For that, viewing straight in through the front of the chamber is better. For photography, you'll want to place the camera looking straight down through the top of the chamber.
Understanding Cloud Chamber Tracks:
Identifying the particles that make tracks in a cloud chamber is simply a matter of looking at how thick they are and what paths they follow. The most common particles are low energy beta particles: electrons (very low mass particles with a -1 electric charge) moving comparatively slowly. Because they are light and moving slowly, they are easily deflected by atoms and trace out erratic paths. Note: all of the following images have been resized so that if your monitor is set to the standard 72 PPI they will appear actual size. Additionally, most of the following information except the images came from http://en.wikipedia.org/wiki/File:Nuclear_particle_in_a_diffusion_cloud_chamber.png.
![]()
From left to right: First up is the most common track. This low energy beta is working it's way up from the lower right to upper left. As it does, it interacts with atoms and gradually looses energy and slows down. Its path becomes brighter (slower means it has more time to interact with atoms and ionize them to create a denser track) and more convoluted because it's easier for atoms to deflect it. The dominant mode of energy loss is through the phenomenon of decelerating radiation called Bremsstrahlung. As an electron is deflected by an atom it releases a photon. The energy from this photon comes from the electron's kinetic energy thereby reducing its speed. Most electron/atom interactions are merely close approaches, resulting in small changes in the electron's direction. Collectively, many such interactions appear as gentle curves in the electron's path. But once in a while things get more exciting.
In the left middle is another low energy beta particle that starts off coming down out of the upper right corner. Things are going like the first example until it comes close enough to an atom to experience a sudden, violent change in direction. In this case it almost reverses its direction. Afterward it continues on its meandering path, but with sharper curves, proof it lost energy in the maneuver.
Many beta particles have so little energy their tracks can be as little as 1/2 inch long. These particles follow the most convoluted paths, such as the one at the middle right which traced out the letter "S."
Finally, on the far right is a more energetic beta particle (as evidenced by it following a straighter path) being suddenly deflected by a close approach to an atom.
The next most common track is made by high energy beta particles.
Because its energy is high enough, it has sufficient speed to punch through the cloud chamber with little deflection. Usually all that's seen is a slight curvature. If they remained in the cloud chamber's sensitive zone long enough, we'd see them loose enough energy to start behaving like low energy beta particles.
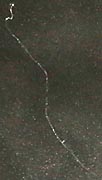
Rarer, but much brighter, are tracks created by alpha particles, Helium nucleuses with a +2 electric charge.
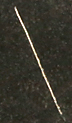
These are one to two inches long, very straight, bright and dense. Their high mass makes them difficult to deflect so they don't get knocked around like beta particles. Here's a video of what they look like in a cloud chamber:
The question is: Where do they come from? Even the most energetic alpha particle can be stopped by a sheet of paper, so the glass walls of the tank represent an impenetrable barrier to them. The answer is that they are produced inside the chamber by the decay of radioactive Radon, a naturally occurring gas in our atmosphere. Radon produces alpha particles with a range of energies, which in turn determines how long a track they make. But this raises an even more interesting question. Since the glass walls prevent alpha particles from entering the chamber, then how do all the electrons get into the cloud chamber?
While their small size allows high energy beta particles to penetrate deeper into dense materials than alpha particles, the glass walls of the chamber are more than sufficient to block them. So where do they come from? The answer is the 500 pound gorilla of the cloud chamber: the muon.
So far we've been talking about particles with energies of thousands to millions of electron volts. A muon is small and carries a -1 electric charge like a beta particle but has 207 times the mass and energies averaging 4 billion electron volts at sea level. Their high mass and extreme energy means they blast through the cloud chamber like a canon ball through tissue paper.
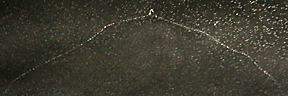
A muon bores though the cloud chamber.
Straight as an arrow, muons leaves tracks so long it's common to see blank spots as they pass through areas where droplets can't form. The only thing that can deflect them is an extremely close interaction with an atom or a spontaneous decay into a beta particle and two neutrinos, which carry no charge so they don't leave tracks.
The following video shows low energy beta particles, high energy beta particles and a very faint track from a muon:
Muons are created when cosmic rays, most commonly high energy protons, interact with the upper atmosphere. Muons have so much energy that they can penetrate hundreds of feet of rock. They are created in such quantities that every cubic centimeter of air at the Earth's surface if flooded with them. A very few decay or interact with atoms in the cloud chamber to create the electrons we see. Approximately once per minute in a chamber as large as the one on this page, a muon leaves a visible trail.
There are two problems with this explanation. The first is, "How are high energy electrons differentiated from muons?" Researching dozens of references only provided the weak answer that muons leave perfectly straight tracks, unless they interact or decay, while high energy electrons will show some curvature. In actual use it can be very difficult to tell if a trail is perfectly straight or merely almost straight. The frustrating fact is that in the absence of a strong magnetic field, which would curve the high energy beta particle much more than the muon, it's impossible to tell.
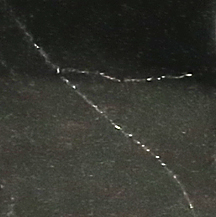
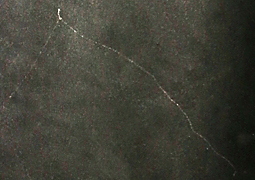
Consider the following image from earlier in the page:
Is the sudden change in direction shown in this image from a high energy beta particle interacting with an atom to change direction, or a muon spontaneously decaying with a high energy electron moving off toward the upper right corner while two unseen neutrinos fly off toward the lower right to balance momentum? Again, in the absence of a magnetic field it's impossible to tell.
Equally problematic is the question of where low energy beta particles come from. When muons decay or interact with an atom to give off a beta particle, the beta particle leaves with an average energy of 45 million electron volts. This high an energy would let it rip through the cloud chamber in a long, straight line, not the short, wandering paths most commonly seen. The answer is that while muons create high energy beta particles, these aren't usually created in the active trail-producing zone but in the much large volume above it. These high energy beta particles interact with the air and by the time they wander into the track layer have lost most of their energy.
Antimatter muons are also created in the upper atmosphere. When they decay they create positrons, electrons with +1 charges. These can be differentiated in cloud chambers if a strong magnetic field is present. With the north magnetic pole facing upward, electrons will curve to the right while positrons will curve to the left.
The problem with all of the above is that when watching a cloud chamber, the tracks, which last a second at most, don't remain visible long enough to appreciate. The solution is to use a camera to capture images of whole groups of trails for later study. This opens up an entirely new and satisfying way to use a cloud chamber. To do so set the camera on manual so that you can control the exposure. Place it on top of the chamber looking straight down and use a intervalometer, a trigger you attach to the camera to release the shutter once a second. I found shooting at 1/25 second, ISO 6400 and F5.6 works well for my lighting system, though I plan on experimenting with ISO 12,800 so I can stop the lens down for increased depth of field. Another option is to use the camera's video function if it has one.
Because most of tracks are small, adjust the camera for maximum resolution. Once it's set up, turn on the automatic shutter release and let it work. Video is easier and will capture more images but they will be lower resolution.
Although the vast majority of images will be boring, once in a while you'll capture something remarkable. The following are a few examples:
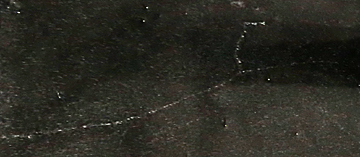
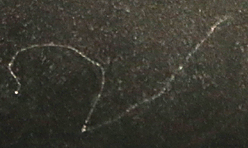
I call these forks. In each case a beta particle collided with an atom to knock off a electron before continuing on its way. Applying the principles that higher energy particles leave straighter tracks and that slower moving particles create more convoluted, brighter tracks, good estimates can be made for the direction the particles traveled.
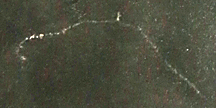
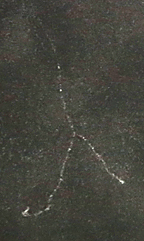
Next we have coat hangers. These are a variation on the previous examples where the ejected electron has so little energy it only travels a short distance. (These are called delta particles.) Particularly interesting is the track on the right, where a high energy beta particle flies in on from the left, collides with an atom, ejects a very low energy electron upward , then continues on toward the lower right as a low energy beta particle.
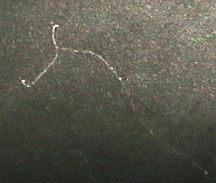
The following image is the pride of my collection:
A extremely high energy beta particle, or more likely a muon, enters from the lower left, collides with an atom and ejects not one but two electrons toward the upper right then continues up toward the top of the frame. This is the only event of its type I captured out of 2345 pictures. If that sounds like a lot, early researchers would regularly go through tens of thousands of photographic plates to record just a few important events.
Even rarer would be to catch such an image where there is no incoming particle. In such a case what has happened is that a gamma ray, which carries no charge so it doesn't leave a trail, interacts with an atom to eject particles.
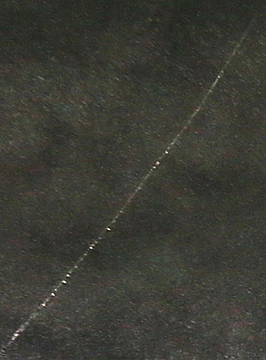
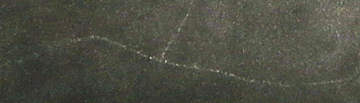
There is one more particle I've detected that is the rarest of all. The following short video is the only time I've seen one out of hours of videos recording and thousands of still images. It'll show up briefly on the right hand side of the screen. The video is only a few seconds long so I recommend pausing it as soon as it opens and resetting the resolution to 1080 and size to full screen.
What it shows is a perfectly straight, bright dense track going diagonally across the full depth of the chamber, a distance over 12 inches. Closer examination indicates the particle track starts immediately at one wall and and stops at the opposite wall, strongly suggesting the the particle traveled completely through the chamber as if the glass wasn't there. The only particle I can imagine having enough energy and the penetrating power to do this is a primary cosmic ray: most likely a doubly charged Helium nucleus with tens of giga-electron volts of energy.
While most cosmic rays are stopped at by the upper atmosphere, a few manage to bore their way down to sea level. I believe this is what created this track.
NEW!!!
Two years after creating this page I got my second cosmic ray. This one was captured in much greater detail. Here's the video:
Magnetic Fields in Cloud Chambers:
Besides the cloud chamber itself, the most important tool early researchers used for analyzing particle tracks was the application of a strong magnetic field, which curved particle trajectories. Measurements of the direction and radius of curvatures enabled the particles charge and mass to be calculated. Permanent magnets back then were far too weak to create the sorts of fields required so they had to resort to expensive electromagnets. Fortunately today, there are high power rare earth magnets that can provide the magnetic field strengths needed. I epoxied several to the bottom plate of my chamber to see what effect they had. The result was complete disaster.
Anyone who hasn't worked with rare earth magnets will find it difficult to believe their strength. Even tiny ones barely a quarter inch in diameter and an eighth of an inch thick have enough pull to pinch hard enough to tear skin. Larger ones are dangerous to have around. They can grab metal from as much as a foot away and smash it into the hand holding the magnet. They seem to have personalities all their own... and they are not friendly ones.
Using quick setting epoxy, the first 3/4-inch diameter by 1.4-inch thick, N42 (13,400 Gauss) magnet mounted on the base easily. The second was a different matter. It needed to be as close to the first as possible, which required manually holding it in place while the epoxy set. Although I was using 1-minute epoxy I quickly learned it had to be held ten minutes before it had set enough to resist the repulsion of the first magnet. I didn't have any clamps with jaws long enough to reach the magnets so each had had to held in place by hand, and there were seven of them.
It took over an hour to finish. After giving the epoxy enough time to finish setting to maximum strength, I placed the base on the cloud chamber and placed it on the dry ice. A few seconds later there was an explosive crack as the differences in coefficients of thermal expansion between the aluminum base and magnets caused all but one to tear loose and smash together. They impacted the glass wall of the chamber hard enough to crack it. The chamber appeared sound enough to finish the experiment with the one remaining magnet so I proceeded. The results were underwhelming.
With only one magnet in place it took several hundred images to find two with particle tracks crossing the magnet. Here's what they showed:

On the left is a faint track from a high energy beta particle and on the right a low energy beta particle. To my eyes I see no curvature. The sharp turn of the one on the right is from a collision, not the smooth curve the magnetic field should have created. What went wrong?
The most likely cause is that while the tracks appeared to be right on top of the magnet they may actually have been over an inch above it. Because the fields of small magnets are notoriously nonuniform the field there was probably too weak. Another possibility is that the area of maximum strength wasn't in the center of the magnet. The tendency to these magnets to prefer to hold small objects off to one side support this. Whatever the reason I was not able to get a high power rare earth magnet to turn a particle. Repeating this experiment with a 4 x 6 x 1/2-inch ceramic magnet produced the same negative result.
Radioactive Sources for Cloud Chambers:
One way to produce tracks in a cloud chamber is to introduce a piece of radioactive material. Several such sources are available but there are practical problems with each.
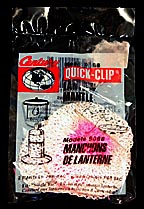
The most common source written about on the Internet are lantern mantels for Coleman type camping lights. Originally impregnated with Thorium 232 (an alpha emitter) to improve brightness and color, in the 1990s Coleman stopped using Thorium in response to public concerns over the radioactivity these mantles gave off. This means only mantles produced by other companies may have Thorium in them. In the United States I found it impossible to find a reliable source for them. Compiling a list from several Internet sources suggested that the following manufacturers may impregnate their mantles with Thorium: Century, Aladdin, Peerless, Petromax, Lancaster Lanterns and Aida. The problem is to avoid negative publicity, none of these manufactures state wether or not their mantles have Thorium in them. Placing orders that may not provide the desired radioactive mantles could get costly. And that's an issue only if you can find someone who sells them. I scoured the Internet and all local hardware, department and sports stores and all I found, other than Coleman mantles, was one by Century in Sports Chalet... and it didn't work. My recommendation is to ignore lantern mantles as a radioactive source.
The next most common radioactive source is the small button of Americium 241 (alpha emitter) in ionization type smoke detectors. It's easily removed and under the right conditions produces a nice concentration of faint alpha tracks, as the following video shows:
The trick to make the track visible is to tilt the chamber slightly to create a slow flow passed the source. This stretches the tracks out long enough to be visible.
Another source for Thorium is 2-percent thoriated tungsten welding electrodes available for as little as $2.00 for the smallest size in welding supply stores. My problem with them was that they produced so few tracks they weren't very entertaining.
The best radioactive source I found was a needle source made specifically for cloud chambers and sold by spectumtechnologies.com. The one I got was PB210 (emits alpha and beta particles) for $50.00 after tax and shipping. I couldn't see any beta tracks but it produced many alpha tracks and did not required the chamber to be tilted to create a flow passed it.

All of these sources have two weaknesses. First, because of their mass they cool slower than the surrounding air in the chamber. This creates a zone around them that's warm enough to prevent trail formation for a long period of time. Second, shortly after they have cooled enough, droplets of alcohol start forming on them that absorbs the radiation before it can form trails. Lastly, and most importantly, they are boring.
Yes, if everything works they produce some short tracks and in so doing demonstrate radioactivity. But all the tracks are small and look the same. When I showed the needle source to three of my grandchildren it only held their attention for a few seconds. They, as well as myself, found the longer and more complex patterns of the naturally occurring tracks in the rest of the chamber more interesting.
NEW!!!
The following video presents everything on this page in live format as well as many new particle tracks with detailed explanations:
Conclusion:
Cloud chambers are fascinating devices to build and use. While they won't enable anyone to discover a new fundamental particle, they are entertaining and can help people re-experience the excitement of discovery early particle physicists felt over a century ago. Cloud chambers are effective for classroom demonstrations and science projects all the way up to college level work.

Return to my main page to browse 60 other subjects