Wayne Schmidt's CPS 2000 Super Soaker Page Disassembly, repair and modification photos with detailed explanations.
Hidden Treasure:
No joy matches discovering a long lost treasure. Recently I was fortunate enough to experience this when, while working on a long-over due cleaning of the garage, I found a dusty brown plastic bag tucked away in the garage's darkest corner. When I opened the bag I found myself staring at not one but two CPS 2000 Super Soaker squirt guns. My son had purchased one back in 1996 when he was in the Army and after showing it to me during a leave I immediately ran out and bought one of my own. Amazed by their size and power, we spent much of his leave blasting away at each other. As all things do, his leave ended all too soon and both guns were bagged, stored and forgotten... until their rediscovery over ten years later.

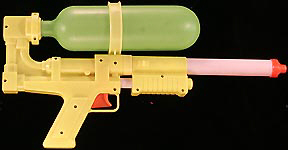
The two
rediscovered CPS 2000 Super Soaker squirt guns.
By that time my son had left the Army, married, started a family and settled in the local area. I immediately called him to tell him about the gun's resurrection. Like me, he'd completely forgotten about them and with the nostalgic excitement only adults feel when finding a cherished toy from their childhood, he rushed over to see if they still worked.
When he arrived we filled them with water, pumped like mad to charge the pressure chamber and pulled the triggers for the first time in ten years. They both worked perfectly, kicking with a powerful recoil that's never been matched by any other squirt gun in the world. We spent the better part of a warm summer's day firing deluging blasts of water at everything we could find.
Although we knew what they were and who made them by the decals on the guns, we really didn't have any idea about their history and if anyone had ever made a bigger, more powerful version. Jumping onto the Internet, we soon learned several surprising facts about these remarkable guns.
We discovered that there were two CPS 2000 squirt guns made: the Mark 1 in 1996 and Mark 2 in 1997. The Mark 2 was a toned-down version that looks much like the original but doesn't pack the same punch. The story was that the Mark 1 was too powerful and exceeded federal safety regulations so it had to be pulled off the market. There were rumors that several children had been injured using them. These guns were the brainchild of the Bruce D'Andrade, a designer at Larami Inc., Lonnie Johnson's ground breaking squirt gun company that revolutionized the genre back in 1988 with the introduction of pressurized water guns. The CPS (Constant Pressure System) 2000 Super Soaker was the first in a new line that used a rubber bladder inflated with water to provide the gun's fire power. The idea was revolutionary and an instant success. Tracking forward through reviews of all the subsequent squirt guns, we learned that no one had ever made another gun with the power of the CPS 2000 Mark 1.
Examining our guns more closely, we found out that they were both a Mark 1, as proved by the longer pressurization window and the fact that their decals had "Air Pressure Super Soaker" on them instead of "Constant Pressure Super Soaker" as a Mark 2 does. This makes them very rare and highly sought after. These guns occasionally sell for as much as $300 on Ebay.
Our joy was cut short when we went back outside to fire them off one last time. I was pumping up one of the guns when there was a sudden phift and water started pouring out of every opening in the gun. Something had broken.
Determined to fix the problem, I decided to learn everything I could about repairing these guns and record what I found on a webpage in case anyone else happened to find a similar lost treasure in their garage and needed to know how to fix it.
![]()
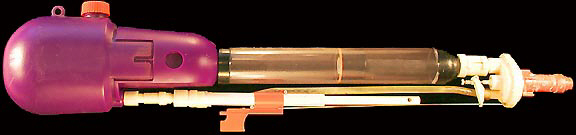
CPS 2000 Super Soaker Disassembly and Repair:

The gun above
is the one that had something give way inside.
With
screwdriver in hand I went to work.

The first thing I learned was that two different screw lengths are used in the CPS 2000. Both are extremely small. This makes them easy to loose, which could be a problem since none of the four hardware stores in my town carry any screws that come even close to them. Should one be lost I wasn't sure how it could be replaced. But then I remembered that packed away with the CPS 2000s was a smaller squirt gun: a SS 50 also by Larami.
Fortunately, its screws are the same size as the Super Soaker 2000s, so if needed I could cannibalize the smaller gun to replaced any lost screws.
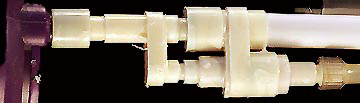
The fact that the screws came in two sizes suggested that as I took the broken CPS 2000 apart I should keep a record of what length screw went where. The following picture of the disassembled gun has the positions of the long screws marked with "L"s and the short screws with "S"s.

Once the two halves of the gun were removed I got my first look at the inner workings of the most powerful production squirt gun ever made.
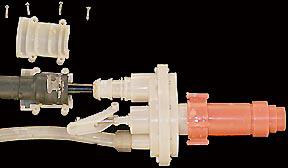
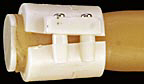
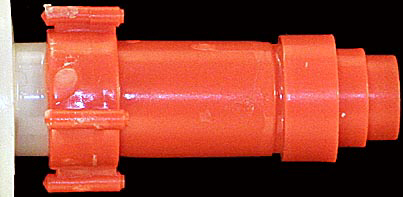
Here's a close-up of the pump:
When you push the pump handle forward (to the right on the photo above) water is draw out of the large purple storage tank through a one-way valve and into the large diameter white tube on the upper right. When you pull back on the pump handle (toward the left above) the one-way valve seals and water is pushed down and into the smaller amber tube on the lower right. This tube leads to the trigger valve in the front of the gun.
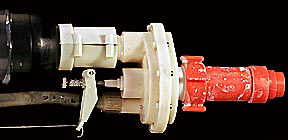
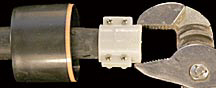
The amber tube, bottom right above, feeds into the back of the trigger valve and since the valve is closed during pumping, the water goes up and to the left into the pressurization chamber. (Note: the plastic thumb nuts that hold the amber tube on the rear of the trigger valve and the front of the pump crack very easily even when just using your fingers, as I was later to find out. Be very careful not to over tighten them.)

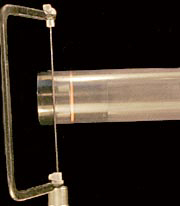
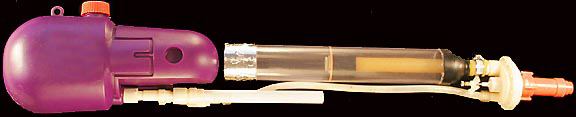
This clear chamber houses rubber bladder (small black tube on the right) and the large black end cap with an orange line painted on it to serve as a fill-level indicator. The clear plastic tube protects the rubber bladder from the many sharp surfaces on the inside of the gun's housing.
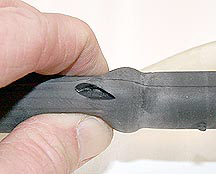
The bladder enters the clear tube loosely through a hole on the right. Pulling it out, I discovered the source of the problem: a rupture. I tried several patching techniques but none of them held. The only solution was to replace the bladder. Following the suggestions on the webpage at http://forums.sscentral.org/t3710, I ordered some replacement tubing from McMaster Carr. It arrived just 36-hours later and I immediately set to work.
First I removed four screws (long) from the plastic clamp holding the old bladder to the rear of the trigger valve. This released the right end of the bladder.
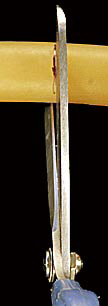
To get the bladder out of the clear plastic chamber I used a coping saw to cut the end off...

...and pulled the old bladder out.
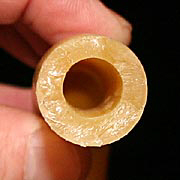
The bladder's end plug was seated very tightly into the end cylinder.
To get it out I had to use pliers and a gentle rocking motion, being careful not to squeeze too hard because it might crush the plastic end plug.
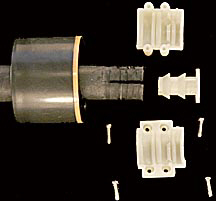
Once it was out I could remove the four holding screws (long) from the clamp. The end of the bladder was jammed so tightly onto the plug I had to cut it off.
The new tube destined to be the new bladder. (Don't ask me why I ordered the amber instead of black tubing.) Note that the tube isn't perfectly even in thickness. I hope this doesn't effect performance. (McMaster-Carr part number 5234K23, 7/8-inch outside diameter, 1/2-inch inside diameter, 3/16-inch thick walled pure rubber tubing.)
The tubing cuts easily with standard scissors. I measured the length of the original bladder, 9 and 3/4-inches long, and cut the tubing to match.
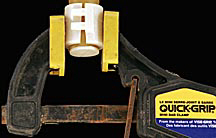
While I trust the screws to hold the clamp together once it's assembled and they have a full depth of thread to hold them, I don't trust the plastic they screw into to pull the halves together against the considerable resisting force of the rubber tube. I decided to use a clamp to push the two sides together then insert the screws.
The replacement tubing must be slightly larger than the original because the fit wasn't tight. There was so much extra rubber that some of it extruded outward between the gap in the clamp making complete closure impossible. If I ever have to do this again I'll use a metal hose clamp instead. While tightening the screws I realized something important: When reinserting self-cutting screws like these into plastic, it's critical to feel the threads as they go in. They should flow in easily and smoothly if they are going into the same threads they cut when they were first screwed in. If you have to force them in it means that the screw's threads and the threads cut into the plastic aren't fitting together and the screw is trying to cut new threads. If this happens the threads in the plastic holes will be stripped out or at least weakened. I recommend backing out any tight-fitting screw and trying again until it goes in easily.
I replaced the end cylinder, inserted the new bladder into the clear pressure chamber, used two layers of waterproof aluminum tape to reattach the pressure chamber's end cap, and used a hose clamp to attach the bladder to the rear of the trigger valve. (My experience with the previous plastic clamp drove me to use a hose clamp.) I dicovered that the I couldn't get the new bladder pushed all the way on to the fitting on the back of the trigger valve, even after wetting it. The closest I could get was 1/4-inch short. This pushed the starting position of the red fill-indicator line well away from the end of the clear tube. With this in mind it might be good to cut replacement bladders 1/4-inch shorter so they fit better, unless you know a secret for pushing ruber tubing onto tight fitting connectors.
All that was left to do was reassemble the gun and see if it works...
...which it did!
Side-by-side comparisons with the other gun proved that the new bladder shoots as much water just as far as the original.
(Note: after firing the repaired gun a few times, the bladder suddenly bulged in front of the clear plastic container and almost burst the gun's outer case. What had happened is that in a moment of laziness I used a metal hose clamp to secure the new bladder to the rear of the forward valve. This clamp didn't hold onto the domed end of the clear container so eventually the container slipped toward the rear of the gun and when pressurized, the small section of bladder no longer contained by the clear tube expanded outward. This did not damage the gun. I took the hose clamp off and replaced the original plastic clamp, which has a groove that locks the domed end of the clear container close to the valve fitting so that no extra bladder is exposed. Everything works great now.)
Nozzle
Experiments:
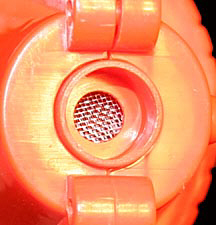
Looking into the business end of a CPS 2000 Super Soaker shows a complex arrangement of screens and tubes that condition the flow of the water to create the most coherent, far-traveling blast of water possible. Or does it? I like to think that the geniuses at Larami Inc. put all that stuff in there for a good reason, but I don't know that for a fact.
The only way to know for sure is to conduct some experiments, which I proceeded to do. But first. let's take a close look at the existing nozzle design:
Nozzle Exterior
Interior
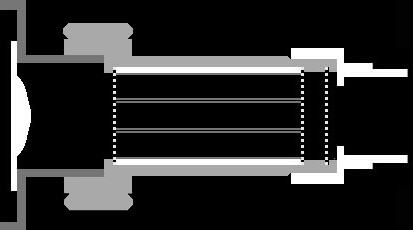
Sketch of the Nozzle showing the face of the
trigger valve
on the left, a screen, an insert holding
seven
1/8-inch diameter tubes and two more screens.
The exit
orifice on the right is 1/2-inch in diameter.
The sketch is
approximately twice actual size.
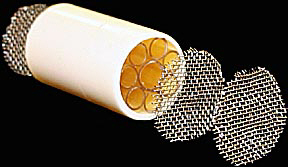
The screens
and insert from inside the nozzle.
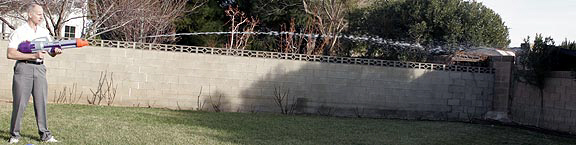
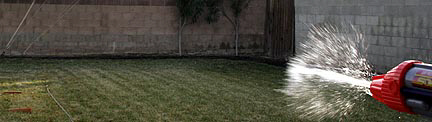
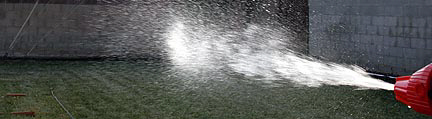
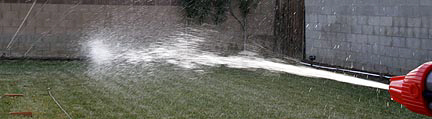
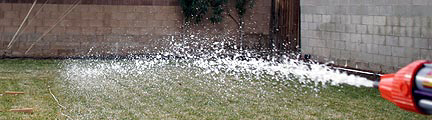
The first experiment was to capture stop action photos of the stream from the nozzle in its original configuration.
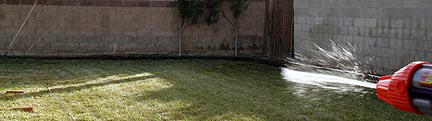
Locked in a horizontal firing mount, the stream travels 21 feet. Note the solid, stabile stream.
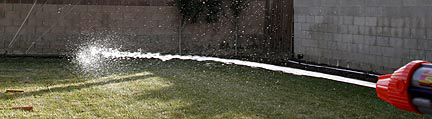
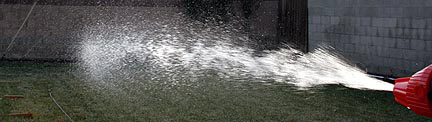
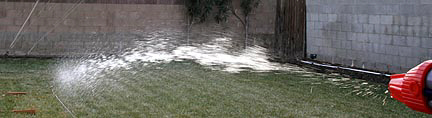
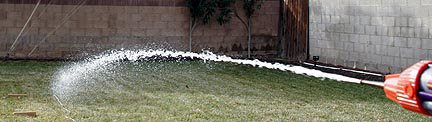
Next I removed
the seven small tubes from the insert but left everything else the same:
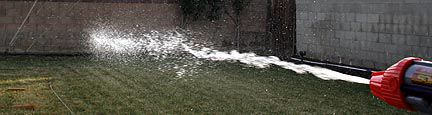
The stream is much less stable and more diffuse. Oddly, it actually shot further: 24 feet.
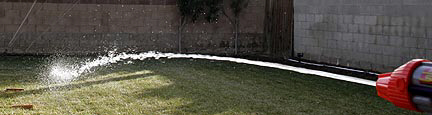
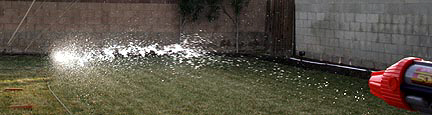
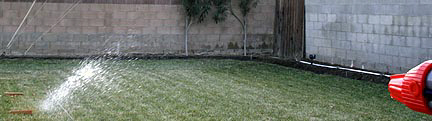
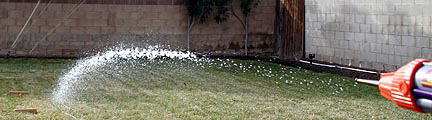
Next up,
remove the screens:
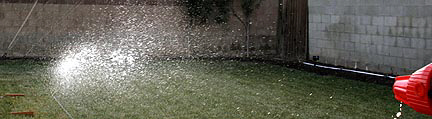
The resulting stream is a mess. But, it still had good range: 22 feet.
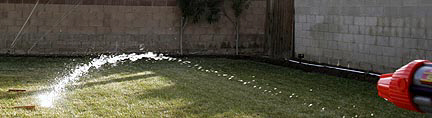
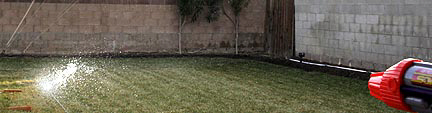
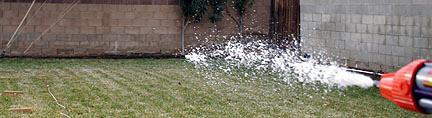
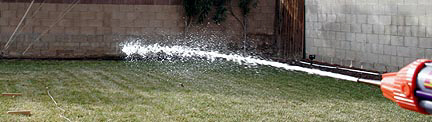
I decided to
replace the screen at the very front of the nozzle.
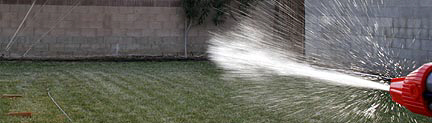
As you can see this one screen provides significant improvement, though the range is still in the same ballpark: 23 feet.
These
experiments showed that all that stuff in the nozzle is necessary for
producing a concentrated stream. Although the others had slightly
better range, their diffuse spray would make them more vulnerable to
wind. Also, the effect of being hit with a concentrated stream is
more effective than a diffuse spray because while both dump the same
amount of water on your enemy, the diffuse spray will hit with less
shock. It's like being hit with a pillow or a BB fired from a gun.
They may both deliver the same impulse but because the BB is so much
smaller its energy is concentrated into a smaller area and
consequently causes significantly more damage.
But, the complicated internal structure of the CPS 2000 Super Soaker's nozzle may be a design necessity forced by wanting the keep the nozzle very short. I wondered how a longer nozzle consisting of a simple tube would work. The following test consists of a 4-inch long, 1/2-inch inside diameter tube mounted on the open back half of the original nozzle. It has no screens.

The stream is diffuse and only shoots 15 feet.
Finally, I
mounted a 6-inch brass garden hose power washer on the back half of
the nozzle. The opening at the end is only 1/4-inch in diameter so
the resulting stream carries 1/4 the water and therefore 1/4 the impact.
Although the
stream from a full discharge lasts much longer than
the original
1/2-inch diameter nozzle, it still isn't as focused
as the
original nozzle and the range isn't any greater.
What all this taught me is that the people at Larami really know what they're doing and that it's going to be tough to improve upon the outstanding design that was the Mark 1 CPS 2000 Super Soaker.
When I started tearing into the Super Soaker to repair it I got all sorts of ideas to improve it, or at least interesting experiments to try. As much fun as they sounded at the time I've decided no to pursue them. The reason is that they all involved cutting into either the structure or the inner workings in such a manner that would almost certainly lead to the gun's ruination. CPS 2000s are extremely rare and I feel compelled to respect that rarity by preserving them as best I can.
Valve
Problem
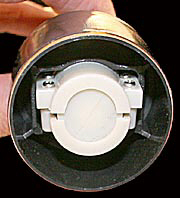
One of the guns stopped pumping. Instead of inflating the bladder water shot out of the front of the gun every time it was pumped. Repeated disassemblies disclosed the fact that age had weakened the sealing spring inside the trigger valve. The way this unit is made precludes taking it apart to replace the spring. The only solution I could figure out was to point the gun straight down when this happens and gently tap the nose on a hard surface. This helps the spring make the seal it needs to for the valve to close.
Why
Bother Fixing Them?
After almost 20 years there may only be a very few working Mark I CPS Super Soakers left. They can never be replaced, so it makes sense to preserve the few we have for the next generation. To this end we're fortunate that these guns were made so well. Considering that they are 95-percent plastic it's remarkable that after all this time the two I have are still working.
Serial
Number Mystery
CPS 2000 squirt guns have serial numbers printed on the left hand side just above and behind the pistol grip.

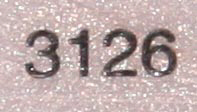
I've
talked to a couple of people on different water gun forums and they
suggested that these are production codes defining which factory made
the gun (the first two digits) and the year (the final digit: 6 and 7
for 1996 and 1997) in which it was made. So far I've collected five
serial numbers: 3017, 3126, 3017, 3027,
and 3107. The repeated 3017 confirms that these numbers aren't simply
sequential serial numbers.
That's it for
this page about my two Mark 1 Super Soakers. I hope you enjoyed
reading it as much as I enjoyed putting it together. The two guns are
going to be stored in an air-tight, light-proof box to protect them.
On special occasions I'll drag them out to show the next generation
what real power in a water gun looks like.
![]()
(Click
on main site
to browse 70 other topics ranging from exotic kaleidoscope designs to
the strange world of lucid dreaming. There you will also find several
other pages dealing with chocolate.)