Detailed instructions with pictures on how to grow dozens of different types of crystals
Fast, simple crystal
growing projects
A salt garden (Good for classroom demonstrations.)
The simplest, fastest crystals of all to grow
(Good for classroom demonstrations.)
Super-fast crystals (At last that's what one site
claimed. I rate this as a dud.)
How to grow a borax snowflake (Good
for classroom demonstrations.)
How to grow sodium acetate crystals
(Good for classroom demonstrations.) NEW!!!
A super-fast crystal growing technique that really
works (Good for classrooms.)
Soap crystals (Dud number 2)
How to grow stalactites and stalagmites
(Good for classroom demonstrations.)
Salt crystals
Vinegar/salt garden (another dud)
Bicarbonate of soda crystals (a semi-dud)
Advanced crystal
growing projects
Rock candy
Alum crystals
Growing crystals in gelatin
Ultra-fast sheet crystals (Good
for classroom demonstrations.)
Monoammonium phosphate crystals
How to grow tin crystals with electricity NEW!!!
Growing large,
high quality single crystals
Tricks of the trade: hints on how to grow the best crystals
Alum crystals
Sugar crystals
Monoammonium phosphate crystals
Epsom salt crystal
Exotic Crystal Growing
Sodium Thiosulfate Crystals (Good
for classroom demonstrations.)
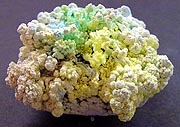
Copper Sulfate Pentahydrate Crystals
Nickel Sulfate Crystals
Ferrous Sulfate Crystals
Rochelle Salt (potassium sodium tartrate)
Potassium Chromate Crystals
Potassium Dichromate Crystals
Silver Crystals from Silver Nitrate
Potassium Ferrocyanide Crystals
The Best Crystals to Grow
A short list of the fastest and easiest crystals on
this page that produce the best looking crystals
How to Grow Snowflakes
How to grow your own snowflakes indoors any time of
the year!
Testing a commercially
available crystal growing kit
Online sources for crystal growing kits and chemicals
Other websites that explain how to grow crystals
Solubilities of common crystal growing chemicals
The following techniques make use of ingredients available in all grocery stores, are quick and easy to put together and produce fast results, at least fast as far as growing crystals is concerned. The trade off for this simplicity and quickness is that the crystals are small to microscopic and form in dense clusters.
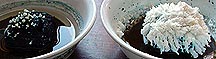
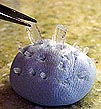
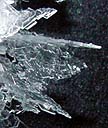
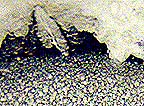
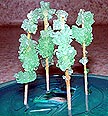
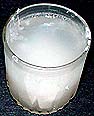
Salt Crystal Garden

Growing a salt garden is the most common crystal growing experiment mentioned in books and on the Internet, even beating out growing sugar crystals. These crystals normally grow white with some faint brown areas. The picture above shows what happens if a couples of drops of food color are dripped onto the material the crystals grow on.
The following formula and technique resulted from combining several different formulas obtained from the links in the Other websites that explain how to grow crystals section at the bottom of this page.
Note: although only household chemicals are used, some are toxic so this project should only be done under adult supervision.
Step 1: mix together:
4 tablespoons salt (one recipe recommended un-iodized salt.)
4 tablespoons liquid bluing (Mrs. Stewart's is available in the laundry department of grocery stores. One recipe called for using three times this amount. If you can't find bluing at a store near you, it is available on-line: http://www.mrsstewart.com)
4 tablespoons water
4 tablespoon ammonia (Some recipes use half this amount. One recipe calls for not adding the ammonia until the third day and then doubling the amount.)
Pour the mixture over small pieces of porous rock, charcoal or pieces of broken clay flowerpots in a shallow glass or plastic bowl or plate. (Some recipes suggest soaking the charcoal, etc. in water for 15 minutes then placing it in the bowl with the growing solution.) Crystals will begin to grow in six hours and continue for three days, depending on the humidity, temperature, and how much airflow is present. To concentrate crystal growth on the charcoal and avoid them forming on the edge of the plate, coat the plate with Vaseline.
Briquettes aren't very good at drawing the liquid up so be sure to keep the level of the liquid at least half way up the side of the briquette.
Most recipes suggest sprinkling two more tablespoons of salt over the charcoal and on the first or second day to get the crystal growth off to a faster start.
Add more of the salt-bluing-ammonia-water mix starting on the third day to keep the crystals growing. Be careful to avoid dripping any of the new solution on the growing crystals or they will be damaged. In time the crystals may grow over the sides of the bowl.
I've grown these crystals in both plastic and Corelle bowls and the growing liquid did not stain them. The crystals and any left over growing liquid washed off them very easily.
How it works:
The porous material draws the solution up using capillary action. Water evaporates on the surface and the solid chemicals are left behind forming crystals. Because the evaporation is a fast process compared to the rate of crystallization and there are many rough spots for nucleation (places where crystal growth begins) the crystals grown are small and may look like small grains or even powder.
Because evaporation drives this project, place it where it has free air circulation, but no hard drafts or the delicate crystals may be blow over. Warm dry areas will have faster growth than cool moist areas. Avoid direct sunlight because this causes the liquid to evaporate faster than the growing structure can draw it up so the crystals form on the plate instead of where they are supposed to. A gentle breeze from a small fan set on its lowest setting can increase the speed at which the crystals grow by a factor of ten.
Both crystals in the picture above started at the same time with the same amount of liquid. The one on the left was grown in quite air while the one on the right had a small fan very gently blowing on it. This represents 12 hours of growth. Without a fan the sample on the left would require three to four days to become as dense as the one on the right.
Bluing contains an iron compound that the ammonia breaks down into iron salts, which are added to the salt crystals as they form creating yellow and reds. At least this is what one site I visited said. All I noticed was a faint brownish coloring in some areas of the growth.
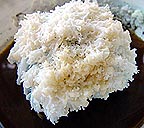
Another value of the bluing is that the material that gives it its blue color is an extremely fine powder. When this powder is mixed in with the salt solution it provided millions of microscope particles that act as nucleation sites for crystal growth.
As the first picture in this article showed, brighter colors can be added by dripping food color onto the charcoal. This is cheating, a little, because the crystals are being colored or painted instead of actually growing that color. Here's the picture again so it can be contrasted with a natural color above:
These crystals are very small and held together by the binding action of water, like fine mud. They are extremely fragile and a slight bump can cause them to collapse. Touch them and they smush (technical term for digital compression of soft, hydrated structures) to shapeless mush.
Experiments:
As simple as this technique appears, it none the less suggests many experiments suitable for classrooms. Here are several I tried and the results I got:
Does rubbing Vaseline on the sides of the growing bowl really prevent crystals from forming there?
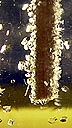
No, they will still try to climb up the side of the bowl but not as bad as if the bowl isn't coated with vaseline. The following picture shows crystals working their way up the side of the bowl that hasn't been coated with vaseline:
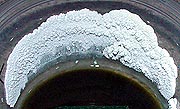
What happens it that a spot on the edge of the liquid creates a few seed crystals. These are close enough together so that by capillary action they draw some fluid up into their structure. This wet zone evaporates creating more crystals, which grow partly upward. the wetting and evaporating process continues with the crystals literally pulling themselves up by their own bootstraps.
This process can be demonstrated by placing a tall piece of porous pottery in a dish of growing medium.
The best growth will occur on surfaces that are rough.
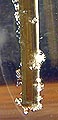
The following picture shows the edge of a dish that had the right half of its surface coated in Vaseline:

Note that the vaseline didn't stop the crystals forming but did prevent them from working their way up a little bit.
Will the crystals grow
without either bluing or ammonia?
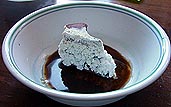
Not really. A few crystals may grow but as the following picture shows the clear dish on the left (no bluing) and the blue dish in the center (no ammonia) didn't grow crystals of any significance. On the other hand the dish on the right with the heavy growth had both ammonia and bluing.
I've also tried growing crystals using the same technique but with only salt and water. It didn't produce the large bloom of powdery crystals that the bluing and ammonia create.
Which works better: just
placing the briquette in a pool of the liquid or spooning the liquid
over the briquette?
Spooning some of the liquid over the briquette greatly speeds the creation of crystals. This can be seen in the photo below. The briquette on the left was basted with the liquid and had several crystals after three hours whereas the briquette that was simply placed in the liquid (right) has practically no growth.
![]()
Does sprinkling some salt on top of the briquette speed crystal formation?
Yes, but only for the first two hours. After that the non-salted areas catch up.
Which is the best growing
substrate: charcoal briquettes, unglazed pottery shards, course
sponges, fine sponges, cardboard tubes or wet-type floral foam?
I tested all of these and for reasons I don't understand the briquettes worked the best. Pot shards came in second.
Does roughening the
surface of the briquette or drilling holes in it make crystals form faster?
Not significantly, but drilling shallow holes does provide wells for depositing drops of food color. Without them much of the food color dribbles off the briquette.
Does it matter if
the salt used is iodized
or un-iodized?
No. While all the other photos in this article are of crystals grown with un-iodized salt, the following picture shows crystals grown with iodized salt. They look pretty good to me.

Does it help to soak the briquette in water for 15 minutes before placing it in the growing liquid?
No. I tried this and the growth started later than briquettes placed in the growing liquid dry or soaked with growing solution. The reason is that before the growing liquid can be drawn up and evaporate to form crystals all the water stored in the briquette has to evaporate first. This takes more time than starting dry and much more than starting with the briquette soaked with growing solution.
Will growing the crystals with no water
work (only ammonia, bluing and salt)?
Yes, but the crystals didn't grow as large or as fast as with some water in the mix. I assume this is because salt isn't very soluble in ammonia.
Will epsom salt work as good as table salt?
I thought it would work better because pure epsom salt crystals are much easier to grow than salt crystals. I was wrong. After three days of growing thee were no crystals at all.
How about sugar?
Again, no. It appears this technique only works with table salt.
Can you dry these crystals to preserve them?
Yes and no. You can dry them but they remain very fragile. Below is an example. The crystals will continue to grow even if the briquette is taken out of the pan of solution because there is a lot of solution still stored inside the briquette.
Here's a short time lapse video showing three and a half hours growth in seven seconds:
And here is a better time lapse video showing 12 hours of growth in 23 seconds:
The next video compares manufactured charcoal to natural charcoal:
Finally, this video is an attempt to create brighter colors using gel food coloring:
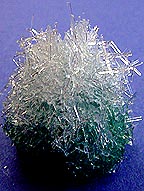
The simplest, fastest crystals of all to grow
The simplest and fastest crystals to grow are Epsom salt (magnesium sulfate) crystals. Epsom salt is sold for a few dollars in half-gallon containers in the medicine department of grocery stores.
To grow a bowl of crystals, simply mix 1/2 cup of Epsom salt with 1/2 cup of the hottest water you can get out of your kitchen faucet. Stir for one minute and then place the bowl in a refrigerator. There should still be some crystals left on the bottom of the bowl. In three hours the bowl will be filled with needle thin crystals.
This bowl is two inches deep and three across.
Using a narrow deep bowl generates more interesting crystals than a wide shallow bowl. One word of caution: don't boil the water before mixing. If you do the crystals will grow much faster, in as little as an hour, but they will be so fine and numerous that they look like a mass of coarse cotton. Worse still, a hard shell usually grows over the top of the water hiding the crystals underneath.
If you don't have room in a refrigerator, go ahead and bring the solution to a boil for five seconds either in a microwave or over a stove. Stir for one minute (all the crystals will dissolve) and set the bowl out on the counter. In a few hours to overnight, depending on how cool the room is, a bed of fine crystals will form.
The small crystals grown using this technique are very fragile and may be damaged in the process of scooping them out of the bowl. By adding something like a poker chip to the bottom, then dropping a few undissolved crystals on the poker chip, the crystals will grow on the chip and can be removed and displayed more safely.
This one-inch diameter mound of crystals was grown on a disk made of epoxy putty.
Another way to create a display piece is to use tweezers to push crystals taken from the Epsom salt box and push them into a mound of epoxy putty or florist's clay.
Let it, a second bowl, and the bowl with the growing solution cool in a refrigerator for an hour. Then pour the growing solution into the second jar and add the crystal mound. Be sure to not let the undissolved crystals from the first bowl get into the second.
What you'll get after three hours is a tall mound of crystals.
This pile of Epsom crystals is two inches tall.
Unfortunately, food coloring won't color the crystals. A large mass like the one below will pick up a slight tint from dyed water clinging to the crystals, but the crystals themselves remain transparent. Crystallization is, in fact, a very effective method of purification. The crystal lattice determined by the atoms or molecules that make it up is so selective about what it'll allow in that most chemicals are locked out.
Although delicate, Epsom salt crystals are stable and will last a long time. Clusters of crystals like the ones in this article are real dust collectors so if you want to keep them sparkling bright keep them covered except when displaying.
NEW!!!
HOW TO GROW EPSOM SALT FROST CRYSTALS
Combine 1/2 cup of hot water, 1/3 cup Epsom salt and stir until the crystals are dissolved. It may be necessary to heat the mixture in a microwave for 30 to 60 secinds to achieve this. Place one drop of dish soap on a 8 x 10 inch glass sheet and rub it all over to cover the surface. Lightly wipe off any excess. Place one teaspoon of the crystal solution on the glass and lightly rub it to cover the surface in a thin layer. Set aside to dry. In 30 to 60 minutes, depending on temperature and humidity, the glass should be covered with crystals. Here's a video showing the process in live action:
Here's a time lapse video of colored Epsom salt frost crystals growing:
Illuminating the crystals with polarized light while they grow increases the detail that can be seen and adds attractive colors, as the following short time lapse video shows:
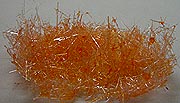
Super-Fast Crystal Spikes
In addition to showing how to grow crystals, I also want to warn people about crystal growing formulas available on the Internet that may be difficult to make work, not because the process is complicated but rather because the formula may be in error or so sensitive that failure is common. This experiment may be one such case.
I found a site that gave the following instructions:
All you need for this demonstration is some Epsom salts, (The stuff people add to water to soak their feet. It's found in the medicine section of grocery stores.) a piece of black construction paper, a little hot water, a pie pan and some sun.
Cut the construction paper so that it lays flat in the bottom of the pan. Mix 1 tablespoon of Epsom salt into 1/4 cup warm water and stir until dissolved. Pour the salt solution over the paper. Place the pan in bright sunlight and as the water evaporates short, spiky crystals will appear. Depending on how hot the day is, the brightness of the sun and the humidity, you can expect to see crystals forming in one to three hours.
Sounds good, doesn't it? The problem is that I've tried it four times and I never got any crystal spikes. I tried varying several parameters and still couldn't get it to work. Perhaps I'm doing something wrong. However, even if this is the case then this apparently simple experiment must not be very forgiving. As such, it may not be the best project to try with young children where you want something that's sure-fire. (If anyone knows how to make this work, I would appreciate an email about how they did it. Thank you.)
I did get it to work very well, though not dramatically, by using table salt instead of Epsom salt. It took 1/2 tablespoon of table salt in 1/4 cup of boiling water. The crystals formed quickly and were easy to see against the black surface of the construction paper. Sugar didn't work... except to attract a horde of ants.
Salt crystals grown in one hour in bright sun: 1/16 to 1/8-inch across
Update: After working with Epsom salt and sugar in other experiments, I learned that the amount of either material that can be dissolved in water is extremely sensitive to the temperature of the water. Take sugar: boiling water will dissolve four times as much as room temperature water. I think what went wrong with the experiment above is that as the black paper heated up, the solubility of the sugar or Epsom salt increased so fast that the solutions remained below the saturation point so there was no motivation to form crystals. Salt, on the other hand, is very weakly effected by water temperature and formed crystals quickly even if only a little water evaporated. Sugar and Epsom salt at high temperatures require that almost all the water evaporate before crystals form. By then the solution is so thick that instead of crystals all that's obtained is powder.
How To Grow a Washing Soda Snowflake
Mix two cups of water and one-half cup of washing soda - available in the laundry section of grocery stores- in a pot. (Caution: I've heard that a product called Boraxo doesn't work. I haven't tried it so I can't verify this.) Heat the water until it simmers, stirring to dissolve the soap. Pour this solution into a large drinking glass.
Cut a pipe cleaner into three pieces and twist them to form a star. Tie one end of a piece of thread to one leg of the star and the other end of the thread to the middle of a pencil or a second length of pipe cleaner. Make the distance between the pipe cleaner snowflake and the pencil such that when the snowflake is put in the glass the bottom is 1/2 inch above the bottom of the glass. Insert the pipe cleaner snowflake into the washing soda solution and set the glass in a cool location where it won't be disturbed for several hours to overnight.

Pouring the growing solution into the glass after the pipe cleaner snowflake had been added. It works better to fill the glass first then add the snowflake.
If you leave the glass in a cool (50 degrees F.) location, the pipe cleaners should be completely covered with crystals in 8 to 12 hours. Pull the snowflake out carefully, the washing soda crystals aren't as delicate as Epsom salt crystals but they will break off.
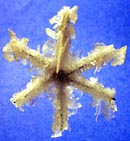
This snowflake crystal is two inches across.
Check the status of the crystal every hour until the crystals start growing, then more often until you get the size of crystals you want. Left too long, the crystals will grow to the sides and bottom of the glass making a solid mass. If this happens, try using a sharp knife to free the snowflake. Work carefully and slowly and you should be able to pull it out. Then break off any chunks of crystal which ruin the snowflake shape.
Washing soda crystals incorporate a lot of water into their structure. If you leave the snowflake out this water will begin to evaporate turning the crystal a powdery white.
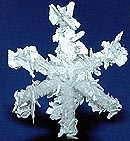
Dried out it looks more like a snowflake but a little less like a crystal.
The incorporation of water into the crystal matrix explains an interesting aspect to washing soda crystals: the amount of crystal you get out is much greater, both on volume and weight, than the amount of washing soda you mix into the water. You can demonstrate this by letting a glass of the solution completely crystallize. The amount of water that can be poured off afterward is only half of the two cups originally used. The crystals in the glass will fill the bottom half. Crush fresh washing soda crystals and they smush (technical term known by all elementary school students) into a slushy mixture of water and crystals.
If you are in a hurry you can place the glass in a refrigerator and it'll only take three hours or less for the snowflake to form. Be careful to check it often because under these conditions the crystals grow very fast.
You can also experiment with forming the pipe cleaners into different shapes and adding food color to the solution, in the experiment below I used green:
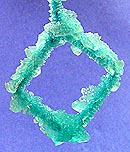
The coloring in the picture above is on the crystals, not in them. As crystals grow, their structure is so rigidly determined my their chemical makeup that any non-compatible atoms or molecules, like dyes, are excluded.
NEW!!!
Sodium Acetate Crystals
The following video shows how to grow sodium acetate crystals, which are great for classroom demonstrations:
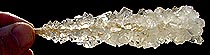
A super-fast crystal growing technique that really works
Washing soda crystals are perfect for a super-fast demonstration of crystal growth. Simply set up a drinking glass for growing a washing soda snowflake but don't insert the pip cleaner snowflake. Instead, cover the glass with a piece of saran wrap so that surface evaporation doesn't trigger crystal growth. Let the glass cool for four hours to room temperature. If no crystals have formed spontaneously you should be set. If they have but are small, you can still proceed. But if they fill up the glass you'll need to start over. The next time be careful to keep everything clean. Dirt can provide sites for crystal formation.
I've heard than shaking super saturated solutions can cause them to start forming crystals so once the glass is full of the hot mix, be careful to avoid disturbing it.
If everything has gone correctly you should have a glass full of super-saturated growing solution that's desperate to grow crystals. The problem is that until it gets a seed crystal to get started, it can't do anything. Take a straight pipe cleaner and wrap one end around a pencil so that the tail hanging down won't touch the bottom of the glass. Uncover the glass and dip the pipe cleaner in the solution to wet it. Pull it out, sprinkle a small pinch of washing soda on the pipe cleaner being careful not to get any in the solution, then put the pipe cleaner back in the glass. The washing soda will provide lots of seed crystals and the solution will jump at growing crystals on them. In as little as 20 minutes the entire glass will be filled with crystals.
On the day I took the following photos, the temperature was a little warm for supper-fast growing. Still, the results are impressive when compared the the days to weeks required for many crystals.
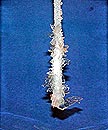
After ten minutes
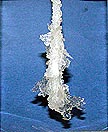
After 20 minutes
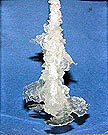
After 30 minutes
After 40 minutes
The length of the crystal column above is four inches and the width of the crystals at the bottom of the last picture is three inches.
Had the temperature been ten degrees cooler, say 50 degrees, the time to get from inserting the pipe cleaner to getting a crystal mass the size shown in the bottom picture would have only been 15 minutes. Also, every time I removed the cluster to take a picture, it slowed the growing process significantly.
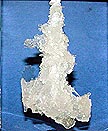
This closeup of washing soda crystals shows their flat planar structure.
Note: I received an email from Mr. Randy Oliver of the Nevada County Science Center, California, who explained that washing soda and borax are not the same chemical. Washing soda is sodium carbonate, borax is sodium borate dodecahydrate.
I repeated the experiment above with borax and found that the crystal grow shows up as small, uninteresting grains and does not get as large as those grow with washing soda.
Soap Crystals
Mix a solution of:
1/4 cup of liquid Cheer
1/4 cup of Ultra Joy (antiBacterial)
1/4 cup of salt
2 Tablespoon (15 ml) ammonia.
-pour it in an aluminum pan and place a sponge in the mixture. Sprinkle alum on one end of the sponge. Place it in the sun and a crystal bloom similar to the salt/bluing/charcoal briquette technique mentioned earlier .
I tried this experiment and only got a little blooming near the edge of where I'd sprinkled the alum.
The results were so unimpressive that I can't say it was worth the effort. But, the problem probably is that I did something wrong. The site:
http://www.rockhoundingar.com/pebblepups/growcryst2.html
has the original article on this procedure with pictures of what the crystals are supposed to look like. (If anyone knows how to make this work, I would appreciate an email about how they did it. Thank you.)
How to grow stalagmites and Stalactites
If you have a hard time remembering which is which, just remember this: To hang from the roof of a cave, stalactites must cling "tite" to the ceiling. So, stalactites hang down, stalagmites grow up.
In real caves, water seeping through rocks dissolves many minerals including calcium carbonate. When this water slowly drips from the roof of a cave, each drop deposits an small amount of calcium carbonate as it hangs for a moment before falling to the floor. Over centuries these deposits lengthen to form stalactites. When the drop hits the floor of the cave and evaporates, it leaves behind the rest of the calcium carbonate. In time these deposits grow up forming stalagmites.
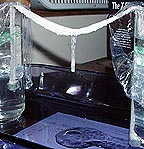
At home or in a classroom this process is much too slow for demonstrations. But, by switching to concentrated solutions of washing soda or Epsom salt, both of which are much more soluble in water than calcium carbonate, it's possible to grow a two inch long stalactite in as little as four hours. Here's how:
Bring four cups of water and one cup of washing soda to a simmer, stirring until all the powder dissolves. Divide this solution into two large drink glasses set four inches apart on a cookie sheet with an edge that can prevent liquid from escaping. Take a 12 inch long piece of heavy yarn and tie a small metal washer or nut to each end. Dip the yarn into one of the glasses to get it completely wet then suspend the yard between both glasses with one end of the yarn in each glass. Adjust the spacing of the glasses so that the bottom of the loop of yarn is even with the level of the growing solution in each glass. Cover each glass with a piece of saran wrap, being careful not to press down on the yarn. (The saran wrap prevents evaporation that could cause crystals to form on the surface of the glasses.)
Capillary action causes the solution to be drawn up the yarn and over the edge of the glass. Then gravity pulls the solution down to the lowest point of the hanging loop and causes it to drip off. If the dripping is slow enough, each drop with leave behind a deposit of washing soda, forming a stalactite. Move the glasses closer or further apart so that the drip rate is one drop every five to ten minutes.
The following pictures show the growth after two, four and eight hours:
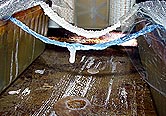
The photo above was taken two hours after starting. Instead of glasses I used glass bread pans because I wanted to test different materials to grow the stalactites from. The blue line in front is thick yarn. The one in the rear is a 1/2 inch wide piece of terry cloth. Both worked well. The yarn started off faster because its loop hung a little lower than the terry cloth. I also tried a piece of fleece but quickly discarded it because it pumped so much liquid I couldn't control the dripping.
After adjusting the bread pans so that the terry cloth strip was slightly lower than the yarn its stalactite quickly caught up and passed the yarn. The picture above was taken after four hours of growth.
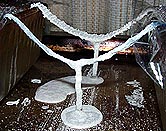
After eight hours of growing.
I also tried a mixture of four cups of hot water and two cups of Epsom salt but the stalactite didn't form as fast and had a transparent appearance that didn't look right. Additionally, the stalactite that formed was much more delicate than the ones grown using washing soda.
The Epsom salt stalactite crystal above is an inch and a half long and took eight hours to grow.
If you plan to grow a long stalactite it'll be necessary to move the glasses closer together every four hours or so. As the liquid is drawn up out of the glasses, the level of the solution drops, slowing the drip rate. Keep adjusting the distance between the glasses so that the drip rate remains at the optimum growth rate for your particular setup.

One of the things I learned was that the diameter of the stalagmite is influenced by how far the drop falls before hitting it: the further the fall - the larger the diameter. In the picture above the stalagmite started off with the drops falling six inches. After eight hours I reduced the fall to 2 inches while keeping the drip rate the same. The shorter fall made the stalagmite grow tall faster but narrower. The bottom of the stalagmite in the picture is 1/2 inch in diameter. The narrower top section is 1/2 of that.
I found that placing a piece of absorbent cloth where the stalagmite will form helps give it a more definite shape than when the drops simply fall on a nonporous surface.
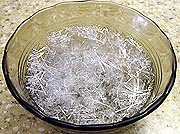
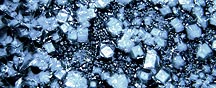
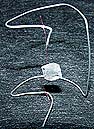
Salt Crystals
While easy, this technique does not impressive crystals. Mix 1/4 cup of table salt into 1 cup of water, let it rest one minute, stir again and let any undissolved salt settle. Pour the solution, but not any remaining salt particles, into a Teflon lined pan and set it in the sun. After two hour you should see a scattering of salt crystals growing on the bottom of the pan. (Teflon pans work best because their dark color absorbs more heat from the sun and therefore speeds evaporation.)
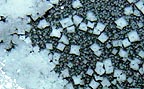
The square salt crystals are 1/16 inch across.
Also look at the edges of the pan. Many times there will be thin sheets of clear material growing down to the water. These are crystals growing right at the edge of the water as it evaporates. As the water recedes, the crystals are forced to grow in thin sheets.
There are two problems with this procedure. First, the crystals are small. I've tried using different types of salt and water and growing them very slowly but they don't seem to like getting larger. When I place a large seed crystal into the solution, instead of growing larger it gets covered with many small crystals. Second, white powdery islands of salt form on the surface of the liquid that fall when disturbed hiding the crystals growing on the bottom.
If you can spend a day waiting for crystals to develop, you can get a much better display by dissolving 1/2 cup plus 2 teaspoons of salt in two cups of water, heating slowly and stirring just until the salt dissolves. Avoid bringing the liquid to a boil.
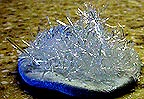
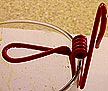
Pour this solution into a tall glass and dip a weighted nylon thread into it, pull the thread out and suspend it somewhere to dry while the salt solution cooled. Once the salt solution has cooled to room temperature, suspend the dried nylon thread back in it and cover the glass with a piece of cloth. By the next day there should be long thin spikes of crystals growing up at every possible angle from the bottom of the glass. There should also be thousands of crystals growing out from the nylon thread.
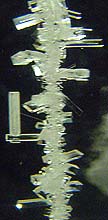
This picture is enlarged. The largest crystals
visible are only 1/8-inch long.
If you grow these crystals, be sure to shine a
bright focused flashlight
through the jar from the opposite side you're
looking from. You'll be
able to spot hair-thin crystal threads extending far
out from the
nylon thread.
The pile of crystals growing up from the bottom of the jar formed very interesting shapes. Unfortunately, while the individual crystals are quite tough, they don't stick together and as a result the mass of crystals falls apart easily when you try to pick them up.
This is a single salt crystal harvested from the
bottom of the glass.
It's small, only half an inch long.
Vinegar/salt garden
This was another dud for me. Following the instructions in a book from the library, I combined 1/2 cup of warm water, mixed in salt one teaspoon at a time until no more would dissolve, added 1 teaspoon of vinegar and poured this mixture into a plastic tub. Then I added a charcoal briquette and waited. After a day with no results I placed it outside in the sun and gave it another day. Still nothing. Here's what it looked like after the two days:
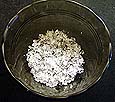
Bicarbonate of Soda Crystals
You can grow crystals, sort of, from plain old baking soda or more properly bicarbonate of soda. Mix 3 and 1/2 teaspoons of baking soda in 1/2 cup of water. Heat gently and stir until all the soda dissolves. Do not bring to a boil. This is tricky because as the baking soda warms up it releases carbon dioxide gas, which looks like bubble from boiling.
Pour this mixture in a glass and let it cool. After several hours you should see a fine layer of crystals growing on the sides and bottom of the glass. The individual crystals are tiny so I rate this as a poor demonstration of crystal growth.
This is a closeup of the small grainy crystals grown
from baking soda. There
is one interesting feature. Note the oval fan-like
growth in the upper
center. It's reminiscent of the snow crystal fans
observed in the
water crystal growing section further down this page.
The following crystals require more exotic chemicals or more elaborate procedures than the experiments above.
Rock Candy
I found more errors in the formulas available on the Internet for making rock candy than any other crystal growing technique. Many of them advise boiling a sugar and water mixture until it reaches the hard ball candy stage then letting the crystals grow for a week. If you do that the crystals will completely fill the growing container and be impossible to remove. This, and several other gross problems with using crystal growing formulas that failed, makes me suspect that many of these formulas are being recommended by people who have never tried them.
The following formulas are ones I have personally used.
Fast growing but small
crystal size rock candy technique
Warning: the following procedure requires boiling a sugar syrup. Hot sugar syrup can stick to skin and cause severe burns. Only do this with adult supervision, preferably someone experienced with hot-sugar based candy making.
Bring one cup of water and two and one half cups of sugar to a steady even boil (half way between a summer and a rolling boil) and maintain it for about half an hour until the syrup reaches 250 degrees F., or the hard ball stage. Pour this into a tall heat proof glass container and dip a long wooden skewer into it. Remove the skewer and let it air dry while the syrup cools. (Dipping the skewer and then letting it dry creates a coating of seed crystals on it that will facilitate crystal growth. Also, be sure to remove the sharp end of the skewer so no one gets poked with it.) Cover the syrup container to prevent evaporation from forming crystals on the syrup's surface. Let the syrup cool fifteen minutes and then suspend the skewer down the center so that the bottom of the skewer is one inch above the bottom of the container. (One way to hold the skewer in place and keep the container covered is to poke it up through a clean plastic butter container cover.)
Now sit back and watch the show! In as little as ten minutes you will be able to see crystals forming on the skewer and all through the syrup. After half an hour the glass should look like the picture below:
This is the best time to remove the skewer and suspend it in an empty glass to let the syrup drain off. The syrup is thick and will take a couple of hours to drain and dry up. Be careful, even an hour after boiling the syrup can still be very hot.
The crystals grown using this technique are much smaller than those commercially produced for rock candy, think gravel instead of rocks.
If you wait much longer than an hour to remove the skewer you run the risk of having the crystals lock up so tight in the glass that you can't remove them. Waiting longer will not allow the crystals to grow large like the ones you see on strings in candy stores. Those are grown much slower. In crystal growing, fast growth almost always means small crystal size.
Caution: if the crystals are allowed to sit overnight, those growing on the bottom of the glass will adhere to it so strongly that they are almost impossible to get loose. Repeated soakings in hot water helps, but a better solution is to use a disposable glass... just make sure it's heat proof.
For making several small samples, stick toothpicks through a soft plastic cover and place it over a wide shallow glass. Crystals will grow on the toothpicks.
These were grown in water with green food coloring.
I also tried this experiment with syrup cooked to 240 degrees. It behaved the same as the 250 syrup except it took an extra hour to develop the crystals and they weren't quite as dense.
I experimented this crystal growing procedure up after boiling the sugar syrup to 215, 220, and 225 degrees F. The goal was to see if there was an optimum temperature at which large crystals formed quickly. After two hours the 215 degree sample showed no growth. The 220 degree sample had a few small crystals and the 225 degree looked like this:
Note the free floating crystals.
Two hours later the layer of crystals had doubled in thickness. There was no change in the other two test cases.
After 24 hours the 225 degree syrup stopped growing and looked like the picture below.

The 220 degree syrup after 24 hours had similarly stopped growing and only had a few tiny crystals.
The 215 degree syrup showed no growth at all.
From this I assume that the optimum syrup temperature for growing small fast sugar crystals is between 230 and 235 degrees.
I tried an experiment to grow larger crystals by slowing down the speed that the sugar syrup cooled. To do so I placed the glass containing the syrup inside two Styrofoam chests. The smaller chest was covered with aluminum foil to reduce heat loss do to thermal radiation.
While I boiled up a batch of 230 degree sugar syrup, I heated the glass and 20 pounds of iron weights in the oven to 230 degrees. Once the syrup was ready, I poured it into the heated glass (heating the glass prevents a sudden temperature drop in the syrup) and placed the glass and iron weights in the insulated boxes. The weights act as a thermal ballast to keep the temperature from dropping too fast. The boxes were placed in the back of a closet in the center of the house where temperature variations are minimal. Thirty-six hours later the crystal mix had lost all its heat and I opened the box to find a beautiful cluster of much larger sugar crystals clinging to the skewer.
Many of the individual crystals showed the classic elongated hexagon shape of sugar crystals.

These crystals are getting close to the size of those grown commercially in the manufacture of rock candy. I suspect that if I increased the thermal mass and the amount of insulation to slow the growth, the crystals would become even larger.
The next step was to repeat this last experiment, but this time instead of inserting a stick on which to grow a cluster of crystals, I inserted a single large seed crystal to see how large it would grow. It didn't. Instead, all I got was a solid mass of small crystals packed around it.
Rock Candy on a String
This is the classic way rock candy is grown and sold. I tried making it by filling a glass bread pan with 115 degree syrup and laying a length of yarn in it. After covering it with a cloth and placing it in a safe (ant-free) location for two weeks I went to check and discovered two things: the liquid had formed a hard shell over its surface preventing the evaporation that was supposed to drive crystal formation and the crystals on the yarn were very small. Complicating things further was that the yarn had gotten so attached to the crystals growing on the bottom of the pan that it broke when I tried pulling it loose.
My second attempt was to start with room temperature water, in which as much sugar as possible could be dissolved (In my case, 4 cups of sugar in three cups of water at the temperature of the growing location left a small amount of undissolved sugar on the bottom of the mixing jar after three stirrings and rest periods. This is perfect because a little undissolved sugar is a guarantee that the solution is saturated.) After pouring the saturated solution, but not the undissolved sugar, into a glass bread pan I placed a length of cotton string (not yarn this time - I decided fuzzy rock candy wouldn't be to appetizing) in the liquid and suspended it with a wire holder at each end so that is was an inch off the bottom of the pan.
The setup sits in a shallow pan filled with a
1/8-inch thick layer of oil to keep
ants out of the sugar solution. If there's one thing
that'll draw them it's
concentrated sugar water sitting undisturbed for
weeks at a time.
How'd it turn out? It didn't. After a week nothing had formed on the string. I even tried dusting the string with sugar crystals and still couldn't get anything to grow. After experimenting with sugar solubility I discovered that I hadn't managed to create a saturated solution.
I've made three observations that suggest that evaporation is not an important factor in growing sugar crystals. First, I dipped a nylon thread into a 190 degree sugar syrup (very thin) and let it air dry to create nucleation sites of crystals. After 24 hours the tiny droplets, less that 1/100th of the size of a drop of water, were still tacky, indicating that in spite of their small size they still had not dried out. With an evaporation rate this slow it's unlikely enough water would evaporate from a growing solution to cause crystallization at a fast enough rate to form crystals within a reasonable number of weeks. Second, after spreading a thin layer of the same sugar syrup on a plate and letting it rest for several days, I noticed that a very thin hard shell had formed on the surface. Although the first experiment showed evaporation was very slow, this proved that it nonetheless happened. But, the syrup under the shell was still thin and liquid. Evidently some small amount of evaporation will occur to form the shell, then the shell blocks the air from getting at the remaining syrup and further evaporation is stopped. Third, I set up a 215 degree syrup and let it sit for a full month. After an initial small precipitation of crystals over the first 24 hours followed by the formation of a hard shell across the surface, there was no additional crystal growth.
I believe that these observations indicate that almost all sugar crystal growth beneath the surface of the is strictly the result of precipitation out of a supersaturated solution and not from prolonged evaporation.
What all of the above showed me was that growing large sugar crystals is tricky and almost certainly requires a thermostatically controlled growing chamber capable of handling 230 degree F. temperatures. These are available at most laboratory supply stores for five hundred dollars... or you can do almost as well by looking in your pantry: a crock pot. Since this is getting complex I'm going to continue the saga of my search for a technique to grow large sugar crystals in the Growing large, high quality single crystals article below.
Two important hints about
working with sugar solutions:
You can color sugar crystals with food coloring. BUT! add the food coloring before you boil the syrup if you are using a technique that requires a concentrated syrup. If you try adding it afterward the liquid coloring will flash to steam creating a cloud of bubbles and the syrup will crystallize solid in a few minutes. Also, never add cool liquids to hot syrup. There's always the chance that when the cool liquid hits the hot syrup it could boil and splash you with syrup hot enough to burn.
The counter area near where the syrup was boiled will be splattered with tiny drops of sugar syrup. Unless you want legions of ants swarming through your kitchen I recommend you follow this experiment with a thorough cleaning.
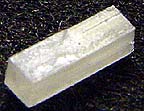
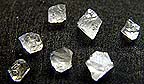
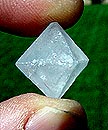
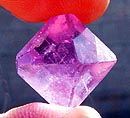
Alum Crystals
Alum (aluminum potassium sulfate) can be purchased in the spice section of larger grocery stores. It's used in pickle making to make the pickles crisp. In crystal growing is is celebrated as one of the easiest chemicals to use for growing large, clear crystals. It naturally seems to prefer to to grow a few large crystals over many small ones.
Mix two tablespoons of alum in 1/2 cup of water. Heat and stir until the alum dissolves. (A good way to see if it's dissolved is to stir in a circular pattern then pull the stirrer out. As the water swirls around any undissolved crystals will collect in the center of the pan where they are easier to see.)
Pour this solution into a clear cup and set is aside for 24 hours. By that time the bottom should be covered with crystals.
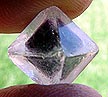
Alum crystals after the growing solution has been poured off.
Some of the better individual crystals collected from the glass above.
Many of these would make good seed crystals.
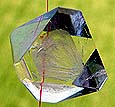
Alum's desire to form single crystals can be seen below.

The same growing solution used in the first alum grown above was used here. The only difference is that instead of letting the mixture cool down quickly, it was placed in an insulated box so it would cool slower and the crystals would grow slower. Usually this results in a solution forming dozens of medium crystals instead of hundreds of small crystals when the fast cooling technique is used. In this case only four very large crystals formed. Granted, they are all badly flawed but to get so few out of an uncontrolled crystallization is amazing.
Growing Crystals in a Gel
I read about this in a book from the library and thought it would be a way to grow crystals without having to tie a string on them to suspend them in a growing solution. I tried it and while it works the quality of the crystals is so poor I can't recommend it.
Mix 1/2 cup cool water with two tablespoons of alum in a non-aluminum sauce pan. (Teflon coated is okay.) Sprinkle 1 teaspoon of plain gelatin over the top of the water and let it soak for 5 minutes. Then start stirring and warming the solution until it comes to a simmer and all the gelatin is dissolved. Pour this solution into a glass and let it stand for 24 hours. By then you should be able to see white lumps growing in the cloudy gel.
These lumps are the crystals. The problem is that the gelatin interferes with the crystallization process so they come out irregular and cloudy, as show below:

I found a webpage explaining a complicated
procedure for growing crystals in gels. It is: http://k12s.phast.umass.edu/k12/brown/gelxtals.doc.
Ultra-fast sheet crystals
These technique produces crystal grow on the order on one inch per second. It is by far the most dramatic example of crystal grow.
Prepare your favorite growing solution. While it is still warm, pour a small quantity in the bottom of a warm metal pan. (You don't what the solution to boil when it hits the pan. The warmth is only to speed evaporation.) Swirl the solution around to form a very thin layer then set the pan down a watch. Within a minute or two crystal fans will spread across the face of the pan with startling speed.
The process just starting. In this example I used
monoammonium phosphate with green dye.
This works well with almost any crystal growing mixture.
This picture was taken only five seconds after the one above.
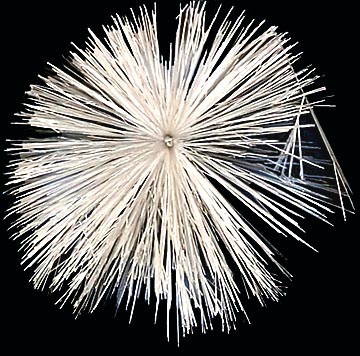
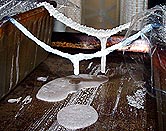
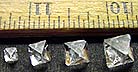
Monoammonium phosphate crystals
Monoammonium phosphate is one of the two chemicals sold in crystal growing kits because it is second only to alum (the other found in kits) in being the easiest crystal to grow.
Mix six tablespoons of monoammonium phosphate into 1/2 cup of water. Heat slowly and stir until it's completely dissolved. Pour this solution into a glass. Twenty-four hours later you should have a thick bed of long thin crystals growing in every possible direction.
If the solution is allowed to cool more slowly in an insulated box, I use a Styrofoam ice chest with a pot of hot water in it to slow the cooling, much larger crystals will form a truly impressive display.
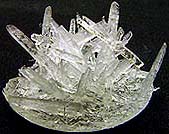
This cluster of crystals is 2 and 1/2 inches across.
NEW!!! How to grow tin crystals with electricity
Start by purchasing a small bottle of stannous chloride ($20 for a 2-ounce bottle from Amazon.com.) In a glass container and using a glass stirring rod, mix 1.5 grams of it with 1.5 grams of distilled water. The stannous chloride may need to be broken up to dissolve. If you can find powdered stannous chloride it should go much faster. Next, use a crayon draw a 2 x 3 inch rectangle on a sheet of glass. The wax lines will help retain the growing solution. Bend two paper clips so they can be taped down onto the glass plate so that one end touches the inside of the rectangle and the other end is outside and elevated so that an electrical clip can be attached to it. Find an old AC-to-DC converter such as those used to power laptops or toys. You want one that put out around 12 volts at 1.5 amps. Remove the connector at the end of the wire and attach an alligator clip to each wire. Pour the stannous chloride solution into the rectangle and use the glass rod to spread it around, making sure it contacts both paperclips. attach an alligator clip to each paper clip and plug the converter into the wall. Very quickly, you should be tin crystals growing from one of them and creating complex shapes.
If you can only find a power supply with lower voltage, position the paperclips closer together so help current flow through the solution. Lower current power supplies will also work, but the crystals won't grow as fast.>
What's happening is that tin ions from the stannous chloride combine with electrons flowing through the solution to form tin atoms which combine with other tin atoms to form the crystals.
The following video shows the process in live action:
Tricks of the trade: hints on
how to grow the best
crystals.
Growing high quality single crystals is the ultimate challenge for the crystal grower. It requires careful attention to detail, temperature controlled growing chambers (surprisingly easy and inexpensive to make), and patience. Failure is more common than success but the rewards are worth it. Nothing either man made or natural is more perfect than a single crystal. Even a small one represents billions of atoms or molecules arranged in perfect order. The fact that anyone can grow such perfection in their own kitchen is amazing.
(The following articles apply to growing any crystal.)
Seed Crystals:
The first step in growing an outstanding crystal is to grow an outstanding seed crystal. Most references recommend growing seed crystals by evaporating a saturated solution until single crystals form on the bottom of the bowl and then tying these at the end of a thread, which is then suspended in a growing solution. The problems with this technique is that it's common for the seed crystal to slip out of it's knot and fall to the bottom of the growing jar. Even it it remains and grows a large crystal, the loop and knot that went around the seed will be visible. Worse still, seed crystals grown this way tend to be hazy. Because the surrounding crystal will be optically clear the hazy seed crystal will stand out in the heart of the gem you're trying to grow. As a flaw, it will draw the observer's eye away from the good part of the crystal.
My solution to these three problems is challenging, but results in superior crystals.
First, prepare a growing solution and tie several nylon threads to a pencil with weights on their ends so they hand down into the solution. Wait a day to see if and crystals start forming on them. If they do, then you are off to a good start. If not, pull the threads out of the solution and let them air dry for half an hour then put them back in. This will create microscopic seeds on the threads which will act as mini-seeds for the seed crystals you want. After an hour your threads should look like this:
![]()
These seed crystals are 1/32-inch across.
Now comes the tricky part. Pull the threads up and gently use your thumb and forefinger to pinch the crystals several times all the way down the length of the threads. Crystals growing on the surface will break loose. Crystals growing all the way around the thread will remain. Dip the thread a couple of times in the growing solution to rinse off loose crystals. Repeat this step if necessary until only a few crystals remain. If you are lucky you will end up with a thread that has three or four good seeds growing on it.
![]()
Put these back in the growing solution to get larger. Once they are around 1/8th inch across, they will be perfect for starting a crystal. The great thing about these seed crystals is that because they've grown around the thread they can't come loose and fall off. As they grow, you can slide them up and down the nylon thread to accommodate changes in the level of the solution.
When you put the seed crystals back in the growing solution to get larger, it's common for more crystals to form on the threads. These develop on the residue of the crystals you removed. You can prevent almost all of these by using a narrow, steady stream of warm water from the kitchen faucet to wash the thread off between the seeds you want to keep. This takes a steady hand otherwise you're likely to wash away the crystals you want to keep.
The best thread to use for crystals is transparent nylon. It's invisible in the crystal and best off all, seed crystals slide up and down it so they can be positioned to the most convenient location for growing. As it comes off the spool it will often be so curly it's difficult to work with. To straighten it, simply give a length of it a firm pull. The thread will stretch a little and in so doing straighten out. When tying knots, working over a dark cloth will help you to see the nearly invisible thread.
Accidents happen, parasitic crystals form on main crystals and crystals break. For these and other reasons it's best grow several crystals at a time in the same jar. That way if something happens to one you can remove it and carry on with the others.
Starting
your crystal:
Regardless of whether you elect to grow your crystal by the evaporation technique or the super saturated technique, you will need some way to suspend the crystal in the growing medium. Many references suggest hanging it from a pencil laid across the top of the growing jar. The problem with this is that where the thread meets the liquid is a prime location for the growth of crystals. These can break loose and fall down on the main crystal, start to grow, and ruin it. A better technique is to bend a length of wire into a small loop, which will act as a base to rest on the bottom of the growing jar, and then bring one end up and over and form it into a hook. The crystal is tied to the hook and hangs down. Because the entire unit is below the surface of the growing solution there is no place for secondary crystals to form and fall on the primary crystal.
As crystals grow, they pull molecules out of the growing solution. The solution is now lighter so it rises. The top half of the crystal is caught in this wash of less concentrated solution so it grows slower than the bottom half. The result is that the crystal grows lopsided. If there is anything as bad as a crystal with internal defects, it's one that's nonsymmetric.
To solve this problem I use a growing frame that can be turned upside down from time to time so that both the top and bottom grow at the same rate.
A sample of my growing frame with a seed crystal tied at both ends. It's
an inch and a half across and the same tall. The thread is
transparent and almost invisible in this picture.
Using a growing frame like this isn't necessary to grow good crystals, it just helps a little. I've gotten perfectly acceptable crystals from seeds attached to a thread that's simply dangling in the solution.
If you prefer to use the suspension technique, rather than hanging the crystal from a stick resting on the top of the growing jar, may I suggest that you visit an office supply store and look for wire spring clips. When one leg is bend back ninety degrees, the clip can be flastened to the lip of the glass and will stay in place much better than a stick just resting on the lip.
The bent leg extends out to the middle of the glass in perfect position to hold the line on which the crystal will grow. I don't tie the line to the overhanging leg, but rather tape one end to the side of the glass and then simply drape the line over the loop. This way I can pull the line up to work the crystal without having to remove the clip.
Growing techniques:
One of the two ways to grow a crystal is the slow-cooling technique. The growing solution is heated to dissolve a large amount of chemical then slowly cooled to the point where there is more chemical dissolved in the liquid that the liquid can hold. If a crystal is introduced at this time it will grow very rapidly. Usually this technique works so fast that many small, flawed crystals are formed. To grow a high quality single crystals it's necessary to have the solution in a sealed jar in an electrically heated water bath inside an insulated box. The temperature is then reduced very slowly (one degree F. per day) so that the crystals have time to form with as few flaws as possible. This technique works well and can produce large crystals in as little as two weeks. The problem is that it takes a lot of equipment and has to be worked with every day. The hazard with this technique is that it is very easy to loose control of the crystal growing rate and wake up with all sorts of ugly things growing on your main crystal.

This one got away from me while using the slow-cooling technique.
It's clouded and irregular.
Even with this technique, parasitic crystals can still form on the surface of the main crystal. Opening the jar to remove them can start the formation of many other unwanted crystals.
The evaporation technique is much simpler and cheaper. It is also much slower. To do it you warm the growing solution to dissolve more chemical in it than it can hold at the temperature of the growing location. The solution is allowed to cool and a few loose crystals are added. Twenty-four hours later any extra chemical that was in solution that can't be maintained in its dissolved state because the temperature is too low will have formed on the seed crystals. You now have a saturated solution. Pour this into a clean dry glass, add your good seed crystal, cover it with a cloth to prevent dust falling into the solution and forget about it. As the solution evaporates it becomes slightly supersaturated and the excess chemical will form on the main crystal. Because evaporation is slow the crystal will grow slowly insuring high quality.
Take a look every day to make sure no small crystals have formed on the main crystal. If so, pinch and rinse them off using the same technique used to grow the seed crystal. Other than that, simply watch the crystal grow. If the solution is clear, you should be able to see growth within the first 48 hours. Once the crystal gets to be 1/2 inch across the growth may appear to slow down, but it hasn't. It's just an optical illusion. A growth rate of 1/64-inch per day is easier to spot in a small crystal than it is in a large one.
Whether you use the super saturated or evaporation technique, the best location for your setup is somewhere with the least amount of temperature fluctuations: usually a closet located in the center of the house. Placing the crystal growing solutions on a shelf at eye level makes observing easier and more enjoyable. Growing them in a thermal bath, a fish tank with a thermostatically controlled heated, is the ultimate but may be too much expense and hassle for some people. I've gotten good results with the evaporation technique without it.
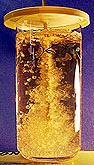
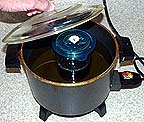
For myself I get the most pleasure growing crystals in the growing tank pictured below:
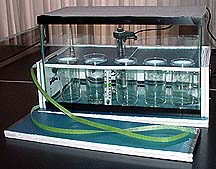
By insulating the tank with foam, daily temperature
changes are almost completely eliminated.
Crystal surgery:
If a second small crystal starts growing on either a seed crystal or your main crystal, you can either ignore it and hope that the larger crystal will grow over it or take the more hazardous choice of removing it. Usually a fingernail will usually dislodge the offending crystal. The problem is that it sometime leaves a crater in the main crystal. This will heal but it may leave a defect that looks like a faint fracture. I've experienced good and bad results from both techniques.
Harvesting and storing crystals:
When a crystal is removed from its growing solution it will be wet. If it's allowed to air dry the liquid will evaporate quickly and may form many microscopic crystals on the surface of the main crystal. This can dull the shine. I recommend drying crystals with a very soft tissue like Kleenex the second it's removed from the solution.
Some crystals, like alum, are very stable and will last for decades as long as they are kept away from moisture. Even occasional handling hasn't hurt mine. Other crystals may dehydrate and are trickier to preserve.
.. .................
  ....
....
......nickel
suflate hexahydrate...nickel
sulfate heptahydrate after 2 days
As the above pictures show, some crystals, like nickel sulfate heptahydrate, quickly dehydrate, forming a white powder on their surfaces. Several coats of a clear gloss spray paint may slow the process. The risk is that before it dries the paint may dissolve part of the crystal or worse, the chemicals in the paint may react with the chemicals in the crystal. This method also has the drawback that the many coats may dull the sharpness of the edges of the crystal, reducing its attractiveness. I've had some luck preserving crystals using a gloss protector for photographic prints. One way to preserve crystals that dehydrate that was recommended by a couple of crystal growing sites I've visited is to place the crystal in a jar with a sponge saturated with water. The crystal goes in a small cup inside the jar so that it doesn't come in contact with the wet sponge. I tried this and it didn't work. The humidity in the jar was so high that the crystals started to melt.
My preferred preservation technique for crystals that dehydrate is to store them in a tightly sealed jar that is filled with small trash and seed crystals of the same type. The atmosphere in the jar quickly adjusts to the perfect humidity for preserving the crystals. Using this method I've kept nickel sulfate crystals, which dehydrate quickly, in perfect condition indefinitely.
Amount of solution needed
to grow good crystals:
A crystal of alum that measures an inch from tip to tip only weighs three grams. Since a tablespoon of alum weighs 14 grams and will dissolve in 1/4 cup of warm water, it's easy to see that a lot of solution isn't required to grow a nice sized crystal. More often than not, people mix up far more than they need. This isn't necessarily wasted. Extra solution allows for maneuvering room if you have to move the crystal around. It also provides thermal ballast to blunt sudden temperature spikes. What I'm saying is that one cup of solution is enough to grow most crystals. Two cups may provide more elbow room but really aren't needed. This can be valuable information if you're growing a crystal that requires expensive chemicals.
Since a little solution is more than enough for a good sized crystal, consider growing several crystal at the same time. That way if something goes wrong with one, the others can take it's place.
Fall is
the best season to grow crystals by the evaporation technique.
Why? Because the slowly decreasing temperatures
help keep the growing solution supersaturated. Late Spring is the
hardest time of the year to grow crystals because the increasing
temperatures can drive the growing solution toward undersaturation
faster that evaporation can drive it toward supersaturation. The
result is that a crystal that grew fast in March may actually
decrease in size during April. It's times like that when I fire up my
heated growing chamber.
Are your crystals
shrinking?
Because crystals grow so slowly this can be a tough
question to answer. The key is to look at the sharp corners of the
crystal in question. If they looks razor sharp and well defined the
odds are excellent that the crystal is still growing. If they looks
dull or rounded the crystal is most likely dissolving, usually
because the temperature has increased slightly and the growing
solution has dropped below the saturation point.
What to do? First, I remove and dry the crystal. Then I warm the growing solution ten degrees F. warmer than the highest temperature the room in which the crystals are growing is likely to get to dissolve some of the crystals laying on the bottom of the jar. After that I place the jar in a water bath maintained at a temperature five degrees higher than the highest temperature the growing room will get, let the solution sit for a day to come down to the saturation point at the new temperature and put the crystal back in it.
Less complicated solutions are to harvest the crystal as is before anymore of it dissolves, or place the growing jar in a bowl of cool water to induce growth again. Adding an ice cube every few hours to keep the water cool may help. Beware that if the growing solution gets too cold the growth rate could increase to the point where obvious flaws are introduced into the crystal or small crystals may start growing on the surface of the main crystal.
Supercharging
the evaporative technique to grow crystals faster:
If you have a thermostatically controlled growing
chamber you can add a few items which will greatly increase the speed
at which the crystals grow. First, prepare the saturated solutions at
an elevated temperature, one which the heated chamber can easily and
safely support. At higher temperatures the evaporation rate
increases. Second, rig up a small fan to blow across the tops of the
growing jars. This blows away the humid air above each jar and again
helps to speed evaporation. The only trick with the fan idea is that
there needs to be a filter to clean the air, otherwise dust will be
blown onto the surface of the growing solutions and could at as
nucleation sites for crystals you don't want. Be aware that speeding
the evaporation rate can also speed the formation of crystals on the
surface of the growing solutions. Check often to make sure the
surface doesn't develop a crust. The biggest drawback to this system
is that the rate of crystal growth can become so fast that the
crystals turn out cloudy from internal imperfections.
Crystal Growth rate
As the following photo of alum crystals shows, growing good quality single crystals is a slow business:
The crystal on the extreme left took one week to grow. The others took two, three and four weeks respectively. As you can see, crystal growing isn't a very exciting spectator sport.
Washing Crystals
It may happen that you end up with a quantity of small crystals had have become mixed with dirt or silt. One way to wash away the silt while dissolving the crystals as little as possible is to place them in a fine strainer and run ice-cold water over them. Because the water is so cold the rate of crystal dissolving will be low. You'll still lose a little crystal, but much less than if you'd used room temperature water. Dry the crystals right away and store them in an air-tight jar.
The techniques above were used to produce
the following crystals as well as the crystals in the Exotic
Crystal Growing section.
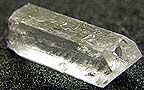
Alum Crystals
Aluminum potassium sulfate (alum) and its brother potassium chromium sulfate (chrome alum) are the easiest single crystals to grow and some of the most beautiful.
Above is pure alum, normally a glass clear crystal. This example looks white because it got wet by accident and became clouded. Also, this example is 20 years old and the surface has been roughened by handling over the years.
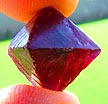
Chrome alum is a dark purple color, which looks opaque but when enough
light shines through its inner beauty can be seen. This
particular crystal
shows the wear and tear of twenty years of handling.

Whereas this new chrome alum crystal is clean and sharp. This
is also
closer to the true appearance of chrome alum. Chrome alum grows
faster than alum. This example only took one month to form and
measures one and one-half inches from point to point.
Alum and chrome alum are chemically compatible and grow
crystals of the same type. Therefore they can be mixed to produce
beautifully colored transparent crystals. The example
above is 3/4 alum and and 1/4 chrome alum by volume.
This is a two-layered crystal. A single crystal of chrome alum
was put it in a
solution of pure alum to grow a transparent shell around it.
All of the crystals above were grown using a slow-cooling technique. A ten-gallon fish tank insulated with Styrofoam on all six sides and heated with an aquarium heater served as the temperature control system.
The next crystal is also alum but this time red food coloring was added to the growing solution. However, the crystal came out absolutely clear, proof that crystallization only allows in those atoms or molecules permitted by the crystalline structure for the crystal. In this case the dye was excluded.
 ....
.... 
Note the fogginess at the center of the crystal.
That's the result of using a standard
seed crystal grown on the bottom of a jar and having
a string tied around it. It
detracts from the quality of the crystal. Note also
that although the crystal
did not take up any of the dye, the thread,which
started off clear, did.

This one-inch tall clear alum crystal took two months
to grow using the evaporation technique.
The following is the largest single crystal in my collection:

It measures a full two inches tall. If you are viewing this at the standard 72 ppi then you are seeing it full size. If it were a good quality diamond it would weigh 277 carats and be worth half a million dollars. To grow it I started with a pure chrome alum solution and every three days replaced 1/4 cup with an equal amount of aluminum alum so that the crystal slowly changed from opaque purple in the center to clear on the outside. It took four months to grow using the evaporation technique.
Growing large sugar crystals
I've had many problems growing good sugar crystals. Part of the problem is that sugar dissolves so well in water that it's difficult to know if I've achieved a saturated solution. What follows is a record of my attempt to grow a large sugar crystal.
I added sugar one tablespoon of sugar at a time to one cup of sugar in a sealed jar and mixed it until all the sugar had dissolved. I'd let it sit for hours between each addition to see if an undissolved sugar fell to the bottom. Three days later I finally managed to saturate the solution at 70 degrees F. It took 1 and 3/4 cups of sugar.
I then added two more tablespoons of sugar and gently heated the solution to 190 degrees F. to completely dissolve the sugar. The solution was a clear light green color. I poured the mixture into a jar, sealed it to prevent evaporation from causing crystals to form on the surface and let it cool. After added so seed crystals I watched in dismay as the dissolved. Evidently the sugar solution after heating was no longer saturated.
After reviewing my experiments with growing rock candy I decided that sugar crystals simply won't form in solutions not cooked to at least 215 degrees F. Also, evaporation is not a main driver for crystal formation and that the temperature of the solution needs to be reduced very slowly. This last requirement was a problem until I came up with the idea of placing the glass growing jar in crock pot filled with oil. The crock pot I'm using has a thermostat which will allow me to reduce the temperature in controlled steps. Here's a picture of the setup:
I preheated the growing dish and oil to 227 degrees. Then I boiled one cup of water and two and a half cups of sugar to form a 227 degree F. syrup. This I carefully poured into the heated growing dish. I covered the pot and reduced the temperature five degrees. Later I dropped a large seed crystal into the solution to determine that it wouldn't dissolve. I reduced the temperature another five degrees to be safe, added a seed crystal and waited. After 24 hours with no growth the temperature was reduced another 5 degrees. Every morning the seed was checked and if no growth was observed, the thermostat was turned down another five degrees.
This seemed like a good idea. Unfortunately, it didn't work.
I kept reducing the temperature yet the seed crystal never grew. Right now the solution is down to 70 degrees and there's still do growth. When quick or slow cooled in the past, crystals would spontaneously form at this temperature. I'm beginning to think that by cooling it so slowly the solution was eased into a stable supersaturated state. I'm not an expert on sugar solutions so I can't state that this is what's happened with authority.
The bottom line is that I've found that growing a large single sugar crystal is a very difficult project. So much so that I'm giving up on it for the time being. If anyone knows a sure-fire way of doing it, I would appreciate their emailing me the instructions. I'll post it on this page and give the source full credit.
Growing large monoammonium phosphate crystals
I set up an evaporative growing solution of 3/4 cup of monoammonium phosphate in 1 cup of water. The solution was warmed to dissolve the chemical then cooled and a seed crystal suspended in the solution. After two weeks the crystal grew from a 1/8th inch long seed to the 2 and 1/2 inch long crystal show below:
![]()
The crystal's cross section is square, which I'd expected but the tapered shaped surprised me. This isn't a particularly good quality example and because the shape isn't very interesting I doubt I'll grow any more of these.
Epsom Salt Crystals
I ran into a serious problem while trying to grow a single Epsom salt crystal using the evaporation technique: a solid shell of crystal kept forming on the surface of the growing solution preventing further evaporation. I had to break up this shell every three hours. That restarted the evaporation process but filled the solution with floating shards that invariably attached themselves to the crystals I was trying to grow, causing them to have surface imperfections and many internal flaws. I gave up after two weeks. The picture above of a 1-inch long crystal was the best I could do. One interesting thing about the shape of this crystal is that the wedge-shaped end on the right is repeated at the opposite end but rotated 90 degrees. It's very hard to see this in the photo.
Because of the shell-forming problem, I would assume that this crystal is better grown using the slow-cooling technique.
The chemicals for the crystals in this section will have to be purchased from a chemical supply store. I got mine from Tri Ess Sciences in Burbank, California. In addition being harder to find and considerably more expensive, several of these chemicals are extremely dangerous to use. Silver nitrate, for example, can irritate skin and mucus membranes and even cause death if inhaled or ingested. Treat all chemicals with respect by wearing appropriate protective equipment. Ask your supplier to explain the hazards involved with the chemicals you purchase.
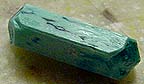
Sodium Thiosulfate Crystals
In May of 2004 I paid 3 dollars for two ounces of sodium thiosulfate. This is plenty if you're using a test tube or small bottle. If instead you're using a small jar like a baby food jar, I recommend getting four ounces. This chemical looks a lot like Epsom salt: small, transparent, 1/8-inch long hexagonal crystals.

Instead of dissolving the sodium thiosulfate in water we're going to melt it. This chemical melts at 119 degrees F. and when cooled forms a super cooled chemical melt: a liquid that really wants to be a solid. I put all but a few pieces of mine in a small bottle and heated it in a 1100 watt microwave on high for 30 seconds, pausing every 10 seconds to swirl it to speed melting. (You could also melt it in a test tube over a low flame or in a double boiler.) I then set the bottle aside to cool for two hours. At that time the sodium thiosulfate was cool and still a transparent liquid.
I taped a seed crystal to the end of a bamboo skewer so I could lower it until it just touched the surface of the liquid. I was hoping to initiate the growth of a single crystal. It didn't work. Instead I got a rapid spread of several crystals.
Crystal growth is very fast, as the following photos show:
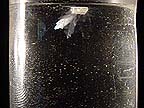

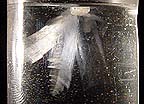
.....2 seconds after the seed....
10 seconds later........ 20 seconds later...........
crystal touched the liquid........................................................................
After one minute the crystals had grown to the point where they filled the bottle. If you are performing this as a demonstration I would recommend using a square sided bottle and have a light shining through it from the side. This will make the crystals, which are almost transparent, easier to see. Also, it would be much easier to simply drop a seed crystal into the jar instead of suspending it as I did. Here's a video of the process:
One interesting phenomenon with this demonstration is that the speed of the crystal growth slows down as the bottle becomes almost filled with crystals. The reason becomes apparent if you touch the side of the bottle, it's hot. As the crystals form, they go from a random liquid, with energy stored in the motions of the molecules, to a rigid crystal with almost no molecular motion and therefore less energy. The energy that had been in the liquid has to go somewhere so it is conducted into and concentrated in the remaining liquid. By the time most of the liquid has crystallized the small amount of remaining liquid becomes so hot that it is near the melting point for sodium thiosulfate. The warmer the chemical is, the slower the crystals grow.
I tried growing these crystals at warmer temperatures to see if slowing the growth would enable me to grow a good quality single crystal. It didn't work. The crystals always grew so fast, on the order on minutes, that multiple, flawed crystals formed.
One nice thing about this demonstration is that it can be done over and over again. All you have to do is reheat and cool the liquid and you're good to go.
Note to teachers: Once the sodium thiosulfate is melted it is very stable as long as no crystals are introduced. This means you can melt a quantity the morning of or even the night before you demonstrate it to your class and carry it from home to school. Just make sure that the bottle is tightly sealed. I've vigorously shaken melted sodium thiosulfate and the agitation did not cause crystals to form spontaneously.
One way to make this demonstration easier for everyone in a classroom to view would be to have the melted liquid in a shallow container like the bottom of a petri dish and place it on an overhead projector. The growing crystals will appear dark because they act like lenses reflecting light away from the screen but their growth will be easy to observe.
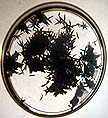
Copper Sulfate Pentahydrate Crystals
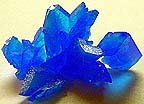
Copper sulfate crystals are a beautiful translucent blue. Making a saturated mixture caused me some problems at first because just a slight increase in temperature greatly increases the amount of chemical that will dissolve in a cup of water. I brought the mixture to a simmer and found I could dissolve a cup of chemical in a cup of water. But, as soon as the solution started cooling most of the copper sulfate precipitated out and I was left with only slightly more than a cup of saturated solution. I tried again and found that 1/2 cup of copper sulfate in 1 cup of distilled water works well. Heat it just until most of the crystals dissolve, cover, and set aside. Several hours later you should have clusters of crystals like the one pictured above. These are small, only 1/4 to 1/2 inch long.
Larger versions, like the following 3/4-inch long single crystals, exhibit the complex six-sided, double-angled end structure of nickel sulfate crystals, as well as its glowing sky-blue color:

This larger, one and a half-inch long copper sulfate crystal is currently the pride of my collection:

Copper sulfate crystals grow quickly using the evaporation technique. The example above only took three weeks to produce. They are also well behaved in that they aren't prone to parasitic crystals popping up on the surface of the main crystal. (This is a problem with chrome alum crystals.)
The following video shows how to grow frost crystals on a sheet of glass using copper sulfate. The time lapse segment is very interesting.
Copper sulfate cost 8.25 dollars for 8 ounces in May of 2004.
Nickel
Sulfate Crystals
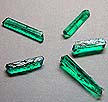
These 1/2-inch long nickel sulfate crystals display
the long, thin architecture of the crystal
form with seven water molecules (nickel sulfate
heptahydrate.) There is a shorter form
with six (nickel sulfate hexahydrate.) The
seven-molecule form dehydrates quickly,
forming a white powdery coating. Unfortunately, this
is also the form
that seemed more likely to appear in my experiments.
Nickel sulfate crystals are long, square, attractive green crystals. Pour 8 ounces (by weight) into 8 ounces (volume) of warm water. Heat and stir until all the crystals dissolve. Place in a heated water bath (I keep mine at 80 degrees) and after 12 hours you should have a crusting of 1/4-inch crystals on the bottom and sides of the glass. Use a couple of these as seed crystals, filter the solution through a coffee filter and suspend the crystals back into the solution by tying them to the bottom of two lengths of nylon thread. Cover the glass with a piece of cloth and let the crystals grow for several weeks, cleaning them as needed. (Nickel sulfate cost 8 dollars for 8 ounces in May, 2004.)
I started to grow a large single crystal of nickel sulfate on 8 May, 2004. One problem with this crystal is that like monoammonium phosphate, a hard crust tends to form on the top of the growing solution. This needs to be broken up at least twice a day. This creates a shower of crystal fragments that rains done on the good crystals you're trying to grow and many times starts parasitic crystals growing on them. I gave up after one week. Here was the result:
Because it was allowed to grow for only one week, the nickel
sulfate hexahydrate (?) crystal
only got to be 3/4 inch long. It has a square cross section
with a four-sided
pyramid at each end.
Because of their similar shape and color, I find it difficult to differentiate between the hexa and hepta forms of this crystal. To my eyes the hepta is longer. The problem with telling the difference between seed crystals is that they are usually broken and I can't tell if a particular specimen is the blockier hexahydrate or the longer heptahydrate that has been broken off short so it looks blocky.
I believe I may have managed to grow both a hexa and hepta version of nickel sulfate. The blockier hexa sample had a length/width ratio of 2.7 whereas the longer hepta ratio was 4.5. The color of both was so close that I couldn't discern a difference. Both have the same square cross section with pyramidal ends.
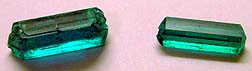
The color rendering of my digital camera greatly emphasized the
color difference between
the bluer and blockier nickel sulfate hexahydrate on the left
and the greaner, thinner
nickel sulfate heptahydrate on the right. Viewing them in
person they appear
the same color, a slightly darker, purer green than the crystal
on the right.
Late update: I found that both of the crystals in the photo above started to dehydrate after three days, indicating that in spite of their different shapes and colors they may both be nickel sulfate heptahydrate. Scrounging around in the bottom of the paper envelope I kept my seed crystals in, I found one that was still untouched by dehydration whereas all the others had long since turned to dust. Perhaps this lone seed is the true hexahydrate.
Ferrous Sulfate Crystals
Ferrous sulfate crystals are blue-green. The chemical cost 8.25 dollars for 1 pound in May, 2004.
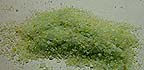
As purchased, ferrous sulfate appeared to be two chemicals: one
a dirty yellowish
powder and the second small, pale green crystals. The crystal
grains were slightly larger than table salt.
One cup of ferrous sulfate dissolved in one cup of 140 degree F. water. The resulting solution was an ugly muddy brown color that was so opaque that watching crystals grow in it will be impossible.
The first thing I noticed is that a thick brown mud quickly settled to the bottom of the growing solution. I decanted the liquid above it into a clean jar. This liquid was still an opaque brown. Two hours later there was another inch of brown mud on the bottom of the glass and the water above it now had a green tint. I decanted again, leaving me only 1 cup of growing solution. It appears that ferrous sulfate is a chemical with a steep solubility curve with respect to temperature.
After 24 hours, a thin layer of fine brown silt covered the bottom of the glass and dotted the sides. The liquid had cleared to a barely translucent ugly green. I was happily surprised when I discovered attractive pale blue (or pale green) crystals clinging to the seed line suspended in the solution.
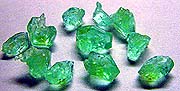
They were only 1/4 inch across and too jagged to guess what crystalline shape they had. Many had some of the brown silt incorporated into their matrix. I cleaned up the seed line and put it back in the solution to see if I could grow large enough samples to determine their shape. The growing solution is well behaved (it doesn't form a shell on its surface) and the crystals are an attractive aqua color.
Attempting to avoid the problem of mud settling on the crystals, I dissolved one cup of ferrous sulfate as purchased from the store in two cups of almost simmering water. I poured this into a glass pitcher and after covering it, placed it inside a small Styrofoam ice chest and that inside a second larger ice chest. The idea was to slow the cooling enough so that all the silt has a change to settle out before crystal formation begins. Twelve hours later the solution had cooled. There was a brown scum on the surface, translucent sea-green liquid filling most of the jar and one inch of course silt on the bottom.
I dropped a couple of seed crystals into the liquid to test for saturation. They dissolved so the solution wasn't saturated and had to be concentrated. Since I had used up all my chemical supply, I decided to boil the mixture to drive off excess water. This turned out to be a mistake.
After decanting and filtering the clear green liquid, I boiled it in a stainless steel pan until its volume had reduced by 25 percent. I then placed it in a glass to cool. I immediately noticed that the previously clear solution was now a muddy brown. After 12 hours of cooling and settling I observed that once again a brown silt had settled to the bottom of the jar. Thinking that the ferrous sulfate had reacted with the stainless steel pan to create the silt, I decanted and filtered the liquid once again. I then placed it in a glass bowl and brought it to boiling in a microwave. Even though the liquid never came in contact with metal of any kind, the brown silt formed again. I conclude from this that heating a ferrous sulfate solution causes the brown silt to form and not contact with metal objects. What this tells me is that in the future I will make my solutions by heating them as little as possible.
Since iron oxides are reddish brown and the silt is brown I assume the silt is some form of ferrous oxide. This is just an untested supposition.
After a week of growing these crystals, I've observed that a crust is tending to form on the surface after all. However, rather that forming in the middle and growing outward, it's forming at the edges and growing inward. Its rate of expansion is very slow and if any chunks break off they fall down the sides rather than onto the seed crystals. This isn't too much of a problem.
This crystal's solubility is too sensitive to temperature to grow without a thermal bath. The temperature fluctuations in my growing room are only 8 degrees per day, yet I've repeatedly seen seed crystals form in the morning hours, when it's coolest, only to dissolve in the late afternoon and evening when the temperature goes up.
After trying to grow a ferrous sulfate crystal for three weeks I still hadn't gotten anything good enough to recognize its shape. Worse still I'd run out of materials. Because the transparent aqua color looks so good I decided to get more chemical and start over.
I began again by adding 1 and 1/2 cups of distilled water to 1/2 cup of ferrous sulfate and heating it in a microwave to a temperature of 160 degrees. All of the chemical dissolved, creating a medium brown solution. I filtered this through fine filter paper to get a lighter, greenish brown solution. This was covered and placed in the 82 degree F. water bath. Twelve hours later clumps of brown silt had formed on the bottom and sides of the jar as well as dispersed throughout the solution. I strained the solution, being careful not to disturb the thick silt on the bottom because it would clog the filter, through fine filter paper and ended up with a clear, light green solution. I put this back in the water bath and let it sit until crystals started forming on the sides of the jar where the solution meets the side. This indicated that the evaporation process had proceeded to a point where crystallization was occurring. At this point I added a seed crystal and waited.
While waiting for the solution above to work its magic, I experimented with techniques for reducing the amount of brown silt produced when preparing a ferrous sulfate solution. I found that sifting the dry ferrous sulfate through a very fine metal sieve separated the larger, purer crystals from most of the fine brown powder that accompanies it. If these larger crystals (they're still small, about the size of table salt) where then briefly washed with ice cold water, almost all of the remaining brown impurities were removed. When this clean chemical was then used to prepare a solution without heating it, the resulting liquid was almost completely free of the brown silt. The problem with this technique is that three-quarters of the original chemical is lost. Most of the loss occurs during the first sifting. Much of that material is good, but it's mixed in with almost an equal amount of brown silt. If this mixture is mixed with ice cold water, then left to settle for a few seconds, the heavier crystals will settle out and the brown cloudy solution above can be decanted off. Repeating this step results in a fairly clean quantity of fine crystals, which can then be used to prepare a solution that shouldn't have nearly as much silt as if the raw chemical were used. Caution: the sifting process throws up a cloud of fine dust that is hazardous.
While heating a solution in the microwave, I noticed that a brown layer formed in the top 1/2 inch of the glass. I assume this was caused by the formation of iron oxides. If so, then it's location suggests that it is the result of iron in the solution bonding with oxygen from the air. If the oxygen was taken from the water, then the brown would have been distributed throughout the solution. This means that I may be possible to reduce the formation of iron oxide by covering the surface of the liquid when heating so that oxygen can't be pulled from the air.
I believe this oxidation process continues at low temperatures. Please look at the following picture:
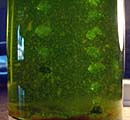
Note the small clumps of brownish muck floating all through the growing solution (The two vertical lines of lighter green chunks are the seed crystals.) Eighteen hours before this picture was taken I strained the solution through a fine filter paper to remove all the brown silt. It reappeared overnight. This brown muck is so light that it floats for hours. Even the gentlest current can keep it from settling out. The real danger is that some of it will settle on a crystal and cause an imperfection. I suspect it forms on the surface of the solution and drifts down. If so, then this suggests that the slow cooling technique in a container void of air might have an advantage.
Growing ferrous sulfate crystals continues to be a frustrating process. After many weeks of work I have yet to grow even a good enough seed crystal to identify the shape of these crystals. But, the beautiful sky blue aqua color of the crystals is irresistible so I intend working on it until I succeed.
So far the best I've been able to do is to grow a few flawed seed crystals.
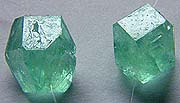
While the example on the right suggests a cubic architecture, the one on the left hints that the shape might be more interesting. Even if it ends up being a simple cube, that transparent aqua would make it a beautiful crystal. These seeds are 1/4 inch across.
Finally, after several weeks of work I believe I've come up with a seed crystal that hints at the shape of ferrous sulfate crystals:

This 1/4-inch long seed appears to have the same four-side, double pyramid architecture of alum and chrome alum. If so, this could be an extremely attractive crystal, if a clean, good quality one can be grown. Even though this is by far the best seed I've been able to grow, it have many flaws. I suspect the problem lays with the brown silt that continually forms in the growing solution. Tiny specks of this material land on the forming crystals and acts as either a nucleation site for a parasitic crystal or prevents additional crystal growth where it rests because it prevents growing solution from depositing material at this location.
After over a month of work trying several different techniques, here are the best ferrous sulfate crystals I've been able to grow:
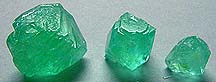
The largest of the three is barely one inch long and all of them are seriously flawed because of the iron oxide that forms in the solution.
I considered a scheme where I'd use the sublimation from dry ice to create a layer of carbon dioxide over the surface of the growing solution. This should let evaporation take place yet prevent atmospheric oxygen from reaching the surface. I decided not to try it because I'd have to keep a supply of dry ice on hand for several weeks. This would end up costing fifty dollars to grow a crystal, which is too much for me. Consequently I'm having to give up on growing a single ferrous sulfate crystal. If anyone knows how to do it I would appreciate an email with the directions. Thank you.
In June of 2005 I received an email from Christian, who sent me the following URL to a page that explains about ferrous sulfate: http://www.crscientific.com/ferroussulfate.html. (Thanks, Christian!)
Rochelle salt:
Potassium sodium tartrate has a very steep solubility versus temperature curve (a small increase in temperature greatly increases the amount that will dissolve in water) so it's best to grow these crystals in a thermostatically controlled temperature bath. I found that 3/4 cup of Rochelle salt will dissolve in one cup of 82 degree F. water. I added two more tablespoons, heated the solution until they dissolved, and cooled it back to 82 degrees to form a slightly supersaturated solution. I the selected a seed crystal from the unused chemical in the supply jar, tied it to a nylon thread (I got lazy and decided to not grow my own seed this time) suspended it in the growing solution and sealed the jar. Within two hours I could tell the crystal had started to grow. After eight hours it was obvious that the solution was too supersaturated because the seed was growing several different crystals orientations and other crystals were popping up all over the jar. Fortunately one of these formed on the growing threat so I used it as a clean seed.
I've read that Rochelle salt forms a stable supersaturated solution that allows you to seal a seed crystal in a jar and it will grow for a long period of time. I've tried this twice and found that parasitic crystals always form and compromise the main crystal. I've had better luck using the evaporation technique where it's easier to access the main crystal and clean it up if necessary.
The following crystals were going along great, growing fast and clean. Then one morning I discoved the sharp, clean surfaces looked like someone had carved long groves into them.
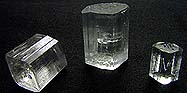
I assume what happened is that in spite of their being in a thermal bath, a temperature spike caused them to start dissolving. Although they grow quickly and are usually trouble free, I can't recommend Rochelle salt because they don't have an interesting color or shape. The largest of the three crystals above is 1 inch tall and took three weeks to grow.
Potassium sodium tartrate (Rochelle salt) cost 12.75 dollars per pound in May of 2004.
Potassium Chromate
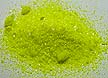
Potassium chromate is a bright yellow chemical the consistency of fine sugar. It cost 14 dollars for 4 ounces in May, 2004.
Three tablespoons dissolved in 1/2 cup of room temperature (74 degree F.) water. Approximately 1/2 more tablespoon dissolved when the temperature was raised to 112 degrees. Compared to chemicals like Rochelle salt, potassium chromate's solubility does not increase dramatically as temperature increases. This suggests it would be good candidate for growing without a thermal bath because daily temperature changes will have little affect on the developing crystal. Because its solubility is high (a lot of it dissolves in a small amount of water) it should grow quickly using the evaporation technique because very little water needs to evaporate to deposit a lot of chemical.
The solution is very transparent, which makes observing the growing crystal easy.
The following day I checked the solution and discovered that crystals were growing up the side of the glass.
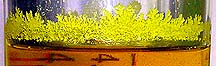
This is not unusual, but not favorable for rapid crystal growth. As solution evaporates small crystals form where the solution meets the glass. These crystals represent material that would preferably be deposited on the main crystal.
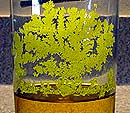
One week later the crystals had climbed their way up the side of the glass four inches.
After two weeks I finally managed to harvest a couple of solid crystals that might serve as seed crystals:
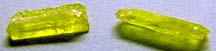
All these poor quality samples tell me is that the crystal archetecture is elongated. These samples are 3/16 inches long. The problem with growing potassium chromate crystals is that they seem to prefer to form fine branching structures consisting of hundreds of tiny crystals.
After three more weeks of working with this chemical I gave up. The seeds pictured above didn't grow at all. Instead, the crystals growing up the sides of the jar continued to flourish. I'm giving up on this one.
Potassium Dichromate
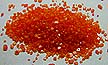
Potassium dichromate is a bright orange chemical the consistency of medium coarse salt. It cost 10 dollars for 8 ounces in May, 2004.
This chemical's solubility is much lower than the
chromate form discussed above, only
1 and 1/2 teaspoons dissolve in 1/2 cup of water.
Heating the water to 110 degrees F. only increases the solubility to
about 2 teaspoons. As with potassium chromate, the low increase in
solubility with temperature implies this crystal might be forgiving
of small daily temperature changes. Since the overall solubility is
low, a lot of liquid must evaporate for a small amount of chemical to
be deposited. This means that if the evaporation technique is used
the crystals will grow slowly.
The solution is very transparent, which makes observing the growing crystal easy.
Twelve hours later I observed that the few remaining crystals in the bottom of the jar had dissolved and that no seed crystals had formed. This suggests that the solution never truly got saturated. I added another two teaspoons per half cup, heated the solution to 120 degrees F. to dissolve most of the chemical and set the jar aside to cool.
After three hours the bottom of the jar was filled with very fine orange crystals. What this implies is that this is a chemical that prefers to make many small crystals instead of fewer larger ones. This means it could be very difficult to grow a large, high quality single crystal. So far all I've been able to see are very small seed crystals like the one below:

Potassium dichromate appears to be a rectangular prizm, similar to the nickel sulfate crystals discussed earlier. The color is excellent but I wish the shape was more interesting. Because this is a slow growing crystal, I've decided to decant the growing solution every three days to remove any crystals that form on the sides and bottom of the jar. This will concentrate crystal growth on the seed instead of spreading it out over many crystals.
After several weeks of very slow growth I obtained the following crystals:
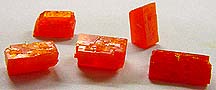
These are all very small, the largest being barely one inch long. The color is good, but opaque instead of the preferable translucent. They grow very slowly and their shape isn't interesting. I can't recommend this crystal.
Silver Crystals
Silver nitrate is a chunky, colorless crystalline substance that cost 25 dollars an ounce in 2004.
![]()
I dissolved 7 grams of silver nitrate in 330 grams of distilled water. (Use distilled water. If tap water is used it turns cloudy.) I then suspended a 1/2-inch copper pipe end cap from a hardware store into the solution.
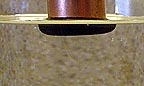
Within seconds a black coating had formed over it.
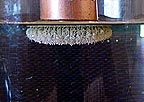
Fifteen minutes later fine silvery crystals started to grow.
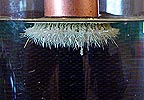
After half an hour they were 1/4-inch long.
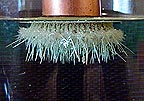
An hour later they were 1/2-inch long. Shortly after this the crystal mass broke loose and fell to the bottom of the glass.
Silver crystals are long, hair-thin wires that grow as the copper from the endcap dissolves in the silver nitrate solution. This process is called ion exchange. It's not surprising the hanging crystals would eventually break free because the copper surface on which they are growing is constantly dissolving.
To avoid the breaking-off problem I grew the next batch of silver crystals by placing the copper end cap on the bottom of the glass. It worked but the weight of the crystals caused them to mat down and not be as attractive.
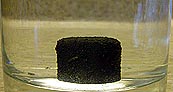
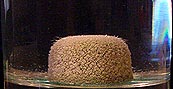

The blue-green color of the water shows that copper
is going into the solution.
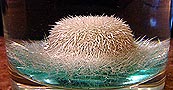
The display was at its best after five hours of growth,
as the picture above shows.
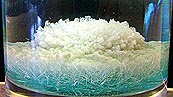
Shortly after that the crystal mass took on a clumpy appearance.
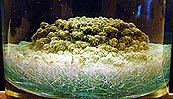
At the eight hour mark the clumps had turned brown.
I do not know what caused this.
I think the hanging display is more interesting. The next time I do this I plan to enclose the end of the copper end cap in a loose-fitting glass mesh. The idea is that the mesh will provide enough support to prevent the crystals from breaking loose and falling.
If copper wire is used to grow crystals, it needs to be at least 1/8th inch in diameter. I tried using finer wire and the silver crystals kept breaking off before they got long enough to be interesting.
One disappointing thing about silver crystals is that even though the individual crystals are stiff, they are so thin and weakly linked to each other that a mass of them is very soft. You can't remove them from the solution or they matt down like a mass of wet cat fur.
While many of the chemicals used for growing crystals are dangerous, special care should be taken with silver nitrate because it has the additional hazard that when in solution it looks like plain ordinary drinking water.
Potassium Ferrocyanide
Potassium ferrocyanide comes as a granular material with the graininess of sugar. My sample also had 25 percent powder mixed in with the grains. It's reddish brown and cost 1.50 dollars an ounce in 2004.
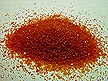
Eight teaspoons dissolved in 1/2 cup of 74 degree water. When warmed to 120 degrees, an additional 4 teaspoons could be dissolved. This solution was covered and placed in an insulated box with 1/2 gallon of 120 degree water to serve as thermal mass. Twenty-four hours later the bottom of the glass was covered with seed crystals ranging from 1/32 to 1/8 inch across.

The seeds were too irregular to hazard a guess as to what their shape might be. They were transparent and an attractive orange red when light shines through them. I have a feeling that as it gets larger the color will darken. One of these seeds was suspended in the solution allowed to grow by way of the evaporation technique without using a thermal bath.
Four days later the seed had grown to 3/8ths-inch across.
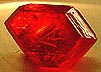
As feared, the crystal darkens as it get larger. To show the internal color in the photo above it was necessary to shine a flashlight through the crystal.
After a week the crystal was an inch long and clearly exhibited an elongated hexagonal shape.

These crystals grow almost as easily as alum. They put on size quickly and don't have problems with excessive parasitic crystals forming on the suspension line or on the crystal itself. The biggest problem is that the color is too dense. Large crystals will end up looking dark reddish brown.
The shape still isn't clear. The forward facing facet on the crystal above hints at a elongated hexagonal shape.
My criteria for a great crystal to grow are:
1. Since you're probably going to spend more time watching the crystal grow than looking at it once it's finished, the growing solution has to be transparent enough to see the crystal clearly. It's even better if the solution is an attractive color.
2. The resulting crystal should have an interesting, pleasing shape.
3. The crystal should have an attractive color.
4. The crystal should have a natural tendency to grow cleanly, with few parasitic crystals growing on it's surface.
5. There should be no difficulties in the growing process such as crusts forming on top of the growing solution.
6. The resulting crystal should be stable and not be fragile or dehydrate.
7. The chemicals needed for growing the crystal should be easy to obtain and inexpensive.
After considering all of the above, here are my picks for the the best crystals to grow:
1. Pure alum: while glass-clear, this crystal glistens with a brilliance that rivals a diamond and its double-pyramid form is the quintessential crystal shape. It grows quickly, cleanly, and the chemical is available in the spice section of many grocery stores.
2. Alum doped with a little Chrome Alum: Combining these two chemicals produces the most beautiful pale purple crystals imaginable. Growing them is identical to pure alum and the only reason I'm putting them in the number two spot is that chrome alum is more difficult to find and at 40 dollars a pound in 2004, more expensive than plain alum. But, for a good-sized crystal you'll only need one ounce of it (2.50 dollar's worth) so don't let the price scare you away.
3. Copper Sulfate: This crystal, also called bluestone, is a beautiful translucent blue with an interesting six-sided flattened shape with sharply angled ends. It grows quickly, cleanly and easily in an attractive blue solution that is easy to see through. The resulting crystals are stable.

Kenneth G. Libbrecht, a professor of Physics at Caltech. This site has dozens of incredible pictures of snowcystals (snowflakes) and is well worth a visit. This site also presents plans for a very inexpensive and easy to build water crystal (snowflake) growing chamber. I made one and it worked very well. After making a few modifications to accommodate my digital camera I was able to take several pictures of the water crystals I grew and have posted them a little further down this article. They don't come remotely close to the crystals grown and photographed by Professor Libbrecht but serve to demonstrate that his design is forgiving enough for even a novice like me to succeed with it. For this I am profoundly grateful to Dr. Libbrecht.
Here's what the snowflake growing chamber I made looks like:
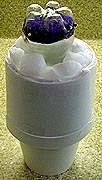
It's simply three, 32-ounce Styrofoam cups stacked inside each other with a fourth one cut open to form a collar around the top. A 20 ounce water bottle is inserted upside down into a bed of crushed dry ice. The bottom of the bottle was cut off and a piece of wet sponge inserted into the bottom and held in place with pins. A three inch long length of nylon thread with a paper clip at one end hangs from the center of the sponge. The fourth cup I used as a collar isn't necessary. I only added it in an attempt to streamline the appearance and add a little more insulation.
Water evaporating from the sponge saturates the air in the chamber. Because the lower part of the bottle is chilled to well below freezing and the uninsulated top is above freezing, there is a temperature gradient set up inside the bottle. Just like cold water can't dissolve as much sugar as warm water, so cold air cannot hold as much water vapor as warm air. When that happens the water condenses out as water droplets or, if it's cold enough, started to form water crystals. At one inch below the sponge in my unit the temperature was low enough to form snowflakes, which can grow on the thread.
This little snowflake factory only took 15 minutes to make and within minutes of putting it together there were snow crystals growing on the thread.
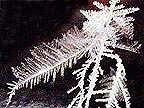
This snow crystal fan was 1/4 inch long.
The problem with this setup was that the crystals were hard to see through the side of the plastic bottle and if you lifted the top to take a picture the crystals melted in one second. Also, even if you were able to snap a picture before the snowflake melted the string was swinging making getting a focused picture difficult. The picture above was the only success out of ten tries, and even with it if you look on the right hand side you can see a fan that melted and is hanging straight down.
I took care of these problems by cutting a small window in the side of the bottle and surrounding it with a plastic collar cut from another bottle. I could then mount a camera in a tripod and position it to take picture of crystals as they grew. Here's what the new arrangement looked like:
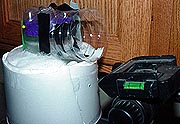
The dark unit in the lower right corner is the top
of the tripod. The camera
mounts on it with the lens inserted into the
transparent plastic collar.
With this unit I was able to take the following
sequence of photos:
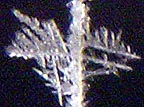
Four minutes of growth. The water crystals (snowflakes) are 1/16 inch across.
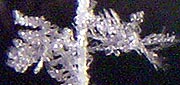
Ten minutes of growth increased the size to 3/16 inches across
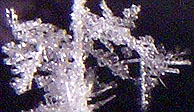
After 15 minutes the crystals measured 1/4 inch across.

After forty-five minutes of growing. This mass
of crystals measured half an inch across.
This was a very simple, easy and quick experiment that is both interesting and enjoyable.
As well as Dr. Libbrecht's design worked, I decided
to make a new water crystal growing chamber in a configuration that
would be more observer and camera friendly. I made a 9-inch box out
of 2-inch thick Styrofoam. A cirlce was cut in the center of the top.
In the box I placed a 24-ounce drink glass to hold the stage upon
which the crystals would grow. The area between the box and glass
would be packed with crushed dry ice. The outside of the box was
covered in aluminum foil to block thermal radiation.
I then cut two thin strips of sponge and glued them to the inside rim of the glass. This leaves the center open for viewing and photographing straight down on the crystals. Since water crystals tend to grow horizontally, this provided a better view over looking in from the side.
Instead of stretching a nylon thread from the center of the goring chamber's top to the bottom, I molded a stage out of epoxy putty and stuck three 1-inch lengths of fiber optic thread and one needle into it. The optical thread is stiff enough to hold up the weight of the crystals without having to be support at the top end. This again provided a clearer, unobstructed view of the crystals.
Finally, I cut a pair of covers for the dry ice and one for the top of the glass. The one covering the glass have a 3/4-inch diameter hole to look down through and take photos through. By shooting through a small hole I prevent hot air from getting into the chamber and melting the crystals and also avoid frost collecting on the camera lens.
For taking pictures I rest the camera on its lens ring directly on the glass cover. and use the timer release to take pictures. This eliminates an awkward tripod and lets puts the camera as close as possible to the crystals, enabling the finest possible detail to be captured.
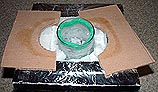
The box loaded with dry ice and showing the box covers that help hold the cold in.
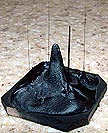
The growing stage. The fiber optic threads are finer than
the original nylon thread. This stage is placed in
the glass
so that the tops of the threads are 1/2 inch below
the top of the glass
It's important to have the top of the glass with the
sponge exposed to the
air to prevent the water in the sponge from freezing
solid. If it does, then
the source of water vapor is cut off and the
crystals won't grow. The
next time I fire this unit up, I'll use a plastic
jar instead of a glass, which
conducted enough cold up to the sponge to freeze it
after two hours.
The complete setup. The camera rests on the glass
cover. This way I can get
the lens as close to the crystal as possible. The
small flood lamp on the left
shines light into the chamber through the gap
between the dry ice
cover and the glass cover. The camera is a Sony
DSC-F707, a
5.25 megapixal camera with a very tight macro
setting that
enables the camera to focus on objects as close as
5/8ths of an inch from the lens.
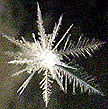
A crystal after five minutes of growth. It's 1/8 inch across.
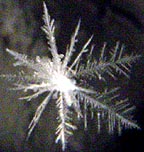
Fifteen minutes old.
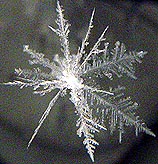
At twenty-five minutes it's 3/16 inch across.
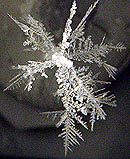
After 45 minutes of growth it measured 1/4 inch from top to bottom.
The crystals grow 1 inch above the level of the dry ice, which in this system drops at the rate half an inch every two hours. This creates focus problems because as the level drops the location where the crystals grow also drops. When the object is only one inch away from the camera's lens there isn't much depth of field, even at F8.
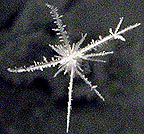
One final water crystal picture. This one's just
started growing and is only 1/8 inch across.
Testing commercially available crystal growing kits
The only brand of crystal growing kit available
locally was a Scholastic kit sold at
Toys-R-Us. It contained 15 crystal growing
experiments using alum and monoammonium phosphate, two chemicals that
grow crystals easily. Different colors are achieved by some of the
mixes containing a dye.
I have to confess that even though I wasn't expecting much from this kit, I was still disappointed. Consider the picture below copied from the cover:
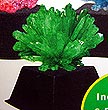
Since this kit is designed for children, I had expected that the results would have at least a passing resemblance to what was pictured on the cover. Otherwise children, attracted to the kit by the cover, would think that they had failed somehow if their results weren't as good. Science kits should teach and encourage children. Setting them up for disappointment does neither. Below is a picture of the crystals I obtained from very carefully following the instructions that were supposed to grow the crystal pictured above:
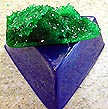
It's not even close. The fact is that it would be impossible to grow the crystal mass pictured on the cover in the container supplied because it is far too shallow.
My conclusion is that while you can grow crystals with this kit they will not be anywhere as impressive as those pictured on the cover.
Online sources for
crystal growing kits and chemicals
Hearths:
http://www.hearthsong.com/hearthsong/product.do?section_id=0&bc=1005&pgc=26&country=0&occ=1005
A unique glass-domed device that continually grows crystals without having to mix any chemicals. Completely enclosed. (I got one and was disappointed.)
Tri-esssciences:
http://www.tri-esssciences.com/crystal%20growing%20kits.htm
The cheapest source of Space Age Crystal Growing kits I found on-line.
Analytical Sciences
http://www.analyticalsci.com/science/Crystal%20Growing%20Kits.htm
Another source for Space Age Kits. Offers three different kits not available on the Tri-esssciences site
The Science and Hobby Store:
http://www.sciencehobby.com/listings/main_crystal.html
Offer the Smithsonian line of crystal growing kits
Omni Resources:
http://www.omnimap.com/pscience/xtl-kit.htm
Offers a wide range of kits for all ages and experience levels.
Explore for fun:
http://www.explore4fun.com/explorestore/crysgrowkit.html
Inexpensive mini pack refills for Space Age kits.
The Science Company:
http://www.coscosci.com/sci-exper/crystal_chemchart.htm
Source for pure crystal growing chemicals. These are not kits.
Websites that
explain how to grow crystals
http://www.cristallogenese.com
This is a French-language site maintained by Roger with pictures and information about crystal growing.
About Chemistry:
http://chemistry.about.com/cs/growingcrystals
Many pages on how to grow crystals and explanations of the science behind them. Much of the information on this page came from this site.
Crystal Growing:
http://www.crystalgrowing.com/index_e.htm
A page from Germany
The Science Company:
http://www.coscosci.com/sci-exper/crystal_intro.htm
Several crystal growing experiments explained.
Growing Alum and salt crystals:
http://www.beloit.edu/~SEPM/Rocks_and_minerals/growing_crystals.html
Growing alum, rock candy, stalactites:
http://www.rockhoundingar.com/pebblepups/growcryst.html
The Wizard:
http://www.seawhy.com/xl.html
An excellent site with some of the best crystal pictures I've found on the Internet.
The only good book I've been able to find on growing crystals is Crystals and Crystal Growing by Alan Holden.
The following are the solubilities I found for the following chemicals. These are not in the more rigorous measurement units of grams because not everyone has access to a accurate scale calibrated to them. Instead I use cups, tablespoons and teaspoons because they are more readily available and convenient units.
Sugar: 1 and 3/4 cups of sugar dissolves in 1 cup of water at 70 degrees. But, when I warmed this solution to 190 degrees and added another 1/4 cup of sugar, the solution turned a clear green hue and when cooled did not form crystals indicating that it still isn't saturated. Also, small grains of sugar will dissolve over time if dropped into the solution. It appears that sugar solubility in water is a complex subject.
How much more will dissolve at higher temperatures is difficult to determine because the rate of dissolving is very slow and the evaporation rate is high. Also, it's difficult to maintain a constant temperature long enough to allow the sugar to dissolve. One reference stated that 456 grams (about two and a quarter cups) would dissolve in 1/6 cup of 200 degree water.
Alum: Two tablespoons will dissolve in 1 cup of 70 degree water. Four tablespoons will dissolve in 200 degree water. When I try forcing more in, the water turns cloudy and I suspect it's more like a suspension that true dissolving.
Chrome Alum: I've read that it is three times as soluble as alum. I dissolved 8 ounces in 1 and 1/2 cups of water amd I might have been able to take more.
Monoammonium phosphate: Seven and 1/3 tablespoons will dissolve in 1 cup of 70 degree water. I have not measured the amount that will dissolve in simmering water.
Table Salt: Four tablespoons will dissolve in one cup of 77 degree water. By heating the water to 160 degrees I can get one more teaspoon to dissolve in it, indicating that salt's solubility is not influenced by temperature. This means that a lot of solution may be needed to grow a crystal a respectable size.
I did find that 6 tablespoons of salt will barely dissolve in 180 degree F. water (out of an Insta-hot dispenser.) by the time it had almost dissolved, the water had dropped to 140 degrees F.
Rochelle Salt: I read that 60 g of Rochelle salt will dissolve in 100 g of water at room temperature. At high temperatures 130 grams will dissolve into 100 grams of water. That's about 2/3 of a pound in a cup of water.
Baking soda (sodium bicarbonate):
1 and 1/2 teaspoon dissolves in 1/2 cup of 70 degree F. water. Three
and 1/2 teaspoons will dissolve in 120 degree water.
(Instead of recording other chemical
solubilities here, I will put them in the article about growing a
crystal of that chemical.)
Please click HERE to visit my main site and browse 90 other pages covering everything from electric rocket engines to astronomy.