Wayne Schmidt's Watering/Fertigation System
The Fertilizing System:
With over 220 linear feet of flowering beds I need a watering and fertilizing system that saves as much time as possible. Complicating the problem is the fact that I live in the high desert of southern California so my soil is strongly alkaline (averaging a pH of 7.8), my water is alkaline (averaging 7.5) and the beds are edged on both sides by concrete, which leaches more alkalinity into the beds. Amending the soil with peat moss helps but I need some way to correct the pH of the water itself.
The first thing I tried were syphon hoses:

These connect between the spigot and hose. The black rubber hose is placed in a bucket of concentrated fertilizer solution, which is drawn up and mixed into the water when the tap is turned on. The mixing rate is fixed at 16 to 1. I've had three of these and they all failed miserably. The problem was that the orifice through which the solution is drawn is so tiny that it clogs constantly. The steel spring filter the company put on the end of the hose did more damage than good because it wasn't fine enough to stop clog-sized particles and it immediately rusted, releasing flakes that further clogged the syphon. These syphons also reduce the flow rate through the hose so that only very small areas can be watered in a timely manner.
The next thing I tried was a glorified hose-end fertilizer:
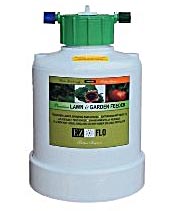
As with the syphon device, this one is connected between the spigot and the hose leading to the garden. In this system the bottle is filled with dry, water soluble fertilizer. When the water is turned on, a high pressure stream near the entrance enters the bottle, pressurizes it and starts dissolving the fertilizer. The rest of the water flows through an orifice that reduces the pressure slightly. Because the pressure in the bottle is slightly greater than that in the main stream, concentrated fertilizing solution from the bottle is pushed up through a small tube leading back into the main line, where it mixes with the water entering the hose to the garden. The mixing rate is fixed at a ratio of usually 99 to 1.
These systems don't clog and have much greater flow rates than syphon systems. But, the rate of fertilizer application is uneven. As time goes by the concentrated solution inside the bottle gets diluted yet the mixing rate is constant so the final fertilizing solution gets weaker. As you work your way through the garden the plants at the end of the line will get much less fertilization that those at the beginning.
There are more expensive pump systems available that provide complete flow rate and mixture rate control. But these are designed for commercial use and cost many hundreds to thousands of dollars and are large complex systems. What I wanted was a system that would let me control flow rate, mixture ratios, be inexpensive to build and easy to maintain. My solution was to mount a 10 gallon plastic trash can on a shelf 3 feet above the ground. I pour 1 and 1/2 cups of water soluble fertilizer into it (the same as one full hose end feeder package) and fill it up through the hose indicated with the small yellow arrow. PVC fittings act as a hook to hold the hose in place and direct the flow straight down for maximum mixing. Two 1/4-inch diameter hoses (blue arrow) attached to the bottom of the trash can let fertilizing solution flow out and into a second trash can on the ground (red arrow.)
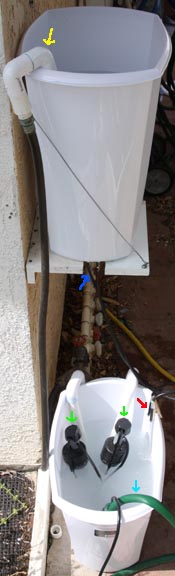
The bottom trash can is filled through two bathroom flush valves (green arrows.) One did not supply enough water to keep up with the required flow rate. In use, at least one of these valves is almost always on creating enough turbulence so the concentrate from the upper trash can is thoroughly mixed into the lower trash can's water before it goes out to the garden. A 400 gallon per hour pond pump, available for $30.00 from any hardware store, pumps water out of the lower tank into a hose (cyan arrow) and out into the garden.
By adjusting the amount of fertilizer added to the upper trash can and selecting one or two of the black tubes feeding concentrated solution into the lower tank I can completely control the amount of fertilizer in the final solution. Because the fertilizer in the upper tank is completely dissolved and mixed, the concentrations are always constant. Valves at the end of the hose leading to the garden permit me to control the rate of flow into a particular bed. At maximum flow, the pump puts out enough water to cover 100 square feet with one inch of water every 20 minutes. The only thing not shown in the picture are the cloth covers I keep over the trash cans to prevent leaves from blowing into them.
I've used this system for hundreds of hours and have not had a single clog or failure of any kind.
For correcting the water's pH, instead of fertilizer I add three cups of vinegar to the upper tank before filling it. The corrects the pH of the water being applied to the beds to a perfect 6.5. This isn't necessary when fertilizing because water soluble fertilizers already have pH correctors in them.
The Watering System:
Now that I had a good fertilization system I needed some way to distribute the water in my beds. Over the years I've experimented with every type of water distribution system imaginable for my flower and vegetable beds. Every one failed in one way or another.
Sprinklers were a nightmare. Not only is it almost impossible to get even water distribution, they wet the plants, causing disease problems, and crush down foliage and flowers, many times completely destroying a great display. (Ranunculuses are particularly damaged by overhead watering because their heavily ruffled flowers catch so much water they fall over, breaking the stems trying to hold them up.) Sprinklers are also wasteful in high wind areas, like those where I live. Leaky hoses release 90-percent of their water in their first few feet with the result that the first plants get drowned while the last plants die of thirst. Drip systems are complicated and expensive when you want even water distribution over large areas. I found the recommended one-dripper-per-square foot to create overly wet zones in the center of the square foot and dry zones at its edges in good draining soil. Four drippers per square foot was needed. That means I'd need 2640 of them for my garden beds. That's a lot of assembly time and expense. Another problem particular to me is that when I turn a watering system on I like to be able to see the water flowing so I can be sure it's working. This is difficult with drip systems.
My solution was to drill two rows of 0.035-inch diameter holes, six inches apart down 3/4-inch thin wall PVC tubing. The rows are angled 90-degrees apart so that the streams of water come out at 45-degrees relative to the ground.
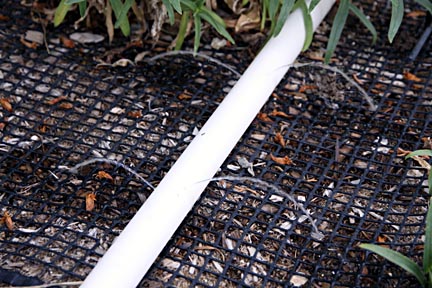
The flow rate out of the holes is low enough so that the rate is constant along pipe lengths up to 32 feet. The last holes put out the same amount of water as the first. To make sure all the holes are at the same angle I recommend using a drill press and securing the assembled pipes with something that maintains their orientation. The small drills are sold in wire drill sets and usually cost $4 for a set of 16 sizes. The exact size is not critical. I've used everything from 0.050 to 0.025 bits with success. It's important to make sure the same size bit is used throughout pipe. I admit that drilling hundreds of holes is a little tedious, but once you get your system set up the work goes very quickly, many times faster than inserting drippers into supply lines. The best features of this system are that you can easily see which holes have gotten plugged (a rare occurrence that is easy fixed by clearing the hole with a pin), water distribution is extremely uniform, the system connects directly to a garden hose without the need of a filter or pressure regulator and best of all: it's cheap.

Because many of my beds are longer than 32 feet, I ensure more even watering by cutting the pipes in half and supplying them half way down the bed. In the case of the 50-foot long bed pictured above, each pipe is 25 feet long. The bed is 3-feet wide. Two lines of pipe provide even distribution across the 3-foot width of the bed. Total cost: $25 for the equivalent of 400 emitters. Actually, it's more than 400. Because the flow is uniform regardless of pressure, I can adjust the distance the water squirts out of each hole by opening or closing the supply valve. If I plant a bed with lots of scattered seeds, I give it three short waterings at three different flow rates so that only the top inch gets watered but very evenly over the entire bed so all the seeds get their share. By that counting I get 1200 emitters.
I've found this system to be extremely durable. There are pipes still working in my beds after ten years of being in place.
There are two important factors for using this system. The first is that the beds must be very level, within two inches from the beginning to the end. If not, emitters at the low end will release slightly more water than the high end. Second, there needs to be a small drain hole drilled every 4 feet along the bottom of the pipes. This lets the water drain out when it's turned off. Without these holes algae will grow in the water trapped in the pipes and clog the holes.
I sincerely hope this system helps solve whatever fertilizing or watering problems you may have, or at least provide some ideas for how to do so. Thank's for stopping by!
![]()
Return to my main page to browse 60 other subjects