Monster Soap Bubbles!
Introduction:
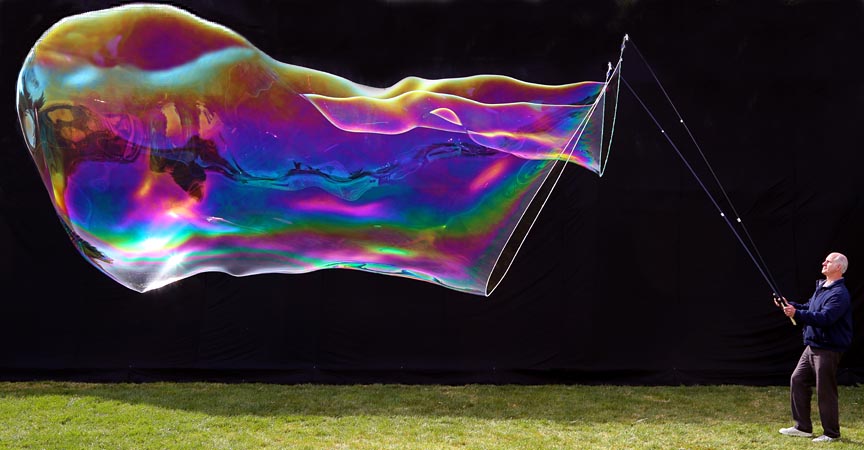
Few objects have the power to stop people in their tracks and stare in astonishment as much as the sight of a huge soap bubble floating by on a breeze. Seemingly impossible to exist, they twist and undulate in fantastic shapes, reflecting rainbows off their shimmering surfaces. Children laugh and run along side of them, parents point and watch mesmerized and even the most cynical can't resist the tickle of a smile. This page shows giant soap bubbles in their full glory in photos and videos and explains how anyone can create these beautiful miracles of soap and light.
We are fortunate to live in what is sure to be regarded as the golden age of bubbles. Dozens of professional performers have earned world class honors for bubble stage shows with bubble tricks that stretch the imagination of children and adults alike. New world records for the largest bubble, longest bubble, largest bubble sheet, tallest bubble stack, most bubbles inside a bubble and the greatest number of people encased in a bubble are being set and broken at an unprecedented rate. Most importantly, there have been revolutionary breakthroughs in bubble film chemistry and wand materials that enable even novices to create bubbles that would have staggered professionals just a few years ago.
This page chronicles the step-by-step process used to find out which bubble solution and wick produces the biggest soap bubbles in my location. If you prefer to skip to the end to find out quickly what the winning combination ended up being, please use this bookmark: SUMMARY.
Making
giant bubbles is inexpensive and easy to learn, so if you think you
want to give them a try be assured that with very little effort you
can be creating huge bubbles that will amaze everyone who sees them.
As a newcomer to the art and science of blowing giant bubbles, the first thing I did was test every bubble solution recipe I could find that claimed to be good for huge bubbles. To test each one I used a 14-inch diameter wand and noted how many times the soap membrane broke prior to trying to make a bubble and how long of a bubble that particular solution made. In each case the mixing and aging directions were followed carefully.
For those new to bubble solutions it'll be helpful to describe a few of the stranger ingredients you'll be using. J-lube is a plasticizer that strengthens bubble walls. It is extremely powerful and only very small quantities are used. One problem is that most recipes site teaspoon-sized measurements but not if those are loose or compressed. Because it's a powder this can have a significant impact on how much is added. In the absence of specific information, I used uncompacted volumes. Surgilube, or the similar and more easily available KY-jelly, is a thick gel that also strengthens bubbles. Some claim the two have a synergistic affect on each other. Another strengthener is Guar gum, a powdered food thickener available in most health food stores. Baking powder is common additive. Many claim it corrects the pH of the solution so that bubbles last longer. Glycerine, available in pharmacies, and corn syrup are common thickeners. Unless a different soap was called for, I used Dawn hypoallergenic dish soap. The following list shows what I discovered:
1) BeeBoo Concentrate: Although the people on the BeeBoo page claim their solution created the world's biggest bubble, a claim currently disputed by Guinness World Records Inc., I found it worked poorly when mixed as directed. Thirty percent of all dips failed to create a membrane and the average bubble length was six feet.
2) Ultra Bubbles Ready Made Solution: Slightly better than BeeBoo. Twenty percent of the membranes broke and the average bubble length was 6.5 feet.
3) NightHawknLight's Youtube Solution: 3 gallons of water, 24 ounces of Dawn hypoallergenic dish soap and 1 tablespoon of J-lube. Very viscus, almost slimy. No membrane breaks and 12 foot long bubble lengths.
4) Same as above but with 3 tablespoons of baking powder. Similar results though the average bubble length was 14 feet. However, this may have been the result of a slight variation in the amount of J-lube used.
5) Keith Johnson's Recipe: 18 cups of water, 1/2 teaspoon J-lube, 4.25 ounces (one tube) Surgilube, 1/4 cup glycerine, 16 ounces of Dawn Ultra and 4 ounces of Dawn Pro Pot and Pan. Zero membrane breaks and 20 foot long bubbles. By far the best tested. The solution was very thick, almost gelatinous but not as bad as NightHawk's solution. This was the best of all the solutions I tested.
6) HouseHoldHacker Youtube recipe: The written recipe in the description of the video states that only one bottle of glycerine is needed while in the video 10 are used. The written description states water is used, but not how much, while in the video no water is used. In the video the statement is made that the solution can be made for less than $10.00 yet the five cups of glycerine shown being measured out alone would cost over $30.00. I following the recipe in the video (5 cups of glycerine, 3 cups dish soap and one cup of corn syrup) and got a heavy, gloppy mess that barely held a membrane and at best produced bubbles only 4 feet long. It's obvious the creator of this video never checked it to discover and correct all the inconsistencies.
7) HowToDudes Youtube Recipe: 10 cups water, 1/5 cup dish soap and 1/2 cup corn syrup. 75-percent of all the membranes broke. In those very few times when I did manage to create a bubble it was at best only 2 feet long.
8) BertoA's Youtube recipe: 250 grams sugar, 14 cups water, 30 ml glycerine, 375 ml dish soap. Very thin, yet holds onto the bubble solution pan so strongly that it pulls much of the solution off the wand before the membrane closes. Bubble lengths averaged 6 feet long.
9) Anne2Matthew's Youtube recipe: 6 cups water, 2 cups dish soap and one cup corn syrup. 50-percent of the time the membrane broke before a bubble could be formed. Bubbles averaged 7 feet long.
10) Modification of number 8: I replaced the corn syrup with an equal amount of glycerine. This was a big improvement. Film breaks were almost completely eliminated, though the bubbles averaged the same length.
11) Steve Spangler's Youtube recipe: 2 cups water, 2 tablespoons dish soap and 2 teaspoons glycerine: 20-percent of the membranes broke and the average length was 6 feet.
12) Science Bob's on-line recipe: 2 cups water, 1/6 cup dish soap and 1/12 cup surgilube. 10-percent of the membranes broke and the bubble length averaged 7 feet.
13) soapbubble.wikia.com on-line guar gum recipe: 17 cups water, 11 tablespoons Dawn Pro Pot and Pan, 1 slightly heaped teaspoon guar gum powder, 2 teaspoons baking powder. No membrane breaks and 18-foot bubble length. Second best solution.
14) designdazzle.com's recipe: 13 cups water, 1 cup Dawn, 1 cup of corn starch (I double checked this and it is corn starch.), 2 tablespoons baking powder and 3 ounces of personal lubricant or surgilube. The article claims that it takes two days for the corn starch to dissolve. Even though I mixed it every two hours for this amount of time it never dissolved. The corn starch (Kingford's) invariably precipitated out to form a thick muck on the bottom of the bowl. Performance wise it was average, making bubbles 7 feet long. This sort of performance could be achieved from similar solutions without the hassle of the corn starch.
Based on the results of these initial experiments, only Keith Johnson's and the soapbubble.wikia.com recipe warranted further exploration. To do so I made a tri-string wand out of 8-foot long plastic bamboo poles with a 6-foot on a side triangle of 3/8-inch diameter cottom braided rope with the core removed. The rope was washed in a machine with bleach but without laundry detergent prior to use.
A) Keith Johnson's recipe made large bubbles the easiest and that lasted the longest so a fresh batch was prepared and used for comparison.
B) Adding 2 compressed teaspoons of baking powder to "A" did not measurably increase how long these bubbles lasted.
c) Eliminating the surgilube very slightly reduced the size, ease of making and longevity of bubbles compared to "A."
D) soapbubble.wikia.com's Guar Gum recipe is noticeably thinner and less gelatinous than the Keith Johnson recipe. Large bubbles tended to break off the wand earlier and more often than "A," though when they did form they were often as large and lasted almost as long as "A."
E) I doubled the amount of Guar gum in "D." The bubble solution was thicker but the bubbles didn't form better, be larger or last longer than the original "D" recipe.
F) I increased the amount of Dawn Pot and Pan in "D" to 2 cups to more closely match the amount of soap in "A." It didn't not make the bubbles better than the original "D" recipe.
G) I replaced the surgilube in Keith Johnson's recipe with Guar gum but didn't measure any improvement.
H) I cut the amount of dish soap in "A" in half. The bubbles broke much faster.
I) I replaced the Dawn Ultra in "A" with Dawn Pro Pot and Pan. The resulting bubble solution made smaller and shorter-lived bubbles than the original recipe.
J) The amount of J-lube and surgilube in "A" was reduced by half, and again the resulting solution failed to produce soap bubbles as large or that lasted as long as those from the original recipe.
K) NightHawknLight's video shows such incrediable soap bubbles that I decided to try it again. His recipe does not call for letting it rest overnight but I found if it isn't allowed to rest then it's almost impossible to form a bubble using a 6-foot tri-string wand. After a 12 hour rest, this solution performed much better, though still not nearly as good as "A".
Before proceeding with the rest of the experiments, I thought it would be good to explain how I make comparisons between bubble solutions. First, all comparisons are made on the same day and at the same time to minimize the effect of changing weather conditions. All testing is done in the early morning on days with no wind. Typical conditions are 24-percent humidity and 55-degrees. Each test batch uses the same wand with the wick thoroughly cleaned between each experiment. The wand is dipped before each bubble to ensure the wick is fully saturated. A minimum of 20 bubbles are blown using each batch of bubble solution being tested. All bubbles are blown the same size and using the same technique as closely as possible. (The third video further down this page show the average size of the bubbles created.) All the tests are video taped and the duration each bubble lasts is determined during playback. The sum of the longevity for all of the bubbles from a particular test are added and then divided by the total number of bubbles. The solution with the longest average bubble duration is judged to be the best.
For example, on the morning of 18 January, 2013, I compared five bubble solutions: the original Keith Johnson "A" recipe, that same recipe with 5 teaspoons of baking powder, that same recipe again with ten teaspoons of baking powder, (all three of these made the night before and allowed to age overnight), another batch of "A" made the night before without any baking powder - then 10 teaspoons of baking powder added five minutes before use, then that solution tested again after resting one hour.
The purpose of these tests was to see if adding baking powder increased the longevity of the bubbles, how much should be used, and if adding it immediately before use is better than adding it the night before. Here are the results:
L) Bubbles from the original solution lasted an average of 5 seconds. (Note: I attribute much of this admittedly short lifetime to the low humidity and dusty air common to my high desert location.)
M) Bubbles from the solution with five teaspoons of baking powder also lasted an average of five seconds.
N) Bubbles from the solution with ten teaspoons of baking powder lasted an average of 4.5 seconds.
O) Bubbles from the original Keith Johnson recipe with 10 teaspoons of baking powder added five minutes before use only lasted 4.0 seconds.
P) Bubbles from the recipe above that had been allowed to rest one hour lasted an average of 4.1 seconds.
What I conclude from these tests is that (1) adding baking powder to this recipe in my environment has little affect on the longevity of bubbles... unless there is peak halfway between the original and 5 teaspoon batches. (2) There is an upper limit as to how much baking powder can be added before it starts reducing longevity, (3) adding baking powder immediately before use reduces longevity, (4) a short rest does not help to significantly increase bubble lifetime.
The most interesting aspect of using a qualitative technique such as the above is that it often disproves subjective impressions. For example, as I worked through the tests it seemed obvious that the bubble solution with the ten teaspoons of baking powder produced much bigger bubbles that lasted significantly longer than any other mixture. The psychology is easy to understand. I'd read that adding baking powder helped make bubbles last longer, so I was conditioned to expect them to do so. This expectation, when coupled with the desire to produce a long lived solution, influenced me to believe that the solution with it would preform better even though in fact it didn't.
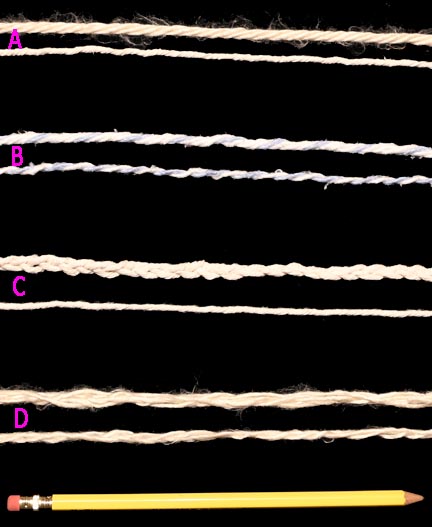
The initial giant bubble solution tests indicate Keith Johnson's formula, or one close to it, is the bubble solution I'll be using. Therefore the best wicking material for the wand I'll be using needs to be the one that works best with that solution. The test will be to see which produces the longest bubble.The following five materials will be used to construct equally sized 6 foot on a side tri-sting wands:
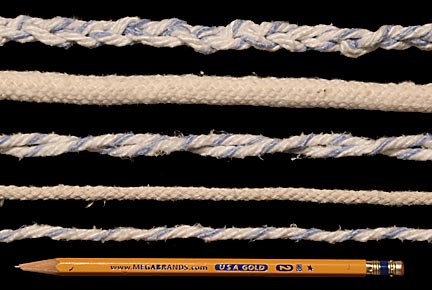
From top to bottom: a 3-string braid made from the strands of a Rubbermaid #24 finish mop, 1/2 inch cotton uphostery piping, a lightly twisted two-string lightly mop yarn wick, Walmart Secureline 3/16-inch diamond braid cotton rope with the core removed, a single string from a Rubbermaid #24 finish mop. The pencil provides scale. I also tested a 3/8-inch diameter cotton braide rope with the core removed. Unfortunately I forgot to include it in the image above.
The wick that produced the longest bubbles was the 3/8-inch cotton rope with the braided mop yarn wand a close second.
The following video shows the sort of bubbles I'm able to produce:
If these aren't the giants that can be seen in abundance in YouTube videos or on the soapbubble.wikia.com site, that fact that I live in the dusty, dry high desert has to be taken into account. In particular, with maximum humidities around 30-percent, bubble size and longevity are particulary problematic. Here are more bubbles blown on a day when the humidity was only 25-percent:
January 19, 2014 update: As usual, I prepared the solutions for today's testing (based on the "A" recipe) the night before to let the PEO completely hydrate over night. These solutions are typically mixed vigorously by hand using a whisk. They have always come out thick, stringy and almost gelatinous. This time I used a mixer on medium high for one minute and was amazed that the action of the beaters seemed to "break" the stringiness. All the solutions ended up thin and almost watery. By the next morning they hadn't changed and I expected them to perform very poorly. In fact the opposite happened. These thin solutions all outperformed the hand mixed solutions, producing bubbles that averaged 20-percent larger and lasted 20-percent longer. From now on I'll be using an electric mixer to make solutions.
One of the tests used solutions with 2.5 teaspoons of baking powder compared to no baking powder, 5 teaspoons and 10 teaspoons. The 2.5 teaspoon batch did not perform measurably better than any of the others. This is the second time that quantitative comparisons of solutions with and without baking powder indicate the baking powder does not help in my location.
Another test looked at increasing the amount of J-lube from 1/2-packed teaspoon to 1 packed teaspoon. The result was that the 1 teaspoon solution produced bubbles that lasted 20-percent longer, an average of 7 seconds.
After the formal tests, I experimented with bubble forming techniques. I learned that it helps to let some of the bubble solution to drain off the wick before blowing a bubble. If not, then the bottom of the bubble has so much liquid that the weight drags it down to burst on the ground. I also discovered that when closing a bubble I have the habit of lowering the tips of the wand. This creates a bubble with a low tail, toward which solution drains. This heavy tail tends to pull the bubble down and often causes it to burst as it hits the ground. By making an effort to prevent this I found I can add several seconds onto the life of a free floating bubble. This last issue is more of a problem when there isn't any wind to form the bubble forcing me to walk backward to fill it out. Finally, I tried some bubble solution that was two days old. It outperformed itself when it was only one day old. This suggests it may take more than over night for a solution to reach it's full potential. On the other hand it may be that on the second day the weather conditions were more favorable.
As usual, a day's testing ended up producing more questions than it answered, but I seem to be make progress, even though at a glacial rate.
January 20, 2014 update: This morning's test was of a batch of "A" with the J-lube increased to three packed teaspoons, six times the original recipe's. After one minute with the mixer on medium high, the resulting bubble solution was again watery-thin. I tried blowing bubbles with it but they all popped before they could be closed. By the next day this bubble solution had thickened to a thin syrupy consistency. Using the same techniques as the previous tests, this batch produced bubbles with an average lifetime of 6.5 seconds. This is below the 7 second average of yesterday's batch with one packed teaspoon, suggesting there is an upper limit to how much J-lube helps extend bubble duration.
I believe that no matter how vigorously a mix is beaten by hand, there are long strands of J-lube concentrated solution that never blend in with the rest of the solution. What results is like a plate of spaghetti covered in sauce. The spaghetti is the thick J-lube strands and the sauce is a water-heavy slurry between them. When blown into a bubble the water-heavy areas represent weak zones that cause premature rupturing. Using an electric mixer breaks up the strands into small pieces that can disperse and melt overnight into the solution creating a uniform mixture. I tried using a paint mixer but noticed that it tended to swirl the solution around more than mix it up so I'll be sticking with a hand held mixer.
I now understand that thorough mixing is critical to creating consistent solutions. Unfortunately, it means that all the work to date is virtually worthless. So, it's back to the beginning. But I don't consider the time spent so far as being wasted. I've learned a lot about mixing bubble solutions and can now begin a more disciplined methodology for developing a mixture capable of blowing record-breaking giant bubbles. I will document every step, both failures and successes, so that anyone reading it can understand how the resulting recipe came about.
Extensive on-line research indicates that PEO-based bubble solutions are the most likely to achieve the best results. Guar gum and HEC solution are usually reported as being "almost as good" as PEO solutions, suggesting PEO's are the gold standard for which to strive.
Reviewing videos of previous tests and comparing them to subjective evaluations while conducting those tests indicate that subjective comparisons are often inaccurate. For this reason all comparisons will be made using the lifetime duration measurements technique previously described. This not only more reliably determines which solution performs best, but also by how much. This will be useful in predicting by how much various ingredients should be changed.
Finally, although Keith Johnson's recipe seemed to be the best performer in the initial tests, I'm abandoning it and starting from scratch. This is partially because I've always felt uncomfortable about using its 8.5/1 water to soap ratio when virtually everyone else recommends ratios of 16/1 to 22/1. But the main reason is that by starting at the very beginning the tests will provide quantitative information on how each of the ingredients affects bubble size and longevity.
January 21, 2014 update: The weather conditions were as good as it gets in my high desert location: slightly overcast, 22-percent humidity and 65 degrees. The wind was calm with occasional 1 mph breezes. I used the 3/8-inch diameter, 6-foot tri-string loop to blow 6-foot diameter bubbles, video taped them then used a stopwatch to record bubble lifetimes during playback. These first tests use bare-bones, non-optimized PEO bubble solutions and as expected, the lifetimes are very short. However, the tests succeeded in discovering some interesting relationships between longevity, soap concentrations and PEO concentrations.
Test
Set A:
1) 1 gallon water, 1 cup Dawn Ultra (16/1 water to soap ratio) and 1/2 teaspoon J-lube produced bubbles that lasted an average of 1.4 seconds.
2) When the J-lube was increased to 1 teaspoon per gallon the average lifetime was 3.4 seconds.
3) 2 teaspoons of J-lube per gallon produced bubbles that lasted an average of 3.9 seconds
4) 3 teaspoon of J-lube per gallon produced bubbles that lasted an average of 3.8 seconds.
Things
got interesting when the above test was repeated with an 8/1 water
to soap ratio.
Test Set B:
1) 1 gallon of water, 2 cups Dawn Ultra and 1/2 teaspoon J-lube produced bubbles that lasted an average of 3.6 seconds (Doubling the soap concentration almost tripled lifetimes.)
2) When the J-lube was increased to 1 teaspoon per gallon the bubbles lasted an average of 3.0 seconds.
3) 2 teaspoons of J-jube per gallon of 8/1 solution produced bubbles that lasted an average of 2.9 seconds.
4) 3 teaspoons of J-lube produced bubbles that lasted an average of 3.0 seconds.
Here's
what theses two test sets look like when graphed:
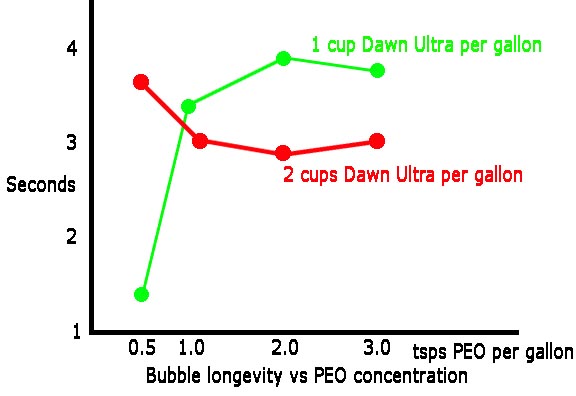
Please note that on this graph "PEO" refers to J-lube, which is actually only 25-percent PEO.
Note how at there is an almost antagonistic relationship between soap and J-lube. This graph suggests there are two ways to increase soap bubble lifetimes in low humidity areas: use small amounts of PEO with large amounts of soap or large amounts of PEO with small amounts of soap. The question is which is better? The answer is that it depends on the introduction of synergistic effects when other ingredients, such as Surgilube, are added.
To address this question my next tests will investigate the affect of adding Surgilube to both the low-PEO/high-soap solution as well as the high-PEO/low-soap solution. The report on those test will have to wait until I receive an order for more Surgilube on January 27. Until then I have enough Surgilube for one small test. I'm going to compare how Keith Johnson's recipe performs with and without the Surgilube. I confess that the actual motivation for this test is that after an entire day of short-lived bubbles I need to see some that last a little longer.
One additional test I conducted today was to see what effect a thick layer of foam on top of a bucket of bubble solution has on bubble longevity. The result was that it doesn't have any effect. Bubbles made with and without the foam lasted the same time.
January 22, 2014 update: At the recommendation of the people at the soapbubble.wikia.com forum, I decided to conduct an test of low concentration soap solutions. They consisted of 20/1 concentrations of water to Dawn Pot and Pan, 25/1, 30/1 and 35/1 each with three different amounts of J-lube: 1/2 packed teaspoon (1.6 grams) per gallon, 1 teaspoon and 1.5 teaspoons. All liquid measurements were made to the gram. Each mix was prepared in the same order and the same type and amount of mixing, then rested 14 hours before use. The conditions were clear, calm, sunny, 55-degrees and 20-percent humidity. The bubbles averaged 6 feet in diameter and were made using a tri-string wand with a 3/8-inch diameter braided cotton rope with the core removed.
The best solution was the 20/1 concentration with 1 packed teaspoon (3.6 grams) of J-lube. The bubbles averaged 6.2 seconds. This solution also had the highest percentage of successful bubble closures: 90-percent.
January 23, 2014 update: I decided to repeat yesterday's test using the remains of the solutions. The result was very disappointing. For the most part the bubble solutions that did well yesterday did poorly today. Yesterday's losers were some of the best today. There was no pattern to the change so I doubt that it was caused by the solutions being 24 hours older.
Clearly, there is something wrong with my methodology. Weather permitting, tomorrow's test will be to simply blow 100 bubbles and examine the video of them to see what needs to be done to extract useful, repeatable data from them.
January 24, 2014 update: By examining earlier videos of my bubble making technique, I noticed that I wasn't consistent with how long I let bubble solution drain off the bubble wand's wick before blowing a bubble. Thinking that this might have an effect on the consistency of the bubbles, I spent the morning experimenting with different drain times. Using a bubble solution with a water to Dawn Pot and Pan ratio of 20/1, 1 teaspoon of J-lube per gallon and 2 teaspoons of baking powder per gallon, I tested several different drain times. Below ten seconds bubble lifetime declined, as it also did for drain times over 20 seconds. For this solution the optimum drain time was 15 seconds. Using this the bubble closure rate was over 80-percent and the bubbles lasted until they hit the ground, typically 16 seconds for bubbles 5-feet in diameter. The day was calm, with 21 percent humidity and 55 degrees. The following video shows this performance as well as the consistency of the bubbles I create for testing:
I had looked at drain time effects earlier, but back then I was using bubble solutions with much higher viscosities so they didn't drain nearly as fast. Consequently small differences in drain time had little effect.
This test was also interesting because several times, while in the middle of a long series of good bubbles, one bubble would pop almost immediately. The rate was so low it was unimportant, yet while examining the videos in slow motion I could not discover anything different to account for why some bubbles pop prematurely.
Tomorrow's test will be to verify today's results and also measure the effect baking powder has on bubbles.
While examining the earlier videos I noticed I had several nice clips under different lighting conditions showing how cloud cover increases the amount of color on large bubbles. Here's a short video showing this:
January 25 update: The baking powder test went perfectly. The results were very consistent within each group and the results were large enough to be meaningful.
I started by mixing a large batch of the 20/1 + J-lube solution I've used for recent tests. I divided it in half then added the equivalent of 2 teaspoons of baking powder per gallon to one of them. The conditions were 23-percent humidity and 55 degrees. Thirty bubbles from the solution without baking powder lasted an average of 6.5 seconds and 73-percent closed. Thirty-two bubbles from the solution with baking powder had an average lifetime of 11.1 seconds and a 94-percent closure rate. Clearly, using baking powder in lower concentration bubble solutions improves performance.
Following those tests, I played around with wick materials. The 3/8-inch hollow cotton rope I usually use works well but is heavy. 3/16-inch diameter hollow cotton rope did not work as well. Neither did Rubbermaid mop yarn, contrary to many reports extolling its virtues. Super-bulky acrylic yarn worked very well. It held a lot of bubble solution and released it easily. The only problem is that the loop tended to wind up on itself, making it difficult to pull apart for the next bubble. However, it worked so well otherwise that I'm going to make a few more tri-strings from it using different techniques to see if one prevents the winding problem.
Tomorrow's tests will focus on wick materials and wand design.
Anyone starved for more bubble videos may enjoy the following excerpts taken from today's testing:
January 26 update: Following up on the importance of having a dark background for bubble photography, I covered part of my back wall with black plastic to see if it helped. The following video shows how much brighter the bubble's colors are when the area behind them is dark. Not how the color fades when the bubbles drift off the dark background. (To view it at its best please be sure to reset your youtube setting to HD.)
February 2 update: After the success of the black plastic background, I decided to invest the time and effort to make a better one. Sewing together 12 flat black twin bed sheets provided a 16 x 32-foot backdrop. It's supported by two telescoping aluminum poles. Here's a 1-minute video showing how well it works:
As good as it works, there is still room for improvement. It needs a third pole in the middle to flatten out the top, the poles need to be extended more to get the maximum amount of height and most importantly it needs to be widened. All this is coming soon as well as more bubble solution tests and experiments with different wick materials.
February 3 update: Today's test explored the effectiveness of adding surgilube to my basic 20/1 bubble juice to see if it made the bubbles last longer. The night before I mixed three batches of the 20/1 mix. One was left as is, one had 80 grams of surgilube per gallon and the third had 160 grams per gallon. I began with timed tests of each using 5-foot diameter bubbles as I had before, but quickly had to give it up. All the bubbles lasted so long they invariably ran in to something and burst from the collision, negating that test. I changed the test to one comparing the length of bubble each could create from a 6-foot tri-string wand. Great care was taken to ensure that the production speed of each bubble was the same to avoid the situation of premature membrane failure because the bubble's wall had been over stressed. I'm happy to report the results were consistent and validated by subjective comments by experts at sites such as soapbubble.wikia.com. Comparing 20 bubbles made from each solution, I found the following: The bubble solution without surgilube created bubbles that averaged 17 feet before breaking. The 80 grams per gallon mix produced bubbles that averaged 20 feet and the 160 grams per gallon solution averaged 21 feet. This data suggests an asymptotic relationship with a practical optimum concentration of surgilube of 80 grams per gallon.
So, my basic recipe now consists of 1 gallon of water, 92 grams of Dawn Pot and pan (a 20/1 volumetric ratio) 1 teaspoon of J-lube, 80 grams of surgilube and 2 teaspoons of baking powder.
I tried a simplified mixing procedure to one where the J-lube and baking powder are mixed directly into the soap, then water added to the correct amount. This solution performed much worse than the same ingredients but with the baking powder added at the end of the mixing process. I concluded that mixing baking powder directly into soap somehow cancelled its ability to properly buffer the solution's pH to provide the typical increase in bubble duration. This taught me that how a bubble solution is made can have as much affect on the results as the ingredients used. For that reason I always mix my solutions in the following manner:
1. Using a scale, I measure out the amount of soap to be used in the main mixing container to the gram. Add the J-lube and stir in using a beater from my electric mixer. J-lube mixes very quickly in pure dish soap. It doesn't clump as it will if added to water.
2. Add the surgilube and stir it in using the same beater.
3. Pour in all the water except for 100 grams.
4. Measure out 100 grams of water in a separate container and mix 2 teaspoons of baking powder into it. Add this to the main solution.
5. Place the beater used for hand mixing in the electric mixer and mix the solution on medium high (5 on the 7 increment scale on my 220 watt mixer) for 90 seconds. I use the same beater for hand mixing and electric mixing because I want to avoid loosing even the smallest amount of the concentrated J-lube/soap solution. For the same reason I only use one container to mix in. Employing several invariably results in some of the J-lubed solution being left behind. Because it's so powerful, even small loses can affect results. The one exception is the water-baking powder solution. It's so thin all of it comes out of it's container without loss. When using the electric mixer, be sure all of the beater's heads are below the solution's surface or it'll whip up a lot of foam.
6. Place the mixture in a container, cover and let rest overnight before use.
February
4 update: Today I compared 20/1, 30/1
and 40/1 water to soap ratio mixtures. All were my basic J-lube,
surgilube and baking powder recipe with only the amount of soap
varied. The 20/1 bubble solution produced bubbles that measured and
average of 16 feet. The 30/1 mix averaged 14 feet and the 40/1
averaged 10 feet.
This establishes my best bubble solution recipe: 3786 grams (1 gallon) of water, 184 grams (13 tablespoons) Dawn Pot and Pan, 1 compacted teaspoon of J-lube, 80 grams surgilube and 2 compacted teaspoons of baking powder.
February 5 update: This morning I compared three guar gum bubble solutions that used a 20/1 water to Dawn Pot and pan ratio, two teaspoons of baking powder per gallon and 1/2, 1 and 1.5 packed teaspoons of guar gum per gallon. I following the alcohol mixing technique as described on the soapbubble.wikia.com site and let them rest overnight. They yielded averages of 8 foot, 10 foot and 11 foot bubbles respectively using a six-foot tri-string wand. These are so far below the performance of my basic J-lube/surgilube recipe that I am not going to pursue guar gun formulations. I'm not saying that guar gun bubble solutions are bad, just that for me in my environment they don't perform as well as PEO-based solutions.
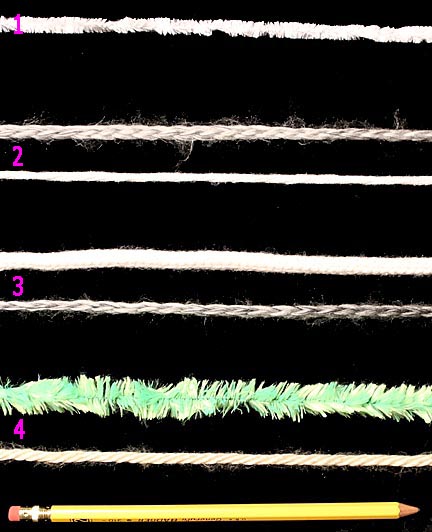
February 6 update: Having settled on the final bubble recipe that works best in the local environment, I decided to revisit wick performance to see which works best with it. All were machine washed in hot water before use in addition to any other special treatments. Performance was judged by how long a bubble each could produce. First up were 6-foot tri-string wands where all three sides had the same wick.
1: This was a 1/2-inch upholstery piping with a solid non-removable cotton core. It was far too heavy and stiff. It didn't perform any better than many other much lighter wicks.
2: 3/8-inch braided cotton rope with the core removed. Favored by NightHawkNLight in his youtube video, it worked very well for me producing some of the best bubbles but it's painfully heavy when loaded with bubble juice.
3: 3/8-inch piping cord with its core removed. Purchased from Jo-Ann's fabrics, the braided skin ended up being so thin that it collapsed and would not go back to a round shape as the rope did. It didn't perform as well as the same sized braided rope.
4: 3/16-inch braided cotton rope with the core removed. Much lighter than the 3/8-inch rope and performed almost as good.
5: Rubbermaid #24 Rayon finish mop yarn. I found this highly touted wick disappointing. It was lighter but did not outperform either of the cotton ropes.
6: Super bulky Acrylic yarn. Very light, holds a lot of bubble juice and gives it up very quickly to the bubble. Overall, the best performer in this group.
7: Cotton cooking twine from Bed, Bath and Beyond, boiled and soda washed as per the directions on the soapbubble.wikia.com site. Performed almost as good as the Acrylic yarn, but was so light that the bubble's surface tension was strong enough to make closing bubbles difficult. In even the slightest breeze the lower loop would get pulled back, reducing the size of the opening. In a way this is good because it reduces the open area while increasing the effective amount of wick-to-bubble-perimeter so bubbles are less likely to tear off the wick. Subjectively, I just didn't like its "feel" when blowing bubbles. The yarn felt better, outperformed it and doesn't require complicated treatments before use.
8 and 9: (Not shown.) I made wicks out of braiding three lines of the mop yarn and also the 3/16-inch rope. Both held an enormous amount of bubble solution and performed well. But they were impossibly heavy and used so much bubble juice they would get to be very expensive to use.
While reviewing the videos of the tests of these wicks, I noticed that most of the bubbles burst seemingly prematurely across their tops. Also, all bubbles from the heavier, larger wicks were bottom heavy. They sagged from excess bubble solution and many times were dragged down to the ground and popped prematurely from contact. These observations suggested that what is needed is a thin wick for the bottom loop and a heavier one, or at least one that holds much more solution, for the top string. The following tests explored the use of such compound wicks:
A: This wand used a cotton twine lower loop with an Acrylic yarn top line. It worked better then either the all twine or the all yarn wand. But most bursts still occurred at the top of the bubble suggesting more capacity was needed in the top string. The thin lower string was hard to control and closing bubbles was a challenge.
B: The bottom line was one-half (two strands) of Rubbermaid mop yarn and the top was full (4 strand) mop yarn. Many top bubblers use this configuration with great success. It worked the best for me, producing 6-foot diameter bubbles and average of 17.6 feet long during testing.
C: The bottom line was cotton twine and the top was a three string braid of the same twine. The braid held a lot of bubble juice in all of it's nooks and crannies and the wand worked very well, but that light lower string still annoyed me.
D: I took apart 22 feet of the Acrylic yarn and used three of its four strands to make a 21-foot long three-string braid. This was made into a 6-foot tri-string wand and the remaining 22-foot long single strand of yarn loosely wound around the top line three times to increase its capacity. This wand is light yet holds a lot of solution and releases it very easily to the bubble. The biggest drawback is that the yarn tends to float more than other wick materials if there is a lot of foam floating on the bubble solution. Producing 16-foot long bubbles, his is my number two choice so far.
9 February update: Wand performance varied so much with wick material that I decided to explore a few more options. The following wicks will be tested as soon as the weather turns more favorable:
1: 1/4-inch diameter Acrylic fuzzy yarn. This will be tested as a non-compound tri-string wand. It wasn't overly heavy but not only did not make long bubbles its performance was very erratic.
2: The top line is a three-yarn braid I found ready made on the yarn section of a Michael's Craft Store. The bottom line is a 1/8-inch smooth yarn similar in diameter to the cotton twine mentioned above. I wanted to try it to see if it worked as good as the twine but without the twine's pretreatments. It actually performed better, making 16-foot long bubbles 6-feet in diameter.
3: The top line is fine Acrylic baby yarn braided into a 1/4-inch tube using a knitting Nancy. I thought it would be more open weave than it came out. I suspect it will work the same as the 3/8-inch cotton rope. The bottom line is the pre-braided yarn. It was painfully heavy and a poor performer.
4: Lastly is a top line made of 3/4-inch fuzzy yarn and a bottom line of the super bulky yarn mentioned earlier. Very heavy and almost all the bubbles burst prematurely.
The
overall winner was the deconstructed mop yarn with two strands on
the bottom and four on top. The hand braided yarn wick came in second
and the 1/8-inch yarn bottom line with the prebraided top line came
third. The next step is to retest these more extensively.
While 17 feet may not seen very long in the world of monster soap bubbles, in my low humidity, dusty location it's really very respectable. More importantly, it represents an average. Several of the bubbles blown with the mop yarn wand were over 30-feet long.
11 February update: Conditions were good this morning and I looked forward to another date of wick testing, only to discover that the left over bubble juice from yesterday's session wouldn't work. Using the mop yarn wick I was lucky to make bubbles 8-feet long. The weather was identical so I have to assume something happened to the bubble solution. Three possibilities occurred to me.
First: The solution was 8 days old. It's possible that bubble juice breaks down in time. I doubt this is the case because I would expect the degradation to occur gradually, not suddenly overnight as it seems to have done in this case.
Second:
The leftover bubble solution from yesterday's testing had picked up
a few gnats and bits of grass. Prior of closing it up for the night I
poured it through a fine metal strainer. The mechanical processes of
passing the solution through the strainer may have somehow
"broken" the plasticizing effect of the J-lube or
surgilube. I've observed this effect, oddly enough, in making
pudding. Poured directly into the bowl after cooking the pudding
would set up perfectly. But, if it was passed through a strainer as
it was poured into the bowl it tended to remain much thinner and
would often break down completely. (Anyone interested in how to make
the world's best tasting vanilla pudding can review my recipe and
techniques at: THE
VANILLA PUDDING PAGE.)
Update: On 16 February I ran some
bubble solution through the same strainer and this time it had no
measurable effect
on bubble size or duration. I conclude from this that one of the
other proposed causes must be the problem.
Third: While several references state that the cornstarch in baking powder does not affect bubble lifetime or size, the fact is that it is a powder and in high enough concentrations may decrease bubble wall strength. The original mix was a two gallon batch. Over several days to testing it had been reduced to half a gallon. Because the cornstarch from the baking power settles to the bottom of the pail, it became concentrated. When I emptied the pail into the container in which the wands were dipped, all that concentrated corn starch got stirred up and made the bubble solution cloudy. I believe this is the most likely cause of the problem.
12 February update: Retesting the three best wicks showed that the hand braided loop failed for the second day to perform as well as the mop yarn or ready-made braided top and 1/8-inch yarn bottom, so it has been discarded.
While studying the videos of today's tests of the wick materials, I noticed that very few of the bubbles made with a lower sting consisting of two strands of the Rubbermaid #24 yarn or the 1/8-inch Acrylic yarn had overloaded bottoms that sagged, dragging the bubble down to an early death. This suggests that both of these lower lines are good choices.
Reflecting on yesterday's theory that large amounts of cornstarch could affect bubble performance, today instead of pouring solution out of the holding bucket into the dipping container I carefully ladled it out. In this way the cornstarch that had settled out overnight was not disturbed. The intent was that once the bucket was down to 1/2-gallon, I'd mix it up to disperse the cornstarch and then see what type of bubbles it blew. However, as I worked my way down the bucket I noticed that the bubble solution itself became more viscous. It was as if some of the J-lube and surgilube had also settled in spite of all the blending with the electric mixer. When the final half gallon was stirred as planned, the bubbles averaged slightly shorter than the unstirred solution. I still suspect the cornstarch may cause a problem but in this test the positive effect of the more plasticizing agents mitigated it. I will explore this tomorrow.
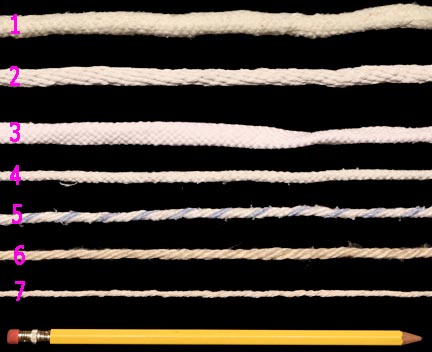
I obtained a Rubbermaid Web Foot Microfiber mop head from Amazon.com for $22.00 including shipping. This is considered by many as the premier wick material available. Since so much has been written about it I thought an image would be appropriate.
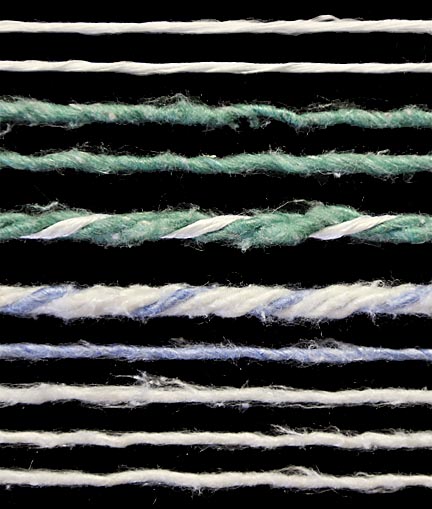
The lower middle blue-and-white yarn is the more common Rubbermaid #24 Rayon Finish Mop yarn. The one blue and three white single strands below it are the four strings from which it's made. The upper middle green-and-white yarn is the Rubbermaid Web Foot Microfiber Mop yarn. The four strands above it are its constituents: two fluffy green lines and two thin smooth lines. Although the microfiber yarn is slightly smaller in diameter than the #24 yarn. it's reported to have maginally greater holding capacity and better release properties. The Guinness World Record largest free floating bubble is reported to have been made with a loop consisting of two strands of the #24 yarn on the bottom and a full thickness microfiber yarn for the top line. I made two new tri-sting wands using the microfiber yarn and will test them tomorrow to see how they stack up against the two best wands from previous experiments.
16 February update: This morning's test compared three different wicks for 6-foot tri-string wands: 2-strand lower line with a 4-strand upper line using Rubbermaid #24 mop yarn, 2-strand #24 lower line and full thickness Rubbermaid Web Foot Microfiber upper and finally a 2-strand #24 lower line with four strands of the bulky lines from a Rubbermaid Web Foot mop. Weather conditions were 55-degrees, 24-percent humidity, calm and overcast. The test compared the average length of bubbles made with each wick when drawn to breaking. The first averaged 19 feet, the second 18 feet and the third 21 feet. The following video shows typical results:
Based on these results, from now on I'm going to use the third wick. The other two will be retained and retested after further breaking in to validate these results.
17 February update: Last night I made a new tri-string wand that was 9-feet long on each of the three legs. It had two strands of Rubbermaid #24 mop yarn on the bottom and four of the bulky strands from Rubbermaid Web Foot Microfiber mop yarn braided together on the top. When I tested it this morning I learned that the difficulty of blowing giant soap bubbles increases with the square (or perhaps even the third) power of the size. Using a 6-foot tri-string I could easily pump out 16-foot long soap bubbles. Going up to a 9-foot wand I was lucky to get one out of ever ten attempts. Equally important is that the bubbles from the 9-foot wand weren't that much larger than those from the 6-foot wand. The smaller wand produced longer bubbles, which contracted into bubbles almost as large as the larger wand. Bubbles from the smaller wand also tended to flow in more interesting shapes, close much easier and last longer. When combined with the fact that the smaller wand is more comfortable to use the net result is that the smaller wand is a lot more fun and satisfying. This surprised me because the driving motivation for this page has been to produce the biggest possible soap bubbles.
I still intend working with the larger wand, but from now on most of my work will involve the smaller one.
20 February update: Many readers may be wondering why I haven't experimented with glycerine while perfecting my bubble juice. The reason is that extensive reading of the soapbubble.wikia.com forum has convinced me that it would be a waste of time. Multiple experiments have shown that except in the cases of extremely high concentrations, glycerine has no measurable affect on soap bubble longevity or size.
1 March update: While taking still images with the camera set on continuous shooting, I captured the following sequence of a bubble bursting with the initial break clearly visible in the center of the bubble:
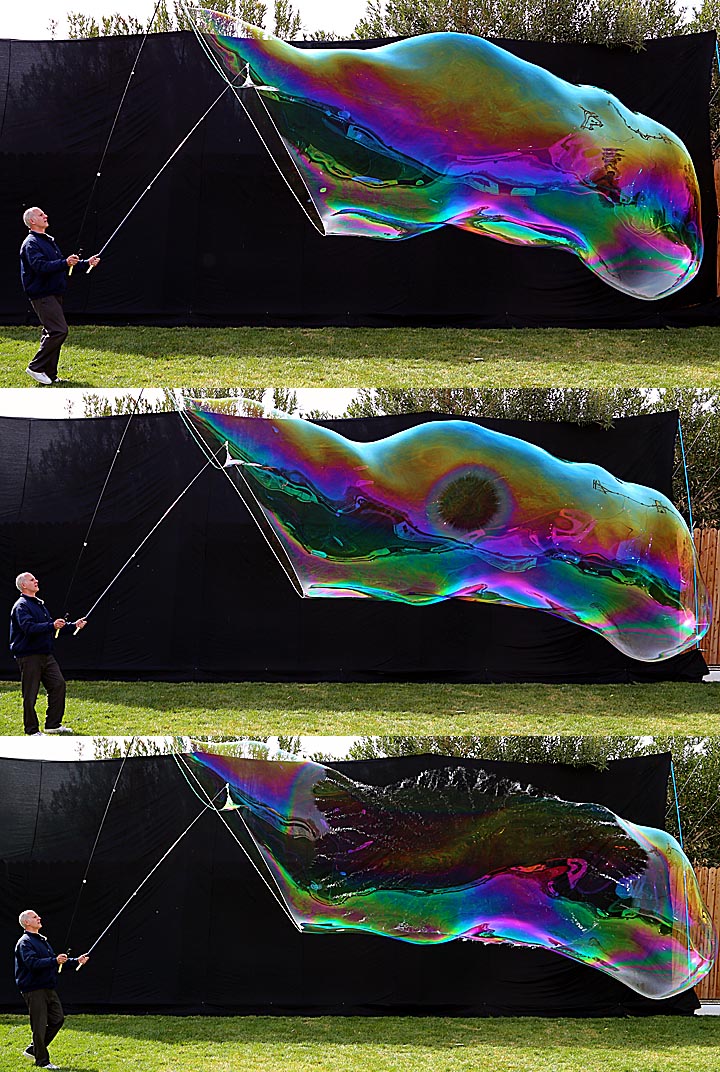
April 9 update: After a month of unusually hot, dry, dusty conditions the weather suddenly turned perfect this morning, enabling me to capture the following images:

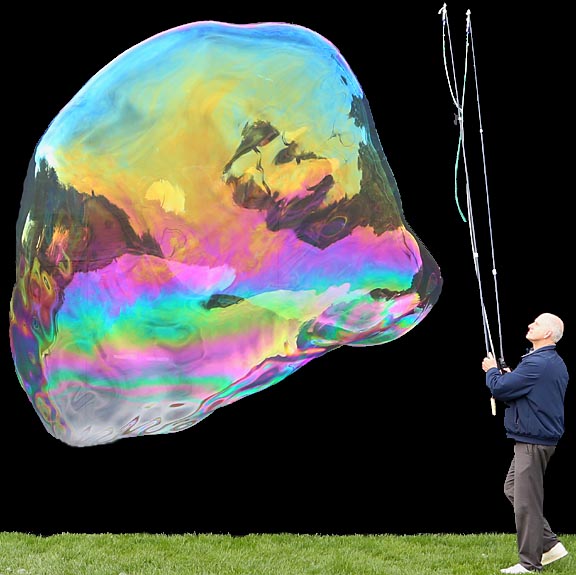
The sky was brightly overcast. Note how fully the bubble is covered with color because light hits it from almost every angle.
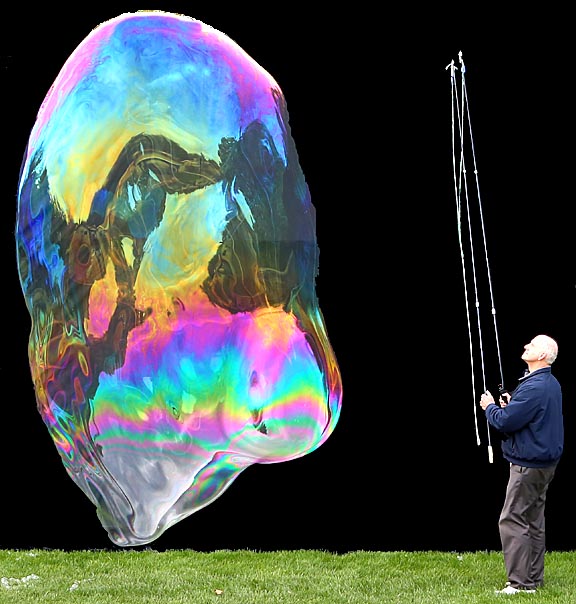
Twelve feet tall from top to bottom.
Sometimes the bubble just won't let go of the wand!
But
when it does you can get a free floater like this 10-footer. This
isn't even
close
to the monster bubbles many people create, but in my low humidity
(20-percent
in the morning dropping to 5-percent by afternoon)
it's
respectable.
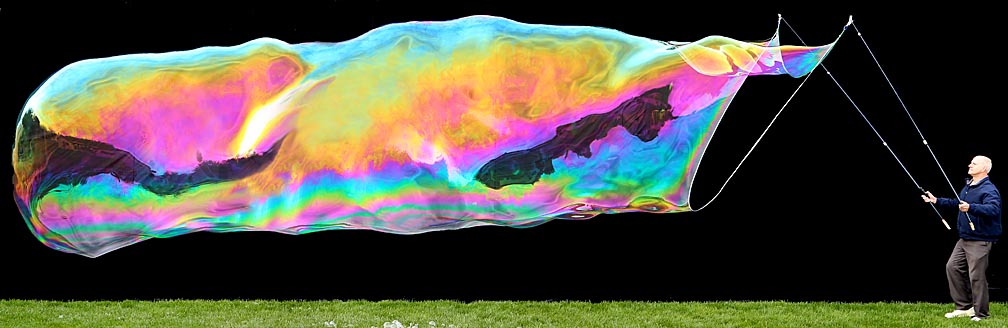
I try for some free floaters!
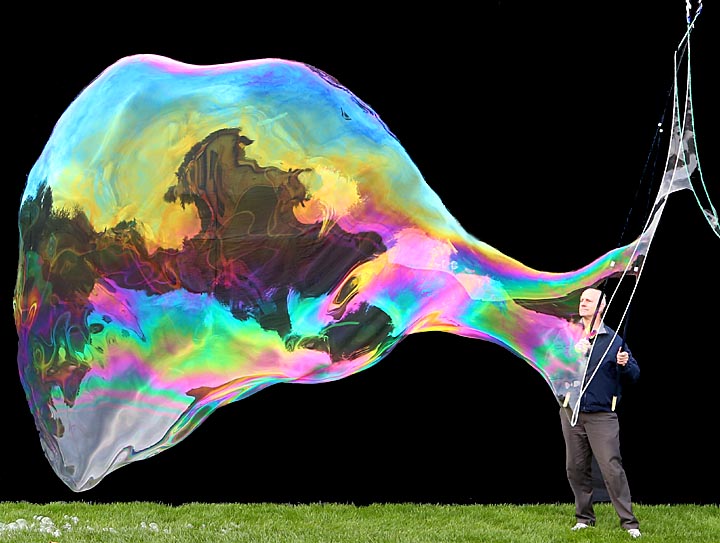
Going for length!
Going for MORE length!!!
December 2014 Update:
After a long, hot, dry summer the weather finally turned cooler and in mid-December my high desert location actually got a little rain. I decided conditions were good enough to try out the new 16-foot by 24-foot wand against an enlarged 1200 square foot backdrop. The results were mixed. The wind was fitful and blew many of the bubbles out of the camera's frame. The larger wand was also extremely difficult to use. Worst of all, even a backdrop 17-feet high and 60-feet long isn't large enough for these bubbles. Still, I learned enough to make the exercise worth the effort. The following short video shows how the session went:
NEW!!! January 8 2015 update:
This is my second attempt using the large tri-string wand:
By this time visitors may be wondering why I post so many videos, particularly when many aren't great successes. The reason is that this page is a record of my bubble blowing experiments. The videos and notes provide hints for improving both how to blow giant bubbles as well as how to capture them in images and video. For example, in the video above I learned that having a long top string is a waste for videos. The bubbles shown are actually much larger than they appear because the long top string results in bubbles that are twice as wide as they are tall. Because the width isn't visible to the camera it's a waste of bubble juice. Also, the increased square footage of the bubble decreases its stability and therefore longevity. For these reasons the top string will be reduced from 16 feet to 10 feet for the next video. The video also provides clues as to the best location to stand for capturing the entire bubble and the exposure settings that show the bubbles at their best.
The Frustrations of a Giant Bubble Blower:
Before anyone jumps into trying to blow giant soap bubbles, they need to be prepared for the frustrations attendant on this hobby. The following short list gives the idea:
1. Weather forecasts are always wrong. When they predict calm it'll be windy. If they say windy, it'll be calm.
2. The weather waits until you've finished setting up for a bubble session to change into the worst possible conditions for bubbles.
3. As soon as you finish putting away your bubble blowing equipment the weather will change back to perfect.
4. Just like smoke from a barbecue always moves so it always blows in your eyes, so wind will change no matter which way you turn to blow the bubble in your face.
5. If you manage to dodge the bubble being blow into your face, the wind will locate the closet available bubble-bursting object and blow it toward it.
6. As soon as your get your poles half way up to blow a bubble your nose will itch... or a fly will land on your ear... or you'll discover you're standing on an ant hill.
7. As soon as you turn on your video recorder to film your bubble making session, the neighbor's dog will start barking.
8. The phone waits to ring until your hands are covered with bubble juice.
9. Tri-string lines always tangle the second the weather turns perfect.
10. Halfway through making the biggest bubble you've ever seen your telescoping poles will collapse.
11. After years of experiments, you have the perfect bubble juice and wand and finally succeed at blowing the biggest, most beautiful bubble that ever existed... only to discover that no one was around to see it and the battery on your video camera died ten seconds ago.
Everything mentioned above is meant to be taken humorously. But, the sad reality is that the most frustrating problem of all is even when you've done everything right sometimes the bubbles just won't form. Dust? Pollen? Insects? Sunspots? Who knows. But from time to time for reasons impossible to determine the bubbles simply won't perform as they have many times in the past. On the other hand, once in a while everything comes together and you get something like this:
It doesn't seem possible that something like this could exist. Yet when it does it has the power to make it seem that there is still wonder in the world. So please give it a try. Blowing giant soap bubbles can be messy and frustrating, but it's also the closest thing any of us will ever come to making something so beautiful it seems magical.
Here's the best bubble solution I found for making giant soap bubbles. Please note that the mixing method is almost as important as the ingredients.
1. Using a scale, measure out 92 grams of Dawn Pure Essentials Hypoallergenic dish soap in a mixing container. Add the 1/2 compressed teaspoon of J-lube and stir in by hand using a beater from an electric mixer. J-lube mixes very quickly in pure dish soap. It doesn't clump as it will if added to water. (I found Dawn Hypoallergenic dish soap works better than Dawn Pot and Pan. It's inexpensive and available at Walmart.)
2. Add 40 grams of Surgilube and stir it in using the same beater.
3. Pour in 1793 grams of room temperature tap water.
4. In a small cup, measure out 100 grams of tap water and mix 1 compressed teaspoon of baking powder into it. Add this to the main solution.
5. Place the beater used for hand mixing in the electric mixer and mix the solution on medium high (5 on the 7 increment scale on my 220 watt mixer) for 90 seconds. I use the same beater for hand mixing and electric mixing because I want to avoid loosing even the smallest amount of the concentrated J-lube/soap solution. For the same reason I only use one container to mix in. Employing several invariably results in some of the J-lubed solution being left behind. Because it's so powerful, even small loses can affect results. The one exception is the water-baking powder solution. It's so thin all of it comes out of its container without loss. When using the electric mixer, be sure all of the beater's heads are below the solution's surface or it'll whip up a lot of foam.
6. Cover and let rest overnight before use.
Here's
the best wick I found:
Before assembling the tri-string wick, wash the mop head before taking it apart in hot water but no laundry detergent. Laundry detergent has anti-foaming agents that might linger in the mop yarn and hinder bubble formation.
Two lightly twisted strands of Rubbermaid #24 Finish Mop yarn for the bottom string.
Four of the fuzzy green strands from a Rubbermaid Web Foot Microfiber mop head very loosely braided together.
While I've made tri-string wands up to 12 feet on a side, the best performance seems to come one that's 6 feet on a side. It's easier to use and produces longer bubbles, though admittedly not as big in diameter.

Please click HERE
to visit my main site and browse 90 other pages.