Binoculars boast many virtues for astronomy. Because our minds have evolved to process an image in each eye, using both increases light sensitivity 25-percent, color sensitivity 40-percent, provides noise reduction because interference seen in only one eye is reduced in intensity, creates a sense of 3D and provides greater eye comfort. The price paid for this is that the collimation and alignment of a pair of binoculars is a difficult task.
Making matters worse is that in the interests of reducing costs, manufacturers often don't use the most robust design or construction, with the result that even expensive binoculars can get knocked out of alignment so badly that looking at the double images they provide can be frustrating and cause painful eye strain. This web page will explain how adjustments can be made to get the images to merge so that the binoculars can be used.
For the purposes of this page, collimation is being defined as referring to collimating all the optical elements of one side of the binocular so that all the optical axes line up. In this sense it is that same as collimating a single eyepiece telescope. Alignment, on the other hand, will refer to the process of adjusting the left and right halves of the binoculars (the two collimated optical paths) so that the images emerge from the eyepieces parallel so the viewer's eye can merge the two images into one.
The process of collimating and aligning a pair of binoculars requires a special optical jig and extensive training. The only thing the average person can do at home is adjust the collimation in one or both sides so that the images can be merged. This is done by slightly uncollimating one or both of the optical paths. The image quality will suffer slightly, though usually too little to be noticeable. While this isn't ideal, it at least makes a pair of otherwise worthless binoculars usable.
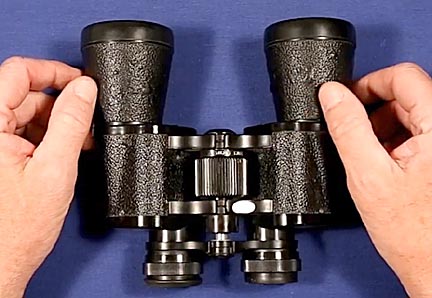
When I got the pair of inexpensive binoculars above as a gift and looked through them at a star, I saw the following:
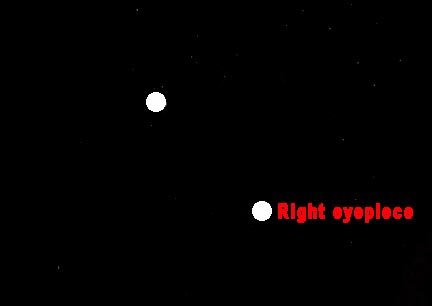
The star image in the right eyepiece was below and to the right of the one in the left eyepiece. The first thing I did was check to see if they had been dropped on one of the front objectives, resulting in it being knocked crooked. Both were firmly seated and flush with the case.
I assumed the problem was that one or both of the prisms inside the binoculars had been knocked out of collimation. To fix this, I used an Exacto knife to remove rubber glue covering the four adjustments screws: 1, 2, 3 and 4.
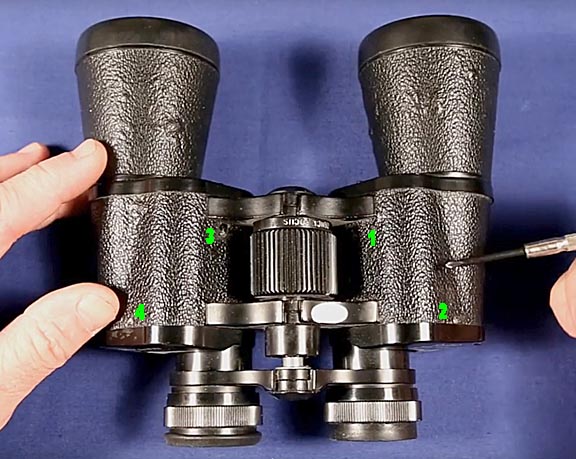
It's very important to make sure the screw slots are clear so that the screw driver doesn't strip them because it couldn't properly be seated. Some binoculars have these screws hidden under the layer of surface texturing. By adjusting these screws it's possible to get the images to once again emerge from the eyepieces parallel.
Consider the right half of the binoculars. If screw number 2 is turned clockwise (CW) the star image will move down and to the left, as indicated in the following image:
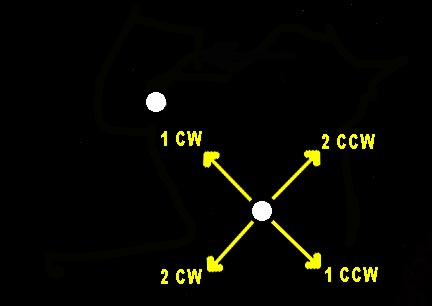
Rotating it counter clockwise (CCW) moves up and to the right. Repeating this with screw number 1 produces the movements labeled as "1" above.
With this guide, it's easy to move the right star image close enough to the left star image so that the two images merge. The problem is that this is one of those cases where "close enough" really isn't close enough.
The reason is that our eyes will automatically adjust themselves to merge two images that are close. It's part of our depth-of-perception reckoning. The problem is that this creates eye strain that can build to painful levels in a short amount of time. To finish the alignment so this doesn't happen, lock the binoculars on a star, close your eyes for a few seconds, then open them and quickly evaluate if you see one star image or two that quickly push together. If the second, increase the amount of adjustment until after briefly closing your eyes then opening them the star image is perfectly merged without having to wait for your eyes to merge it.
While this will work, a better technique is to split the amount of adjustment between the two halves of the binoculars. In the example above, adjust the right collimation to move the lower right star image halfway toward the left one. Then adjust the left one the rest of the way toward the right. This way the amount of de-collimation is divided between each half and the amount of image degradation is minimized.
I hope this helps you if you find your binoculars are out of alignment. Of course, the best option is to send them to a professional but there is no assurance he or she isn't going to do the same thing rather than the more laborious task of a combined re-collimation/alignment on a jig. If you'd like to watch a live action version of this page, I invite you to click on the following YouTube video:

Return to my main page to browse 60 other subjects