BESTTRACK ALUMINUM PINEWOOD DERBY TRACKS

Every serious pinewood derby car builder needs a track because no amount of tuning on incline boards or treadmills provides the performance achievable using a track. Like rail riders? Great! But how can you determine how much side steering a particular car needs for minimum run times? Also, does the car run faster leaning to the right or to the left? These are questions that can only be answered if you have a track. Don't like rail riders? (And there are a lot of us who don't.) Even better! With a track you can determine if, after 10 or 20 feet, your car is favoring one side over the other. Again, this is something that can only be determined if you have a track.
Perhaps you're not a car builder but a Boy Scout pack leader or someone who enjoys supporting a group that uses pinewood derbies as an annual event. Having a good track to volunteer for events is one of the best ways anyone can support the pinewood derby community. Good was emphasized in the last sentence because, sadly, most pinewood derby tracks are poorly maintained. Several I've observed have rough surfaces, aren't cleaned properly prior to a race and, most seriously, have poor transitions from one section to the next with steps high enough to eject cars from the track. Taking the time to understand how a good track works, how put one together, how to stage it for a race and maintain it are all critical to hosting a successful race.
That's what this page is for; to provide guidelines, hints and tricks for assembling and staging the best possible pinewood derby track.
The first question to deal with is: Which track should someone interested in getting one buy? I've built two (HOW TO BUILD A PINEWOOD DERBY TRACK) and had experience with several others. What I learned was: (1) wood tracks always warp and in time become worthless. (2) Plastic tracks also warp over time, particularly if they are stored in a hot area. Worse still, they invariably build up a static electric charge during use that pulls dust out of the air and even dirt off the ground, which slows cars, make lanes run unevenly and wears down car wheels. The only tracks that avoid these pitfalls are aluminum ones. The next question is: Which brand?
The answer has to be the 42-foot long aluminum pinewood derby track by BestTrack. Ignoring for the moment issues of its superior quality, this track has become the standard by which all other tracks are compared. It's used for more district, national and professional pinewood derby races than all other tracks combined. Most importantly, by owning the 42-foot BestTrack you can compare your car's times to those of anyone anywhere else in the world. While it's true that each track has it's own peculiarities, if set up properly they are close enough to make such comparisons useful.
How convinced am I that BestTrack is the way you should go? Convinced enough to spend $1,000 of my own money to purchase one. Yes. I know that's a lot of money but any track is going to cost almost as much and will be inferior to it in performance, durability and beauty. Looked at not as a track but as a piece of precision engineering, a BestTrack aluminum pinewood derby track is remarkably inexpensive. My 4-lane track had 168 feet of high grade aluminum extruded into a complex cross section that emphasized light weight, stability, strength and consistency. Try ordering something like that from an aluminum fabricator and the price would be astronomical.
At this point I feel it's important to say that I don't own stock in BestTrack and no one at BestTrack paid me or asked me to create this page. I'm doing so because I believe in the values the pinewood derby program instills in children and the fun they have participating in it. Since their enjoyment and satisfaction largely hinges on the quality of the track they race on, I want as many people as possible to have the best tracks. But... there's a catch.
No matter how well a pinewood derby track is made, it will only perform well if it's assembled properly. The assembly instructions BestTrack provides are probably the best I've ever read. They are clear, easy to understand and illustrated with many color photos. However, as I put my own BestTrack together I learned a few tricks that I feel may help someone putting his or her own track together. The following assembly guide should be viewed as a supplement to BestTrack's written instructions. Much of what I'm going to say will be a reiteration of what's in the instructions. This will provide anyone who is considering purchasing a BestTrack pinewood derby track what to expect.
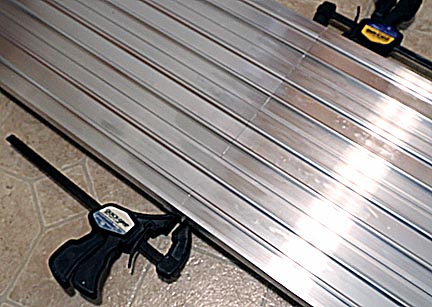
My 4-lane track came packed in two 7-foot long boxes and one 4-foot long box. The long boxes weighed 50 pounds each, the smaller one was 30 pounds. As I opened them I discovered that the two long boxes contained the twenty lanes pieces that would be connected groups of four to create the five major track sections. The smaller box contained the four short curved lanes that are assembled into the transition from the inclined starter section to the four horizontal sections, the four short lanes that make up the stopper section and what looked like thousands of nuts, bolts, pins, springs, plastic jam pins and 90-degree aluminum angle supports. Everything was extremely well packed with lots of heavy cardboard being used to protect the aluminum pieces as much as possible.
Always work on a level flat surface that is softer than aluminum so that the track surface doesn't get scratched. I found the linoleum floor in the kitchen worked well.
Once unpacked and laid out, the number of pieces appears daunting. However, the actual assembly is simple and once you get the hang of it, goes quickly.
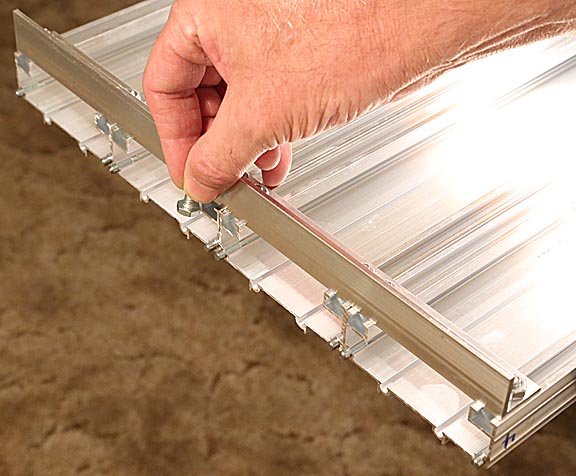
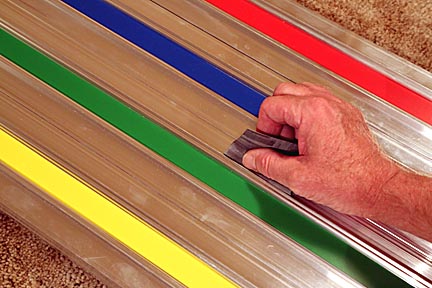
After making sure your track kit came with all the required pieces, I recommend carefully inspecting each lane to make sure it's perfect. Pinewood derby cars are so light that even small bumps can throw them off or slow them. Start by looking down the length of each lane and seeing how light reflects off the racing surface. There should be no sudden distortions indicating a dent. A few of mine had minor dents on their sides, complements of UPS's not-so-fragile handling. These were merely cosmetic and did not affect the racing surface. If you get a lane like this and choose not to ask for a replacement, the dent can be hidden by placing that lane in the middle of one of the track sections. Look down the length of each section to make sure it isn't warped or twisted either vertically or horizontally. Next, run a finger down both sides of each lane to check for scratches or rough spots. I found a few of these and found they quickly polished out with sandpaper. BestTrack recommends 400 to 600 grit paper. While these work well, I found 2400 MicroMesh sanding cloth produced a finish that was closer to the factory finish.
While I was assembling my track I had reason to contact bestTrack. Both by phone and via email I received replies within 24 hours. I found their customer support to be outstanding. Although I had no problems with my track, they readily offered to send me replacement parts for anything I felt was defective.
The next item to inspect is both ends of each lane. It's here that I discovered an issue that I only learned about later. Addressing this problem, if you have it, from the start will save a lot of frustration and result in a much better track.
When I finished assembling my first two sections of track and tried to fit them together, I discovered they would not go together no matter how hard I pushed on them. I finally had to use two squeeze clamps to force them together.
The next thing I discovered was that there was a large bump where one lane transitioned to the other.
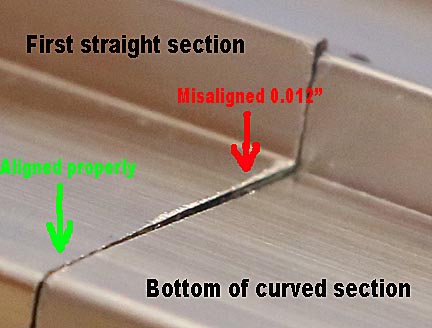
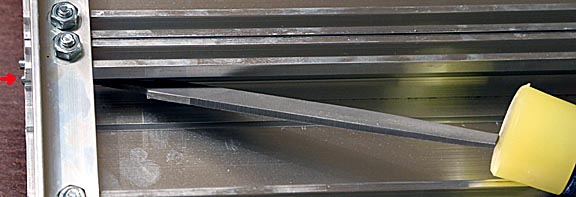
This would, at the very least, nick wheels and could eject a car completely from the track. The cause turned out to be that many of the lane pieces were slightly bent along their entire lengths, creating an upward or downward curve across the width of the track of varying magnitude. This is easiest to see if a straight edge is lined up across the surface of a lane.
Of the 20 straight lanes in my track, 11 had upward bends of varying amounts like the image above, 5 had downward bends and 4 were perfectly flat. I contacted BestTrack and they explained this happened during shipping by someone at UPS stepping on the sides of the boxes and in so doing applying pressure in the direction of the green arrows. This bowed the lanes. BestTrack offered to replace all the bent lanes immediately. I declined because there was no assurance it wouldn't happen again and I didn't feel like incrementally working my way toward to set of flat lanes. Besides, I learned how to fix this problem.
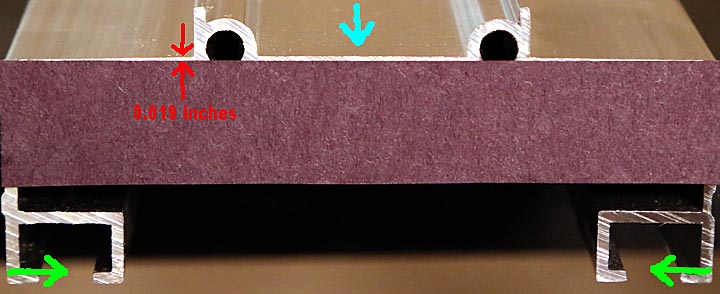
Small amounts of curvature could be removed by simply bending the track outward in the opposite direction of the green arrows. Placing the lane on a hard surface and pressing down in the middle also worked. More stubborn curves were removed by placing a wood block in the area of the cyan downward pointing arrow and hammering it downward. It's important to hammer an inch back from the edge. The goal is to remove the curvature over a long distance, not just bend the edge down so the two sections match. Sometimes hammering in the area of the downward pointing red arrow also helped. Doing this took an average of ten minutes per warped lane to get it perfectly flat. That added up to three hours, but was well worth it to insure smooth transitions.
After doing this, I found track sections slipped together very easily. Evidently the curvature narrowed the lanes enough so that if a section with curved pieces was mated to one with flat lanes their widths differed enough to prevent the alignment pins and holes from fitting together.
Using the file provided, remove any burs from the ends of the lanes that may have resulted when they were cut.
Contrary to the instructions, I do not recommend filing off any burs that stick up perpendicularly to the racing surface at this time. It's almost impossible to do so without creating a bevel that acts like a dip, slowing cars as they roll over it. A alternative treatment is suggested later that I believe provides smoother transitions.
Time to start building your track!
The first step is fun. Using soft-headed hammer, tap the knurled pins into the outer two holes of the ends of four lanes.
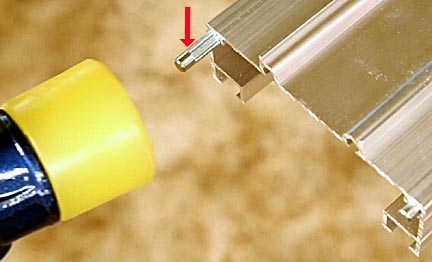
Only hammer the pin until the end of the knurled section (red arrow) is flush with the end of the lane.
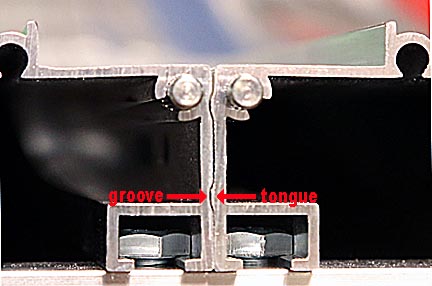
Make sure all the lanes for a section are laid out first so that the tongue and grooves along the sides all mate.
Pins only go in one end of each track section. The pin holes in the other end are empty so they can receive the pins from the adjoining section of track. Lining the lanes up first insures that all the pins for a section of track are at the same end.
If a pin gets hammered in too far or into the wrong end, simply insert the end of the file into the groove holding the pin and use it to gently hammer the pin out.
The red arrow indicates a pin driven in too far.
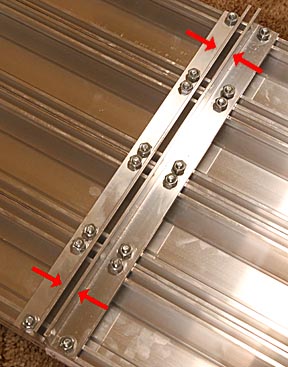
Start assembling the first track section by lining up as many lanes side by side as your particular track has, in my case four. Again, make sure that the tongue-and-grooves on the sides of the tracks fit together and that all the pins are sticking out of one end.
Slide a bolt down each of the channels on the bottom of the lanes, line them up and place one of the angle supports over them so they fit through its holes. Finger tighten the nuts on each bolt, use a square to insure the lane ends all line up perpendicular to the side of the section and tighten the bolts down with a socket wrench. The angle support should be 1/8th inch from the end of the section. Do the same for the other end and you've finished your first track section!
Don't be surprised by the absence of lock washers. Aluminum is soft enough that the tightening process deforms it enough even with light torque that it provides a locking function.
Repeat for the a second section and fit them together upside down on a level surface. Check the lanes to make sure they fit together without gaps. Usually these can be fixed by loosening the bolts for the lane with a gap by loosening and pushing it forward. The lanes vary slightly in length and a little custom fitting may be necessary to get perfect transitions.
If you still see a gap on the race surface but the bolt channels on the bottom of the lanes are in contact, the problem is some aluminum needs to be filed off to let the top surfaces come together.
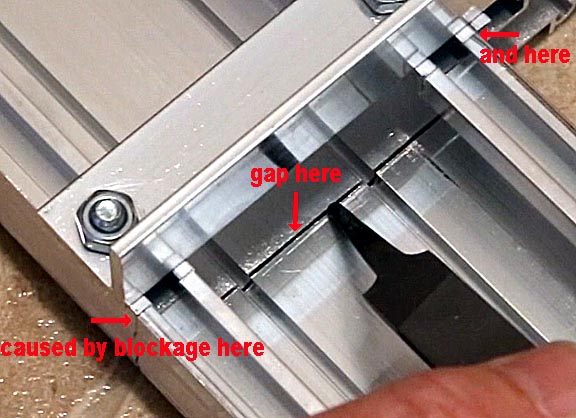
These two issues must be addressed to insure there are no dips between the track section joints, which could disrupt the smooth rolling of the cars.
Once you have good, tight transitions, separate the sections, turn them over so the race surface faces up and rejoin them.
Using a wood block wrapped with 2400 MicroMesh sanding cloth, sand down both transitions between for each lane as well as the sides of the guide rails. This eliminates any burs. Next, run your finger over all the transitions. If you feel any stubborn burs, sand them down some more. But, if you feel a definite step caused by one lane being higher than its mate, the problem is that one of the lanes isn't perfectly flat. Using the wood block and hammer, lightly tap down the higher one until the transition is perfect. I found that doing this with the wood block on one side or the other of the inside of the lane rails, rather than where the wheels run, creates smoother transitions than hammering where the car's wheels run.
Fine tuning the transitions is time consuming but means the difference between a track that works great versus one that's a car-killer.
After you have the sections perfectly mated, number their sides so that they are always assembled together.
Continue building up your track one section at a time.
The starter section of the track is a little tricky because there are a lot of bolts that have to slid down channels prior to assembly. Missing a bolt means the entire section might have to be taken apart.
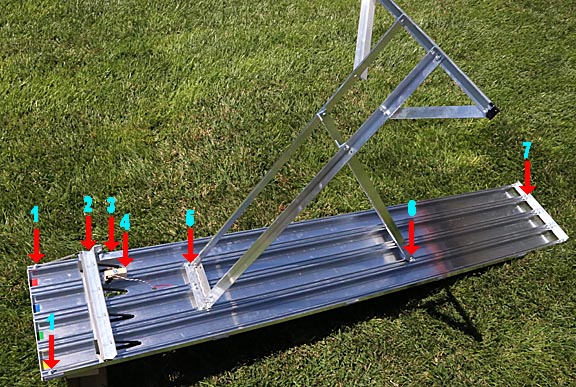
A good plan of attack is to stage a dry run. Place everything that needs to be attached to the start section so you can see how many bolts are required and where they go. Then remove the parts, slide the bolts into position and mount the equipment. I failed to do this and ended up having to remove one end angle support twice, once because I forgot the bolts for the gate release arm and again because I needed a bolt to mount the timer release switch. For my track I needed two bolts to hold the start gate springs (1), eight bolts for the start gate hinge (2), two for the start gate release (3), one for the timer release (4) [yours may require two or more depending on how it's mounted], four for the upper support hinge (5), four for the lower support hinge (6) and eight for the bottom angle support (7.)
Although it looks complicated, assembling and mounting the gate and support legs is easy and well explained in the instructions.
The last section to put together is the stopper section.
It goes together like the track sections except that it does not have guide pins. I recommend cleaning the upper surfaces of the stop lanes with alcohol before putting on the rubber strips that gently slow cars to a stop. This ensures the adhesive has a clean surface on which to adhere.
The rubber strips can get dusty and over time cars may start sliding all the way to the hard stops at the end. If this happens use a lint remover to clean the rubber. Never store this section with anything laying on the rubber. Part of its effectiveness comes from its surface texture. Any prolonged weight can flatten it, reducing its braking power.
Once all the sections are complete it's time to add the color striping.
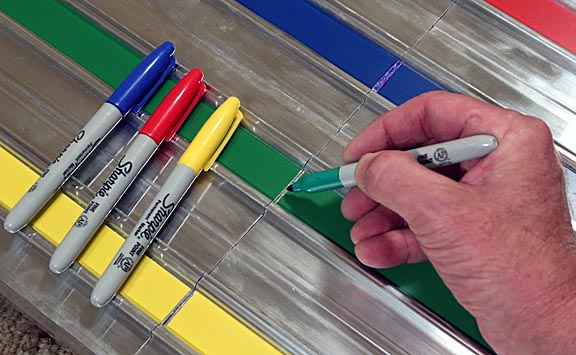
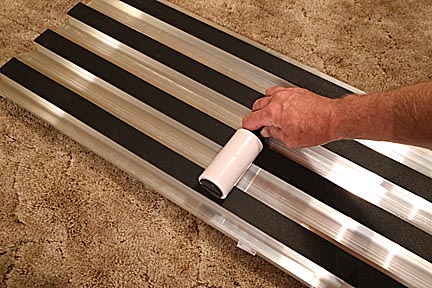
Lane striping not only makes the track look great, it also helps race proctors keep track of which cars have raced on which lanes. I've seen two tracks where the lanes were painted and they both looked terrible. It's difficult to paint aluminum uniformly enough to look good. A much better looking, quicker and easier solution is to apply colored vinyl tape down the centers of the lanes. While such tape can be found in hardware stores it's usually only 3/4-inch wide and doesn't look good. A better option is the 1-inch wide tape offered by BestTrack. The only problem with it is that no matter how carefully it's pulled off the roll, how long it's let to rest and how gently it's applied to the lanes, it invariably shrinks. This results in gaps between the sections. Permanent markers can be used to fill in these gaps. Another problem is that air bubbles get trapped under the tape. Small ones can't be seen but large ones may be noticeable. These can be avoided by first running a finger up the middle of the tape to push air out toward the sides where it can escape. Any remaining bubbles can be pierced with a pin or Exacto knife and the air pushed out.
After the track is completed, recheck each lane and sand out any scratches that may have occurred during assembly.
When putting the track together for a race, the instructions suggest pushing sections together then lifting one side up to apply one of the binder clips provided to hold the section together, then repeat for the other side. If looked at from the bottom the clips go where the red arrows indicate.
One problem is that this process subjects the guide pins and the holes in which they fit to bending stresses which, considering how soft aluminum is, could in time deform the holes enough to compromise the transition. For my track I used 14-inch long sections of 2x4s nailed to 12-inch wide pieces of masonite to lift the track up off the floor.
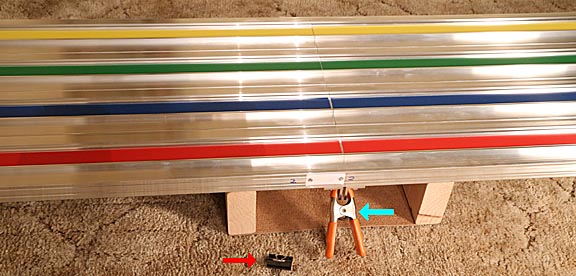
This allows me to apply clamps without lifting track sections. It also provides enough floor clearance so stronger spring clamps (cyan arrow) can be used instead of the provided binder clips (red arrow.) Other benefits include raising the track so it presents a more solid appearance, which discourages children jumping over it, and gives enough height for checkerboard draping.
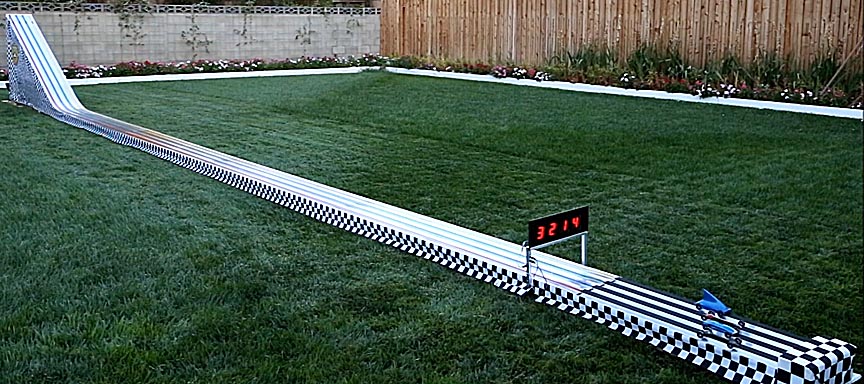
My track after its very first race. The Red Menace won!
And with that your track is done!
Working steadily, you can count on two hours to assemble the track, three hours to fine tune the transitions, and hour mounting a timer (I prefer the Smartline timer with large placement numbers on both sides and times on one side) and two hours laying down the colored tape for a total of eight hours. I highly recommend investing another eight hours making checkerboard drapes for both sides. It makes the track really pop. Another addition would be use memory foam to build a soft stopper at the end of the stopper section in case cars start sliding to the end. Many high performance cars are very delicate and soft stops are critical to protect them.
Care
And Feeding Of Your BestTrack
Aluminum Pinewood Derby Track:
While aluminum is a durable, corrosion resistant material, I recommend storing your track inside out of the weather. Extreme temperatures will weaken the vinyl tape's adhesive to the point where it peels off. Keep it covered so dirt and dust can't build up on its surface. Brushing or wiping it off could scratch the surface. Avoid storing it on end because that could dent the transition surfaces. Keep it out of heavy use areas so that people don't accidently step on it, kick it or drop tools on it. Pad the race surfaces with cardboard during storage and when transporting to protect them.
On race day, politely decline help setting the track up. One person can do so easily in 15 minutes so help isn't really necessary. The problem with people helping is that if they don't understand how the track works they can damage it. Once the track is put together, double check all the transitions to make sure they are perfectly smooth. Then use a soft brush to brush it down, followed by a vacuuming and finally a wipe with a cleaner like Simple Green or 91-percent alcohol to remove any fingerprints, which can contaminate wheels and make dust stick to them. Avoid using any metal polishes. These may make the surface look shinier, but they do so by despositing a layer of polish that can hold dust and gum up wheel treads.
It's also good to inform the people running the race that while the stainless steel bolts used in the starting gate are non-magnetic for most magnets, the new rare earth magnets are strong enough so that if an unscrupulous racer mounts one in the nose of a car it'll get a slight boost when the gate drops.
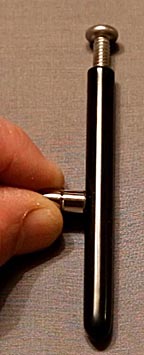
Small super magnets in a car's nose can attract the stainless steel starting pins giving illegal cars a head start.
Race officials can check for such illegal cars by placing a regular steel bolt near their front ends. If the car is pulled along with the bolt it should be disqualified.
Conclusion:
Is it worth it?
YES! A well-made track with smooth transitions is both beautiful and a joy to use. While the assembly may appear daunting, in fact it's a lot of fun, like building with a giant erector set. Once built, the track goes together in as little as fifteen minutes. Best of all is the satisfaction of a job well done and the happiness in the faces of the children who'll get to race their cars on it. Additionally, it enables the serious pinewood derby car builder to fine tune cars to run their very fastest. I have no regrets and I hope you will feel the same.
The following provides a video of everything covered on this page:
And this video shows how to improve the Besttrack's start gate so that it doesn't shake the cars as much when released:
Thank you for visiting. I sincerely hope you found this page useful. Please be sure to visit the other Pinewood Derby pages on my site at: www.waynesthisandthat.com. They are located in the Pinewood Derby Section immediately under the Hobbies Section.

Return to my main page to browse 60 other subjects