While observing my wife struggling to start a basket, I decided that she needed at least three more hands to manage the basket and all the strands that needed to be twisted, woven and forced into place... or a little help from her engineer husband. What I came up with is a metal disc and sets of magnets that hold the basket together during its early stages of construction so that getting it started is much easier and therefore more enjoyable.
Using spray
contact adhesive, attach thin, galvanized sheets of steel (available
in the flashing department of hardware stores) on a 2 x 2 foot square
of 3/4-inch thick plywood. Use a jigsaw with a metal cutting blade in
it to cut out a circle. The saw will throw off razor sharp, hot
flecks of metal so be sure to wear the appropriate safety equipment.
Cover the edges with thick plastic tape.
Drill a hole in the center of the disk and attach it to another piece of 3/4 inch plywood so that the disk can be rotated. The second piece of plywood needs to be wide enough to be stable and long enough so that it extends slightly beyond the disc. Almost any piece of scrap wood will do. My wife prefers to lean her magnetic weaving platform against the top of the backsplash of our kitchen counters. This puts it at a comfortable angle and height for her to work while standing. If it's preferable to work sitting down, then I recommend adding a leg to the top to support it at a convenient angle. Rubber pads under the platform will prevent it from slipping around.
Purchase two dozen 1 x 2 inch ceramic magnets (they're available on Amazon.com) and use indoor/outdoor double faced carpet tape to attach them to 1 x 1 inch wood rods. I found two 1 foot long rods and four 4-inch rods worked well. Leave the rest of the magnets loose so they can be positioned as desired.
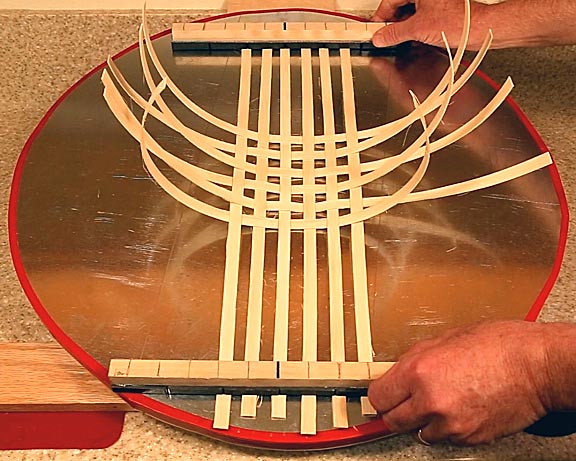
Use the two long rods to hold the top and bottom of the vertical warps. The magnets will hold them very firmly yet there is enough play in the center to make weaving in the wefts easy. When removing the rods, it helps to rotate them around the top or bottom edge rather than trying to lift them straight up.
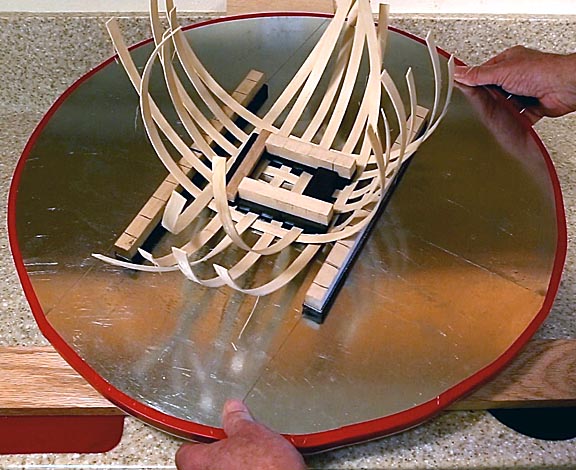
Once the center section is complete, use the smaller magnetic rods and loose magnets to secure the center, remove the long rods and use them and any remaining loose magnets to force the sides upward. This step isn't shown well in the image above because the strips weren't soaked and as a result are too stiff to bend. As the sides are being woven, rotate the platform as needed to keep the side being worked in the most convenient position.
The following short video shows the platform in action:

Return to my main page to browse 60 other subjects