RELAXING MOMENTS PUZZLES
A guide for making beautiful, heirloom quality jigsaw puzzles
Introduction:
I hate jigsaw puzzles.
That
may sound strange coming from someone who's invested countless hours
discovering the best ways to make them and even more time creating
dozens of jigsaw puzzles for his own use. But read on and it'll all
make sense.
It
started started one fine Spring morning as I walked through the toy
section in the local Walmart, looking for something new to entertain
the grandchildren. Strolling down an aisle I came to a display of
jigsaw puzzles. The thought occurred to me that it had been 30 years
since I put one together. It sounded fun, or at least interesting. I
selected puzzle with a pretty garden scene. tucked it under my arm
and headed for the nearest checkout stand. Suddenly possessed by the
need to play with my new acquisition, I broke several speed laws
hurrying home. I burst
through the front door, dumped the colorful pieces out on the dining
room table and began fitting tiny pieces of cardboard together.
That's when things started going horribly wrong.
Confusion turned into frustration and very soon to anger. I couldn't find the right pieces. Teeth grinding, I struggled on, determined to defeat the cardboard nemesis scattered across the table. Hours later, eyes bleary and fingers trembling I popped the final piece in place. And my reward? An out-of-focus, insipidly colored picture of a garden. I threw the pieces back in the box and glared at it, vowing never again to waste my time on another jigsaw puzzle.
Days later, the thought came to me that the problem might not be the fault of jigsaw puzzles in general, but with that particular puzzle. I decided to give them another try. The Internet provided a list of puzzles along with reviews by people who'd purchased them. I selected one with five out of five stars, ordered it and waited for the post office to work its magic. Four days later it arrived. Hands shaking with trepidation, I poured the pieces out on the table and went to work. One of the virtues of this jigsaw puzzle was that the shapes and sizes of the pieces were much more varied than the first. The advertisement claimed this made it more interesting and easier because no two pieces looked alike. If the first jigsaw puzzle was a bad dream, this one was a nightmare. After an hour and a half I hadn't even managed to finish the outside border. My wife came over and together we spend another half hour looking for the last piece to the border... and never found it. Now, I'm one of those people who hates to give up on a project no matter how hopeless it is. Yet this time I did. After dumping the pieces back in the box, I placed it and its predecessor in the attic and swore I'd never even look at another jigsaw puzzle again. Little did I know what was coming.
Haunted by the psychological scars inflicted by these experiences, I brooded about jigsaw puzzles. In time a coolness crept into my thoughts and I was once again able to consider them rationally. As frustrating as they were, there was nevertheless satisfaction in finding a piece and slipping it into place. During those rare moments when several pieces fell together in quick succession it was really quite enjoyable. And when the last piece snapped into its hole it felt great. Granted, the picture quality wasn't good, but it hinted at an appealing garden, which was pleasing. I began wondering if it would be possible to find jigsaw puzzles with all of their positive virtues and none of their drawbacks.
Being of an orderly mind, the first step was to list all the problems with the jigsaw puzzles I'd tried. It turned out to be a long one:
1. The Picture on the Cover Didn't Match the Picture on the Puzzle. In both puzzles the cover pictures showed 1/4-inch more detail all the way around than what was on the puzzle. This led to endless confusion trying to figure out which border pieces belonged where.
2. The picture on the jigsaw puzzle was so indistinct it was impossible to tell if I was holding a piece right side up or upside down.
3. All the border pieces looked so much alike there was no way of telling which were from the top, the bottom or sides.
4. Almost all of the flowers in the picture were the same type and size, making it impossible to tell which pieces went to what flowers.
5. The pieces were so small they didn't have enough information on them to tell where the belonged.
6. The image quality was so poor that once the jigsaw puzzle was completed there was no pleasure looking at it.
7. The cardboard pieces felt cheap and flimsy, making handling them unpleasant.
8. The random shapes of the second jigsaw puzzle pieces created eye strain and mental fatigue after sorting through them for endless hours.
9. Some pieces were cut along the edge of two colored areas robbing the person putting the puzzle together of color cues.
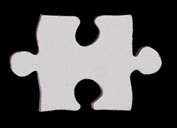
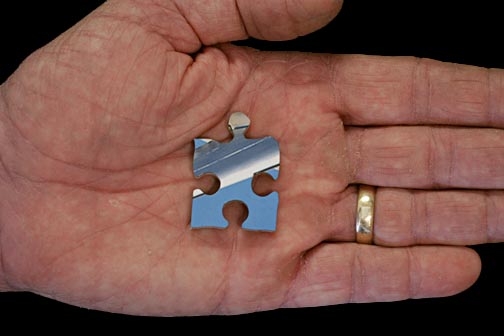
10. In the second puzzle, it was impossible to figure out how some border pieces should be used. For example: the following image is of one such piece with two flat edges.
Which straight edge is the edge that's part of the border?
The answer is neither. This is actually a piece that belongs in the middle of the puzzle.
I could go on but you get the idea. I suppose dedicated jigsaw puzzle players love these sorts of problems. They revel in spending hours searching for a single piece. I found it painfully frustrating. Yet the more time I spent thinking about them the more I felt there was something attractive about them... if they could be made differently.
The concept would be to create jigsaw puzzles that provided just enough challenge to occupy one's mind pleasantly without the frustration attendant on most puzzles. The pieces would be large enough to hold sufficient detail to tell which end was up. The border pieces would be easily identified. The jigsaw puzzle's picture would match perfectly the cover picture. The image quality would be of the highest photographic and artistic standard so when the puzzle was completed the builder would be rewarded with a beautifully satisfying scene. Piece shape would be varied enough to make assembly interesting, but not so varied that the pieces couldn't be easily grouped to help speed searches. The pieces would be hefty enough and solid enough to last for years and feel good in the hands. The end result of incorporating all these features would be to create a puzzle that would be enjoyably diverting enough to provide a few minutes of peaceful escape from our increasing complex world. I searched high and low for such jigsaw puzzles and drew a complete blank. The only option was to make them myself, and so Relaxing Moments Puzzles was born.
This page chronicles everything I learned while discovering how to design and make a relaxing and enjoyable jigsaw puzzle. The most important thing I discovered was that even if someone doesn't enjoy putting them together, making jigsaw puzzles is an unusual, challenging and fascinating hobby.
Sequence of Events in Creating a Jigsaw Puzzle:
1.
Decide the puzzle's purpose.
2.
Select and create the puzzle's picture.
3.
Create the puzzle pattern.
4.
Cut the jigsaw puzzle.
5.
Complete the finishing touches and box it.
Don't let this short list fool you. We're not talking about cheap cardboard cutout jigsaw puzzles, but the highest quality, hand-cut wooden puzzles intended to become heirlooms. Each step involves overcoming challenging problems. When all is said and done it takes an average of 5 minutes to complete a single piece to one of these top quality jigsaw puzzles. That comes to 25 hours for a 300 piece puzzle. To add insult to injury, you need to be prepared to spend at least $700.00 to get started.
I'm not trying to dissuade anyone from exploring this great hobby. I just want everyone to know it's not easy or cheap. However, this expense sets you up for years of creating the finest puzzles on the earth. That's not an exaggeration. Because you're not limited to production costs like professional jigsaw puzzle makers you're able to add extra steps that significantly improve the quality of your puzzles above them. Interested? Let's get started.
1. Decide the Jigsaw Puzzle's Purpose:
You're going to spend many hours making a jigsaw puzzle so it makes sense have a crystal clear idea of what you want it to accomplish.
Do you want it to be as hard as possible to put together? If so then you want irregularly shaped pieces that are as small as possible. You want a picture that has a lot of confusing repetition to make it difficult to figure out where pieces go. You want to cut along, rather than across, edges of colors for the same reason.
If, instead, you want to impress people with your cutting virtuosity, then you want to design pieces to be complex yet show a definite pattern. For example, you could make them tiny and look like waves, plants, or animals.
The guiding philosophy behind Relaxing Moments Puzzles is; "A puzzle shouldn't be a chore to put together... it should be a delight." This dictates that the pieces be of convenient size, limited in basic types so they are easily sorted, varied in shape only enough to make individuals easy to identify but not so much as to be confusing, and the picture selected so there are as many clues as possible to help indicate where pieces are supposed to go. This is the philosophy followed on this page.
2. Select and Create the Jigsaw Puzzle's Picture:
Unlike the vast majority of hand-cut puzzles, which are designed to be a difficult as possible to assemble, Relaxing Moments Puzzles are intended to be as easy as possible to put together without being so trivial as to be childish. The first step in doing this is choosing an image that has as many cues as possible to guide the assembler in putting it together. The first consideration is that each of the four sides the jigsaw puzzle should be completely different to allow border pieces to be sorted easily. The following images of three pictures I turned into puzzles demonstrate how this works:
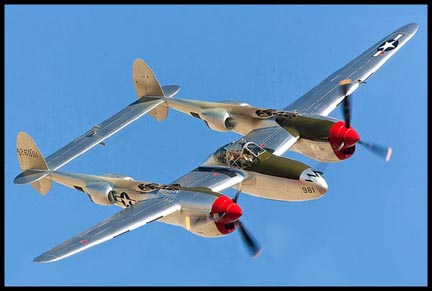
This first one is poor because the blue sky all the way around the border makes it impossible to figure out which pieces belong to the top, bottom or sides.

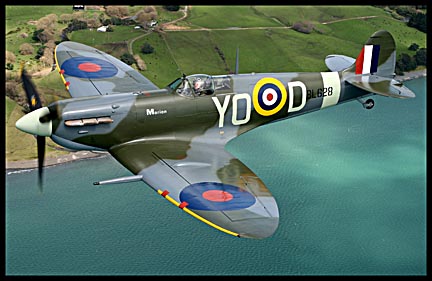
This second image is better because the sky above and the hills below makes it easier to group the top and bottom border pieces. Better still would be to have clouds near the upper border to act as clues as to how order to the pieces of the top border.
This image is perfect. There is sufficient detail all the way around the border to make it easy to identify which pieces go where. A good border like this is a great way to start off a puzzle.
(In case anyone was wondering, the first image is of a P-38 Lightning, the second a P-40 Flying Tiger and the third a Supermarine Spitfire.)
In the same way, the interior of the jigsaw puzzle should be selected so as to minimize repetition of patterns and colors that make figuring out where pieces go a frustrating chore; think blotches of color rather than fields. Consider the following image:
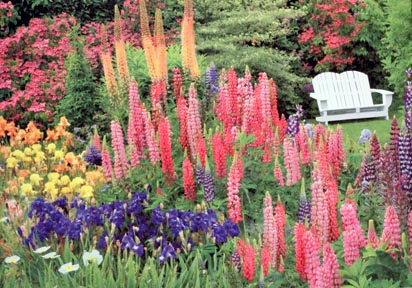
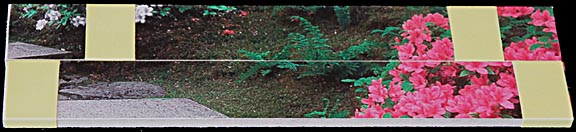
This is a nightmare of a jigsaw puzzle. Dozens of the lupines are the same color and so close to the same shape and size that telling one piece from another is almost impossible, and certainly not relaxing. The next image is much better:
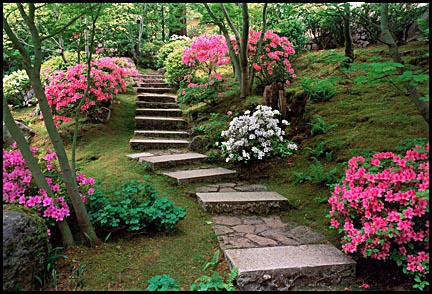
Each azalea bush has a slightly different color, making sorting pieces easy. The bushes are discrete rather than part of a solid field. This creates many more borders that helps identify where pieces go. (In the original, all the azalea bushes were the same shade of pink, which would have made figuring out which pieces go where an exercise in frustration. One at a time, each bush was selected and its color changed to make the puzzle easier to assemble. Even the white azaleas were pink in the original.)
The "blotch" concept can be found in surprising places. For example, take a look at this image of an F-40 Ferrari:
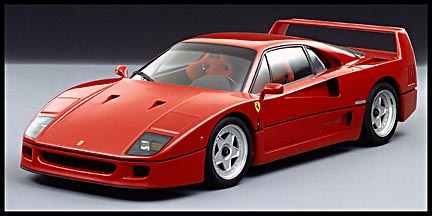
The tires, bumpers, spoiler and windshield clearly define specific, well defined zones that are easy to sort for and assemble.
The Internet abounds with thousands of public domain images which can be turned into jigsaw puzzles. Start searching by deciding what topic is desired: gardens, hot air balloons, rivers, mountains, planes, trains, cars or anything you enjoy. For example, the earlier azalea image was found by using the keyword string: "images of azalea gardens," which produced hundreds of pictures. This was the most attractive to me, which raises the question of subject matter.
Good art needs to be more than just attractive, it should also be inviting. Consider the lupine picture again:
It's pretty and there's a bench inviting the viewer to sit down but there is a wall of lupines blocking access to it. This image could be made more inviting by editing it to create a clear path from the bottom right of the image to the bench. This helps pull the viewer into the picture. The following image shows this:
Feel how the walkway draws you into the image? This is much more effective. As for the airplanes and Ferrari puzzles shown earlier, I find them very inviting. I want to sit in them and fly or drive them.
Scale also plays a part in the idea of an inviting image. The walkway above through boxwood and azaleas is close enough to imagine standing on the walkway. Distant vistas of grand mountain scenes may be beautiful, but are so far away and vast in expanse that you can't see a specific area to be at. This makes them less inviting. Aerial views of such scenes are even less inviting.
Creating this sense of being drawn into the image is almost impossible to do with drawings or paintings. In my opinion only photographs of real scenes can accomplish this.
Such considerations may seem excessive but this page is about creating heirloom quality jigsaw puzzles that aspire to the highest artistic standards. Careful image selection doesn't take much more time than being casual about it, so why not make the most of your time to help create a more effective image?
Although they can't be seen, there is a 1/8th inch black boarder around each picture. Not only does this help identify border pieces, it also creates an attractive frame for the completed puzzle.
Often the same image will be posted several times at various resolutions. Select the one with the largest number of pixels so the resulting image is as free of digital artifacts as possible. Trim the image in whatever photo processing software you use to eliminate any undesirable features. Next, make changes as necessary to make the puzzle easy to assemble, such as changing the color of the azaleas in the previous picture.
When deciding what size to make your puzzle, consider the size and quality of the backing board material. If you're using fiberboard, it's cheap enough that you can cut any size you want and not worry about waste. If you are using expensive hardwood plywood, then consider sizing the puzzle to use it the most efficiently. For example: if you're starting with a 24 x 32 inch sheet of walnut plywood, cutting it into eight, 7.8 x 11.8 inch pieces is more efficient than if you had your heart set on 8 x 12 inch pieces, in which case you could only get three and and some smaller pieces. Undersizing the puzzles is necessary because of the material lost during cutting.
Boxing is another issue affecting size. Because hand cut wooden jigsaw puzzles are so much thicker than cardboard puzzles, they take up a lot more room when stored. An 8 x 12 inch, 77-piece puzzle requires a box that's 4 x 4 x 7 inches, a nice size for putting on a bookshelf. A 300-piece puzzle would require a box over four times as large and might not be as convenient. If you're buying top quality decorative wood boxes for your puzzles larger ones can get to be very expensive.
Finally, print the image. If you want a large picture and don't have a large format printer, stationary stores like Office Depot or Staples can print it for you. Most photography shops also offer this service, but usually charge more. It's at this point I'm going to recommend something that is diametrically opposed to every jigsaw puzzle making guide I've read: print your image on the highest quality, glossy, professional-weight paper you can get. Every website, youtube video and book I've researched says that you want to print on the thinnest paper possible because a scroll saw's blade invariably frays thick papers. The paper they recommend is light weight (32-pound) coated glossy paper as is used in high end magazines. I've tried one of the best of these papers, by Red River Paper, and discovered three problems. First, under most print settings the paper gets so wet it warps. The only setting the doesn't do this is transparency, but that produces prints that are significantly darker. Second, the image is more easily smudged. Third I could not find a clear protective spray coating that didn't soak into this type of paper, render it translucent and weaken the image. I tried several different sprays and coating techniques and they all ended in disaster.
What I use is Canon Photo Paper Plus Glossy II. It produces sharp, durable images that can be overcoated without damaging the image. This is thick, 72-pound paper that never warps during printing. As for the fraying problem during cutting, I've never seen it. My edges always look razor sharp, as the image below shows:
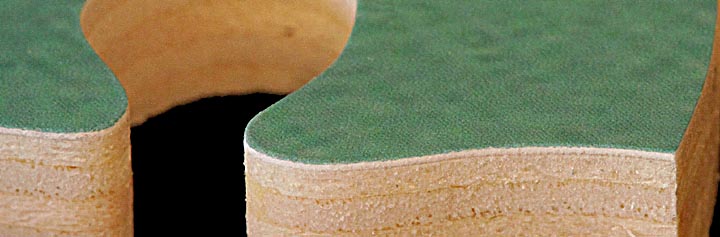
I believe the fraying is caused by using dull blades or pushing the jigsaw puzzle through the scroll saw too fast. Fast cutting is a necessity when trying to make money from selling puzzles because production has to be high, but it invariably results in rougher edges. I prefer taking it slow when cutting to create perfectly clean edges. It's not unusual to spend over a minute cutting a single piece.
Always make two copies of the print. The second not only acts as a backup in case something happens to the first but is useful during the edging process. (More about that later.)
The next step in creating the image is to spray it with a clear, glossy spray to protect it and create a glossy, professional looking image. The best product I've used is Sureguard glossy photo protectant. The problem is that it's hard to find and expensive. Next best is Design Master's Dresden Clear Glaze, clear glossy finish, number 655. Michael's and Jo-Ann's craft stores carry it in the spray paint cage in their art supply area. Krylon's clear gloss spray works just as well and costs half as much but gives off such an offensive odor I can't bear to use it. Avoid water-based Varathane and Deft water-based acrylic sprays. They dissolve inkjet ink and blur the image.
Tape the print to a stiff, flat board to stop it from curling, place it perfectly horizontally so the spray dries flat and even, and spray an even coating that's heavy enough to completely wet the surface. You want the spray droplets to flow together to create a glass-smooth surface. Do this in a draft free, dust free room after making sure the print is perfectly clean. Let the print dry at least 12 hours before touching. Not only does such a thick coat take a long time to dry but it continues to harden long after it appears to be dry to the touch. (One problem I've had with the Dresden spray it that once in a while I get a can that sprays large drops out from where the plastic nozzle fits into the can. Keep an eye out for this problem because it can ruin a print.)
Trim the picture face up using a brand new razor blade for the finest cut. Cover the image except the edge being cut with tracing paper so the straight edge used as the cutting guide doesn't scratch the print. Cut the board to be used for the jigsaw puzzle's body to match the print's dimensions and sand the edges just enough to remove any frays or splinters. I prefer 1/4-inch, walnut plywood so the back can be finished. This gives the puzzle an instant heirloom appearance the second someone picks up the first piece. (I purchase my plywood from Rockler.com. I haven't tried anyone else so I can't comment on whether they are the best or cheapest source.) Print the puzzle pattern, I'll explain how to make it later, and mount it on the the face of the print to protect it during the gluing process.
I've use Super 77 spray adhesive (messy and too unforgiving when the print isn't laid down perfectly) Elmer's white, clear and carpenter's glues (permits a long time for adjusting the image but are messy and hard to get an even coat) and rubber cement (messy, hard to get an even coat and no adjustment time) and found them all poor materials for mounting pictures on the board. I prefer Scotch 568 positionable mounting adhesive. It's essentially a layer of pressure sensitive glue sprayed on to a plastic coated surface that it doesn't want to stick to. Unroll the mounting sheet, place the back of the print on it, cover the surface of the print with the liner that comes with the adhesive sheet and rub it all over. This transfers the glue from the paper to the back of the print. Lightly trace around the print with a razor blade to cut the adhesive so no extra is pulled up. Pull the print off being careful to not get any adhesive on your fingers. Very lightly place the picture glue side down on the board, position it so the edges line up, cover with a piece of paper and rub it on moving from the center out to prevent air bubbles from being trapped. If the adhesive is applied to the board first, it grabs the back of the print too aggressively to be repositioned. Putting the adhesive on the print first makes use of the fact that the wood surface of the board has a slight fuzz that facilitates moving the print around.
Most jigsaw puzzle making instructions recommend mounting the image on the board then sawing the edges off to ensure a clean edge all the way around the puzzle. This doesn't work for puzzles with solid black borders like mine because it's almost impossible to line up the cuts. Mounting then cutting invariably produces uneven border thicknesses.
That's it!
After a brief explanation about how to make the puzzle pattern mentioned earlier we're ready to start cutting the jigsaw puzzle.
Create the Puzzle Pattern:
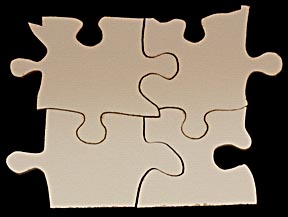
Many high-end profession jigsaw puzzle makers eschew puzzles cut to a repeating pattern because it's considered less artistic. Free-form cutting creates a more challenging puzzle that demonstrates the cutter's virtuosity with a scroll saw. Since my goal is to produce jigsaw puzzles that are easy for the user to assemble, I prefer to cut to a pattern. The human mind has a great facility to group similar objects to speed sorting. Jigsaw puzzles made with all the same shaped pieces like this:
or all randomly shaped pieces like this:
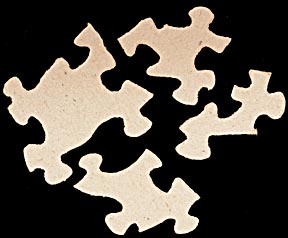
don't permit this. Therefore I cut puzzles with the following six shapes to facilitate searches:
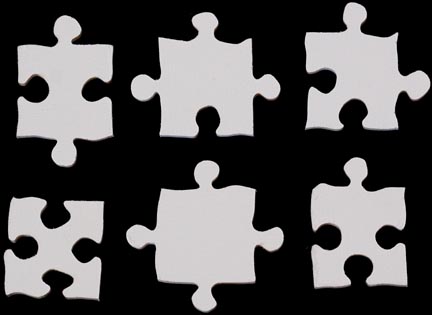
Use more or fewer as you desire for your own jigsaw puzzles.
Making all the pieces the same size and placed on a consistent grid helps the person assembling the puzzle to place pieces within the border even if there are no other pieces close to them. The grid acts like graph paper once the border is assembled.
Don't be concerned that cutting to a pattern will result in all the pieces being identical. The thin blades used to cut them are so hard to control that they will automatically give each piece a unique shape.
The next consideration is piece size. Too small and there isn't enough of the image on them to tell where it should go. Too large and assembling the puzzle becomes a trivial activity. For my puzzles I found pieces based on 1 and 1/8-inch (2.8-centimeters) squares not including keys to be perfect.
That comes out to 77 pieces for a 12 x 8 inch puzzle. This may seem ridiculously low but remember, the goal of a Relaxing Moments Puzzle is to provide 15 to 20 minutes of pleasantly diverting activity, not hours of eye-straining piece hunting. The following is a full sized image of a cutting pattern for a 12 x 8 inch jigsaw puzzle:

Don't be concerned that it's a low resolution image if you wish to copy it for printing your own cutting pattern. The lines only need to be distinct enough to act as a general guide. For larger puzzles, paste as many copies as needed side by side to create patterns of any size. Some resizing may be necessary to maintain the 1 and 1/8-inch piece dimension.
Some references recommend staggering the intersection points like this to create tighter fitting puzzles:
I didn't find this to be true and don't like the choppy appearance it gives the assembled puzzle.
I tried using removable rubber cement and repositionable adhesive sprays to attach cutting patterns to puzzle images and discovered they either held too strongly and left residue when removed, or didn't hold well enough and let saw dust get under them, which could damage the image. I tried mounting the blade upside down in the saw and cutting the puzzle face side down and found that created rough cuts and invariably scratched the puzzle's face. Taping the pattern to a thin sheet of wood and taping this in turn to the puzzle also didn't work well. Saw dust gets under it and imbedded into the image surface, ruining it. In the end the best technique was to print the pattern on full adhesive 8.5 x 11-inch Post-It sheets.
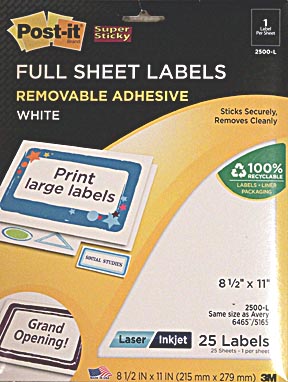
They are available on-line from many sources. Adhering it to and removing it ten times on a sheet of untempered masonite (sometimes referred to as fiberboard) reduces the stickiness just enough so it doesn't leave any adhesive residue yet still remains in place.
Even if you don't plan on using a pattern for cutting your jigsaw puzzle piece there are two excellent reasons you should use the Post-It technique: it prevents the puzzle from getting glue on the print during mounting and protects it from abrasions from during the cutting process.
After mounting the pattern, cover it with clear sealing tape, the 2-inch wide heavy Scotch tape used to seal boxes. I found multiple references that claimed the thin layer of silicone on the non-adhesive side lubricates the scroll saw's blade so it cuts cleaner and stays sharp longer. Even if the pattern paper wipes the silicone off the blade the tape is still worth using because it strengthens the underlaying paper so the pattern pieces can be removed after cutting without their tearing.
How To Cut A Jigsaw Puzzle:
Cutting jigsaw puzzles requires, oddly enough, not a jigsaw but a scroll saw. This is where the major expense of this hobby comes from. The $100 Craftsmans and Ryobis carried by hardwares stores are too noisy, vibrate too much and are too unreliable for cutting quality puzzle pieces. You need a good saw such as an Excalibur ($800 in 2013) or DeWalt ($460.) If you don't believe me, check out scroll saw videos on YouTube. Virtually every one will feature one of these two saws. The DeWalt was designed by the same company that created the Excalibur and some people claim it's better than its more expensive predecessor. Either of these machines will last a lifetime and are a joy to use.
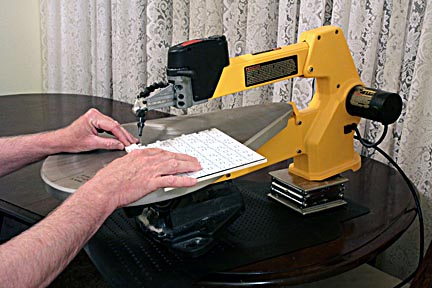
My
DeWalt. I don't have a permanent workroom so the dining room table
has to do.
Jacking
the rear end up a few inches provides a clearer view of the work.
Second only slightly in importance to the saw is the blade put in it. For cutting jigsaw puzzles the standard workhorse is the 3/0 size blade. Measuring approximately 0.023-inches wide and 0.009-inches thick it cuts an average kerf (cut width) of 0.010 inches. It's wider than the blade because the blade's teeth lean out to one side (like a burr) making it cut a wider swath than the width of the metal used to make the blade. Actual blade dimensions vary with brand. I measured Olsen 3/0 blades at 0.009 inches thick, 0.0095 inches including the burr. Flying Dutchman blades measured 0.008 inches thick, 0.0082 inches including the burr. (A note about Flying Dutchman "Special Puzzle" blades advertised as being only 0.015 inch wide instead of the standard 0.023 inches for 3/0 blades. When mine arrived I measured them and they read 0.023 inches, not 0.015. I contacted Mike at Mike's WorkShop where I bought them and he said he was just passing on the specifications given to him by his supplier in Germany.) Jeweler's blades go down to 8/0, which are 0.0063 inches thick. They have extremely fine teeth that clog easily with sawdust and cut very slowly. They are also delicate, typically lasting only long enough to cut 10 puzzle pieces.
Why all this talk about blades widths, burr widths and kerfs? Because the wider the kerf, the cruder the final jigsaw puzzle will look. The smaller the kerf, the smaller the gaps between the puzzle pieces will be, the tighter they will fit together, and the harder it'll be for the person putting the puzzle together to see them. Small kerfs are the holy grail of hand cut wood puzzles. If you want to make heirloom quality jigsaw puzzles you have to do everything you can to minimize kerf... well, almost.
Blades that are too thin can bend vertically when going around sharp corners. This results in slightly angled cuts which, when combined with an extremely small kerf, means that two puzzle pieces can only be put together one way.

In the case above, the angles prevent piece B's key from fitting down into A's lock, even though they were cut at the same time. They only way to get them together is to drop A down onto B. This is why you want to minimize kerf width "almost" as much as possible, 0.0055 inches seems to be the practical limit.
While I'm still experimenting with different types and sizes and brands of blades, I've already come up with one conclusion: I don't like any of them.
I couldn't find a blade that cut razor sharp edges, was easily controllable and generated the smallest possible kerf... so I made my own.
I put a Flying Dutchman 3/0 blade in my saw, turned it on and using a 1/4-inch thick fine Arkansas knife sharpening stone, ran it over both sides of the blade until the blade was ground down to 0.0055 inches thick.
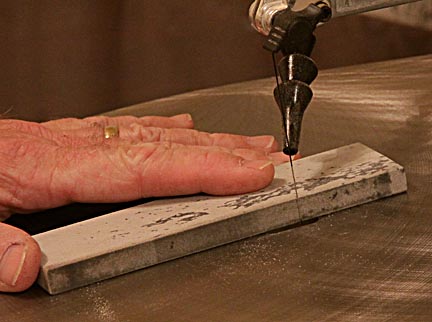
This was also the kerf width since this grinding process eliminated the burr. During the last minute of grinding I angled the stone slightly to sharpen the leading edge of the blade. The entire process took five minutes for one blade. The stone used was so fine that it produced a polished rather than ground blade.

The
upper blade is the one that was ground down. It appears
polished
compared to the unground blade below it.
In effect I converted a course-toothed 3/0 blade into an 11/0 size serrated razor blade.

This
30X magnification shows how much more uniform the teeth of the
ground blade above are
compared
to to the unground blade below it.
Based on its 0.0055 inch kerf this blade would be graded as a size 11/0. In the 5X magnified image below, the cut on the left was made with a 3/0 blade, the one on the right the ground blade:
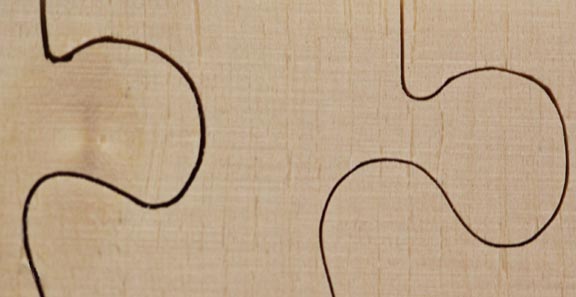
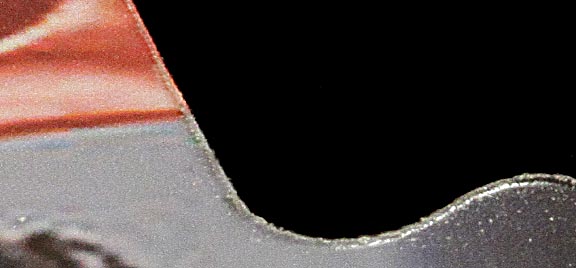
Not only does the reground blade cut a kerf that's half the 3/0 blade, it's also smoother. Examine the following highly magnified image of the edge of a puzzle piece cut with this blade after it had cut 80 other pieces:
There is absolutely no fraying of the edge. There is also no edge rolling, or ridging, which sometimes occurs with normal blades.
Standard
blades often create a rolled edge as shown above. This edge is only
3 to 4 thousandths wide,
but
still large enough to make the kerf appear larger than it really is.
This is not the paper being frayed
by
the blade. That effect is typically ten times larger and has a fuzzy
appearance. Seen in person, rolled edges
have
an almost polished appearance when viewed close up.
The ground blade cuts slower than standard 3/0 blades and is slightly noisier but is much easier to control.
Another problem with standard blades is that the burr pulls the blade off at an angle as you feed work into it. Since the ground blade doesn't have any burrs, it cuts straight.
Hundreds of cutters across the nation use 3/0 blades to produce outstanding jigsaw puzzles so you don't really need to go the extra step of grinding one down. But, if you want something just a little bit better, this gives you an option to do so. If you want to try it you'll need a fine Arkansas sharpening stone and a vernier or dial caliper capable of measuring within 0.0002 inches.
The last piece of equipment is optional, but I find it a great help: a good pair of 3-D magnifying glasses.
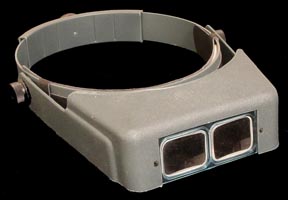
These 5X power glasses cost $40 in the local hobby store. They not only help in the cutting, cleaning and edging steps, but also provide excellent eye protection.
Okay, you've got your puzzle, your saw, your blade's chucked up and you're ready to start cutting. The first step is to take your jigsaw puzzle-to-be and lock it away on the highest shelf in the darkest closet as far from the saw as possible. The reason is that if, like me, you're new to scroll saws the last thing you want to do is attempt your first cut on a finished puzzle blank. Instead, grab a piece of the same type of wood used on the blank, stick a cutting pattern on it and try some practice cuts. The reason is that the exceedingly fine blades used for cutting jigsaw puzzles are so flexible that when trying to cut smooth curves they seem to have minds of their own. They want to go everywhere except where you want them to. Understanding some of the reasons why will speed the process of learning how to control them.
First, whether you're using a fiberboard, plywood or solid wood backing, all such products have slight variations in strength and density. This means that if you cut with constant pressure the cutting speed will speed up and slow down unpredictably. Because puzzle cutting blades are so thin and sharp, this can lead to times when the blade suddenly charges ahead, cutting much further than you intended. The blade's fine teeth can clog with sawdust, greatly slowing its cutting speed. In those dark moments when the fates are being particularly cruel, your blade can clog at the same time it hits a tough area of wood. Cutting speed drops to almost zero. You push harder to get things going and the second you do the teeth clear and the blade enters a soft area. It feels like the wood's turned into hot butter and the blade jumps forward out of control. ARGH!
The key to controlling this is to cut slowly. If things slow down, resist the urge to push harder and always be prepared for sudden changes in cutting speed.
The second problem results from the blade twisting as it cuts a tight curve, such as the root of a key. Blades want to cut straight. To force them to cut a curve the work is rotated, twisting the blade. Because the blades used for jigsaw puzzles are so thin, they flex along their length so that the work has to be rotated further than the desired cutting direction. This puts the blade in rotational tension... which means it's going to spring back the first chance it gets. As you ease out of the root there is enough twist to the blade so that even though you've rotated the board for the blade to cut up the side of the key, the blade suddenly sees its chance to unwind and instead of cutting up along the key it slices straight ahead, creating a much wider key than intended. The tendency is to overcorrect, quickly swinging the work around, with the result that the blade again twists and unwinds resulting in a sharply down sloping key. You just catch up to it when you need to turn again to cut the right side of the bottom of the key, and the process of twisting and unwinding starts all over again. Here's what it looks like:
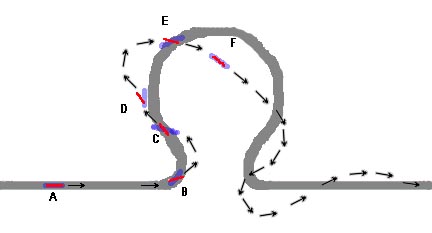
In this drawing light blue represents the direction you aim the blade. This is also the direction the top of the blade points. The thin red line is the direction in which the part of the blade that's cutting wood is actually pointing. Anytime they don't line up there is torsion in the blade. At A everything's going great. At B you start turning the work to cut up the side of the key. The blade doesn't want to turn so it tries to go straight. It ends up cutting half way between where you want to go and it wants to go. Just as you muscle it back into line at C, the torsion stored by the blade's twisting causes the blade to suddenly snap around at point D, cutting a swath through the wood that's wider than wanted. You force the blade around trying to get back in line with the top of the key at E, the blade twists again and cuts the top off the key. Around F you give up and follow the blade where it wants to go. The twist eases out and things start to look better. Then you begin turning to create the bottom of the key and the twisting/correcting process repeats itself forcing you wander all over the board.
If you cut free form pieces this isn't a problem because you can just shrug your shoulders and say, "Oh, I meant to do that." and no one will ever know. But, if you're cutting to a grid pattern it can look sloppy. While puzzle assemblers may appreciate oddly shaped keys to help them identify where pieces go, experienced jigsaw puzzle makers will spot this defect for what it is.
You can reduce this problem by anticipating it. When approaching a tight corner start the turn early, slow down and turn the work more than needed to point the blade in the direction you want it to cut. Start turning back before coming out of the corner and make the blade twist work for you to guide the cut up the side of the key. This takes developing a feel for your particular blade, blade tension and blade speed but can significantly improve control. You can still cut strangely shaped keys, but now they'll be of your choice.
Once in a while things can gang up on you. The wood can turn hard in the area of a tight curve at the same time the blade's teeth load up with sawdust. You push harder and just as you come out of the curve the wood turns soft, the teeth clear and the blade springs around. The saw seems to jerk the board out of your hands and chews through the piece under its own power. This can happen so fast there's not much you can do about it. I deal with it by mumbling a few salty expletives, sighing with resignation and continue cutting hoping I can hide the damage.
So, having been mentally prepared for what can go wrong, fire up your saw and have a go at the practice piece. When you think you've got the hang of things, don't stop. Keep practicing. Learning how to cut jigsaw puzzles is as much about developing the mental fortitude to stay focused for long periods of time as it is learning how to control your cuts.
I wish I could recommend specific blades to use, what tension works best and which saw speed cuts the smoothest. But the reality is that every situation is unique. One person may prefer a 3/0 Flying Dutchman blade in a DeWalt scroll saw with the tension set to 2 and the speed to 3. Someone else using the same equipment may produce better results with more tension and lower speed. That is what's so important about practicing before starting in on an actual puzzle. Experiment with different blades and saw settings to find the set that feels the most comfortable to you and produces the results you want.
Okay. Done practicing? Have a good feeling for your saw settings? Are you able to control your cuts? If so then fetch your puzzle out of that dark closet. It's time to get serious.
If it's been awhile since your practice session, grab the practice board and try a few cuts to get back into the feel of things first. Then take the puzzle blank and prepare yourself mentally. Be aware that one mistake can ruin a puzzle. Unfortunately this mistake always seems to happen several hours into cutting after you've invested considerable time and effort. So at all times maintain sharp focus on what you're doing and above all, anticipate what can go wrong to avoid disasters.
I find it difficult to control a large puzzle so my first cut is down the center. If the remaining halves are still too large they're cut down as well. I prefer cutting on pieces no larger than 6 x 8 inches.
Everyone has their own method of cutting. I prefer staring in the upper left corner and cutting all the way down the side, then moving over to the next row of pieces. I enjoy focusing on one piece at a time, so after cutting one I use a fine jeweler's file to remove any shreds along the bottom edge of the piece, using a piece of tape to pull the paper off the face of the piece and cleaning it with a soft cloth. Always clean pieces from the center outward. If you move from the edge inward you may catch the edge of the paper and curl it off the board. If an edge does come loose, use a toothpick to place a tiny amount of glue under it and press it down. I prefer Elmer's Carpenter's glue because it has excellent instant holding strength. I place this piece out of range of where the sawdust from the saw is settling and move on to the next piece. As each piece is completed I connect it with the others, building the puzzle as I cut. Others prefer cutting all the pieces at once, sanding all the backs, then removing the paper. You can also cut down diagonally from a corner or work your way around the border first. This is a hobby and hobbies are supposed to be enjoyable so use whatever sequence you prefer.
Cutting a jigsaw puzzle is hypnotic. The amount of focus required for a good job can make the cutter oblivious to the passage of time. Many evenings I've started cutting at 8 PM only to look up after what seems like a few minutes to discover it's 1:00 in the morning, which brings up an issue mentioned earlier. It can take 2 - 3 minutes to cut and clean a single piece if you're taking the time to create an heirloom quality puzzle. When the time of all the other steps needed to finish the puzzle are taken into account the time per piece can approach 5 minutes. Any professional reading this will cringe because it would be almost impossible to spend that much time and still make a profit. But this page isn't intended for the professional jigsaw puzzle maker. It's designed for a dedicated hobbyist who wants to take the time needed to produce the absolutely highest quality product possible.
Several hours later, depending on the number of pieces in the puzzle and the number and length of any breaks you take, you've cut your last piece, slip it into place with all the others and sign with relief. Congratulations! You've cut your first puzzle and have joined the ranks of the very few woodworkers to have done so. If you've been careful the odds are that it is near, or perhaps a little better than, professional quality. By all rights you could dump the pieces in a box and be proud to show it to anyone. Or you could take it a few steps further and make it something truly unique, something special, something great.
The Fine Art of Edging:
Take a hard look at your jigsaw puzzle. Are the edges razor sharp and clean? Is the image almost painfully appealing? Are the kerfs tight? If the answers to these questions are "yes" then you may want to invest another minute or two per piece to "edge" them, a process that will make the cuts almost disappear. Consider the following image of an all black puzzle:
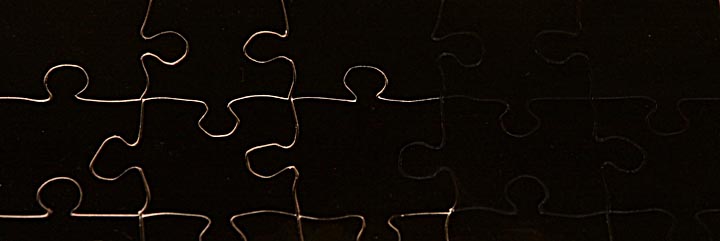
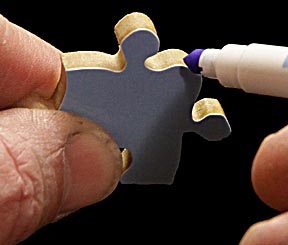
The left half is unedged. The right half has been edged. While the cuts can still be seen, they have been reduced to the point where they are easy to ignore. What I did was use a black felt pen to color the top 1/16th inch of the side of each piece. This eliminates the contrasting light edges and helps the pieces blend together. The process is simple, but does take time.
Start by collecting a large set of water soluble colored markers. You need as many shades and hues of each color as possible. The children's crafting area in Walmart sells a 50-pen kit by Crayola and a 40-pen kit by Cray-Z-Art. Together these sets provide a wide range of hues of each color. Making a holder with examples of what colors the pens actually produce is a great help in selecting the correct pen for a given edge. Avoid permanent markers. One slip could put a mark on the face of the puzzle that ruins it. The same slip with a water based marker lets the mark be wiped off easily.
Remember the extra print of the puzzle's face? If you haven't used it already this is where it becomes useful. Cut it into strips and mount them on strips of wood the same thickness as the jigsaw puzzle. Double face tape is good enough for this. Then wrap as many layers of tape around each end of the sticks so that the tape thickness is the same as your kerf width. Stagger the tape on different strips so they don't stack up to create a gap that's twice as wide as your kerf. Staggering the taped areas allows several strips to be stacked without the tapes interfering with each other.
Another option would be to use half as many layers of tape on each strip and put them in the same place so that they add to provide the correct kerf. Line them up together and use them to test pens to find which create the best blending effect. You'll usually want to go lighter than the color on the puzzle's face. That's because as it's applied to the edge it's absorbed into the paper's edge and ends up looking darker. Once you've selected the pens that work best, take up each piece and carefully color the top 1/16 inch of the piece with the appropriate color. Some pieces may only need one pen, other several. This process takes time but is well worth it.
Only touch up the edges where their lighter color shows through. Light areas, even if they have color, may actually end up worse if over darkened. Many times it's best to leave them alone. If a pen ends up being too light but is the correct color, try going over it a second time. More ink means a darker shade. A light gray is the most useful color. Depending on how many times you go over the same spot it can vary from barely detectable to almost black. It not only blends gray areas, it also works for light beiges and blues. Try to match colors as closely as possible but you don't always have to be exact. The goal is more to hide the white edges than create a perfect color match.
Edging's effectiveness has nothing to do with the thickness of the paper. Even when using the ultra light coated paper a white edge still glares out over the kerf. Even printed directly on the wood itself the lightness of the wood would amplify the image break caused by the kerf.
Don't wash mistakes out with water. It gets under the emulsion and stains the paper. Instead, cover over the mistake with a white paint pen then edge again with a different color once the white is dry.
White paint pens are also useful if a cutting error creates a large void. Use epoxy putty to fill in the mistake, then the white pen to give a neutral base for touching up the color. Without painting it white the epoxy's color will alter the color of the pens used to blend it in and make things worse than if you had left the void alone.
If you're successful with edging, you've gone above and beyond the call of duty and created a truly unique jigsaw puzzle.
Respraying:
By now you've invested close to 6 hours making a 12 x 8 inch puzzle. It looks great by any standards. There's one last step you can attempt to make it even better. But be warned, it is the scariest and most dangerous process to attempt: respraying. Place the pieces two inches apart on a non-stick surface such as wax paper, non-stick foil or the plastic side of freezer paper. Using the same high gloss spray used to coat the original print, sweep back and forth across all four sides to each row of puzzle pieces to cover the sides then finish with a heavy coat to the top surface of the pieces. Make sure that they are perfectly horizontal so the spray doesn't flow off to one side. What respraying does is cover up any rubs or scratches on the face of the puzzle resulting from handling it during the cutting and edging steps. It also seals the sides of the puzzle pieces, particularly the print paper, making them much more durable.
This step is dangerous because if the spray sputters it can create droplets that don't flow out, ruining a piece. If this happens you may be able to sand it down after a week of hardening and respray that piece, but the odds are it'll only make things worse.
Sometimes I respray. Other times I don't. I prefer the more finished look and feel it gives the pieces, but more often than not I'm too cowardly to risk it.
Just When You Thought You Were Done:
Don't worry. I'm not going to recommend another step for the jigsaw puzzle. You can relax. You're done with it. Now you face the problem of what to put it in. You've created something of stunning quality. Do you really want to dump it into a cheap cardboard box?
We are all affected by first impressions. The first impression people will have of your craftsmanship isn't when they see the puzzle itself, but when you hand them the box that holds it. Hand them a plain cardboard box and they'll think, "Okay, what's the big deal?" Hand them a finely crafted wood box and they'll sit up and take notice before they even lift the lid.
So, please store your masterpieces in a box that's at least as attractive as the jigsaw puzzle inside it. Unfortunately, I have yet to find a commercial source of such boxes. The solution is make them yourself, something made easy because by now you have a scroll saw and know how to use it. I won't go into how to do so here because it's beyond the scope of this page. There are many sites on the Internet and libraries abound with books on how to make small, decorative boxes. For anyone who can't locate a source for such boxes, I encourage puzzle makers everywhere to learn how to make them so their jigsaw puzzles can be stored with the respect they deserve.
Jigsaw Puzzle Etiquette:
Heirloom quality jigsaw puzzles should be treated with respect, not only because of the work that goes into making them but also to preserve them for future generations. For this purpose I suggest the following courtesies be followed to protect them and increase the pleasure they offer:
1. Place pieces in their storage box upside down. That way when they are turned out to be assembled people don't have to spend a lot of time turning them over.
2. Leave a few pieces connected. These "freebees" are a nice treat to the next person putting it together.
3. Never dump the pieces out onto a table. This can mar the face of the image. Instead, gently place your hand over the opened box and turn it over as close to the table as possible. Lower your hand to ease the pieces out of the box.
4. Avoid trying to force pieces together because it can tear up the edge or mar the surface of the puzzle. Even puzzles cut with very small kerfs should slide together smoothly so forcing them shouldn't be necessary. If you're sure it's the correct piece and it still won't fit, try lifting the piece next to it and fitting it in from the bottom. The problem could be the sides were cut at enough of an angle to prevent them fitting together in one direction but not the other.
5. If you are the host, always offer the guest the right-side-up view of the puzzle.
6. Don't twist pieces to get them apart after you're done with the puzzle. High end puzzles are cut with such small kerfs that it's sometimes difficult to get the pieces apart, often more difficult than putting them together.
7. Never dump pieces back into the box, which can damage them. Place them in carefully.
8. Always include a small picture of the puzzle's image. It should be just large enough so that it tells people where the pieces go without being so large that it pre-empts the satisfaction of looking at the completed puzzle.
9. Whenever possible, title, sign and date the puzzle. Also, including a sheet explaining how the puzzle was made, where the image came from and something about it is always appreciated. A brief history of jigsaw puzzles is also appropriate.
How to Assemble a Jigsaw Puzzle:
Relaxing Moments Puzzles are designed to be calming, so the most important thing to remember when starting one is to relax. It isn't a race. Enjoy noodling through the pieces looking for the next one. Enjoy each discovery as a small victory. Start with the border, grouping border pieces into top, bottom, left and right. Note the scale: the number of pieces across the top and down the sides. This will help you place pieces where they will go long before the surrounding pieces are in place. Select one patch of color and search for all the pieces with that color and focus on building it, place it where it'll go and move on to the next patch. Be methodical but not dogmatic. If one patch doesn't want to go together put it aside and select another to work on. Once the puzzle is complete, be sure to scrunch the corners in to hide the seams as much as possible, stand back a moment and enjoy the artwork. If provided, read the explanation sheet that came with it.
A Brief History of Jigsaw Puzzles:
Blurred by time, no one knows the exact history of the earliest jigsaw puzzles, though many references claim an English mapmaker named John Spilsbury cut the first one in 1760. These early puzzles were called "dissections" and were non-interlocking maps cut along country lines. They were used as geographical teaching tools. This was long before powered scroll saws so they were all painstakingly cut by hand using fretsaws; coping saws with extra deep jaws and fine blades. As such they were expensive and only the rich could afford them. In the 1800s, fiberboard and cardboard began replacing wood as the backing material, greatly reducing construction costs and opening up the jigsaw puzzle to the middle classes. It wasn't until the late 1800s that the Milton Bradley Company began marketing recreational puzzles for children. Around 1880, foot powered treadle saws specifically designed for puzzle making appeared, again reducing production costs. Another innovation that helped popularize them was the interlocking puzzle. This meant that if someone bumped the table all the pieces wouldn't go flying apart. In the 1930s the interlocking concept was mated with inexpensive die-cut cardboard puzzles to produce the great jigsaw puzzle craze of the depression years. Puzzles were popular because they were an inexpensive form of long-term entertainment. These puzzles were virtually identical to the inexpensive puzzles we have today.
Search as I might, I could not find a good reference explaining why jigsaw puzzles are called jigsaw puzzles. Un-attributed sources claim it was because early versions were cut using jigsaws. I find this difficult to believe because a jigsaw's blade, being unsupported at one end, is necessarily so thick and wide that the kerf it would cut would be so large as to make the puzzle unacceptably unattractive. Every accredited source, like Wikipedia and various encyclopedias, state that the first puzzles were cut using marquetry or fret saws, both of which use very thin tensioned blades capable of cutting fine curves and kerfs. I suspect what happened is that as jigsaw puzzles became popular, people asked how they were made and someone who didn't know any better stated that they were cut using the commonly known jigsaw. The masses would have been less likely to know of the much rarer fret and marquetry saws. This "jigsaw" misnomer propagated across the land and became accepted even though it was incorrect. I have to admit that "Jigsaw Puzzle" has a better marketing appeal that either "Fretsaw Puzzle" or "Marquetry Saw Puzzle."
In many ways the the first decade of the 21st century has introduced a second golden age of puzzle making. There are now more kinds of jigsaw puzzles and production techniques than ever before. Besides die cut cardboard puzzles and hand cut wooden types there are now laser cut puzzles and even puzzles cut by water jets. Three dimensional puzzles are also gaining in popularity. And of course there are computer and smart phone apps that create digital jigsaw puzzles.
However much technology advances, there will always be a special magic to the hand cut wooden jigsaw puzzle. Part of its charm is the fact that each one will be unique, something no other technique can offer. Another is that it's made by hand, not mass produced by a machine. You pick up a piece, finger it, wondering where it should go, appreciating as you do that somewhere, sometime, the maker held the same piece in his hand as he painstakingly created it. For a moment you and the cutter share a connection, in a way shaking hands across time and space.
Conclusions:
I believe that for someone to invest all the time and effort it takes to make a jigsaw puzzle the picture should be appealing enough to hang on the wall, bringing pleasure to everyone who views it. One problem with this is that no matter how good it ends up, the fact is you have to cut up this beautiful image to make the puzzle. It can be heartbreaking. I call it cutter's remorse.
After spending what seems like endless hours making a jigsaw puzzle you may wonder if it's still enjoyable to put together yourself. For myself I find it is. Sure, I'll put it away for awhile but not many days go by before I get the itch to take it down and put it together.
I recommend avoiding making puzzles from photographs of people, particularly children. Cutting the puzzle makes their faces look disfigured. Cutting around faces to avoid this appears contrived.
I hope this page has helped you consider taking up making jigsaw puzzles as a hobby, or at least provided a few minutes of interesting reading. I know other jigsaw puzzle makers will likely disagree with many of the techniques and the puzzle philosophy I suggest, and I respect their right to do so. Jigsaw puzzles are very personal and in cutting one it should reflect the cutter's own personality. Relaxing Moments Puzzles reflect my desire to create easy-to-assemble works of art that provide a few minutes of peaceful calm.
Thank you for spending the time to read this page. I wish you well and much enjoyment making your own jigsaw puzzles.
![]()
Return to my main page to browse 60 other subjects