Kaleidoscopes: Experiments to find the brightest and most interesting objects to use in kaleidoscopes
(Click here to browse 70 topics on my main site ranging from magnetic rocket engines to the strange world of lucid dreaming.)
Kaleidoscopes can be much more than the inexpensive children's toys
found in variety stores. At their best they are refined optical
instruments costing hundreds of dollars and worth every cent of the
price. Exotic, one of a kind scopes with complex three dimensional
images can run into thousands of dollars. Specialty shops in resort
cities like Carmel in California can carry fine instruments.
As good as these fine instruments are, after looking through many of them I came away with a sense of haunting dissatisfaction. The kaleidoscopes were great but the objects used to create the images didn't have the burst of intense color I hungered for. I was looking for exploding stars, fireworks, and fiery colors. I couldn't find it in the available models so I decided to build one myself.
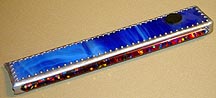
The first step was to purchase a kaleidoscope with good optics. These are difficult to find. Even good scopes can have flaws in the mirrors or mirrors set at non-perfect angles. I finally found an outstanding scope by David Sugich in a Natural Wonders store. I decided to purchase it because I had neither the materials nor the training to make a first-class scope myself. (Here's a new close-up of that great instrument! The black disc close to the right end is used to keep the kaleidoscope from slipping out of its holder.)
The second step was to mount the scope on an adjustable holder. It's the center of the three objects in the upper picture shown below. (Note the two focusable flashlights on either side of the kaleidoscope.)
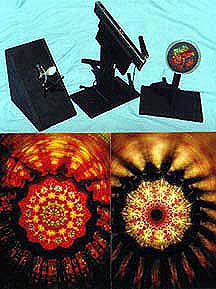
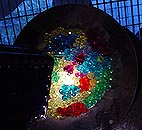
Next I went to work on the objects. The first one I made consisted of colored, transparent, faceted beads mounted on a mirror. The mirror (which intensified the light traveling through the beads) was mounted on a magnet, which holds it on a metal plate supported on a pedestal (right-hand object of the three in the picture). The magnet holds the mirror in place yet allows it to be moved around to create a wide range of images. When flashlights, mounted alongside the kaleidoscope, are focused on the beads, an intense pattern of colored fire fills the kaleidoscope. There is simply no adequate way to describe or photograph the display. (The image pictures above demonstrate a wonderful aspect of Mr. Sugich's kaleidoscope. By using a round oil-filled wand as the third mirror, he creates the effect of framing the main image with a ring of fiery columns. Fantastic! Any errors in image symmetry are not the fault of the kaleidoscope design or construction. Mr. Sugich's instrument was perfect when purchased but suffered a fall shortly after that, which knocked the mirrors slightly out of alignment.)
The plastic beads were an improvement, but I still wasn't satisfied. I looked for something even more brilliant and found it in a Michael's craft store under the name of "JonesTones Lazer Gems." These are thin plastic quarter-inch diameter dots that have diffraction gratings etched into their surfaces. The resulting facets burn with a spectrum-pure brilliance that outshines everything else. I glued several hundred of these to a second magnet-backed disk (shown on the right-hand pedestal in the top picture) and when I turned the lights on it the rainbow of color erupting from the kaleidoscope made my eyes water. This was it! At last I'd captured the excitement of fireworks inside the tight confines of my mirrored cage. Fire Under Glass was born!
Excited by this victory, I decided to try one more idea. The left-hand object in the top photo is a holder for a fiber-optic bundle illuminated by a high-power flashlight. Before entering the bundle, the light passes through a clear plastic wheel painted with transparent colors in various patterns. Turning the wheel causes complex patterns of colors to appear on the exit-end of the bundle... right where the kaleidoscope is placed to intercept the images. I placed a telescoping plastic tube around the bundle so that the fibers can be confined to a small circle or allowed to expand depending on the tube's position. Finally, two adjustable arms were mounted on opposite sides of the bundle so that the fibers could be compressed and shaped to form a wide range of image patterns. The effect is stunning. The bundle creates fiery images consisting of thousands of needle-sharp points of light. The effect is more refined than the Lazer Gems disk but just as intense.
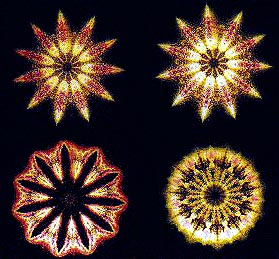
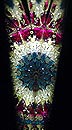
The lower left photo above is a complete failure to capture the brilliance of the Lazer Gems object disk as seen through the kaleidoscope. Each of the round discs that can be seen actually consists of half-a-dozen scintillating areas of light. Imagine the scale of difference between a photograph of a Christmas tree during the day with its lights off to seeing it at night with all of of its lights ablaze. The photo taken through the kaleidoscope can be likened to the photo of the tree during the day. The reality is like the lit tree shimmering at night.
The lower right photo above is, again, a lifeless example of the images created by the fiber-optic bundle. The closest description that captures some of what it looks like is to imagine a crystalline snowflake aflame with blinding colors.
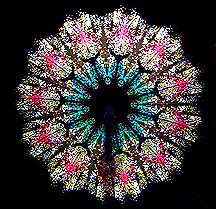
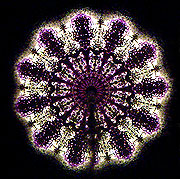
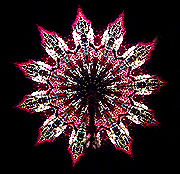
Above are some more fiber optic images. I ran the original photos that have been on this page through photo-processing software to sharpen them up so that they look a little more like the real images.
NEW PHOTOGRAPHS!!!
I recently got a digital camera and used it to fill out the picture inventory on this page. Unfortunately, the close-up lens used on my old camera don't fit the new one so I couldn't get full-frame pictures of some of the larger images in the kaleidoscope.
On the left is a photo of the kaleidoscope fitted with the mirror that has plastic beads glued to it. On the right is the image created by the beads. In real life it's much brighter than regular kaleidoscope images but didn't have the impact I wanted.
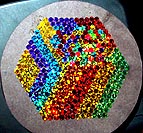
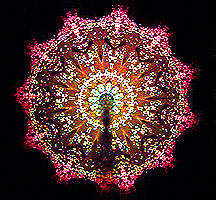
The left-most picture above is of the disk with the laser disks glued to it. I arranged them a varied patterns so that as the disk is turned many different images can be created. Some of the best images are when the disk is moved so that the kaleidoscope also sees some of the area without the laser disks. (It looks gray here but it's really black.) This enables the viewer to create star or ring patterns. Second from the left is a close-up of the laser disks. Each of them has many facets, which greatly increases the detail of the images seen through the scope. Next is a picture of the laser disk image source in position for viewing. Furthest to the right is an image taken through the scope. As bright as this last image is, it falls far short of the blinding intensity and complexity of the actual image. The light coming out of the kaleidoscope is so bright that it's fun to watch someone else as they use the kaleidoscope; there's a ring of rainbow light around their eye and they jerk back when a particularly bright pattern hits them.
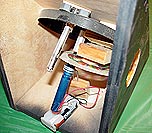
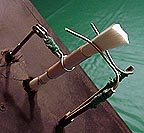
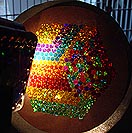
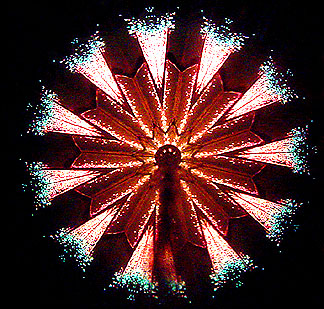
On the left is the rear of the box that holds the fiber optic bundle. The blue cylinder is a miniature maglite - small but very powerful. Above that is the transparent color wheel, which can be turned by a finger inserted though the hole in the right side of the box. I used to have the disk motorized but switched to manual so that I could show people interesting images I'd discovered. Ideally, I'd like to modify it so that it could be used either way. The middle picture shows a close-up of the front of the fiber optic box. A short length of plastic tubing mounted on a telescoping antenna can be extended to concentrate the fibers into a tight bundle or retracted to create a loose spray of light. Above that are two pieces of solder mounted on an architect's divider. These can be opened and bent to force the fiber bundle into many complex shapes. The sliding tube and wire squashers allow the operator to create an incredible variety of images. On the far right is a picture of the lit fiber optic bundle as seen outside of the kaleidoscope. The apparent graininess of the image is not a digital artifact but a real image of the thousands of individual fibers in the bundle. This is the image that the kaleidoscope sees and turns into...


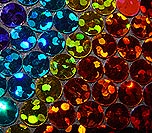
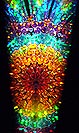
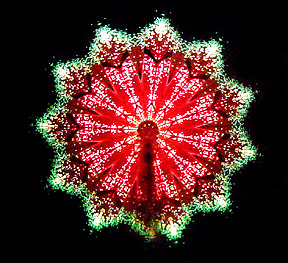
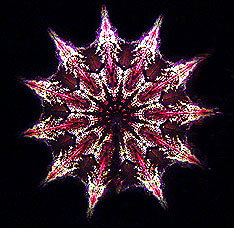
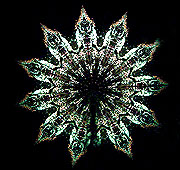
Two new images of images taken through the kaleidoscope with the fiber optic bundle as the object. The actual images are vastly brighter and more detailed.
I had so much fun dusting off the old kaleidoscope to update this page that I couldn't help taking more pictures of images created with the fiber optic system. These new images are higher resolution and may take a minute to load but are worth the wait. Some of them clearly capture the individual fiber optic strands. Viewed in a dark room, these pictures come close to what live images look like. The size variation in the photographs reflect the difference sizes of the images as seen in the kaleidoscope. Enjoy!
One of the tricks to make even more interesting patterns is to push the kaleidoscope forward until it bumps into the fiber optic bundle. This causes individual strands to bunch up in complex shapes, as the pictures above and below demonstrate.
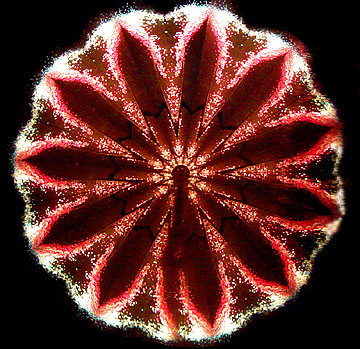
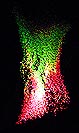
These last two images are of the same fiber optic pattern. The only difference is that the color wheel has been rotated one-quarter turn.
I hope this short article prompts visitors to investigate premium kaleidoscopes. They are definitely worth the time whether you want to modify them as I did or appreciate them as they come out of the box. For more information on Kaleidoscopes I refer you the the website of Kaleidoscopes of America at http://kaleido.com.
![]()