KALEIDOSCOPE MIRROR DESIGNS: This webpage is intended to help novices, like myself, understand the details of kaleidoscope mirror design.
(Click here to browse 70 topics on my main site ranging from triangle looms and Knitting Nancies to the strange world of lucid dreaming.)
After a few pictures of images produced by kaleidoscopes I've made, this page starts in on the basics of simple, traditional kaleidoscope mirror designs and progresses step by step toward more novel kaleidoscope configurations.
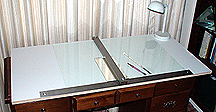
Please do not assume that I am an expert in making kaleidoscopes. Nothing could be further from the truth. The kaleidoscopes on this page are the first I have ever made and my skill level is far below that of professional artisans. If the images appear out of alignment and unsharp it is because these kaleidoscopes were quickly taped together and made from second-surface mirrors. Most of the time I didn't even remove fingerprints from the mirrors. I'm currently in the process of ordering first surface mirrors and building a dedicated kaleidoscope mirror cutting board. (All of the scopes on this page were cut on my kitchen counter using nicked and warped 30 year old straight edges and compasses.)
None of the images on this page are from complete kaleidoscopes, only mirror systems. For the time being I'm focusing my attention on learning how to make images. I'll investigate exterior design once I have a collection of kaleidoscopes worthy of decoration.
Since this page is a tool to record answers to my own questions about kaleidoscope designs it will be presented in a question and answer format. I sincerely hope you find it interesting and informative. If you have any questions or suggestions please email them to me and I'll respond immediately.
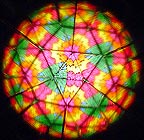
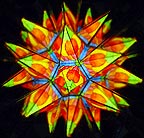
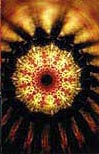
MY BEST KALEIDOSCOPES TO DATE:
Before jumping into the chronicle of my efforts to learn about kaleidoscope mirror designs I thought visitors might enjoy looking at a few images from scopes I have made. (The inspiration for many of these kaleidoscopes came from images from Mr. Don Doak's kaleidoscopes.) Again, my kaleidoscopes exhibit many flaws because they were made within two weeks of my first attempt to make a kaleidoscope, and hence reflect my lack of skill, and they used second surface mirrors. I made them as part of a learning process and not as works of art. These images are repeated further down this page with comments about their construction.
(After I had figured out how to make the following kaleidoscopes on my own, I received an email from Mr. Don Doak explaining that he owns the patents to all kaleidoscopes that produce geometric, three dimensional solid images based on tetrahedrons, hexahedrons, dodecahedrons and icosohedrons. Mr. Doak kindly said that I could keep the ones I'd already made and even post images of them on this webpage as long as I didn't make any more, sell these or exhibit them in shows or contests. His patents run out in 2017. However, making a good 3-D solid block image kaleidoscope is so difficult I would not be surprised if few makers attempt them.)
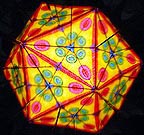
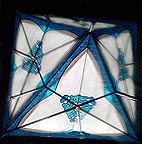
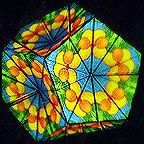
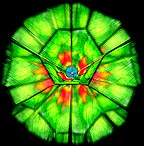
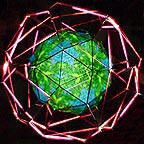
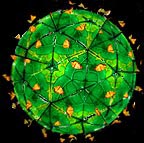
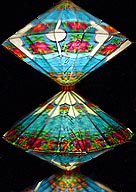
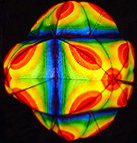
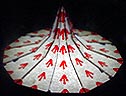
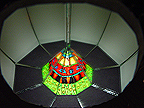
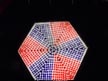
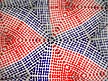
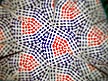
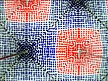
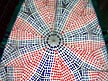
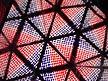
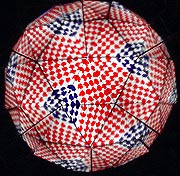
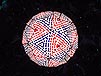
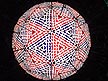
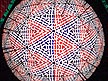
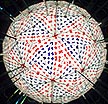
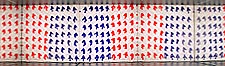
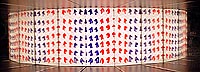
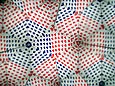
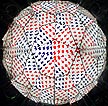
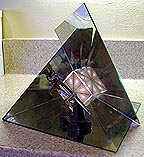
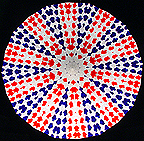
A pentagonal dodecahedron:

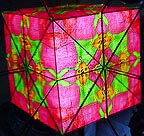
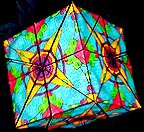
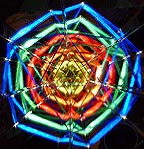
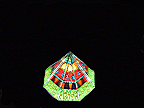
A hexahedron (cube):
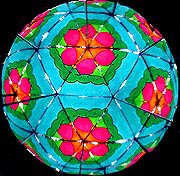
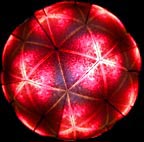
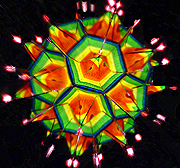
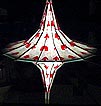
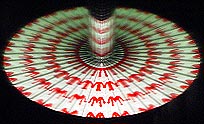
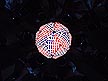
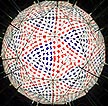
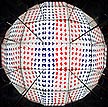
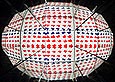
A true sphere:
Here's a video of the 3-D spherical quiltscope.
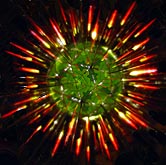
Another shot of the same kaleidoscope, this time using an electrostorm lamp for the object:

Here's a short video of it.
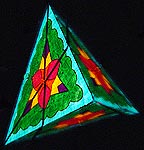
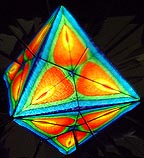
A tetrahedron:
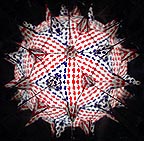
An icosahedron (20-sided figure):
A spiky icosahedron:

Two octahedrons:
 .....................
A concave or imploding dodecahedron:
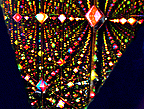
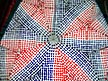
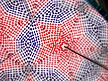
Three identical tapered mirror kaleidoscopes with different window angles:
 ......
 ......
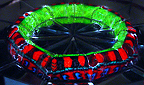
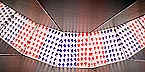
A torus:
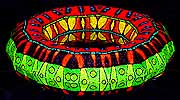
The next kaleidoscope is named "Saturn's Ring."

The planet turned out too large for the ring but it still serves as a concept demonstration. Because there are two object windows, kaleidoscopes of this type would be difficult to make with moveable objects and might more correctly be labeled kaleidoscopic sculptures.
Another cube:
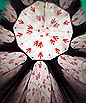
A mesh of pink lines encircling a planet:
A tapered mirror kaleidoscope with lines instead of a central object:
This kaleidoscope of meteors falling on the Earth is called "Rain of Fire."
Butterflies flitting over a planet:
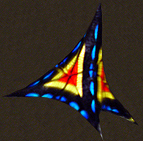
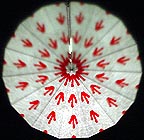
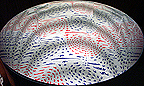
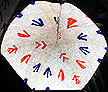
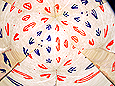
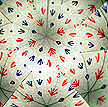
The following kaleidoscope image was inspired by Mr. Steven Gray's "Parasol:"
My variation of this is the following:

Instead of lopping off the corners and using the top and bottom mirrors to put bottoms and tops on the cones, I nibbled and ground a half circle out of the center of the two angled mirrors. It creates a similar effect except that the sides of the spheres facing each other are the same, whereas in the original version they're different. (Hogging out the half circles with a Dremel tool was tough.)
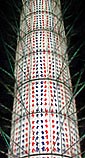
A true sphere kaleidoscope illuminated with a fiber optic bundle:
Looking into a cube kaleidoscope:
A cube kaleidoscope is one in which six square mirrors with their corners trimmed away are taped together to form a cube with the reflecting surfaces facing inward. When you look in through one of the eight corners you see a three dimensional matrix of points stretching away in all directions. The problem is that there are seven object windows that have to be illuminated and varying the objects in all seven windows is awkward.
EXTREME DECONSTRUCTIONS:
In my efforts to learn how to make kaleidoscopes I occasionally attempt designs and techniques that may not work, are too difficult to make with precision, or don't result in useable instruments. When they produce interesting pictures they'll be posted here. Since they all start with simple shapes that have been distorted nearly beyond recognition I'm calling them "extreme deconstructions."
This first one started off as a true sphere which had all three corners trimmed each to a different length with a long, curved, narrow taper. Hindsight suggests that removing the silvering from the mirror edges might have produced sharper rays, but then the object source would have been distorted as it passed through the angled edges of the glass.
Using first surface instead of the second surface mirrors in this kaleidoscope would sharpen the effect. The object window for this particular kaleidoscope is very convoluted and requires three light sources to illuminate properly. If anyone has suggestions on how to cut the very tight curves (1/8-inch radius) necessary for this mirror system I would greatly appreciate their sending them to me. Thank you.
The advantage of struggling to trim the corners to create radial rays over the simpler technique of removing silver from the centers of the mirrors, as in the Rain of Fire kaleidoscope, is that trimming the corners produces rays that appear more three dimensionally solid.
This next poor kaleidoscope started off life as a cube... then things went horribly wrong.
The 1-inch radius curves were very difficult to cut into two of the object window's three edges, but then I don't have a circle cutter, which wouldn't have helped anyway because the curves were ellipses. This solid looks much better in person than this photo indicates. My wife says it reminds her of a Chinese lantern.
The next kaleidoscope is easy to guess: a tetrahedron with curves cut into two of the edges of the object window.
My wife says it looks like a mutant Eiffel Tower. I think it's more like an alien shuttle craft from Star Trek. I tried cleaning up the background because the black edges of the image were lost in the darkness of the background. It makes the image easier to see but gives it an artificial look. I'm learning that kaleidoscope photography is an art form all its own. Many patterns that look good in person do not come across well in a picture.
Finally, Here's a sphere with the sides of two mirrors cut first to extend away from the viewer, then back toward him. It creates a mountains-inside-a-honeycomb pattern. To gild the lily I added small floating spheres near the apexes of the mountains.
After spending two weeks working through 2, 3 and 4 mirror kaleidoscopes, scopes with tapered mirrors, and complex mirror systems like the 25 kaleidoscopes used to create the images featured above, I've come the realization that kaleidoscopic images are only limited by imagination and the glass-cutting skill of the builder. There is still an enormous amount I need to learn about image manipulation, but for the time being I'm taking a break from experimenting with mirror systems to work on improving my mirror cutting technique. My first course of action will be to build a dedicated cutting table like the one described by Mr. Don Doak in his video A Kaleidoscope Master Series: Volume 1.
Now on to the
chronicle of my initial kaleidoscope making attempts:
KALEIDOSCOPE CONSTRUCTION AND EXPERIMENTS:
Disclaimer: Working with glass to make kaleidoscopes is dangerous. Do not attempt it without the supervision of a knowledgeable adult.
HOW DO KALEIDOSCOPES WORK?
I looked through several books and dozens of webpages about kaleidoscopes and could not find a clear explanation of how they work. After a few experiments with a simple two-mirror kaleidoscope I was able to figure out a ray trace that explains the reflective optics that create the splendid kaleidoscope images we all enjoy.
A simple two mirror kaleidoscope
I
colored the lower part of the right hand mirror of the two mirror
kaleidoscope above with red and blue highlighting pens to help keep
track of which mirror was which in the kaleidoscope's image. The
background was solid red with a grid of blue lines to help determine
the positions where image rays reflected off mirrors. This allowed me
to quickly figure out how the images bounced around the kaleidoscope
to produce an image. To show how kaleidoscopes work I took a picture
of this test kaleidoscope and used Adobe PhotoShop to add colored
lines representing the directions the reflections followed to create
the circular image (called a mandala) in the center of the
kaleidoscope. While I was as careful to draw the ray traces as
accurately as possible, my artistic limitations and the difficulties
of drawing a complex three dimensional image in two dimensions almost
certainly introduced some inaccuracies. However, I hope it is close
enough to make clear how the images are created.
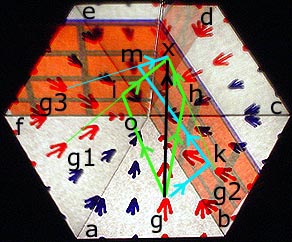
The bottom center triangle (o-a-b) is the object. All the other triangles, like (o-f-a) on the lower left and (o-b-c) on the lower right, are images of it created by reflections off the two mirrors o-a and o-b.
The first and brightest of the triangles seen by an eye located at x would be the object triangle (o-a-b). Light from red arrow "g" goes directly to the eye along ray "g-x", the thick black line.
The next brightest triangles would be those adjacent to the object triangle: (o-f-a) on the lower right and (o-b-c) on the lower left. These two images are created by the object triangle reflecting once from the mirror between the object triangle and the image triangle. For example, while the red arrow "g1" in image triangle (o-f-a) appears to get to the eye along the thin green ray "g1-x", in reality it comes from "g" after one reflection as it travels the heavy green ray "g-i-x". Similarly the "g2" image travels along the heavy green ray "g-h-x".
Even though this is beginning to sound like a complex parlour game, so far it's no more involved than placing a single upright mirror perpendicular to an object and viewing the object obliquely in the mirror. Where things get interesting is trying to trace the path to images further around the mandala.
Consider the red image arrow "g3". It appears to travel to the eye along the thin cyan line "g3-x". In reality it starts at the red object arrow "g", goes up and right along the heavy cyan line until it bounces off mirror o-b at "k", then up and left to reflect off mirror o-a at "m" and from there to the eye at "x".
The true path of any reflected image in a kaleidoscope can be traced in a similar manner. The simple answer to the question of how kaleidoscopes work is that light from the object traces a series of zigzag reflections up the sides of the mirrors until it enters your eye. The number of reflections is the same as the positional number of the image from the object. The closest triangles are right next to the object so they are position number one (on either side they are just one reflection removed from the object) and are therefore created from one reflection off a mirror. The next two images around the mandala going either clockwise or counterclockwise would have number two and reflect off two mirror surfaces, alternating first on one side and then the other. A kaleidoscope with closely spaced mirrors can have many images, some of which might make ten or more zigzag reflections on their way from the object to your eye.
Although this discussion has focused on two mirror kaleidoscopes, the principles are the same for all mirror configurations.
WHAT TYPE OF MIRRORS SHOULD BE USED IN GOOD KALEIDOSCOPES?
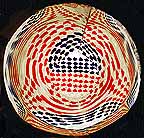
As the following picture taken of a kaleidoscope made with common second surface mirrors (the reflecting material is on the back of the glass) shows, the image gets dimmer and fuzzier the further away it is from the object, which is the lowest center triangle:
There are three reasons it gets dimmer. First, no surface can reflect all the light that strikes it. Some is scattered and some is absorbed at the reflecting surface. For a single reflection this is not an issue. But in a kaleidoscope like the one above the final image is created by reflecting off seven mirror surfaces, each time losing a little brightness. Second, because the reflecting surface is behind the glass, the light reflecting off it has to travel through the glass on its way to be reflected then again on its way out after it's been reflected. Glass looks clear but if you try looking through it edgewise you'll notice that it's quite dark and has a greenish color. The reason for both is that there are impurities in the glass that absorb some of the light. (The green color is from iron.) In the case of the mirror above, the last image has seven reflections. That means it's passed in through the glass seven times and then seven more times on its way out. That means it's passed through 14 layers of glass or almost a solid inch. That much glass of this type can absorb a lot of light. Finally, although most of the light reflects off the reflective layer on the back of the mirror, some of it (about 4 percent) reflects off the front side. Multiply this by seven reflections and the light has been reduced by 28 percent, almost one third. The relative sizes of the losses are that the loss from the limited reflectivity of the reflecting surface and light reflected off the front of the glass are about equal. The light lost as it travels through the glass is much a smaller amount but still significant.
Dimming may not be a bad thing in some kaleidoscopes. It can help create an illusion of distance, which may be beneficial in scopes with three dimensional images. But, the loss of sharpness caused by second surface mirrors is always a detriment.
The main reason the image gets fuzzy is mainly that the image reflected off the front of the glass follows a slightly different path than the main reflection off the reflective back of the glass. These secondary images stack up as you work your way around the mandala to images requiring multiple reflections. Since each of these weaker images have their own location that is close to but not coincident with the main image they make it look blurry. Imperfections in the glass and main mirror surface also blur the image but these are small effects compared to that caused by the front surface reflections.
How do good kaleidoscopes overcome these problems? By using front surfaced mirrors. These are mirrors where the reflective coating (aluminum) is deposited in a vacuum chamber on the front surface of a sheet of glass. Light reflecting off it does not pass through the glass to be absorbed and there are no secondary reflections to dim and blur the image. All the glass does is provide a structural support for the microscopically thin layer of aluminum. (Mirrors in telescopes are front surface mirrors.)
One final reason to prefer first surface mirrors is that the glass used to make them is flatter and has fewer imperfections than that used for second surface mirrors.
The prices paid for the improved images obtained with first surface mirrors are cost (25 dollars in 2004 for a 12x 16 inch sheet, a similar sized second surface mirror from a discount store would only cost 4 dollars) and the handling difficulty because the reflective surface is exposed it is very easy to damage. Manufacturers cover it with a removable layer of protective plastic but accidents still happen.
TWO MIRROR KALEIDOSCOPE EXPERIMENTS:
This is what the mirrors in a
typical two mirror kaleidoscope look like.
Both mirrors are straight. The
apparent taper is an artifact of
perspective. The opening at the
bottom is the object window
and the opening at the top is
where the eyepiece is located.
WHAT ANGLES CAN THE MIRRORS IN A TWO MIRROR KALEIDOSCOPE BE SET AT TO CREATE GOOD IMAGES?
Any angle that divides 360 degrees by a whole, even number of times. While this answer is mathematically correct many of the images resulting from extreme applications of it aren't useable. Consider the following:

This is the image from a two mirror kaleidoscope where the angle between the mirrors is 180 degrees, in other words both mirrors form a single flat plain. The angle divides 360 degrees by an even whole number (2), but the image isn't interesting. The next case, a ninety degree angle of separation giving 4 images, isn't much better.

Starting with 60 degrees we get into the realm of useable kaleidoscope images:


....60
degrees.....45
degrees.....36
degrees....30
degrees....22.5
degrees...20
degrees
......6
images........8
images.......10
images.....12
images.......16
images.....18
images
Other
allowable angles are 25.71 degrees (14 images), 18 degrees (20
images), 16.36 degrees (22 images), 15 degrees (24 images), 13.85
degrees (26 images), 12.86 degrees (28 images), 12 degrees (30
images) and so on all the way to 1 degree (360 images). However, as
the following image of a kaleidoscope with a 12 degree angle (30
images) shows, the amount of dimming towards the far side of the
mandala may be excessive even using the best first surface mirrors.
(This kaleidoscope used second surface mirrors.)

Another limitation is that at angles less than 20 degrees the opening to view the image becomes so small it may be difficult to look through unless the kaleidoscope is made very large.
One important consideration in selecting the kaleidoscope's separation angle is the size of the objects to be viewed and the desired final image. A small angle means the object window will be small. If large objects, compared to this window, are used then they will not be able to be seen in their entirety and the resulting image will lean toward a series of concentric rings, as the following pictures of the same object field viewed through a large angle kaleidoscope on the left and a small angle kaleidoscope on the right demonstrate:


As the kaleidoscope's separation angle decreases the number of images increases. Carried to an extreme this yields a very interesting result. If the separation angle is reduced to zero (when the two mirrors are parallel) the number of images should be infinite because 360 degrees divided by 0 equals infinity. (Actually, any finite number divided by zero is mathematically defined as being undefined. But I'm an engineer, not a mathematician, and have no compunction about saying, "close enough.") If the mirrors are pulled apart while being kept parallel so that they can see the object, the infinite number of images can be seen lining up in a straight row. Here's a small segment from the image seen in such a kaleidoscope:
![]()
By looking sideways across the tops of the mirrors this line can be seen to trail off as it fades away into the far distance.
This is an interesting class of kaleidoscope and will be investigated later.
WHAT HAPPENS IF A MIRROR SEPARATION ANGLE IS USED THAT DIVIDES 360 DEGREES BY A WHOLE, ODD NUMBER OF TIMES?
The kaleidoscope will produce a mandala with an odd number of images. While the following examples may not look too bad when stationary, the problem is that when the objects being viewed are moved, instead of the reflections merging seamlessly as they do with an even number of images, the boundary between the final two reflections will have images of different objects dissolving into each other. This may not be a problem for kaleidoscopes designed to produce images that are primarily single-color concentric rings, but it places limitations on object size. Here are some examples of kaleidoscopes with odd numbers of images:
.... ...........
 ..........
  .........
.....120
degrees...............72
degrees ............
40 degrees .........
15.65 degrees
.......3
images ..................5
images .................9
images .............
23 images
Look carefully at the top vertical boundary and you can see the loss of symmetry (red arrows merging into blue arrows.) This may not be a limitation if the kaleidoscope is designed so this boundary isn't visible.
WHAT HAPPENS IF THE KALEIDOSCOPE'S ANGLE DOESN'T DIVIDE 360 DEGREES BY A WHOLE NUMBER?
The mandala will will have one reflection that's broken and uneven, as the following picture illustrates:

This
kaleidoscope has a separation angle of 64 degrees,
which
creates 5.6 images.
If the angle is only off by a small amount it may not be noticeable, as the following kaleidoscope with a separation angle of 51.4 degrees (7.004 images) shows:

Unfortunately the odd number of images in this kaleidoscope creates other problems.
HOW DOES THE VIEWING ANGLE CHANGE THE APPEARANCE OF THE KALEIDOSCOPE IMAGE?
The vast majority of kaleidoscopes are designed to be viewed very close to the long axis of the mirrors, almost looking down the corner where the two mirrors meet. The following pictures show how the image changes as the viewing angle is lowered:
....... ...........
  .........
  .......
....viewed
10 degrees..........45 degrees.............65
degrees............80 degrees
........from
the axis
The advantage of lowering the viewing angle is that it gives the image a more interesting three dimensional look. The drawback is that building a kaleidoscope with the eyepiece in a lowered position is more complicated. For me the best viewing angle is 55 degrees, but this varies depending on the nature of the image.
HOW DOES CHANGING THE OBJECT WINDOW SIZE WHILE KEEPING THE MIRRORS THE SAME SIZE EFFECT THE KALEIDOSCOPE IMAGE?
Making the object window smaller simply makes the image smaller in diameter. Making the object window larger so that it extends beyond the mirrors creates an image with vertical panels blocking off sections of the outer edge of the image, which is now larger in diameter. The effect is unattractive.
HOW DOES MIRROR WIDTH EFFECT THE IMAGE?
As long as the mirrors are wider than the object window it doesn't.
HOW DOES MIRROR LENGTH EFFECT THE IMAGE?
If the mirrors aren't long enough it's difficult to see the entire image. Even with your eye pushed right up against the mirror opening it can end up looking like this:

After experimenting with kaleidoscopes of several lengths I discovered that the mirrors should be at least four times as long as the largest dimension of the object window. This 4-to-1 ratio is strongly dependent on the viewing angle. Lowering the angle from 10 degrees (near the axis) to 45 degrees allows the length-to-width ratio to be reduced to 2-to-1 and still see the entire image. But, lowering the angle also means that the mirrors have to be made wider to see the entire image. How much wider depends on the viewing angle.
WHAT HAPPENS IF THE OUTER EDGE OF THE OBJECT WINDOW IS MASKED TO GIVE IT A SHAPE OTHER THAN THAT DEFINED BY THE MIRRORS?
The images can be made to look like stars or the petals of a flower as the following examples show:
............ .....................
 ..................
 .....
.....
These are all the same kaleidoscope and object. The only difference is that in the picture on the left I used black paper placed at an angle across the outside edge of the object window, in the middle picture a "V" shaped piece of black paper covered the outside edge, and in the picture on the right a curved piece of paper was used. More complex shapes can be created by further modifying the shape of the mask, as the following picture with shallow "V" shaped masking along the inside edges (next to the mirror) of the object window shows:

SINCE OBJECT WINDOW MASKING WORKS SO WELL, WHAT'S THE EFFECT OF MASKING PARTS OF THE MIRRORS?
The effect is almost always bad. Areas of the image are cut off by dark areas extending three dimensionally toward the viewer. I find myself invariably trying to look around the corners of these barriers to see what I'm missing. Here are two examples where the effect of mirror masking wasn't too negative:
....................... .................................
The kaleidoscope on the left had the inside inch masked off along the long axis. Viewed on end it looked terrible but at a lower angle it presented a somewhat more interesting 3D effect suggesting a column. The kaleidoscope on the right had a thin curved mask applied to the bottom of the mirrors. It reminds me of a spider.
WHAT EFFECT DOES REMOVING AREAS OF THE MIRROR'S SILVERING HAVE SO THAT LIGHT CAN SHINE THROUGH?
Viewed along the kaleidoscope's axis there was very little effect, at least in a nontapered, two mirror system. Viewed from a lower angle the openings weakly suggested lighted discs floating in space over the mandala. One of the problems with this concept is that it makes it easy to spot the mirrors and in so doing weakens the mysterious effect of the image seemingly produced out of nothing. Also, the non-silvered areas weakened the image. Here's a picture of a kaleidoscope with a curved area of silvering removed from the bottom of one mirror:

This might be more interesting if the kaleidoscope's separation angle was greatly reduced so that the bright, glowing mounds were close enough to blur together.
This got me wondering about physically removing sections of the mirrors and then bending the object window to follow their shape. The following picture shows how this looks when the inside corner of each mirror is cut off:
Viewed from a low angle the image had a very strong 3D appearance.
Next I trimmed the corners to create a more curved look.
I found this such an interesting shape that it spawned half a dozen design ideas, which I intend to pursue once the rest of my basic research is complete.
This last image also taught me something very useful: That really interesting kaleidoscope images probably aren't going to result from one single image manipulation trick, but rather by overlapping several tricks. In the picture above two different techniques, viewing the image from an unconventional angle and cutting off the corners of the mirrors, were required to create the image.
Following the same theme, I made a kaleidoscope with the outside edges cut off. It didn't produce anything interesting, just an image faintly suggesting a bowl shape. Looking down from the top the effect was almost too subtle to notice and looking from a shallow enough angle to make it obvious resulted in the bottom of the bowl being cut off by the raised corner.
HOW TO THREE DIMENSIONAL OBJECTS LOCATED ABOVE OR BELOW THE OBJECT WINDOW PLANE EFFECT THE IMAGE?
I think it weakens the image because the object looks solidly three dimensional but the images, even if perfect, look two dimensional. This creates a contrast between the object and images that weakens the symmetry of the overall image. For some reason I don't understand why locating them below the object window plain looks better than above.
WHAT HAPPENS IF THE TWO MIRRORS ARE STOOD ON A THIRD MIRROR?
I'm still classifying this as a two mirror kaleidoscope, as well as several other multiple mirror systems that follow, because the primary image is defined by the two main mirrors. All the other mirrors do is modify the image slightly, unlike a true three-mirror kaleidoscope where the addition of the third mirror as a profound effect on the fundamental nature of the image.
The effect of resting a two mirror kaleidoscope on top of a third mirror is simply to reflect a second image below the first, as the following photo shows:

Here a battery was placed on top of the base mirror. The effect is best seen from a low viewing angle.
Seeing this ring of batteries gave me an idea for a way to create a torus by placing mirrors beneath the inside and outside third of the mandala and introducing a half-cylinder between these two bottom mirrors and the two side mirrors. It worked.
If you think this looks crude now you should have seen it before I used PhotoShop's "sharpen" function on it. The ghostly white glows are light leaking between the edges of the object cylinder and the glass thickness between the mirror's front surface and the reflecting surface behind it. Also, the angles were way off. Still, it serves to illustrate a potentially interesting concept.
The following torus uses first surface mirrors:
Though it's much better, two obvious flaws mar the image: The object (a piece of cloth) flexed outward slightly creating a scalloped look to the ring and the mirror angle was off by 3 degrees causing a break in the image on the far side.
Taking the two mirror kaleidoscope with the inside corners cut off from a few questions ago, placing it on a bottom mirror that covers the outer half of the object window, using a curved back lit object, and shooting from a very low viewing angle produced the following picture:
This image makes me think of a spindle or top. Place a forth mirror on top of the two angled side mirrors and this spinal figure would be repeated end to end in a column stretching off in both directions to infinity.
WHAT HAPPENS IF A NARROW THIRD MIRROR IS ADDED TO THE INSIDE CORNER OF A TWO MIRROR KALEIDOSCOPE?
Nothing very useful as the following two pictures show:
 .................
I tried angling the mirror and tilting it but nothing proofed interesting. It always seemed to destroy the symmetry and balance of the image.
WHAT ABOUT ADDING SMALL MIRRORS TO THE OUTSIDE EDGE OF A TWO MIRROR KALEIDOSCOPE?
Although the results were a little better than the previous case they still didn't suggest a profitable avenue for investigation. The small mirrors block more of the main image than they create new images so there is a net loss. Besides, making such a kaleidoscope so that the mirrors retained their alignment would be difficult. Here's what they looked like:
 .........
They looked even more uninteresting when viewed along the axis of the main mirrors.
HOW DOES TAPERING THE MIRRORS IN A TWO MIRROR KALEIDOSCOPE EFFECT THE IMAGE?
It makes the image look tilted down like the top of a parasol.
 ............
The kaleidoscope on the left had the mirror tapered by three inches on each side over a length of 12 inches. In other words the top was six inches wider than the bottom. The amount of bending this gave the image was very slight and had to be viewed from a low angle to be easily seen. The picture on the right had a larger taper, the mirrors were eight inches wider at the top than the bottom, again over a 12 inch length. The amount of bending and the resulting 3D illusion was more pronounced. From this I learned that the greater the taper the more the image will be bent.
If you look through a tapered kaleidoscope from the other end so that the small end is close to your eye, the images bends inward so it appears like you're looking at the underside of an upside down parasol.
![]()
Several experiments earlier I found that cutting the inside corners off a straight sided, two mirror kaleidoscope produced an interesting cone-shaped image. I wondered what would happen if I took that idea and applied it to a kaleidoscope with tapered mirrors. Here's the result:

While it created an interesting image, comparing it to the image produced with simple straight mirrors that also had their corners cut off,
shows that both techniques produce similar results. By playing around with the angles, either technique could be used to produce the same image. While tapered mirror systems take more glass and are harder to make, they enable the creation of three dimensional spheres and other complex shapes, as we will see in the near future.
CAN THE OPEN SIDE OF A TWO MIRROR KALEIDOSCOPE BE USED AS THE OBJECT WINDOW?
Yes, and the effect can be used to create interesting surrounds for the mandala. Because the nonreflecting side may not have as much light as the main object window the images it generates may be dim. Lighting control is important for using this technique.
For
some of the best examples of this concept log onto the On Reflection site
(http://www.onreflection.com,
a great site with some of the most unique kaleidoscopes available
anywhere.) Some of the kaleidoscope images posted there had more
depth than any I'd seen before. The reason is that the artists had
realize that a great looking mandala needs great looking
surroundings. What Marc and Susan, the two artists who make the
scopes featured in On Reflection, have done is invent
mirror systems that place the mandala in an environment or place, an
egg-shaped room for example. This greatly increases the sense of
three dimensionality of the entire illusion.
Consider the following two images: the first is a conventional 3D cone mandala, the second is of the same mandala but this time located in a room with curved sides.
While these are poor examples, they still demonstrate that placing the main image in an environment, like the picture on the right, can create a more interesting image. Here the surround is boringly plain, but with imagination it can be made to look like a gold-leafed room inside a palace.
To see the surround, it may be necessary to view the image from a low angle and not along the central axis.
A LITTLE DIGRESSION:
The ultimate goal for this page is to develop complex, innovative mirror systems for kaleidoscopes that create interesting and attractive images. To do this it is necessary to continually ask oneself: Why? and What if? and most importantly to think outside of the envelope. Although I've only progressed as far as the most rudimentary fundamentals of a simples two-mirror kaleidoscope, I discovered that by making two very minor changes to the kaleidoscope used in previous articles it was possible to create an interesting image.
First, take a second look at the picture:
Notice the thick line extending from the center of the mandala and going upward? This is the joint between the two mirrors. Because they were second surface mirrors it's impossible to get them to fit where the reflecting surfaces touch because the glass gets in the way. (Another reason to use first surface mirrors.) The fact that the edges weren't cut straight also adds to the gap. However, these problems can be turned into an advantage. Take a look at the same kaleidoscope with two changes:
All I did was reduce the angle between the mirrors and lower the viewing angle. Reducing the angle greatly increased the number of images. The flaw in the middle was therefore replicated so many times that it created a column of vertical lines rising from the center of the mandala. It's out of focus in this picture because the camera's autofocus selected the lower corner of the object triangle and the central column was beyond the field of focus. In person, the column was sharp and beautiful. Lowering the viewing angle increased the apparent height of the column and gave the image a three dimensional look. In this case instead of looking down the line where the two mirrors meet, as in most kaleidoscopes, the viewing position was looking in toward the faces of the mirrors. This is a design that shows promise and will be developed later.
The lesson I learned from this was to constantly observe everything that's going on in an image and continually ask if changing something might create a more pleasing effect.
ANOTHER DIGRESSION:
While setting up an experiment with simple, straight mirrors, the mirrors slipped and I caught them at a complex combination of intersecting angles. Just by accident I glanced at the image and was surprised to discover something interesting, I call it a circular accordion image:

This image was strongly three dimensional. I marked the mirrors, trimmed them of un-needed material and taped them back together to take the picture below of how they looked:
Seeing the image requires looking in at a low viewing angle. I have no idea what's going on and have not seen an image like this in any kaleidoscope books. If any visitors know what type or class of kaleidoscope this is I would appreciate their sending me an email about it. Thank you.
THREE MIRROR KALEIDOSCOPE EXPERIMENTS:
This is what the mirrors in a
typical three mirror kaleidoscope look like.
All three mirrors are straight.
The apparent taper is an artifact of
perspective. The opening at the
bottom is the object window
and the opening at the top is
where the eyepiece is located.
HOW ARE THREE MIRROR KALEIDOSCOPE IMAGES DIFFERENT THAN TWO MIRROR KALEIDOSCOPE IMAGES?
The third mirror reflects the image from a two mirror kaleidoscope back towards the first two mirrors, which reflect it right back at it. These multiple images zig zag there way up to the eyepiece. What you get is a plain of repeated images stretching out to infinity.
....... ................
  ................
The image on the left above is from a two mirror kaleidoscope. The one in the middle is that same kaleidoscope and object field except now w third mirror has been placed in the open side of the two mirror system. The picture on the far right shows what the image looks like when viewed close to the edge of the top of the eyepiece. In person it appears to be an infinite plain stretching in all directions. The dark vertical lines are images of the mirror joints. In a well made kaleidoscope with first surface mirrors these would be much less pronounced.
HOW DOES CHANGING THE RATIO OF LENGTH TO WIDTH CHANGE THE IMAGES IN THREE MIRROR KALEIDOSCOPES?
The longer the mirrors are relative to their widths, the smaller the individual reflections of the object window will be.
..........  ..........
 ,,,,,,,,
The ratios of length to width for the photos above, left to right are 12/4, 12/3, 12/2, and 12/1. There are two causes to the effect. First, as the mirrors get narrower they made the object window smaller. Second, because the narrower mirrors are now closer together they push the images closer together.
This has important size repercussions for anyone wanting a three mirror kaleidoscope with a very fine image pattern. As the far right picture shows such scopes will have small eyepieces that are hard to look through, especially if you want people to be able to look sideways to see more of the entire image plain. Such a kaleidoscope with a two inch wide eyepiece would have to be two feet long.
(The inward- pointing dark lines are from slightly open joints between the mirrors. In a well made kaleidoscope this would not be present.)
WHAT EFFECT DOES VARYING THE ANGLE BETWEEN THE TWO MAIN MIRRORS HAVE ON THE IMAGE?
 .........
.........
......... .........
From left to right the pictures above are of images from 90 degree, 60 degree, 45 degree, and 30 degree mirror systems. The corners of the two on the right were cut off because the kaleidoscope's opening was too small for my camera's lens. Viewed in person the plains still extend to infinity.
The rules for symmetric primary images in three mirrors kaleidoscopes are the same as for two mirror systems.
WHAT HAPPENS TO THE IMAGE IF ALL THREE MIRRORS HAVE DIFFERENT LENGTHS?
 .................
Because only one angle can be fixed as the other two are changed (a result of the sum of the interior angles of a triangle always having to add up to 180 degrees) it's not always possible to obtain a configuration where all three angles are such as to produce symmetric images. The best thing to do is play with them until the desired image is achieved. In the two examples above the angles were 100/60/20 degrees on the right and 80/60/40 degrees on the left.
HOW DOES MASKING OFF PARTS OF THE OBJECT WINDOW EFFECT THE IMAGE?
Depending on the shape of the masking, it usually results in creating a net laid across the landscape of the image.
 .......
  .......
  ......
From left to right: a mask with an open circle in the center of the object window, the edges of the object window masked, the corners masked, and the edges masked with shallow "V"s.
HOW DO IMAGES IN A THREE MIRROR KALEIDOSCOPE LOOK AFTER THE CORNERS HAVE BEEN TRIMMED?
As the following photo shows, trimming the corners creates raised hummocks spread across the plain of the image:
Getting enough light into the wells created by cutting off the corners can be a problem. There is a lot of potential here by extending the cuts taller and/or wider.
In this picture all three corners were trimmed. If only one corner had been cut, only every third hummock would be created. By giving each corner a different size and shape trimming and projecting a different object on each of them as well as the flat plain, a truly bizarre image could be created.
WHAT HAPPENS IF THE MIRRORS OF A THREE MIRROR KALEIDOSCOPE ARE TAPERED?
Strange and wondrous things!
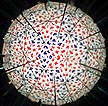
The effect of tapering the mirrors of a kaleidoscope with three mirrors is nothing short of amazing. Tapering causes the flat plain of the straight three mirror scope to curve around itself, creating a sphere with such a solid sense of three dimensionality that it's hard to believe.
The picture above shows the configuration of a kaleidoscope with the sides of each mirror tapered 15 degrees for a total of 30 degrees from one side to the other. The image it produces looks like this:
This flat picture doesn't come close to the impact of looking at it in person. Even with second surface mirrors quickly thrown together the image is mesmerizing. This kaleidoscope uses mirrors that are 12 inches tall with an object window that's 2 inches on a side. The sphere appears to be 8 inches in diameter.
Even without an object these tapered kaleidoscopes are beautiful.
In person the pattern of radial facets is much more complex.
A
benefit of the mirror taper is that it opens up the viewer's end of
the kaleidoscope so that the image is very easy to see. (Many
untapered scopes have viewing windows that are so small you have to
push your eye right up against them.) The down side of this is that
the wide open end also lets outside light in, which makes some of the
surrounding mirror faceting bright enough to be distracting. One way
to reduce the amount of light flooding in is to cover the viewing
window with a cover that's flat black and has an oblong opening in
the center so that the image can be looked at with both eyes. This
cover darkens the background considerably but creates a barrier
between the viewer and the image that some people might not enjoy.
All in all I think the viewing mask helps more than it hurts.
HOW DOES CHANGING THE TAPER OF THE MIRRORS EFFECT THE APPARENT SIZE OF THE BALL?
Smaller tapers produce larger spheres.
.. ......
  ......
  ......
......40
degrees..............30
degrees..............20
degrees...............15
degrees
The stated taper is the angle difference between the two edges of a mirror. A mirror with a 40 degree taper will have each side cut at an angle of 20 degrees from the vertical. Each of the kaleidoscopes above was 12 inches tall and had an object window that was 2 inches on each side. The camera's lens was positioned three inches from the view window, a distance for comfortable viewing. From left to right the balls appeared to be 4, 6, 8, and 10 inches in diameter. The front surface of each ball looked like it was 12 inches away in each case, which makes sense since the closest segment of the ball would be the object window, which is located at the bottom of the kaleidoscope which is 12 inches long.
The apparent size of the sphere is the combined result of the width of the object window and the taper angle. Shallow tapers start to get close to parallel mirror kaleidoscopes (with their infinite plain images) so they have more facets. The larger the number of facets the larger the sphere will be. Equally, as the size of each facet increased, or in other words as the size of the object window increases, then the sphere will also get larger because it's made up out of the facets. Two kaleidoscopes with the same taper can be made to create different sized images simply by cutting the object windows different sizes.
My preference is for a 26 degree taper in 12 inch long kaleidoscopes with two inch object windows. Larger angles make the sphere too small, with relatively large facets that emphasize that it's not a true ball but a geometric shape made up of flat sections. At 15 degrees of taper the sphere is so large that you have to push your face uncomfortably close to the instrument to see all of it and then much of the sphere is lost in peripheral vision. I suspect that for this taper a kaleidoscope should be at least 16 inches long.
One thing to consider in selecting the taper angle is that larger angles open up the viewing end of the kaleidoscope and can let more light in. This can result in annoying reflections.
WHAT HAPPENS IF THE CORNERS OF THE MIRRORS ARE TRIMMED?
You get a very spiky ball.
How'd you like to try to play soccer with one of these?
IS THERE ANY WAY TO MAKE THE IMAGE IN A TAPERED MIRROR KALEIDOSCOPE LOOK TRULY SPHERICAL INSTEAD OF BEING MADE UP OUT OF A LOT OF FLAT PIECES?
Yes. To do so we employ a variation of the technique used to created the spiky ball pictured in the previous article. There, we cut away the corners to create high spots at the vertices of the image. To round out the facets of the ball to make a smooth sphere we need to do the opposite: cut out some of the mirror between the corners. If this is done in a curve that's the same diameter of the apparent size of the ball in the kaleidoscope and we then use a spherical backing for the object material, assuming it's something flexible like cloth, then the segments that make up the ball will be sections of a sphere and if all the curves match we should get a smooth sphere. Here's how to do it:
1. Make a tapered mirror kaleidoscope and look through it. Hold a ruler at the apparent center of the ball and measure its diameter. (In the case of the 20 degree kaleidoscope mentioned two articles age, this turned out to be 8 inches.)
2. Lay the kaleidoscope flat. Find something 8 inches in diameter to use as a cutting guide and use it to cut a convex (curving inward) arc in the bottom of each mirror. Reassemble the kaleidoscope.
3. Find an 8 inch diameter ball, or segment of a ball, and stretch the material to be used for the object over it and place this against the object window. The combination of the curved mirror edges and the spherical object surface will create an image that looks like a smooth ball.
Here's how it turns out:
The mirror boundary lines are still visible (they'd be much less pronounced in a carefully made kaleidoscope with first surface mirrors) but notice that they are curved and give the ball a much smoother appearance.
WHAT HAPPENS IF THE ANGLE BETWEEN TWO OF THE TAPERED MIRRORS IS VARIED?
You get a sphere made up of rosettes with more segments as the angle is decreases.
.... .....................
  .....................
.......60
degrees..............................45
degrees............................36
degrees
WHAT ABOUT A TAPERED THREE MIRROR SYSTEM WITH THREE DIFFERENT ANGLES BETWEEN THE MIRRORS?
The resulting figure is still a sphere but the shape of the segments is determined by the separation angles between the mirrors. Such kaleidoscopes are difficult to make because each mirror has a unique shape.
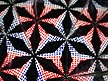
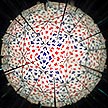
Since the sphere above with mirror angles of 90, 60 and 30 degrees appears much like any other, one might wonder why go to the bother of such a mirror set. The reason is that when specific sets of angles are combined with a particular angling of the object window it's possible to create three dimensional images of extraordinary complexity: boxes, dodecahedrons, icosahedrons, and many others that defy description.
Carried to extreme, the rosettes compete with the sphere for attention, to the detriment of the overall effect. As the following tapered, three mirror kaleidoscope with separation angles of 110, 42, and 18 degrees demonstrates:
PARALLEL MIRROR KALEIDOSCOPE EXPERIMENTS:
These kaleidoscopes have mirrors that are parallel to each other and face each other. The are usually two or four mirror kaleidoscopes.
The simplest example is two straight mirrors facing each other. They for ma long straight line of images.
Angle the sides outward and the line of images warps into a circle.
Tilting the tops outward creates a barrel shaped image.
Kaleidoscopes like this with three mirrors all perpendicular to each other simply doubles the image in the direction of the added mirror in the side.
When four mirrors are used the image is an infinite plain of square segments.

Tilting the tops of two facing mirrors outward creates the image of an infinitely long cylinder.
Squashing the square formed by the mirrors so the object and viewing windows take on a diamond shape creates an image consisting of double rosettes. This is the same effect obtained by pushing two, 2-mirror kaleidoscopes together.
Tapering all four mirrors produces a sphere made out of square segments if the object window shape is square.
Squashing this kaleidoscope so that the object and viewing windows take on a diamond shape produces a sphere made out of pairs of rosettes.
If two facing mirrors are moved closer to each other so the object window forms a rectangle the spherical shape becomes squashed to form a football.
KALEIDOSCOPES WITH TWO AND A HALF MIRRORS:
I purchased a kaleidoscope made by David Sugich with a round plastic rod used as the third mirror. The wand wasn't silvered so the reflection off it was weakened. That, and the fact that it's round shape prevented it from creating the plain of reflections in a traditional three mirror kaleidoscope, created the pleasingly unusual effect of the central mandala surrounded by a ring of columns extending down from the eyepiece. The columns picked up some of the color and pattern of the object.
Since the third mirror in such kaleidoscopes don't look like either two or three mirror systems, I call them two and a half mirror kaleidoscopes.
As the picture below shows, the effect can be attractive even if the curved third mirror isn't of good quality. Here I used a length of transparent plastic tubing used to protect a florescent bulb:
One thing to be careful of is letting the two primary mirrors wrap too far around whatever cylinder is being used. If that happens, as it did slightly in the kaleidoscope above, secondary reflections become visible on both sides of each column. These weaken the colonnade effect. This depends on the diameter of the tube. If it's small enough, about 1 inch in diameter for mirrors that are 2 inches wide, this isn't a problem.
I found it helps to use a thin black mask across the tube edge of the object window to provide separation between the mandala and the columns.
CONTINUING ON WITH THE 2 AND 1/2 MIRROR CONCEPT, WHAT HAPPENS IF THE THIRD MIRROR IS CLEAR GLASS?
Nothing useful. The glancing reflections are only strong enough for the first reflected image to be clear. The next one around the mandala is almost invisible.
HOW ABOUT USING A ONE-WAY MIRROR AS THE THIRD MIRROR?
This idea was a bust, too. I thought it might allow me to look in at the extended plain of a three mirror kaleidoscope at a low viewing angle. The problem was that the attenuation through the one-way glass was so strong that only the brightest sections of the image were visible, even when using a sight tube that blocked out all exterior light.
EXOTIC KALEIDOSCOPE DESIGNS:
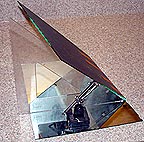
For me, any kaleidoscope that produces a complex, three dimensional figure is exotic. Because I'm new to kaleidoscopes and have never met nor spoken to a professional kaleidoscope maker it's very possible that what I call an exotic kaleidoscope design is really commonplace. However, I don't see many pictures of them in the few books I've studied and those kaleidoscopes that do seem to be made by a very few artists, so I feel somewhat secure in using the term exotic. Besides, these turned out to be by far the most difficult and challenging kaleidoscopes to figure out how to make.
Why bother?
Here's the answer:
This is a pentagonal (five-edged rosette) dodecahedron (a solid figure with 12 sides.) Even though this kaleidoscope was made with second surface mirrors and therefore has soft features, the three dimensional impact of looking into such a kaleidoscope is astounding.
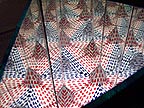
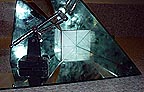
Laying the mirror system out flat shows the complexity of the shapes required to produce such an image.
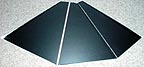
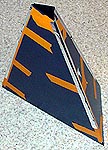
Each mirror is a different shape, with no two angles the same. Assembled, the kaleidoscope looks even more complex.
Here is the process I use to figure out the mirror shapes for such a kaleidoscope:
1. Select the taper angle and object window width. Since most of my kaleidoscopes are only 12 inches long I get the best sized images with a 26 degree taper and a 2 inch wide object window.
2. Select the number of segments in the rosettes that will make up the figure. In the case of the pentagonal dodecahedron above, this was 10. This number sets the separation angle between the first two mirrors. In this case it's 36 degrees. For the kaleidoscope that generates the cube images further down this page, the number of edges to the rosette is four, the number of segments eight, and the angle between the first two mirrors is therefore 45 degrees.
3. Carefully cut a piece of poster board to the separation angle.
4. Tape two 12x12 inch mirrors together to form a two sided kaleidoscope and use the poster board cut out to set the angle between them to 36 degrees, or whatever angle was dictated by the selected rosette. This angle needs to be angled in by half of the taper angle. (Actually, setting the angle visually by the appearance of the image is more accurate than using a angle guide.)
It's a good idea to use second surface mirrors to build a prototype. After the design is worked out the resulting mirror pieces can be used as guides to cut first surface mirrors for the final kaleidoscope.
I happened to have a plastic
triangle that was the correct angle
so I used it instead of a poster
board cutout to set the
rosette angle for this kaleidoscope.
5. Place a piece of paper over the object window. The paper should be the same shape and size as the desired final window. (Note: Because the two segments that make up one side of the pentagonal rosette have to end in a straight line, I know that the corner of the object window that cuts this edge in half must be a 90 degree angle.) Look through the kaleidoscope to make sure that the rosette is the correct shape and that all five (or however many) edge lines are straight. The rosette should not have a pleated or accordion look to its surface.
6. Being careful not to disturb the first two mirrors or the object window, hold a piece of tapered scrap mirror against the open edge of the object window and play with the angle until the figure seen in the kaleidoscope takes on the desired three dimensional shape.
The cube figure the kaleidoscope is destined to make can be seen to start take shape.
As with the object window we know that the third mirror will have to have a 90 degree angle between it and the bottom mirror. If it didn't then it wouldn't be able to make contact along the side of the object window.
7. Once you've got the angle of the third mirror established, mark this angle on the bottom mirror and cut the bottom mirror along that line.
8. Flip the trimmed mirror pair upside down, re-establish the separation angle, lay a sheet of mirror against the edge of the upper mirror and position its bottom edge so that it touches the outside corner of the object window.
9. Mark all of the intersection lines and cut the mirrors to those lines. Trim away any excess mirror hanging off the viewing end and assemble the kaleidoscope. Be careful to assemble it with the joint patterns having the same orientation as when the mirrors were marked and cut. If not, then a mirror that was marked with it laying on top of another mirror might end up being butted up against that edge and the angles could be thrown off.
10. Check the image and make sure that all the lines that should be straight are straight and that all the rosettes meet to form a solid figure. If they don't, massage the angles until they do, mark them, and recut them. Repeat until the figure is perfect.
Once you have a three dimensional figure you can trim the object window to make the rosettes point outward (by cutting the window so that the axial corner of the object window is moved closer the the viewing window) or make the rosettes point inward (by recutting the window so that the axial corner is further away from the viewer) as in the following:
A pentagonal dodecahedron:
Here's an image from a kaleidoscope designed to generate a cube:
The true sphere again:
Here's another shot of the same kaleidoscope, this time using an electrostorm lamp for the object:
The patterns created by the writhing lightening bolts are impressive at first, but quickly become repetitious.
A tetrahedron:
This is not a great kaleidoscope to use. To see three faces and get the full three dimensional effect you have to position your eye close to primary axial corner of the kaleidoscope.
An icosahedron (20-sided figure):
An icosahedron with the primary axial corners cut off to create a spiky geometric solid:
An octahedron:
.....................
The green dodecahedron again:
A study in object windows: The following three images are from the same type of kaleidoscope. The only difference is how the object window was cut. The image on the left was taken with only one of the three mirrors' points cut off to create the window. The result is a honeycomb effect. The middle image is with all three points cut off to make a standard window. The image on the right was obtained by trimming the entire corners off two adjacent windows to create a spiky ball. (The left and middle images in the kaleidoscope were smaller than the one on the right.)
............
Another cube:
I found it was easy to create the illusion of objects hovering around a sphere. In the example below it's a mesh of pink lines encircling a planet:
To do this, simply remove silvering from the mirrors and light will shine through. If the removal is in star shapes it will look as if a planet's imbedded in a field of stars. Taken to the extreme the lines can form the entire image. Here's what one with five lines looks like:
The reason many of the lines appear broken is that I didn't cut them all at the same angle.
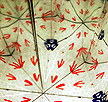
The next kaleidoscope uses silvering removed in radial streaks to create the impression of thousands of meteors falling on a planet. I call it "Rain of Fire."
One problem with this particular kaleidoscope is balancing the amount of like for the meteors and the planet. If the meteors don't get enough light the don't create the dynamic fiery effect needed. If they get too much, the planet's appearance is overshadowed and appears too dark.
In the kaleidoscope below a small paper butterfly was suspended over a background of green cloth to create the illusion of butterflies flitting over a planet:
The
inspiration for most of my geometric solids came from seeing
pictures of
Mr.
Don Doak's kaleidoscopes. The following kaleidoscope image was
inspired by
Mr.
Steven Gray's "Parasol."
The kaleidoscope consists of a short, 2-mirror system with all four corners cut off of the inside edges of the mirrors. It's then sandwiched between two parallel mirrors. The objects to be replicated have to be angled so they lay flat across the cut off corners. You look in between the two angled mirrors instead of down from one end.
But my favorite object source is a fiber optic bundle.
Kaleidoscopes like this can have images so brilliant they'll scorch your retinas.
How small can one of these kaleidoscopes be?
The first limit to how small they can be made is how close can a viewer get to the object and still be able to focus on it. For most people up to their late thirties this is eight inches, assuming the kaleidoscope in question doesn't have a lens as the exit window. Older people may have to wear reading glasses but if they need them they usually have them so you don't have to make the scopes longer for them. The second limit is that the scope has to be long enough so that the entire object can be seen with enough clear space around it so that the object doesn't appear crammed into too small a space. This is tricky because kaleidoscopes with small windows generate smaller objects than similar ones with larger windows. My criterion is that I prefer to see the entire object without having to look side to side. I want to catch the entire object by looking at it's center without the edges turning fuzzy in my peripheral vision. For me that's an object that's 5 inches in diameter at a distance of 12 inches. That means 12 inches is optimal for this type of scope. If you prefer larger images you may want to think about going up the 16 or more inches in length. Finally, even when I change reading glasses and use different kaleidoscopes I find myself ending up looking through them to place the object 12 inches from my eyes. So, I make my kaleidoscopes 12 inches long. Others may prefer smaller or larger scopes and the desired object may demand a longer kaleidoscope. My purpose in this article isn't to provide absolute direction, only to mention some of the things worth considering.
KALEIDOSCOPES WITH CURVED MIRRORS:
This turned out to be a very disappointing avenue of investigation.
What happens if you make a kaleidoscope out of a mirrored cylinder?
Nothing very useful. (In contrast to all of the previous photos that were less impressive than looking into the kaleidoscopes in person, all of the pictures taken of kaleidoscopes with curved mirrors look better than the reality.)
 ............
Looking into this kaleidoscope causes significant eyestrain.
How about two and three mirror kaleidoscopes with curved mirrors?
The curved surfaces cause so much distortion that there isn't enough repetition of the object pattern the create a pleasing image.
Two Mirrors
Three Mirrors
What about combining flat and curved mirrors?
These systems produced more symmetry in the image, but not enough to be attractive.
Two flat and one concave mirror.
The same kaleidoscope looking into it at a shallow angle.
All of the kaleidoscopes above had concave curvatures with a 12 inch radius. I repeated these experiments with convex mirrors and got different, but no more attractive results. I also tried some where the mirrors curved along the long dimension. These produced bowl-shaped images that weren't very pleasing and could be more easily formed by cutting curves into the bottom of the object window.
My last curved-mirror experiment was to form a cone with the inside surfaces aluminized. The goal was to produce a spherical image. What resulted was more like a disc with severely distorted images.
What these experiments with curved mirrors taught me is that the essence of a kaleidoscope's image is recognizable repetition of the central object. Since curved mirrors create distorted images of the object, repetition doesn't exist and the resulting image is not what most people think of as being kaleidoscopic.
Please don't let my negative results dissuade anyone from performing their own experiments with curved mirrors, or any other type of system. It's very likely that I may have done something wrong that compromised the images.
I carefully measured and cut a pair of mirrors exactly the same size but when I assembled them one ended up wider than the other. What happened?
It's called edge loss. Because one mirror rides on the surface of the other, part of the edge of the underneath mirror is cut off.
This isn't a problem with three mirror systems where each mirror has one edge on top of one mirror and under the next. They all lose the same amount. It's also less of an issue when the mirrors have been sized by making a prototype as long as the edge relationships are the same in the prototype and the final model. But, on some kaleidoscopes where mirror sizes have been calculated it can cause problems. I haven't figured out a good rule for how much will be lost because it depends on the angle of the mirrors and how the edge is secured. I suspect that in many cases it might be too small an effect to worry about, but it's a good thing to be aware of.
(This effect almost ruined my dodecahedron because I inadvertently taped it together with two mirrors riding on top of the third when there was only supposed to be one on top.)
What's the best glass cutter?
Good question... I wish I knew. I've only tried three out of the many different types and here's what I found:
![]()
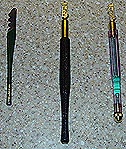
From left to right: a cheap $2 cutter from Wal-Mart, a Toyo TC-22 from Delphi Glass for $16 and an $18 Toyo oil cutter (TC-No. 1) from Delphi Glass that applies an almost microscopic trace of oil to the cutting wheel. The picture above the cutters shows the cut lines each of them produces. The first two cut almost the same and the breaks were equally hard to break. The oil filled cutter produced almost no glass shards and the line broke with half the force required to break the others. There is so little oil deposited on the glass that I doubt you could see it if you tried. The oil's water soluble and cleans up easily. The oil-filled cutter is the one I use for making my kaleidoscopes. If anyone who has tested many different cutters can recommend a better cutter I would appreciate their telling me. Thank you.
IMPORTANT UPDATE! Even though the oil cutter cuts better, I've decided to use the dry cutter. Cleaning off the oil gets to be an extra annoying step after awhile. If all the oil isn't cleaned off, the ramaining residue will weaken the tape.
How much does it cost to step up to a good cutting table and start working with first surface mirrors?
In 2004 it cost me 500 dollars to move up from cutting second surface mirrors on the kitchen counter with a Wal-Mart cutter to cutting first surface mirrors on a dedicated cutting board with a good cutter. Here's how the cost breaks down:
Good cutter:............... $20
cutting
board:...........
$120 ....(Based
on Don Doak's design. $110 of this was for
...........................................the
metal cutting guides made out of tool steel.)
Front surface mirrors:. $240 ....(For ten, 12x16 inch sheets. This should be enough for a ..........................................dozen or so large kaleidoscopes.)
Grinding wheel:...........$110 ....(For cutting small concave curves. I needed this for ...........................................shaping complex object windows.)
Incidental supplies:.......$10......(Masking tape, acetone to clean mirrors, etc.)
I have no idea what a professional level kaleidoscope cutting studio would have in it or how much it would cost. If any pros find this page I would appreciate hearing from them what it costs to set up a professional studio. Thank you.
MOVING UP IN QUALITY
Having explored some of the basic principles of kaleidoscope mirror design, I decided my next step would be to improve the quality of my kaleidoscopes. This means assembling a dedicated cutting board that will allow me to make consistently straight lines and cut more precise angles as well as stepping up to using first surface mirrors and assembling my kaleidoscopes with object and viewing windows to protect the mirrors.
My Cutting Board
The design for my cutting board comes directly from Mr. Don Doak's design as explained in his kaleidoscope making video: a melamine board with oil quenched, hardened, steel bars ground straight to within 1/10,000 inch over a three foot length.
After setting the two metal guides bars as close to 90 degrees as my best triangle allowed, I tested the angle by making four sequential cuts-and-breaks as I worked my way around a piece of scrap glass and then measured the angle between the fourth and first edge. Any deviation from 90 degrees would be added to itself at each cut-and-break so the final deviation would be four times the actual. When the angle was measured it came out to less that 0.04 degrees, the smallest angle I can detect. That means the angle between the guides is between 89.99 and 90.01 degrees. It's so close to perfect I can't even tell if it's high or low.
An advantage to having a good reference like this is that it can be used to check other instruments. For example, the Picket adjustable triangle I purchased has its "0" degree setting off by 0.25 degrees. Not knowing this could have caused problems that haunted me for years.
I've heard that Don Doak has developed a magnetic cutting system that is a great improvement over my system, which I got from his first video. If anyone could send me plans for this new cutter or directions to where I can obtain a copy of his Master Kaleidoscope Building Volume 2 video, in which he describes it, I would very appreciative. Thank you.
First Surface Mirrors
A survey of the Internet showed that the cheapest source for first surface mirrors is Delphi Glass. In 2004 I ordered ten 12x16-inch sheets at 22.50 dollars each. I order ten of them with which to experiment. They arrived in pairs connected by the protective blue vinyl coating over the good side. There was a sheet of paper between them for extra cushioning.
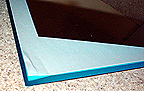
The glass was almost half the thickness of the second surface mirrors I'd been using. In the picture below the first surface mirror is on the left and the second surface mirror is on the right.
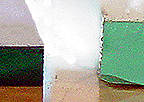
The first surface mirror was 1.5 mm thick whereas the second surface mirror was 2.4 mm. Either because it was thinner or the glass was of better quality the first surface mirror breaks with one quarter the amount of force of the second surface mirror. Many times it breaks on the score line even before any pressure is applied.
The real question is: Do first surface mirrors eliminate the dimming of the image in kaleidoscopes with small angles between the mirrors? The answer is Yes. Consider the following two pictures:
.......
The one on the left shows the dimming of the reflections as you move around the kaleidoscope to the last reflection, the image on the top opposite to the object window on the bottom. The mandala on the right is from a kaleidoscope with first surface mirrors. Not only are all the segments of the mandala equally bright, they are all sharp. The image on the left shows how the image gets blurry as you move away from the object window. What doesn't show in the picture on the right is the incredible image sharpness. Hair-fine details are easily made out.
Object and Viewing Window Covers
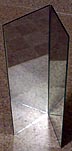
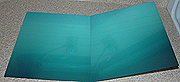
I found four materials for covering the ends of my kaleidoscopes.
From left to right they are glass, Plexiglas, acrylic, and Lexan sheets. Glass, Plexiglas and acrylic average 2 dollars a square foot. Lexan costs twice that.
All four materials appeared equally clear. However, the Plexiglas exhibited some distortion in one small area. I assume this was a defect in the molding. The acrylic a Lexan sheets were perfect.
Plexiglas is 10 times more resistant to shattering than glass, acrylic 100 times more resistant, and Lexan 250 times more resistant.
While shatter resistance is desirable, it is offset by the fact that the plastics scratch much easier. All of them resisted scratching from firmly dragging a fingernail across their surfaces. They all also resisted scratching when rubbed hard with a clean paper kitchen towel. The acrylic and Lexan did not dent when lightly bumped with a gold ring (assumed to be the most likely cause of injury to a kaleidoscope's window). The Plexiglas did. All three scratched when a gold ring was dragged firmly across them. The Plexiglas scratched the worst and the acrylic the least.
Glass was by far the easiest to cut. All of the plastics, especially the Plexiglas, were difficult to cut without scratching.
After considering all the pros and cons of the various materials, I've decided to use glass. It's cheap, the easiest to cut, and the most resistant to scratches. While it can shatter, so can the mirrors used to make the kaleidoscope. However, my kaleidoscopes will only be used by me and adults who I can trust to treat them with enough caution that breakage is a small risk. If they are to be viewed my children, it will be done under my close supervision.
One concern about using glass that I've heard is that small glass shards from the cutting process might stick to the glass and be dislodged during use and fall into the viewer's eye. I intend using a beveling and cleaning process that insures that the likelihood of this happening is vanishing small. (Note: I am not recommending the use of glass for windows in kaleidoscopes, only that I intend to use it in mine. Each individual needs to evaluate both the materials that go into his or her scopes and how they are to be used to determine what is the best and safest material.)
Layout Guides:
Because first surface mirrors are so expensive I like to use it as efficiently as possible. To do so I cut posterboard to match the shapes of all the mirrors I plan to cut for my next half dozen kaleidoscopes then fit them together so that after cutting there is as little waste as possible.

I also record special cutting and assembly instructions on these sheets. This technique sometimes shows where, by reducing a kaleidoscope's length by a fraction of an inch, I can squeeze the pieces together and save an entire 12x16 sheet.
However, this system only works when I have a set of several different kaleidoscopes I want to make and already have stenciles for the mirrors. When developing a new design I find it's easier and more enjoyable to to just dig in and cut my way through as much glass as I need while focusing on that one kaleidoscope.
Why does my glass break crooked even though I'm using a good cutting board?
Assuming the board is one with a thick, non-flexing, tool steel cutting guide like the one recommended by Don Doak and you're holding the cutting head solidly against the guide, then the problem is in the breaking, not the cutting. I've recorded two types of breaking errors. One can be avoided and the other worked around.
The first one looks like inch-long scallops toward the middle of the glass on the side away from the score.
![]()
In the picture above the black arrow is pointing to the edge of the top, or scored, edge of a second surface mirror that broke with a scallop. The scallop can be seen as a slightly darker zone that curves first away then back toward this edge. The dark area on the left is the silvered part of the mirror. Because the scallop cuts into the silvered area it can create a void or blank spot in the kaleidoscope's image. The other half of this break had a matching scallop that bowed away from the straight edge and could interfere with aligning the mirrors. I've found that two things contribute to this problem: breaking the glass by holding it in the middle and trying to break long thin strips. By planning ahead so all cuts involve at least half an inch of glass and snapping the break from one end, most scalloping can be prevented.
The second break problem I've seen is unavoidable, but can be worked around. It's where the glass breaks with a flare at the end of the break.

In the photo above the piece of mirror on the right broke with a flare jutting to the left. There is a matching void in the piece on the left. Sometimes this doesn't happen or is so small it's undetectable. Sometimes the break flares to the right, sometimes to the left. I haven't been able to observe a pattern or found a breaking technique that prevents it. Don Doak's video states that the only way to deal with this is to arrange your breaks so that the flare always occurs in a section of mirror that is going to be cut away and discarded.
This works perfectly in cases where you are making a series of mirrors from one piece of glass and the last one, which will have a flare, can be discarded. The problem is harder to deal with when you are cutting a single complex mirror.
Imagine that you need a square mirror. You make four scores around the outside. When you snap off the first piece a flare forms at the end. When the second piece is snapped off you eliminate this first flare from the first break but create a second one. When the third is snapped off the flare from the second piece is eliminated and the same with the forth break getting rid of the flare from the third break. The problem is that thi technique doesn't prevent the flare, it just chases it around the mirror. I believe the only way to deal with this last flare is to make the breaks in a sequence that insures that the last break places the flare where it won't be seen by the viewer and can't effect the alignment of the mirrors. This means it needs to be located at the viewer's end of the kaleidoscope, along an edge that is covered by the adjacent mirror resting on top of it.
I've also noticed that both of these phenomena are less likely to occur as the depth of the material broken off increases. I assume this is because a wide piece doesn't flex as much as a narrow strip and the snapping force is more evenly distributed along the entire length of the score. End flares are most common when breaking scores that go to the corner of a tight angle. I avoid these situations by laying out my cuts so that there is always a half inch of mirror extending away from the corner.
All of the above was reasoned after observing the break patterns from dozens of test breaks. If anyone has better information about these problems and effective ways of dealing with them, I would appreciate hearing about them so I can post that information here. Thank you.
What are the different ways to put spikes on a sphere? I could think of three, and only two are practical.
The first technique is one already used: trim the corners off of the object window.
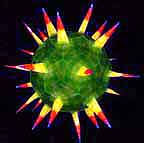
This technique is quick and easy and best of all produces three dimensional spikes.
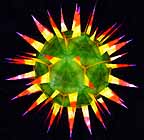
The second technique involves removing the aluminum coating from one mirror near the object window. It produces twice as many spikes as the trimmed-cormers method but the spikes are flat. Oddly, it doesn't matter very much if the aluminum is removed in such a way that the glass remains clear or if it's sandblasted off giving the glass a frosty look.
The third technique would be to remove aluminum as above and mounting the object surface on the inside surface of the mirror over the window. This would be difficult to pull off as would varying the object seen by the internal spike.
WHAT'S NEXT?
So far I feel that making the kaleidoscopes on this page and answering the questions they suggested has only provided me with the most basic fundamentals. There is much more to learn and I look forward to pursuing my education in this fascinating field. If anyone has and comments, suggestions, or corrections I would very much appreciate an email. Thank you very much for visiting and I hope you've enjoyed this page.
UPDATE!!! I recently used acetone to clean off the residue left by the protective blue plastic sheet on a first surface mirror and discovered that the acetone left a haze that was difficult to clean off. I don't know if this residue is from the acetone being contaminated or if it was a reaction between the plastic residue and the acetone.
(I've recently
added a new page to my Kaleidoscope Section titled MY
NEWEST KALEIDOSCOPES,
which showcases my newest creations. I hope you'll be able to stop
by and take a look at them.)
![]()
Return to main page to browse 50 other topics: