How An Engineer Warps a Loom
I couldn't believe all the work my wife had to go through to warp her loom: lacing yarn through a warping frame, tying off bundles of yarn, taking it off the frame, laying it on the loom, threading the reed and finally threading the heddles while all the time remaining watchful of tangles and crossed yarns. It was a nightmare that took hours. I got to wondering if there was an easier and faster way of doing it when I remembered something I learned in business management school, of all places, that solved the problem.
The gem of the idea from the business class was that one way to save time was to handle a piece of paper only once. Whatever it was, taking care of it right away saved time in the long run. Consider loop warping and I think you'll see that a lot of time is spent picking up, moving, putting down, and picking up again all of the lengths of yarn that go into the warp. I wondered if there was a way to avoid all this. There was.
I got the idea that if I placed two bars that could hold individual strands of yarn at each end of the loom and separated them so that they were the same distance apart as the length of warping yarn required for the job, then I could run the yarn one strand at a time through the loom without having to handle the yarn more than once. Placing a skein holder at one end prevented the hassle of the yarn ball flopping about as yarn was pulled from it. Here's what the set-up looked like:
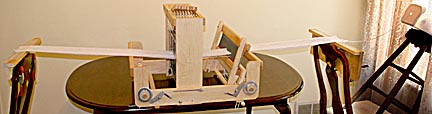
The skein holder is on the right. Starting with the center warp thread, I simply pull the yarn through the reed and heddle in one smooth motion, attach it to the holding bars (lengths of wood clamped the the backs of chairs), cut it loose from the skein and move on to the next warp yarn, working my way outward toward both sides.
The key that saves a lot of yarn manipulation is a needle modified to quickly and easily grab the yarn so it can be fed through the reed and heddle.
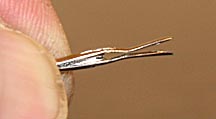
I remembered seeing small needles that where split near the eye so that rather than having to feed the thread through the hole of the eye, the thread could simply be snapped through the slit. I made a larger version of this by taking a 3-inch long needle and slicing the end open with a Dremel tool. Then I crimped the middle and flared the ends outward. Yarns slips in and out very quickly yet is held tightly enough so it doesn't come off when threading the needle through the loom.
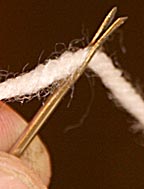
I start a warp thread by slipping the loose end of yarn from the skein into the end of the needle.
Then I drag it
over the first holding bar and immediately thread it through the reed.
Note that with this technique it's not required to stick a hook through the reed to snag the thread.
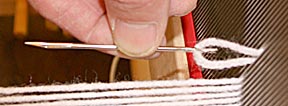
Next I dive straight through a heddle eye:

and finish up by pulling the yarn across to the yarn holder on the left, slipping the yarn off the needle and attaching it to the holding bar.
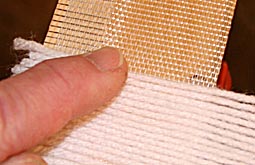
The holding bar is simply a piece of wood with a strip of good quality, cloth-based double faced carpet tape. Yarn pressed onto it is held very securely. After that I walk back to the right, stick the yarn to the tape on holding bar at that end of the loom, cut it off and I'm ready for the next thread.
Once I get into a groove I can warp a thread in ten seconds. That may not sound fast but remember, that's all the way from skein to completed warp, which includes all the measuring, moving, threading and detangling.
One advantage to this technique is that because there are no bundles of thread to deal with it's extremely easy to keep track of individual warps. Additionally, using a dining room table and chairs puts everything at a comfortable height and eliminates the need for a warping board.
If the first lengths of yarn start coming off the tape, try reducing the tension of the yarn and adding a second piece of tape to the outside face of the holing boards. Besides providing more tape to hold onto the yarn, the 90-degree turn goes a long way toward reducing the tension that could pull the yarn off the tape.
Once the warp is complete, roll the yarn up onto the sticky board on the reed side of the loom, using a paper spacer to prevent the layers of yarn from tangling. Then pull the yarn off the sticky board at the opposite end of the warp and tie it to the loom's take-up dowel. Wind it up as usual with a paper spacer, unwinding the reed-end sticky bar as needed. When you get to the end of the warp, pull the yarn off the sticky bar, even out the tension in the strands, make sure they aren't crossed, then tie them to the reed-side take-up dowel as usual.
That's it. The loom is now warped. My estimate is that this technique is at least twice as fast as traditional warping.
I'm not a
weaver so for all I know this sort of technique is common, though I
haven't seen anything like it in my wife's weaving books. I hope you
found this page useful.
![]()