METAL DETECTING! Dozens of articles on metal detectors and their use.
(Click on main site to browse 70 other topics ranging from exotic kaleidoscope designs to the strange world of lucid dreaming.)
Bookmarks
to Articles on this Page:
Why
I Wrote This Page and What's in it
My
Experiences Researching Which Should be the First Detector I Purchase
The
Detector I Chose and Why
Out
of the Box: What I found when my detector arrived
Air
Testing the Detector
My
Test Garden: a Metal Detector's Worst Nightmare
Running
the detector through The Gauntlet
How
My Detector Works in Mineralized Soil
The
Learning Curve: Things
I'm learning as I use the detector.
In
the Field
Hints
and Ideas
Metal
Detector Links
My
Other Metal Detecting Pages:
Comparisons
of three different coils
Pinpointing
Probes A survey of pinpointing probes. UPDATED
Test-Driving
the CP-100 Pinpointing Probe
A
Survey of Sand Scoops!
Club
Test of Detector ID Accuracy The
most important page on this site!
The
Antelope Valley Treasure Hunter's Society
The
Adventures of Melvin Cogsworth, PD
(Private Detectorist)
The
Adventure of the Del Rio Cross
The
Case of the Midnight Caller
The
Mystery of Silas McPhee
The
Secret of Makerpiece Mansion
The
Problem of the Tiger-Striped Cat
Why I Wrote this Page and What's in it
I created this page to provide a brutally-honest evaluation of my first detector. In addition to listing everything I like and dislike about it, I'm also posting performance numbers for air and ground testing.
Please note that this is not a recommendations page. I have no prejudices for or against any brand or model of detector, not even the one I purchased.
On a lighter note, I've posted several stories about Melvin Cogsworth: PD (Private Detectorist) at the bottom of this page. These chronicle his comic misadventures as he tries turning his metal detecting hobby into a new career. I plan to add one story a month to this series. I hope they make fellow detectorists everywhere smile.
If you got to this page directly via an Internet search, may I invite you to take a look at my main page? There are 100 other subjects covered on it, some of which, like the wierd world of Lucid Dreaming, might be new and interesting to you. If nothing else, the 26 pages of jokes should be good for a laugh.
My Experiences Researching Which Detector to Purchase
When I decided to purchase a metal detector, I had no idea of the frustrating experience it was going to be. I had hoped to be able to do an Internet research for metal detector tests, review hard numbers on detecting depths, discrimination accuracies, etc., on all of the available detectors and from that select the best one. Boy, was I dreaming.
First, I couldn't find any quantitative comparisons between different detectors, other than two lists comparing detector air test results. I found many qualitative comparisons but for every one that said detector "A" was better than detector "B," there was another saying the opposite. Second, the magazines that cater to this hobby hadn't published any consumer-reports type comparisons of detectors. This didn't surprise me because doing so would point out which detectors weren't good, causing the magazine to lose advertising revenues. Lastly, I found dealer tests to be of limited value because they praised all detectors as being outstanding. However, they and manufacturers sites do provide essential information about which features the models have. In a few cases, careful reading of dealer field tests sometimes provided hints about potential detector problems. For example, one dealer praised a detector's potential capabilities for someone willing to invest the time to master it. I interpret this as meaning that there is a learning curve for that detector, so it probably wouldn't be a good choice for people desiring a turn-on-and-hunt device.
I went to a dealer and asked his advice. His first question, which was reasonable from his point of view, was, "What do you plan to use it for?" The problem was that since I'd never used a detector I didn't know what type of detecting I was interested in. Also, I didn't know enough to ask the right questions to become familiar with the different models. Still, the trip was worth it because I got to see what different detectors looked and felt like and how clearly I could read their readouts.
Then I turned to several metal detecting forums. By reading through dozens of posts, asking for recommendations, and reviewing the responses, I discovered that every detector has fans that love it and others who think otherwise.
Detector popularity surveys can be misleading. Fords are more popular than Mercedes automobiles, but that doesn't make them better. A great detector might have a low popularity because it hasn't been advertised as well as a more popular model, or it may not have been on the market as long.
After two weeks of research without coming to a sound conclusion, I received a couple of emails that cleared everything up.
Both were from dealers. Collectively, they said that all of the high end detectors, whether Fisher, Garrett, Tesoro, White, or Minelab, work well and will find enough coins, jewelry and artifacts to be satisfying. They also implied that metal detecting is supposed to be enjoyable, so my best bet was to select a detector not on the basis of some performance standard but by which one I thought would be the most fun to use.
Following their advice, I took another look at all of the detectors I'd been considering (Fisher CZ-70 Pro, Garrett GTI 2500, Tesoro Cortes, and White MXT), and choose the one that seemed to me to be the most fun to learn and use, even if I never found a single coin. I may never know if it can see the deepest ring or find the biggest treasure, but I smile every time I pick it up so I think I made the right choice.
In summery, to anyone trying to figure out which detector should be their first, I suggest the following course of action:
1. Get several current books on metal detecting and detectors and read them thoroughly. I failed to do this and it caused most of my confusion.
2. Decide on the maximum amount of money you're willing to spend, use the Internet to find all the detectors within your budget that are offered by the major brands mentioned above, and make a simple list for each of its features.
3. If you know what you want to use your detector for, coins-jewelry, relics, or prospecting for gold, use that to select the detectors from your list that have descriptions stating that they are geared toward that specific task. Otherwise, select those that are adaptable to let you try your hand at each.
4. Go to a store with detectors and handle each of them to decide which feel good to you and have readouts that are easy to read.
5. Finally, select the one from the short list generated by following the above steps that you think will be the most fun to learn and use. Try not to think about how much you're going to enjoy discovering Blackbeard's treasure. The odds aren't you won't find it.
I sincerely hope reading this will help others looking to purchase their first detector an easy and pleasant experience. However, I can't emphasize strongly enough that I have only done this once and as such am a rank amateur at selecting detectors. Each purchaser should follow what they consider their own best course of action.
I'd like to thank all the dealers and people who emailed me recommendations and suggestions. Without their help I still be wallowing in data sheets trying to sort out which detector to buy.
The Detector I Choose and Why
And the winner was.... The Garrett GTI 2500!
The main reason I selected this detector is that its imaging capability intrigued me. I plan to spend many hours investigating this function in a test garden to see how well it works.
But that wasn't the only reason I chose it.
I traded emails with many people and better than two thirds of those who were familiar with it and other detectors rated it above the others.
A metal detector comparison of 28 detectors (VLF Metal Detector Tests by Alain Chatillion, http://www.metaldetection.net/english/Metal_detector-tests.htm) stated that in both air and ground, the Garrett GTI 2000, the model immediately prior to the 2500, made contacts deeper than any other detector. A second comparison (http://home.wanadoo.nl/corholland/) indicated that the 2500 was the second deepest probing of 73 detectors. (The difference between first and second place was only 0.3 centimeters.) These comparisons indicate that the Garret GTI 2500 should have very good depth penetration.
When I hefted several detectors at a dealership, the 2500 felt the most comfortable and had the display that was the easiest to read.
Lastly, the Garrett came with a host of features that sounded impressive.
So that's why I selected the Garrett GTI 2500 as my first detector. This is not a recommendation. Everyone is unique and has their own preferences and interests and these play a big part in what would be the best detector for them.
The next question is: Now that I have the Garrett 2500 in hand, do I like it? For the answer to that, read on!
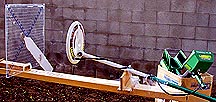
Out of the Box: What I discovered When the Detector Arrived
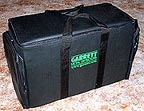
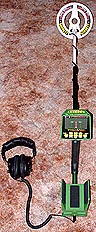
My Garrett GTI 2500 arrived in a sturdy cardboard box. I expected to open it and discover the bits and pieces of the detector scattered throughout a ton of foam popcorn. I was pleasantly surprised. The detector was already packed in its carrying case. Inside, the cut-to-form foam protected the detector better than typical postal packing. The case feels like real leather, is well made, and the padding feels sufficient enough to protect the contents even if it fell off a speeding car.
Inside I found everything I'd ordered in excellent condition: detector, 9.5-inch coil, headphones, manual, warranty, and instructional video.

In less than two minutes (an actual, not rhetorical, two minutes) I had the detector assembled without even having to read the instructions.
I slipped the headphones on and just for laughs pushed the "ON" button. There I got my second surprise: the detector turned on! It had come with good batteries already installed. I dropped a quarter on the floor and swung the disc over it. Bleep! Two minutes after unzipping the case I was detecting coins. Since this is my first detector I have no way of knowing if they are all this simple, but I was impressed.
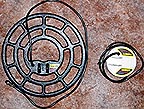
I also purchased a 12.5-inch imaging coil for deep objects and a 4.5-inch coil for small objects close to the surface or for trashy areas. The padding in the carry case came with cut-puts in the foam to hold the 9.5 and 12.5-inch coils. The 4.5 fits nicely into one of the two large end pockets. I will be testing the detector using all three coils to quantify their performance.
So far, so good. But it's time to get into the evaluation of the detector. From this point on I intent to nit-pick everything that I like and dislike about the Garrett. And I do mean nit-pick. Many of the issues I bring up are laughably trivial, but I'm trying to be as complete as possible. Human nature being what it is, you should expect to see more negative comments that positive. THESE NEGATIVE COMMENTS SHOULD NOT BE CONSTRUED TO IMPLY THAT THE GARRETT GTI 2500 IS A POOR DETECTOR! If I went through the same process with any brand or model metal detector, I'm sure that I would find as many negative things to say about it. Also, remember that I am not an expert. Please do not accept my comments as informed judgements. I'm just a regular Joe talking about what he discovered in the process of learning to use his first detector.
Having clarified that, let's get to it!
The headphones were extremely comfortable to wear, even though I wear glasses, and blocked out a considerable amount of outside noise. The volume to each ear can be independently adjusted, which is nice for anyone who is hard of hearing on one side. When combined with the detector's own volume adjustment, the adjustable headphones provide the user with two loudness controls. There is a stereo/mono switch but I couldn't detect any difference in either position.
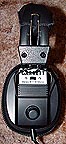
The headphones use a simple spring slide system to adjust the fit. Both sides failed to stay where I put them because there was so much spring tension that the wires forced the headphones to slip. In seconds the earcups would drop, trying to push my ears down to my collar. I had to use pliers to bend the upper part of the wires outward to get the adjustment to stay put.
The detector worked perfectly first time out of the case, even when used by someone who's never used a detector before.
Batteries were included. This sounds like a minor point but few things are as annoying as getting a new toy and having to run to the store for batteries before you can use it.
The inclusion of an instructional video in addition to a manual was great. The video clearly explained the detector's operation. Actually, it was quicker and easier to learn from the video than from reading the manual.
But, the man talking on the video adopted an excessively-buoyant tone that had me itching to turn it off. He sounded like an adult talking about something he wants an eight-year old to get excited about, in which the child isn't interested. To me it was patronizing and condescending. Additionally, there were constant "pitches" to the new owner on how great the machine was that he or she had just purchased and how much fun they were going to have using it. It sounded like the presenter thought everyone should join hands and start dancing and skipping for joy. I found it annoying.
The forearm support is made so wide that unless you are wearing a very heavy jacket your arm will move around, making the detector feel floppy. I assume it was made this way on purpose because most people do wear heavy clothing when detecting. However, this could better dealt with by making the forearm support adjustable.
The manual was clear and easy to read. However, a first-page listing of words and their definitions that may be unfamiliar to new detectorists would be a welcome addition. For example, sensitivity, threshold, and hot rock are used long before what they are is explained.
In a couple of places the manual devotes considerable time to talking about how great a unit I'd purchased. It was excessive enough that it began sounding like propaganda. This was much more than the usual, "Congratulations on purchasing this unit," opening sentence almost every manual has. I found it bothersome and a waste of time. When I read a manual, I want to get through it as quickly as possible.
I would have appreciated a little more technical explanation in the manual. For example, it explains how to control sensitivity, but it doesn't explain how it works. (Does tuning the detector to be more sensitive increase the output power or increase the gain of the receiver?) It states the 2500 has eight different operating frequencies, but doesn't tell me what they are... only that the basic frequency is 7 KHZ. It tells how to adjust the volume of the background noise (called threshold), but other than commenting that this enables the user to set it a comfortable level, doesn't discuss the pros and cons of silent versus loud background noise levels. The manual didn't explain the advantages of using slow, medium or fast Auto Tracking. It mentions that the Garrett GTI 2500 can find "very small nuggets," but doesn't explain what a very small nugget is. (The size of the head of a pin?) People like myself, who have never seen a nugget, don't know these sorts of things.
Everything worked and (except once) appeared on the detector's readout just like the manual said it would. I can't count the number of times I've gotten software or hardware where the manual hadn't been updated to reflect the latest changes. It's annoying and confusing and I'm glad to see that such was not the case with this unit.
The manual provides no information on how to test the detector to make sure it's working up to its design potential. All that's offered is a basic ID test by passing a coin close across the face of the coil. This does not test the most critical aspect of a metal detectors ability to find objects: depth penetration. A better test than the one offered would be if the detector couldn't sense and ID a quarter in air at some reference distance from the bottom of the coil, say 10 inches, then the detector isn't working to specifications. The important thing would be for the test to be an honest one. Simply waving a coin an inch under the coil would be a trivial exercise. There are off-brand detectors in Wal-Mart that could pass that test. I can understand that it might be unattractive to the manufacturer to give customers the power to quantify their detector's performance and see if it's operating acceptably. I'm not pointing a finger at the Garrett company alone. I wouldn't be surprised to learn that no manufacturer provides this sort of information.
I appreciate that the manual was designed to be small enough to fit into a pocket so the user can reach it for easy reference and that this places size constraints on it. But, in each of the cases where I asked for more information it would only take a few sentences to significantly increases the user's understanding and satisfaction. Eliminating the post-purchase sales pitches would provide more than enough room without having to increase the page count.
All of the control and programming buttons are within easy reach of the thumb of the hand holding the detector. There is no need to use the "off" hand, so it's free to do other tasks.
The soft plastic control buttons easily wedged under the edges of the openings for them in the control panel. This is exacerbated by using the thumb of the hand holding the detector because there is a natural tendency to push forward on the buttons, pushing them under the edge of the openings. This was only an issue with the larger buttons. When a button was stuck, the detector sometimes acted unpredictably. This sticking problem could be solved by making the buttons taller so that when fully depressed, they remain above the surface of the panel.
Since the detector is held to one side of the body, the LCD is viewed at an angle. This dims the appearance of the readouts and because the appliqued guide on the surface of the LCD panel is higher than the LCD symbols, parallax makes it appear as if the size symbols are off to one side. Clearer views would have been possible if the display unit had been mounted so that it could be rotated left or right ten degrees. This would allow people to twist it so they could look at the screen straight on.
It is very easy to work through the menu selections and make changes. I usually have problems keeping menus straight, but not with this detector. The menus are only one list deep. You don't have to work down through several levels of menus to get where you want to go.
While making my first attempt to set up a custom operating configuration, I pressed the wrong key. I tried correcting it but everything I did made things worse. Before long I had voices gibbering at me (Yes, the Garret GTI 2500 talks.) bleeping when I thought it should be quiet, quiet where I thought it should be bleeping, and weird things were showing up on the display. This was all my fault because I got carried away and trying doing something before reading the manual. Even after turning the detector off, it came back on still acting crazy. Then I remembered that if you press and hold the "On" switch for five seconds, the unit automatically returns to the factory programmed configuration. I did and it worked perfectly. I don't know if all programmable metal detectors have this sort of fail-safe recovery system, but they should.
The detector indicates depth in inches via a display bar but only in two-inch increments on the imaging grid. Since the imaging grid is the big sexy thing that differentiates the 2500 from other detectors, it would seem to make sense that it should display full accuracy.
At least in air, the detector appeared both consistent and accurate in identifying objects. For example, I could pass the coil over a quarter a dozen times and each time to ID was solidly on the "quarter" position.
I thought the LCD readout back light was a little dim. However, I recognize that making it brighter might wash out the display so much that it would be hard to read.
The information decals on the top of the display are unlit when the back light is turned on. You can't see what's there if you're in an unlit area. This is somewhat corrected by Treasure Talk, which can be set up to tell you everything that's happening.
At first I found the Treasure Talk feature annoying, but I quickly came to enjoy it. (It's rather like the talking computer on Captain Kirk's starship Enterprise.) The only problem is that the voice is uneven and jerky because instead of a voice synthesizer the computer sounds like it draws from a collection of pre-recorded words to create the announcements. The result is that many times words get jammed too close together and the tone changes from word to word. Also, some of the words are unclear. Every time Treasure Talk is activated, the first thing I hear is "five" instead of "size."
Although the battery pack can be removed and attached to the user's waist, I found that the detector's balance was better and easier to hold. It felt lighter with the batteries left on the unit even though it actually was heavier.
The "On" button isn't just a simple push. On my unit, a quick push and release, what must people do with push buttons, does not turn the metal detector on or off. The screen flashes but returns to it's original configuration. It's necessary to press and hold the "On' button for a second to get it to take.
The detector turned itself off four times during the first 16 hours of use. I have no idea why.
The tone of the background and target alert can be adjusted. Many people develop notches in their hearing where it's hard for them to pick up sounds. The Garrett has enough range so that they can find a tone they can hear.
That's it, as far as first impressions out of the box are concerned. Next things get tougher; I run the detector through an extensive air test and then it's on to the test garden.
![]()
Air Testing the Garrett GTI 2500
The value of air testing is that unlike soil testing, air is consistent enough regardless of location so that different tests by different people are relatable regardless of where they take place. This is not the case for soil tests because soils in different areas vary greatly in their ability to effect test results.
I set my Garrett GTI 2500 detector up on a wood holding frame, outside, as far away from metal objects and power lines as possible. The closest metal to the coil was the screws holding the legs to the support chairs, six feet away. The cardboard target holder and moveable plastic measuring reference grid could be moved until they touched the coil without being sensed. I held the target holder, which held coins in place with double-faced tape, by the very end to ensure that my hand did not effect the test results. Care was taken to ensure that the plane of the coil and the plane of the plastic test grid remained parallel and that the centers of each remained in line with each other. Even though the target holder and reference grid did not effect the detector, all tests were conducted with the test object between the grid/holder and the detector.
Tests were conducted using a 9.5-inch imaging coil, a 12.5-inch imaging coil, and a 4.5-inch non-imaging coil, each in the discriminate (coins) mode and in the all-metal mode.
The limit for distance was defined as that distance where the detector detected the target in 50-percent of the sweeps across the field.
Test results are presented on graphs with a scale of one inch per square. The solid black silhouette at the top of each graph represent the search coil. All graphs have been sized so that they show the same square size, making direct comparisons possible.
One thing I learned right away is that the pitch of the audio signal does not change as the target material changes. Because all targets sound alike, it makes it hard to understanding what other detectorists mean when they talk about the importance of tuning one's ear to target sounds.
Test Results:
Discriminator (coin) air tests with a 9.5-inch imaging coil:
The first series of tests used silver quarter, a silver dollar, a clad quarter, a nickel, a copper penny, and a silver dime as targets to determine the detector's sensitivity in the discriminate (coins) mode. The detector had fresh batteries. All targets were tested at sensitivity 10. An additional test was preformed using a silver quarter at sensitivity 9.
The first thing I noticed was that target sweeping speed had a profound effect on the metal detector's ability to detect it. At very slow speeds of 1-inch per second it was possible to pass a silver quarter one-inch from the coil without the detector sensing it. At 1-foot per second, the detector captured the target 50-percent of the time at 8-inches from the coil. Increasing the sweep speed to 3-feet per second, a normal sweep speed for detectors in the field, the detector captured the target 50-percent of the time at 10 inches. This last result seemed to the optimum, To capture the quarter at 11-inches, it had to be swept so fast that to do so with a detector would bend the coil support arm. For all of the following tests, a sweep speed of 3-feet per second was used.
The above might help explain why some people claim the Garrett GTI 2500 has poor soil penetration and others claim it is one of the deepest. The people claiming it doesn't go very deep may be using a slower sweep speed than those who claim it does.
The next discovery was that the detector behaved erratically at sensitivities above 10. It would spontaneously announce random target detections at an average of once every two seconds. This is the reason the tests were conducted at a maximum of sensitivity 10. I contacted several people more familiar than I about the GTI 2500 and they all stated that this is common. Higher sensitivities are only possible far out in the country where radio noise is at a minimum.
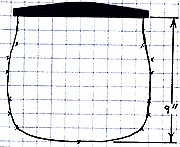
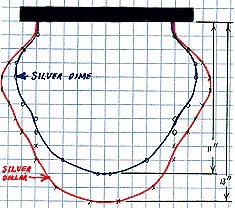
The first test used a silver quarter as the target.
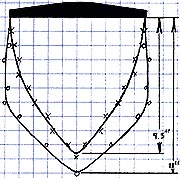
The inner conical-shaped profile shows the detection envelope at sensitivity 9. The maximum range was 9.5-inches. From 1-inch to 7.5-inches, the Target Imaging system was able to lock on to the target and 90-percent of the time assign it a metal value of 10.5 (half-dollar), identify it as being coin-sized, and estimate it's depth within 1-inch of it's actual location.
The larger outer profile shows the detection envelope at sensitivity 10. Increasing the sensitivity from 9 to 10 increased the detector's range by 1.5-inches.
The most interesting feature of this graph is that the basic shape of the envelope changed, becoming cylindrical for the first six inches of depth. Although the increase in depth was only 16-percent, the change in shape represents a doubling of the volume covered by the detection field. Much of the detection envelope balloons outward beyond the edge of the coil.
At distances greater than 7.5-inches, the Target Imaging system failed to lock on to the quarter and would not function. The metal-type identification became erratic beyond 9 inches in the all-metal mode.
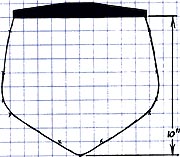
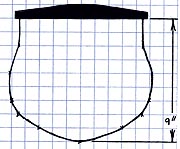
The second test used a silver dollar as the target.

The maximum depth was 12 inches and the maximum width was 13 inches. The Target Imaging function failed to lock on at distances of eight or more inches. The detector consistently recognized the target as a silver dollar and within one inch of the correct depth. The gray zone close to the detector coil is the area in which the silver dollar caused an overload.
The third test used a clad quarter as the target.
The only significant differences between the clad and silver quarter are that the detection envelope for the clad quarter is one inch shallower and slightly flatter. The detector identified both quarters with equal accuracy. The Target Imaging function failed to lock on past 7.5 inches.
The fourth test used a nickel as the target.
The detection envelope's maximum depth was 10 inches and the maximum width was also 10 inches. Note the change in shape which could be caused by the coin being smaller or the difference in the metal. No Target Imaging lock-on occurred beyond 7.5 inches. Accuracy as to type, size and depth continue to be accurate 90-percent of the time.
The fifth test used a copper penny as the target.
Test results were similar to the previous tests as regards accuracy. Note that the bottom of the detection envelope is almost flat.
The final air test in this sequence was of a silver dime.
Test results were similar to the previous tests as regards accuracy.
All-metal air tests with a 9.5-inch imaging coil:
I've read that using discriminate mode reduces the detecting range, but I was surprised by how much.
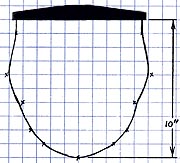
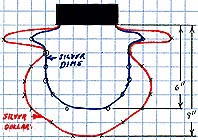
In the graph above, the inner detection profile is for a silver quarter with the discriminator on. The larger outer envelope is for the same target and sensitivity setting except detector had been switched to all-metal mode. Close to the coil, the width of the all-metal detection zone swells to 20-inches in diameter. The bulk of the detection zone is 12-inches across. In all-metal, the detector was able to see 2-inches deeper.
If you thought that was something, wait until you see what happens with a silver dollar as the target.
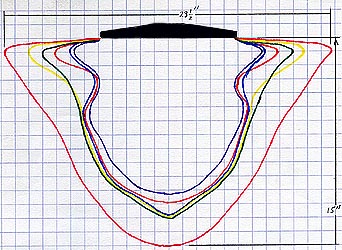
The outermost red profile is for a silver dollar. Yellow is for the silver quarter shown above. Green, it looks black, is next for a copper quarter. Blue is a nickel, orange for a copper penny, and the innermost purple profile belongs to a silver dime. The silver dollar could be detected out to a diameter of almost 24 inches when one inch below the coil. The maximum depth for the silver dollar was 15 inches.
The curious "waist" in the profiles for the nickel, penny and dime at three inches below the detection coil is very real. I retook all of the measurements in that area to make sure the detection field really did reduce and then increase at greater depths. A spokesperson at Garret confirmed this "waisting."
For the sake of simplicity, the last four graphs were only plotted using silver-dollar and silver-dime numbers. These sufficiently characterize the detector's performance. Target identification accuracy was similar to the above tests. The target Imaging function still failed to lock on beyond 7.5 inches.
Discriminator (coin) air tests with a 12.5-inch imaging coil:
Discriminator (coin) air tests with a 4.5-inch non-imaging coil:
All-metal air tests with 12.5-inch imaging coil:
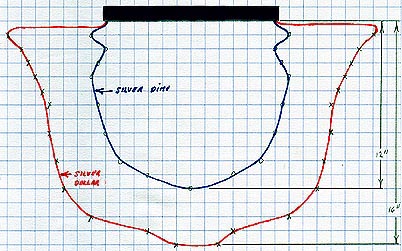
Twenty-five percent of the time the 12.5 imaging coil predicted target depths that were an inch in too deep.
All-metal air tests with 4.5-inch imaging coil:
Summary of results:
The detector zone profile is more barrel-shaped than the cone-shape usually presented for detectors functioning with one frequency.
The Target Imaging function failed to lock on whenever the target was 8 or more inches from the coil, even though the signal strength registered 12 and regardless of the target size. I contacted the Garrett people and they stated this is normal. I found this disappointing.
The metal-type number assigned to each target was accurate to within 0.5 value points on a 12-point scale.
The target size was 95-percent correct with most of the errors coming from the 12.5 imaging coil.
The depth finder was always within one inch of the actual depth and in 50-percent of the cases it was right on. I noticed that there appeared to be a systematic error for the depth indicated by the depth bar, the lower row of black squares at the top of the display, and TreasureTalk functions to report a depth that was one-inch too shallow 50-percent of the time with the 9.5 and 4.5-inch coils. However, the rounding-up function of the depth displayed on the imaging grid compensated for this. The detector never once displayed a depth that was greater than the actual depth except for a few cases with the 12.5 imaging coil.
The maximum
depth for the stock 9.5-inch imaging coil in discriminate mode
was 12 inches (30 centimeters) for the silver dollar. This is only 2
centimeters greater (7-percent) than the results reported in the
http://home.wanadoo.nl/corholland/
study. This is excellent agreement. Just as good was the 15-inch (38
centimeters) depth for a silver dollar in the all-metal mode. This is
exactly what the same study found. Using a 12.5 imaging coil
increased the all-metal depth to 16 inches (41 centimeters.)
I do not believe that my Garrett GTI 2500 has a no-motion all-metal mode. If the coil isn't moved at least every 4 seconds, the audio target sound will fade to nothing. I've never used any other detector so I don't know if there are detectors that will provide a continuous audio alert no matter how long they remain motionless over the target. I thought the fading of the target might be caused by Auto Trak, the automatic ground balancing system. But, speeding it up, slowing it down, and even turning it off did not stop the audio target signal from going away after 4 seconds.
In quiet situations, I found I could monitor the audio signal just as accurately using the detector's speaker as I could with headphones.
At least as
far as coins are concerned, the 9.5 imaging coil reaches almost as
deep and is more accurate in identifying the correct depth, size, and
metal type as the 12.5 imaging coil.
Numerical summery of maximum depths from the air test:
9.5-inch
coil in discriminate mode
silver quarter
- silver dollar - clad quarter - nickel - copper penny - silver dime
11 inches ..... 12 inches ..... 10 inches 10 inches .. 9 inches
....... 9 inches
9.5-inch
coil in all-metal mode
silver quarter
- silver dollar - clad quarter - nickel - copper penny - silver dime
13
inches ..... 15 inches ..... 13 inches 13 inches .. 12 inches ...
11.5 inches
12.5-inch
coil in discriminate mode
silver quarter
- silver dollar - clad quarter - nickel - copper penny - silver dime
................... 13 inches
....................................................... 11 inches
12.5-inch
coil in all-metal mode
silver quarter
- silver dollar - clad quarter - nickel - copper penny - silver dime
................... 16 inches
....................................................... 12 inches
4.5-inch
coil in discriminate mode
silver quarter
- silver dollar - clad quarter - nickel - copper penny - silver dime
................... 8 inches
......................................................... 6 inches
12.5-inch
coil in discriminate mode
silver quarter
- silver dollar - clad quarter - nickel - copper penny - silver dime
................... 9 inches
......................................................... 7 inches
I hope you enjoyed the detection envelope profiles. I haven't seen them anywhere else and I thought they might be interesting.
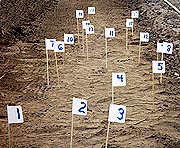
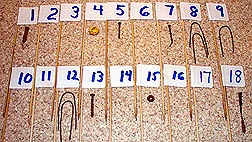
My Test Garden
It's called The Gauntlet, 47 test targets cunningly selected to ferret out a metal detector's strengths and weaknesses. The garden is arranged in two rows of targets, each separated by 18 inches. Prior to planting the targets, the entire area and borders were swept clear of every detectable piece of trash. The area was then leveled and rechecked. The targets were buried a precise depths and marked locations. In addition to the obligatory coins buried at various depths, I planted as wide a selection of trash and precious targets as the area allotted for the garden allowed. Care was taken to ensure that the backfilled soil was compacted to its original density. Unless otherwise stated, all flat objects were planted parallel to the surface of the soil.
Updated! Several targets are now closer to the surface to better enable checks of the detector's discrimination capability. Four targets were eliminated because initial testing indicated that there was no way the detector would ever detect them. Changes are indicated in purple.
1. clad
quarter, 1" deep
2. clad
quarter, 3" deep
3. clad
quarter, 5" deep
4. clad
quarter, 7" deep
5. clad
quarter, 9" deep
6. clad
quarter on edge, 9" deep
7. clad
quarter on edge, 7" deep
8. clad
quarter on edge, 5" deep
9. silver
quarter, 5" deep
10. clad 1/2
dollar, 5" deep
11. silver
dollar, 5" deep
12. silver
dime, 3" deep
13. silver
dime, 5" deep
14. silver
dime, 8" deep
15. nickel,
3" deep
16. nickel,
5" deep
17. nickel,
8" deep
18. penny,
3" deep
19. penny,
5" deep
20. penny,
8" deep
21. steel
penny, 4" deep
22. steel
penny, 8" deep
23. 1/2"
steel washer, 5" deep
24. 1"
steel washer, 5" deep
25. steel
bottle cap, 5" deep
26. 2-piece
pull tab, 5" deep
27. 1 and
1/2" drywall screw, 5" deep Now
3" deep
28. 1 and
1/2" rusted drywall screw, 5" deep Now
3" deep
29. to
be determined
30. 1 and
1/2" screw pointing up, 5" deep
31. 5"
length of 14 gauge wire, 5" deep
32. 5"
wire bent into a "U", 5" deep
33. rusty
3/4x3/4x3/4" staple, 5" deep Now
1" deep
34. small
paper staple, 3" deep Now 1/2" deep
35. 12 oz
crushed aluminum can, 11" deep
36. 15 oz
crushed steel can, 11" deep
37. 1 sq in.
al foil, crumpled to 1/2" disc, 5" deep Now
1" deep
38. steel BB,
3" deep Now 1" deep
39. 1/2"
lead ball, 5" deep
40. silver
dime 2" from a 2" nail, 5" deep
41. silver
dime 4" from a 2" nail, 5" deep
42. 3.3-gram
sterling silver ring, 5" deep
43. clad
quarter, 11" deep
44. .125-gram
gold nugget, 3" deep
45. to
be determined
46. to
be determined
47. to
be determined
48. clad dime,
3-inches deep
49. 1-inch
steel washer, 3" deep
50.
5.7-gram gold ring, 3" deep
51. to be determined
52. to be determined

It may not
look like much, but buried in the
depths of this
test garden are the things
metal
detectors have nightmares about.
Besides using the garden to test and become familiar with my detector, I plan to monitor the garden to see how the target signals change over time as the targets build up their halos. If I can find a dealer who rents detectors I also plan to use the garden to compare the 2500's performance against others.
As I become
more familiar with the GTI 2500, new targets will be added to the
garden to push the detector to the limits of its performance. There
are three empty spaces left. I would appreciate anyone with ideas for
interesting targets to email them to
me so I can add them. Thank you.
![]()
Running the Garrett Through The Gauntlet
It's 3 P.M. on a freezing Sunday afternoon, three days before Christmas, and here I am in the test garden putting the 2500 through its paces. I just finished the garden and my impatience to try it out wouldn't let me wait for a more sane time. So, here we go...
All readings were taken at sensitivity 10 (0-12 range), with a 9.5-inch imaging coil. Batteries were new. Auto ground balance varied between 11.7 and 12.3. Threshold (background tone) was set to be barely noticeable. Frequency was left at factory default 4. The first value following each target is the numerical metal-type prediction in discrimination mode, the second is the numerical metal-type prediction in the all-metal mode, and the last listing is the result for activating the Treasure Imaging (TI) function, which predicts metal type, target size, and depth. (For example: TI = 9.5-coin-1" deep means metal type 9.5 (copper-silver), the size of a coin, and 1" deep.) "NA" means that no values were available for that particular setting either because the signal was too weak or too erratic. In some cases clarifying notes are added after the detector results. When the detector indicated varying metal-type values over a range, it's indicated by "a-b," where "a" is the lowest value and "b" the largest in the range.
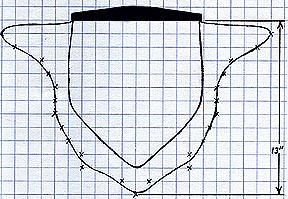
First, let's look at the difference between the detection envelopes for a quarter in air and in the ground.
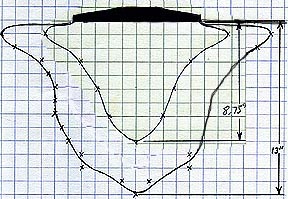
The outer profile in the graph is the all-metal air test detection envelope for a quarter. The inner detection envelope is the one in the ground. In addition to the the detection depth being reduced from 13 to 8.75 inches, the shape of the in-ground detection envelope also changed to be more conical.
(For those not familiar with the Garrett GTI 2500's metal value scale, here's a simplified version: 0.5-2.0=iron, 2.5-7.5=nickel, aluminum and gold, 8.0-12=copper and silver.)
(I modified the garden on 30 December, 2002 and retested the detector on the changed targets. Please scroll to the bottom of this section to see the new results, which are posted in purple.)
1. clad
quarter, 1" deep Disc = 8.0, all-metal =
10, TI = 9.5-coin-1" deep
2. clad
quarter, 3" deep Disc = 9.5, all-metal =
10, TI = 9.5-coin-3" deep
3. clad
quarter, 5" deep Disc = 9.5, all-metal =
8, TI = 9.5-coin-6" deep (TI started becoming erratic, giving
values of 9.5-coin-6", 8-can-7", and 3-larger than coin-6")
4. clad
quarter, 7" deep Disc = NA, all-metal =
1-10, Target Imaging = NA (TI and all-metal metal-type widely fluctuating)
5. clad
quarter, 9" deep Disc = NA, all-metal =
NA, TI = NA (Barely detectable)
6. clad
quarter on edge, 9" deep Disc = NA,
all-metal = NA, TI = NA (Fainter than #5)
7. clad
quarter on edge, 7" deep Disc = NA,
all-metal = NA, TI = NA (Fainter than #4)
8. clad
quarter on edge, 5" deep Disc = NA,
all-metal = NA, TI = NA (Fainter than #3.)
9. silver
quarter, 5" deep Disc = NA, all-metal =
5-8, TI = 7.5-smaller than coin-4" deep and 5.0-coin-4" deep
10. clad 1/2
dollar, 5" deep Skipped
11. silver
dollar, 5" deep Disc = 12.0, all-metal =
12, TI = 12-coin-5" deep
12. silver
dime, 3" deep Disc = 7-10, all-metal =
9-12, TI = 7-coin-3" deep
13. silver
dime, 5" deep Disc = NA, all-metal = 7, TI
= 7-larger than coin-8" deep and 12-coin-3" deep
14. silver
dime, 8" deep Disc = NA, all-metal = NA,
TI = NA (Could barely detect)
15. nickel,
3" deep Disc = 5.5-8, all-metal = 1-3.5,
TI = 7-coin-3" deep
16. nickel,
5" deep Disc = 8-12, all-metal = 11-12, TI
= 8-coin-5" deep
17. nickel,
8" deep Disc = NA, all-metal = NA, TI = NA
(could barely detect)
18. penny,
3" deep Disc = 8-10, all-metal = 7.5-10,
TI = 9.5-coin-3" deep
19. penny,
5" deep Disc = 7.5-8.5, all-metal =
7.5-10, TI = 8.0-coin-4" deep
20. penny,
8" deep Disc = NA, all-metal = NA, TI = NA
(could barely detect)
21. steel
penny, 4" deep Disc = NA, all-metal =
1-12, TI = 10.5-smaller than coin-3" (all-metal values for metal
fluctuated widely.)
22. steel
penny, 8" deep Disc = NA, all-metal = NA,
TI = NA (could not detect at all)
23. 1/2"
steel washer, 5" deep Disc = NA, all-metal
= NA, TI = NA (could not detect)
24. 1"
steel washer, 5" deep Disc = 1-7,
all-metal = 1-8, TI = 9-coin-4" deep
25. steel
bottle cap, 5" deep Disc = 2-9, all-metal
= 2.5-10, TI = 7.5-larger than coin-5"
26. 2-piece
pull tab, 5" deep Disc = 8-12, all-metal =
5-9, TI = 5.5-coin-5" deep
27. 1 and
1/2" drywall screw, 5" deep Disc =
NA, all-metal =NA, TI=NA (barely detected)
28. 1 and
1/2" rusted screw, 5" deep Disc=NA,
all-metal=NA, TI=NA (weaker than #28)
29. 1 and
1/2" drywall screw, 7" deep Disc =
NA, all-metal =NA, TI=NA
30. 1 and
1/2" screw pointing up, 5" deep Disc
= 2-7, all-metal = 1-3, TI = 7-coin-4"
31. 5"
length of 14 gauge wire, 5" deep Disc =
2-8, all-metal = 2-12, TI = 12-smaller than coin-3" (This was
interesting because the wire registered as two targets, one for each
end of the wire.)
32. 5"
wire bent into a "U", 5" deep Disc
= 2-8, all-metal = 2-12, TI = 12-smaller than coin-3" (This
time the wire registered as two targets slightly closer together.)
33. rusty
3/4x3/4x3/4" staple, 5" deep Disc=NA,
all-metal=NA, TI=NA (No detection)
34. small
paper staple, 3" deep Disc=NA,
all-metal=NA, TI=NA (No detection)
35. 12 oz
crushed aluminum can, 11" deep Disc = 5-9,
all-metal = 1-10, TI =10.5-can-6"
36. 15 oz
crushed steel can, 11" deep Disc = 3-9,
all-metal = 2.5-9, TI = 2.5-can-8"
37. 1 sq in.
al foil, crumpled to 1/2" disc, 5" deep Disc=NA,
all-metal=NA, TI=NA
38. steel BB,
3" deep Disc=NA, all-metal=NA, TI=NA
39. 1/2"
lead ball, 5" deep Disc = 1-6, all-metal =
2.5-6, TI = 6-smaller than can-4"
40. silver
dime 2" from a 2" nail, 5" deep Disc=1-7.5,
all-metal=8.5-10.5, TI = 5-coin-6"
41. silver
dime 4" from a 2" nail, 5" deep Disc=NA,
all-metal=1-12, TI = 12-coin-6"
42. 3.3-gram
sterling silver ring, 5" deep Disc=7-10,
all-metal=7-10, TI = 8-coin-5"
43. 5.7-gram
gold ring, 5" deep skipped (Actually, my
wife wouldn't let me bury my wedding ring for the test... go figure.)
44. .125-gram
gold nugget, 3" deep Disc = NA, all-metal
= NA, TI = NA (no detection)
45. .08-gram
gold nugget, 3" deep Disc = NA, all-metal
= NA, TI = NA (could not detect)
46. .04-gram
gold nugget, 3" deep Disc = NA, all-metal
= NA, TI = NA (could not detect)
47. .02-gram
gold nugget, 3" deep Disc = NA, all-metal
= NA, TI = NA (could not detect)
Summary:
The layout of the 2500's display suggests, and the manual, video, and dealer descriptions imply, that the metal-type cursor position for a target that's a quarter will always end up under the 25-cent symbol on the decal above the LCD.
What my stroll through the test garden indicated is that the metal-type cursor position has nothing to do with the coin values on the decal. A copper or silver coin may register anywhere in the 7-12 range. This may be confusing and disappointing to new detector users because they expect the detector to indicate exactly and consistently what the target is, not a range of possibilities.
The Target Imaging function becomes erratic at depths of 5 inches and below. This makes sense because it should be reduced from the 7.5-inch in-air limit by an amount proportional to the reduction in penetration depth. Because the Target Imaging Grid is scaled to 12+ inches, new owners might justifiably expect it to work accurately to that depth and be disappointed because it doesn't.
The manual states that the 2500 can detect "very small nuggets," but doesn't specify what this means or at what depth. The nuggets I used may have been too small or too deep. I intend recovering them and seeing if the GTI can pick them up on the surface.
The discrimination function was erratic in its predictions of metal type below 5 inches, even for large targets. The most accurate detection zone appears to be from 1-4 inches deep.
New test results:
27.
1 and 1/2 " drywall screw, 3" deep Disc=0.5-7.5,
all-metal=0.5-3, TI = .5-coin-3" (Sweeping
perpendicular to the screw resulted in single bells. Sweeping along
the screw's length produced double bells. Target Imaging from the
side locked on when centered on the screw. TI coming in from one of
the screw's ends locked on 2-inches from either end.)
28.
1 and 1/2" rusted drywall screw, 3" deep Disc=.5-8,
all-metal=4.5-10, TI = 3-coin-4" (Behaved
same as note above, plus - obtained good bell tones only 49 percent
of the time sweeping perpendicular to the screw, but 90 percent of
the time when sweeping along its length.)
33.
rusty 3/4x3/4x3/4" staple, 1" deep Disc=NA,
all-metal=1.5-7, TI = NA (Strongest
return occurred when the edge of the coil passed over the staple, not
the center.)
34.
new small paper stable. 1/2" deep Disc=1-8,
all-metal=0.5-8, TI = 2-smaller than coin-4" (One
of the new times the depth estimate was far off.)
37.
1"-square al foil crumpled to 1/2" disc, 1" deep Disc=2-8,
all-metal=3.5-8, TI=2-smaller than coin-1"
38.
steel BB, 1" deep Disc=NA,
all-metal=.5-8, TI = .5-smaller than coin-2"
43.
clad quarter, 11"deep Disc=NA,
all-metal=NA, TI = NA
44.
0.125-gram gold nugget, on surface
Disc=NA, all-metal=NA, TI=NA Could barely detect with 4.5" coil.
Not at all with standard 9.5" coil.
48.
clad dime, 3-inches deep Disc=7-10,
all-metal=5.5-9, TI = 5-coin-3" (This
target tests erratically. Some days it's like this, others the
detector is more stable with metal-type readings very consistent at
10. There are no weather differences between the days and the soil
has the same amount of moisture in it. I'd estimate that the
wider-range tests occurr three times as often as the more consistent ones.)
49.
1-inch steel washer, 3" deep Disc=4-8,
all-metal=3-8, TI = 8-coin-2" (Another
erratic target. Sometimes the range increases to .5-11.)
50.
5.7-gram gold ring, 3" deep Disc=4-6.5,
all-metal=4-6.5, TI = 5-coin-3"
I would greatly appreciate email from anyone familiar with the Garrett GTI 2500 who can explain if these results are consistent with their experiences with this and with other detectors. Thank you.
The Learning Curve
This new section will chronicle tricks I pick up for squeezing more accurate information out of my Garret GTI 2500.
Updated!
Changing Frequency to Reduce EM Noise Interference
One corner of my backyard is cris-crossed with power, telephone, and television cable lines. In this zone, setting the detector's sensitivity higher than 9.0 results in the metal-type cursor randomly jumping up and down the scale. I set the adjustable frequency at 1, 4, and 8. None of these settings improved the detector's ability to operate more stably in this area.
Silver or Clad?
A quarter three inches down is about as easy a target as anyone could want. Yet when I swing my 2500 over one, the metal-type cursor jumps all over the scale from 7.5 to 12.0. What good is a discriminator if it can't nail things down any better that that? Well, by observing the range of values, perhaps enough to tell if it's a clad or silver quarter.
Consider the following, each number is the numerical value of the metal-type from one swing over each target in discrimination mode:
#1 #2
9.5
11.5
8.5
10.5
9.5
11.5
7.5
10.0
9.5
10.0
7.5
10.0
9.5
10.0
7.5
10.5
9.5
9.5
10.5
9.5
8.0
11.5
9.5
10.5
8.0
9.0
8.0
10.5
9.0
10.5
When I first watched the numbers jump around like this I was appalled. I thought the discriminator would always give the exact same value after each sweep over the same target. I even thought that the detector would be able to tell me what the denomination was by positioning the cursor under the penny, nickel, dime, or etc. spot. Instead what I got was a random series of widely-scattered numbers. Then I had the idea of writing down a large number of numbers for each target to see if there was a pattern... there was.
Note that although the numbers for both targets have similar total ranges, the positioning of the ranges on the scale is different: target #1 values run from 7.5-10.5 for an average of 9.3 whereas #2's go from 9.0-11.5 with an average of 10.3. Similar tests using the all-metal mode showed that the range of values for the targets followed the same pattern, although the ranges were slightly smaller.
So which is which? After checking the map to the test garden, #1 turned out to be the clad quarter and #2 was the silver quarter.
While the above may be interesting, it's hardly practical in the field. I found that if I swing the coil ten times over a target and the discriminator values oscillate around 9, it's probably a clad coin. If the values center on 10, the probability is increasing that it's a silver coin.
So,
how does this system work for smaller coins?
Values for 20 passes over a clad dime buried at 3 inches ranged from 5.5 to 9.5 with an average of 7.8. A silver dime ranged from 7.5 to 10.5 with an average of 9.0. The system seems to work for small coins, but is shifted down 1.0 points.
Values for twenty passes of a nickel buried three inches deep ranged from 1.5 to 9 with an average of 6.0.
Nineteen passes over a penny gave a range of 7 to 9 with an average of 8.1
Then I tried to type a steel washer and everything fell apart.
I expected it to be nailed down around 0.5 or 1.5, but many readings reached as high as 11! Then I got to thinking about it and tested several other washers and steel objects. What I found is that some washers registered in the "iron" zone where others were up in the 8 to 10 zone. A pulley consistently scored in the 10 to 12 zone and soft metal strapping tape was solid at 0.5.
I think what's going on is that there really isn't very much made out of iron in our modern world. It's mostly steel, which means it's been alloyed with various materials. I assume this changes it's conductivity and therefore how the detector sees it. Also, most steel objects like washers and pulleys are plated with tin or other metals to protect them from rusting. The type and thickness of this plating may also play havoc with a metal detector's discrimination circuits.
So, washers are tough. Most of those I tested had readings averaging in the 4-5 zone. But many were consistently higher while others ran lower.
Maximum
Detection
Depth
Mr. James Eckert emailed me with a request to determine the maximum depth the GTI in all-metal mode equipped with a 12.5-inch coil could detect an uncrushed soda can on its side. The answer for my soil is 27 inches, or 68.6 centimeters.
False
Target Imaging Lock-Ons
If the target is close to the surface, The Target Imaging function can get a solid lock-on as the target passes under the outer edge of the coil as well as when it's under the center of the coil. It's not as strong or accurate, but it's good enough to fool me from time to time. The key to watch for is if the TI lock on is about four inches from the target location as indicated when in Discrimination or All-metal mode.
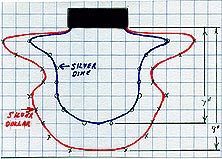
In-Ground Detection Envelope shape and size as a Function of Sensitivity
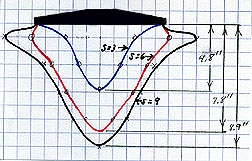
This graph shows the effect on the size and shape of the detection envelope as sensitivity is changed from 3.0 to 6.0 to 9.0. The detector was in all-metal mode and equipped with a 9.5-inch imaging coil. The targets were clad quarters.
Plotting the maximum depth as a function of sensitivity yields the following graph:
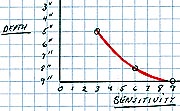
This gives me a way to double check a Target Imaging readout that's trying to tell me that I'm looking at a large deep object. Let's say that at sensitivity eight I saw a brief flash indicating the target was a coin five inches deep, but for the rest of the time it says the target is a can at 12 inches. If I cut the sensitivity to five and the target is still detectable, it's more likely that it's small and shallow. This is similar to raising the coil several inches and if the target fades, it's likewise probably small and shallow. I suppose this chart could be used to pinpoint an object's depth. The problem is that the chart changes with soil conditions.
In the Field
Field Trip #2 The Garrett 2500 goes to the Beach!
I spent several hours beach combing with the Garret on January 18, 2003 with the metal detecting club I joined. The pickings were slim because the area had been previously swept by residents. However, I focused on the parking islands and an area surrounding a telephone and while I found nothing of value, I got a lot of valuable experience in the field. Here's my meager take:

The upper left three objects are foil and all registered solidly in the silver (11-12) range. The best find was a solitary zinc penny, lower right. The most interesting object was the circuit board in the center. What made it interesting was that it had a footprint of six-inches. A assume all the wiring created an antenna effect.
The detector was within 1-inch of the correct depth 90-percent of the time. It had about the same accuracy as regards object size. But, the metal-type discrimination tended to jump all over the scale. Iron and steel commonly registered as high at 8 and aluminum as silver. After an hour, I fell into the habit of only using the All-Metal mode and the Treasure Track to pinpoint and find the size of objects. I completely gave up on working in Discriminate mode. Why bother? The metal-type is indicated in All-Metal.
All of the above was in dry sand. I found working in wet sand almost impossible. In All Metal, the detector was constantly whooping and hollering at me regardless of sensitivity setting. It sounded like there was a strong target every six inches. In one spot it insisted there was a silver quarter three inches under the coil. It did so even though I had excavated a hole eight inches deep and a foot in diameter under it. In Discriminate mode, I activated the salt-elimination function but could not detect any change.
I'm going back to the beach in February and will work on the wet sand problem more.
In dry sand the detection depth was the same as dirt. In wet sand it appeared to be reduced from 9 inches for a clad quarter to seven inches.
Field Trip #1 Wasn't much of a field trip, I walked all of thirty feet to my back yard. I'd only had the detector one day and wanted to test it where I wouldn't have to worry about curious onlookers and park managers giving me the evil eye for digging up their sod. Besides, I want to build a test garden and thought it would be a good idea to sweep the intended area clear of unplanned targets.
I selected a strip in my vegetable garden that will be a walkway for at least several years. This area had been tilled and worked for fifteen years and I figured I'd spotted and discarded most of the trash that might interfere with the detector. Boy, was I wrong.
Within the first ten feet I found eighteen strong targets. I marked each with a flag to help keep tracked of them. Taking trowel in hand I started digging and came up with the following treasures:
If I thought I was finished... I was gravely mistaken. Three days and 93 rusted screws, staples, bits of foil, and bent wires later the 3-foot by 36-foot area designated for the test garden was clear of every contact detectable with the detector on sensitivity 12, with a 9.5-inch coil, in the all-metal mode.
What I found was that in trashy areas, the Garrett GTI 2500 had a difficult time discriminating and pinpointing targets. This is because the objects were so close together that their signals overlapped. I assume all detectors would have difficulty under these conditions.
Once the field was cleared, I ran the detector one last time to see how the it reacted to quiet ground. I discovered that it's not completely quiet. As the coil moves, the automatic ground tracking reacts slower than my normal sweep speed of three feet per second. Also, it's common for the detector to give off a slight buzz at the end of each swing if the coil lifts slightly. This is just the result of the uplift at the end of the swing happening faster than the ground balance can adjust for. In every case I found that slowing my sweep slightly and making sure that the coil head remained the same distance off the ground eliminated these buzzes. However, there are always some ground signals making some noise. I assume these are small mineralized areas, perhaps from removed targets whose halo of mineralization remained in the ground where they were.
Hints and Ideas
As I learn more about detectors and detecting, I hope to post hints and ideas that might be useful. I'll also be adding things I try that don't work so that others don't make mistakes that I already have.
Probe
Tongs
![]()
I found this ridiculously long, thin plier and thought it would work as a probe to locate objects, then by spreading and closing the jaws, the object could be grabbed and pulled out. I marked the jaws every inch to help guide how deep I went. Think of it as a minimally-invasive soil surgery technique.
It didn't work. The jaws would clog with dirt and not be able to close on the target. Also, I wasn't able to "feel" the target well enough in most cases to locate it.
Detector
Note Pad
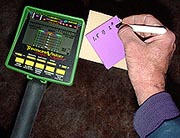
This
idea did work. I noticed that in the excitement of digging a
target, I often forgot what the some of the many readouts the 2500
provides were. To make notes required letting go of the detector to
hold a pad in one hand and a pen in the other... awkward. I solved it
by hot-gluing a small piece of masonite to the side of the detector
to act as a table. A pad of post-its is stuck to it. The pad is
inclined for comfortable writing. It works great! I record all of the
target predictions and as I dig, use the pad as a reminder of
possible IDs and depths. Then, after the target is found, I wrap it
in the post-it with the predictions. This way I can compare what the
detector predicted to what I found. Also, the paper cushions any
sharp points on the object, this is important to me because it seems
all I'm good at finding are rusty nails.
Clear Area
This sounds like a no-brainer to experienced detectorists, but I spent five hours working a trashy area before it occurred to me.
If you have to work an area that has so many contacts that the "bleep" from one almost overlaps the "bleep" from close neighbors, I found it important to find a clear spot with no targets. This gives someplace to pile excavated dirt and test it to see if the target had been dug up target.
Make a Rogue's Gallery of Trash
It's easy for me to forget the detector's readouts that end up leading to a piece of trash. So, I got the idea of hot-gluing the trash I find to poster board sheets in a binder and writing after each item the detector values for it.
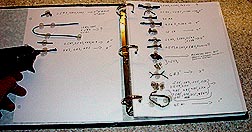
It makes a good reference and is helping develop a feel for what targets produce what kinds of readouts. Some of the items, though of no value, are interesting. Consider the following piece of... well, I'm not sure what.
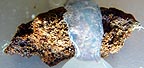
In real life it looks like a mixture of rust and mineral. What makes it interesting is that while it gives a very strong target alarm in all-metal, the Garrett's Target Imaging system won't lock on to it or even indicate it's there, even when the object is held right under the coil. It's barely attracted to a strong magnet, much less than a heavily-rusted nail.
Use Your "Off" Arm
If you are right handed, try holding your detector in your left hand. Swinging a coil doesn't take much dexterity and using your off arm for this task frees up your good arm for more delicate duties, like digging up all those gold coins.
Metal Detector Links
Here are several links I found useful while researching detectors. Although I've traded emails with several of these site owners and found them to be helpful and friendly, I have had no business dealings with any of them.
Manufacture
Links:
Fisher
Garrett
Minelab
Tesoro
Dealer
Links: (Note
- I found that most dealers sell the same products at the same price.)
Kellycodetectors
Metal
Detecting Forums (The best places
to ask experienced detectorists questions)
(Links to 15 other metal detecting forums)
Personal
Web Pages about Detectors and Detecting:
(Sites I've checked and like)
Toms
Treasures NEW!!! Dozens
of detector reviews of all brands and models!
Jim
Vokes Detecting Pages
Phil
Harveys Metal Detecting Page
Boom
Towns and Relic Hunters
![]()
Please click HERE to visit my main site and browse 90 other pages covering everything from electric rocket engines to astronomy.