EXPERIMENTS WITH MICROWORMS: How to raise and collect them easily.
(Click on Bettas to return to the main betta page or on main site to browse 70 topics ranging from exotic kaleidoscope designs to the strange world of lucid dreaming.)
NEW!!! Microworm life cycle information: Microworms belong to the species panagrellus. They live for 20-25 days, start reproducing at 3 days, and bear up to 40 live young every day to day and a half. They perfer living on the surface of soggy, pulpy material like moist mashed potatoes or oatmeal. They eat bacteria that grow in these materials.
NEW!!!
Bill
Wedekind's collection technique. You're going to love this!
By Bill Wedekind
Dear fellow aquarium enthusiasts:
I would like to share with all of you an incredible harvesting technique that I just discovered.
I used to grow microworms many years ago when I had over a dozen tanks in my parents home. I found them to be a very valuable live food for young fry. Now I am showing my children then joy of keeping an aquarium and breeding. I remember never being able to harvest enough worms for all my young. In an effort to increase my harvest, I would always have 6 -12 cultures going.
The time tested method of harvesting these worms is to scrape them off of the side of the container as they climb out of the medium. Indeed, this is what I did many years ago and it is also the instructions I received from Clint when I ordered my culture. However, if you have kept microworms before, you have observed the same thing as me - most of the worms are on the surface of the medium. Only a small fraction of them actually climb out to be harvested. Of course, if you try to harvest off the top of the culture, you will also get an unacceptable amount of the medium which you do not want to put in your tanks.
A little background: I used to grow the worms only in a corn meal culture. We put this in plastic shoe boxes which were great because they were large and clear with covers. Per the instructions that Clint provided, I saw that you could also use other material such as oatmeal. So, from the starter culture I bought, I started two cultures; one in oatmeal and one in corn meal. I wanted to see which would work better (provide the most worms). These were both put in large plastic shoe box size containers.
Both cultures grew well. However, even after 8 days of growth, there were not many worms climbing up the sides. Sure, there were millions of worms in each culture but they were mostly on top. I tried many things to harvest more worms but always got too much oatmeal or corn meal. So, after two days of experimenting, I tried something "revolutionary." In fact, it worked so well, I believe it could become the new standard for harvesting these worms. Would you believe that at each feeding, I actually harvested MORE worms than I could use. But now I just take less by choice. Here's the technique:
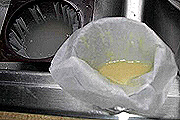
First, wait until your culture has reached maturity (has a gazillion worms crawling all over it). Then cut a piece of paper towel to fit over about half of the culture surface. You can decide later if you want to use more or less towel. The size of the towel will determine your harvest size. Now thoroughly wet the towel in fresh water and squeeze it so it is just damp. You are going to lay this towel over the top of the culture. We dampen the towel so as not to deplete the moisture in the culture. If you see your culture getting dry, just add water. Now, cover it and just wait a few hours. I let mine wait overnight the first time I tried it. In this time, worms will cover the surface of the towel. Now just remove the towel. It will be literally saturated with worms. The towel comes out virtually "clean." It comes out a bit cleaner from the oat meal culture but I believe the corn meal culture provides more worms. Rinse the towel in a cup or two of clean water. It usually takes me two cups of water just to rinse the towel to the point where it looks like it is free of worms. Then I finish rinsing the towel in one of my fry tanks. Even after taking the vast majority of worms off of the towel and then dipping the "empty" towel in a tank, I am probably overfeeding this first tank (thousands of worms still on the towel). Next, I pour the cups containing the worms through a #2 cone coffee filter that I put in a second cup. I rinse this through 2-3 times. What is left is millions of worms in the coffee filter that you can use to feed more fry than most of us will ever have.
I took a photo of ONE of my worm harvests from one culture. It is an unbelievable sight.
I weighed the harvest - it was OVER ½ ounce of worms without any debris. I had so much left over that I fed my adult tanks with it also.
 ...........
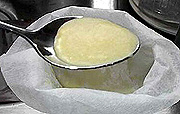
I've actually improved on the "millions of microworms" harvesting method described above. It totally eliminates the process of filtering the worms through a coffee filter. Although filtering works, I have found over time that sometimes the filter "clogs" and it takes a long time to get the worms "purified". Also, some of the worms go through the filter and are lost. Check this out - imagine being able to dip a teaspoon and get ONLY worms. No filtering, no trouble whatsover.
Here's my final setup:
Get a worm culture going the normal way. Although my original article indicated that I thought the oatmeal was a better medium than cornmeal, I now prefer cornmeal (it stinks less, it seems to work better and it lasts longer).
So ...
1) Get a cornmeal worm culture started and wait until it is going strong.
2) Lay a paper towel over the well-populated culture (same as before). Sprinkle a few teaspoons of fresh water on top.
3) Wait until you see the worms in abundance on top of the towel (same as before).
4) Now, instead of removing the towel, leave it in place. Just use a spoon to gently scrape the worms right off of the towel. You get no cornmeal (or just a couple of specs). From my experience, you can leave the towel in place (as long as you don't tear it which if you do, just buy a stronger towel, not the cheap store brand) for the LIFE of the culture. This works better because it doesn't disturb the culture and the only worms disturbed are the ones you harvest. The culture continues without interruption - there is no "recovery" time (such as when you remove the towel). I have harvested 3-4 teaspoons of pure worms EACH DAY from each shoe box size culture. Each of my cultures goes about 3 weeks - some a little longer. When my kids say it stinks too much (I'm used to it), I get some new ones going.
5) For each teaspoon of culture you remove, replace with an equal amount of pure water right on top of the towel.
That's it! My cultures are working so well I could probably start feeding my adult population if these worms weren't so small. Thought you might want to share this with your readers as well. As good as the first method was, this is even better still. I don't plan any more improvements because I don't see any room. I'm harvesting worms as simply as taking frozen food out of a packet. It doesn't get any easier than this (unless you can get the worms to jump into the aquarium too.)
(Thank you Bill! This is an outstanding solution to a problem that's haunted fish breeders for decades. Thanks to your inventiveness, life will be easier for all of us.
I tried this technique myself and it works. The only problem is that for small cultures the layer of microworms is so thin it's hard to scrape off. Most of the worms hide in the wrinkles in the paper. What I found works well is to place a smaller, second piece of wetted paper toweling on top of the first one. The worms climb through both of them. The top one is lifted off and dipped into the tank to release the worms. You can't just lift up the first layer and dip it in the tank because there is a lot of culture medium sticking to its underside. Using the two-towel technique insures that none of the medium gets into the fry tank.)
NEW!!! Microworm-only diet!
I
was fortunate enough to trade several emails with a Betta enthusiast
by the name of Mister Doug Varney. He related to me that he attempted
raising a spawn on only microworms. Within two weeks they started
dying off. This is sooner than a similar die-off I noticed with a
vinegar eel-only diet so I assume that vinegar eels are more
nutritious than microworms... though neither is good enough by themselves.
Frosting microworms! Feeding microworms:
I raise my microworms on mashed potatoes and have had a problem topping existing cultures with a thin, fresh layer of potatoes when it's needed. The new mix is thicker than the old so it tends to squish to the bottom of the culture instead of floating on top. Trying to spread it only makes things worse. Then I got an inspiration! I fitted a pastry bag with a medium round tip and filled it with mashed potato mix. Then I piped the potatoes on top of the old medium. It worked great! Not only is it quick and neat, it also helped me practice my cake decorating skills.
NEW!!! Worm-frosting update! I've been experimenting with different potato/water mixtures and found that a one-part instant potato flakes to two-parts water is the best mix for the worm-frosting technique presented above.
How to see microworms. I had one visitor write and ask how to see microworms, it was impossible to spot them by looking down on the culture. The answer is to look at the surface of the culture at a glancing angle, preferably with the culture held between a light source and your eye. As the worms wriggle, they reflect light away and greatly magnify your ability to spot them. The surface of the growing medium should look like it's boiling with minute undulations. The same principle works when you take a glancing look at a polished table to see any defects.
Different microworm food:
Further down the page I present the results of comparing several different growing mediums. One visitor wrote and mentioned that his worms grew fastest on wheat flour. He also said the odor was quite strong. I haven'y used this yet but anyone impatient for microworms might want to give this food a try.
Microworms
live in their own waste:
Because microworms are surface dwellers, they live, eat, reproduce, and (I apologize if the following insults any visitor's sensitivities) excrete their wastes in the thin layer of growing medium at the top of a culture container. Because of the last issue, the quality of the inhabited zone declines much faster than if the worms simply ate the food. My cultures seem to take on a strained looked after one month. Topping them with a new layer of growing medium perks the colony right up. The pastry-bag technique mentioned above is particularly effective because the worms get completely covered without being disturbed. As they burrow up through the new medium, any waste clinging to their sides gets scraped of. By the time they immerge on the top they are clean and haven't carried old medium up from the lower levels that could soil the new growing zone.
Er... with all the time I'm spending on the care and feeding of microworms, I'm beginning to think that I should refile these pages under the microworm category instead of bettas. Does anyone out there know if there's a microworm webring?
Which growing medium do microworms prefer?
Microworms are so easy to grow and harvest it seems pointless to invest much time on them. But I can't resist sticking my finger in so here are the results of a few tests I've conducted.
I inoculated the following growing mediums with the same amount of microworms and got these results:
a. 1/4 cup instant mashed potatoes and 3 tablespoons water - the mixture looked too dry and growth was slow.
b. 1/4 cup instant mashed potatoes and 6 tablespoons water - worms grew rapidly and when they climbed the sides they appeared to drag less of the mix with them as compared to the other mixes.
c. 1/4 cup instant oatmeal and 1/4 cup water - fastest growth.
d. 1/4 cup instant oatmeal and 5 tablespoons water - mix was a little wet but the worms still grew quickly.
e. 1/4 cup instant oatmeal and 6 tablespoons water - mixture was very wet, had mold problems, but worms still grew quickly.
f. 1/8 cup oatmeal, 1/8 cup corn meal and 1/4 cup water - mix was dry, slow growth, but after 10 days the surface teemed with worms.
What these six tests show is that microworms will grow on almost anything. However, that is not to say that all mediums are acceptable. I found oatmeal-based mediums gave off a strong yeast odor that wasn't pleasant. This odor was strongest in the wettest mixes. The mix with cornmeal didn't have any mold but smelled putrid. I'd do without microworms if they had to be grown in cornmeal. The mixes using mashed potatoes had an almost undetectable, pleasantly sweet aroma. Also, the worms seemed to climb up out of the mashed potato mixes cleaner than any of the others. For my money, mashed potatoes are the medium of choice for microworms. The best mix I found was two parts dry instant potato flakes and three parts cool water. This mix looks dry but in three days it settles out to a moist consistency the worms love.
If you have an oatmeal-based culture and want to convert it to one that uses mashed potatoes, it isn't necessary to transfer the worms to a new container. Simply cover the existing culture with half an inch of mashed potatoes and the worms will burrow to the top. The layer of potatoes will completely block off the yeasty odor of the oats, if the layer completely covers them.
Eliminating mold:
Mold spores can float anywhere, stay dormant for centuries, and spring to life quickly. I thought that if one of my cultures became infected with a mold, that culture would be lost. I was wrong.
I had one sample that had one-quarter of its surface area covered with a light gray mold. I simply scooped out the bad areas and covered the entire surface with a 1/2 inch thick layer of clean mashed-potato growing medium. That was six weeks ago and the mold has never reappeared. If you have a mold-infected culture you want to save, try the above technique. I'd appreciate hearing how it works. Thank you.
Oxygen requirements:
Most microworm rearing guides suggest closing the container tightly and popping the lid once a day to give the worms fresh air. This procedure reduces the amount of strong odors released into the fish room. Since I use mashed potatoes odor is not a problem, so I tried several different hole sizes to determine the smallest size hole that lets fresh air in but didn't cause the growing medium to dry out. I found that the optimum size hole is 1/2 square inch for every seven square inches surface area of growing medium. With this ratio, a culture can last two weeks before the surface dries to the point where the worms start slowing down. At this point a light spritzing with water will restore them for another week. Note: these results are for my low-humidity environment in the high desert area of southern California. If you live in a humid area, you could make the hole larger and not have your medium dry out.
Climbing experiments:
I've noticed my microworms don't climb very much. At any given time, only one of the seven cultures I currently have growing will have significant numbers of worms on the walls. I've tried adding more water and letting them dry out more but neither of these induced climbing. But, when I seal the cultures so that fresh air can't get to them, the worms start climbing within minutes. If the cultures are then uncovered, they pull back into the growing medium. This indicates that restricting air is an effective technique to get microworms to climb.
Drowning experiment:
One Internet information source for microworms stated that the worms could drown in the layer of liquid that builds up on the surface of the growing medium. This struck me as odd since they are reported to last for days in a fish tank. I tested this theory by mounding the growing medium up in several locations in a culture. Excess liquid drained away from these hills and filled the valleys between them. If the worms were stressed by being forced to live in areas that were too wet, I assumed they would migrate up the sides of the hills or perhaps the walls of the container. Nether happened. The worms congregated in the wetter areas, shunning the comparatively dry, but still wet, heights. This seems to show that microworms are perfectly happy in a shallow (1/16 inch) layer of liquid on top of the growing medium.
![]()