Wayne
Schmidt's Addams
Family Playfield
Restoration
Page
(How I restored a seriously abused TAF playfield.)
Since
I already own an Addams Family pinball game it may seem strange that
I'd also want to have a separate playfield. There are several reasons:
First, There are only so many TAF games in existence and every year one or two are lost to old age or abuse. While virtually everything in any pinball game can be replaced, the playfield itself , like the back glass, is copyrighted and therefore irreplaceable. It is the heart and soul of the game. If I can save a playfield from perishing I'll have helped preserve this great game.
Second, I was interested in learning the many skills needed to accomplish a first class restoration.
Third, I plan on completely stripping down my TAF and doing a thorough restoration of its playfield. By having a second playfield I can transfer all the parts from the game immediately onto it rather than storing them for months... and probably forgetting how they go back on.
Lastly, I've read many differing accounts of the best way to remove old playfield Mylar and wanted a playfield on which I could experiment with each of them to determine which is best.
Motivated
by so many reasons I decided that this was something I really wanted
to do. All I needed was a playfield.
Buying
an Addams Family
Pinball Game Playfield
I thought this was going to be the easy part. I was wrong.
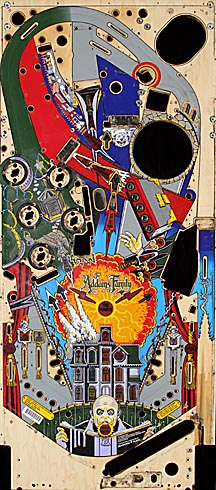
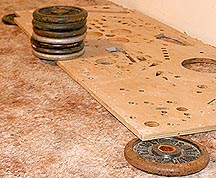
It took three months of searching before I finally located one on Ebay. It looked completely trashed, which is just what I wanted. I placed a bid and as I had some experience with Ebay before, knew the best insurance for winning the auction is watching the bidding during the final seconds. Sure enough, after five days of no activity, two minutes before the auction was ending the bids started rolling in. Ten seconds before the auction concluded I increased my bid $20 over the last one. I hit "submit bid" three seconds before the bell, too late for anyone else to raise their bid. The playfield was mine for $420.
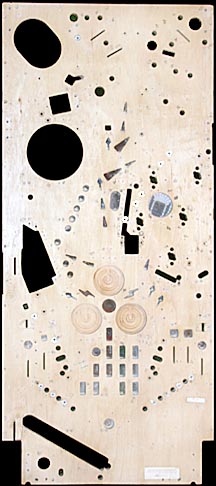
Here's what it looked like:
 ......
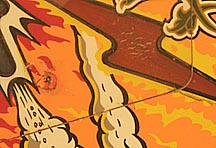
Although these images aren't large enough to show them, the playfield had almost every imaginable problem. Someone had done a horrible touch-up job using paints with the wrong colors and hadn't applied them anywhere near the lines they were trying to repaint. The wood in the shooter area was warped, broken and severely rotted. The electric chair kickout lip was ground down so far much of the paint was missing. There was more... a lot more.
It was a total wreck.
Just what I wanted.
I don't know if $420 is a high price to pay for a pinball playfield in this condition, but since it was the only one I could find the point is moot. Besides, it means much more to me than just a replacement playfield, it's also the source for all the material required to create this webpage.
On to the restoration:
Repairing
Broken Wood in the Ball Shooter Area
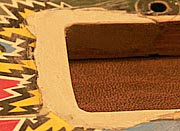
By far the worst damage was the broken wood at the end of the feeder that ejects balls to the ball shooter.

It was much worse than this image shows. Besides being shattered all the way through, large chunks of wood were missing and the area was severely rotted. Not helping was the fact that the last owner had attempted to patch the break with a soft wood putty. But by far the biggest problem can't be seen in this image.
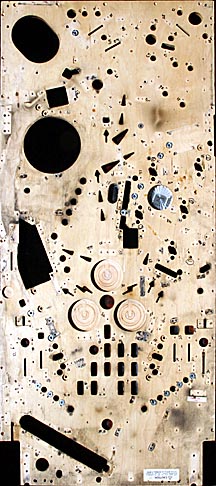
After this break occurred, it appears the playfield had been thrown into a corner and left standing on the broken section of wood. Over time, the weight of the playfield warped the wood so that the lower right corner, as seen on the top view of the entire playfield above, had warped over an inch upward. Any attempt to repair the break without first removing the warp was doomed because of the enormous torque the warp would put on the glue joint.
To remove this warp I clamped a block of wood to press the warped section back into place. Then I drove in a wedge to bend the warped playfield in the opposite direction of the warp. I then heated the back of the playfield in the area of the warp with steam from a tea kettle for ten minutes.
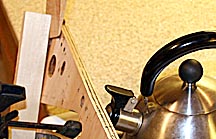
The
heat and moisture softened the wood without burning it or damaging
the finish. After half and hour of cooling I removed the wedge and
brace. Almost all the warp had been removed. One more touch-up
steaming was all it took to finish the straightening.
Next I attacked the break. Using tweezers, I pulled out any loose bits of wood, then used an exacto knife to scrape off rotted wood and old wood putty. A thorough cleaning with naptha came next.
There wasn't enough wood left to attempt a simple glue or even epoxy repair. The surface layers on both sides were missing so I cut matching pieces from birch plywood and fitted them into the break. Working one side at a time, I used masking tape to dam the edges of the break so glue couldn't drain away and then epoxied the break together using the highest strength epoxy I could find. Extreme care was taken to made sure any and all voids were completely filled with epoxy. After one side set I repeated the procedure with the other.
After the exopy cured, I used light colored exopy putty to fill in the areas that had previously been patched with wood putty.
Starting with 220-grit sandpaper I carefully worked the area with increasingly finer grades of sandpaper until it was as smooth glass. Here's how it came out:
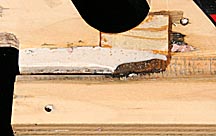
It looks much worse than it is. The most important thing is that the repair is extremely strong. The shooter track is even and smooth so the ball won't jump when fired. The dark areas aren't gouged out spots, but areas filled with clear exopy. After all the other mechanical problems with the playfield are repaired I'll address the cosmetic issues of this area when during the painting part of the restoration. This area isn't cosmetically critical because it's covered by the ball shooter's cover.
Split
Wood
Screws tightened along the grain of plywood can easily split the wood, especially if the screw holes aren't drilled properly beforehand. That's what happened to the outside flange of the ball shooter area. Two oddities about this are that there is nothing that should be screwed into this area and that one of the two screws broke off flush with the hole; there was nothing to grab to unscrew it.
A knife blade driven into the split widened it enough to grab the screw with tweezers and twist it out. I then filled the split with a professional wood glue, clamped it overnight and by the next day it was as good as new... though I still don't know why someone put screws into that piece of wood.
Advance
X Wear Repair
![]()
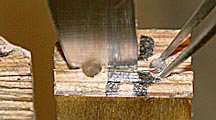
Every time the ball tracks across the playfield on the wire racetrack it's dropped onto the "Lite Adv. X" lane that leads to the lower right flipper. Because this is one of the most repeated shots, this zone gets more wear than any other area on the playfield other than the electric chair.
The problem is much worse than it looks. The grey "stuff" covering the wear is a soft, gummy material used in a botched attempt to fill wood gouged out 1/16-inch deep.
I began by using an exacto knife to remove the old patch material and all loose bits of wood.
Because of the constant pounding this area gets the top surface of wood was pulverized. I carefully scraped this off since it would weaken any patchwork to follow.
My first attempt to fill in the lost wood used a liquid epoxy. The problem was that the epoxy's surface tension was so great it formed a high dome no matter how often I leveled it. This dome was extremely hard to sand down. Once cured, the epoxy became very brittle and I felt it was sure to crack considering the number of balls that were going to fall on it. I removed it by flicking off bits using an exacto knife.
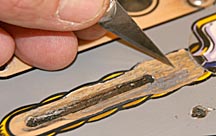
My next attempt worked much better. I used epoxy putty to replace the lost wood, leveling it by rolling a PVC union over it.
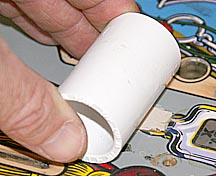
Epoxy putty has the annoying habit of sticking to everything but what it's supposed to. The solution is to use water to wet the roller and surface of the epoxy, being careful not to wet the wood you want the epoxy to stick to.
The result is a very smooth, flat layer of epoxy perfectly leveled with the top of the playfield. This sounds great but there's a problem.
Left as is, when the patch is painted the paint will raise up over the level of the patch several thousandths of an inch, enough to deflect balls and create uneven lighting reflections. To prevent this, I sanded down the surface of the epoxy so it was slightly lower than the surounding playfield.
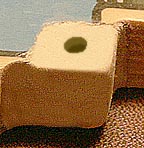
The resulting patch came out great:
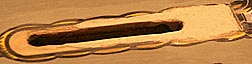
I
repeated the same process to fill in the badly damaged electric
chair hole, which had half an inch of wood worn off its front edge:
The right edge of the Swamp:
A screw hole completely torn out off the lower left corner of the Swamp:
And
lastly a notch ripped out of the gap beteen two holes in the left sligshot:
Mylar
Removal:
Ugly dirt lines at the margins of the Mylar protectors and several holes created by driving screws all the way through the playfield required the Mylar to be removed for repairs and cleaning.
After comparing five different Mylar removal techniques (which can be read in detail on my MYLAR REMOVAL page) I decided to use the Goo Gone technique. It worked perfectly and easily without lifting any paint.
Cleaning
the
back:
While it can be argued that no purpose is served by cleaning the back of the playfield I still wanted to do it so the playfield looks as good as possible. I began by using soap and water and progressed up through several different types of solvents: alcohol, Goo Gone, Naptha, etc. Nothing worked. In the end the only thing that removed the dirt and scorch marks was good old 220 grit sandpaper. An hour's work took care of everything.
.......
Before..........................................After
The result was better than I'd hoped and well worth the effort. Sanding the back created an enormous amount of fine dust, which of course collected in every lens hole. I used a can of compressed air, the type used to blow dust out of computer keyboards, to clean them out.
Tee
nut
replacement:
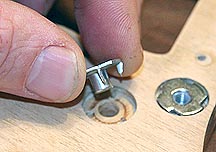
Seven 8-32 x 1/4-inch tee nuts were missing on the back side of the playfield. I expected this to be an easy fix. It wasn't.
The countersinks for the tee nuts are smaller than 90-percent of the heads of the 8-32 tee nuts available. I had to go to four different hardware stores to find ones that fit.
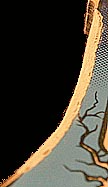
Removing
board
warp:
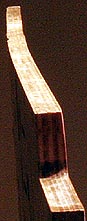
Sighting down the length of one edge of the playfield shows that it has a significant warp even though the opposite edge is straight. While side rails would flatten this warp it would put enormous strain on the screws. Some of this warp also propagates across the face of the playfield so that even with the side rails in place the board would have a cupped shape. To remove the warp I placed blocks under the opposite ends of the warped edge and placed weighs on top of it so that the playfield was bent in the opposite direction of the warp.
Shortly after taking this photo I
placed non-stick aluminum foil between the
board and weights to prevent
straining and scratching.
It took two weeks but the warp finally eased out. By varying the location of the shims and weights, warps of complex shape can be removed.
Fixing
Delaminations:

It's common for the surface layer of old plywood to peel off if the surface gets cracked or split, as it has above. Correcting these delaminations is important because over time they collect dirt, each new particle of which acts like a wedge widening and extending the delamination. In time a large area of the playfield can be compromised.
The fix is easy. Use a sharp, thin blade to remove any debris preventing the surface layer from making contact with the underlying wood. Then use a second blade to work good quality wood glue deep into the crack while the first blade props the gap open. Clamp until dry. For delaminations in the middle of the table where a clamp won't reach, use a bolt fitted with a large washer as a clamp.
Leveling
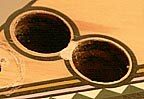
Playfield Lenses:
It's common for old playfields to have lenses that have worked their way up above the level of the playfield because of thermal cycling. In the case of this TAF playfield the "Cousin Itt" lens had moved up the thickness of four sheets of paper, enough to disturb ball movements. The classic solution is to use a hot air gun, my wife's hair drier in this case, on the back of the playfield to soften the glue holding the lens in place and push it down level from the other side.
It took three minutes on high to heat the lens's glue enough to push it back down level with the playfield. I found that I had to continue applying pressure on the lens after removing the heat to prevent it from springing back out. After four minutes it was cool and stable enough to let go.
While this technique worked, there were a couple of problems with it. First, considerable pressure is required to push the lens down. This pressure should be applied to the edges of the lens to avoid warping the lens itself. Second, I used my bare fingers to push the lens in place so I could feel how far the lens was moving. They got hot enough to be painful.
On the plus side this technique is quick and didn't damage either the lens or the "Cousin Itt" decal on it.
Final Epoxy Fills:
That completed all the major mechanical repairs on this Addams Family pinball playfield. The next step was to begin touch up painting but before that I mixed up a small batch of wood colored epoxy putty and wearing high powered reading glasses, slowly examined every inch of both the front and back of the playfield, filling any voids left by bits of plywood veneer breaking loose. This is common wherever two holes are very close. I was surprised to discover several dozen spots where patching was necessary. With that done it it's time to move on to painting.
I
began this restoration in
June of 2008.
It's
an on-going project that will
take months. Please check back from
time to time
to view
my progress.
![]()
(Click
on main site
to browse 70 other topics ranging from exotic kaleidoscope designs to
the strange world of lucid dreaming. There you will also find several
other pages dealing with the Addams Family pinball game.)