How to Make 3D PokeScope Image Pairs: Instructions with pictures explaining what a PokeScope is and how to make image pairs for it to create stereoscopic pictures.
The
PokeScope, shown below folded and unfolded, is a stereoscopic viewer
that enables people to look through it at matched pairs of 3D images
to see true three dimensional pictures. PokeScopes cost $40.00 and
can be purchased from http://www.pokescope.com. (And no, I don't own
stock or am in any way connected with that company. I just like their product.)
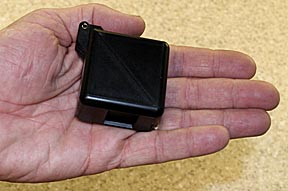
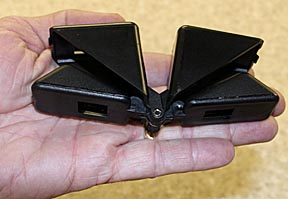
It works like the old ViewMasters we used to use when we were children. The main differences are that the eyepiece spacing is set for adults, the optics are much better and the images it can accept can be much larger thereby provided significantly greater detail. (Note: this isn't one of those cheap 3D viewers where one side is red and the other is blue. Both images are full color for this device.)
(It's easy to draw pairs of pictures or take photographic image pairs that create a stereoscopic effect when viewed properly without a PokeScope. To see how 3D image pairs create stereoscopic pictures please click on HOW TO MAKE THREE DIMENSIONAL IMAGES.)
Creating a 3D image pair for the PokeScope is easy and can be accomplished several ways. For film cameras, simply take two pictures of the same object with 5 to 10 degrees between the two pictures. Ten degrees is approximately a 2-inch sideways shift in position for every foot of distance away from the object. (Any more than 10 degrees and the two images are so different they are hard to merge, any less and 5 and the 3D effect is weak.) Be sure to maintain a constant distance from the object. I find that the resulting 3D effect is better if the camera is turned to keep the object in the center of field. Moving the camera without rotating also works. Avoid taking the picture with the object in bright light if it has shiny surfaces. It's possible that one image will capture a glint of light that isn't in the other. If this happens it creates an odd, disconnected sensation when looking at that part of the 3D picture. Have the pictures cropped and enlarged to 5x7 inch prints (the perfect size for viewing 16-inches away) and you're ready to go... if you already have your PokeScope.
Digitally the process is the same and has the advantage of being able to copy-and-paste the second image next to the first and print them out on one sheet of paper. Just be careful to keep the image scale the same on both pictures when cropping, up-sampling, and resizing for printing. The advantage of going digital, among other things, is that you can look at the image pair on the monitor through the PokeScope and edit out any artifacts that weaken the 3D effect.
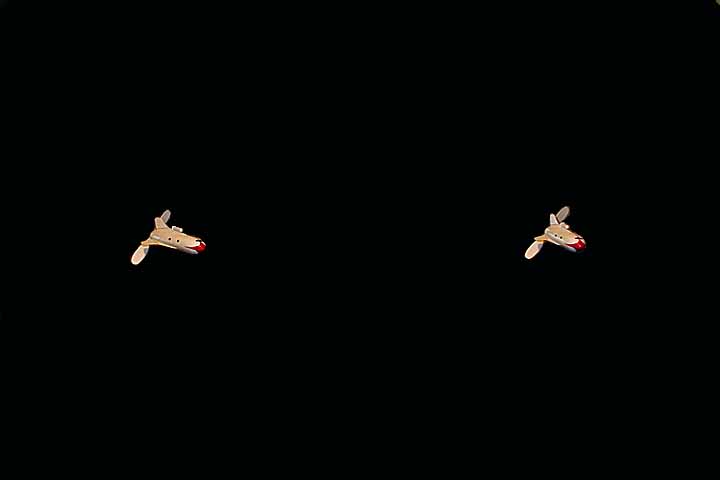
Here's an example of an image pair I made using my grandson's toy train:
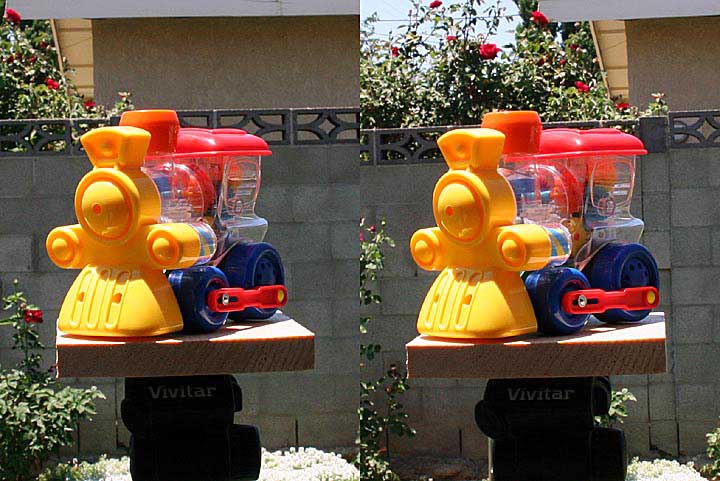
(Images left full size in case any PokeScope owners want to look at it.)
I've found it works best to focus on one central object and try to have the background as out of focus and undefined as possible. The reason is that the angle shift of the camera creates an enormous change in the background if the main object is far in front of it. This means your eyes won't be able to merge the background into a single image. However, you can take two images of distant objects to create a wide angle 3D image, just avoid any objects near the camera from getting into the picture or they will be out of 3D sync.
If you really get into this the PokeScope people also sell a pair of cameras mounted side by side for taking both images at once and a sliding-arm stand for mounting your camera on that helps keep it aligned for both shots.
Another
way to create image pairs is to fix the camera on a tripod and
simply rotate the object between the two shots. The advantage of this
technique is that the background stays in perfect register whereas in
the moving-camera technique it'll almost always look out of sync.
And now for
something really different... introducing the-
Double, sideways-periscope, instant pokescope image creator!
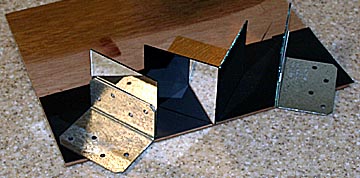
This little gem got thrown together in about 20 minutes and, admittedly, looks like it. A camera lens is positioned close to the two mirrors in the middle so that they split the image into two parts. The outer mirrors, mounted on metal flanges and resting on a sheet magnet that's holds them in position, directs two different perspectives of the object of interest toward the center mirrors and from there into the camera. When it's all set up you get a 3D image pair taken in a single photo. Alignment is a little touchy, but then it was made from bits and pieces scrounged from around the house. First surface mirrors work best (available from http://www.delphiglass.com) but regular old mirror tiles from a hardware store will do. For a sense of scale the mirrors are 2 inches on a each side. It works, but as the picture taken with it below shows, the image scale of the subject is small.
Using a zoom lens helps the scale but makes alignment a bear. A better version with more accurate alignment could be an interesting device, though perhaps not a very useful. I include it here just for it's entertainment value.
By the way, in case you were wondering about a spaceship with a prop, this was for a Cub Scout space derby racer from many years (decades) ago. It was novel because unlike all other space derby ships it used a pusher prop to give it a unique look. Regrettably, it didn't work as well as it looked.
The angle between the two images was 13 degrees, which creates a very strong 3D effect but also causes considerable eye strain.
![]()
Return
to the mainpage and browse 90 other
subjects including several other pages related to cameras, lenses and photography.