My Pinball Restoration from Hell
I figured I had done everything right: got a referral for a good pinball restorer from someone who owned and ran a large pinball center, checked out the restorer's store to confirm he was capable of good work, told him I wanted a first class job and didn't mind paying top dollar for it or having to wait months while the work was completed, and gave him written lists of everything I wanted done as well as what I didn't want done. I thought that would be enough.
It wasn't.
When I got the game back some things I didn't want done had been done anyway. One thing I did want done was the replacement of a particular part. It wasn't done even though I'd sent an email reiterating what I wanted and citing a source for the item I wanted replaced. I acknowledge that the restorer couldn't read my mind and and while I thought I had made things clear I accept that communication between people is an imperfect art and misunderstandings occur. Still, it was irksome.
But there were many additional mistakes which I hadn't expected to be made by a professional restorer.
1. A bumper post was left so loose it rattled.

2. I asked that the playfield be touched up. While some of it was, a large chip in the very middle of the table was left unrepaired. It blazes bright red and it's hard to understand how it could have been missed. There was a similar, though smaller, problem with another lens.
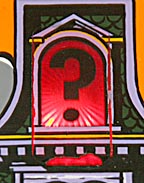
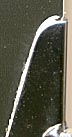
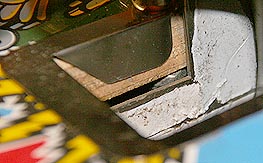
3. Another problem with the playfield touch-up was that over half of the mansion room lenses had cracks in the paint around them that let unsightly light leak through. This problem is visible in the picture above. No effort was taken to repair or even cover over these cracks.
4. Decals were used for some of the touch-ups and some were left with unsightly air bubbles trapped under them.
5. Still another decal problem was that a couple of them weren't positioned properly over the original lettering. This created an unsightly double image effect. (This really bothered me because one of these decals was placed over a window that didn't seem to need it.) Just to rub salt into the wound, two weeks after getting the game home the corners of the 3 MIL and 9 MIL mansion rooms started to peel up.
6.
Decals were also used to cover over several small areas of chipped
paint. While this smoothed them out, it doesn't appear that any
filler had been put down first to level these areas. The pits were
smoother, but still there.
7.
I was told the playfield was going to be completely stripped down
and cleaned. When I got it home I noticed that the entire playfield
was covered with fine dust, as if someone had been doing power
sanding in the shop while the coverglass was off the game. It took me
ten minutes of vacuuming to get it up and some of the inaccessible
areas are still filthy.
8. There was cabinet wear around all four legs that no effort was made to touch up even though some other marks on the cabinet were fixed.
9.
While reinstalling the legs when I got the game home I noticed that
the top layer of plywood lamination was separating from the cabinet
under the right front leg. No effort had been made to glue it back in place.
10.
Somewhere in the game's past someone had pasted a piece of white
sticker paper on the very front of the cabinet. There are no serial
numbers on it and it's impossible to miss, yet no effort was taken to
remove it or cover over it.

11.
The bolt holes in legs to my pinball game have countersinks that
match a bevel on the back of the bolts to make them more secure when
tightened. When I got my machine home and started putting the legs
back on I discovered the good beveled bolts that were on it when I
turned the game over to the restorer were gone and had been replaced
with bolts that had flat backs to the heads. These inferior bolts
will allow the legs to shift more, increasing the wear on the cabinet.
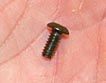
12. The "I" in THING on the backpanel (if you haven't guessed yet this was an Addams Family pinball game) wouldn't light. I discovered the cause was a loose wire to the bulb.
![]()
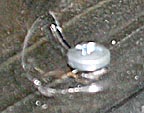
13.
Although it's hard to see in the following picture, the START button
no longer lights.

This, like the "I" light, was particularly disturbing because both of these were working when I turned the game over to the restorer. It's one thing to not fix something, quite another to break something that had been working.
14.
One of the screws to the new cloud topper purchased for the
restoration had been overtightened resulting in the plastic getting cracked.
Addmittedly, this is a very small problem but that's why I hired a professional, so this sort of mistake didn't occur.
15.
Before I turned the game over to the restorer, shooting balls up the
left ramp never created an air ball (where the ball is thrown up into
the air, usually coming down where it gets trapped so you have to
take the cover glass off to free it.) After the restorer finished
with the game, half of all balls shot up the left ramp were air
balls. I traced the problem to the lip of the new plastic ramp. It
was a fraction of an inch too thick, which created a ridge in the
metal entry slide causing balls to be deflected up into the air. I
shaved the edge down and the problem went away.
What's troubling about this problem is that I was told the game had been thoroughly played to make sure everything worked perfectly. How such a high percentage of balls being thrown up to slam into the underside of the cover glass could be considered as "normal" or "acceptable" is beyond me.
16.
When I turned the game over to the restorer, the balls were fairly
new, only having about 200 games on them. They showed a little wear
but nothing critical. When I got the restored game home I noticed the
balls had been changed to newly polished ones. This was nice, until I
noticed all three balls had small flecks of gunk on them, which
rubbed off with a fingernail, and one ball had a large, ugly
tarnished spot that wouldn't clean up.
This turned out to be a bigger problem than it at first appears. While it doesn't effect play, the fact that a player focuses so much attention on the balls means that this tarnished spot is seen many times during a game. It's a real turn-off.
17.
A dozen spots on the cabinet got touched up with black paint, which
was nice. But why then where half a dozen other obvious spots left
untouched? I'm not talking about tiny pinpoints, but white paint
transfers over an inch across.
18.
Three damaged corners on the upper cabinet were repaired with epoxy
putty, yet one was left crushed.
19.
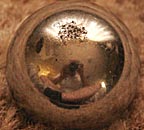
Prior to turning the game over to the restorer, when attempting to
trap a ball on the lower left flipper I never had a ball hang up high
on the flipper as shown below:

After this restorer worked on the game it hangs up here an average of twice every game. It's stuck so firmly that repeated shakes of the cabinet won't dislodge it, unless the shaking is so hard it triggers a tilt. The only alternative is the attempt the riskier maneuver of a light trigger on the flipper. Even this doesn't always work because the ball often just gets trapped in the same spot again.
Running a finger over the area disclosed a raised bump. This suggests that playfield touch-up work in this area wasn't properly smoothed. I've attempted several times to rub and press this bump out, but so far haven't been able to completely eliminate the problem.
20.
After I got the game home the lower right flasher burned out after
only a few games. I had always thought part of a complete
"shopping" included replacing all the bulbs in which case
this flasher should have been good for a long time. When I cheched
the lamp it was a 194, a cooler running lamp which if new, should
have lasted for years. It was blackened on the inside suggesting that
either it was the original old lamp or had been replaced with an
equally old lamp. Either way this should not have been missed during
a complete shopping.
One day later the light beneath the "Light Things Flips" also burned out, more evidence that the lights weren't changed.
(I checked the receipt and on it the restorer wrote that all the bulbs had been changed. I wonder how that could be when two supposedly new bulbs burned out within the first few games?)
21.
I requested that a green light be installed to illuminate the Swamp.
While this was done, the light was placed too far out into the ball's
path that it was repeatedly trapped so it couldn't drop into the
Swamp return.
This required pulling the glass off in the middle of a game many times. All it took to fix it was reposition the light 1/4-inch farther back.
Another problem with the position in which it was placed was that even if the ball didn't get stuck, it always struck the bulb. This loosened it and caused it to pop out of the socket and fall into the Swamp kickout twice during the first few games.
22.
When I turned the game over to the restorer the cover glass was
fitted with Vinyl tape along the top and bottom of both edges to
reduce vibrations. When I got it back the retorer had replaced the
cover glass as requested but failed to replace the tape.
23.
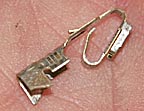
I had attached a thin sheet of plastic to one side of the electric
chair kickout to make the ejected ball path more consistent. When I
got the game back I noticed that the restorer had removed the
plastic. I grant that it may be a matter of opinion as to whether the
restorer should have contacted me first before removing something
that was obviously an intended modification. However, what is
categorically wrong is that having decided to remove the plastic the
restorer then failed to removed the double face tape used to hold the
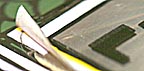
plastic to the side of the kickout.
The white tape left in place can be easily be seen in the photo above. When a ball rubs against it, it creates extremely erratic ejections, many of which clip the lower point of the left slingshot and arc gracefully into the center drain with no hope of a save.
24.
Shortly after getting the game home, the upper right flipper began
sticking. It turned out the armature was jamming. I replaced it with
a new one and that fixed the problem. My complaint is that the
restoration receipt clearly states that all flippers had been
completely rebuilt. Checking the other three flippers I discovered
that they had, indeed, been rebuilt with all new coils and
armatures... except the one that was sticking. Everything on it was
new except the armature.
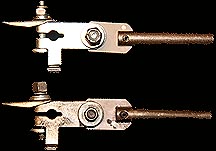
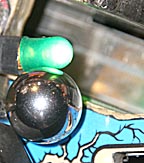
Although
not as obvious in this photo as in real life,
the
armature I removed (bottom) shows many signs of age.
The
top one is the new one I installed to fix the sticking problem.
I suspect the restorer accidentally picked up an old armature instead of a new one and failed to spot his error. This isn't the sort of mistake I expected from a professional.
25.
The restorer replaced the old power plug to the game. This was
appropriate because it was falling apart. This showed that the
restorer understood the importance of making sure the power cord was
in perfect condition, not only for the safety of the game but of the
people using it. Why then did he leave a large gash that exposed the
inner wires in the same power cord?
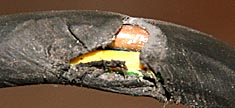
If he didn't want to bother replacing the cord, the least he could have done was take a few seconds to wrap electrical tape around the break.
26.
After playing many games on the restored TAF, it suddenly occurred
to me that I wasn't seeing any ball action from the magnets. Checking
it out, I discovered that all three magnets were inoperative.
I
had asked the restorer to install a fuse in line with each of the
three magnets. This he did and did so very neatly. But, upon
inspection I discovered the reason the magnets weren't firing was
that all three fuses had blown. It turned out that only 1-amp fuses
had been used. This is grossly under powered. One amp fuses burn out
after only a few pulses. One and a half-amp fuses last one Seance
round before blowing. Clearly 2-amp fuses are the smallest that can
be used for this. A few minutes on the Internet turned up many sites
that recommend 2-amp fuses. If this information is so easily
available why didn't the restorer know enough to install the proper
size fuses.
27.
Shortly after the restoration the spring to the Thing flipper on the
upper left side of the table broke. Upon inspecting it the amount of
corrosion made it obvious that it was an very old spring. Either the
restorer installed an old used spring when he rebuilt that flipper or
he didn't rebuild it at all. A new spring is typically good for
thousands of games.
28.
It's common during play to gently bump the coin door. Not a slam or
hard bump for a Kick back to save a ball from draining but accidental
brushes that are so light that they would never normally be sensed by
the tilt sensors. During the restoration an new door was installed on
the game. The new door has a full 1/4-inch of loose play. It's loose
enough so that even the lightest touch causes it to rattle and
trigger a slam tilt. Either the latch wasn't adjusted to hold door
closed tightly or a padded gasket wasn't installed to prevent
unwarranted tilts. This was quickly and easily fixed in seconds by
sticking a felt pad on the door frame.
I
admit that these can be considered minor issues and in fact I was
ready to accept them without comment. Then I discovered something
potentially serious.
29.
When I turned the game in to the restorer the pop bumper caps were
red, yellow, orange, clear and blue, as they are supposed to be.
After having the game home a few days I suddenly noticed that the
blue cap was missing and I now had two red caps.
30.
I had just started playing my third game on the restored machine
when I noticed a ball bump something shiny as the ball went down the
center drain. Looking close, I discovered a loose lock nut on the
very edge of the drain. Had it fallen in it could have jammed the
machine or caused a short.
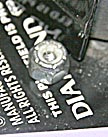
It was easily removed and no harm done. But, where did it come from? Is there a loose part inside the game that this was supposed to hold down which will break free? Was it accidentally dropped there? What other parts were left loose inside the game?
31. After this I gave the playfield a good going over and discovered two more loose items, a small screw...
...and an unused crimp connector.
The angular shape of this last item would make it very easy for it to snag on something under the table as it fell through the center drain, again possibly jamming a mechanism or shorting a circuit.
While
the first 29 items on this list may be subject to interpretation as
to whether they represent acceptable or unacceptable restoration
work, the last three aren't. No restorer should ever leave loose
parts laying around on the playfield. One can be excused as a
mistake, though certainly not expected from a professional. Three
loose parts is just plain carelessness.
I
contacted the restorer and while he did not offer an apology, to his
credit he did offer to send a man out and take care of all the
problems free of charge. While appreciated, I have to confess that it
did nothing to take away the negative feelings this restoration
experience gave me. I understand that the issues brought up on this
page are superficial to the important work the restorer did in
correcting 14 years of bad repairs inside the game, specifically
correcting many wiring problems that had killed two strings of
general lighting. He also rebuilt, or said he rebuilt, all the
flippers, pop bumpers and slingshots, replaced all the rubbers and
claims to have replaced all the bulbs as well as dozens of other
fixes hidden under the table. The problem is that I can't help
wondering that if the simple items mentioned on this page slipped
through, what else was missed? Needless to say my confidence in this
restorer has been lost. (In
case you were wondering, the
restoration cost $1,709.00 and took four weeks. He has been doing
this work for years and has a dedicated workshop and two employes to
assist him. Pinball
restoration is his fulltime occupation.)
Maybe this was an isolated case and the person who restored my TAF is the best that can be had. Perhaps he was so focused on getting the important stuff right, like rewiring and repairing circuit boards, that minor things were forgotten. He may have completed hundreds of outstanding restorations and mine was just a little weak in a few minor points. He deserves the benefit of the doubt, which is why I'm not saying who this was or where he works.
Still, I had expected better work from a professional.
Now
to the real reason for this page: recommendations to anyone
considering hiring someone to do a professional restoration on a
pinball machine.
First, even though it didn't work out in my case, by all means get the best referrals you can. Go and see the person and check out his or her work.
Second, don't be afraid to sit down and talk about everything you want and don't want done. Once you've settled that, type it out in a list and make sure you both have a copy of it.
Third, give him photographs with all the touch up work to the cabinet and playfield to be accomplished clearly identified.
Make a list, with photos where needed, of everything the machine does right so that if something is broken you have proof it wasn't that way when you handed the machine over to the restorer. (A video tape might be a good idea for this.)
Ask the restorer to take off the cover glass so you can thoroughly inspect the playfield for smudges, dirt, and loose parts.
Be sure to play at least one full game, making sure all mechanisms and ramps function properly.
Finally, don't be shy about taking the agreed-upon work list with you when you pick up the game and go down it item by item to make sure everything was done the way you wanted.
Is all this a hassle? You bet. But remember that pinball machines are a dying art form. If you're going to have a game restored it's important to make sure it's done correctly to help preserve it for future generations.
![]()