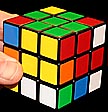
Wayne Schmidt's Rubik's Cube Page: A simple mnemonic trick makes solving them easier than ever.
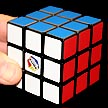
I've been aware of Rubik's cubes my entire life but had known a number of people who went crazy trying to solve these monsters of the puzzle realm so self preservation warned me away. Then one day, after figuring out how the solution technique to 15-puzzles worked,
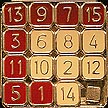
A typical
unsolved 15-puzzle
for my web page HOW TO SOLVE A 15-PUZZLE, I realized that solutions to Rubik's Cubes used the same technique. Intrigued, I got one and started playing with it.
An hour later my eyes glazed over in confusion. While I understood the principle of the solution, applying it was a nightmare. Turning to the instructions included with the cube and the solution techniques offered on a dozen web sites I was finally able to solve my Rubik's cube. In doing so I discovered a problem with virtually every reference on them written by experts... they were written by experts.
Here's the problem, because the authors of these pages were experts they had forgotten how newcomers to Rubik's Cubes think. Consequently, they fail to add a lot of information that to them seems so obvious that they can't image anyone not knowing it. That's why this page is different from any other page. I am not an expert on Rubik's Cubes. I began writing this page after managing, barely, to solve my cube only twice. In so doing I remembered all the initial problems newbies to Rubik's Cubes have and how to address them.
So, if you are new to Rubik's Cubes and want to learn how to solve them you've come to the right place. This page will cover all the details of how to solve one of these puzzles and provide something isn't offered any where else: A mnemonic memory trick that makes learning and memorizing the moves used to solve a Rubik's Cube much easier.
Note, I said "easier," not easy. Unless you are a super genius or savant, solving a Rubik's Cube requires over 100 manipulations and takes ten minutes.
Enough preamble. Let's get to the solution.
The
Principle Used in Solving a Rubik's Cube:
I believe it always helps to understand the basic underlaying principle of how something works, even if I don't understand the details of the principle's application. As with 15-puzzles the principle of the solution to Rubik's Cubes is that the manipulations used during the solution park parts of the cube you've already solved in places from which they can be returned to their original positions after the unsolved parts of the cube have been moved into solved locations.
Let's say you have the first face of the cube solved. To solve the second face requires you to move parts of the Rubik's Cube that scramble the first face. Not good.
But, using a complex series of manipulations the squares of the first page can be moved to safe places that don't interfere with solving the second face. From these safe locations they are retrieved and returned to their original locations after the second face is solved.
This process is easy to figure out in the simple 2-dimensional world of 15-puzzles. In the complex 3-dimensional world of Rubik's Cubes the manipulations required to do this are so complex that unless you are genetically gifted, figuring them out is all but impossible.
What the rest of us normal people have to do is follow the solution techniques developed by dedicated individuals. These techniques are strictly turn-the-crank operations: when you see such-and-such a situation, you follow a certain fixed series of manipulations to move one step closer to the solution.
The following solution technique does two things: It shows you how to solve a Rubik's Cube and provides an easier way to memorize the manipulations used for the solution. It does not provide techniques for speed solving Rubik's Cubes. My technique, while moderately easy to learn, takes an average of ten minutes to solve a cube.
![]()
Rubik's
Cube Nomenclature:
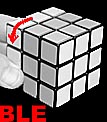
Almost every reference on Rubik's Cubes has its own system of labeling the faces of the cube and designating how the faces are to be turned during the solution. These labels are listed as strings of letters that tell you, once you decipher them, how to manipulate a cube to solve a particular problem. Here are two examples showing what to do in step 6 in the typical 7-step solution process:
U
R Ui Li U Ri Ui L
This is from the instruction guide
that came with my Rubik's Cube.
Plain capital letters designate
cube faces being turned clockwise.
Capitals followed by an
"i" indicate the face should be turned counter clockwise.
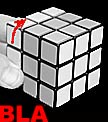
FR'
T BL T' FR T BL' T'
From www.rubikssolver.com.
Letters designate cube faces being
turned clockwise.
Letters followed by a semiquote
indicate the face should be turned counter clockwise.
Now,
try memorizing several different strings of commands like this. If
you think it's going to be a nightmare, you're right. At least that's
what I found when I tried it. I decided to develop a system that was
much easier to remember.
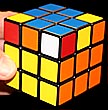
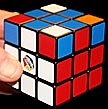
To start with I identified the six faces of the cube as shown in the image below:
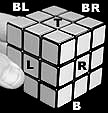
"T" stands for the top face.
"R" designates the right face.
"L" is for the left face.
"B" indicates the bottom or downward facing face.
"BL" means the back left face.
And finally "BR" is for the back right face.
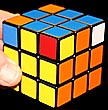
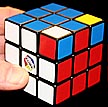
In case you were wondering, a "face" is all the small cubes that make up one side of the overall Rubik's cube, as shown by the lighter cubes making up the "L" face in the following picture:
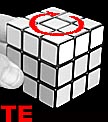
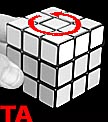
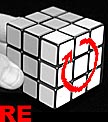
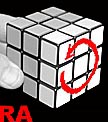
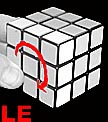
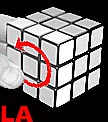
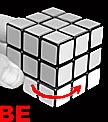
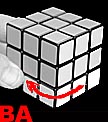
Faces can be turned either clockwise or counter clockwise as you look at that particular face straight on. In my system a short "A" designates turning a face counter clockwise whereas a long "E" indicates clockwise. A "turn" is defined as rotating the indicated face one-quarter of a complete revolution. The following images clarify each move and the letter code or syllable for it:
(Again, all Es are pronounced long as in tree and all As are short as in rat.)
 ....
.... ....
.... ....
....
 ....
.... ....
.... ....
....
 ....
....
(The BRE and BRA faces aren't shown because those manipulations aren't used.)
Why "A" and "E" instead of "i", blanks, semiquotes or any of a number of other systems? Here's why. The following command sentence is the same command given in the two earlier examples. Read it like a series of words with no silent vowels:
RATE BLETA RETE BLATA
Phonetically it would be pronounced ratee bleeta reetee blata. Granted, spoken out loud it sounds like a junior high school football cheer but the important thing is that words, even silly ones, are easier to memorize than random strings of letters. Try it. Say ratee bleeta reetee blata a couple of times and you'll have it firmly locked into memory... whether you want it there or not. Now try the same thing with either of the other two systems. See what I mean?
The first "word" of this command sentence, or solution chant if you prefer a metaphysical touch, is RATE or RA-TE. The RA tells you to turn the cube's right face one-quarter turn counter clockwise followed by TE, which translates into turning the cube's top face one-quarter turn clockwise. Here are the two steps in pictures:
....
Mnemonic (pronounced nimonic) memory tricks like this are extremely effective. By grouping the commands into words, patterns emerge that act as additional cues to remember them. As you will see further below, some command sentences only use "TE" while others only use "TA." As we work through the solution to a real Rubik's Cube I'll point out many hints that help remember the chant used to solve each of the steps.
As good as this system sounds it has one major problem. Because this "Rubik-Speak" language only has six consonants and two vowels many words end up sounding very similar. This makes them easy to mix up. The key to memorizing them is to go slow, learning only one or two command sentences a day and relying on patterns and cues to keep them straight.
Ready to give it a try? Here we go!
Solving
a Rubik's
Cube:

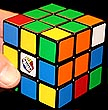
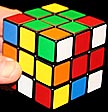
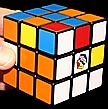
The picture above shows a thoroughly scrambled Rubik's Cube. We're going to solve it together right now, going slowly and thoroughly so that even if you've never touched one before you'll be able to solve it.
Most Rubik Cube solution techniques use seven steps so that's what I'll use. The problem with those 7-step solutions is that they ignore a big step right at the start. They all state something like, "The first step is to solve the top green face so it forms a cross. This is something you'll have to figure out on your own."
Great. I'm looking for a solution and they tell me I have to work the very first step out on my own. Here's what they should have told me:
Step
1: Solving the top and middle-edge side squares
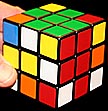
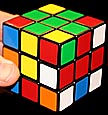
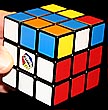
First you need to hold the cube correctly. Let's take another look at the one we're going to solve.
Faces are defined by the color of the square in the center. In the case above the green square in the middle of the top face defines the top face's color, the orange square in the middle of the left face defines its color as does the yellow square in the middle of the right face. Although you can't see them, the BL or back left face is white and the BR face is red. For any given problem, the cube is held so that while various faces are rotated the center squares are kept facing the same direction. After a command sentence is complete the cube may be turned this way or that to find the best next problem to solve but once that decision is made the cube is once again held so the the center squares remain facing the same direction throughout the next problem solving manipulation.
Take a third look at the cube.
To create a green cross on the top face we start by moving middle side cubes with green sides so the green squares are positioned on the four sides of the middle green square. The first one's easy. Take a look and the right face. There's a middle-edge green square just to the right of the center yellow square. Simply rotate the BR face one quarter turn clockwise (as you look at the BR face straight on) and that green square will end up on the top green face right where we want it. Like this:

Sometimes you're lucky and all four green squares will be oriented so that just rotating the face they are on will line them up with the center green square. Usually there will be one or more that require a little more work. For example, take a look at the right face. There's a middle-edge green square sitting at 6 O-clock. The problem is that when we rotate the right face so that the green square is on top we end up with this:
The green square is now up at 12 O-clock but facing right instead of up like we want it. To move it so that it's facing up, use the following command sentence or chant:
RA TE LA
........
Note:
For the RA TE
LA command
sentence to work the green
square
must be in the 12 O-clock position on the right face.
You'll end up with this:
Now we have two sides of the cross completed. I purposely rotated the cube to show where the next middle-edge green square was hiding, 6 O-clock on the new L face, which was the BL face the way the cube was originally held. Turn the cube so this green square faces right, rotate this new right face so that the green square is at the top and repeat RA TE LA and you'll have your third side of the green cross in place. As it happened with this Rubik's Cube, the fourth middle-edge green square simply rotated into place like the first one, leaving us with the following:
That's how to create the top green cross.
Next we have to move the middle-edge pieces we moved to create the green cross around so that the colors of their outward facing squares are the same color as the center squares of the faces where they are located. Take a close look at all four sides of the cube above.
....
The left face of the left hand view has a white square in the middle whereas the outward facing square of the top middle-edge piece is yellow. This mismatch has to be fixed. The right hand view shows the other side of the cube. The reds are lined up but the left face has yellow in the center and white on top. If the top is rotated so that the yellow and white squares match, then the orange and red faces, which previously had matched, will now be scrambled.
Obviously this problem requires more muscle than just turning the top face. This muscle comes in the form of the next two command sentences:
LETA LATE LETA
and
RATA RETE RA
Hold the cube so that the mismatched faces, which are on opposite sides of the cube, are the "L" and "BR" faces. Use the command sentence:
LETA LATE LETA
....
(Hint: It helps me remember this chant by thinking of LETA as a girl who likes Latte coffee.)
After performing this manipulation the cube looks like this:
 ....
....
The white square has been moved from the BR face to the L face. Now the two faces with matching colors, white and orange on the left, are adjacent to each other. This sets up the cube for the next command.
Hold the cube so that the two mismatched faces are the "L" and "R" faces and perform the following manipulation.
RATA RETE RA
........
This switches the middle-edge yellow and red squares in the right view above so that they now match.
 ....
....
If, when you first make the green cross on top, you discover that you have two adjacent sides with matching middle and top middle-edge squares, you don't need to use LETA LATE LATA. Go straight to RATA RETE RA. If you can only get one match no matter how the top is rotated. Use either command to shake things up. Either one will create a second match and from there you can use LETA LATE LETA + RATA RETE RA or just RATA RETE RA to make the remaining two sides match. Just remember, it's essential that the cube be held in the proper orientation before performing the manipulations.
(Note: sometimes it may be necessary to add in an extra rotation of the top after a manipulation to get the squares to line up. This applies to all of the command sentences that follow as well.)
(Hint: RATA RETE RA sounds the most of all the chants as a high school cheer. Thinking of it as such made it easier to remember.)
That's
it for step 1. On to step 2.
Step
2: Solving the corners
We have two goals in step two.
1. Get corner pieces with green squares into the top corner spaces so that the green square face up.
2. Get the proper corner pieces in the proper corners so that the colors of the side squares that face outward match the colors of the center squares on those faces.
Sound
complicated? Don't worry. All you have to do is trust your new best friend:
BELE BALA
....
This simple manipulation switches the top corner of the cube's edge facing you with the bottom corner and gives each corner a one-third counter clockwise rotation. Let's solve a corner. Take a second look at the top and bottom views of the cube's edge that's facing us.
....
The corner piece on the bottom has red and yellow side squares, just what we need. All we need is to move it up to the top corner and get the yellow square facing outward on the "L" side and the red square facing outward on the "R" side.
So, do BELE BALA once and the bottom corner square gets moved up to the top corner.
Closer, but still not right. It needs to be rotated one more turn so that green faces up, red to the right and yellow left. To accomplish this we have to do BELE BALA two more times. The first once sends it back down to the lower corner and the second brings it back up with another twist so that now all the squares match their face's colors. Like this:
The number of times you need to use BELE BALA to solve a particular corner depends on whether the corner piece starts in the upper or lower position and how its faces are oriented. It can take as many as 6 BELE BALA manipulations or as few as one. Sometimes you'll get lucky and when you finish step 1, one or more of the corners will already be in place. But don't count on it. The Gods that watch over Rubik's Cubes are seldom so merciful.
Take another look at the cube as it was at the beginning of this step:
The top corner piece's orange and white faces don't match the red and yellow faces we needed. This corner piece fits another corner. This happens quite often. To get it to where it needs to be, use BELE BALA to move it down to the bottom then turn the entire bottom face to move it to the corner below the corner where it needs to be. Then use as many BELE BALAs as needed to move it up to the top and in the correct orientation.
After using this chant to solve the other three corners the cube looks like this:

The top face is solved as well as half of the four outward facing sides. We're making progress! The next thing to do is solve the middle line of squares all the way around the cube.
Piece of cake.
Step 3: Solving the middle squares
The middle row of squares that girdle the Rubik's Cube all need to be the same color on each face and that color needs to be the same as the color of the center square. In the last cube:
starting on the left we have orange, orange, white. The white needs to be replaced with another orange square. (No. Peeling off appliques and reapplying them where you need them isn't permitted. Niether is coloring over them with felt pens.)
Continuing around the cube we have red, yellow, yellow. The red needs to be replaced with yellow.
We begin by turning the cube upside down so the green face is now the "B" or bottom face.
Rotating the bottom two layers, or the top face, gives us this view:
I'm going to skip forward a little because the first time I attempted the command sentence I made a mistake and the top face got scrambled. I'm confessing this to explain why the top face in the following image looks different than the previous photo.
We need to look for a certain pattern of colored squares. We are only interested in the center vertical column on each face. Look at the left side. There are three orange squares topped with a white square facing up. On the adjacent right side there are two white squares. When the squares are in this orientation applying the following command sentence will move the white square from the top of the column of 3 orange squares down to the middle row on the right:
TERE TARA TALA TELE
....
....
Doing this gives us:
We repeat this step, rotating the top as needed to get proper alignments, until all of the middle row of squares match the colors of each side, like this:
Sometime you can't get an alignment with a center column of three on the left topped with the right face's color facing up and two center columns on the right. Many times you get the reverse with three on the right and two on the left, like this:
When this happens the TERE TARA TALA TELE command has to be changed to TALA TELE TERE TARA. It's the same words except the first two are now the last two. Use either of these commands as needed to match up the colored squares in the bottom two rows around the cube.
What we now have is:
 ....
....
Once in a great while you get a situation where there are no 3 and 2 alignments as described above. All you'll have is two vertical squares on both sides with the square you want facing upward above one of them. In this case just go ahead and use TERE TARA TALA TELE if the upward facing square is on the left or TALA TELE TERE TARA if it's on the right. The command sentences will still work.
Note that the commands sentences are getting longer. That's because the more squares we solve the fewer spaces are available to park them for later recovery and more involved the recovery is. (If you think it's bad now, wait until you see the final command.)
We have the everything but the top face solved. Now things get interesting.
Step
4: Solving the top blue cross
Our cube now looks like this:
....
The goal of step 4 is to create a blue cross on the top face just like in step 1 when green was facing upward. The problem is that now two-thirds of the cube is solved and we don't want to mess it up. Occasionally the blue cross will be formed all by itself while solving the previous step. But don't count on it. Many times you'll have only one or two of the side arms of the cross, as we do in this case. What we need to do is move the middle blue squares that are facing outward so that they face up. Here's how.
Hold the cube so that the upper center edge piece on the left has a blue square facing outward, like this:
Perform the following command sentence:
LERE TERA TALA
....
...which gives us this:
The yellow/blue piece that was on the upper left is now in the upper right position and the blue face is facing up, just what we want. We have our blue cross!
Usually it doesn't work out this quickly and you have to work your way around the cube using LERE TERA TALA several times to move outward facing blue squares so they face up. Sometimes doing this forces a piece into a spot already occupied by a piece with an upward facing blue square. Don't worry about it. Just keep using the chant every time you have an outward facing blue square on the left and in three or four manipulations you'll have a Rubik's Cube that has a top blue cross. Next up: moving the center edge pieces around so that their outward facing squares match the colors of that side's face color.
Step
5: Aligning the upper middle edge squares
Rotating the top face one quarter turn clockwise aligns the yellow middle edge square so it's on the yellow face on the left as shown below:

The other three middle edge squares do not match the colors of the faces they are on. For example, on the right orange face there is a red square. To solve this problem we perform:
RETE RATE RETE TERA
....
....
(A hint to help remember this chant is that all the "T" terms are TEs, clockwise turns.)
What RETE RATE RETE TERA does if leave the center edge square on the left face untouched while moving the center edge square on the "R" face to the "BR" face, the "BR" center edge square to the "BL" face and the "BL" center edge square to the "R" face. Applying it to our cube gives us this:
We got lucky. A single iteration put the yellow square where it needs to be. Looking at the other side shows us that we still have some work to do.
When two adjacent faces are solved, hold the cube so that these solved faces are in the "R" and "BR" locations and repeat RETE RATE RETE TERA. All four center edges will then be solved. If you don't have two adjacent sides solved, repeat RETE RATE RETE TERA until you do. (Note: sometimes you'll need to give the top face an extra clockwise turn to realign the colors.)
A real time saver is to rotate the top face several times before starting this step to align as many center edge squares as possible. Many times you'll find two two adjacent faces that already have matching colors.
Here's what the cube looks like at the end of this step:
 ....
....
On to step 6!
Step
6: Solving the corners:
Each corner has three colors: blue and two sides. The goal of this step is to get the two side colors to be the same as the colors of the side faces on which they reside. In this step we aren't worried about whether they colors are aligned with the faces, only that the right colors are in that particular corner. Look at the previous two images. The corner facing you on the left has yellow and orange side colors yet the sides of the cube are red and yellow. This is a mismatch. Similarly on the right, the corner piece's side colors are yellow and red while the cube's faces for that corner are orange and white. What we need to do is move the corner pieces out of the corners where they are and into corners where their colors match up with the adjacent faces. The solution is:
RATE BLETA RETE BLATA
....
....
Check all four corners. Usually there is one that is aligned. In our case it's the red-white corner.
Hold the cube so that this corner is the farthest away from you, corresponding to the "BL" and "BR" corner. A corner in this location will not be moved. Now perform RATE BLETA RETE BLATA as many times as you need to get the corner pieces in the right corners. What's happening is that the three corners in the left, center and right positions will be rotated one position clockwise. In the case of this cube only one iteration was required. Other times two or at most three will be needed.
On to the final step!
Step
7: Rotating the corner pieces
When we finished step 6 we ended up with the following Rubik's Cube:
 ....
....
Even though the red and white squares are in the wrong places in the corner of the left cube, these are the right colors for the two adjacent faces. We got lucky with the yellow-orange corner in that not only are the right colors there, they are facing the right directions. What we need to do is rotate the corners that the one on the left cube without moving them out of their corners so that their side colors are the same as the colors of the faces on which they reside.
To do this requires the longest and most complicated command sentence in the entire solution process.
BLETE BLATE BLETA TABLA RATA RETA RATA TARE
....
....
and
....
....
I'll be the first to admit that memorizing this isn't going to be easy. But, it'll be a lot easier than one of the non-phonetic systems. Here are a few cues to help things along.
Note that the chant can be broken up into two halves. The first uses "BL" terms and the second "R" terms. Think of it as:
BLETE BLATE BLETA TABLA
RATA RETA RATA TARE
Next, BLETE BLATE BLETA TABLA uses "TE" in the first two terms and "TA" in the second two.
Finally, in the second half of the chant all the "T" terms are "TAs"
This command sentence rotates the two top corners on the right face one-third of a turn clockwise.
Applying BLETE BLATE BLETA TABLA RATA RETA RATA TARE to our Rubik's Cube with it held so that the two corners we want to rotate are on the right:
Gives us this:
Repeating the command provides the final twist so that the corners line up:
And that's it! The Rubik's cube is solved!
When solving your own Rubik's Cube you may find that all four corners need to be rotated. Select any two, put them on the right and use BLETE BLATE BLETA TABLA RATA RETA RATA TARE one, two or three times as needed to get the colors aligned. Then rotate the entire cube so the other two corners are on the right and repeat the process. If one or three corners need work, us BLETE BLATE BLETA TABLA RATA RETA RATA TARE on any two of them until two adjacent corners are fixed and then work on the remaining two.
A
Look Inside the Beast
As puzzling as solving a Rubik's Cube is, trying to figure out how they work is even more intriguing. It seems that all the faces can turn in every possible direction. How then does the thing hold itself together? To answer this question we have to take one apart. Easier said than done.
Although Rubik's Cubes only weigh an ounce and are made of plastic, their small size and design makes them surprisingly tough. To get mine apart I had to rotate one face so that the corners stood out and then pry the thing apart using a screwdriver. (Note: Rubik's Cubes occasionally self destruct when, after scrambling an almost solved cube for the third time, they get hurled at a concrete slab.)
The cube is held together by the central yoke, which consists of six very tight spring-loaded keepers. All of the pieces that make the rest of the cube have small fingers that are trapped under the keepers, whose outward faces are the center squares of each face. These fingers serve double duty in that they not only hold in the squares of their particular face but keep the squares on adjacent faces from moving sideways and slipping out of their keepers. It's one of these affairs where neighbors lean against neighbors. Take just one out and the entire structure crumbles.
Printable
solution page:
Click on this link to open a printable page that summerizes the solution presented here.
Final
words:
Solving a Rubik's cube, even if you are following instructions, is a very challenging task because many dozens of manipulations are required to be performed in a precise order. (For example, the example cube solved on this page took 158 manipulations.) One mistake and you usually have to start over from the beginning. Learning to solve one from memory is even harder.
Why memorize the solution chants? That's a hard question to answer. It's doubtful that some fiend will kidnap you and threaten to kill you if you can't solve a Rubik's Cube so the utility of this knowledge is questionable. Still, it's a respectable mental exercise and leaves one with a sense of accomplishment. I found it entertaining and well worth the effort. I hope you will as well.
![]()
(Click on main site to browse 70 other topics ranging from exotic kaleidoscope designs to the strange world of lucid dreaming.)