Wayne Schmidt's Solarization Page Comparing 10 different soil solarization techniques to see which is the most effective.
I
love growing melons but only have limited room for them in the back
yard. Constant repeat cropping resulted in the soil becoming infected
with many of the diseases which attack melons, particularly fusarium
wilt. The only solution was to find some way to sterilize the soil.
The cheapest and easiest technique is called solarization; using
sunlight to heat the soil to kill pathogens. An added benefit is that
it also kills cutworms, nematodes, beetle larva and weed seeds.
Scouring the Internet turned up the following information for beds out in the open where they get full sun from dawn to dusk:
1. One layer of clear plastic on a sunny day heats the soil to 119-degrees F. at a depth of 4-inches.
2. Two layers of clear plastic heats the same soil to 140-degrees at a depth of 4-inches.
3. Heating soil to 107-degrees at a depth of 12 inches kills 98-percent of fusarium oxysporum. (No information from this reference was provided to clarify if this was 98-percent of all the fusarium fungus in the entire soil from the surface to the bedrock or only at the 12-inch depth. Since plant roots can easily reach 48-inches down in good soil this is an important point.)
4. A maximum surface temperature of 120-degrees requires four weeks for effective solarization.
5. A maximum surface temperature of 158-degrees achieves the same results in one week.
6. typical field solarization temperature are 108 to 131-degrees two inches down and 90 to 99-degrees 18-inches deep.
7. In addition to reducing pathogens, solarization appears to improve the quality of the soil. Plants grown in solarized soil grow faster and healthier than those grown in unsolarized soil even after taking into account the fact that the plants in solarized soil weren't attacked by soil-dwelling pathogens and insects.
This
information convinced me to try solarization but it provided scant
information about the pros and cons of different solarization
techniques. I decided to conduct several tests to see which technique
is the most effective at heating the soil.
Because these tests are intended to develop the best system for a small garden, concepts can be used which are not applicable to large-scale solarization requirements such as one might have on a farm. The small scale of a backyard garden and not having to address profit issues permits the use of systems which would not be practical for large commercial ventures.
Test
1: Five basic Solarization
Techniques
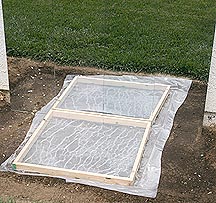
In its simplest form, solarization only requires soil to be saturated with water (to help conduct the heat deeper) and covered with plastic to collect and trap heat from the sun. But which plastic is best and does using two layers help enough to justify the extra expense and hassle? To answer these questions I built five frames and covered them with different types of plastic. (The maximum temperatures mentioned in each test is the temperature of the soil immediately under the bottom layer of plastic.)

From left to right:
Two
layers of 2-mil thick clear polyethylene plastic (Maximum soil temp
= 128 degrees)
One
layer of clear polyethylene (Maximum = 124 degrees)
One
layer of black polyethylene (Maximum soil temperature = 118 degrees)
One
layer of super-clear 2-mil vinyl (Maximum = 124 degrees)
One layer of black PE under a layer of clear PE (Maximum = 123 degrees)
While
the black plastic became much hotter than the clear plastics, it did
so by absorbing the sun's energy instead of transmitting it through
to the soil.
The reason the super-clear vinyl didn't due any better than the plain polyethylene is that the underside of any plastic touching the soil quickly becomes covered in condensed water droplets, which refract most of the light away from the soil instead of into it. This effect greatly reduces the soil heating capability of these systems.
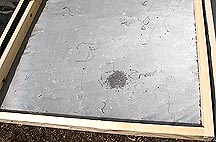
A
close-up of water condensed on the underside of a sheet of plastic
making
it look almost white except the small patch where I touched
it
and in so doing caused the condensation to temporarily come off
onto
the soil.
Test 2: Anti-fog Treatment
I thought I had figured out how to beat this problem. Automotive stores carry a product called Rain-X Fog Reducer. It's a liquid that's wiped on the inside of car windows and stops them from fogging. I covered the inside surface of of the plastic in one of the frames, all except a small square in the upper right corner, and placed it over the soil. For an hour it appeared to work, remaining condensation free, clear, and heating to soil to much higher temperatures.
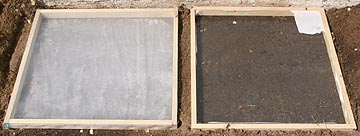
Untreated plastic on the left, treated on the right
Unfortunately
the effect was sort lived. Soon, water could be seen dripping from
the inside surface of the plastic and as it dripped it washed away
the coating. Within two hours the treated plastic was as fogged as
the untreated plastic.
Test
3: Inclined Soil
Next I tried raking the soil into an incline so that it faced the sun straight on, thinking that this would increase the amount of solar energy it collected.
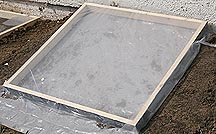
It worked, increasing the maximum soil temperature to 138 degrees when covered by two layers of clear plastic. The downside to this technique is that creating the incline is a lot of work and it's impossible to get the soil thoroughly saturated with water. One could saturate it then create the incline but that involves compacting wet soil, which can have long-range negative consequences on soil texture.
Test 4: Blacked Aluminum Foil
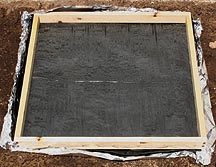
The black plastic got so hot that it it had been in better contact with the soil it might have succeeded in heating to very high temperatures. To examine this idea I spray painted aluminum foil flat black and placed it under a cover layer of clear plastic. The flat-black foil absorbed a great deal of solar energy and became extremely hot. Better still, the foil was good a conforming to the shape of the soil under it and managed to get it to 141 degrees. Repeating this test on the inclined soil resulted in a top soil temperature of 152 degrees. Impressive, but painting to foil was time consuming, the foil was awkward to work with, and building the incline was a lot of work.
Test
5: Do It With Mirrors
To achieve the 160-degree temperatures I wanted for quick and deep sterilization I needed to come up with something much better than any of the systems tested so far. My idea was to use cheap wall mirrors to reflect light from behind the test plot unto it. In this way the solar intensity would be doubled. It worked. With soil covered with two layers of clear plastic the maximum soil temperature reached 162 degrees in less than two hours. Considering this test was conducted in early April, the same system in the middle of summer could easily reach 175 degrees or higher.
Mirror boosters certainly aren't practical in large situations, but in mine they work fine. I plan to have enough to illuminate a 10-foot strip of soil at a time and move it around until all the areas are treated. Besides speeding the solarization process, the higher temperatures will kill more pathogens and reach deeper into the soil than any other system.
I tried several reflective options to glass mirrors but nothing worked as good.
Test
6: Tight
Versus Loose Plastic Next to the Soil
I noticed that the condensation that caused so much of the sun's light to be reflected (refracted, actually) away was minimal wherever the soil touched the plastic because the soil wicked away and condensation. I found that plastic stretched over a frame rarely touched the soil so most of it was covered in condensation. Loose plastic laid directly on the soil had many more places where it made contact and consequently had less condensation. The difference was only 2 degrees but in solarization every degree counts.
Test
7: Thin Versus Thick Plastic
Plastics come in all thicknesses from 0.7-mils to 10-mils. Experimenting with several I found the 2-mil thickness to be the best. They all transmitted about the same amount of heat but the very thin 0.7-mil plastic sheet tended to get holes pocked into it allowing moisture to leak through and fog the inside of the second layer of plastic while thicker plastic cost more.
Test
8: Using Hot Water to Jump
Start the Solarization Process
Solarization follows a daily cycle of heating during the day and cooling at night. As such it can take up to a week for the final maximum temperature to be reached. One way to reduce this time is to attach a hose to the hot water spigot that attaches to a clothes washer and use it to saturate the soil to be solarized. The 120-degree water starts the sterilization processes immediately and the solarization system works as both a booster and sustainer. It's best to run the water in under a plastic sheet so that it doesn't cool off by evaporation. The best time to do this is in the morning right before the sun is up high enough to start heating the soil on its own. As the hot water tank empties its remaining contents mix with cold incoming water reducing the temperature of the water leaving the tank. It may start off at 125 degrees but drops to 110 after a few minutes. I monitor the output temperature and stop the flow once it hits 110. The water heater recovers in an hour and the process can be repeated until the soil is saturated. This stepped process maximizes the average temperature of the water. Left to run until cold, the average water temperature will only be 90 degrees.
(I thought I could use the hot water technique alone and sterilize the soil by repeated applications. This would work but it would also leech away most of the soil's nutrients. Also, the 120-degree temperature of the hot water from my water heater isn't hot enough to do a good job of soil sterilization.)
Test
9: Cut Night
Time Heat Losses
I used the same piece of Reflectix to cover the bed at night to reduce the amount of heat lost once the sun goes down.
My
Final Solarization System
The optimum solarization system that come out of all of the experiments consists of soaking a level bed with hot water at 9 AM on the first day, running the water under a plastic sheet. This gets the surface temperature up to 120 degrees. By 9:30 the sun hits the plot and the heating begins. At 2 PM the maximum soil temperature hits 162 degrees, even in the cool, short days of early April. By 5:30 PM the sun has moved off the area so I cover it with two layers of Reflectix.
How
Well Does It Work?
The following graph compares the daily surface soil temperature of three different solarization techniques to my mirror-boosted approach with a Reflectix insulation cover at night. While the sun was bright during these tests the daytime air temperatures were only 75 degrees and the night time temperatures a cool 55 degrees. In the middle of summer the night time air temperatures would be much higher, therefore heat losses would be less and the soil temperatures would not drop as much.
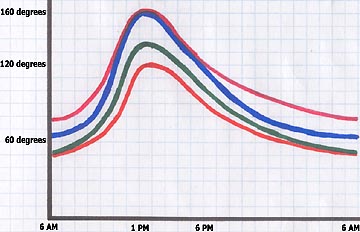
The bottom orange curve is for a single layer of transparent plastic laid on the ground, which achieved a maximum temperature of 120 degrees. The green curve is the heating profile for two layers of clear plastic separated by a 1-inch air space. Its highest temperature was 135 degrees. The blue line is for a mirror-boosted system without night time insulation and the top red graph is the same system with night time insulation. On the days these tests were conducted the air temperatures were all the same as well as the amount of sunlight. Both of these last two systems hit a maximum temperature of 160 degrees.
The mirror-boosted system with night time insulation is clearly the best performer. The cost for this performance is the hassle of covering and uncovering the plot every day and the expense of the mirrors and insulation, which came to $80 for a 10-foot long plot. (The same plot covered with a single layer of plastic would only cost $1.) The mirrors and insulation account for $75 of the expense and they can be used for many years. Considering that I am limited to using the same plot every year, some type of soil sterilization procedure is necessary or I wouldn't be able to grow any melons at all. I feel the expense of my system is more than justified because is achieves excellent results. This is the best solarization system I could come up with. But...
Problems
with even the best solarization system:
But what happens if just when you set up a solarization system it turns cloudy for several days (or weeks?) What do you do for beds against an east or west or (God forbid) south wall where the sun isn't bright enough and doesn't last long enough to reach solarization temperatures. What if you need to solarize in early Spring or late Fall when the sun isn't strong enough even out in the complete open? What if you only have one week to solarize? And finally, what about solarizing the soil deep enough to kill all the pathogens deeper than a few inches below the soil surface?
The solution to all of these problems is as radical as it is effective: Solarize your soil without using the sun.
While the term solarization was coined because it uses the sun to heat the soil, it has to be understood that the light from the sun has no mystical effect on the soil. It's only purpose is to act as a source of heat. Realizing this, I began experimenting with alternate ways to heat the soil. High intensity lamps could be used but much of the energy they use is wasted as heat that can't be conducted into the soil. I tried pumping boiling water into tubes buried in the soil, but the system was fraught with potential dangers and the immersion pump I used failed after 8 hours in the high temperature water bath. My final solution, and the one that worked the best, was to find a moisture-proof electric heating pad that could be set to remain on indefinitely (most pads time off automatically after a period of time.) But before I say any more I need to make a disclaimer:
WARNING!
The following soil heating system is experimental. There is considerable danger of injury from burns and electrocution and damage to structures from fire by burying electric circuits in damp soil. I do not recommend anyone try this system.
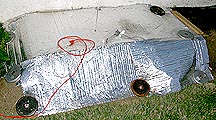
I
found a Sunbeam king size heating pad, model 809-015, P.N. 115469,
that had the required attributes. I purchased two of them and removed
the heating elements from the pads, buried one 12-inches deep
covering a 2 x 5-foot area and another 4-inches deep. (Using just one
didn't heat the soil deeply enough.) Setting the power control to
maximum I then covered the bed with three layers of Reflectix insulation.
Each coil only puts out 42 watts so it took 48 hours for the bed to heat up. The following graph compares an average solarization temperature profile to my electric solarization system:
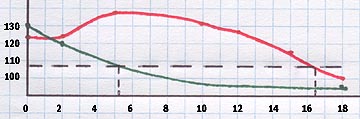
The vertical axis is in degrees F. and the horizontal axis is in inches of depth. The lower green curve is the typical temperature profile for soil in an open field solarized for 6 weeks. The upper red curve is for my electric heater system 48 hours after turning the heaters on. The horizontal dashed line is the 107-degree threshold for killing fusarium wilt fungus. While the fusarium-killing temperature for the conventional solarization technique only extends five inches down, the profile for the electric system shows that fusarium fungus should be killed down to a depth of 16.5 inches, over three times as deep. Better still, it accomplishes this in less than one week.
The 100-degree temperature at a depth of 18 inches was the reading taken 48 hours after turning the heating coils on. In fact the soil at this depth continued to increase in temperature reaching 105 degrees by the end of the fourth day. While the temperatures for the other depths remained essentially the same the surface temperature also eased up to 127.
The electric system has the additional advantage of maintaining constant temperatures day and night. Even on bright sunny days the conventional solarization system goes through a daily heating and cooling cycle, which significantly reduces the average soil temperature.
Because the heating cables are buried in the soil and the top and side of the bed heavily insulated the system works very efficiently with very little heat escaping. The entire system uses less energy than a 100-watt light bulb.
Using a slight overlap, I'll move the coils down the length of the bed, solarizing the soil as I go. I contemplated using both conventional and electric solarization but decided that the hassle of covering and uncovering the insulation on the bed every day wasn't worth it considering how well the electric system works by itself.
One thing particulary nice about this system is that it concentrates the heating the primary root zone, instead of the surface of the soil like conventional solarization systems.
Test Results:
I used the above system to sterilize a bed heavily infested with both nematodes and fusarium wilt. I then grew both tomatoes and melons in the bed. Both showed no signs of either problem, which confirms that this form of solarization works. However, one year later I repeated the test and both nematodes and fusarium wilt were back. Either they were reintroduced with soil ammendments, on seeds or worked their way back into the bed from the surrounding unsolarized soil. I conclude that for small beds surrounded by untreated land, solarization is at best a short-term solution. It also has the negative effect of killing all the earthworms in the bed. Even if it had worked I doubt I'd ever use this system again. The process of burying then digging up the heating cables each and every week for months got to be too tedious and time consuming.
![]()