EXPERIMENTS
IN TEMPERING CHOCOLATE
What
tempering is and comparisons of different techniques to see which
work best at home.
WARNING
Working with chocolate involves dealing with hot materials and fire.
No one should do so without the supervision of a responsible adult
experienced with all the processes and equipment involved. The
following is provided for information only and is not intended as a
recommendation to repeat these or any other experiments.
Tempering
chocolate is a process of using mechanical manipulation and
temperature control to force chocolate into one particular
crystalline form so that when molded it forms a stable solid with a
smooth, shiny surface. Failure to properly temper chocolate can
result in dull-looking pieces with poor texture.
While tempering formulas abound, I haven't found a source of information that compares the different techniques. That's the purpose of this page: to chronicle my experiments with several different techniques.
But
first a little molecular chemistry:
Depending on which school you prefer, there are 3, 4, or six different crystalline configurations into which the cocoa butter in chocolate can solidify as it cools. Each of them have different melting points and strength properties. For those of you with a scientific inclination, here's a table comparing their melting temperatures for milk chocolate (note: semisweet and dark chocolates have slightly higher melting points):
Temperature (F.)
Above 125 - getting into the danger zone for
burning the chocolate
.
.
Above 115 - some chocolates may scorch
.
.
88 - beta (type V) crystals melt
85 - beta (type V) crystals start to form
78 - beta prime (type III and IV) crystals start to form
69 - alpha (type II) crystals start to form
51 - gamma (type I) crystals start to form
(Although
common experience leads us to think that all crystals are hard like
diamonds, in fact it's possible for crystals to vary considerably in
strength. In the case of cocoa butter they are quite soft. Some
prefer to refer to them as phases instead of crystals.)
To understand why the melting points and strength properties vary, think of each crystal type as a different sized and shaped chair. If you cool the chocolate too fast at too low a temperature you get many different sized and shaped chairs jumbled together in a haphazard pile. Nudge such a pile at it'll fall over easy. In chocolate, such a tangle of different shaped crystals is also unstable and can fall apart (melt) at a lower temperature. Because the chairs (crystals) are different shapes and sizes they can't lock together, which also means they are mechanical weak, the chocolate breaks easily and may even be slightly flexible.
On the other hand, if you start off with chairs that are all the same size and shape and take the time to stack them in a column where their legs lock together, they can be bumped and shoved around quite hard before they fall apart. In chocolate, if all the crystals are the same and are cooled slowly so that they have time to lock together, then they form a rigid structure that takes a harder "bump" to disturb (a higher temperature to melt) or to break.
The most desirable form is beta because it's the strongest, most stable, has the shiniest surface, releases the easiest from molds and has the best eating texture.
Tempering is nothing more than controlling the temperature so that beta is encouraged to form and all the others are discouraged. The easiest way to do this is to melt milk chocolate in the 85 to 87 degree range, at which temperature all other forms melt yet beta can still crystallize. Once the melt thickens as it's stirred you know that it contains a large number of beta seed crystals, which will grow throughout the chocolate if it is left to cool slowly. The problem is that this technique takes a long time to get the chocolate to melt (it's like boiling water with too small of a flame) and almost as long to form seed crystals. The process can be speeded up by heating the chocolate quicker (to a higher temperature) cooling it quickly to form a lot of seed crystals, some of which will be the undesirable types, then warming it again to 85-86 degrees to melt away everything but the beta seeds. The up-and-down heating technique has nothing to do with some sort of magic conditioning of the chocolate. It's just a way to speed things up.
The easiest technique of all for tempering chocolate is to purchase an electric temperer.
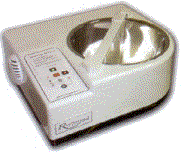
All you do is push keys to tell the machine what type of chocolate you have and it automatically mixes it and adjusts the temperature as needed for a perfect temper. The only problem is cost: they average $400.00 for a small unit.
Test Number 1: Just melt it (or is it really that easy?)
All the milk chocolate sold available to the public has been tempered because that's the only way it's stable enough for storage. Since beta crystals fall apart at 88 degrees, all we have to do is make sure that the chocolate remains below this temperature as it melts and the temper will be preserved. To do this you'll need to create a thermal bath that remains at 85-87 degrees and never cycles above 88 degrees. Simple, right?
When I tried this technique I ran into three problems:
1: It turns out that maintaining something at a certain temperature within plus or minus one degree is difficult. I tried using two different thermostatically controlled heating pads, but both provided temperatures that ranged above and below the target temperature by as much as 10 degrees. This could be evened out somewhat by using a very heavy ceramic bowl, but temperatures still fluctuated. Next I tried a thermostatically controlled crock pot with water in the pot and a heavy ceramic bowl over the top like a double boiler. This worked better than the heating pads but again, the temperature fluctuations were too great for absolute control. Finally, I set up a deep pan half filled with water and covered with a heavy ceramic bowl. The water did not touch the bottom of the bowl. By setting the flame of the smallest burner at it's lowest flame the melting bowl's temperature could be maintained at a near constant 86 degrees. The constant heat provided by the non-fluctuating flame worked better at maintaining the temperature than the thermostatically controlled systems.
2: Heat travels from the bowl to the chocolate because there is a temperature difference between them. Near the melting point, this temperature difference is so small that it takes a very long time for the chocolate to melt. In my test it took two hours. This is too long to spend watching and mixing the chocolate when other techniques enable chocolate to be tempered in just a few minutes.
3: A problem develops when this technique is applied to large quantities of chocolate, the top layer of chocolate is cooler than the bottom even with constant stirring. This means that it is impossible to keep the top liquid without having the chocolate on the bottom get too hot and lose it's temper.
Still,
this technique does work for very small quantities of chocolate. I
was able to melt and remold 2 ounce portions and the resulting
chocolate retained the gloss and texture of well-tempered chocolate.
Test
number 2: Transitional temperature technique:
This is the classic technique where the chocolate is heated quickly, compared to the above technique, to between 100 and 115 degrees (for milk chocolate) then cooled to the high 70s to create seed crystals, then warmed again to 84-87 degrees to melt all the seeds crystals that aren't beta. The advantage of this system is that while maintained a constant temperature is difficult, passing through such a temperature during heating or cooling is easy.
I began with a double boiler setup and gently heated 4 ounces of chocolate while stirring, being careful the maintain the water below the simmer point so that steam couldn't come up and cause the chocolate to seize (more on that later.). In five minutes it had melted and the chocolate thermometer ($15 at a cake decorating specialty shop) used to stir it indicated that the temperature was 98 degrees F. I removed the bowl from the water bath and stirred it constantly as the temperature dropped to 75 degrees, about fifteen minutes. I then returned the bowl to the heat and warmed it, still stirring, back to 85 degrees, which took four minutes. After stirring the chocolate a few more minutes to make sure only, or mostly, beta crystals remained, I poured the chocolate out onto a piece of aluminum foil on the kitchen counter. It cooled quickly and while there was some gloss and the texture was good, the chocolate didn't snap when broken. I repeated this process only this time I made sure the air temperature in the room was 75 degrees (it was below 70 before) and that the surface onto which the chocolate was poured was also warmed. This time the chocolate came out glossier and had more snap. What happened the first time was that the cooler temperatures caused the chocolate to solidify too quickly, an occurrence which tends to produce the bad sorts of chocolate crystals.
This process produced acceptable results but when breaking the chocolate I noticed that it had a slightly lighter color than the original and that there were some air pockets in it. I believe both of these were the result of too rapid stirring which caused air bubbles to be mixed in and trapped in the chocolate.
Test
number 3: the seeding technique:
This is the same as technique number 2 except instead of letting the chocolate cool slowly after the initial melt to a low temperature then rewarming it, scraps of reserved and still tempered chocolate are added to the melted chocolate and mixed in. This unmelted, still tempered chocolate cools the mixture quickly and and provides beta seeds for proper tempering. In this technique the seed chocolate is usually one-quarter to one-third of the melted chocolate and is added off heat slowly, two tablespoons at a time until the chocolate cools to 84 degrees. At that point any unmelted chocolate is removed and the chocolate remaining should be in perfect temper.
I found this the easiest and fastest technique to use. The resulting chocolate was better than that from the second technique because there was less stirring and therefore fewer bubbles. Also, I suspect that the density of beta crystals was higher. The problem with this technique is that it can only be used with pretempered chocolate. If you're going to make your own chocolate at home technique number 2 will have to be used.
Test
number 4: The
marble surface technique:
I found that this technique produces the glossiest, best temper.
Warm the chocolate to melting then pour it out onto a marble slab. Use an offset metal spatula to work the chocolate back and forth, repeatedly gathering it to the center and spreading it out. Pretend like you're repeatedly spreading frosting over the top of a cake and then scraping it back to the center. Do this until the temperature of the chocolate drops to 83 degrees and it should be tempered.

The reason this technique works so well is that the spreading action causes the chocolate to be worked a lot with the result that many seed crystals are formed. Also, unlike stirring, the spreading action does not incorporate air bubbles into the chocolate.
One
final issue:
How do you know if your chocolate thermometer is properly calibrated? Being a research engineer, I have a natural tendency to doubt everything. To verify my thermometer, I used tempering technique number 3 and removed small samples of chocolate from the bowl as the mix cooled and let them cool slowly. Then I compared their appearance and texture to see at what range the resulting chocolate was the best.
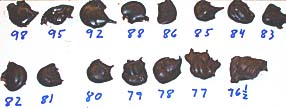
Although it's difficult to see the differences in this picture, the best results were obtained from chocolate taken when the mix was between 83 to 85 degrees. Both above and below that range the chocolate was less glossily, didn't snap and had a course texture. The three samples at 78, 77, and 76.5 degrees were noticeably lighter in color. The 76.5 degree sample was the end point of the test because the chocolate turned solid. This test calibrated my thermometer by providing the best temperature for pouring or dipping. It's two degrees cooler than indicated by most references so I assume that the thermometer was slightly miss-marked.
And
yet another final issue:
As a follow-up to the slow/low temperature melting technique, I played around with different ways to maintain constant controlled temperatures and came up with the following system:
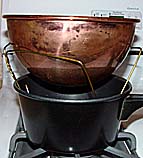
I set up a pan with two cups of water in it and placed it over a burner with the flame set on its lowest setting. After 15 minutes the water was up to a constant 190 degrees. Then I bent a coat hanger so that it wedged inside the pan and created a cradle to hold the bowl in which the chocolate was placed at just the right height to maintain a constant 98 degrees. This turned out to be low enough so that I didn't have to worry about scorching the chocolate yet high enough so that it didn't take all day to melt. Once the chocolate was melted I could take it off the frame and work on it as needed for tempering, then replacing it for a few seconds or minutes depending on what technique was being used to warm it. Once I had it tempered, I placed a small rack on top of the frame and placed the bowl on the rack.
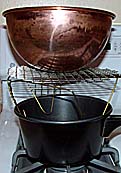
The extra height allowed enough cooling air between the water and bottom of the bowl so that the chocolate was now maintained at a constant 84 degrees: high enough to prevent undesirable forms of chocolate crystals from forming yet cool enough so that the good beta crystals weren't lost.
WARNING This is a system I made for my own use. I do not recommend anyone else do it because the presence of flame and hot materials and instability of the structure make it potentially hazardous.
Seizing:
The chocolate maker's worst nightmare
Although melted looks like a smooth liquid, in fact it consists of dry chocolate particles and liquid cocoa butter. If it sounds weird to think that part of a liquid is dry, think of potato chips. When fresh they are crisp and brittle, yet that are also very high in the oil used to fry them. The reason this is possible is that the fat in both cases cannot "wet" or saturate the dry ingredients. Dip a potato chip in water and in short time it turns flabby because unlike the fat, water can wet the dry components. The same thing happens when water comes in contact with melted chocolate... sort of.
When a very small amount of water gets mixed into melted chocolate, it wets the chocolate particles and being wet, they get sticky and tend to clump together. These clumps drive out the cocoa butter and the whole mess appears to instantly "seize" up into a semi-dry paste similar to fudge. Once this happens the chocolate cannot be saved and is only good for baking. Here's what the seizing process looks like:
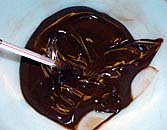
Four ounces of freshly melted milk chocolate at 88 degrees
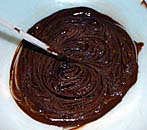
Only
3 seconds after a 1/2 teaspoon of water is added
the
melt starts looking dry
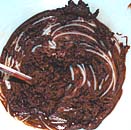
Three
seconds later the chocolate has completely seized into a
lumpy,
fudge-like mass
Water, or water-based products like milk and cream, can be added to melted chocolate if the liquid is first brought up to the temperature of the melted chocolate and if a large enough quantity of liquid is used so that instead of the dry chocolate particles being barely wetted so that they are sticky and clump together, they can flow like a liquid. Using sufficient liquids is how ganaches are made.
![]()
Return
to my main page for more chocolate
articles or to browse 70 other topics: everything from Knitting
Nancies and metal detectors to the strange world of lucid dreaming.