How to Grow the Best Transplants Techniques for making your transplants grow the fastest.
Every year in late winter I start dozens of plants inside under plant lights to get a head start on the growing season. Like all gardeners who do this I want these transplants to grow as fast and be as strong as possible. This page chronicles many experiments I've performed to figure out the best way to do this.
First
Step: Chose the Best Potting Soil:
Good potting soil wets quickly, holds sufficient water, drains well, doesn't crust over preventing small seedlings from breaking through and promotes rapid grow. It should also be widely available and if possible, inexpensive. My POTTING SOIL page presents the results of testing several different potting soils. The best I found was Supersoil Potting Soil, a medium-coarse mix that's a delight to use. It scoops very easily and wets the best of all the potting soils I compared. Wet or dry it is the lightest of the mixes, which would be advantageous if it's going to be used in a very large pot that has to be moved around. It's extremely fast and easy to bottom water and drains quickly. While draining it has very little shrinkage. It has an outstanding texture for seedling emergence and plant growth. This potting soil already contains some fertilizer and the package label claims no additional fertilizer is needed for 3 months.
Second
Step: What Type of Light to Use?
After comparing several types of plant light options I found the one that worked best for the small indoor gardening was fluorescent using GE Plant and Aquarium Wide Spectrum bulbs. (For complete details of this test with pictures of plants grown under each system please see my FLUORESCENT PLANT LIGHTING page.)
Step
Three: Fertilizer Strength
While all plants need fertilizer, using too much can burn roots and actually kill plants. The question then is how much should be used and how often should it be applied. To determine this I grew muskmelons, zinnias and tomatoes under identical conditions except for the amount of fertilizer each received. All the plants were watered the same and grown for 4 weeks. In the image below the fertilizer strength from left to right was none, 1 tbsp per gallon, 2 tbsp per gallon, 3 and 4 tbsp per gallon of watering water. The fertilizer used was the organic Omega 6-6-6 by Peaceful Valley Farm Supply. The potting soil used was Supersoil Potting Soil.
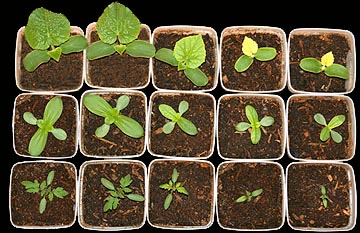
As can be seen, using no fertilizer or 1 tbsp per gallon of watering water produced the best growth. As expected, there is an obvious, consistent decline in plant growth once the optimum fertilization rate is passed. Considering the negligible difference between no fertilizer and 1 tbsp per gallon, I'm recommending that no fertilizer be used. This has the advantage of eliminating the smelly and messy job of mixing the fertilizer into the water. (Note: this result is for Supersoil Potting Soil only. Non-fertilized potting soils may perform better with fertilization.)
Step
Four: Root Boosters?
Many high-end farm companies recommend inoculating soils with mycorrhizae spores, which form a symbiotic relationship with plant roots that encourage the plants to grow larger, healthier root systems. To test this I inoculated some potting soil with these spores as per manufacturer's instructions and compared the root development in them to those of plants grown without the innoculant. As the picture blow shows, in my case the difference wasn't significant:
![]()
The two plants on the left did not receive innoculant, the two on the right did. Although the first plant's roots are slightly smaller, the difference wasn't enough to justify the expense and hassle. Note: I'm not saying that such innoculants don't work. I'm only stating that in this small test using Supersoil Potting Soil it didn't show a significant advantage. It may be the Supersoil already has the mycorrhizae spores in it.
Step
Five: Watering
Watering dozens of transplants can be tedious. While I'm willing to do it as often as needed for optimum growth I also don't want to waste time. To determine how often watering is necessary I planted melons, zinnias and tomato seeds in 1-quart planters filled with Supersoil Potting Mix. The plants were sorted into five groups that received water once a week, every five days, every three days, 2 days and every day. I got the best growth from those watered every three days. Note, however, that these were the results of only the first four weeks of growth after seed emergence. By that time I noticed that the size of the plants started having an effect on how dry the potting soil got between waterings. As expected, the fast-growing melons with their aggressive and large root systems began sucking the water up much faster than the slower-growing tomatoes. My advice is to use the three-day watering schedule until you notice the soil drying out between waterings then increase as needed... though this drying out might suggest that the container was too small for the plant and therefore couldn't store sufficient water rather than too infrequent waterings.
Step
Six: How Much Light?
Two things have to be considered when figuring out how much light to use: intensity and duration.
It would seem that considering how weak artificial lights are in comparison to sunlight that you can't have too much. While this is true up to the point where the light exceeds sunlight in strength, the fact that most artificially lit planting areas are enclosed to reflect as much light onto the plants as possible creates a heat problem. Even with fluorescents, heat can quickly build up above 100-degrees. I found that four, 40-watt GE Plant and Aquarium Wide Spectrum bulbs illuminating a 4-foot long by 15-inch wide enclosed growing box provides enough light for rapid, healthy growth. But, I also use a small fan set at its lowest speed to gently blow fresh air into the planter to prevent temperatures from getting too high and also provide a supply of fresh air. An additional benefit of the fan is that the gentle rustling of the plants encourages them to grow stronger trunks and stems.
I've read many accounts stating that plants need a period of darkness everyday for proper growth. This may be true but not one of these references proved this with a test. For my own purposes I did.
I planted two groups of muskmelons, tomatoes and zinnias. One received light as described above 18-hours a day while the other received it 24-hours an day. The differences between the two groups were extremely small and variety-specific.
The zinnias appeared to grow slightly better with 6-hours of darkness a day. However, the plant-to-plant variations in size in both groups was as great as the differences between the 18 and 24-hour lighting groups.
The muskmelons and tomatoes grew the same in both groups.
The result from this experiment is that while a period of darkness may be beneficial to some types of plants, the differences may be too small to worry about. All the plants I used i this test grow strong and healthy when reaching light 24-hours a day.
One might then ask: Why run the lights all the time if they aren't necessary? The answer is some growing situations may benefit from 24-hour lighting if the lighting is also being used as a source of heat or to keep nocturnal insects at bay. For myself, I plant my melons outside up to 8 weeks before the last Spring frost. By placing a light box over them and leaving it on 24-hours a day I'm able to use the heat from the lights to not only warm the soil for proper germination but ward off the killing effects of frost. This technique allows me to seed melons directly into the garden without having to subject them to transplant shock.
Finally:
Pot Size
It may seen that this issue should have been addressed earlier but I held off because I feel this issue is particularly important and wanted it saved for the last. The unfortunate truth is that the vast majority of transplants are grown in pots that are far too small. The roots of most plants grow 1/4-inch per day. This means that if planted outdoors in 4 weeks they would spread in a circle 14-inches across. My favorite, melons, fire roots out at the almost explosive rate of 1-inch per day. The upshot is that using small pots may be convenient to the gardener but it results in root bound plants whose growth is effected for the rest of their lives.
In consideration of this I recommend using nothing smaller than 1-quart pots with transparent sides and checking the roots everyday for signs of root binding (roots tangling on the inside surface of the planter.) Plan the planting schedule so that once they reach this size the weather permits transplanting them outside. A few examples follow:
Melons in 1-quart pots: transplant no later than two weeks after germination
Zinnias: 3 to 4 weeks after germination (Zinnias grow incrediably fast so it's best to error on the low side to prevent them from outgrowing the light box.)
Tomatoes: 5 to 6 weeks
Actually,
I use 5 gallon plastic tubs for melons and even then transplant them
no later than 8-weeks after germination. Such large pots require
something to support the root ball when trasplanting or it will break
apart under its own weight. I do this by lining the pot with 2-inch
chicken wire mesh, leaving enough extending above the top of the pot
to act as a handle to pull the root ball out of the pot. Here's a
picture of a 2-month old bush muskmelon being lifted out of its pot:
![]()
Even
better, I sometimes seed a melon directly in the garden and place a
water-proof light box over them so their roots can grow unhindered.
This technique also avoids transplant shock.
Closing
Comments:
Growing optimum transplants is a complex subject, which this page only begins to explore. I hope you found it useful and I promise that as I perform additional experiments I'll post them.
I
hope you'll come back often and I wish you good gardening.
![]()
Return to my main page and browse 100 other topics: everything from kaleidoscopes and metal detectors to the strange world of lucid dreaming.