TRIANGLE LOOMS: 67 photos showing how to make a triangle loom and weave on it.
(Click on main site to browse 70 other topics ranging from exotic kaleidoscope designs to the strange world of lucid dreaming.)
While
researching the Internet for my Knitting
Nancy weaving page I came across a reference to something
called a triangle loom. What caught my attention was the comment that
these looms weave in such a manner that warps are automatically
created with each weft and weaving was accomplished using a single
continuous piece of yarn. Not being a weaver I wouldn't recognize a
weft if it ran up an bit me. But, the idea of doing two things at
once sparked my engineer's curiosity. Also, the only looms I'd seen
were huge framework affairs packed with hundreds of pieces of yarn
all doing their own thing. If these triangle looms really did trade
in all that complexity for a single thread they were something I had
to see.
At first the Internet search went well. In short time I learned that triangle looms were just what they sounded like: a simple triangular wood frame. Hundreds of nails are driven into the frame along all three sides and weaving is achieved by running the yarn up and down, back and forth through these nails. The only problem was that I couldn't find any detailed construction information, particularly on how close the nails have to be for different yarns. Even more importantly there weren't any instructions for triangle loom weaving understandable to someone completely unfamiliar with weaving. A visit to the library also failed to turn up any helpful information.
Eventually, from bits and pieces picked up from different sources and a little creative thinking, I got an inkling of how to build a triangle loom and weave on it. This page chronicles my stumbling progress as I learned to weave on a triangle loom. I'm posting it to help newcomers like myself learn to weave and by showing my mistakes how they can be avoided. I strongly recommend anyone seriously interested in triangle weaving to purchase a professionally written book on the subject available from many weaving supply sites.
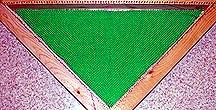
Step
1: Making
a small triangle loom
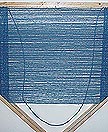
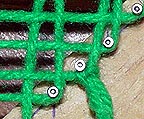
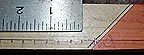
A triangle loom consists of a triangular frame with a 90 degree angle at the bottom and 45 degree angles at the two upper corners. The frame can be made out of any wood that is smooth enough so that it doesn't snag the yarn. Nails are pounded into the face of the frame close the inside edge. These nails are usually 1/2 inch apart on the top rail and approximately 1/4 inch apart down each of the sides. The wood should be predrilled for the nails to prevent splitting.
Scrounging around the garage, I turned up a box of 1 and 1/4 inch finishing nails and a 59 inch piece of 2 x 2 inch pine. (Pine is a little soft for a loom intended for many projects. The nails might pull out over time. Using a hardwood would made a much more durable frame.) Applying a little high school geometry I calculated the angles and lengths required for the three rails of the frame. Joining the corners with three inch drywall screws created a sturdy frame. I then drew a line 1/4 inch in from the inside edge of the frame all the way around it. Along the long upper arm of the frame I drilled holes every 1/2 inch along this line and pounded a nail into each one. I used a plastic draftsman's square to provide a 90 degree drop from each of these nails to where it crossed the line on the side rails. I then added additional marks halfway between each of these marks to double the number of positions for nails. As you will see a couple of pictures further down this page, every time yarn is looped over a nail on the top rail two vertical lines of yarn (wefts) are created. But, every time a line of yarn is carried from one side rail nail to the other, only one horizontal line of yarn (a warp) is created. Therefore, to have the same number of horizontal and vertical lines of yarn there has to be twice as many nails per inch on the side rails as on the top rail. If the number of nails were the same then the vertical lines of yarn would quickly start to angle toward the center of the frame and the grid of crisscrossed yarns wouldn't be square.

This small frame took an hour to build and only cost $1.34. Using inexpensive lumber you could build a loom with an eight foot top arm for only $7. It wouldn't look like much but it would get the job done as well as one costing ten times as much.
Step 2: starting the weave
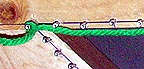
I started by tying a slip knot in the end of a skein of yarn and secured it to the corner nail on the left side of the top rail. I then carried the yarn under the nails to the right corner of the frame. This horizontal line of yarn is the first or top warp. (Instead of tying the yarn to the corner nail, a piece of the hooked side of Velcro to hold the yarn. This enables the yarn to be pulled loose and tightened, which is useful since the top line sometimes gets stretched out and floppy.)
At the corner nail on the right, I made one counter clockwise turn around it, carried the yarn down and under the first nail on the side rail and headed back over the the left. This second horizontal line of yarn is the second warp.
Back at the left side of the loom I brought the yarn up and around the second nail on the left side rail and brought it up and over the first warp. The line of yarn going straight up leads back the the skein
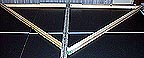
The loom is now primed for weaving.
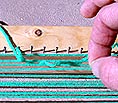
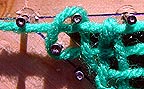
Simple or plain triangular loom weaving consists of snaking a crochet needle over and under the horizontal warps, snagging the loose line of yarn going back to the skein, pulling it down to create a loop of yarn, dragging this loop through the warps, hooking one side of the loop on the next nail down the side on which you're working, widening the loop by dragging it to the other side letting yarn pull from the skein as you do so, and hooking the second side of the loop on the next nail down on the far side of the loom. Here's what it looks like in pictures:
Reaching up through the warps to snag the loose yarn
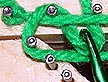
Pulling the yarn down to create a loop and dragging this loop through the warps
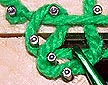
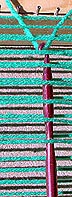
Hooking the left side of the loop on the next nail down on the left side
Pulling the loop toward the other side, drawing yarn from the skein to widen the loop
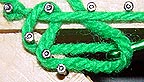
Hooking the right side of the loop on the next nail down on the right side of the loom
Notice in the last picture that the loose end of the yarn is once again going up and out of the picture. For the next weaving, the same process is repeated except this time the loop is started on the right side. Weaving is simply a matter of repeating the process of dragging loops down from one side, hooking them on a nail, widening the loop as it's dragged sideways across the warps, and hooking it on the next nail down on the opposite side.
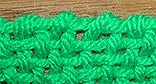
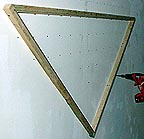
Here's what the end product of the sequence of pictures above looks like after the yarn has been pulled tight:
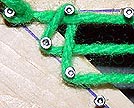
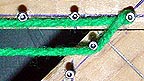
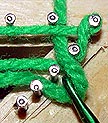
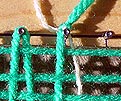
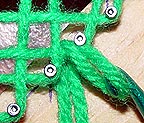
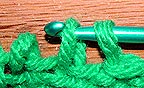
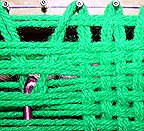
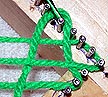
The only tricky part about weaving on a triangle loom is understanding that for the cloth to hold together, neighboring wefts (vertical lines of yarn) must alternate going over or under the same warp to lock everything in place.
Look closely at the two wefts circling the top nail next to the corner nail above. The weft coming down from the right side of this nail goes under the top warp and over the second warp. The weft on the left side of the nail does the opposite. It goes over then under the same two warps. It's essential to make sure that the wefts alternate in this manner. There are two ways of doing this. First, every time you bring a new loop down you can take a close look at where the last loop went to see if it started off going over or under the top warp and do the opposite with the new loop. Second, you could follow the program of always bringing the new loop over the top warp when you are starting the new loop on the right side and under the top warp if you are starting the loop on the left side.
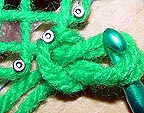
Above is another loop started from the left side so the loop starts off by going under the top warp.
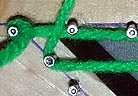
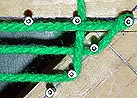
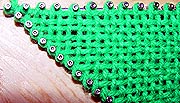
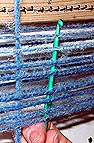
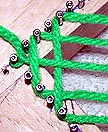
The picture above shows a loop that's been brought down through the warps on a larger project. It needs to have it's left and right sides hooked around the nails on both sides and tightened. (When dealing with this many warps, it might save time and effort to switch from a crochet needle to a weaving needle, a long, bunt-pointed needle with an eye.)
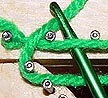
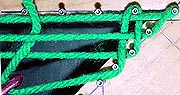
I quickly discovered that trying to pick up the warps with my fingers to weave the wefts under them wasn't going to work. My fingers were too large for the closely packed threads. Doing this one warp at a time was also far too slow to be practical. Fortunately a much easier and faster technique presented itself.

I noticed that it's easy to see the effect of the last weft: it pushed up the warps it went under and pushed down the ones it went over. Since the next weft has to do the opposite, I realized all I had to do was weave it over the high warps and under the low warps. As soon as that light went on, another lit up which further sped things along.
Instead of plucking at the warps one at a time to weave the wefts through them, I realized I could run a crochet hook up through several of them at once, hook the loop, then draw it down. By making sure the crochet hook went over the warps that the previous weft pushed up and under the warps it pushed down I was certain to get things right. It worked so well it speeded things up by a factor of ten.
All that's needed to do now is continue weaving loops down through the warps until the triangle is full. Before getting that far there's something I wanted to try.
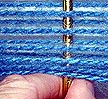
Step 4: Changing colors
I came across two explanations of how to change colors but in spite of reading them many times and trying to work it out on a loom I couldn't understand how to do it. I'm sure the instructions are correct. It's just that my unfamiliarity with weaving made it impossible for me to understand what I was supposed to do. So I figured out my own technique. Be warned, this is almost certainly the wrong way to do this.
The one thing I did get out of the instructions was the importance of making sure the color change takes place in such a manner that the change is symmetrical. This means that the first new color weft on the left goes under the same warps as its corresponding weft on the right. The only way I could do this was to tie the new color to the old yarn exactly at the point where the old yarn would have gone up and over a nail in the top rail.
This knot has to be very strong, small and be able to be trimmed very close so that the loose ends of yarn aren't visible. A very tight square knot worked perfectly. (The only yarn I could find at home that was a different color was some that I "borrowed" from my wife's collection for her knitting machine. It's much finer than what I started with and didn't work very well. From this I learned that I want to use yarn that is all the same weight.)
After tightening the knot and trimming the loose ends it's back to weaving as before.
The picture above shows the first loop of the new color after it was pulled tight.
After a dozen loops with the new color I switched back to the original one and continued weaving until the frame was full. The last loop ran right down the middle and hooked on the bottom center nail. The tuft of yarn sticking up on the top is the end of that loop.
Step 5: Finishing off
Normally the product of a triangle loom is a shawl with a fringe. If that's the case simply pull the loose end of the last loop down through the warps and cut it to the length of fringe you plan to add. For this test piece I wasn't adding a fringe so I simply pulled it down and tied it off to the last warp.
Step 6: Adding fringe
I didn't do this on my test piece but it's easy. Take a length of yarn twice as long as the desired fringe. Double it over, use a crochet hook to pull the fringe's loop through a side loop and use the hook again to pull the fringe's lose tails through the fringe's own loop. Pull the ends to tighten. Repeat this to all of the loops on the two side edges of the piece.
Note: the fringe will have a softer look and texture if it's torn to length instead of cut.
Step 7: removing the work
With two exceptions, the edges of the weaving are locked so that the work can now simply be lifted off the frame. One exception is the upper left corner.
The top warp runs through the top row of loops. Because the left end isn't secured to the woven piece, if it isn't tied down it'll pull toward the right through the loops and the work will unravel. I tied it off to the last loop with a square knot. If a fringe is being added this lose end can become part of it.
The second location where the loops are unsecured is the last loop pulled down through the center of the shawl. It can be secured by pulling the loose side of this loop down and cutting it off to form part of the fringe or tied off to the last warp.
The top edge produced by pulling the work straight off the loom is a bit plain.
A nicer edge can be created by passing a crochet hook through the first loop on the top right, grabbing the next loop and drawing it through the first loop, then repeating this process across the top of the work to create a chain stitch. Tie it off with the tail of lose yard sticking out of the left left to lock the chain.


The resulting edge has a more solid appearance.

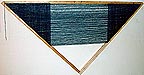
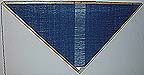
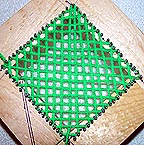
My finished test piece without braiding the edge:
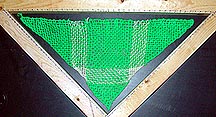
After running it through a hot wash and dry cycle the finished piece ended up being ten percent smaller than the original nail spacing. What that means is if I wanted a shawl with a seven foot long top edge I'd need to make the top line of nails on the frame seven feet eight inches long.
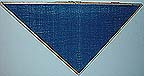
One thing that's obvious is that the weave on my test piece is far two open. The yarn I used was 1/16 inch in diameter, tight, smooth and twisted (worsted) so it didn't fluff up during the wash/dry treatment. The nails on the top rail were were spaced 1/2 inch apart. What I learned from this is that the nails need to be spaced apart no more than four times the diameter of the yarn. In my case they should have been 1/4 inches apart on the top rail and around 1/8 inches apart on the sides. This spacing is so close it might be difficult to work with. This four-times-the-yarn-diameter spacing only applies for a tight weave using non-fluffing yarn. If the yarn puffs up during washing a wider spacing can be used. Also, some shawls are supposed to have an open, airy weave. They would also have wider nail spacing.
One option instead of increasing the nail density or using thicker yarn for a tight weave is to use two or three skeins simultaneously. Tie the loose ends from the skeins together and weave as if they were one piece of yarn.
Above is a picture of two yarns being woven as one. The resulting fabric hints at a checkerboard pattern. I found this technique awkward because the multiple strands had a much greater tendency to catch on things, slip off the ends of the nails and it was hard to find the correct pairs of warp yarns to weave through.
![]()
How
much yarn does it take?
From several sites I learned that the geometry of a triangle loom dictates that each loop is the same length and that length is equal to the distance across the top rail. This makes estimating the length of yarn needed easy to calculate. In the case of my little test frame, it's the top length of 21 inches multiplied by 43 nails running down the side (including the bottom-most center nail.) This gives 21 x 43 = 903 inches or 75 feet 3 inches.
The question now is how accurate is this estimate? To find this out I unraveled my test piece and measured the yarn. It came to 72 feet six inches unstretched and 74 feet 9 inches stretched. These numbers are very close to the estimate. More importantly, they are less than the estimate so it's on the safe side to use it. I assume the difference is due to the yarn being stretched in the loom more than when measured.
For a seven foot shawl I'd need a frame with a seven foot eight inch long upper side to allow for shrinkage. If the nails on the top row are spaced 1/2 inch apart the estimated length of yarn required is 1417 feet or 472 yards. If I wanted to finish the two short edges with a four-inch long fringe, that would add (8-inches per fringe x 369 fringes (the number of nails on the sides of the frame)) 247 feet or 86 yards. That brings to total to 562 yards of yarn.
Onward and upward!
Once I'd gotten the basics down it was natural that I'd want to try something more substantial. I looked around the house for something that needed covering and noticed my lovely wife's shoulders looked cold. Seems to me like something a nice warm shawl could fix. While I could weave two-dozen small triangles like the one above and sew them together to make a shawl, I doubt that it would look like anything she'd want to wear. That meant I needed a larger loom. A quick trip to the hardware store provided three 8-foot pieces of 2 x 2 inch pine and two boxes of finishing nails. I was good to go.
But first, time to try tightening things up
As already mentioned, the nail spacing on my test loom was much too far apart for the yarn I was using. I doubled the nail count so the spacing between the nails on the top rail was four times the width of the yarn to see if this rule was correct.
My concern wasn't with the 1/4 inch spacing on the top rail as much as the almost 1/8 inch spacing on the side rails.
As you can see by comparing the spacing to the "E" size crochet needle behind the nails, they are so close the heads are starting to crowd each other. Surprisingly, when I started weaving it wasn't as hard as I thought it would be. I quickly figured out different techniques for handling the yarn that made getting it between the correct nails easy.
The increased density was more than I had hoped for. I'd expected it to double but now understand that by doubling the nails along the top and sides I doubled both the number of warp and weft lines. That increased the density by a factor of four.
. 
original nail spacing ........ after doubling the nails
Both pictures above were taken at the same scale, as you can see by comparing the distance between the first and second nails on the left to the first and third on the right. The yarn looks thicker in the left picture because it hasn't been drawn as tight. It seems that as the weave becomes finer there is a tendency to weave tighter, which stretches the yarn. This is something to avoid because it makes the yarn thin, counteracting the purpose of going to a higher density weave. I need to back off on the tension.
By examining my technique, I discovered I straightened the wefts by pulling them down until they were straight. This stretched the yarn. Now what I do is only pull it enough to get it around the nail then use the end of the crochet hook to push it over so it lines up straight. This leaves the yarn fuller and makes the weave look tighter. I also suspect it will reduce the amount of shrinkage when the piece is taken off the frame.

(Pushing the weft to the left)
Another advantage of pushing the wefts over is that I was able to get them perfectly straight. There's a tendency for wefts to bow in toward the center of the work. Left uncorrected this could cause bunching in the center of the piece. Beating the wefts straight prevents this.
The last few wefts were extremely difficult to weave through the warps. Everything was so tight the drag on the yarn was almost enough to break it as I pulled the final loops through. The result was worth it.
The finished cloth from the frame with the 1/4-inch nail spacing on the top rail (above left) was solid, smooth and only shrunk five percent. Compare it to the first sample (above right) woven with the 1/2-inch nail spacing. Having the top rail nails spaced four times the diameter of the yarn, as they were on the left, seems to work out right.
Sizing the shawl-to-be to my wife
I measured my wife's reach and figured she'd need a shawl 64 inches long. Adding ten percent to compensate for shrinkage gave 70 inches for the distance from the top corner nail on the left to the top corner nail on the right.
Yarn! I need yarn!
My wife asked for a soft blue shawl. A trip to the local Hancock's Fabrics provided a yarn that I thought might fit the bill.
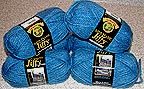
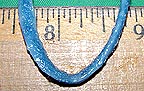
I got six skeins of Lion Brand JIFFY Quick and Easy Mohair Look Yarn for two dollars each. My calculation indicated that I'd only need three, but I wanted to be sure to have extra all from the same dye lot. The yarn measured out at a little under one-eighth inch in diameter so I figured the nails on my frame should be 3/8-inch apart on the top rail and about half that on the side rails.
This yarn looked like it was going to be perfect. I was soon to discover the opposite was true.
Making a very cheap triangle loom
The big loom was built using the same low cost approach taken with the test loom. The only materials required were two boxes of 1 and 1/4 inch finishing nails for $1.29 each and three 2 x 2 inch pine boards eight feet long for $1.89 each.
First came the top rail. I drew a line 3/8 inch from the edge of one of the boards and hash-marked it every 3/8-inch for 187 nails. I then used a plastic triangle to mark the 45-degree cut lines for the ends.
After cutting this piece, I joined the remaining two boards at one end with 3-inch drywall screws, making sure that the corner made a 90-degree angle. Then I placed the top rail across them and shimmied its ends up and down until the lengths from the inside of the 90-degree corner and inside corners made by the top rail and sides were the same. Three inch drywall screws secured the top rail to the two sides. I trimmed the excess wood on the side rails extending above the top rail. Next I added one more nail mark to each end of the top rail to bring the total to 189. These are for the corner nails. Now I had to mark the positions for the nails on the side rails.
The distances between the side rail nails don't have to be exact but they do have to be the correct number. Too many or too few nails means I'll have to do some tricky work to finish the piece off. Since I knew that the number of nails on each side rail is the same as the total number of nails on the top rail, I could divide the side rail length by the number of nail minus one and get the distance between each nail on the side rail. In theory I could then measure and mark the nail positions. The problem with this technique is that the distance usually ends up being something like 0.2716 inches. Since rulers aren't marked in such units I'd have to round it off somehow. With almost 200 nails on a side any small change in the distance marked each time means that by the time I got to the end I could be several inches off.
To avoid this problem, I simply used a large T-square to drop straight down from each nail on the top rail to where it crossed the line for the nails on the side rails. (This line was 3/8-inch from the inside, as it was for the top rail.) Then when I went to drill the holes I eyeballed an extra hole between the marks. This gave me the exact number of nails needed.
With all the nail positions marked, all that was left was to drill and pound in the nails.
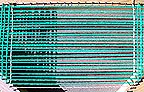
This 74-inch loom took two and one-half hours to build: half an hour to make the frame and two hours to drill 591 holes and pound 591 nails into them. After all the nails were in place I used a pair piers to bend the nails outward a bit to help hold the yarn on them.
Rather than build a frame to hold the loom I simply screwed it to the wall. Standing is a comfortable working position and the wall provides a rock steady support.
The total cost for this frame came to $0.65 for half a box of nails (The two boxes I bought were far too many) and $4.25 for the wood (The remainder of the wood went to other projects so I deducted its value from the total.) That comes to $4.95. Not bad!
Weaving
I'd barely begun weaving when I ran into a disastrous problem. The fuzz on the fake mohair yarn I purchased tangled so easily than when I tried to drag a loop down through the warps all the lines of yarn cinched together. The tangling was so bad that I almost gave up.
My first attempt to conquer the tangling problem was to run a crochet needle back and forth between the warps before pulling the weft through. (I have since learned that this is called "clearing the sheds," where a "shed" is a set of warps that the loop will either pass over or under.)
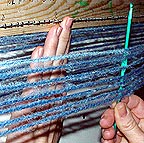
(These are my wife's fair hands.)
This cleared away tangles between the warps but when I tried dragging the weft yarn between them I still got too many tangles to deal with.
Next I tried holding the warps away from the weft as I carried the loop from one side to another by holding crochet needle upright to push the warps close to me outward while guiding the weft between the two layers of warps without letting it touch them.
This also helped but not enough. There had to be a way to completely prevent tangling. I'm sure experienced triangle loom weavers know how to do this but as of the writing of this page I was all on my own. There had to be a solution.
There was... but it's so strange I can't recommend it.
As an engineer, my immediate reaction when faced with something that creates drag is to smear grease all over it. Tangles certainly increase drag so I began wondering if there wasn't some way to treat the yarn to keep it from tangling.
The first thing I tried was soaking the yarn in water. No good. Not only was it a mess to use but the weight of the water caused the yarn to stretch. Next I tried rubbing the yarn with a bar of soap. This eliminated one quarter of the snags, but that wasn't good enough and besides, the soap made me sneeze. However, the soap treatment showed promise so I tried soaking the yarn in liquid hand soap. This didn't work because the soap wasn't thick enough to plaster the yarn fibers flat. It was also incredibly messy.
The soap experiments indicated I was on the right track. What I needed was something that would go on quickly and easily and plaster the fibers against the sides of the yarn: something about the consistency of Crisco. I considered using Crisco thinking it should wash out, but decided to look around for something that might work as well and wash out easier. I found it.
Grocery and hardware stores sell a soap product called GOOP. It's a paste soap with the consistency of Crisco. I found that by placing a dollop of it in one hand and drawing yarn through it I could give a skein of yarn an even coating in fifteen minutes. Although very thick, the soap is so light that it shouldn't weigh the yarn down and stretch it. As I coat the yarn, I let it drop into a bucket then will pull it from the bucket as I weave. This should prevent tangles, keep it off the floor and clean, and prevent me from stepping on it. After treating a skein I headed back to the loom.
It worked!
The soap eliminated 95 percent of the tangling. Clearing the sheds took care of the remainder. I was back in business. (I'm not recommending the soap technique because I'm certain there are better techniques for dealing with tangly yarn.)
........... 
.....untreated .....................treated with GOOP
I quickly discovered the hazards using this technique: I never want to rub my eyes and it gave the chocolate I enjoyed snacking on while I worked an odd flavor. Also, the crochet needle gets hard to handle because it's slippery with soap. If someone wants to try the GOOP technique, instead of purchasing GOOP (two dollars for 14 ounces) go to a Wal-Mart store and look for Gojo soap in the automotive department. It's only 86 cents for 18 ounces. One 18 ounce container should be enough to coat two skeins.
(After writing this page I was fortunate enough to communicate with Joanne Ambrus of the Yahoo Triloom Group and she explained that mohair is so tangly it isn't recommended for a first project. She mentioned that some people have had good luck reducing tangles by spraying the yarn with silicone lubricant. Next time I had to start a new skein I saturated it with the silicone spray. The yarn wove easily without tangling. Considering it's much faster and easier to apply the silicone spray is a much better option than soap. Joanne spent a lot of time proofing this page for me and I'm deeply indebted to her. In addition to correcting my terminology and spelling, she also offered many excellent suggestions, which are shown in blue print. Thanks Joanne! )
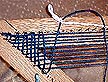
After an hour's work the number of warps got so large that I could no longer sweep the tangles free with a crochet needle. It wasn't long enough. I got the idea of using a long smooth stick to do the same job.
It worked great and had a second payoff. By leaving it in place after clearing the warps it held the warp layers apart making it much easier to pass a crochet needle up to catch a weft loop. (The stick I used was wood and even though it was smooth it tended to catch on an occasional fiber. Switching to a long metal knitting needle avoided this problem.)
Then I noticed that another problem.

The loops at the top of the piece were getting longer as I worked my way toward the center, What was happening was that the weight of the piece was dragging everything down. Left unchecked, by the time the piece was finished the loops could be two inches long. Preventing this turned out to be easy. Every time I pushed a weft straight, I using the smooth end of the crochet hook to give all the warps an upward brush. This kept them even and the top warp tight against the nails on the top rail.
Still another problem, which didn't happen with the small test loom, was that I learned I had to be careful to make sure the tension was the same on each warp. Left too loose, as shown in the picture below, the warp hung down and making it difficult to keep it's order relative to the other warps clear.

If the next warp was pulled tight it would ride above the previous loose warp, encouraging tangles and increasing the likelihood of a mistake.
Here's what the shawl looks like after finishing the half skein I started with:
This much took me an hour and a half. I noticed that as I worked I tended to constantly be stepping closer to the work, then leaning back to see better. This resulted in an ache on the small of my back. I found that by making sure I worked at arm's length I could avoid the backache.
The second skein took four hours. I'm finding that most of the weaving time is spent working a crochet needle through the warps. As the piece gets further along the number of warps increases so each new loop takes longer than the last.
Here's what the shawl looked like after one and a half skeins:
(105 loops done - 84 to go)
By this time the fibers were starting to pull out of the yarn of the top warps. The soap was still preventing the loops from tangling as I brought them down but the warps were starting to snag a little when I separated them (cleared the sheds) prior to bringing a new loop down. I think what is happening is that the soap is being drawn toward the center of the yarn. As this happens, it's pulled away from the surface and the fibers are exposed. Fortunately, they still have enough soap on them to prevent most of the tangles.
Note: it was at this point that I switched from coating the yarn with soap to saturating the skein with silicone spray.
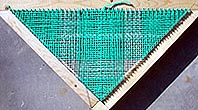
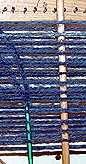
The picture above shows one of the unique attractions of triangle loom weaving: the artistic appearance of the loom with a project on it. The shape of the loom is perfectly repeated in beautiful balance and symmetry by the two triangles in the upper corners and the open triangle at the bottom. These shapes are pleasantly contrasted by the large rectangular section of open warps in the middle. I was half tempted to leave it as is and call it a wall sculpture, but my wife's shoulders were still cold so I carried on.
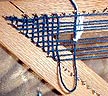
I discovered that one of the danger areas in weaving was where the two knitting needles I was using to clear the sheds overlapped.
It's very easy at this point to misread the warps and drag the loop over or under the wrong line. I found that overlapping the needles so they both went over and under a few of the same warps helped avoid this confusion.
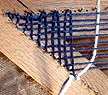
Sometimes the warps tangled when clearing the sheds and other times they didn't. I traced the source of this occasional tangling to how I was holding the knitting needle used for the clearing.
What I found was that if I let my fingers ride up the needle far enough to bunch the warps (pictured above on the left) they would tangle as I dragged the needle across the work. The reason was that as the lines of yarns were forced to cross each other the bunching caused them to rub together and snag fibers. From now on I'm careful to hold the needle well away from the warps (picture on the right) so the warps can pass each other without touching.
After two and a half skeins:
It was at this point that I noticed the warps were so tight that it was getting hard to work yarn through them. I believe the reason is that I began with the warp lines far too tight. I didn't stretch them but I pulled them snug enough so that they made straight lines across the loom. I think that if I had started with the yarn loose enough so that the warps hung down one inch in the center it would have provided enough slack so that by the time I got almost done the weave would be comfortably snug without being drum tight.
I quit using tangle preventer half a skein before the picture above was taken and noticed that I wasn't having any tangle problems. I can only assume that in some way unknown to me my technique has improved to where I avoided tangles.
Finished!
All together it took three skeins, a little over 400 yards of yarn, which is close to the 425 yards I estimated.
Before taking the shawl off the loom I used a knitting needle to close up any wide gaps in the weave and open up areas where yarn bunched together.
Because my wife asked that the shawl not have a fringe, I simply popped the shawl off the loom after tying off the two loose ends, deciding not to add a braided edge to it.
After a hot wash and dry all of the areas where I didn't get the yarn evenly spaced adjusted themselves so the weave looked uniform.
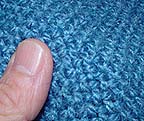
The yarn fluffed up very nicely and is thick and soft to the touch.
However, there were a few problems.

(Please
note the vertical bunching in the center.
It's
much more obvious in person)
Although I tried to separate the two lines of yarn from the last loop, they crowded together to form a rib running down the center of the shawl. I realize now that the problem is that I created adjacent lines of yarn next to each other going over and under the same warps instead of the two lines alternating as they do everywhere else. The fix for this is to pull the loose end of this last loop down, tie it off, and cut the extra yarn off. That way the alternating pattern of the weave will be constant across the face of the piece.
The worst mistake I made was to accidentally pull a loop over a warp I was supposed to go under.

Look carefully at the center of the picture above and you'll spot where a weft goes under a warp it was supposed to go over. The resulting bumps look much more obvious when holding the shawl. I regret to confess that there are eight of these in the shawl and it seriously compromises its appearance. My lesson from this is that it's impossible to be too careful about making sure the loops are properly pulled through the warps.

Finally, I learned the value of adding a fringe to the shawl. Besides providing a place to hide knots a fringe also covers up the long wisps of fiber that are pulled out of the edge of the shawl during washing.
After washing, it shrunk almost exactly ten percent from an initial width of 70.5 inches between the top two corner nails down to a finished width of 64 inches.
It took me a total of 12 hours to make this shawl. I'm sure an experienced weaver could have done it much faster and certainly much better. But, for a first effort it turned out okay, I learned many things, and my wife's shoulders are no longer cold. What more could one ask for?
I take a stab at square loom weaving
The only picture I could find of a square loom showed that they have an odd number of pegs on each side so I began by making a small test loom with 19 nails on each rail.
I began by securing the yarn to the left corner with a slip knot then carrying the yarn over to the right corner.
![]()
I looped the yarn under and around the right corner nail, up and over the next nail (I'm using every other nail to make seeing the warps and wefts easier) and back to the left side of the loom.
At the left side I brought the yarn over and around the next nail, (again skipping every other nail to open up the weave for viewing convenience) down and around the nail below it and back to the right.

Once I'd gotten back to the right I could start weaving. Using a crochet needle I reached under the center warp, snagged a loop in the yarn just carried over from the left and pulled it up and around the next nail. The left side of the loop was then carried back over to the left.
After carrying the loop to the left I circled the next nail with it, pulled it down and around the appropriate bottom nail, then back to the right.
It's now simply a matter of repeating the process of weaving loops up through the warps on the right, carrying the left side of each loop to the left, over and around the top and bottom nails, and back to the right. The big difference between triangle loom weaving and square loom weaving is that with a triangle loom you alternate pulling loops up and down through the warps on each side of the loom whereas with a square loom the loops are always pulled through the warps on the the right side, or at least on the side opposite to that where the yarn was originally tied.
(The finished test piece)
Note that as with a triangle loom, the last loop is unsecured. The easiest way to lock it down is to pull the loose end of the last loop through the work and tie it off to the previous loop.
At this point I noticed that this square loom looks a lot like a ring knitter. (Please see my Knitting Nancy page of an explanation of ring knitting.) In theory I should be able to transition from a flat woven piece to a ring knitting pattern by holding yarn against each nail and carrying the loom's existing loops up and over the yarn. This would enable me to weave vertical sides directly onto the flat square. I didn't do it because it would only look good if all the nails were used instead of every other one as shown here. There are 76 nails on the circumference of the loom. Figuring that it takes five seconds per loop, it would take six minutes to go around it once. If I wanted a box with sides four inches tall it would require 216 minutes or about three and a half hours, a little much for me just to get a small box.
Note: if you use a square shaped loom like a Knitting Nancy, it will not produce a square tube. The tube will be round. (Thanks, Lynn!)
What learning to weave on a triangle loom taught me
I assume that most nonweavers, like I used to be, think that weaving is nothing but boring mindless repetition. Nothing could be further from the truth. Because mistakes are easy to miss and can have catastrophic results to the finished piece, every step of the weaving process has to be scrutinized to make sure it's correct. Constant attention must be paid to technique and how to improve it. A change that saves a few seconds per weft can add up to taking an hour off the time to finish a large project. The weaver must always be thinking, constantly examining his or her work and technique, and ever watchful.
Making a large shawl can be a lot of work and take a long time. But, the finished piece is uniquely your own and will last for years. Given to another, it is a gift of warmth and comfort that will be greatly appreciated.
As the square loom above showed, the concept of using interlocking loops to weave is not limited to triangular shaped looms.
To get the spacing of the nails on the sides use your T square but put the T along the short side and line up with the marks clear across the top. Do one side then put the T on the other side and continue marking by lining up with the top marks. This will give you the same number of nails on each side as there are across the top.
Instead of using the crochet hook to straighten your weaving go buy a wide hair pick comb. Perfect for respacing the weaving.
To handle the fuzzy yarn mix up a flour and water sizing. Wind the yarn in a large skein then dip the yarn and squeeze out the sizing. Hang to dry under tension. Keeps the fuzzy down, washes out easily and is really cheap.
For the large loom if you over lap the corners with half lap joints you can join them with nuts. Makes it easy to take the loom apart for storing or transporting.
For dealing with drawing down the last loop through the center of the piece, try using a flute cleaning rod. They are 14 inches long, thin, and have a convenient eye in the end to hold the yarn.
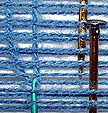
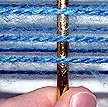
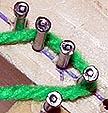
Barb also sent me some good photos of her color-changing technique.
Tie the new color to the old.
Pull the new color through the warps.
Retie the new color to the old so that the knot is located on the edge of the piece and continue weaving as before. This places the knot on one of the short edges where it can be hidden in the fringe. Also, It gets it away from the top edge where it would receive more rubbing and stretching and would be more prone to coming undone.
I want to thank everyone on the Internet who took the time to write and post descriptions of triangle loom weaving. Without their excellent guidance I wouldn't have been able to put this page together. In reality all I did was parrot what they had to say and add a few pictures for clarification. If anyone visiting this page notices any errors I would greatly appreciate hearing from them so I can correct the mistakes.
I would particularly like to thank Joanne Ambrus for sending me many helpful emails. (Thanks Joanne!) She contributed significantly to this page. She is preparing a book on triangle loom weaving and I encourage everyone to obtain a copy as soon as it's available.
![]()
Please click HERE to visit my main site and browse 90 other pages covering everything from the lost art of knitting Nancies to metal detecting.