Wayne Schmidt's Pysanky Page My fumbling attempts to learn the fascinating art of Ukrainian Easter Egg decorating
Forty
years ago while browsing through a National Geographic magazine I
came across an article about Pysanky, or Ukrainian Easter eggs. The
impossibly complex geometric patterns on the eggs immediately
attracted my budding engineer's mind. I decided to give it a try.
Without access to traditional tools I used what I had at hand: a
metal inking pen from my high school drafting class, common egg dyes
and a candle for heat and wax.
The result? Two of the ugliest eggs ever decorated by the hand of man. Despite this failure, or perhaps because of it, I remained interested in this art form even though I never again tried it. Then for my 55th birthday my wife, to whom I'd given one of the two eggs when we were dating all those years ago, gave me an official Pysanky decorating kit from the Ukrainian Gift Shop in Minneapolis, complete with a real kistka (the tool used in decorating), beeswax, and a set of official Ukrainian egg dyes. Before the wrappings hit the floor I'd fired up a candle and set to work on my first egg in 40 years. As with my first two attempts 4 decades ago, this one also turned out as a nightmare (It's nice to know that some things don't change over time.)
Undaunted, I perservered. This webpage chronicles the glacial improvement in my skill and what I learned in the process. It shouldn't be read so much as a "how to" page but rather as a "how not to" because most of what I have to say refers to the mistakes I made and how they were corrected. I hope you find it useful or at least entertaining. (For the best Ukrainian Easter egg "how to" site on the Internet you can't do any better than to visit Ann Morash's outstanding site at http://www.learnpysanky.com. I heartily recommend you visit her site to learn all about this art form then come back here for comic relief... though I hope you'll find some of what follows useful.)
What
is Pysanky (Ukrainian Easter egg) decorating?
A fine funnel-shaped tool called a kistka is loaded with beeswax and used to draw lines on an egg.
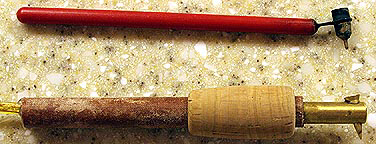
Top: a traditional kistka, bottom: an electric kistka
The egg is then dyed and the process repeated through successively darker colors.
Traditional
Pysanky dyes come as powders and after mixing with water
and
vinegar are much more concentrated than typical Easter eggs dyes.
After
each dyeing the color of the area sealed under wax is protected from
the next dyeing. In the end the egg looks like a rough lump of dirty
wax. Then, after a brief heating, the wax is wiped off and in a
second the egg turns from drab ugliness to a bright and colorful wonder.
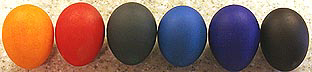
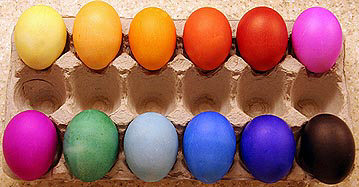
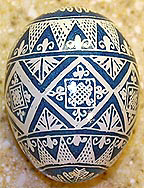
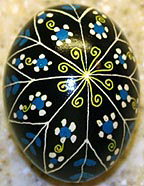
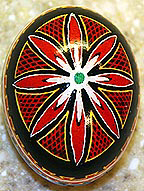
I offer the following examples of my eggs with the warning that I am a newcomer to this craft and these are poor samples of what can be done with this technique:

The egg on the far left was the first one I'd attempted in 40 years... and it looks like it. Besides gross problems in style and technique I also committed errors in placing yellow next to white (the two colors are so light that they wash each other out, hiding any detail), failing to use a dark color to anchor the lighter colors and not sketching the design out first (which led to unevenness and poor symmetry.) Moving toward the right my technique slowly improved until at the far right I managed to produce a simple design which is tolerable to look at... if you don't look too close... and the lights aren't too bright... and you haven't seen any truly good examples like those on Ann Morash's site.
As of the writing of this page these are the only eggs I've done. What they show is that this is a craft that can be learned fairly quickly by anyone, even someone artistically challenged like myself. An egg typically takes several hours to decorate, but the time goes by enjoyably. There's a curiously hypnotic attraction as you watch a kistka trailing fine lines of wax over an egg's surface. Within moments of starting I feel myself pulled in by the design. It's a great way to escape the daily grind.
After
completing the six eggs above, I decided this was an art form I
wanted to investigate further. What follows is what I've learned.
Since this is a new page I plan to add to it as my skill improves so
please check back from time to time.
Why use wax? Why not just draw the designs with felt pens?
I tried felt pens and found they fail in three ways:
1. Even the finest felt pens can't create the razer-fine lines possible with a kistka and beeswax.
2. The lines from felt pens aren't as sharp as those made by kistkas.
3. Felt pen colors aren't as uniform as those from dyes. They tend to form dark spots where the pen is lifted off the egg's surface.
What
colors do the dyes come in and what do they look like on eggs?
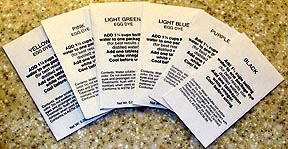
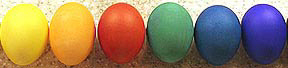
While many other colors are available, I found the standard set of dyes consists of 8 colors: yellow, orange, pink (actually more of a magenta), red, green, blue, purple (more of a royal blue) and black. Add to this white for areas on the egg that are waxed prior to the first dying and you have a basic pallet of 9 colors. Each color gets darker the longer the egg is left in the dye. The following four images show the colors and how they change with soaking time. All of the dyes were mixed as directed on the package except orange, which I gave only 3/4-cup of water instead of the recommended 1 and 1/4 cups. (Note: the reds show up slightly more orangey on monitors than the look in person.)

After
5 minutes

After
10 minutes

After
15 Minutes

After
30 minutes
Pink (magenta), red, blue, purple and black tend to color-up very quickly so I tested them at very short dyeing times. In the following image all the eggs, except black, were dyed for just 30 seconds. The black was only dyed 10 seconds.
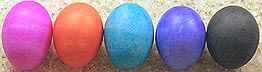
What's
hard to see in this image is that the colors aren't uniform.
They
show streaks and blotching. The red came out orangey.
Orange
seems to be a difficult color of obtain in a dark shade, so I tried
another dyeing - this time for 45 minutes, the limit recommended in
my kit.

This is better but still not as dark as I'd hoped. Next I tried a trick from Ann Morash's site; starting with a red egg, placing it in yellow to weaken the red, then returning it to the red to get a final solid orange. The following egg was dyed red for 15 minutes, dried, placed in yellow dye for 5 minutes, dried, then returned to the red dye for only ten seconds:

(Left
= more red than it looks here, middle = orangey-yellow, right =
honest orange)
In one last attempt to obtain an intense, pure orange I deviated from the mixing instructions on the package and added 1 tablespoon of vinegar to the water. Here's what happened:

A 1/16-inch thick layer of gelatinized dye formed on the surface of the egg. Left to dry for 24 hours this layer bonded to the egg and provided a very dark orange. But, since the original layer was so delicate and took so long to dry I doubt this is a useful technique.
Another
way to alter the color of eggs is to fade them. The following shows
what a set of 15-minute dyed eggs look like after placing them in a
mixture of 1-cup water to 2-tablespoons vinegar for 10 minutes:

The most remarkable thing is that the green faded to a pale blue instead of a lighter green. Also of interest, though not obvious here, is that the orange didn't fade at all. While the water all the others had been placed in turned colors the water that the orange egg was in remained crystal clear. It's odd the the hardest color the get to come out dark is also the most durable.
NEW!!!
Are
there other colors?
Yes. When my scarlet dye became contaminated with black smudges I ordered a larger set of dyes. This set included the dyes shown above and the nine in the following picture:

From left to right: dark brown, brick, dark red, pumpkin, royal blue, red, turquoise, dark green and gold. These colors resulted from 15-minutes in the dye baths.
Does
over-dying from one color to the next effect the final color?
Yes. Starting with a set of 15-minute eggs:
I then redyed them moving each colored egg one dye to the right: the yellow to the orange, the orange to the red, the red to the green and so on. Here's what I got:
...............
.....
The
big surprise, though it shouldn't have been, is that the
red-to-green redyeing ended up looking dark gray - almost black. The
reason is that red and green are optical opposites, when combined
they produce black. Equally surprising is that the green-to-blue
redying resulted in a pure blue with no trace of the green
undercolor. Blue to purple didn't seem to effect the final purple
color and of course black completely covered the purple.
Next, I moved the orange into the red dye and got red (no surprise there) and the blue to the purple dye and got a very dark navy blue than looked almost black.
Finally, I took a yellow egg and redyed it in green (not shown.) The resulting green was no different from a white egg dyed green.
Is
purchasing an electric kistka
worth it?
I paid $45 for my Larry's Brand electric kistka from http://www.mccallisters.com and feel it's worth every penny. The line of wax comes out much more even and consistent than a traditional kistka, there are fewer, if any, inadvertent wax blobs or drips, and because I don't have to constantly stop working to reheat the kistka in a flame I'm able to work twice as fast.
NEW!!!
What
about the plastic egg lathes available on the Internet?
I got one and couldn't be happier.
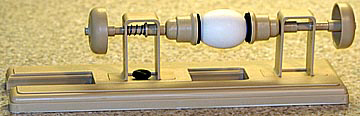
In spite of being made out of plastic, it is very solid and works extremely well. The axels do not wiggle at all as the egg is rotated. By resting the kistka-holding hand on one of the "U" supports, perfect circles can easily be drawn.
What's
the best way to prevent pencil marks from spreading all over the egg?
Much of the white and yellow areas of my first couple of eggs came out looking dirty because I inadvertently smudged pencil lead from the sketch marks. I found that by switching to a harder (4H) lead from the soft (HB) lead in most pencils reduced the tendency to smudge. Also, having very clean, dry hands helps. Finally, sketch as little as possible: the less lead there is to spread the less the lead will spread.
What
about sketch lines showing through the colors?
Maybe I'm wrong in that I tend to look too closely at my eggs, or put too many pencil marks on them, but a found it easy to spot pencil marks in white, yellow, orange, and sometimes even red areas. I found two techniques help. First, using a hard lead and a soft touch creates a lighter line that's more easily covered up by dyes. Second, I place my sketch lines on the borders of two colors, not right where I'm going to lay a line of wax. That way the sudden contrast shift between the two colors helps hide the line. In other words I don't lay wax on top of a sketch line, but along side it.
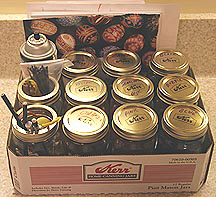
How
should mixed dyes be stored?
I found using pint Mason jars works very good. They're cheap, seal tightly so water and vinegar don't evaporate and are just the right dimensions to get eggs in and out of. In fact I found a case of a dozen provides enough jars for a basic set of dyes and left over jars to store kistkas, wax, unmixed dyes and everything else associated with this hobby. The case itself works great to keep everything organized.
How
can ellipse
and circle templets used for sketching be prevented from slipping
off the egg?
I had a particularly difficult time with this problem. Even when they wouldn't slip I invariably had a finger placed so I couldn't trace around the guide. While I'm sure there are tracing guides specifically made for drawing on eggs I discovered that an easy solution was to use a 1-inch high section of a toilet paper cardboard tube. It's flexible enough to conform the the inique curve around each individual egg and has enough "grab" that it doesn't slip. It's high enough that the fingers are held far enough away so they don't interfere with sketching. Better still, you can trace around them with a kistka to produce very even lines.

By cutting out or adding in small sections of the tube, the dimensions can be varied to provide whatever size ellipse, or circle, is desired. I have a collection of over a dozen that fill any design need I may have. Although the one above doesn't show them, the tubes are marked with evenly-spaced divisions all around the edge for design index marks.
How
can I prevent previous colors from effecting later colors?
The only sure way is to completely fade the earlier colors by placing the egg in a 1-cup water/1-tablespoon bleach bath for a short while. I found this works very quickly. But, it also does something to the egg and wax so that unless all traces of the bleach are not removed there will be problems. After bleaching, carefully wash the egg clean and leave it sit for at least 1/2-hour for the last traces of bleach to evaporate. Otherwise, enough bleach will be held in the shell to bleach the next color and it will prevent the wax from melting off cleanly.
How
can I pierce the bottom
of the egg without breaking the shell?
I tried the egg piercer that came with my kit, electric drills and even a dremel tool and cracked eggs with all of them. I found that the best way was to coat the end of the egg with a thick coat of wax (to both strengthen it and to help hold the cutter in place) and use the tip of a very sharp exacto knife gently rotated against the egg to create a hole. The key is to use very little pressure and go slowly. As soon as you feel the blade "bite" into the egg, reduce the pressure and slowly grind through the shell. Very smooth, small holes can be made this way but be careful to not make them too small or the pressure created to blow the insides out will have to be so high that it could crack the egg.
Do
eggs really need a finish coat of clear lacquer?
I think so. Besides protecting the dye from rubbing off and brightening the look of the egg, it seems to me that it also makes some of the colors look darker, richer and more uniform.
Unlaquered eggs
Lacquered
When using a regular kistka, how can blots be prevented?
Other than keeping an eye open for obvious drips hanging from the end of the kistka, I found that having a sacrificial egg on the work table to be very helpful.

sacrificial
egg
This is simply an extra egg on which I test the kistka right after taking it out of the flame. If any blots of drips are going to take place that'll most likely happen on the sacrificial egg rather than on the good egg. (The only problem with this is that many times the sacrificial egg comes out looking better than the egg I'm trying to make - a most humbling experience.)
Sometimes
my eggs come out with lighter areas where the dye is washed out. Why?
I found that this was caused by the egg resting against the bottom and one side of the jar as it soaks in the dye. To prevent this I move the egg around every few minutes.
I
tried darkening the red by putting back in the red dye and it came
out with black smudges all over it. Why's this happen?
I have no idea even though it's happened to me four times. One possibility is that after the red dye sits for a while some of the dye somehow concentrates in spots so that it looks like dark or even black. I found that shaking the red dye up right before dyeing seems to prevent this problem.
The
kistka seems to have a mind of its own sometimes and lines end up
going where they aren't supposed to.
This used to happen to me all the time until I borrowed and idea from golf. Before making a stroke, I take a couple of practice strokes without touching the kistka to the egg. This lets me check that the arc of the stroke is easy and comfortable and that the beginning and end points are where they are supposed to be. I also discovered that eye/hand coordination is improved if the eye can see definite start and stop points. I found that placing a tiny dag of wax at the beginning and end points of a stroke before actually making it helps anchor the line as it's drawn.
Yikes!
I dropped an egg after removing the wax and the back side of it cracked!
What do I do?
Procede to blow the egg out and varnish it as usual. When displayng the egg make sure the cracked side is to the rear and chances are no one will notice. (This happened to me once.) Be aware that some of the insides may leak out of the crack while blowing the egg empty. Hold the egg so that the liquid drains away from the good side so that the dye isn't washed away.
I
always get a little water on the egg while blowing the insides
out and some of the dye washes away. How can this be prevented?
What I do is place the egg in a plastic baggy and cut the corner of the baggy off near where the hole in the egg is. This, when used in conjuction with covering the holed end with wax, prevents water from touching the egg.
Help!
My lines are jagged!
I still have problems drawing straight lines. What I found that helps is to relax. Tight, stiff muscles cause hands to move unevenly because opposing muscle groups are fighting each other. Another trick is to make a couple of practice strokes. This adds in relaxing and also pretrains your muscles to move the kistka where you want it to go.
Do
I have to remove the wax?
As the picture belows shows, it's tempting to leave the wax on in many cases:
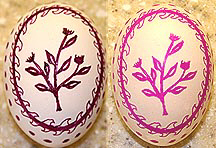
The egg on the left still has wax on it. The wax provides a 3-D effect that can be very attractive in simple designs like this; sort of Victorian. In comparison the one on the right, with the wax removed, looks flat even though the color is much brighter. (The 3-D effect is much more pronounced than shown in this image.)
The problem with leaving the wax on as part of the design is that I doubt there is a varnish that will stick to it, which means the egg will be unprotected. Still, it's an intriguing idea. Using transparent wax would let the underlying color be more visible.
I've
heard that eggs can be etched by placing them in strong vinegar
solutions. How does this work?
Not
very well to my way of thinking. I placed the egg above in
100-percent vinegar for two hours and the amount of etching was so
small that it couldn't be seen. You could barely feel it by running a
fingernail over the surface. Even this minimal amount of etching made
the shell so thin that it broke very easily.
Closing
remarks:
I've put material on this page that I wasn't able to find elsewhere, as such it isn't intended as a stand-alone page but rather as a supplement to pages by experts of this art form.
Below are my latest eggs. I'm still learning so don't expect too much. Thank's for stopping by!
![]()
Return to my homepage and browse 90 different general interest pages: everything from metal detectors to the strange world of lucid dreaming.