Van de Graaff Generators!
How to shop for them, build them, and interesting experiments.
INTRODUCTION
COMMERCIALLY
AVAILABLE VAN DE GRAAFF GENERATORS
THE
GENERATOR I PURCHASED AND WHY I CHOOSE THAT MODEL
HOW
VAN DE GRAAFF GENERATORS WORK
MY
HOME-MADE VAN DE GRAAFF GENERATOR
EXPERIMENTS
AND DEMONSTRATIONS
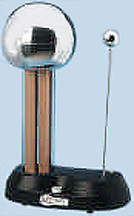
This webpage chronicles what I've learned about buying, using and making Van de Graaff generators. Why would someone want to either purchase or build one? Because every self-respecting science nerd dreams of owning a Van de Graaff static generator. As the picture below shows of the first one I built, I'm no exception:

It worked, but just barely. This generator struggled to produce sparks 1/8-inch long, about 2000 volts. Anyone familiar with the design of Van de Graaff generators will instantly see several things I did wrong. We'll fix these problems further down this page but for the moment I decided to buy a commercial unit so I'd have something reliable with which to play and help figure out what I'd done wrong with the home built generator. If you want a Van De Graaff generator I strongly encourage you to purchase one rather than attempt to build one. Commercial units work better, look better and last longer than most homemade efforts. While making your own can save some money, a home made machine with a 10-inch ball is probably still going to cost over $100.00 and take a lot of time to build.
COMMERCIALLY
AVAILABLE VAN DE GRAAFF GENERATORS
Searching the Internet turned up 14 different models of Van de Graaff generators. The following list shows what they look like, how big they are, how strong a field they generate, how much they cost and who offered them at the lowest cost. The images of each have been sized to the same scale so you can get an idea how they compare. (Note: prices are in 2007 dollars.) I found that costs for the same generator vary widely depending on the source. Shopping around can easily save hundreds of dollars.
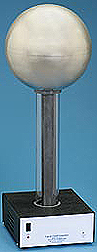
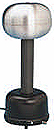 This is the most common Van de Graaff generator available on the
Internet. It's 18-inches tall, has a 7-inch diameter globe and
generates 200,000 volts. Prices average $200. The cheapest I found
was $140 at hobbytron.com.
This is the most common Van de Graaff generator available on the
Internet. It's 18-inches tall, has a 7-inch diameter globe and
generates 200,000 volts. Prices average $200. The cheapest I found
was $140 at hobbytron.com.
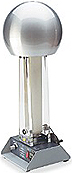
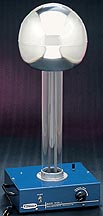 The
second most common generator is this N100-V by Winsco. It is
extremely popular as a school demonstration unit. It's 30-inches
tall, has a 10-inch diameter globe and generates 350,000 volts. It
also has a variable speed motor control. Prices range from as little
as $400 (scienceenthusiast.com) to over $750. (By 2011 the
scienceenthusiast.com price had increased to $519.00)
The
second most common generator is this N100-V by Winsco. It is
extremely popular as a school demonstration unit. It's 30-inches
tall, has a 10-inch diameter globe and generates 350,000 volts. It
also has a variable speed motor control. Prices range from as little
as $400 (scienceenthusiast.com) to over $750. (By 2011 the
scienceenthusiast.com price had increased to $519.00)
 You can pay anywhere from $179 (hometrainingtools.com) to $199
(anatomyphysics.com - includes discharge ball) for this 24-inch tall
Van de Graaff generator with an 8-inch diameter globe. It's rated
anywhere from 200,000 to 300,000 volts depending on who's selling it.
You can pay anywhere from $179 (hometrainingtools.com) to $199
(anatomyphysics.com - includes discharge ball) for this 24-inch tall
Van de Graaff generator with an 8-inch diameter globe. It's rated
anywhere from 200,000 to 300,000 volts depending on who's selling it.
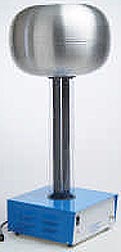 This largest production generator is 36-inches tall with a 14-inch
diameter oblate spheroid globe. It's rated at 400,000 volts and
typically sells for $499 (sargentwelch.com.)
This largest production generator is 36-inches tall with a 14-inch
diameter oblate spheroid globe. It's rated at 400,000 volts and
typically sells for $499 (sargentwelch.com.)
 This Van de Graaff generator is a close second in size. It's
35-inches tall and features a one-piece, mirror-finish stainless
steel globe rather than the more common two-piece spun aluminum
globe. The manufacturer claims this polished globe increases the
voltage 4-percent. The odd thing is that in this picture of the
generator, borrowed from the seller's site, the "polished steel
globe" doesn't look very polished. In fact it looks like a plain
two-piece aluminum sphere.
This Van de Graaff generator is a close second in size. It's
35-inches tall and features a one-piece, mirror-finish stainless
steel globe rather than the more common two-piece spun aluminum
globe. The manufacturer claims this polished globe increases the
voltage 4-percent. The odd thing is that in this picture of the
generator, borrowed from the seller's site, the "polished steel
globe" doesn't look very polished. In fact it looks like a plain
two-piece aluminum sphere.
These units produce 400,000 volts. Google.carolina.com sells a kit version for $495. Sciencefirst.com offers them for $499, but this may be for a kit. Sciencefirst.com also offers an upgrade to a 14-inch diameter globe for $582, which they claim reaches 500,000 volts. These are large, good looking units but I found some inconsistency in the pictures used in the advertisements. Some showed an oblate spheroid in one image and the steel sphere in others.
![]() This beauty is offered by unitednuclear.com. I believe it's identical
to the previous unit. This generator comes in two variants. The first
has a 14-inch globe and is rated at 400,000 volts ($665.) The second
costs $725, has a 17-inch sphere and a rating of 600,000 volts.
This beauty is offered by unitednuclear.com. I believe it's identical
to the previous unit. This generator comes in two variants. The first
has a 14-inch globe and is rated at 400,000 volts ($665.) The second
costs $725, has a 17-inch sphere and a rating of 600,000 volts.
While it's possible that form follows function in Van de Graaff generators as much as with any device, the similarity of the base in each of the last three units suggest they may all be manufactured by the same company and simply repackaged for different distributors.
 This 24-inch tall generator with an 8-inch diameter globe charges to
200,000 volts and sells for $165 at physicstoolbox.com
This 24-inch tall generator with an 8-inch diameter globe charges to
200,000 volts and sells for $165 at physicstoolbox.com
 Sargentwelch.com sells this 19-inch tall Van de Graaff with a 9-inch
globe for $149. It's rated at 200,000 volts. (Note: it may be a kit.)
One very interesting feature about this units is that it may be
battery powered.
Sargentwelch.com sells this 19-inch tall Van de Graaff with a 9-inch
globe for $149. It's rated at 200,000 volts. (Note: it may be a kit.)
One very interesting feature about this units is that it may be
battery powered.
 This tiny Van de Graaff generator is only 13-inches tall with a
4-inch diameter globe. It generates 75,000 volts and sells for $207
at google.carolina.com.
This tiny Van de Graaff generator is only 13-inches tall with a
4-inch diameter globe. It generates 75,000 volts and sells for $207
at google.carolina.com.
 This is a variable speed unit rated at 250,000 volts. It's 24-inches
tall and has a 9-inch diameter globe. If you're a teacher you can
purchase it for $549 from store.pasco.com. It features open
construction so that all of the workings can be observed.
This is a variable speed unit rated at 250,000 volts. It's 24-inches
tall and has a 9-inch diameter globe. If you're a teacher you can
purchase it for $549 from store.pasco.com. It features open
construction so that all of the workings can be observed.
 Generating 200,000 volts, this 17-inch tall unit with a 7-inch globe
sells for $169 at Edmund Scientific. Except for the metal-finished
base, it's very similar to the first generator of this list.
Generating 200,000 volts, this 17-inch tall unit with a 7-inch globe
sells for $169 at Edmund Scientific. Except for the metal-finished
base, it's very similar to the first generator of this list.
 This unique hand-cranked Van de Graaff generator can build up a
200,000-volt charge. It's 28-inches tall, has a 10-inch diameter
globe and sells for $179 at arborscientific.com. I believe it is a
kit. This could be an unpleasant unit to operate. Unless it's clamped
to the table, the tendency will be to hold the base down with one
hand. This could result in that arm getting repeated shocks for the sphere.
This unique hand-cranked Van de Graaff generator can build up a
200,000-volt charge. It's 28-inches tall, has a 10-inch diameter
globe and sells for $179 at arborscientific.com. I believe it is a
kit. This could be an unpleasant unit to operate. Unless it's clamped
to the table, the tendency will be to hold the base down with one
hand. This could result in that arm getting repeated shocks for the sphere.
 This deluxe 400,000-volt generator is 30-inches tall and features an
11-inch mirror finish globe. It sells for $699 at sargentwelch.com.
This deluxe 400,000-volt generator is 30-inches tall and features an
11-inch mirror finish globe. It sells for $699 at sargentwelch.com.
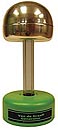
 This small Van de Graaff generator is 14-inches tall, has a 4 and
3/4-inch half-globe and produces 25,000 volts. It costs $59.95 at chaneyelectronic.com.
This small Van de Graaff generator is 14-inches tall, has a 4 and
3/4-inch half-globe and produces 25,000 volts. It costs $59.95 at chaneyelectronic.com.
When shopping
for a Van de Graaff generator it's important to carefully read the
fine print. Some sellers charge more because they load you up with
bonus items like extra belts, discharge electrodes and even
demonstration kits. Warranties vary and are sometimes completely
absent. Also be sure to check about return policies. Finally,
carefully consider what you're going to use it for and where you're
going to store it. A 36-inch Van de Graaff generator with a 14-inch
globe is a large, bulky item that is too fragile to be thrown in a
dusty corner of the garage and so large it takes up too much room in
a closet. Also be aware that while the spark from even the largest
unit may not injure you, it'll sting quite sharply and leave you with
a very uncomfortable electric jitter.
Regarding voltages: The actual voltage a Van de Graaff generator attains is effected by how clean the unit is, how dusty the air is, and humidity. A unit rated at 350,000 volts in a very clean, dry location may only produce 200,000 in a dusty, humid one.
THE
GENERATOR I PURCHASED AND WHY I CHOOSE THAT MODEL
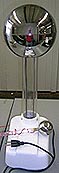
After considering all the options I decided to purchase the Winsco N100-V from scienceenthusiast.com.
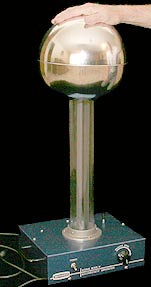
The Winsco people have been making this unit for a long time and have worked out all the design problems. It's a sturdy unit with a long history of reliability. It arrived completely assembled (even the dome halves were put together), worked perfectly the first time I turned it on and easily produced the rated 350,000 volts. I particularly liked the variable speed option that comes on this generator. It enables me to control the frequency of the discharges, a useful feature for photographing discharges.
Here is a close-up video of it working:
HOW VAN DE GRAAFF GENERATORS WORK
Van De Graaff generators employ three tricks to work: 1. Charges don't move once they are on a nonconductor, 2. Contact electrification and 3. The fact that the electric field inside a metallic sphere is zero even if the outside is highly charged.
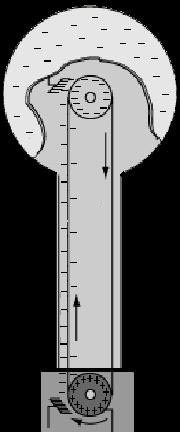
1. Consider
the following cross section of a Van De Graaff generator: Electrons
get stuck onto the rubber belt between the two pulley's. Because
charge can't move on nonconductors, the electrons can't side down the
belt as it moves up toward the highly charged sphere, which exerts a
repelling force downward on them. Because the electric motor driving
the belt creates a greater upward force on the belt than the sphere
provides a downward force, electrons are forced upward against the
electric field. A Van De Graaff generator works like a pump or
conveyor belt, mechanically carrying electrons trapped on the surface
of the belt up to the metal ball. The key to it's success is that
electrons can't move once they are trapped un the rubber belt's
nonconducting surface.
The next question is: How do the electrons get on the belt?
2. The answer is contact electrification. Every material has a tendency to take or release electrons when it comes in contact with another material. When a material that likes to absorb electrons comes in contact with one that likes to give them up, electrons are pulled off the second and onto the first. Separate them, and the first material will come away from the encounter with a negative charge and the second material will have a net positive charge. The process by which this happens is not well understood even today. However, long lists of the relative tendencies of materials to take or receive electrons are readily available on the Internet. These lists are referred to as triboelectric series.
The most complete triboelectric series I was able to find was supplied by www.SiliconFarEast.com, which is reproduced below. In this list, materials at the top of the list have a tendency to give up electrons. Those near the bottom tend to take electrons. The further toward the top the greater the material's tendency to give up electrons gets. The closer to the bottom, the greater the tendency to take them. Two materials close together won't exchange as many electrons as two that are far apart.
air
skin,
human hands
asbestos
rabbit
fur
glass
human
hair
mica
nylon
wool
(wool felt)
lead
cat
fur
silk
aluminum
paper
cotton
steel
wood
Lucite
sealing
wax
amber
soft
rubber
hard
rubber
mylar
nickel
copper
silver
uv
resist
brass
synthetic
rubber
gold
platinum
sulfur
acetate
rayon
polyester
celluloid
polystyrene
Orlon
acrylic
cellophane
saran
wrap
polyurethane
polyethylene
polypropylene
vinyl
(PVC)
Kel-F
silicon
Teflon
silicone
rubber
ebonite
(extra hard rubber used in bowling balls)
From this list we can see that if a Teflon rod (tends to take electrons) is rubbed by silk (tends to give electrons) the rod will end up with a negative charge and the silk with a positive charge. Because these two materials are far apart the effect is large. If two materials are closer on the series, such as cotton and soft rubber, electron transfer will still take place, but not as strongly.
There is a problem with triboelectric series: none of them agreed. I compared 14 different series (siliconfareast, lighteningeffectgenerators, rfcafe, wikipedia, schoolforchapmions, physiced.buffalostate, afcasci, howstuffworks, julienindustries, eskimo, esdjournal, ece.rochester, esosystems, and regentsprep) and they all had differences in where materials were placed on the series. For example, rfcafe lists polyethylene up above soft rubber while several others list soft rubber 22 positions farther down. I found dozens of similar disagreements between the various lists. I believe these result from differing testing methodologies. Static contact triboelectric effects are different than dynamic, or rubbing, effects. One list may be based on static testing while another on rubbing. Some lists may not be based on original research but rather were assembled from other lists. If these lists used different testing techniques then the resulting assembled list could be hopelessly mixed up. Triboelectric effects are also affected by surface texture and contact pressure.
For the purposes of this page, I'm assuming that the SiliconFarEast series is accurate. The materials used in the Van De Graaff generator we're discussing will have a felt (wool) covered lower pulley, a soft rubber belt and a vinyl upper pulley. To begin the discussion of how electrons get on the belt, let's take a second look at the diagram.
Starting at the bottom, the felt covered pulley gives up electrons to the rubber belt because rubber is lower on the triboelectric series than felt. This means the pulley now has a net positive charge. Because the pulley and belt exchange the same amount of charge while at the same time the pulley area is smaller, it ends up with a larger density of charge, meaning that its positive electric field is stronger than the negative field on the belt. This means the metal comb in the lower left of the image sees a net positive electric field because the belt's field isn't strong enough to completely cancel the pulley's. Since the comb is connected to ground, electrons are pulled off the sharp points of the comb by the pulley's positive field and deposited onto the outside of the belt. The motor turns the pulley, driving the belt, with its electrons, up and into the metal ball. As the belt contacts the upper vinyl pulley, its lower position on the triboelectric series means that it will pull electrons off the belt's inner face and in so doing acquire a negative charge. The inner face of the belt may end up with a reduced negative charge, a neutral charge or a net positive charge depending on the balance between the material's exact triboelectric tendencies and the speed at which the belt is driven. Either way, the upper pulley ends up with a strong negative charge, creating an overpowering negative electric field which repels the electrons on the outside of the belt. Looking for someplace to go, they are driven off the belt and onto the upper comb. Since this comb is attached to the inside of the metal sphere they accumulate on it. Now for the third trick that makes Van De Graaff generators work.
3. At this
point you might be wondering why the negative charge on the upper
metal sphere doesn't repel electrons as they try to jump the gap
between the belt and the upper comb. The answer is that inside a
metal sphere the net electric field at any point is zero, regardless
of the amount of charge on its surface. Therefore the sphere doesn't
exert any force on the electrons. The reason is that at any point
inside the sphere the field on one side perfectly cancels the field
from the opposite side. As you get closer to one side, the distance
is less so the field is stronger but at that point you also
"see" less of the closest side while you "see"
more of the opposite side, making its total effect great enough to
cancel the closer side's. Imagine that instead of a continuous sphere
you're inside a ball made up of millions of individually charged
points. The net field is the sum of the fields from all the points.
Get very close to the left side of the inside of the sphere and only
a few points will be further to your left to push you away. On the
other hand, although the points to your right are further away, there
are so many more of them that collectively they create a field that's
as strong as the few points to the left. The net field is zero... almost.
The description above is for a completely closed sphere. In actual Van De Graaff generators the opening in the bottom of the sphere creates some nonuniformity in the field inside the ball so that the field isn't completely zero. However, most of the field cancels so it isn't a problem.
That's how Van
De Graaff generators work. The belt carries electrons up and dumps
them onto the upper sphere, also called "the collector."
Charge continues building until electrons leak off the collector at
the same rate that the belt delivers them. If there is a sharp point
on the surface of the collector, or dust which acts like thousands of
tiny sharp points, electrons are pushed off into the air at a steady
rate by the high strength of the electric field around the collector.
This can be heard as an electric buzz. But, if the sphere is
smooth and clean the charge will continue to build up until the field
is strong enough to force an arc to the nearest ground, usually the
generator's base if no other electrical paths are closer. This arc is
accompanied by a bright flash and sharp snap as air through
which the arc travels is superheated and explodes, creating a mini
thunder clap. Another sound that can accompany such a discharge is a
loud painful shriek if "you" happen to be the arc's
destination. Don't be alarmed. Although Van De Graaff generators
produce very high voltages, the currents from most demonstrator-scale
machines are too low and of too short a duration to cause injury.
They can, however, be quite painful so it's best to be careful,
particularly if young children are around.
The discussion above pertains to a Van De Graaff generator set up to create a negatively charged collect or upper electrode. If the felt pulley is moved to the top and the vinyl one to the bottom then you have a device that produces a positively charged upper electrode. In the negatively charged generator the source of the electrons is either the air around the lower comb or more efficiently, ground connected to the lower comb. In positively charged generators, the same applies except that the air or ground is where electrons are driven. Very high power Van De Graaff generators require copious amounts of electrons, which are supplied by connecting the lower comb to a 10K to 20K voltage power supply. These monsters can produce currents that can be dangerous.
EXPERIMENTS
AND DEMONSTRATIONS
WARNING!!!
Taking
pictures of the discharges from a Van de Graaff generator
is
extremely dangerous to camera equipment. The large electric
fields
can easily destroy the camera's internal electronics.
Arcs
The easiest of all demonstrations is to place a discharge electrode near a Van de Graaff generator to create an arc. After watching a few of these miniature lightning bolts it's easy to get bored with them because they all appear pretty much the same. However, taking a closer look at these arcs with the discharge electrode in different positions enables the user to create a wide range of arc types that defy explanation.
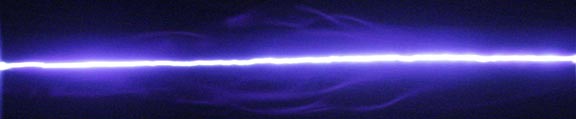
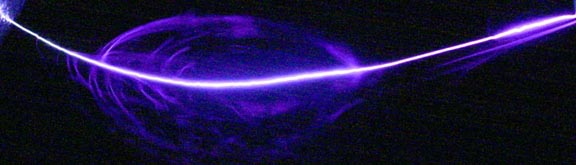
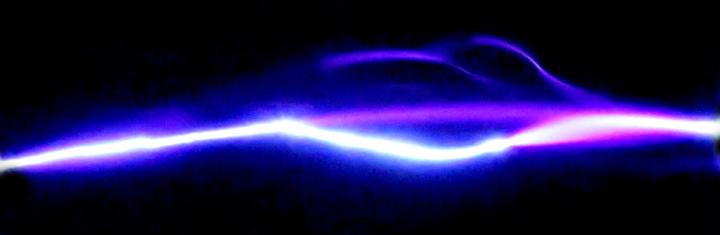
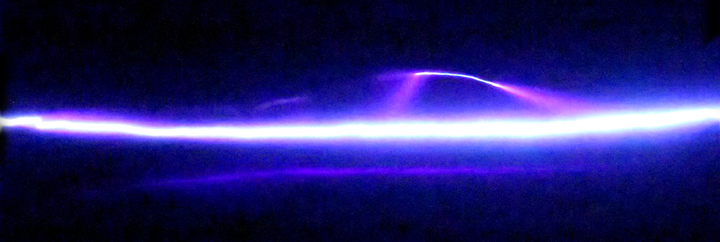
Placing a 5-inch diameter grounded electrode anywhere from almost touching the Van de Graaff generator's globe to 3 inches away creates a diffuse discharge tapered at both ends. Here's one at three inches: (Note, it's been enlarged to show detail.)

The negatively charged globe of the Van de Graaff generator is on the left and the grounded (positive) discharge electrode is on the right. See the softly glowing collar on the right? I have no idea what that is. It shows up in one quarter of these types of discharges.
Move the electrodes an inch more apart and interesting things start to happen.

A gap appears on the left side. The glow in this zone in much dimmer than the main body of the discharge. The oddest feature is that the transition from the dim to the bright zone is very sharp. I would have expected a gradual blending. Although this image again shows the mysterious donut on the right, it appears much less often in these longer discharges.
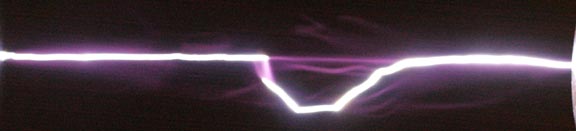
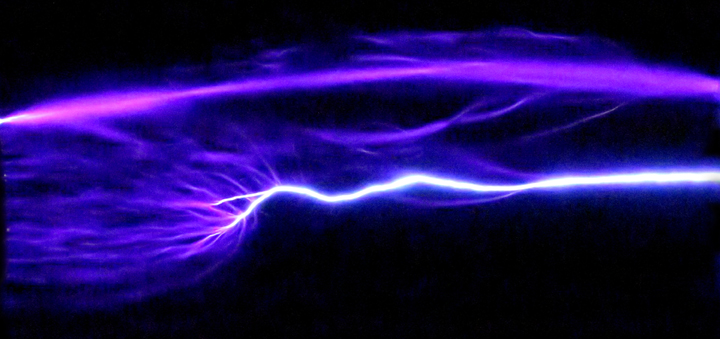
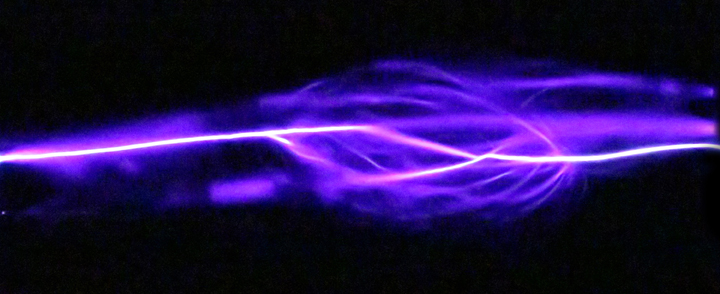
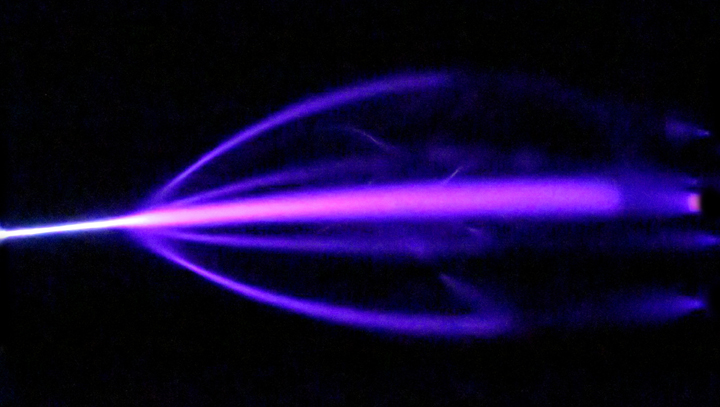
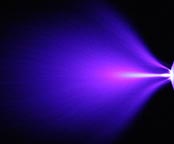
At a 5 inch separation things start getting strange.
One third of the arcs at this distance are solid cascade discharges like the one above. Seen in person the discharge is brilliant and followed by a sharp snap: miniature thunder. In photographs like this the main discharge is surrounded by soft, dim filaments, which aren't noticeable in person.
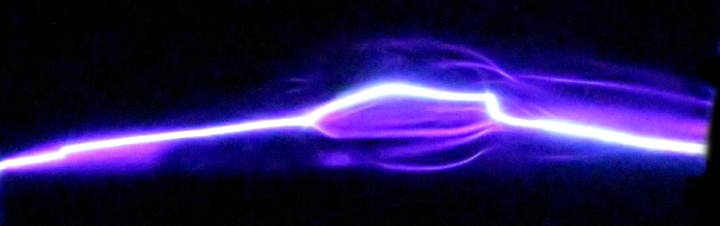
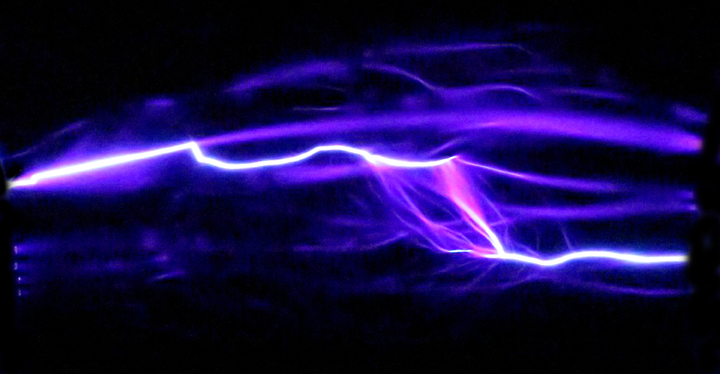
Some of these discharges follow irregular paths.
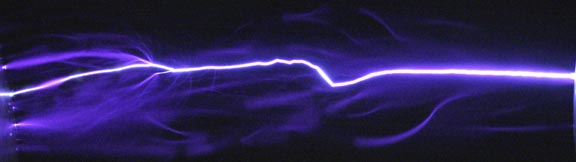
Many have breaks or bends in them, like the following image:
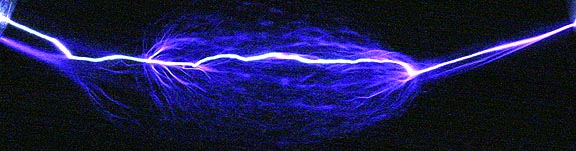
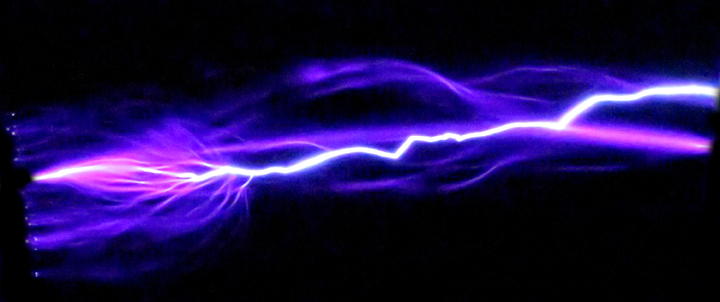
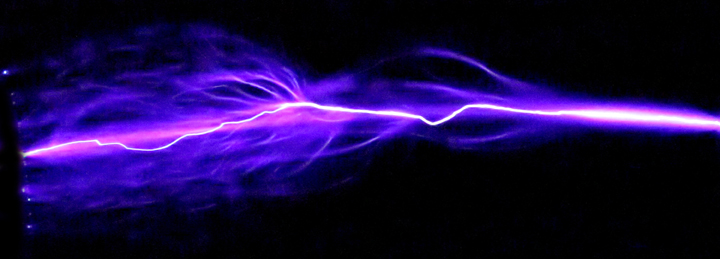
Most
of the discharges at this distance consist of a complex matrix of
diffuse filaments.

Using a 12-inch diameter discharge electrode produced many interesting arcs on the order of 9 inches long. Here are two of them:
(The photos above were taken with a Canon 20D, 8.2 megapixel camera with a Canon 100mm macro lens working at f2.8. The camera's ISO was set to 3200. I'd set the speed of the Van de Graaff generator's belt to produce one discharge every second, open the shutter after a discharge and use the next discharge itself to create the exposure, then close the shutter. Needless to say this was done in a dark room. For the continuous jets I used timed exposures ranging from 2 to 20 seconds. Setting the color temperature to 2800 K seemed to help capture finer detail.)
Several years later I used a Canon 6D to take higher resolution images of Van der Graaff generator discharges. The following images were taken using the same technique discussed above, except the ISO was set to 104,000:

Arc shape can
be sculpted by using oddly shaped discharge electrodes covered with
various materials. For example, the following diffuse arc was
produced by bending a length of insulated wire in a tight curve and
placing it 2 inches from a Van de Graaff generator:
The bent wire is the magenta curve on the right.
I have read
that charging two large spheres and attaching a ball bearing to one
of them makes it possible to create very long arcs. I tried this with
a commercial Van de Graaff generator with a 10-inch diameter sphere
and a 12-inch diameter grounded discharge sphere. The ball bearing
was 1-inch in diameter. This arrangement only created discharges up
to 9 inches long, far short of the 18 to 24 inches about which I had read.
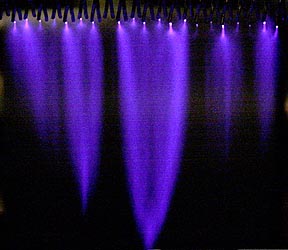
Jets
While they aren't as large and dynamic as arcs, ion jets are still interesting and can create some fascinating effects.
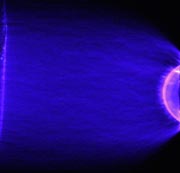
Using a needle to create a tiny pin prick in a curved section of grounded wire causes a jet of ions to form. Here's what it looks like when it's 2 inches away from a Van de Graaff generator:

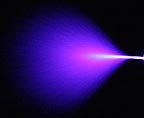
Moving it six inches away causes the jet to flare out.
These last two images had exposures times of 3 seconds. Increasing this to 20 captures additional detail in the jet.
I assume these jets consist of positive ions accelerating toward the negatively charged Van de Graaff generator to the left. As the ions stream toward the generator they collide with neutral atoms in the air, which get pushed along with them. This flow of air is strong enough to blow a candle flame over.

You can feel the draft on the back of you hand as you hold the candle. Moving the candle higher causes it to get blown out.
Jet production
is tricky for me. I've attempted to make them using wires and needles
inside insulating tubes of various diameters and length but none of
these work. All I get are confined arcs. The same happens if the pin
hole in the insulator is too large. It seems that what's needed is an
almost microscopic hole. I've also noted that they only seem to form
when grounded or possibly from a positive Van de Graaff generator.
Attached to a negative potential nothing much appears. They are also
sensitive to current flow. If it's too low they degenerate into a
normal arcing mode. Turning up the speed on my generator to create
more current tricks the arc over into a jet. These jets produce a
very pleasing sizzle when operating. Once formed, they are
quite stable and you can move in close enough to use a jeweler's loop
to investigate their structure. The hassle is worth it because once
you manage to create a good jet it is a fascinating phenomenon to observe.
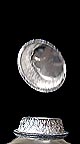
One great
disappointment was in attaching a sharp point to the Van de Graaff
generator's dome to create St. Elmo's Fire: a corona discharge.
![]()
Whether the point was on the generator or the discharge electrode and regardless of how close these were to each other this glow was exceedingly tiny and dim, barely a pinpoint of light. The image above is many times larger than the actual glow.
When attached to the negative electrode I did notice a substantial flow of air coming off the sharp point. You can easily feel it on the palm of your hand. Arcing to my hand wasn't an issue because the sharp point bled off charge so quickly to the air that arcing to another object (me) didn't happen. The same could not be said when the sharp point was mounted on a grounded discharge electrode. Although it too produced a breeze, because the electrode had to be placed within a foot of the Van de Graaff generator to induce a charge in it, arcing to my hand was an unpleasant issue. I assume if someone had a positive Van de Graaff generator this wouldn't be a problem.
Another interesting demonstration is to take the upper dome off the generator and turn it on. In a very dark room it is easy to see the flow of electrons from the belt to the upper comb. The following image captures this effect:
The belt in
this picture is coming up from behind and is covered with electrons
deposited on it by the comb at the bottom of the generator. As the
belt comes up and over the top of the roller, the roller's strong
negative electric field pushes the electrons away from the tips of
the comb, leaving the tips positively charged. The field between the
belt and comb is strong enough to ionize the atmosphere between them
creating a path for the electrons on the outside of the belt cross.
The freed electrons flow across the gap to the comb and charge the
Van de Graaff's sphere while the positive ions travel to the belt.
These ions, excited oxygen and nitrogen, attach themselves to the
belt and are carried down. The persistent glow is because it takes a
fraction of a second for the ions to attract neutralizing electrons
from the air and in so doing give off photons as electrons fall down
through the ion's potential energy shells.
Repulsion Demonstrations
Objects with the same electric charge repel each other. This phenomenon can be used to create a wide range of demonstrations using a Van de Graaff generator.
Flying
Saucers
Well... almost. Stack aluminum pie plates on top of a Van de Graaff generator and they will lift and float off one at a time.


Ten to twenty seconds after turning on the generator the top pan lifts off, fly up, flips over, and falls toward to floor as the next pan starts its liftoff. What's happening is that the top pan picks up a charge and is repulsed by the generator and the pans under it. As soon as it is gone, the next pan is also repulsed, and so on until the entire stack has taken off. A stack of eight takes about 30 seconds to fly off, some getting as high as one foot above the generator. The slower the generator's belt is turning the slower the pans launch themselves into the air. I tried several different sizes of foil pie plates and found the small, 5-inch diameter pans to work the best. This demonstration also works if the pans are right side up. But, they just lift off and quickly slide off the one side and fall the the floor. Placing them upside down gave me higher launches and their flipping over made the demonstration more interesting.
Rice
Krispies Volcano
Tape a plastic bowl to the top of a Van de Graaff generator, put a small handful of rice krispies in it and turn on the generator. The krispies will shower up out of the bowl.
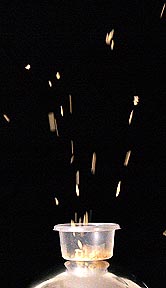
The rice krispies pick up a charge the same polarity as the generator and are repulsed. They fly upward as far as two feet. I tried small Styrofoam balls, small fuzzy decorator balls, confetti, foam packing popcorn and even feathers. Rice krispies always worked the best. Typically the first burst is the highest. After that the krispies shoot upward sporadically. I found it best to start with a small handful and repeat that several times rather than trying to load the bowl up with a large amount. (This is a messy demonstration so be sure to have a vacuum cleaner handy.) In theory a metal bowl would work. But, when I tried it with a foil pie plate so much charge leaked off the edges of the pan that the krispies never took off.
The following video shows twenty-six different demonstrations that can be made using a Van der Graaff generator:
This video provides a more detailed look at growing snowflake stalagmites:
One of the most difficult Van de Graaff generator demonstrations is to use it to charge two sheets of metal (foil taped to wood ot cookie sheets) seven inches apart and levitate a two inch tall foil rocketship between them. The following video shows how it's done:
Electrostatic
Motor
Electrostatic motors are so easy to make you can throw one together with only three plastic soda bottles and some aluminum foil. I wanted something a little showier so I used glass Christmas bulbs. The following video explains how it's put together and how it works:
MY
HOME-MADE VAN DE GRAAFF GENERATOR
As ready mentioned, this first attempt at making a Van De Graaff generator barely produced sparks 1/8th-inch long. The biggest problem is the wood tower. Although dry wood is an acceptable insulator in the 1 to 220-volt regime common in daily life, in the 100,000+ world of electrostatic generators is acts almost like a dead short. My first fix was to exchange it for a 4-inch diameter PVC tube, a 2-foot long section cost $8.00 at a local hardware store. The mounting flange at the bottom was another $4.00.
The second biggest problem was that the globe in the first machine was a 10-inch plastic pet ball, one of those clear balls with air holes in it that small pets are placed inside so they can roam around the house. The holes were epoxied shut then the entire sphere sanded smooth. It was then covered with 4-inch squares of super-thin aluminum foil purchased from the bridal section of a Jo-Ann's craft store. (These squares are used to wrap candies.) The foil was adhered to the sphere by lightly spraying them with Super 77 adhesive. Once covered, the foil was burnished down to remove wrinkles and blend the edges. It came out better than you might imagine, but it tended to leak charge. I replaced it with a 10-inch diameter, seamless, chrome-plated steel sphere purchased from Amazon.com as a gazing globe for $40.00. Using a Dremel tool with a cut-off wheel, I cut a 3-inch diameter hole in it, used a torch to heat the edges up and hammered them inward to form a smooth curve. This was a messy, dangerous, time-consuming process.
The belt was a section of heavy-duty rubber exercise band trimmed to 1.5-inches wide and long enough to fit snuggly between the two pulleys. The ends were connected with a strip of Scotch tape on the outside. The pulleys were curved furniture wheels. (The curves are necessary to keep the belt tracking in the middle of the tube.) The bottom pulley was covered with leather and the top with vinyl electrical tape.
Finally, the original fan motor was replaced with a stronger unit that ran faster.
Here's the new machine:

It certainly looks better. Unfortunately it still only produced sparks that were only 2-inches long. Worse still, what started out as an attempt to make a super-cheap Van De Graaff generator ended up costing well over $100.00 and involved a lot of frustrating work. What I learned from this is that even making your own Van De Graaff generator can end up costing a lot of money and while it'll work, it probably won't produce sparks anywhere near that of a commercially produced unit. Yes, $500 is a lot to pay for what really isn't anything more than an electrostatic toy, but investing that much ensures that you'll have a great looking machine that will almost certainly out perform home made generators.
![]()
Return to my main page and browse 100 other topics: everything from kaleidoscopes and metal detectors to the strange world of lucid dreaming.