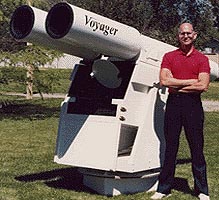
The Making Of Voyager The design and construction of Wayne Schmidt's motorized binocular chair for a pair of 8-inch diameter aperture binoculars.
Telescopes are
great... as long as you don't have to use them. Flat, one-dimensional
views, straining to reach the eyepiece and fighting the cold all
conspire to challenge even the most stalwart astronomy enthusiast. My
solution to these problems was to mount a pair of large binoculars on
a motorized chair complete with electrical heaters. I named it Voyager.
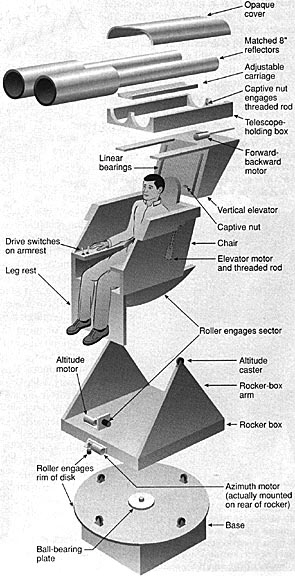
I used large binoculars because they reduce eyestrain, increase light sensitivity 40-percent, color sensitivity 25-percent and most importantly provide beautiful three-dimensional appearing images. The following drawing is an exploded view of Voyager to illustrate how it's put together:
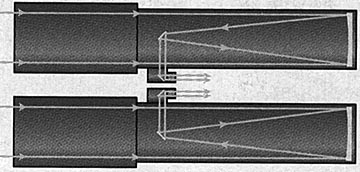
I used F8.0 mirrors because they provided the optimum compromise between light capturing capability, ease of fabrication and image quality. By using a longer focal length than the usual 4.0 to 6.0 seen on most reflective binoculars, I was able to use smaller secondary mirrors and thinner spider vanes to reduce diffraction effects. Here's what the optical path looks like:
Unfortunately, one of the negatives of this design is that the image rotates as the tubes rotate. This means that the simple method of tube rotation for adjusting the interocular distance can't be used. Instead, right-hand tube is mounted on a cradle equipped with sideways push-pull screw pairs front and back to adjust eyepiece separation. For merging the images in both scopes, the left-hand tube was mounted on a cradle whose rear end could be moved left-and-right and the right-hand tube with a cradle that moves its end up-and-down by turning adjustment knobs located in the front of the chair. This way the observer can set the alignment while using the binoculars in the actual viewing position. This is important because unavoidable flexure resulting from tilting the 350-pound chair with a 170-pound rider can throw the alignment off. The ability of adjusting on-the fly makes tuning up the alignment easy at any time. The pivot points for the tubes are set at the eyepiece positions so alignment doesn't effect the interocular distance.
By removing the opaque overhead light cover you can look don into the observing area of the chair:
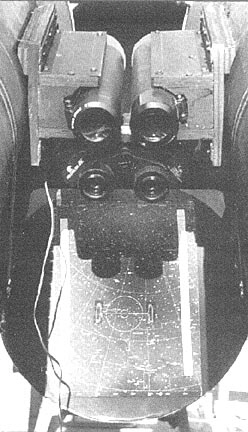
The top set of eyepieces are 50mm Plossls that provide 32.5-power with a 1.4-degree field of view. They are mounted on sliding carriages that allow the focus to be quickly adjusted for higher powers using a pair of 2.0X Barlow lenses stretched to 2.8X to provide 90X. The eyepieces themselves lock into focusers made from flush valves. The second. The smaller eyepieces are to a pair of very fine Adlerblick 7x50 binoculars. Their large field of view and erect image make them ideal finder scopes. Below that is a circular metal disc, which uses magnets to hold star charts in any desired position. In the middle of the star chart is a finder gauge consisting of two wire rings. The outer one corresponds to the field of view of the Adlerblicks while the smaller inner circle matches the field of view of the 8-inch, F8.0 binoculars. The wire hanging down on the left is a low-power resistive heater for both pairs of eyepieces to prevent dew formation. (Speaking of heaters, the chair has an electrically heated vest and boots to make sure the rider stays comfortable on even the coldest nights.)
To move the binoculars forward and backward or up and down to use different eyepieces or reach the finder binoculars, the frame that holds the binoculars is equipped with two motors. One, mounted on the back of the rider's chair, moves the entire binocular assembly up and down using an electric motor driving a treaded rod through a captured nut. The 100+ pound weight of this assembly tended to grind down the nut and rod so it's important to keep both of them heavily greased and protected from dust. For moving the binoculars back and forth they were mounted on a pair of linear bearings and a second motor/captured nut drive pushed or pulled them as needed.
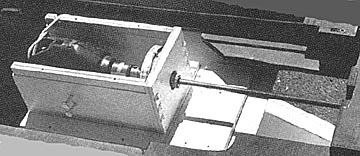
The motor
drive that moves the binocular carriage forward and backward.
The motor is a
cheap, rechargeable drill with its handle cut off. Three
similar motors
drive the other chair motions.
At this point it's necessary to make a comment about safety. When the chair is tilted back so that the observer is looking straight up, if the binoculars broke loose all 100+ pounds of them would come crushing down into the observer's eyes. For this reason it's necessary to have multiple safety measures in place to insure that if this ever happens, fail safe mechanical locks prevent the observer from being injured. The same thing applies to all aspects of such chairs. When being ridden, the observer is essentially imprisoned and every aspect of safety must be carefully considered and addressed.
The chair's frame was made of 3/4-inch plywood strengthened where needed with 2x4-inch lumber. Straight-grained, kiln-dried wood was used through to avoid warping. The altitude bearings are 2-inch diameter metal casters. I found they produced less drag and ran smoother than traditional Teflon bearing. The altitude drive consists of a rubber roller pressing against a sector arc covered with 30-grit sand paper. The rubber wheel is driven by an electric motor. (Note: because this was a friction drive it is essential to keep the center of weight the same or the drive could slip. I found this to be the chair's biggest weakness because if a 170-pound rider shifts his position by only 2-inches, he's creating 340-inch pounds of additional torque, enough to cause the altitude drive to slip. (I tried a bent-bolt drive but it slipped even easier.) For this reason it's difficult for other people much different in size to myself to use the chair. I have counter-balancing weights that can be used to compensate for this problem but they are awkward to use.)
The seating area of the chair is padded with a 5-inch thick layer of contoured foam to provide uncompromised comfort. The rotating part of the chair rests on a 12-inch diameter lazy Susan bearing stabilized with four casters mounted near the edge of the circular base. A similar drive system rotates the chair except the entire disk of the base is used so the chair can turn 360 degrees.
Ordinary toggle switches on the right-hand armrest turn the motors on, off, and control the direction of slewing. Additionally, there's a switch that puts a one-ohm, 20-watt resistor into the power circuit to reduce the slew rate from 3-degrees per second to 0.5-degrees per second. Power is provided by a six-volt, 140-amp-hour deep discharge battery that has enough stored energy to run the chair for five nights, even in sub-zero weather.
I made the mirrors myself. They both pass 6-point Millies-Lacroix diffraction limit test, have smooth surfaces and good edges. The final focal lengths were 64-inches and 64.37-inches, well within the 1-percent agreement needed for good binocular image merging. It took an extra 5 hours of work to get the second mirror to match the first but then these were the first mirrors I'd ever made. A more experienced mirror making could certainly do it in less.
I used 3, two-square-inch pads of foam mounting tape to secure each mirror to its cell. These mounts have held for years and never shown any sign of straining the mirrors or coming loose. The mirror cells themselves were simply two disks of 3/4-inch plywood with push-pull adjusting screws set at 90-degrees, rather than the usual 60-degrees, for easier collimation.
The secondary mirrors are 1.5-inches across and provide a 100-percent illumination field 20-minutes in diameter. Surveying 1,866 astronomical objects indicated that this large a field would be large enough for 100-percent illumination of 95-percent of them. The illumination drop off near the edge is unnoticeable. By using such a tight optical path I was able to employ a better baffling system that increased the scope's contrast. In the end, using the smaller diagonals actually provided brighter, sharper images.
All three mirrors in each tube were coated with enhanced aluminum. This increased the overall reflection efficiency from 68-percent of normal coatings to 86-percent.
The tubes for each telescope were cut from 11-inch diameter concrete forming tubes purchased from Home Depot. Mounted on front of them are 15-inch diameter, 40-inch long baffling tubes used to reduce stray light from reaching the focal plain and reducing contrast.
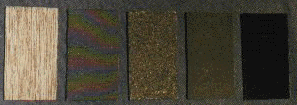
To decide how to coat the insides of the tubes I conducted an experiment to see which surface treatment absorbed the most light. Above, from left to right, is flat black paint, black flocking paper, sawdust sprayed with flat black paint, black cloth and finally black velvet. The velvet was clearly the best so that's what I used.
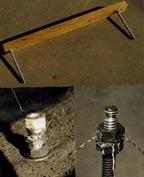
The four, 0.02-inch thick spider vanes used in most telescopes produce very large diffraction spikes. To reduce this I used a set of three vanes, which avoids spike reinforcement from in-line vanes, made of 0.008-inch music wire. The combined effect was to reduce the brightness of the diffraction spikes by 65-percent. While these spikes are easily seen in normal scopes when looking at 2nd magnitude stars, Voyager's wire spiders don't show them until you're looking at 1st magnitude stars, and even then they are barely discernable. Here's a cross section of what they look like:
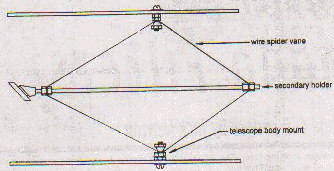
Here's what the actual secondary holder looks like:
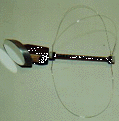
Below is a picture of the jig used to make each wire loop (necessary so that they are all the same length), a close-up of the nylon nut and nut cap that holds the wire firmly to the side of the telescope tube yet with enough slip so it can be adjusted and a close-up of the end of the central diagonal bar showing how two nuts tighten on the wire's end loops. The secondary's position is adjusted closer or further from the primary mirror by sliding the wires through the nylon capture nuts mounted on the telescope's tube. The secondary itself is foam-tape mounted on a wooden block and can be rotated by turning it on the threaded rod screwed into it that forms the central spar of the diagonal. Finally, the entire wire assembly can be angled by sliding one wire through its nylon nut further than the other two. Collimation using this system isn't easy but the reduced diffraction losses are worth it.
A word of warning: I found collimating a three-mirror optical path very difficult. There are so many rings within rings that have to all be concentric that I had a hard time keeping them straight and remembering what adjustment effected which ring. Fortunately, once the scopes were collimated they tended to remain that way even after transporting them hundreds of miles in a car.
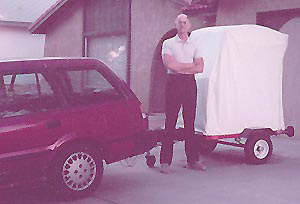
Originally the chair broke down into 10 manageable pieces. Assembly on-site took half an hour. However, it was a tight fit to pack it into my station wagon so after a year I rebuilt it onto a small trailer. Everything except the telescope cradle and telescope tubes were permanently fixed to it. This reduced set-up time to less than 5 minutes. During transport I used wood wedges to raise the main chair off the lazy Susan bearing so heavy bounces wouldn't flatten it. A white vinyl cover sewed to fit the chair protected it from weather. The only drawback to this was that it made the chair look like a construction site port-a-potty.
So, how does it work? Outstanding! Besides the already mentioned advantages of binocular viewing, there is a very real psychological pleasure from physically looking in the same direction the telescopes are looking. One additional benefit I hadn't expected was the fact that when seated in the chair, the observer's head lays on a head rest. This immobilizes his head and therefore his eyes. By eliminating the small eye movements unavoidable when looking through a normal telescope I found that images looked brighter, sharper and much more concrete. I estimate that this increased the scope's limiting magnitude by at least half a magnitude.
Large binoculars breathe life into astronomical views that must be seen to be appreciated and riding a motorized chair in warmth and comfort enormously increases the joy of observing, creating a sense of identity with the objects inhabiting the night sky unattainable any other way. The Orion nebula becomes a huge glowing cloud ripped by valleys of stygian blackness. The Triffid's color can be clearly seen and the Swan looks so solid and 3-dimensional it's hard to take your eyes off it. When riding Voyager the universe comes alive, inviting exploration.
![]()
(Click
on main site
to browse 70 other topics ranging from exotic kaleidoscope designs to
the strange world of lucid dreaming. There you will also find several
other pages dealing with chocolate.)