Wayne Schmidt's Awana Grand Prix Race Car Page: How to build the fastest Awana pinewood race car.
Introduction:
My interest in Awana Grand Prix racing began when my grandson asked me to help him build a race car for a Spring competition. My only previous experience with pinewood-type race cars was 25 years earlier with my son. Since we didn't do very well back then I decided a little study was in order to learn how to build the fastest possible Awana car. This proved be a frustrating venture because while there are a dozen books on the subject of pinewood racers and hundreds of web sites, the problem with all of them is that while they told me what to do and offered some explanations why it should be done that way none provided experiments to verify that the advice they provided was valid. This is critical because many sources offer conflicting advice. (The one exception to this is the excellent DVD titled Physics and the Pinewood Derby by Dr. Scott Acton, a physicist at Ball Aerospace Laboratory. This video provides the science behind building lightning fast pinewood race cars in a thoroughly entertaining and enlightening mix of experiments and practical advice. While I reference this DVD many times on this page, this video covers a wealth of additional information not mentioned here that is worth the purchase price many times over. I strongly recommend that anyone seriously interested in building a fast Awana Grand Prix race car, or any pine wood race car, purchase this DVD. It's available from many sources including Dr. Acton's web site at www.pinewoodphysics.com.)
This page digs deep into the physics that affects how fast a pinewood derby car goes. Anyone more interested in the nuts and bolts of simply building a fast car, I recommend they try the construction page at: HOW TO BUILD THE FASTEST PINEWOOD DERBY CAR.
Before we start building the ultimate Awana Grand Prix racer, a little background is appropriate.
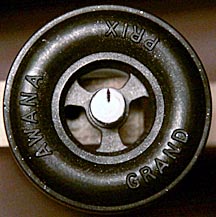
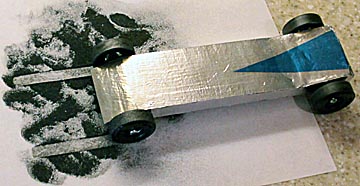
Awana, (Approved Workmen Are Not Ashamed) is a non-denominational, Christian youth organization similar to the Boy Scouts of America in that it strives to promote responsible development in children. One of the programs they support is the Awana Grand Prix race every Spring. Participating children purchase Awana Grand Prix car kits, build their cars with the help of their parents or other relatives and race them at a church participating in the Awana program. The car kits are almost identical to Boy Scout pinewood derby kits in that they consist of a pine block measuring approximately 7-inches long, 1.75-inches wide and 1.25-inches tall, four wheels embossed with the Awana Grand Prix logo and a set of axles.
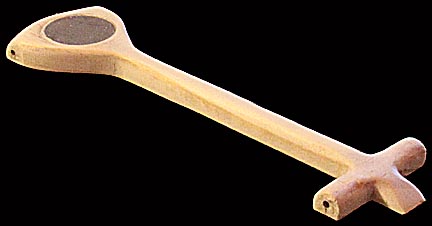
The biggest difference between Awana Grand Prix car kits and all the other variations of pinewood race cars is that while many programs use simple nails for axles, the Awana car kits use small hinge pins. This has a profound effect on one of the critical aspects of car construction: axle polishing. This topic and many others will be researched and discussed in detail further down the page.
A lot of what follows is painfully detailed so let's start off with something lighter. The following video shows the favorite cars in my collection. I hope you enjoy them.
Here's one more you might enjoy:
So much for fun. Let's get started!
Methodology:
The times reported in the various tests on this page are for cars running on my track at home and are for comparison purposes only. If they appear slow that is because the vinyl surface on the track has a slight texturing that causes it to run slower than polished plywood tracks and much slower than aluminum tracks. Additionally, while most 32-foot tracks have actual run lengths of 30 feet or less, mine has a run distance of 31.1 feet. Finally, the start end of most tracks is 48 inches high. Mine is only 44. All these factors add up to a very slow track. For comparison, I made a car identical to one used by Dr. Acton for his DVD and discovered it ran 0.030 seconds slower on my track than on his. The conclusion is that if some of the times reported for what I consider a very fast car sound slow, it's because of the track.
It is my intent to provide experimentally verified information to help people construct the fastest possible Awana Grand Prix car. Readers are provided with the raw data as well as the experimental methodology so they can decide for themselves if the conclusions are valid.
The methodology used to compare speed techniques was to run a set of ten runs with the car in its normal configuration, make the change to be tested being careful to keep everything the same, particularly alignment, then run a second set of ten runs. The times for the two sets are averaged to determine if there is a significant difference. The track is vacuumed before every set of ten runs to avoid dust buildup, which can effect times. For the same reason, wheels were wiped off to prevent imbedded grit from slowing the car by roughening the wheel surface. As an example, the following experiment determines the error between tests:
The same car was raced with no changes made between sets except that fresh graphite was added at the beginning of each set of ten runs:
Run Set 1.....................Run Set 2
2.542
seconds..................2.531
2.569..............................2.563
2.558..............................2.545
2.553..............................2.557
2.564..............................2.540
2.544..............................2.564
2.547..............................2.541
2.550..............................2.560
2.553..............................2.551
2.542..............................2.553
2.552 seconds average....'..2.550 seconds average
The 0.002-second difference suggests that when comparing speed techniques, unless the technique being tested shows an improvement greater than this then it is impossible to claim whether it works or not. This criterion is used throughout this page to judge whether a technique is worth applying. I'll be the first to admit that larger test runs should be used but I had to compromise some accuracy due to time constraints. It's important to understand that the test results reported are for my cars running on my track. Other people using different equipment may obtain varying results.
The biggest source of inaccuracy with this technique is axle alignment changes in those tests where the wheels have to be removed. Marking the axle heads helps return them to their original alignment.
Painting
the axle hub white makes placing an alignment mark on it easy. This
records where
the axle is aligned, which allows removing and replacing
the same axle
without affecting the car's alignment.
I always test
the alignment by running the car down an inclined flat board. If the
car swerves off a straight line it is realigned so that it tracks as
straight as it did before the axles were removed. Test runs confirm
that the average change in run times before and after axle removal is
0.004 seconds. If a speed technique produces a change that is smaller
than this then no judgement can be made regarding its efficacy.
The timer used for the experiments was a Timestopper TS100-2 running 3.0A software. It measures to 0.0001 seconds and rounds to display to 0.001 seconds.
Sometimes there are changes in run times between large groups of tests. For example, run times increase between the sequence of test runs comparing Max-V-Lube, Hillmand and Hub-E-Lube and the follow-on sequence of test runs comparing Max-V-Lube, Super-Z Graphite and Super-Z Graphite with oil. The cause of this was a change in the configuration of the track. For this reason comparisons across different groups of tests should be approached with care.
Major topics
are bookmarked so that visitors may quickly skip down to the article
they want. The first line in each article is a summary of results so
readers can get the answers to their questions as quickly as
possible. Following this summary are the experiments and analysis
that provided the conclusions in the summary.
Several products are mentioned on this page. I have no connection with any of these products or the people who market them. No one is has paid or asked me to mention them.
The topics are ordered with the most important speed hints listed first. I hope you find them helpful and wish you all good racing!
Topic List:
Graphite: Why it's the single most important factor, what types to use and how to apply it.
Axle Alignment: How two wrongs make a right.
Center of Mass and Moment of Inertia: Understanding these two concepts is essential to building the fastest car.
Axle Treatments: How much polishing helps, what about hub coning and do slots really reduce drag?
Wheel Treatments: The dangers of wheel mandrels, does bore polishing help, graphite coated wheels, rim smoothing, the spin-up myth, hub coning, and are $40 lathed wheels worth it?
Three Wheel Cars: How much faster are they?
Extended Wheel Bases: How much do they increase speed?
Rail Riders: Do they really make the fastest cars?
Hub Huggers: Myth or fact?
Quick Start Wings: Do they really provide 0.010-second head starts?
To Bake Or Not To Bake?: Cooking your car may reduce it's weight, but is the risk worth it?
But Dad, I really want fins: A hard look at aerodynamics.
The Shock Absorber Design: Do flex-bodies really help cars run smoother and faster?
Rules: A typical set of rules for Awana Grand prix races.
Putting It All Together: My fastest car.
How Fast Is Fast?: How fast they go.
When Good Cars Go Bad: How a speed demon can turn into a dog.
But I Was Winning!: The dynamics of racing.
Building a Super-Cheap Track for Home Use: Would you believe a 32-foot track for $20?
Want a Super-Cheap Timer to Go with that Super-Cheap Track?: It'll cost another $30.
Odds and Ends: Useful bits and hints.
Are Dr. Scott Acton's Cars Really the Fastest Cars?
Treadmill Tuning: Does it really help?
Bibliography: The sources referenced in creating this page.
Graphite:
Summary:
a.
Using graphite is the most effective way to increase car speed.
b. Max-V-Lube
gives
the best times.
Nothing is more important than having a good layer of graphite on your car's axles. I've had cars that were out of alignment, had bent axles, wobbly wheels, poor centers of gravity and insufficiently weighted, but as long as they had a liberal coating of graphite they somehow managed to make it to the end of the track. I've also had class-A speedsters that rolled to a stop halfway down the course because I failed to graphite their axles.
The two big questions are: What type of graphite is best and what is the best way to apply it?
To answer these questions I drafted my oldest grandson's car to test three common brands.
Joshua
named his car Lighting
Quick, and it's an appropriate name.
It's
been the Grand Champion at several family races.
The first three graphites tested were: Hillman (graphite for locks), Hob-E-Lube (graphite and molybdenum mix) and Maximum-Velocity's Max-V-Lube (pure graphite.)

Max-V-Lube was many times finer than the other two and the container comes with a long thin tube that makes reaching into tight area around axles easy.
How
To Apply Graphite:
There are six surfaces that have to be coated with graphite: the axle, the wheel bore, the area of the car body that contacts the inside hub of the wheel, the inside wheel hub, the outside wheel hub and the inside face of the axle hub. To insure that all six surfaces get the same treatment I adopted the following routine:
1. With a wheel down to expose the inside section of axle, I build up a fillet of graphite all the way around the inner wheel hub.
I then press the wheel up against the car's body and twist it back and forth four times to work graphite into the body's surface and the inner hub face.
2. I build up another fillet and this time tap the wheel lightly with a fingernail ten times to enable graphite to work into the gap between the axle and wheel bore.
3. The car is turned over and both steps repeated for the outside of the wheel.
For
the test I began by removing the wheels, scrubbing the bores clean
with a cotton pipe cleaner, wiped off both wheel hubs and the hub
contact point on the car's body and carefully cleaned all traces of
graphite off the axle. This process was repeated for all four wheels
then they were regraphited with the graphite to be tested. Then the
car was run down my test track 10 times, recording the time of each run.
Here are the results of the graphite tests:
Hillman ..........................Hob-E-Lube .....................Max-V-Lube
2.564
seconds....................2.544..............................2.542
2.550................................2.528..............................2.554
2.537................................2.527..............................2.539
2.541................................2.532..............................2.533
2.547................................2.546..............................2.510
2.516................................2.559..............................2.535
2.529................................2.550..............................2.537
2.547................................2.570..............................2.542
2.552................................2.561..............................2.541
2.577................................2.551..............................2.547
2.546 seconds average......'..2.547 seconds average...'...2.538 seconds average
It
may not seem that Max-V-Lube's 0.008 and 0.009-second advantages are
significant, but at an average speed of 13 feet per second this
corresponds to a lead of 1.2-inches at the end of a race, more than
enough for an electronic timer to signal the Max-V-Lube car the winner.
Shortly after finishing the test above I read an article about Super-Z graphite and Super-Z oil which, when used together, were claimed to produce a super low coefficient of drag and therefore very low race times. Carefully following the manufacture's instructions for using these products I conducted the following tests:
Max-V-Lube ................Super-Z
Graphite ....Super-Z
Graphite and Super-Z Oil
2.766
seconds....................2.785..............................2.931
2.740................................2.812..............................2.925
2.740................................2.827..............................2.933
2.740................................2.835..............................2.891
2.753................................2.822..............................2.901
2.745................................2.837..............................2.918
2.747................................2.812..............................2.875
2.744................................2.823..............................2.867
2.736................................2.816..............................2.894
2.739................................2.832..............................2.900
2.745 seconds average........'2.820 seconds average......2.903 seconds average
These tests strongly suggest that Max-V-Lube is superior. The very large flakes of Super-Z Graphite were extremely difficult to use and the application process much more involved than that of the other graphites tested. (Note: The increased times over the first set of tests were the result lowering the starting end of the track. Also, even if the Super-Z oil had worked, most Awana Grand Prix races only allow graphite.)
Graphite
Types:

From left to right: Hillman, Hob-E-Lube, Max-V-Lube, AGS Ultrafine Graphite, 0.6 micron Tungsten Disulfide, Super-Z Graphite
Smearing each with a finger disclosed some interesting comparisons. Hillman, Hob-E-Lube and Max-V-Lube all smeared smoothly. (Max-V-Lube has a granular, almost crystalline appearance.) AGS Ultrafine looked clumpy and felt a little gritty. Where I first pressed my finger it left a clump of compressed material that was hard to dislodge. The tungsten disulfide looked extremely clumpy but smeared the smoothest of all. (It's reported to be twice as lubricating as graphite.) Super-Z had very large, hard to control flakes that nevertheless smeared smoothly.
Comparing
Max-V-Lube to AGS Ultrafine Graphite and Consolidated Chemical's 0.6
micron tungsten disulfide lubricants:
Max-V-Lube .................AGS
Ultrafine ................Tungsten
Disulfide
2.712
seconds....................2.785..............................2.921
2.701................................2.813..............................2.911
2.698................................2.804..............................2.924
2.710................................2.818..............................2.930
2.704................................2.797..............................2.917
2.709................................2.806..............................2.898
2.713................................2.811..............................2.904
2.707................................2.798..............................2.911
2.698................................2.801..............................2.916
2.704................................2.810..............................2.902
2.706 seconds average......'..2.804 seconds average...'...2.913 seconds average
AGS Ultrafine and tungsten disulfide did very poorly in part because they were so fine they clumped and were impossible to coat the axles. I repeated the test, this time breaking the established application protocol by removing the axles and rubbing AGS and Tungsten disulfide directly onto the axle shafts and wheel bores. That did not change the results. After completing these tests I found another ultrafine graphite sold by Consolidated Chemicals. Like the AGS Ultrafine, it did very poorly when compared to Max-V-Lube. Another problem with ultrafine graphites is that they are so fine that if spilled on almost any surface they get pulled into microscopic pores and become messy and difficult to remove.
Max-V-Lube has proved itself superior to seven other lubricants so it's the one I'm using from now on.
Axle Alignment:
Summary:
a.
The axle slots and predrilled holes in commercially produced Awana
or pinewood derby blocks are not accurate enough for optimum performance.
b.
Pro body tools for guiding drill bits for drilling axle holes are
far too inaccurate.
c.
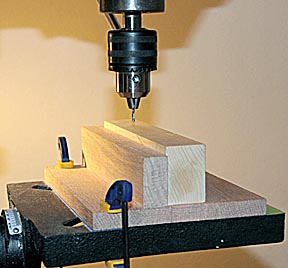
The best way to mount axles is in holes drilled with a drill press
that's been set up to create holes that are within 1/4-degree of perpendicular.
When I began making Awana Grand Prix cars I just about went crazy. My cars always swerved off to one side or another. My only recourse was to go through an arduous process of axle bending to get them to track straight. After countless hours examining the problem I discovered that the predrilled axle holes and precut axle slots in the blocks I was buying were as much as 2 degrees off perpendicular, even on the high-end precision-cut blocks available on-line.
I tried using a pro body tool to act as a guide for drilling holes that were more perpendicular to the sides of the block. It made things worse.
Pro
Body Tool
The
hole for guiding the drill was large enough that the drill bit could
lean two degrees off perpendicular.
I decided that the only thing to do was buy a drill press. It didn't help. I quickly discovered that the adjustments on it were far too coarse to achieve the 1/4-degree accuracy required. But at least the drilling surface was stable and the drill head fixed. I learned that by using layers of tape on the drill bed to shim the back and sides of a wood base I could finally get the press to drill axle holes that were almost perfectly perpendicular to the sides of the block. I grabbed a block, threw on the press's switch and drilled four beautiful holes. Two minutes later I'd mounted wheels on it and let it roll down the alignment board (a 10-foot long by 6-inch wide piece of vinyl coated molding with one end elevated 5 inches) and watched in horror as the car swerved sharply to the left and fell off the board before it traveled three feet.
After examining the problem I discovered that even the best Awana and pinewood derby blocks don't have truly perpendicular edges. They all have slight tapers that give them trapezoidal cross sections. Even though the holes on one side were perpendicular to that side, because that side wasn't parallel to the opposite side the axles on the second side aren't parallel the axles on the first side. I was about to give in to the inelegance of bending axles to achieve alignment when inspiration struck.
If I mounted a wood fence on the drilling base that was perpendicular to it then held the bottom of the car block against it, rather than the side of the block against the bottom of the drill press platform which is more typical, then all four axles would be drilled relative to the same surface: the bottom of the block.
To check the accuracy of the holes, something I do using a test block before drilling the real holes in a car, purchase a 3/32-inch brass rod from a hobby store. After a little sanding on one end with 400-grit paper it should slide down very snuggly into an Awana-sized hole. Using one edge of a very accurate architect's triangle, hold it against the base of the block and check to make sure that the separation between the rod and triangle is constant all the way up the rod's 12-inch length. Then use the right angle of the triangle with one side parallel to the long edge of the block and check that the rod is perpendicular that way as well. (Check the rod's straightness by rotating it in the hole. If the angle relative to the edge of the triangle remains constant it's straight. I'm always careful to hold the block so the rod points straight up. If it's leaning the rod could flex enough to throw the check off.) If the rod shows the hole is straight you're good to go. If it shows an angle then add or remove shim tape to correct it. As simple as this system is it can repeatedly drill holes that are with 1/4-degree of perpendicular.
It worked... almost.
The first car I built using this system rolled down the alignment board swerving just 2-inches in ten feet. Good, but not good enough. I thought I was doomed to descend into axle bending when inspiration struck for the second time. This time it was the realization at at least as far as pinewood race cars are concerned, two wrongs really do make a right.
The first "wrong" is that no axle hole will ever be perfectly perpendicular. The second is that no axle is perfectly straight. Realizing that the very small amount of bend in all axles is on the same scale as the very slight off angle of the axle holes, I realized that if the axle was rotated so that its bend turned the axle in the opposite direction that the axle hole pointed it then the two defects would cancel.
It worked. I began turning the front right axle a quarter turn at a time and on the second turn the car ran straight down the alignment board. It was beautiful. I made two more cars the same way. The first tracked straight the first time I tested it and the other only took three twists to get it to run straight. I was riding high thinking I'd conquered crooked axles forever. Then everything went horribly wrong.
I drilled the holes for a new car, put it on the alignment board and watched in horror as it swerved sharply right. No amount of axle turning would solve the problem. What had happened?
Nature happened. Wood blocks have grain: alternating layers of soft, light wood and hard, darker wood. If the drill hits a layer of hard grain at a small angle the bit will bend as it slides along the hard wood and drill a curved hole.

The
white line represents the path of the drill as it's deflected by a
layer of harder wood.
Normally
this isn't an issue but the thin drills used for Awana axles bend
very easily.
When an axle is inserted in such a hole it'll end up coming out at a slight angle. You can feel this when inserting an axle because instead of sliding in snuggly it has to be pressed in very firmly.
To reduce this problem, stub bits short in the chuck so that only the absolute minimum needed to drill the axle hole is exposed. This effectively makes the drill stiffer. Select wood with the grain as close to perpendicular to the direction of the drill as possible. Drill with a high rotation speed so the drill has more cutting strength to help it pierce the hard layer. Finally, drill very slowly so the bit has enough time to grind through hard layers. I usually take one minute to drill an axle hole that's only 1/2-inch deep.
Another useful trick is to avoid drilling axle holes right next to the edge, as pro body tools do. The problem is that wood is flexible enough that while drilling it will actually bulge out. You can feel this happening if your finger is over that spot. By moving the axle hole 1/8-inch from the edge the extra thickness provides enough strength to prevent this and yield straighter holes.
Once the axle holes are drilled it's time to align the axles in them so the car runs straight. Rough out the shape of the car first to relieve any internal strains that might throw alignment off. Polish and lube the axles before alignment because axle drag can be enough to turn the car even if the axles are perfectly aligned. Place a weight on the car near the rear, remove one of the front wheels and roll the car down the alignment board. If it curves, rotate the axle 1/4-turn and try again. Usually, before you get back to where you started you'll find a position where the car tracks straight. Don't be afraid to play with the rotation. Sometimes a tiny fraction of a turn makes the difference between a car running arrow straight and curving. Use a permanent marker to make a mark at 12:o'clock on the axle head so you know that axle's alignment position and remove it. Repeat the process with the other front wheel then test them together. When they are done turn the car around, move the weight to the new rear end and repeat the alignment with the rear (now front) two wheels. Replace all the wheels using the axle marks to get them back to their properly aligned positions. Check the car one more time and you should be good to go. Remove the wheels and finish the car. The alignment needs to be repeated after the car is finished because all the handling might warp the wood slightly.
Cars can be made to roll straight by leaving all four wheels on and playing with the axle rotations. This saves the hassle of aligning each wheel by itself but it may end up being a car that rolls very straight... and very slow.
What can happen is that two wheels can be off angle by the same amount but in opposite directions. In other words the car is pigeon toed. One wheel wants to turn the car left while the other wants it to go right, both by the same amount so they cancel each other and it goes straight. The problem is that because the wheels are pushing against each other the wheel drag goes sky high and the car never runs as fast as it should. (Dr. Acton's DVD shows how to make a jig for testing axle alignment.)
If you find that axle rotating doesn't quite achieve the alignment needed, try using a different axle. There is always some variation in manufacturing error and a different axle may have enough natural bend to get the car running straight.
Once in a while I end up with a hole that's just too crooked to deal with by rotating the axles. The best course of action is to start over with a new block and hope for straighter axle holes. But if you've invested a lot of time and money in the existing car then there is no other course other than axle bending. After aligning all the other wheels, remove the offending axle and wheel. Hold the axle in a pair of long nosed pliers just below the area where the wheel rides and using a second pliers, bend the bottom of the axle "very slightly." You shouldn't be able to see the bend. Reinsert the axle and wheel and continue the alignment. Bending is a very powerful technique. Usually, the amount of bend is many times what's needed so the angle over which the wheel is aligned is very small. It can be frustrating when a tiny rotation of the axle results in the changing the car from swerving hard right to hard left.
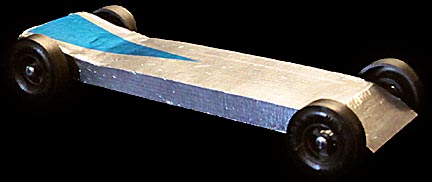
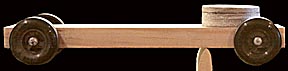
All
of the above has worked great for me for building many solid body
cars like this:
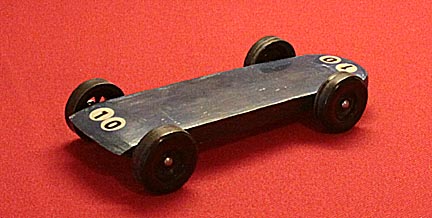
It
doesn't work as well with more complex high performance cars like this:
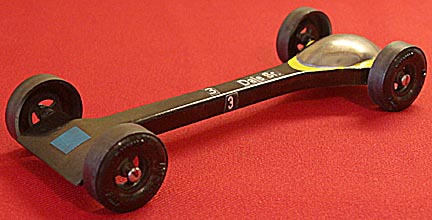
Grandson
James' Dale Sr. blows past even the very fast Lightning Quick.
The reason is that so much wood is removed after the axle holes are drilled that the wood that's left invariably warps. Drilling the holes after final shaping isn't always possible because there's not enough left of the base of the car to act as a reference plane. This is one of the frustrating aspects of building a top performer, as the following car demonstrates:
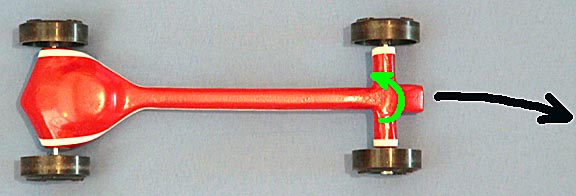
After
drilling the axle holes and epoxying the tungsten weight in the car
above, I carefully aligned it. Going forward or backward it tracked
perfectly straight. Then I proceeded to gently remove all the wood I
could to make it the high performer I hoped it would be. After it was
complete I placed it on the alignment board and as expected, it
failed to track straight even though I'd positioned the axles using
marks I'd put on them after the first alignment. I had expected as
much and started realigning it. In the end I got it pretty good...
but "pretty good" isn't good enough for a car intended to
be a winner. No matter how much I played with the axles the best I
could do was reduce a swerve to the right to 1.5 inches over ten
feet, as indicated by the black arrow. I was about to resort to the
brute-force technique of axle bending when it occurred to me that the
amount of misalignment was so small that there might be enough
flexure in the wood itself to fix the alignment. I held the car body
in my left and and with my right grabbed the front axle section,
gently twisted it in the direction of the green arrow and held it
there for a count of 20. It worked. The car now tracked absolutely
straight. Better still, half an hour later it was still running
straight so it seems this is a long term fix.
For cars with bodies whittled away enough to have some bendability, gently twisting the front in the opposite direction of a persistent swerve might help provide a final touch-up to alignment. But be warned, the front ends of such cars are extremely fragile so don't use too much muscle or you may break it off. Also, be sure to check the alignment right before a race to verify that it's held. The front end's flexibility should be kept in mind when handling the car. Carrying it by the front may throw the alignment off.
In rare cases a car will start swerving one direction, straighten out, then turn in the other direction. I believe what is happening is that a misalignment is turning it one way but as it gets into the bottom half of the alignment board a speed related friction factor on one side begins dominating the car's motion and turns it back the other way. Try using a new set of axles and wheels to correct the problem. If it persists it might be best to start over and build a completely new car.
(Note:
Always keep a log for each car recording how each axle affects
alignment. If
you get the chance to test your car on the
track before a race you can use the log to fine tune the car. Also, in
his DVD Physics and the
Pinewood Derby, Dr. Acton
presents an outstanding way to build cars with an adjustable
alignment system.)
Conclusion: Thorough wheel alignment can be a challenging task, but one that is absolutely essential for building the fastest possible Awana Grand Prix race car.
Center of Mass and Moment of Inertia:
Summary:
a.
Build your
car so that it balances 0.9 inches in front of the rear axles.
b.
Concentrate
as much weight as possible in as small an area as possible.
Where
to Locate Your Center of Mass:
The center of mass of a car is simply the location where it balances.
Typical
Awana Grand Prix cars have their center of mass, where they balance,
located
close to the center of the car.
This
car has its weight moved toward the rear so where it balances, the
location
of its center of mass, is also closer to the rear. Note that the
center
of mass is not where the lead weight is located but the
balance
point for the combined car body and lead weight.
All the energy to make an Awana Grand Prix car go fast is determined by how much it weighs and how far this weight drops as the car races down the track's initial incline. The maximum weight allowed is five ounces so there's not a lot we can do about that. What we can affect is the distance through which this weight drops as the car rolls down the start ramp. The starting post that a car rests up against before being released is usually 48 inches above the flat section of the track. The center of mass of the car is typically four inches behind this. Correcting for the angle of the track the car's center of mass is actually three inches higher, around 51 inches. But, if the front end of the car is made lighter then more of the allowed five ounces can be located in the rear of the car. This moves the center of mass back to as much as five inches behind the starting point or four inches straight up. Now instead of 51 inches of drop distance the car's center of mass has 52 inches.
 ........
Here
you can see that moving the weight back moves the center of mass
higher on the
track.
As the car on the right races down the incline more of its weight
will fall a greater
distance,
which will push the car to a higher speed than the car on the left. This
is
not a subtle effect. Rear weighed cars hit the bottom of the incline and
explode
off the ramp like a turbo boost kicked in. You can hear it as
they
take off with a whoosh.
The extra inch higher of the center of mass of the car on the right represents an almost a 2-percent increase in energy. That means it will end up going 2-percent faster than the car on the left. Instead of an average of 13 feet per second it'll average 13.26 feet per second, enough to finish 8.4 inches ahead of the right hand car. That's over a full car length, a clear victory in anyone's eyes.
So we want to put as much weight in the rear of the car as possible. Or do we? Considering the following poor little car:
I cut the entire end off this guy and replaced it with a solid slab of lead. The car had an extremely low-drag profile, good wheels and excellent alignment. I figured it was going to be a speed demon. It was a dog
The problem was that I moved the center of mass so far back that the front end didn't have enough weight to keep it on the track. The car swerved all over its lane, hitting the guide rail at least a dozen times and barely managed to cross the finish line.
So, we want the center of mass as far back as possible to get as much speed as possible, but we don't want it too far back or the car will become unstable and zigzag all the way down the track. What's the optimum position for the center of mass? I'm sorry to say there's no magic number because it depends on the track.
Very smooth tracks don't subject cars to many bumps so the center of mass can be moved back as far as 0.75 inches before stability problems appear. Old wood tracks with dips at every seam need the center of gravity more forward to help hold the car's nose down. A full inch is a good starting point for such tracks. If you don't know the condition of the track on which you'll be racing a reasonable compromise would be 0.9 inches, about 7/8 inches.
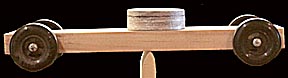
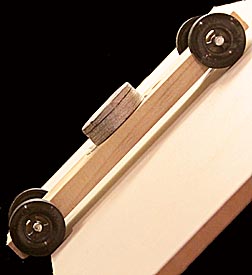
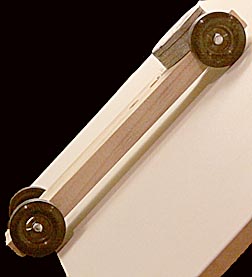
The
key to maximizing the weight toward the rear of the car is removing
as much weight as possible everywhere else. This translates into
carving away all the wood you can. Here's an example of a body that's
been pared down to practically nothing so that most of its weight,
the tungsten disk in the rear, is as far back as stability permits:
This body weighed a scant 8.9 grams, not counting the tungsten weight. The small nose section extending just forward of the front wheels is there to take the impact of stopping the car and and trigger the optical sensor at the finish line. It's width was determined by measuring how narrow it could be and still trigger the sensor even if the car was angled the maximum amount either way. (Note: another price you pay for making a high performance car like this is that the body is extremely fragile. If dropped it will almost certainly break. Also, the front wheels can be knocked out of alignment by smashing into poorly designed car stops, like the pile of bean bags used in one Awana race I attended.
One final weight question: Is it worth it to fine tune the overall weight (mass actually) to be as close to 141.7 grams (5 ounces) as possible? The answer is a definite "yes," as the following test confirms:
Car
at 140.6 grams: .........Same
Car at 141.7 grams
2.720
seconds............................2.701
2.716........................................2.717
2.721........................................2.695
2.726........................................2.716
2.723........................................2.713
2.721........................................2.726
2.710........................................2.712
2.722........................................2.721
2.727........................................2.716
2.715........................................2.724
2.721 seconds average.................2.714 seconds average
The
0.006 advantage is small but equates to a 1-inch lead at the finish
line, more than enough to signal it the winner. (Care was taken to
add the weight in such a way that the aerodynamics, wheel alignment,
moment of inertia and center of mass were not altered.)
Here's another trick about weight. Many AWANA and pinewood derby races are managed by the same people year after year. To make setup easy, it's common for them to have everything needed for a race collected in a "kit," boxes of stuff for the race. One such item is the scale. If you're planning on participating for several years, note what maximum weight gets passed. In the local AWANA races, the scale passes anything up to 143.7 grams. That's 2 grams heavier than 5 ounces. I always weight the cars to this to get as much speed as possible. But be able to peel off or add a couple of small trimmer weights in case they recalibrate the scale.
Moment of inertia:
Moment of inertia is simply a number representing how hard it is to rotate an object.
Imagine holding a broom stick with two weights at its ends. If you try rotating it, it will be hard to do. In this configuration it has a large moment of inertia. Now slide the weights in so that they are right next to your hand. It'll be much easier to rotate even though it still weighs the same. In this configuration it has a low moment of inertia.
It's important to build your Awana Grand Prix car with the smallest possible moment of inertia. Cars with large moments of inertia don't turn easily and when they do they use up a lot of energy, which causes the car to slow down. Cars with high moments of inertia also push against the guide rail harder and longer when they swerve into it. This creates more speed-robbing drag than a car with a low moment of inertia.
The key to building cars with the lowest possible moment of inertia is to concentrate as much of their weight as possible in as small an area as possible. Take a second look at the last picture. of its 98 grams, 89.1 grams are concentrated in the tungsten disk in the rear. This means almost all of its weight occupies a very small area so it will have a low moment of inertia. If I'd used lead the disk would have a larger diameter because it's less dense than tungsten and the car would have a slightly larger moment of inertia.
NEW FOR 2014!!! To determine if the increase in speed tungsten provides over lead is worth the $20 cost, I built a car where the primary weight could be swapped while maintaining the same overall weight of the car, the center of mass and aerodynamics. Two weights were compared. The first was a solid disc of lead 1.25 inches in diameter and the second a 1-inch diameter tungsten disk topped with a thin lead disk to bring its weight up to the same as the all lead weight. The moment of inertia of the lead disk was 50-percent larger than the tungsten and lead disk combination. The average of ten runs with the lead weight was 2.947 seconds. The average with the tungsten disk was 2.937 seconds. Tungsten's lower moment of inertia trimmed 0.010 seconds off the average run time. This equates to the tungsten car finishing 1.7 inches ahead of the lead weighted car. In the close races that finish a pinewood derby race, this is enough to be the difference between first place and last place. I leave it to the builder to decide if $20 is worth it. For myself it is.
The advantage of tungsten goes further than just reducing the moment of inertia. Because of its compactness compared to lead, it allows for smaller, more aerodynamically shaped bodies.
Having decided to use tungsten as the primary weight in my car's bodies, the next issue to address is what shape the additional lead should be. Tungsten disks weigh 92.5 grams. A high performance body weighs 9 grams. Wheels and axles another 11.5 grams. Finally, paint averages 1.2 grams. That totals 116 grams. To bring the finished car up to 141.7 grams means an additional 27.5 grams of lead must be added. Using the same weight-adjustable car, I compared the the average times for ten races each of the following four shapes:

Starting on the left is a lead ring that wrapped around the tungsten weight. This increases the moment of inertia, but creates the thinnest, most aerodynamically smooth body. Left center is a hemi-spherical weight glued to the top of the tungsten disk. Although it creates the highest profile and therefore drag, it creates the smallest moment of inertia. The flattened dome (right center) and smooth dome (far right) provide compromises between drag and moment of inertia.
With the ring the car averaged 2.994 second runs.
With the hemi-sphere it ran 2.985 seconds
The flattened dome and smooth dome both averaged 2.980 seconds and are the clear winners. Which one is to be preferred can be decided for cosmetic reasons.
One final test involved filling in the area immediately behind the spherical dome with ultra light weight filler and smoothing it to create what would seem to be a more aerodynamic shape. (The car's total weight was kept the same.) The result was a reduction in average run time of 0.002 seconds. This is within the uncertainty of the testing methodology so I can't make a conclusion on whether it helps. Since it doesn't hurt, and makes the car look better, I intend using it.
Axle Treatments:
Summary:
a.
Thorough polishing using 3600, 4000, 6000, 8000, 12,000 grit emery
cloths and rouge is important for the best times.
b.
Axle grooves don't make cars run faster.
c.
The hazards of hub coning
outweigh their benefits.
Axle
Polishing:
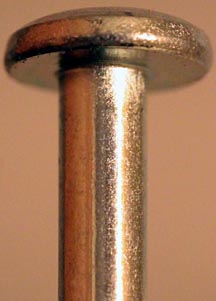
The vast majority of literature on pinewood cars recommends filing, sanding and polishing the axles to reduce friction between the axle and the wheel. As the close-up of a pinewood nail axle shows below, its extremely rough surface demands this sort of rough treatment:

The
typical nail provided in Boy Scout pinewood derby kits. Note the
uneven surface of
the
shaft and the flanges extending down from the head. All of these
have to be filed off
then
the shaft carefully sanded with a series of ever finer sandpapers
and finally polished
to
create a smooth enough surface to enable the car to run at top speed.
While
it's tempting to assume the same is true for Awana Grand Prix axles,
a close look at the hinge pins used suggests it may not be as important.
In
comparison, above is the hinge pin from an Awana Grand Prix car kit.
It has no
gross
shaft deformations or flanges hanging down from the head. Its
surface is so
smooth
that sanding and polishing may be considerably reduced.
(Both
images are 12X.)
To see if polishing is beneficial, I placed a wheel and axle set in a clamp and after applying graphite, finger spun the wheel 20 times, recorded how long the wheel spun and averaged the times to get 17.29 seconds. Then I sanded and polished the axle using 1500 grit sandpaper for two minutes followed by 6000 grit emery cloth for 10 minutes and then polishing with rouge for three minutes. I started with such a fine sandpaper because as the photo above shows, the largest surface defects are only slightly larger than the grit of 1500 paper. Using anything coarser would have made the surface rougher.
The resulting finish looked mirror smooth. I repeated the spin test being careful to apply the same amount of graphite in the same manner. The average of 20 spins was 18.69 seconds. The 1.4 second increase hardly seems worth the effort.
The problem with this and all other spin tests is that they test axle/bore combinations under effectively no-load conditions. An Awana Grand Prix race car wheel weighs 2.2 grams. In a well-balanced car the weight on each rear wheel is 60 grams. This means that under actual race conditions the load, and therefore drag, is 30 times that in spin tests. To determine if polishing provides any significant improvement under actual race conditions, I selected my grandson's fastest car and ran it down our track 10 times before polishing the axles then another 10 runs after they had been polished for one minute with 6000-grit emery cloth, then again after an additional minute of the emery cloth followed by one minute of polishing with rouge. Axle orientation was maintained for both tests to keep alignment constant so run times between axle changes varied less than 0.004 seconds. I was extremely careful to apply the same amount of the same type of graphite in the exact same manner before each test. Here are results:
Unpolished............
Polished
with Emery......
Polished
with Emery and Rouge
2.548
seconds......;.............2.541..................................2.528
2.563................................2.549..................................2.533
2.566................................2.545..................................2.529
2.577................................2.553..................................2.540
2.544................................2.539..................................2.526
2.552................................2.569..................................2.543
2.571................................2.536..................................2.532
2.565................................2.561..................................2.517
2.550................................2.559..................................2.510
2.546................................2.545..................................2.528
2.567 seconds average.........2.550 seconds average..........2.529 seconds average
This test shows that not only does polishing help significantly but that because Awana Grand Prix axles are very smooth to start with they don't require a lot of work to polish. Coarser sand papers such as those needed for BSA axle nails are not necessary.
A very good, straight axle benefits the most from polishing. A slightly out-of-true axle less so because its defects overpower the subtler benefits of polishing. The lesson is clear: always pick through your axle/wheel pairs to find the best. This is one case where spin testing is useful. If you only have two really good sets, put them in the rear of the car where the load is greatest. Finally, whitening toothpastes have extremely fine abrasives that are as effective as rouge for polishing.
Now that an advantage has been established for polishing, the next step is determining the polishing technique that provides the best finish with the least amount of work. The first question to address is: What is the best sand paper with which to begin the polishing process? Start with too coarse a grit and the axle will become rougher after the first sanding, necessitating a laborious succession of finer grits just to get back to original axle. Start with one that's too fine and you could waste enormous amounts of time and paper slowly grinding down the surface until the initial surface defects are eliminated. Unlike BSA axles, which come with gross surface defects and therefore demand coarse grits, Awana axles come from the factory with such a smooth finish that the starting point may be a very fine grit paper. To determine what a good starting grit is I used a sequence of grits on actual axles and photographed the effect of each grit after ten seconds of sanding with the axle chucked in a drill press. The following 100X images show the results:

1200
grit...............................................1800
grit.......................................................................2400
grit.......

3200
grit.........................................................................3600
grit...............................................................................4000
grit.......

6000
grit.........................................................................8000
grit...............................................................................12,000
grit
What
we need is the finest paper that eliminated most original surface
defects in a reasonable period of time. To my eye this appears to be
the 3600 grit paper. Experimentation determined that it takes 4
minutes with 4000 grit paper to completely eliminate surface defects.
After two minutes the paper quit cutting and a second piece had to be
used. The 3600 paper on a fresh axle achieved the same results in
only two minutes. After that, one minute each at 4000, 6000, 8000 and
12,000 followed by one minute with polishing rouge was sufficient to
complete the polish.
Comparing surface quality after using rouge and toothpaste showed that the toothpaste wasn't as smooth. But, it was very close so I would feel comfortable trusting in a toothpolish finish.
The next question is whether all this work is worth it? To answer that the following tests compare the run time for the same car on unpolished axles, axles lightly polished with two minutes of 6000 grit paper and one minute of toothpaste and finally axles thoroughly polished with 3600 grit for two minutes followed by 4000 through 12,000 papers for one minute each and finally Maximum Velocity's axle polishing compound for one minute. The car used was my grandson's newest creation:
Unpolished..................
Light Polish.....................
Thorough
Polish
2.657
seconds......;.............2.653..................................2.576
2.646................................2.619..................................2.603
2.698................................2.614..................................2.598
2.698................................2.621..................................2.604
2.694................................2.635..................................2.587
2.702................................2.692..................................2.618
2.694................................2.630..................................2.589
2.667................................2.623..................................2.639
2.689................................2.648..................................2.645
2.717................................2.645..................................2.631
2.681 seconds average....'....2.636 seconds average..'........2.609 seconds average
The 0.027 second advantage the thorough polishing provided over the light polishing is more than enough to justify the 10 minutes it takes to polish one axle.
Axle
Grooves:
A popular speed trick is to machine grooves into the axles to reduce the area in contact with the wheel and thereby reduce drag.
![]()
Pro
Speed axle from Maximum-Velocity.com
This
makes no sense to me because friction is the product of force
pushing two objects together and the coefficient of drag between
them. Since the force on a wheel, its share of the car's weigh, is
constant, all decreasing the area does is increase the force per unit
area or pressure. Because Awana plastic wheels are soft, this could
lead to deformation issues. To test the effectiveness of axle grooves
I spin tested an axle/wheel combination ten times and got an average
of 15.84 seconds. Next I chucked the axle in a drill press and used a
jeweler's file to carefully cut a shallow groove in it. The result
was that the spin test averaged 10.93 seconds, 4.91 seconds slower.
Thinking I'd done something wrong I repeated the test with a
professionally grooved axle (pro speed axle from
Maximum-velocity.com) and found that it too ran slower, averaging
12.87 seconds.
In both cases I observed that the wheel locked into a fixed position immediately after being spun. This suggests that the process of cutting a groove into an axle creates a sharp lip that acts as a guide to control the wheel and in so doing greatly increases drag. To test this hypothesis I polished the pro speed axle for one minute with 6000 emery cloth and then rouge, concentrating on the edges of the groove to remove any burs and soften the edge. Spin tests showed a significant improvement, up from 12.87 seconds to 18.50 seconds. I then polished the plain axle that generated the 15.84 time of the control test. After one minute of polishing with 6000 grit emery followed by rouge it had an average run time of 22.93 seconds.
These tests strongly suggest that contrary to popular belief, axle grooves do not reduce axle/bore drag. In fact they increase it. The following track tests with the Dale Sr. car verify this:
Regular
Shaft .........Pro
Speed Axle Polished as Directed
2.532
seconds............................2.551
2.533........................................2.559
2.534........................................2.540
2.552........................................2.563
2.545........................................2.548
2.537........................................2.574
2.525........................................2.561
2.519........................................2.550
2.527........................................2.541
2.532........................................2.551
2.534 seconds average.................2.549 seconds average
The
pro axles with grooves ran 0.015 seconds slower than regular
axles. This corresponds to finishing 2.3-inches behind a car
with Awana Grand Prix axles without grooves. I can offer no
explanation why so many references claim axle grooves reduce drag and
therefore increase speed while my experiments suggest otherwise.
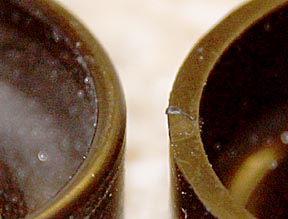
Hub
Coning:
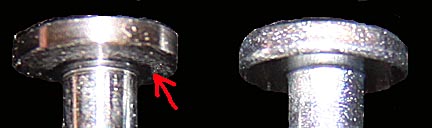
The
coned axle head on the right has had the outside 70-percent of the
head filed so that the
wheel
hub contacts it at a reduced radius. The red arrow indicated the
edge of the cone.
The
axle head in the right is of an unconed axle head.
Filing a cone into the inside head of the axle reduces the radius at which it can rub against the wheel hub. Assuming the force of drag is the same as for a full faced head, then the smaller radius means that there should be less torque to slow the wheel. The problem is that using a file to cut an angle on the inside face of the axle head is very dangerous. It's extremely easy to let the file drift in and score the axle. This would almost certainly result in tearing up the inside surface of the wheel bore and a subsequent loss of speed. To see if the benefit was worth the risk, I tested the same car before and after coning the axle heads.
Flat
Headed Axles . .............Coned
Axles
2.782
seconds............................2.788
2.764........................................2.789
2.777........................................2.763
2.776........................................2.764
2.736........................................2.750
2.747........................................2.731
2.754........................................2.743
2.752........................................2.745
2.789........................................2.751
2.757........................................2.734
2.763 seconds average...............'.2.758 seconds average
The
coned heads provided a 0.005-second advantage. However, considering
that the error associated with changing the axles is 0.004-seconds
it's difficult to say for certain if there is a significant advantage
to axle coning. Considering the risk of scoring the axle and the
requirement to polish the head after filing, I've decided this is not
a procedure I will use. For those wanting to do so, I recommend
wrapping the axle with tape before filing, sanding and polishing to
protect the shaft. If you're using nails, then since you'll be filing
everything anyway you might as well go ahead and cone the heads. It's
not important to polish the angled face of the cone because it never
comes in contact with the wheel hub. But it is necessary to highly
polish the line between the inner flat section of the face and the
start of the cone. Otherwise burs or the sharp edge itself could dig
into the wheel hub face. It takes five minutes to cone an axle head
and polish it. This can be reduced if the coning is accomplished with
axle polishing.
Axle
Straighteners:
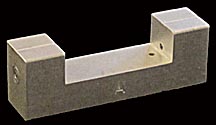
These are two blocks of metal with a groove cut into each face. The axle to be straightened is placed in the groove, the two halves closed and the blocks struck with a hammer. If the grooves are straighter than the axle then the axle should come out straight. I've never used one of these and probably never will. None I've seen states that they are sized for Awana axle diameters, which are different than nail axles. If they were used on an Awana axle it's almost certain that flat spots or grooves would be hammered into the axle.
Wheel Treatments:
Summary:
a.
Avoid wheels with "14" stamped on them.
b.
Wheel mandrels can ruin wheels.
c.
Bore polishing doesn't
reduce drag.
d.
Coating wheel treads with graphite reduces
race times.
e.
Rim smoothing is a must-do operation.
f.
Coning the inner hub doesn't help.
g.
Always turn and polish
wheels, even professionally lathed wheels, if
you have an improved wheel mandrel.
h.
Wheel bore threading increases run times.
i.
If you have a drill press and an improved mandrel, lightly lathing
the outside wheel is a must-do operation.
"14"
Wheels:
Awana
wheels are modeled in sheets with each wheel numbered. Of the over 7
dozen wheels I've examined, those numbered "14" have bores
that are so small that they don't spin on the axles with one
exception, and even it dragged a little. If you're buying wheels and
are able to see the wheel numbers I recommend avoiding 14s.
Beware
of Wheel Mandrels:
Wheel mandrels come in two types: those with flat surfaces that bear against the wheel hub and those with one coned surface.
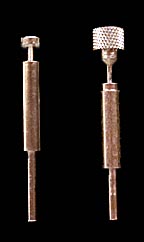
Flat-faced
wheel mandrel on the left, coned mandrel on the right.
Both
can ruin wheels. The problem with the flat type is that they are
loose enough that when a wheel is inserted into them it can end up
off center. While this doesn't affect tread smoothing, any attempt to
make the wheels rounder will almost certainly result in wheels that
are actually more out of round. Flat head mandrels are
useful for smoothing inside rims. Coned mandrels ensure the wheel is
centered but deform the edge of the hub bore by crushing the plastic
and in so doing create a inward facing rim that will make the wheel
run rough. I found it impossible to use a coned mandrel without doing
this. Tightening it enough to hold a wheel always creates enough
force to deform the plastic. Spin test of wheels before and after
using a coned mandrel resulted in a 4.65 second loss. The wheels ran
with a loud rattle that no amount of graphite could eliminate.
A problem with flat faced mandrels is that the two faces are textured. When tightened enough to hold a wheel this texturing gets pressed into the inner and outer wheelhub faces and could cause increased drag.
Wheel
Bore Polishing:
By coating a short length of pipe cleaner chucked into a drill with axle polish and running it through the bore of a wheel several times it's possible to polish the bore. In theory this should reduce drag and help the car run faster. The problem is that the bores of Awana Grand Prix wheels come out of the mold optically smooth. Any attempt to make them smoother could actually make them rougher. To determine if bore polishing helps I conducted the following track tests:
Unpolished
Bore.....................Polished
Bore
2.619
seconds...............................2.603
2.586...........................................2.618
2.599...........................................2.589
2.595...........................................2.599
2.585...........................................2.605
2.599...........................................2.631
2.600...........................................2.606
2.606...........................................2.596
2.631...........................................2.611
2.646...........................................2.625
2.607 seconds average...................'2.608 seconds average
The 0.001-second difference is too small to be significant considering that the error for identical sets of ten runs when axles are removed is 0.004-seconds. Therefore I'm concluding that bore polishing is not an effective investment in time.
Graphiting Wheels:
Coating wheel treads with graphite can reduce run times as much as 0.012 seconds, equivalent to a 2-inch lead at the finish line, as the following test results prove:
Uncoated
Wheel.....................Coated
Wheel
2.528
seconds...............................2.531
2.522...........................................2.509
2.528...........................................2.507
2.540...........................................2.525
2.526...........................................2.526
2.543...........................................2.522
2.532...........................................2.526
2.517...........................................2.501
2.510...........................................2.509
2.528...........................................2.514
2.529 seconds average....................2.517 seconds average
To coat wheels with graphite cover a sheet of paper with graphite and run the car over it several times until all four wheels have an even layer of graphite.
Spin the wheels two times to knock off loose powder that will dirty the track and make the track official give you an angry stare. The positive effect of graphiting wheels lasts a long time and in fact is difficult to remove once applied. An additional advantage is that it reduces the chances the soft plastic used in official Awana Grand Prix wheels picking up grit off the track. Roughening wheel surfaces from picking up debris is a major player in cars getting slower over time.
(I repeated this test two more times with different cars and the reduction in times were 0.002 seconds and 0.004 seconds so graphiting wheels may or may not be as significant advantage as the first test suggested. The older and rougher the wheels are the more this seems to help.)
The
Spin-up Myth:
Many sources claim that a car runs faster after it has been broken in for a dozen races. It's often recommended to use an electric drill to spin wheels to speed the breaking-in process. (In his DVD Physics and the Pinewood Derby, Dr. Acton presents experimental proof that this is not true and that in fact cars slow down the more they are raced. His exploration into this myth is extensive and touches on several other related issues that make it a must-have video.) My experiences suggest that the reason for this gradual slowing is roughening of the wheel tread and plastic from wheel bores becoming stuck to axles.
A similar myth is that graphite needs to get worked into the axle and hub for five races before the car runs its fastest times. An examination of 10 of the tests reported on this page should verify this. Consider the following tests reported earlier on this page and what the times indicate. Note that in each case the car's wheels were graphited before the first run.
Test 1...Test 2....Test 3 .TTest 4....Test 5....Test 6,,,,Test 7...Test 8,,,,Test 9...Test 10,,......,,Averages,
2.542
....2.531.....2.564.....2.544......2.542.....2.528.....2.531.....2.532.....2.551..,..2.528................2.539...
2.569.....2.563.....2.550.....2.528......2.554.....2.522.....2.509.....2.533.....2.559.....2.533................2.542....
2.558.....2.545.....2.537.....2.527......2.539.....2.528.....2.507.....2.534.....2.540.....2.529................2.534..
2.553.....2.557.....2.541.....2.532......2.533.....2.540.....2.525.....2.552.....2.563.....2.540................2.544...
2.564.....2.540.....2.547.....2.546......2.510.....2.526.....2.526.....2.545.....2.548.....2.526................2.538..
2.544.....2.564.....2.516.....2.559......2.535.....2.543.....2.522.....2.537.....2.574.....2.543................2.544..
2.547.....2.541.....2.529.....2.550......2.537.....2.532.....2.526.....2.525.....2.561.....2.532................2.538..
2.550.....2.560.....2.547.....2.570......2.542.....2.517.....2.501.....2.519.....2.550...,.2.517................2.537..
2.553.....2.551.....2.552.....2.561......2.541.....2.510.....2.509.....2.527.....2.541..,..2.510................2.536....
2.542.....2.553.....2.577.....2.551......2.547.....2.528.....2.514.....2.532.....2.551.....2.528................2.542...
........................................................................................................................................2.539 overall average
While
the averages for lines 7, 8 and 9 suggest a pattern of decreasing
run times, the high average time for line 10 and the fact that the
best time was run 3 indicates that this may only be an anomaly. For
myself, I plan on adding graphite to my cars immediately before
racing them. If there really is a breaking in period then you want to
save those runs for when competition is the hardest: the finals.
Early races are easier to get by so you want to save your best times
for the championship run.
Rim
Smoothing:
The
wheel on the right shows an inner rim as it comes from the factory.
Note the sharp edges and molding mark.
The
wheel on the left has been smoothed to remove molding marks and
given a rounded shape
to
help it glide along the guide rail.
As molded, Awana Grand Prix wheels come with rims that have very sharp edges that can snag and drag on the guide rail. By rounding and polishing this rim the wheel can slide along the guide rail more smoothly and in so doing lose less speed. The following test confirms this:
Unsmoothed
Rims . ...........Smoothed
Rims
2.731
seconds............................2.733
2.751........................................2.748
2.743........................................2.743
2.745........................................2.735
2.734........................................2.728
2.788........................................2.735
2.763........................................2.750
2.789........................................2.759
2.764........................................2.756
2.750........................................2.738
2.763
seconds average...............'.2.743
seconds average
The
0.020-second improvement equates to half a car-length lead at the
finish line. It also offers insurance against a track with defects in
the guide rail which could catch on the sharp edge of a wheel without
smoothed rims and flip it off the track. Clearly, rim smoothing is a
must-do operation.
Unfortunately it's not without risks and is a difficult process. I do it by mounting a wheel in a flat-headed mandrel in a drill press so that the rim faces up. The curve is roughed out using 150-grit sand paper. Then it's smoothed and polished using 220 to 6000 papers and rouge. I round both the inside and outside edges. Although it would seem that only the outside needs smoothing, when the car is running straight down the guide rail it's possible for the rim's inside edge to also come in contact with it. Be sure keep the sand paper wet at all times otherwise the wheel could heat up and melt.
The
risk of using a wheel mandrel is that if too much pressure is
applied to the sand paper the wheel may slip. If this happens the
threads on the mandrel's holding screw may score the wheel bore. It
takes five minutes to properly smooth and polish one wheel rim. This
reduces to almost zero if it's accomplished in conjunction with wheel
tread polishing.
Inner
Wheel Hub Coning:
The purpose of rounding or coning the inside hub is to reduce the radius at which it rubs the car's body, thereby reducing the resulting drag torque, and to polish it smoother for the same reason. I'm not a fan of this procedure because I've only measured a marginal improvement in race times. Add to this the difficulty of working this area smoothly (the wheel can't be chucked in a drill press and still permit access to the inner wheel hub) and the risk of sand paper grit getting into the bore and destroying not only the wheel but the axle as well and it is my opinion that this is a procedure with more risks than are justified by the advantages. Besides, if a drill press is used to drill axle holes and the chuck pressed down onto the wood the chuck jaws will polish a smooth cone into the wood, creating the same effect much easier.
Wheel
Turning,
Polishing and Graphiting:
Most references warn against turning wheels at home to make them round because without a lathe you can do more damage that good. That's absolutely true if you attempt it using wheel mandrels and hand-held cutters. But, if you have a drill press, a razor blade and a block of wood I believe the average person can turn a wheel accurately enough to improve run times. Here's how:
"Turning" refers to the process of rotating almost-round objects against a cutting tool to remove the high points and in so doing make the object more circular. In the case of a Awana Grand Prix wheel, or any pinewood derby wheel, removing the high points that make a wheel out of round is like sanding off speed bumps on the track. If the wheel has a high spot, then during every revolution that high spot is going to bump the car up ever so slightly and in so doing slow it down. Because wheel mandrels can hold wheels off center, using one can result in making the wheel more lopsided that it was before turning it. Fortunately, the hub on the inside of the wheel of Awana Grand Prix wheels is long enough for the jaws in a drill press's chuck to grab. Every wheel I've inspected has the bore concentric with the outside of the hub so chucking onto the hub allows the wheel to be properly turned.
To begin, secure the wheel in the drill press by chucking onto the hub. Only use finger tightness. Using a chuck key could tighten the jaws so much that they crush the hub. Next, secure a one-sided razor blade on a block of wood. With the wheel spinning at the press's medium speed, slowly easy the razor blade toward the wheel so that it barely touches it.

Always
make sure that the wheel is turning away from the blade.
If
the blade is pointing into the direction of spin it will jam into
the
wheel, destroy it, and could very likely injure you.
Always
wear protection equipment.
Keep the amount of blade extending out from the block as short as possible or the metal's springiness will cause it to chatter, resulting is a series of closely spaced high and low points much like washboard on a dirt road. (This is also why simply holding the blade in your hand doesn't work.) At first you'll hear the blade "clicking" as it hits only the highest points. Always being safe and careful, experiment with different cutting angles to see which works best for you. As the blade's moved in, it will wear down the high points and the action will become smoother. It usually only takes 20 seconds to turn a wheel. It's not necessary to grind the wheel all the way down, just take off the high points so that when the wheel is stopped you can see a thin zone showing wear all the way around the wheel. This zone may meander across the tire's face, but as long as it's the same radius relative to the bore the wheel will run smoothly.
After turning the wheel, sand and polish it. I found a good starting point is 1000-grit sandpaper followed by 1500, 3600, 4000, 6000, 8000, 12,000 (Always wet the paper so the wheel doesn't melt.) and finally polishing compound on a strip of cloth. It only takes 20 seconds at each stage; figure 3 minutes per wheel.
After that you might want to finish by graphiting the wheels. Some references recommend using plastic polish. I prefer not to because the polish leaves a microscopic layer that could pick up and hold debris. Graphite doesn't seem to do this.
The following track tests show the effect of turning, polishing and graphiting:
Unturned
Wheel.....................Turned
Wheel
2.770
seconds...............................2.741
2.756...........................................2.743
2.744...........................................2.758
2.746...........................................2.723
2.768...........................................2.748
2.765...........................................2.730
2.754...........................................2.752
2.747...........................................2.752
2.756...........................................2.718
2.745...........................................2.751
2.755 seconds average....................2.742 seconds average
The 0.013-second improvement is well worth the work.
Turned
and Polished.....Turned,
Polished and Graphited
2.707
seconds...............................2.695
2.694...........................................2.712
2.741...........................................2.722
2.741...........................................2.719
2.720...........................................2.722
2.716...........................................2.730
2.728...........................................2.722
2.724...........................................2.730
2.719...........................................2.720
2.715...........................................2.700
2.721 seconds average....................2.717 seconds average
Polishing is a clear winner though the 0.004-second advantage from graphiting is just barely enough to recommend it. I suspect that polishing performs the same function of smoothing, which is why adding graphite to polished wheel isn't as effective as it is with rough wheels.
Further experimentation lead me to a product called Novus 2, a liquid fine scratch remover made specifically for plastic. I found it created a much smoother finish than the rouge I had been using. It's so effective that sanding can stop after 3600-grit paper followed by one minute of Novus 2 on a strip of cloth. The resulting tread is beautifully shiny.
Turning increases speed by allowing the wheels to run smoother. Why polishing and graphiting wheel treads helps is more of a mystery. One possibility is that the wheels inevitably move back and forth across the axles. As they do so they must slide on the track. Reducing the coefficient of friction of the wheel-track interface allows them to slide with less drag so they don't use up as much of the car's speed.
Important: Always use a cotton swab to wipe all grit and polishing compound off the inside of the wheel followed by blowing out the inside, outside and in particular the wheel bore before inserting an axle. Grit from the polishing process sticks to the wheel and if it falls into the bore it can score both it and the axle.
An
Improved Wheel Mandrel:
Although the procedure above works, the closeness of the wheel to the chuck makes working on it difficult. The following explains how to modify a flat faced wheel mandrel so that it is suitable for wheel turning:
There are three problems to solve: eliminate the looseness of the threaded shaft the goes through the wheel bore so that the wheel is held exactly on center, prevent the threads from scoring the bore in the event the wheel slips and stop the textured mandrel faces from roughening the inner and outer hub faces. The solution to all three problems is: 1-cent's worth of aluminum tape.
What you need is the cheap foil tape with a paper backing. The better quality tape with the plastic backing is too thick. Begin by cutting a 1/4-inch wide strip of the tape. Wrap this once around the threaded shaft of the mandrel so that there is a slight gap between its top edge and the mandrel's face. Use a razor blade to cut axially down the threads along the end of the beginning of the tape and peel away the extra. You don't want any overlap, just a single even layer. Turn the threaded shaft 180 degrees and repeat so that you have two even layers with no overlaps. Rub the foil down to make good contact, especially near the end away from the mandrel's head so that it's slightly tapered to help ease the wheel onto the shaft. What these two layers of foil do is increase the diameter of the threaded shaft so that there is almost zero clearance between the shaft and wheel bore. This insures that the wheel will be turning on center and also protects the bore from the threads.
The gap at the top is to insure that some of the foil hasn't been pushed onto the mandrel's face creating a fillet that could deform the wheel's bore like a coned mandrel. For the same reason the foil wrapped around the threaded shaft should not extend below the wheel's inner hub face. If it does then when tightened this foil could get bunched up and score the bore wheel the wheel is removed.
Next, use 1/8-inch and 1/4-inch hole cutters to make two foil washers out of the tape and stick them on the mandrel's faces. These will prevent the texturing on the faces from roughening the wheel hub faces.
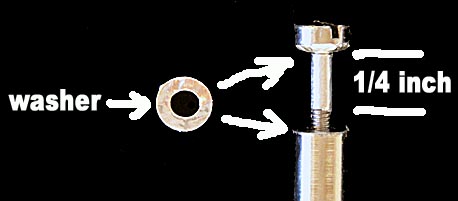
When inserting a wheel, go slowly and gently rotate it to help is slide onto the foil covered threaded shaft. It's supposed to be snug so that the wheel is held on center but not so tight that the wheel bore drags on the foil and jams. Check both aluminum foil washers after every turning to make sure they didn't tear during use.
I've used this improved mandrel many times and it always produces very smooth round wheels.
NEW
FOR 2014!!! Lathing
Wheels at Home:
Using the improved wheel mandrel above enables anyone with a drill press to lathe the outside of the wheel to get it truly round. This can significantly improve run times.
First: screw a piece of iron strapping to a block of wood at a slight downward angle.

Second: use a file or Dremel tool to grind a sharp chisel edge on the top corner.
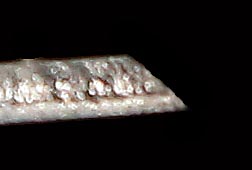
Third: chuck the wheel in the improved mandrel and then the mandrel in the drill press. Securely clamp the wood block holding the tool so that it barely scrapes the surface of the wheel. Adjust the drill press's table as needed so that the tool only cuts a few thousandths of an inch off the outside of the wheel. The goal is not to shave the wheel down to reduce weight and moment of inertia, but to make the wheel perfectly round and centered on the bore.
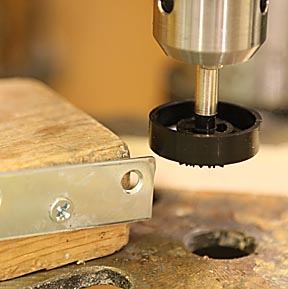
Keep the wheel wet at all times so it doesn't over heat and melt. Lower the wheel very slowly into the tool. Pushing it into the tool too fast will result in the tool jamming on the wheel and the wheel spinning in the mandrel. This could score the wheel bore.
Fourth: sand and polish the tread until glass smooth.
This is well worth the work. The average of ten runs of a car with shaved, sanded and polished wheels was 2.976 seconds. These are the best wheels I can make without lathing. The same car with the same alignment and all other variables the same except that the wheels were replaced with a set that had been lathed as described above averaged 2.937 seconds per run. That 0.039 second difference equates to a 5-inch lead at the finish line. This was such a great improvement I repeated the test comparing a difference set of normal wheels and a new set of home-lathed wheels reduced to 1.155 inches in diameter. This time the improvement was only 0.024 seconds, but that's still an enormous advantage.
I believe the main cause for these reductions in run times is that the wheel is more accurately trued to the bore, allowing the wheel to rotate more smoothly. This explains how these wheels can provide as large an improvement in speed as super-light, commercially lathed wheels. The super-lights have treads that are so thin they tend to go out of round and resist any additional truing.
Another interesting improvement in performance is that the run times for lathed wheels were much more consistent, averaging 0.003 second differences between actual runs and the average run time. Unlathed wheels had a 0.009 second difference.
Again, this isn't lathing like the super-light wheels that have been milled down to almost nothing. All the lathing technique mentioned in this article is intended to do is to make the wheels more round. This is completely legal because it's a variation on sanding or shaving, both of which are condoned by even the strictest of rule sets.
When testing commercially lathed wheels, I noticed that if the wheels rubbed the guide rail, they often emitted a screeching sound because they were thin enough to vibrate. When this happens the cars losses a significant amount of speed. Run times become more inconsistent. Normal wheels and wheels only slightly lathed are stiffer and don't this. When I took the last set of wheels down to 1.155 inches in diameter, they started screeching and producing more erratic run times.
Are
$40
Ultra Light Lathed Wheels Worth It?:
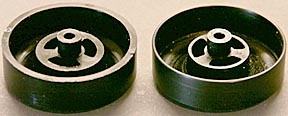
Normal
Awana wheel on the left, lathed wheel on the right.
Note
that the outside diameter of the lathed wheel is still the same.
Ultra Light lathed Awana wheels have had as much material as possible machined away from the inside of the wheel to reduce its mass and moment of inertial. The mass reduction allows more weight to be put in the rear of the car where it can increase speed. Reducing the wheel's moment of initial results in a wheel that doesn't use up as much energy as it spins up. This helps it accelerate faster down the track's starting incline. Lathed wheels are also supposed to be rounder so they run smoother. But... is the $40 price tag worth it?
To answer this question I ran two cars each with and without ultra light lathed wheels. The unlathed wheels were very good with smoothed treads, rounded rims and coated with graphite. The lathed wheel treads were also coated with graphite, Here's what I found:
Car
1 Normal Wheels . ....LatLathed
Wheels
2.746
seconds............................2.685
2.731........................................2.673
2.741........................................2.694
2.729........................................2.689
2.715........................................2.708
2.733........................................2.721
2.744........................................2.720
2.721........................................2.736
2.737........................................2.728
2.733........................................2.670
2.733 seconds average...............'.2.702 seconds average
Car
1 is a good performer. It showed a significant 0.031-second
improvement. This is huge, equating to a 5-inch lead at the finish line.
Car 2 is a high performance car with just about everything optimized for speed.
Car
2 Normal Wheels . ........Lathed
Wheels
2.699
seconds............................2.686
2.697........................................2.693
2.700........................................2.684
2.704........................................2.690
2.707........................................2.694
2.699........................................2.685
2.710........................................2.693
2.708........................................2.695
2.703........................................2.692
2.707........................................2.684
2.703 seconds average...............'.2.690 seconds average
The 0.013-second advantage is still significant enough to recommend using lathed wheels if rules permit them even though it's not as much as with the first car. Subsequent tests on two 3-wheeled cars showed an average improvement of 0.019 seconds.
Lathed wheels only weight 1.0 gram compared to normal Awana Grand Prix wheels, which weight 2.2 grams, so when switching to them be sure to increase the car's weight accordingly.
Lathed wheels also have the tread surfaces sanded smooth and, according to the advertisement, rounded as well. They run down the track with a very smooth, high pitched whine that sounds like speed. They are very flexible so take care not to bend them.
I noticed one serious problem with lathed wheels. Occasionally, when they rubbed against the guide rail they would chatter. I believe this is caused by the flexing of the thin wheels as they slid down the side of the guide rail. I don't hear it as loudly or as often when full thickness wheels are used. A single brief "chatter" was enough to add as much as 0.050 seconds to a run. This is devastating. I'm still researching what causes this and how to prevent it. So far I've discovered that contrary to expectations, smoothing and graphiting the inner wheel rims actually seems to increase the amount of chattering.
The chattering problem not withstanding, lathed wheels can save enough time to make the difference between coming second or first. Considering that a high-end Awana Grand Prix car is going to cost between $10 to $30 depending on whether or not tungsten is used, lathed wheels are going to more than double the price. It boils down the question of how important winning is. That's something everyone must answer for themselves. A major factor on whether or not to use them, if allowed, is the quality of the track's guide rail. If at all possible make test runs on it with the car aligned to run along first the left and then the right side of the rail. If the car chatters consider switching back to conventional wheels.
Close examination of the lathed wheels I got from maximum-velocity.com showed that there was potential for improvement. While the wheel treads were sanded they hadn't been polished, the inner wheel rims hadn't been rounded and polished and I was suspicious that the wheels weren't as round as they could be. I decided to run them through my turning-rounding-polishing procedure to see if their performance could be improved. I would never have attempted this without the modifications made to the wheel mandrel. Here are the results:
Lathed
Wheels . ........Lathed
Wheels With Additional Turning, Rim Rounding and Polishing
2.705
seconds...........................................;...........2.682
2.701...................................................................2.678
2.697...................................................................2.686
2.673...................................................................2.675
2.702...................................................................2.680
2.708...................................................................2.685
2.663...................................................................2.682
2.702...................................................................2.672
2.696...................................................................2.682
2.701...................................................................2.675
2.695 seconds average..........................................'.2.680 seconds average
I was amazed
by the 0.015-second reduction in run time. This is on the same order
of improvement as going from normal wheels to lathed wheels. If you
have a flat-headed wheel mandrel that's been modified to turn wheels
exactly on center then this is a procedure I strongly recommend doing.
Read your race's rules carefully before ordering a set of lathed wheels. Many organizations do not permit them. Some rule sets are ambiguous about this. For example, my grandson's AWANA race only states that the wheels used have to be those in the official AWANA kit but don't say anything about lathing or contouring wheels. One possible way to use lathed wheels and remain legal is to mail the kit wheels to a company that lathes them and request that your wheels be lathed and sent back to you. This way you are getting lathed wheels yet still using the wheels supplied in the kit.
Wheel
Tread Contouring:
Several references recommend reshaping the wheel treads so that only a thin, sharp edge runs on the track. The justification is that reducing the area in contact with the track equates to reducing drag. Awana Grand Prix rules either implicitly or specifically forbid this so I haven't explored it. Considering the softer plastic used in Awana wheels than BSA wheels, doing so may not have a long term advantage even if it works because the thin edge might squash down before the car gets to the finals. Since it would then be running on uneven treads it could start posting embarrassingly long run times.
As with the question of axles grooves, I have serious reservations with the argument that reducing contact area reduces friction.
NEW FOR 2014!!! An extreme example of tread contouring are razor wheels.
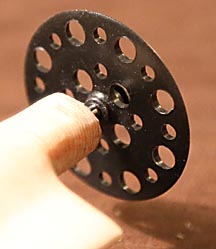
Weighing only 0.8 grams each and having almost no aerodynamic drag they decrease run times by as much as 0.060 seconds. That's a 10 inch lead at the finish line. These wheels cost $20 and don't last very long, but if your rules allow them they can help a car pull ahead of the pack. Note that these usually come with smaller wheel bores and require special, small-diameter axles.
Wheel
Bore Threading:
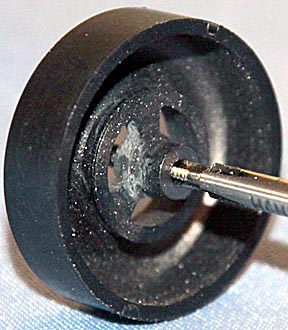
Wheel
bore being threaded
One reference states that threading wheel bores improves speed by decreasing friction and reducing the gap between the axle and bore so that the wheel runs smoother. The reduced friction is supposed to come from reduced contact area and perhaps the threads acting as graphite reservoirs. The reduced wheel chatter comes from the fact that as the bore is threaded, the cutter not only digs valleys into the plastic but pushes plastic up to create hills, which have a smaller inside diameter than the original bore. The only threading tool that fits Awana Grand Prix wheels without making it jam on an axle is a 3-48. Here are the results of testing this concept:
Unthreaded..................
Threaded.................
Threaded
and Pressed Down
2.717
seconds......;.............2.827..................................2.743
2.695................................2.767..................................2.767
2.704................................2.824..................................2.778
2.710................................2.678..................................2.736
2.702................................2.853..................................2.791
2.703................................2.790..................................2.782
2.715................................2.804..................................2.751
2.707................................2.831..................................2.738
2.712................................2.788..................................2.749
2.713................................2.812..................................2.761
2.708 seconds average....'....2.797 seconds average..'........2.760 seconds average
The threaded wheel bores did so poorly that it seems obvious this isn't a technique that works with Awana size wheels and the only threader that fits them. (BSA wheel bores and 4-40 threaders may perform differently.) Thinking that reducing the inside bore diameter might help, I pressed down with one pound of force on first the front and then the rear axles as I rolled the car back and forth ten times. The third list of times show that while this helped, the times are still far greater than the unthreaded wheel bore runs. This does not appear to be a viable speed technique.
Three Wheel Cars:
Summary:
a.
Always run cars on three wheels if rules permit.
b.
Replace
one front wheel with a guide fin if the rules allow it.
Because a car's balance point is so far back, it's easy to drill one front axle hole higher than the other and have the car run straight with just one wheel touching the track. The second front wheel is still needed to guide against its side of the center rail. Because it doesn't touch the track it doesn't create drag,which would slow the car. To test this I completed a control run with a car set up to have all four wheels touching the ground. Then I exchanged the right front wheel with one that had been ground down far enough so that it didn't touch the track. This way the alignment of the car wasn't affected. Here are the results:
Four
Wheels . ....................Three
Wheels
2.727
seconds............................2.718
2.743........................................2.716
2.748........................................2.717
2.733........................................2.727
2.733........................................2.716
2.731........................................2.714
2.729........................................2.713
2.739........................................2.716
2.714........................................2.715
2.731........................................2.719
2.733 seconds average...............'.2.717 seconds average
The 0.016-second improvement makes going to three wheels something you simply must do if the rules permit it.
An interesting result of cars having three wheels is that their run times are always more consistent. This may be because alignment is much easier and therefore more accurate and that there is one wheel less to contact the track and react to its imperfections.
NEW
FOR 2014!!! Guide
Fins:
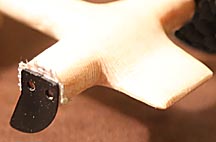
Some clubs have rules that permit cars with only three wheels. If this is allowed, replacing one of the two front wheels with a guide fin will trim an average of 0.018 seconds off a high performance car. That's the same and a 3-inch lead at the end of a race. The reason this is so effective is that the fin weighs practically nothing, meaning the 4 grams of wheel and axle it replaces can be placed back with the main weight increasing the amount of energy available to the car. It also reduces the car's overall moment of inertia as well as improving the aerodynamics.
These fins come with two holes and a pair of small mounting screws. The fin can just as easily be glued on. I mount mine using indoor-outdoor double faced carpet tape and it seems to hold well enough for many races. The fin I got was flat and had sharp edges that could catch on irregularities in the guide rail. I bent the leading edge outward and polished it smooth so that it would skip over any bumps in the guide rail.
Several rule sets I've studied state that the car must have four wheels but do not state that all four must touch the track. The implication is that one wheel could be raised to reduce drag. This rule set creates a loophole that could be exploited. Replace one front wheel with a fin, then fill the replaced wheel with tungsten putty and mount it on the rear of the car as weight. Technically, such a car still has four wheels and the argument could be made that it's legal. However, this ploy does violate the spirit of the rule set. One must ask oneself if it's worth arguing with the race officials to gain this advantage.
Extended Wheel Bases:
Summary:
a. Extending the wheel base may not help run times.
Every source I've referenced suggests using the longest allowable wheel base. The idea is that the further out the front wheels are the less they will have to push on the guide rail to turn the car straight. Less force means less drag.
I was surprised when I ran the same car with a 4.5-inch wheel base and again at the maximum possible wheel base of 5.75-inches and found that the shorter wheel base averaged 0.014 seconds faster that the extended wheel base. Extreme care was taken to maintain the same alignment so I have no explanation why it turned out this way. One possible explanation is that moving the front wheels forward increased the moment of inertia and moved the center of mass far enough forward so that these negative effects overpowered the benefits of extending the wheel base.
I repeated this test with a high performance car designed with a 4.5-inch wheel base and found that this time it ran 0.017 seconds slower than a similar long wheel base car. The main difference appeared to be that the shorter wheel base car tended to wobble from side to side more than the extended base car, in spite of many alignment and center of mass adjustments. For myself, I'll stick with long wheel base cars allowing just enough nose extending in front of the forward wheels to trip the timer and absorb the shock if the track ends in a hard barrier.
Rail Riders:
Summary:
a. Aligning a car to always rub against one side of the guide rail is a risky method of trying to increase speed.
Every time a car turns it loses a little energy and in so doing slows down. The idea behind a rail rider is that if a car's axles are aligned so that it very lightly rides down one side of the guide rail, the speed it loses from the drag of the wheel sliding on the rail is less that what it would lose from swerving. In theory this works: if the wheel rims are highly polished, if the alignment can be adjusted so that one wheel just barely caresses one side of the guide rail, if the guide rail is perfectly smooth and if the joints between the track sections are perfectly in line. That's a lot of ifs.
In the real world few if any of these conditions apply. Here's an example:
Aligned Straight.. Aligned Against the Right Side of the Rail... Aligned Against the Left Side of the Rail
2.746
seconds..............;.............2.729........................................................2.703
2.731........................................2.716........................................................2.708
2.741........................................2.758........................................................2.707
2.729........................................2.753........................................................2.710
2.715........................................2.734........................................................2.699
2.733........................................2.721........................................................2.707
2.744........................................2.754........................................................2.697
2.721........................................2.744........................................................2.704
2.737........................................2.704........................................................2.699
2.733........................................2.734........................................................2.700
2.733 seconds average....'............2.747 seconds average..'..............................2.703 seconds average
When
the car ran along the left side of the guide rail it was faster,
validating the concept. But, when it ran against the right side it
was slower. Either the rail sides are not equally smooth, there are
protrusions that catch the wheel or the car was aligned with too much
pressure on the right side of the rail. What this shows it that to
make a rail rider work you'd need access to the track before the race
to make sure the guide rails are perfectly aligned. Considering that
at most meets the track is strictly off limits prior to the race
makes the likelihood of getting a rail rider tuned to that track very small.
The above comments relate to a normal car aligned to run as a rail rider, which is not optimal. True rail riders are designed and built from the ground up with the rail riding philosophy in mind and have several features which give them a significant speed advantage. My more recent tests verify that the rail rider technique does work. If you'd like a more in-depth study of rail riding, please click on my PINEWOOD DERBY CAR RAIL RIDER TESTS page, which now features a video of my two newest cars.
Hub Huggers:
Summary:
a. Angling axles upward so wheels run against axle hubs may reduce run times.
A hub hugger is a car with axle holes drilled so that the axles are tilted up slightly. This insures that the wheels ride against the axle hub at all times, which is supposed to reduce drag because they never touch the higher drag of the car's body and energy isn't lost driving the wheels back and forth across the axle. Like rail riders, there have been successes and failures with this concept.
I selected one of my fastest cars and drilled a second set of 0.4-degree upward angled axle holes right next to the original straight ones. This car boasts lathed, turned, smoothed rim and polished wheels of the highest quality, beautifully polished axles, perfect alignment, optimum center of mass location and a low moment of inertia. Switching axles from the straight to the angled holes only changes the wheel base shorter by 1/4 inch. Here are the results:
Straight
Axles . ................Hub
Hugging Axles
2.671
seconds............................2.670
2.705........................................2.691
2.693........................................2.683
2.702........................................2.680
2.675........................................2.685
2.688........................................2.682
2.675........................................2.690
2.682........................................2.680
2.687........................................2.679
2.674........................................2.690
2.685 seconds average...............'.2.680 seconds average
The 0.005-second improvement is on the borderline of being inconclusive. But it's large enough to warrant a closer look.
Hub
Hugging - Part Two:
Because the tilt angle has to be very small so that the wheels don't press too hard on the axle hubs, the small imperfections in axle straightness may be large enough to cancel the tilt angle during car alignment. Imagine a car with perfectly aligned axle holes that were tilted up by 1/2-degree. Now imagine that each of the four axles used have slight bends equivalent to 1/2-degree. During alignment the axle bends could end up tilting the axles down by the same amount that the axle holes were tilting them up. The result is that instead of creating a hub hugger we've only succeeded in making a regular straight-axle car.
If this is the case, then there is an easy solution. Aligning a car to run straight only requires that the wheels are straight in the horizontal plane, the plane of the bottom of the car. They can angle up or down but as long as they don't angle toward the front or rear of the car it should roll straight. That being the case, each axle has two positions were it can be aligned: the first one you find and a second 180-degrees the other direction. (This only applies to cars with very accurately drilled holes.) So, after making and aligning a hub hugger car, the next thing to check as it rolls down the alignment board is whether or not the wheels drift outward. If they don't, the axles have been aligned so that their bends cancel the axle hole tilts. If that's the case, rotating the axles 180-degrees should put them in a position were the car is still aligned but now the axle hole tilt and axle bend combine to create a net tilt of something greater than the axle hole tilt.
The car I set up to revisit the hub hugger concept is just such a vehicle. With the axles aligned in one orientation the car rolls straight but the wheels stay where they started. Rotate the axles 180-degrees and the car still rolls straight but the wheels drift out over a five foot roll to gently rest against the axle hubs. As close as I could measure it the tilt angle was 1 degree. Here are the test results from this new car:
Straight
Axles . ................Hub
Hugging Axles
2.713
seconds............................2.704
2.712........................................2.721
2.707........................................2.715
2.715........................................2.700
2.703........................................2.699
2.702........................................2.717
2.710........................................2.723
2.704........................................2.699
2.695........................................2.714
2.717........................................2.705
2.708 seconds average...............'.2.710 seconds average
This time the hub hugger was slower than the non-hub hugger, but again by too small an amount to be inconclusive. For myself this is a speed technique that doesn't show a consistent enough benefit to pursue.
Quick Start Wings:
Summary:
a. They didn't work for me.
Quick start wings are structures that contact the starting pin at the highest legal point: 3 inches. The concept is that since the start pin rotates when released it pulls away faster higher up than down low near the track. In theory this give cars with quick start wings a head start. In reality their effectiveness depends on the relationship between the start pin's rotational speed and the car's acceleration. In some cases it may work, in others it won't. Even if it does most quick start wings are fragile wire structures that can be bent or break in a hard stops. The "wing" is a piece of foil tape and is important because the wire by itself doesn't block enough light for the finish line sensor to react.
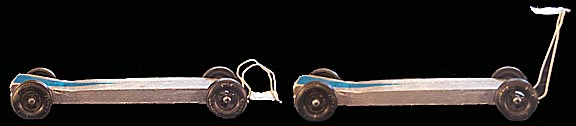
Quick
start wing in the low position............quick
start wing in the high position..
To test this concept I equipped a car with a quick start wing made from wire that could be bent up or down as needed. Great care was taken to insure that when the car was staged against the starting pin that the distance from the starting pin to the center of mass of the car was the same in both configurations. Here are the test results:
Wing
Low . ...........................Wing
High
2.801
seconds............................2.829
2.752........................................2.810
2.738........................................2.813
2.792........................................2.823
2.733........................................2.838
2.790........................................2.834
2.791........................................2.808
2.773........................................2.833
2.768........................................2.837
2.746........................................2.812
2.768 seconds average...............'.2.824 seconds average
The high wing configuration was so much slower than the low wing configuration that this is a technique that I can't recommend. I have no explanation for why some people have reported success with this system except that in those cases the rotational speed of the start pin was so slow that it held up low contact pint cars. This would seem to me to be an unusual situation.
Even if this had worked it would be difficult to use on tracks with hard stops because they'd bend the wing back at the end of the first race. Solid structures would be more durable but would create a center of mass far forward of ideal and a large moment of inertia. Neither of these situations is good as far as run times are concerned.
I suspect the reason such cars win races is lack of competition or that these cars had many other positive design features that were the main reason they won. I must confess I've never witnessed a winning quick start car so I have to qualify my conclusions about them.
To
Bake Or Not To Bake?:
Some references suggest baking the wood body of a car in an oven to drive off moisture and in so doing reduce the body's weight. This weight loss can then by used at the rear end of the car for more driving force and reduce the car's moment of inertia. Sounds logical.... but a few calculations suggest this isn't very effective.
The body of a high performance car should weigh less than an ounce. Take the wheels off and weights for unpainted cars are often 10 grams or less. Assuming the moisture content in the body is 10-percent and it's baked to 5-percent, then the baking has saved only 0.5 grams. It would be much easier to sand this much off the body than baking it for an hour.
Another factor to consider is that during the heating and cooling process it's almost certain that the wood will warp, destroying axle hole alignment.
For me the almost zero gain doesn't justify the risk.
Aerodynamics:
High performance cars like this one:
are the result of balancing the desires for low moments of inertia, center of mass toward the rear of the car and structural soundness. If it looks sleek and smooth that is merely a byproduct of the other more important considerations. Aerodynamically, it may have some problems. The way the body narrows creates sudden drop-offs after the front wheel axles and a second set of leading edges in front of the rear wheels. To see if the shape of this car creates enough air drag to slow it down, I covered the midsection with a paper shroud.
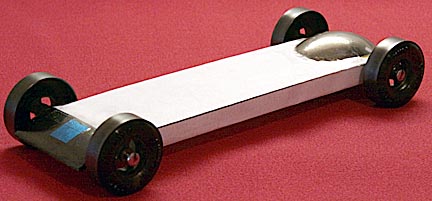
The shroud weighed one gram, which I removed from the car in such a way as to maintain the same center of mass and moment of inertia. The following numbers compare before and after times:
No
Shroud . .........................With
Shroud
2.684
seconds............................2.693
2.686........................................2.690
2.693........................................2.694
2.684........................................2.704
2.690........................................2.697
2.694........................................2.699
2.685........................................2.703
2.693........................................2.698
2.695........................................2.703
2.692........................................2.699
2.690 seconds average...............'.2.698 seconds average
Since the uncertainty between sets of test runs is 0.002 seconds and the 0.008-second time difference is four times greater I'm making the assumption that the difference is valid and indicates that the shrouded body, representing a solid shape, is slower than the more complex unshrouded body. One possible explanation is that while the form drag is less, because the surface area is larger surface drag increased more than form drag decreased. Another possibility is that the open design of the unshrouded body prevented air from being trapped under the car, which could reduce the effective frontal area of the car. The bottom line is that I'm not going to worry about extra leading edges as long as they are as smooth as possible.
Fins:
Kids love fins because it makes their cars look like rockets. The question is: "How much drag does a fin cause?" To answer this I compared the run times of the same car with and without a large central fin with the car's weight adjusted so that the total weight, center of mass and moment of inertia remained unchanged.
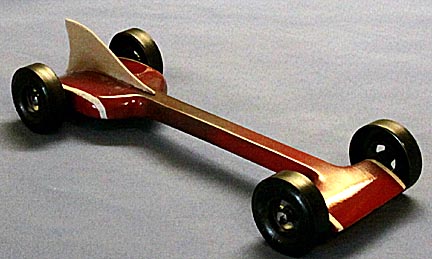
Because I expected the effect of the fin to be small, the number of runs for each configuration was increased from 10 to 20 and a more sophisticated analysis conducted. Skipping the long lists of data points for the sake of brevity, the result was that adding this fin increased run times by only 0.003 seconds. This is so close to the error bar for my tests that it has to be rated as having questionable significance. In other words, if your son or grandson wants a fin let him have it. It won't hurt as long as it's thin and straight. (I actually think it improves the look of this car.)
Domes:
Using the same technique as the fin test, I compared how adding a dome affected run times.
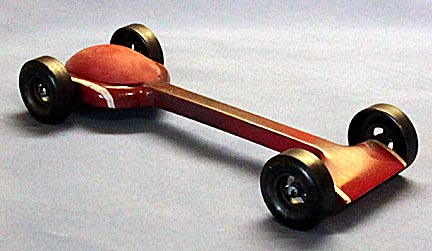
An analysis similar to that used for the fin test indicated that adding the dome actually reduced the average run time by 0.002 seconds. Again, this value is too small to be significant.
Although an absolute number can't be put on the dome test, it does suggest that the effect of a dome is extremely small. This is good news because it means that adding mass in the form of a dome isn't going to hurt run times. Since adding mass this way reduces the amount of wood that has to be carved out of the car body in the area around the rear axles, it means there is less chance of warping the car.
Shock Absorber Cars:
These are cars with flat bodies cut in a zig-zag pattern so that they flex when hitting bumps and therefore should run faster than rigid cars on rough tracks.
I haven't found these cars to be competitive with high performance cars. The main problem is that their solid-body design doesn't permit maximum weight to be located in the rear of the car. I've also never been able to get a really accurate alignment on them to hold. The flexure of the body was so great that it would change the alignment from race to race, particularly if the track's breaking system uses a hard-stop barrier. If a track is so rough that such a car design is needed then a better solution would be to make a new track.
NEW FOR 2014!!! Hollow Body Cars:
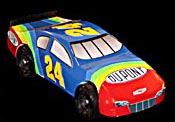
Full body cars like the one above may look good, but so much weight is taken up by the body that there is little left to concentrate near the rear where it generates the most speed. The answer is to hollow out the car's body as much as possible. But this begs the question: Once the body is hollowed out, will it run faster with the hollow left open or covered? To test this I covered the open area of a hollowed car with tape, recorded its average run time, then pulled the tape off and attached it to the inside of the car so that the center of mass, weight and moment of inertia were unchanged. Then I repeated the test.
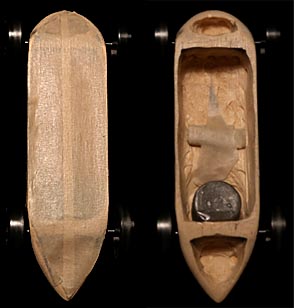
I expected the open car to run slower because of increased turbulence under the car. I was wrong.
The covered ran ran an average of 3.057 seconds. The uncovered car averaged 3.045 seconds. This 0.012 second advantage is enough to convince me to leave the bottoms of my hollowed cars open.
Rules:
The following is a typical set of rules for an Awana Grand Prix race. Every meet will have its own particular set of rules so be sure to get a printed version of them and adhere to them carefully.
1.
Only the wood block, wheels and axles provided in the kit may be used.
2. Maximum length is 7 inches.
3. Maximum width is 2.75 inches.
4. Maximum height is 3 inches.
5. Minimum distance between insides of the wheels is 1.75 inches.
6. Maximum weight is 5 ounces (141 grams.)
7. Wheel bearings, bushings, washers, and springs are prohibited.
8. Starting devices are prohibited. The car must be freewheeling.
9. Minimum clearance between the ground and the bottom of the car is 0.375 inches.
10. The entire car must stage behind the start pin. No part may extend forward beyond the start pin.
11. Cars may be painted, decorated with decals and have various accessories attached for appearance.
12. Wheel treads may be lightly sanded to remove rough spots but the wheels must maintain their original width and diameter.
13. Axles may be placed in newly drilled holes as the overall length of the car is seven inches or less.
14. Dry graphite is the only lubricant permitted.
As I surveyed
many different rule sets, the most important variations I came across
were that some limited the maximum wheel base to 4.5 inches, some
don't limit the lubricant to graphite and some specifically prohibit
wheel tread contouring. For more detailed information and
recommendations about rules, please visit: PINEWOOD
DERBY RULES.
Putting It All Together:
Using everything I've learned in researching this page I made the following car the fastest in our collection:

It uses lathed wheels that I turned, rounded the rims and polished; highly polished axles, primary weighting used tungsten with lead secondary to minimize the moment of inertia, painfully precise alignment and the slickest possible aerodynamic shape topped with a glossy smooth finish. It rides on three wheels and holds the current time record of 2.646 seconds on my admittedly slow track. It screams down the track and looks great doing it. (The faster times listed in certain tests are the result of temporary track adjustments that increased the height of the start line from 44 inches to 48.)
This wasn't an inexpensive car to make, as the following list shows:
Awana
Grand Prix car kit.....'.....$4.00
Lead
weight.......................'..'.$1.00
Paint..................................'..$1.00
Microfine
Emery Cloth.............'.$4.00
Tungsten
disk.......................$20.00
Lathed
Wheels......................$40.00
Total..........................'........$70.00
Additionally, to build this car I had to purchase a drill press ($135.00) a wheel mandrel ($10.00) and invest 100 hours in research as well as 4 hours actually spent making it... and it'll never win a race because there are none for me in which to enter it. Even if I did there's no guarantee that it's fast enough to beat 30 to 50 other cars. Consider these numbers carefully before deciding to build a championship-potential car.
How Fast Do Awana Grand Prix Or Pinewood Derby Cars Go?
Using multi-frame photography I was able to create a single image of a complete race and use the distance the car travels between each exposure to calculate how fast it moves at each point in the race.

The car used is fast, but not championship quality so these speeds would have to be increased slightly to reflect faster cars on a faster track. But, it does give an idea of what the car experiences. By scale, the 12.4 mph maximum speed equates to an average sedan going 297 miles per hour.
At a 2015 pack-level race I recorded the times for the 103 participating cars to see what an average field looks like. The fastest car posted a 3.127 second run time on my new 42-foot aluminum BestTrack set up to league standards. The slowest was 4.581 seconds and the average was 3.340 seconds. Of the 103 cars in the race, only three had times under 3.200 seconds. This reflects the fact that improving the speed of pinewood derby cars is easy at first, but very quickly becomes extremely difficult. If it's assumed that a simple stock car with unpolished axles and wheels puts in the average 3.340 second run times takes an hour to build, then to trim off 0.100 seconds by improving the alignment only adds another hour. But to take off another tenth of a second by optimizing the weight and polishing wheels and axles adds three more hours. Producing a car that crowds 3.000 seconds may take months because of the knowledge that needs to collected and skills that need time to acquire. Sub 3.000-seconds stock cars often take years for someone to be able create.
When Good Cars Go Bad:
In time even the fastest car will slow down. The usual causes are roughening of the wheels, plastic from the wheel bore getting transferred to the axle and alignment thrown off by warping or the car being mishandled.
Rerounding and polishing the wheels will bring them back to life. Likewise, axles can be polished to clean them up and realigned.
Warping is a more insidious problem. This can result in a misalignment that is so severe that even using bent axles won't help. The only thing to do with such a car is put it on display and let it remind you of better days.
Warping can be reduced by always storing the car on a block so that it doesn't rest on its wheels. This also prevents the concentrated load of the rear end from pressing grooves into the plastic of the rear wheel bores.
Warping can also be reduced by carefully selecting the best blocks with very straight grain. An even better solution is to go to a hardware store and buy small pine boards in the hobby area. These were cut a long time ago and have already warped if they are going to do so. Pick out the flattest and take them over to the kitchen display area. Lay them on a flat marble or composite counter, which are both extremely flat, and select the ones that rest perfectly flat. These will be the best of the best and should make good cars. They have also probably been laying around quite a while so they have acclimated to the humidity in your area. Just make sure that using wood that isn't from the car kit is allowed.
But I Was Winning!
Many times one car comes out of the incline a clear leader only to have another, apparently slower car, catch up in mid coast and finally pass it right before the finish line. Some cars fly off the start line. Some zoom ahead at the bottom of the ramp. Others are great coasters. Few cars do all three so leads come and go and victories are often made in the last six inches of a race. Some of the drag factors that slow cars down are speed dependant so cars that seem to slow down a lot at the bottom of the ramp end up making up for it toward the end of the race. There's nothing you can do about it except note where your car does well, where it doesn't and examine winning cars to learn why they are better. Then go home and build an even faster car.
Remember, there's always another day and another race.
How To Build A 32-Foot Track For $20:

I've expanded this topic and moved it to its own page at HOW TO BUILD A PINEWOOD DERBY TRACK. This page also shows how to make a beautiful, 40-foot long, professional quality four-lane track.
Odds and Ends:
Drill
Guide:
It's amazing how often I need to know how much of my axle shaft sticks out of the car or how deep the axles holes are so I make the following little tool out of balsa wood:

I use the wood as a guide to tell me where it's safe to grab the axle in pliers or to chuck it in a drill so the working part of the shaft doesn't get scratched.
Paint
to Win:
A good paint job may not help you win races but the right paint job might. When I attended one Awana Grand Prix meet I was appalled to see one out of every eight cars misaligned on the track by the race stewart. A crooked start can cost a car 0.010 seconds, more than enough the turn a winner into a looser.
To help avoid having your car start a race off-angle, select a paint scheme that helps the stewart align your car centered on the guide rail, like the following:
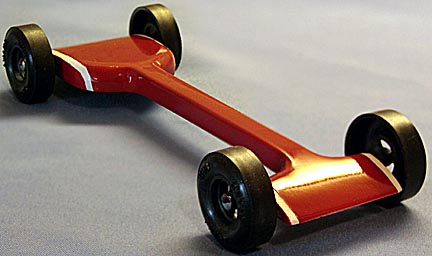
The white stripes contrast sharply with the bright red paint to draw the eye. The stripes are spaced to match the width of the center guide rail.
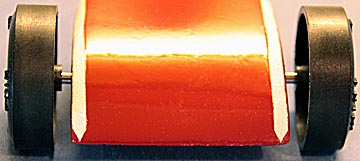
They end in points to further direct the stewart's eyes. In this way the stripes help him get your car properly centered. It works, even if he's not aware that you're manipulating his attention.
Be careful about having the stripes come together to form a single point in the front of the car to the help center the car on the starting post. Some posts are slightly off to one side of the lane. If you can inspect the track before painting your car and the starting posts are well centered, by all means use a paint scheme that helps the stewart center your car on it.
Think about using red as the primary color. When there is uncertainty about which car finished first, judges statistically choose red cars more than any other color.
After observing several races, I've come to the conclusion that a stripe down the center of the car is a more reliable way of getting the car aligned properly on the track than two stripes spaced to fit the guide rail.
Paint
Weight:
I usually prime my cars with two coats of flat white acrylic spray paint followed by two coats of the final color of gloss acrylic spray paint. These four layers add 1 to 1.2 grams to the car depending on how thick each layer is and the car's surface area.
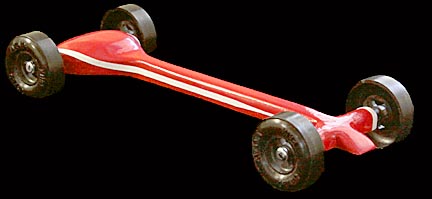
High
performance cars like this one have very little surface area so the
weight of the paint doesn't add up to much.
Solid
bodied cars may realize as much as a 5-gram increase.
Estimating paint weight is useful when fine tuning a car's weight before painting. If you go over you can always drill out a little more wood to keep under the 5-ounce (141.7-gram) limit, but that's not as easy as it sounds in high performance cars because there usually isn't much wood left to drill out. Lead can also be drilled but tungsten can't.
Graphite
Woes:
Few experiences are more heartbreaking than slaving to create a beautiful paint job and have it messed up by stray graphite getting all over it. An easy way to clean the graphite off and polish the car is to place a small amount of Novus 2 fine scratch remover and polish on a clean cloth, use it to rub off the graphite, then buff it shiny.
Build
Multiple Cars:
It's
a frustrating fact that four cars built as identical as possible
will all run at different speeds. I suspect the differences result
from minute variations in alignment and wheel quality. No matter what
the reasons, you can take advantage of it by building several copies
of your best design, testing them against each other and selecting
the fastest for the official race.
Car
Cleaner:
If wrapping cars in tape prior to graphiting their wheels isn't appealing, then a good way to clean graphite off car bodies painted with gloss paint is to rub them with a soft cloth dampened with Novus 2 plastic scratch remover. Not only will it remove graphite stains it'll also give the cars a bright polish.
Bit
Sizes:
Not all 3/32-inch diameter bits drill the same diameter holes. I went through six before I found one that held Awana Grand prix axles firmly yet allows them to be easily inserted and removed. Even in twin packs, one drill would make holes slightly smaller than the other no matter how carefully I chucked them. My recommendation is to buy several brands and see which works best.
Wet
or Dry Sand Paper
for Axles?
I prefer wetting sand papers when polishing axles, particularly the microfine papers because high polishing speeds can heat them enough to melt the backing. I also feel that it results in a smoother finish.
Speed Secrets Hidden In Anomalous Erratic Run Times?
Every once in a while a car will run a ridiculously slow race. If it had been averaging 2.700-second times, all of a sudden it will post a 2.770 time then go right back to averaging 2.700 times. These anomalous data points are easily explained by a car wheel picking up an errant speck of grit or a rogue ant crossing the track at an unfortunate moment. More interesting are the equally anomalous runs where the time is very much shorter, say 2.630-seconds. This isn't so easily explained except possibly that on those runs the car's alignment at the gate was such that it never touched the center guide rail or if it did, it was where the rail was unusually smooth. This feels like a stretch to me and I can't help wondering that if the secret to such fast runs could be discovered it would open up whole new possibilities for increasing car speeds.
Four
for the Price
of Three:
$40 is a lot to pay for a set of lathed Awana Grand Prix wheels. $30 isn't much better but it hurts a little less. The way to get this discount is to run your cars on three wheels and use a regular wheel for the one that's off the ground. That means you're only using three out of every set of four wheels so if you get three sets that leaves three left over wheels: four wheel sets for the price of three!
Are
These Toys?
Yes and no. Pinewood race cars are intended to be fun so they are primarily toys. Yet when someone invests $80 or more to build a top performer it starts to seem something more. Regular cars will seldom if ever win races so they can be rolled across the floor and played with and get broken like any other toy and little is lost. High end racers demand care so it might be best to keep them away from younger children.
Race
Day:
Prior to the race get a printed set of rules and make sure that these are verbatim the rules that will be followed during inspection. Make sure your car takes maximum advantage of them without breaking them. If there is ambiguity in interpreting some of the rules you might want to consider bringing several cars, each optimized for different interpretations.
Just before turning your car in for inspection give it one last graphite treatment and double check the alignment. Always weight your car just under the 141.7 gram limit, then add easily removable weighs that bring it up to 143 grams in small increments. Remove the least amount possible to get the car approved. In the real world the rule isn't that the car must weight 5 or less ounces, it's that it must be judged to weigh 5 or less ounces. Scales vary. Yours may indicate weights higher or lower than the judge's. Either way you want to make sure your car weighs the absolute maximum "according to the entry judge." If his scale is running on the low side then other overweight cars are going to get passed and if you're right at 5 ounces compared to them you're going to be light and at a disadvantage. Equally so, if the judge's scale is reading a little heavy then you need to be able to pull more weight off your car without having to resort to pulling out a knife and whittling away at it. If there's a pre-race weigh-in using the same scale by all means take advantage of it to see which side of 141.7 grams that scale leans.
Always transport your car in a box that's padded well enough so that if it gets dropped it won't hurt the car. Bring a repair kit with extra wheels, shafts, quick-set epoxy, foil tape, graphite and trimming weights. You never know what's going to happen at a race so it's best to be prepared.
Check in after most of the other cars have been inspected and give them a good look. If the inspector is allowing lathed or even narrowed wheels, replace the standard wheels on your car with higher performance wheels. Or, start with them and be prepared to replace them should the official disallow them. Either way, if you change wheels be sure you have some way to check the alignment.
Final
Comment:
Building Awana Grand Prix or any of the other pinecar racers is fun and satisfying for anyone at any age. I've thoroughly enjoyed putting this page together and hope that you found it interesting. I wish you all good racing!
2011 RACE RESULTS!!!
Theory is great, but that doesn't always translate to victory. I'm happy to report that my grandson's, Joshua's, car won 17 out of 17 heats beating 41 cars to take the grand championship trophy in the Lancaster, CA, Spring AWANA race.
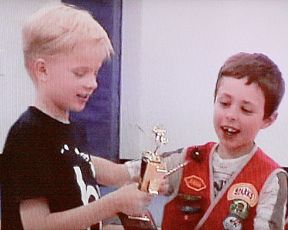
His car crossed the finish line an average of 16 inches ahead of the rest of the cars and in the finals finished an average of 8 inches ahead of the second place car. I feel this validates the techniques recommended on this page.
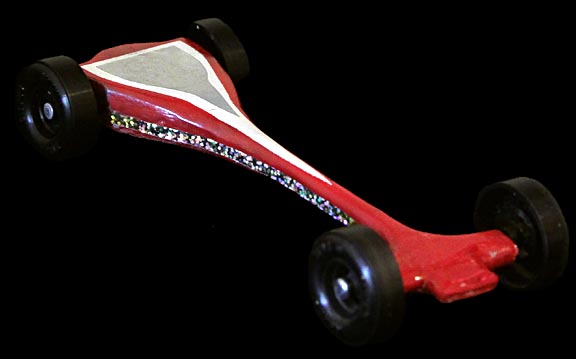
Joshua's
championship car: Red Racer. This car wasn't completely
optimized because it had all four wheels in contact
with
the track. This is proof that you don't have to have everything
perfect to win.
One problem he had to resolve was wanting to use lathed wheels while staying within the rules that require cars to be built using only the parts that come with the official kit. His solution was to mail the wheels that came in his kit to a man who lathes wheels, have them turned and then mailed back. This added a month to the construction process but he felt it was worth the wait.
An important note is that while his car won every heat, in all fairness there were only two other high-performance cars in the competition: a silver, sword-shaped car that placed second in the boy's competition and an open-body design that won the girl's competition and came in second to Joshua's car in the combined, over-all winner races. In district or national level competitions his car would most likely be just an average competitor. On the other hand, in the second race Joshua's car had its front bumper broken off while colliding with a pile of bean bags used to stop the cars. This threw its balance off, reduced the car's weight and probably knocked off the front wheel alignment, all of which are speed killers. It would have been great to see how it would have done if it had been undamaged.
2012 RACE RESULTS!!!
In 2012 Joshua passed the AWANA racing tradition off to his two cousins: James and Daniel. Following the concepts on this page they built cars that both won first place trophies in their respective age classes.

James'
winning car, Dale Sr.,
was
the same car pictured earlier. It was modified for the race by
hollowing
out the body and moving that weight back toward the rear. Daniel's
winning car
was
a more conventional wedge.
2013 RACE RESULTS!!!
2013 was another winning year for the grandchildren. James won again for the older children.
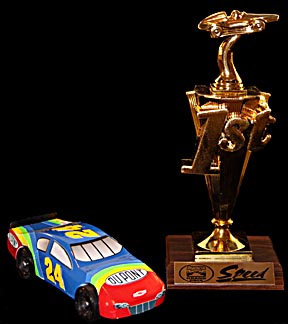
He's a great fan of Jeff Gordon, a NASCAR driver, and built his car to look like one of Jeff's early cars called the Rainbow Warrior. While the body shape is far from ideal, by hollowing out most of the inside, concentrating the weight near the back wheels, using the best wheels and axles possible, making sure the alignment was perfect and using lots of graphite this car managed to win 17 heats, tie one and lost just one to become his age group's grand champion. Although he defeated 29 other cars, most of the races were very close. This car did very well, though it wouldn't stand a chance against one with a better body shape.
His younger sister, Abigail, defeated 48 cars to win grand champion in her class.
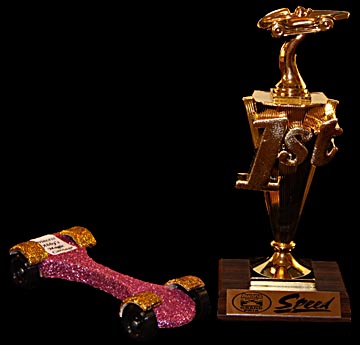
The design she chose was closer to ideal, with the exception of the fenders. In spite of the drag created by them, her car won every heat with room to spare. In the final race she led the second fastest car by a full car length. She wanted her car covered with glitter. This created the problem of specks falling off and fouling the track. The solution was to overcoat the glitter with a clear gloss spray. The name of her car was Princess Abby's Magic Carriage.

A
few of the trophies the grandchildren have collected in three years.
The cars that didn't get first place
were
designs the grandchildren liked because of their appearance rather
than speed.
MY FAVORITE CAR:
I found a pinewood block that had perfect grain so I decided to build what I hoped would be the best car ever. I succeeded, both by doing everything on this page and one new trick. Using digital calipers to measure the width of the block where the front and rear axle holes were to be drilled I discovered that the front was 0.003 inch narrower than the rear. This would have created and toe-in effect, similar to a skier snowplowing down a hill with his ski tips pointed inward. The car might have rolled perfectly straight but the plowing effect would increase drag. By placing a layer of scotch tape along the front, outside edges of the block I was assured that when the holes were drilled they would be more parallel. It's impossible to say if this was a major factor or not, but the car ended up blowing away every other car I've made. I rather like the paint design, too.

My Star Wars fan grandson Joshua likes calling it "Dark Jedi." James is more into judo and prefers "Ninja Racer."
2014 CHALLENGE OF CHAMPIONS!!!
Emboldened by their many victories, my grandchildren decided to challenge my cars to a race to see how their best cars stacked up against mine. The following video shows the results:
Building pinewood derby cars is a lot of fun and very satisfying. If you haven't tried it yet, please do. Even if you never compete I'm sure you'll find it well worth the effort.
Are Dr. Scott Acton's Cars Really Faster?
In 2008 Dr. Scott Acton, a physicist at Bell Labs, released a DVD in which he provides plans for cars like the ones he helped his son build to win multiple district-level pinewood derby competitions. The DVD explains the importance of building cars with very low moments of inertia and the use of set screws to enable accurate adjustment of each wheel so that it tracks in the middle of the axle without touching either the axle hub or the sides of the car. Seven years have passed since the DVD was released and many advances have occurred in the world of pinewood derby racing. In particular: tungsten has replaced lead in most high-end competitions and body design has significantly advanced. For example, Dr. Acton's bodies weigh around 29 grams without wheels. Today's pinewood derby bodies can be as low as 10 grams. Primary weighting using tungsten imbedded in the body of the car not only reduces aerodynamic drag and moments of inertia, but also lowers the center of mass for greater stability over his design, which used a roughly molded lead weight glued to the top of the car's body. Using every speed technique discovered on-line and on this page as well as everything recommended in Dr. Acton's DVD, I built an updated version of Dr. Acton's car.
On my 40-foot long vinyl coated track this car recorded times of 2.969, 2.979 and 2.973 seconds for an average of 2.974 seconds. These are very fast times on my track and would have been fast enough to walk away with the last championship race I hosted with a field of 76 cars.
However, as fast as this is, a top performing pinewood derby car such as Dark Jedi regularly records times under 2.935 seconds. The reason it's faster is that the nature of an Acton racer limits how much the moment of inertia and body mass can be reduced. These factors enable a perfectly aligned conventional car like Dark Jedi to outrace Acton-type cars.
Even if Acton cars were faster, the extreme difficulty on making and aligning one means that the average builder is probably going to have to build several to get one that works. The biggest problems are the wood splitting when the set screws are screwed into it and the set screws stripping out the threads in the soft pine when adjusting the alignment.
For myself, as much as I admire Dr. Acton's work and consider his DVD must-see viewing for anyone interested in Pinewood derby racing, I believe modern cars can be competitive with and victorious over his.
Treadmill Tuning: Is It Really Better Than Inclined Boards?
In 2014 I began seeing a lot of Youtube videos extolling the virtues of tuning or aligning pinewood derby cars on exercise treadmills. After several experiments, and even building a small battery powered treadmill specifically for pinewood derby cars, I came to the following conclusions:
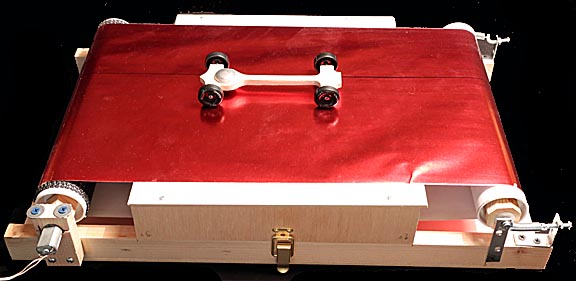
A battery powered treadmill with the Acton car on it.
1.
If an exercise treadmill is used, it must be new or little used so
that the belt is perfectly flat. The reason is that after use the
rubber belt becomes stretched and forms up-and-down curves that make
alignment impossible.
2. The high-friction rubber surface is completely different than the very smooth surface of a pinewood derby track. This, combined with the texturing applied to the belts, means that the car's wheels will not slide easily on it as they can on a real track.
3. Some treadmill have non-symmetric texturing that will drive a car left or right even when it's perfectly aligned.
4. If you're aligning a three wheeled car, the point where the string attaches to the front of the car has to be positioned slightly toward the front dominant wheel. The reason is that the drag of this wheel is not balanced by the drag of the wheel on the opposite side. This one-sided drag induces a torque that will turn the car toward the dominant wheel. The amount of offset must be determined by measuring the weight on each wheel in contact with the track, assuming drag is a direct function of it and offset the attachment point proportionally to correct for it.
5. Typical pinewood derby heats last 3 seconds. Treadmill tuning sessions can last an hour. It's very easy for the graphite to burn off in just a few minutes and then the axles can score the wheel bores.
To
eliminate some of these problems I built a small battery powered
treadmill with a slick surface. It worked much better than an
exercise treadmill and could be placed on any table for convenient
use. After using it to align several cars both as straight runners
and rail riders I discovered that when runs times were compared, cars
aligned using an inclined board ran faster on average than those
aligned using treadmills.
Treadmill tuning is fun, but I believe the old fashioned technique of using an inclined board works better.
The best technique of all is to have your own track and after a rough alignment on an inclined board, fine tune the alignment on the track. Cars aligned perfectly straight on a board may still tend to run slightly left or right over the much greater length of a track. Fine adjustments on an actual track can easily trim 0.010 seconds off an already fast car. Good tracks with timers are expensive but are the most effective tools possible for producing top performing cars. And Oh yes... they're a lot of fun too.
My Newest Car!!!
![]()
Sources Consulted:
1.
Physics and the Pinewood Derby (DVD)
by Dr. Scott Acton, www.pinewoodphysics.com.
Note:
On 6 May 2014 I attempted
to order another DVD from Dr. Acton through Amazon and never
received it. He failed to respond to three emails to find out what
happened to the order. This suggests that he is no longer interested
in marketing this DVD.
2. Pinewood Derby Speed Secrets (book) by David Meade
3. http://www.pinewoodpro.com/pinewood-derby-howto-speed.htm
4. http://www.wikihow.com/Make-a-Pinewood-Derby-Racing-Car
5. http://home.simplyweb.net/bosworth/howto.htm
6. http://pwd100.tripod.com/
7. http://boyslife.org/hobbies-projects/projects/2952/speed-secrets/
8. http://www.rahul.net/mcgrew/derby/speed.html
9. http://www.lastufka.net/lab/cars/html/index.htm
10. http://www.ehow.com/how_4535423_build-fast-pinewood-derby-car.html
11. http://www.three-peaks.net/pinecar.htm
12. http://www.maximumvelocity.com/qa.htm
13. http://www.scoutorama.com/derby/
14. http://www.malaysiaminilover.com/pinewood-derby-cars
15. http://www.goaskgrandpa.com/flex.htm
16. http://www.boyscouttrail.com/library/pinewood-derby.asp
17. http://www.pinewoodderby.us/lubrication.htm (Interesting PDF about super lubrication)
18. http://shapenrace.net/gofast!.html
19. http://en.wikibooks.org/wiki/How_To_Build_a_Pinewood_Derby_Car/Physics
20. http://www.steveweb.net/Building_a_Fast_Pinewood_Derby_Car.htm
21. The 12 Most Important Speed Tips From The Pros (PDF book from http://www.derbymonkeygarage.com/)
22. 23 lectures on PinewoodDerbyPhysics.com
23. How To Win A Pinewood Car Derby (book) by Thomas L. Pedigo
24. Winning Pinewood Derby Secrets (book) by Joe and Steven Garguilo (Although this book contains a lot of useful information, it is mainly an advertising device for pinewoodpro.com. There very few pages that don't recommend purchasing something from them.)
25. Maximum Velocity (book) by Randy Davis
26. Pinewood Winning By The Rules (book) by Phil Reinke
27. Pinewood Derby Handbook (book) by scoutprama.com
28. Dominate By Design (book) by Darryl Huntley
To browse over 100 other topics on my main page please click on: Return to home page: