Introduction:
The following are just a few of the speed trophies my grandchildren have won using the techniques on this page:

The cars that didn't get first place were designs the grandchildren liked because of their appearance rather than speed.
This page focuses on the nuts and bolts of making a fast pinewood derby car. For more detailed discussions of the physics behind these techniques, please visit: AWANA GRAND PRIX RACE CARS. Don't let the AWANA title put you off. The techniques on that page apply equally to all pinewood derby type car including Boy Scouts of America venues.
Speed techniques are largely determined by what rules are followed for any particular race. For this page, the rule set that will be used are those from my PINEWOOD DERBY RULES page. The most important rules are that the car must have four, unlightened wheels of which only three need to be in contact with the track. Also, that the car must be built using only the materials that came in the car's kit with the exception of adding weights. This rule precludes a competitor "buying" a win by simply purchasing premade bodies and high-tech wheels and axles that provide an unfair advantage over other children who play by the rules. Many of these professionally made parts are illegal in most competitions, but so stealthily made that judges have a difficult time spotting them. The goal of this page is to show how to build a winning car from scratch and in so doing bestow on the builder a justly earned sense of pride and accomplishment.
While there are many different classes of pinewood derby cars, mostly determined by how many wheels the car can have and how much they can be modified, there are only two main types: straight runners and rail riders.
Straight runners are cars designed to travel down the track as straight as possible, touching the guide rail only occasionally. Rail riders are specifically designed to slide down one side of the guide rail. The idea is that the small amount of constant friction by so doing slows the cars less than the energy lost as a straight runner swerves back and forth. The rail rider concept has been well proven and most national champions follow this philosophy. But, the glaring problem with rail riders is that they have to race on tracks that are maintained by people who understand cars, tracks, and how the two work together. Unfortunately, most pack-level pinewood derby races use tracks that aren't that good. The problem is that if there is a transition from one section of track to the next that have guide rails that are slightly out of alignment, then when a rail riding car hits that bump the car's wheel can be nicked, the car's alignment thrown off, the impact will slow the car and may even eject it from the race. I have seen rail riders completely destroyed when this happens. Since this page is intended for helping someone win a pack-level competition, it will present techniques for making a straight running car, which is not as vulnerable to the problems associated with less than perfect tracks.
(As a clarification: rail riders are not just straight running cars that have been aligned to run against one side of the guide rail. They incorporate several unique design features that are markedly different from their straight running brethren.)
Building fast pinewood derby cars is a precision operation that requires at least one piece of power equipment: a drill press. Band saws, saber saws and scroll saws are nice to have but can be done without, but it's hard to imagine building a good car without a drill press.
Even if you aren't a competitor, building pinewood derby cars is an interesting, satisfying hobby that anyone of any age can enjoy. So, without further delay let's get to building!

Physics determines the car's shape. You want as much wood removed as possible so that as much weight as possible can be concentrated one inch in front of the rear axles. Doing so puts the greatest amount of weight high up on the track's starting point so that the car has the maximum amount of potential energy to turn into speed. But, you don't want the weight too far back or the car will be unstable and swerve so often as it runs down the track that it looses speed. The body shape that accomplishes this the best is the central rail design. The diameter of the central rail is 3/8ths of an inch. Less than this and warping and breakage become problematic.
Another advantage of the central rail design is that is prevents air from being trapped under the body of a full width car, which can slow it down.

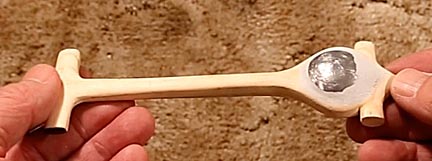
Besides locating the main weight toward the rear of the car, you also want it to be as concentrated in as small an area as possible to reduce the mass moment of inertia, or how hard the car is to turn. Consider a barbell with weights far out toward the ends. It's going to be harder to turn than one with the weights close to the center. The same applies to pinewood derby cars. If the weight is distributed all over the body, then its moment of inertia will be high and when it swerves, it will push harder against the guide rail and do so longer than a car with a concentrated weight that has a smaller moment of inertia. The best way to minimize the moment of inertia is to use a tungsten disk.
Tungsten is much denser than lead so more weight can be packed into a smaller volume. These disks are available at most pinewood derby supply companies. While they cost $20.00, they are well worth it. Lead disks can be used, by they have to be larger in diameter, which increases the moment of inertia, or taller, which increases aerodynamic drag. Another advantage of using tungsten disks is that their smaller diameter permits a smaller body to be used.
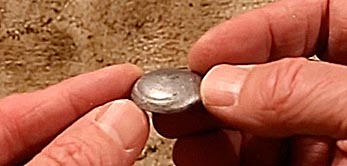
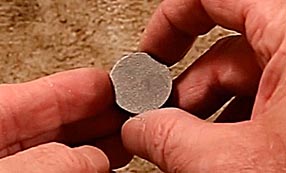
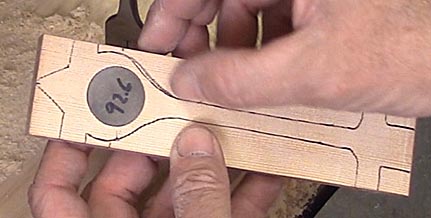
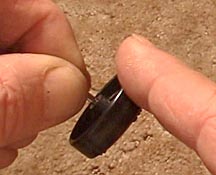
Tungsten disks average 92.5 grams, 28 grams too light for our car. The best way to provide the additional 28 grams is a one inch diameter lead dome. Making one requires melting and moulding lead, which carried with it the very real dangers of fire, burns and lead poisoning. It should only be attempted with knowledgeable, adult supervision and with the proper safety equipment. Another problem with making a lead dome is that because lead has very high surface tension, when poured into a mould it forms a meniscus that has to be ground down, which is very dangerous, or filled in with a lot of putty after it's glued onto the car. My solution was to use the end of a dowel to tamp down the lead while it was still liquid so that a flat bottom was created on the bottom of the dome.
The image above used a already made dome for demonstration. In real life the mold would not be hand held but secured on a level surface. If wood is used for the mold, the first few pours will produces domes with craters formed by escaping air and water vapor.
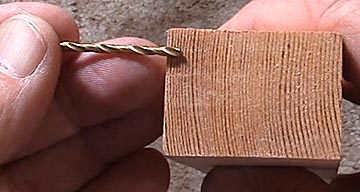
A fast pinewood derby car starts with a good block of wood. Unfortunately these are few and far between. Most blocks look like the following:
The grain lines are at an angle to the side of the car. When you try to drill an axle hole, the harder wood in the grain line will bend and push the drill bit off at an angle, making alignment more difficult. Additionally, the wide spacing between the grain lines indicate this piece of wood was formed while the tree was growing very fast. Because of this it is weaker and much more prone to warping.
The following is an example of a great block of wood:
Note how the grains are much closer together and almost perpendicular to the direction of the drill. It won't be deflected and the harder, tighter grain structure means this block will produce a stronger car with less warpage. Drilling straight holes is important because it helps with car alignment. The axle grooves cut in most blocks are woefully out of alignment, forcing car makers to use bent axles to get the car to role straight. When buying blocks or kits, be sure to examine the blocks in them and select the best.
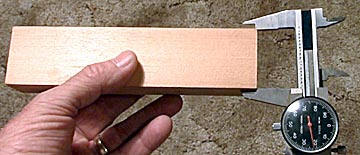
Another problem with blocks is that they are often cut with a taper. Measure the width at both ends. If one is smaller than the other then the block actually has a wedge shape. Drilling axle holes in such a block results in the wheels on one side pointing slightly toward the wheels on the other side. Like a skier snow plowing down the side of a hill, the car may run straight but the wheels will be pushing against each other and thereby slow the car. If your block has a taper, use tape on each side of the narrow end to widen it to equal the other end. Then when the block is placed on the drilling jig the axle holes will be drilled parallel to each other.
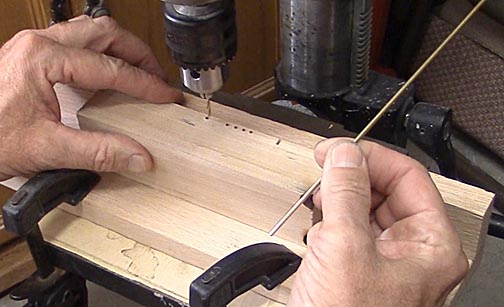
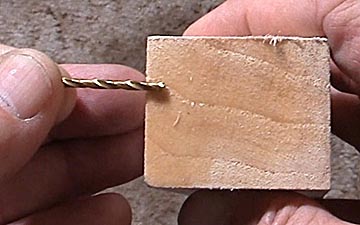
I used a jig on a drill press to make sure the bit drills perpendicular to the sides of the block. Several test holes are drilled in a practice block and checked with a very straight brass rod to make sure they are correct. A good right angle plastic is used to check the angle between the side of the block and the rod while a straight edge is used to check the angle between the bottom of the block and the rod. Getting the drill press and jig aligned can take some time, but the results are well worth it.
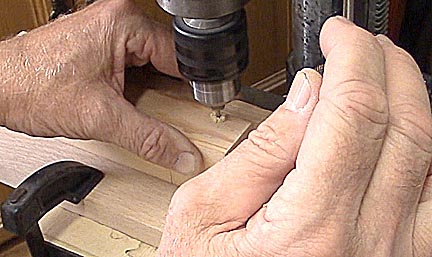
Once the jig is aligned, proceed to drill the axle holes. Drill slowly so that any angled grain lines have less of a chance to deflect the bit. It usually takes me 30 seconds to drill a single hole. I prefer drilling the holes, which are 3/4 inch from each end, before cutting the block so there is as much wood as possible to push against the jig. Placing the wheels as far apart as possible increases the lever arm effect as the rub against the guide rail so that they don't rub as hard as short wheel base cars. Be sure your pack's rules allow for extended wheel bases before drilling axle holes.
Using the tungsten disk as a guide, draw a line to mark the car's thickness.
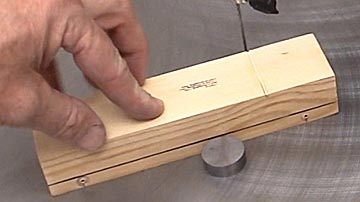
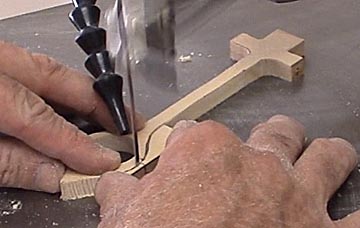
Cut the block slightly thicker than indicated by the line. You can always sand off extra wood, you can't add it back on. Band saws are to best way to do this, though this image shows me doing it with a scroll saw. The block can be cut by hand, but it requires a vice and patience. Many packs will hold a construction day where people will volunteer to bring in power saws for cutting the blocks. If you don't have a power saw this might be a good alternative.
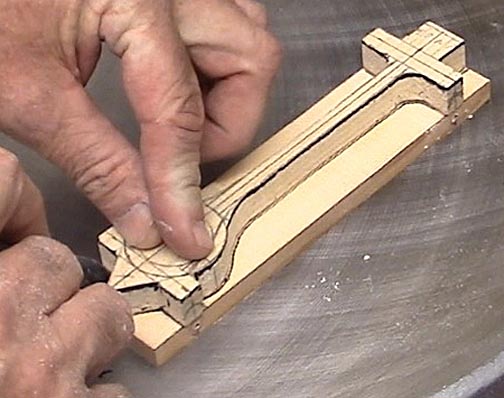
Since all my high performance cars are the same shape, I made a template, which is used to trace out the basic design. Anyone wishing to make this car may copy the following dimensioned drawing:

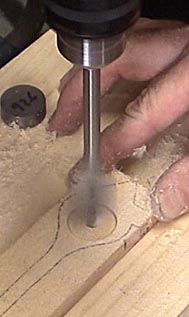
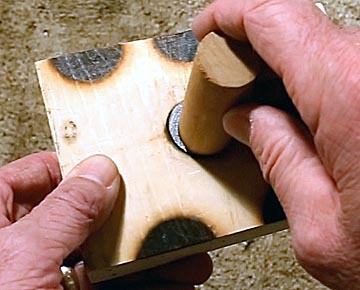
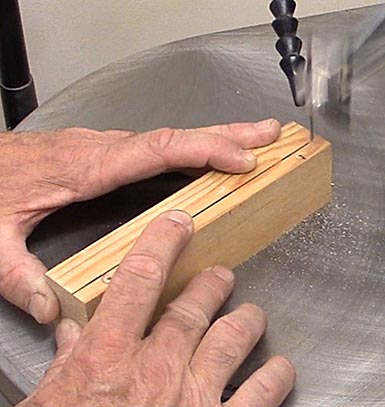
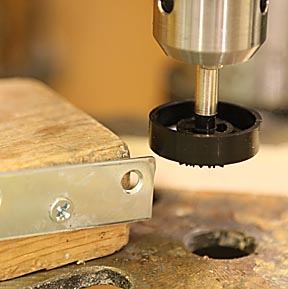
Using clamps and a one inch paddle bit, drill the hole for the tungsten disk. Forstner bits cut smoother, but cost ten times as much. The center for the hole is one inch in front of the rear axles. This hole is cut before cutting out the body so that the piece of wood is strong enough to withstand vibrations from the paddle bit.
If all goes well the disc should slip in snugly. It shouldn't be too tight or it could deform the car's body. If it is, a light sanding around the inside should solve the problem.
Cut out the car's body. Scroll saws are best for this but narrow bladed band saws and coping saws also work well.
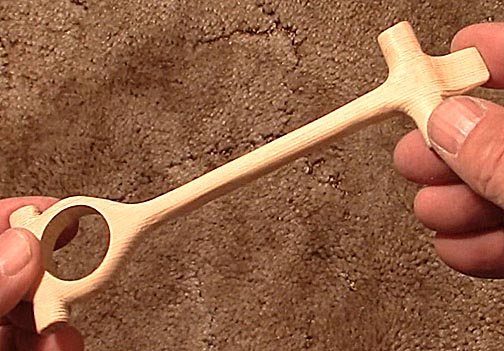
After cutting it out, I use a belt sander to put an downward angle to the central rail so that the thickness across the front axle is 1/4 inch and create a sharper taper for the nose. Many people use Dremel tools at this point to refine the shape, but I found they can work too well and create gouges. Instead I use files, which are slower but provide much better control. After that all that's needed is smoothing with 220 grit sandpaper. The original block started off weighing 151 grams. What remains is only 10 grams. That lost weight can be placed toward the rear of the car where it'll help it go faster than a car with a heavier body.
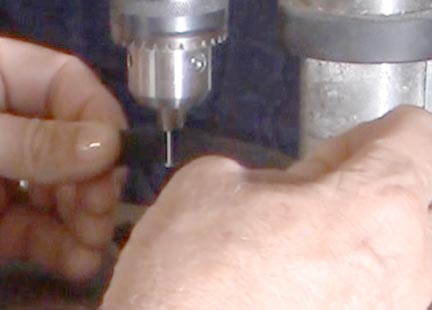
Now that the body's almost done, it's time to start working on the axles. Highly polished axles are a must for the fastest pinewood derby cars because they reduce speed-killing friction.
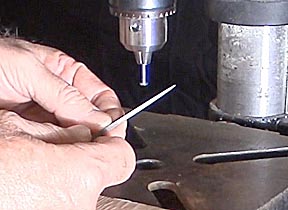
Chuck the axle in a drill press. Don't tighten it to much ore the jaws my press grooves in it, whose edges could cut the wheel bore when it slid onto the axle. Using a file, grind down any burrs on the nail being careful not to grind below the surface of the nail. This step isn't necessary if AWANA-style hinge pin axles are allowed.
Follow filing with wet sanding using 3200, 3600, 4000, 6000, 8000 and 12,000 Micromesh strips 1/2 inch wide and three inches long. Always keeps the strips wet and moving to prevent friction from burning them. Spend one minute on each grit. Follow that with two minutes polishing with a woven cotton strip impregnated with an axle polish. I use Monkey Jam, but there are many equally effective options. Even toothpaste works well. During all of these steps, make sure you move the sanding/polishing strips down over the head of the nail to create a slight bevel, or cone, and to polish it.
Like the axles, pinewood derby car wheels also benefit from polishing. To do so the most important requirement is to find a way to hold onto them. Usually this means a wheel mandrel, a tool that threads through the wheel bore and tightens down to hold the wheel so it can be chucked into a drill press or hand drill. There are two basic types:
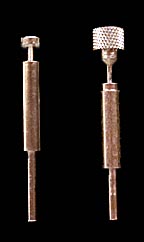
Flat-faced
wheel mandrel on the left, coned mandrel on the right.
I can't recommend the cone type mandrel because if it's tightened down enough to hold the wheel it has always crushed the corners of the wheel bore on my cars. This creates a ridge that can bind on the axle. The flat-headed type has the problem that the threaded pin that fits through the wheel bore is enough smaller in diameter that considerable play is introduced. This creates the potential for the wheel to end up being chucked off center. However, this problem is easily fixed.
Place a single, non-overlapping layer of aluminum foil tape around the top 1/4 inch of the threads. It acts like a bushing that holds the wheel exactly on center.
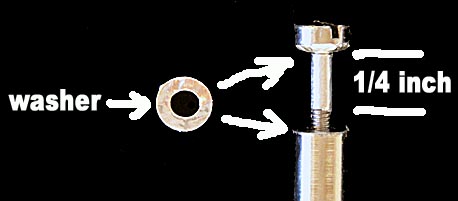
This also protects the wheel bore in the event the mandrel isn't tightened enough and the wheel spins on it. With a normal mandrel the pin's threads could score the inner bore. I also make two aluminum foil washers to prevent the mandrel's two faces from roughing up the bore's outer two faces. Using a wheel mandrel so improved enables anyone with a drill press to lathe the outside of the wheel to get it truly round. This can significantly improve run times.
During the moulding and cooling process, it's common for the outside diameter of the wheel that contacts the track to develop high and low zones. Left as is, these bumps cause the car to by knocked up and down with every rotation, greatly reducing its speed. The first step to improving the wheel is to remove these bumps by "truing" the wheel. This process also ensures that the outer rim is perfectly concentric with the wheel's bore. To do this we need to turn the wheel as if it were on a lathe. Once again a drill press is required as well as a cutting tool.
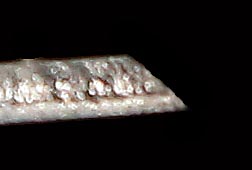
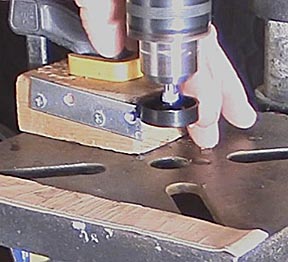
To make the tool, screw a piece of iron strapping to a block of wood at a slight downward angle.

Next, use a file or Dremel tool to grind a sharp chisel edge on the top corner.
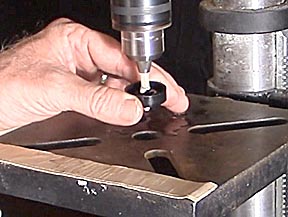
Finally, chuck the wheel in the improved mandrel and then the mandrel in the drill press. Securely clamp the wood block holding the tool so that it barely scrapes the surface of the wheel. Adjust the drill press's table as needed so that the tool only cuts a few thousandths of an inch off the outside of the wheel. The goal is not to cut the wheel down to reduce weight and moment of inertia, but to make the wheel perfectly round by shaving off only enough to eliminate the high zones and center the wheel on its bore.
Slowly lower the wheel into the cutter, keeping the wheel wet at all times so it doesn't over heat and melt. Pushing it into the tool too fast or trying the shave off more than the thinnest amount will result in the tool jamming on the wheel and the wheel spinning in the mandrel. This could score the wheel bore.
It's much better to make many passes with extremely light cuts than a single deep cut. Only a very few thousandths of an inch need to be removed. Again, this is only making the wheel round, not lathing to reduce weight. It doesn't remove enough of the wheel's diameter to cut into the row of bumps on the outer rim of the wheel to indicate to judges that too much material has been removed to be legal. Lathe all wheels down to the same diameter.
After this step, proceed to polish the wheel by working your way up through 1500, 1800, 2400, 3200 and 3600 strips of wet Micromesh followed by polishing with Novus 2 fine scratch remover and polisher. Spend one minute per grit being careful to wipe off all residue between each one to prevent errant specks of grit scoring the wheel's face. Work the inner rims to make them round, which reduces drag when the wheel rubs against the guide rail.
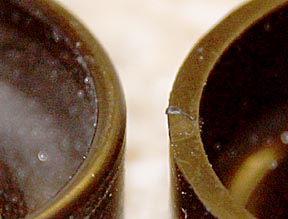
The
wheel on the right shows an inner rim as it comes from the factory.
Note
the sharp edges that can catch on irregularities on the guide rail.
The
wheel rim on the left has been sanded round to help it glide
along
the guide rail and slide over irregularities.
After that, remove the wheel from the mandrel and use a cotton pipe cleaner coated with Novus 2 to polish the bore.
Carefully wash all polishing compound off the wheel and blow the bore dry.
A set of four wheels usually takes a full hour to turn and polish, so be sure you're comfortable before starting.
I typically do many wheel/axle pairs at a time. Afterward, I give each one a spin. Those that spin freely without any jittering are used for the best cars. The rest are used on show cars.
Now comes the most critical step: aligning the car's wheels so it rolls straight. Start by putting three wheels on the car, leaving one of the front wheels off. Roll it down a smooth ramp and using axle pliers rotate the axle clockwise or counter clockwise as needed to get it to roll straight. If the axle holes have been drilled straight, the natural curvature in the axles should be enough to turn the axle in or out enough to get the car to track straight. If it doesn't, it may be necessary to use an axle bender at its lowest setting to help things along. Always graphite the wheels before alignment.
Once the car's going straight, mark the axle head so it can be replaced in exactly the same position, remove that wheel and replace the other, then repeat the process. Mark that axle head and replace the first wheel, being sure to use the mark on the axle head to retain its alignment.
It would seem the alignment is complete. But there's a problem. It could very well be that the rear wheels are out of align and that the alignment of the front wheels only introduced a compensating turning moment to counter it. This is the old snow plowing problem all over again.
To prevent this, turn the car around so that it's pointing backwards down the ramp, Remove one of the rear, now front, wheels and repeat the alignment as before. This should guarantee that the rear wheels are pointing straight. Unfortunately, if they were off in the first place that means the front wheels may need to be realigned a second time. Being able to turn the car around so both front and rear wheels can be aligned is the reason I do a preliminary alignment before gluing in the weights. After that step the rear-end-first alignment can't be done.
Alignment is an iterative process and needs to be approached with patience. It's also one of the most critical parts of creating a fast pinewood derby car so take your time and you'll be rewarded. To preserve this alignment, always keep wheel/axle pairs together and place them in their original axle holes.
In
2014 I began seeing a lot of Youtube videos extolling the virtues of
tuning or aligning pinewood derby cars on exercise treadmills. After
several experiments, and even building a small battery powered
treadmill specifically for pinewood derby cars, I came to the
following conclusions:
My battery powered treadmill
1.
If an exercise treadmill is used, it must be new or little used so
that the belt is perfectly flat. The reason is that after use the
rubber belt becomes stretched and forms up-and-down curves that make
alignment impossible.
2. The high-friction rubber surface is completely different than the very smooth surface of a pinewood derby track. This, combined with the texturing applied to the belts, means that the car's wheels will not slide easily on it as they can on a real track.
3. Some treadmills have non-symmetric texturing that will drive a car left or right even when it's perfectly aligned.
4. If you're aligning a three wheeled car, the point where the string attaches to the front of the car has to be positioned slightly toward the front dominant wheel. The reason is that the drag of this wheel is not balanced by the drag of the wheel on the opposite side. This one-sided drag induces a torque that will turn the car toward the dominant wheel. The amount of offset must be determined by measuring the weight on each wheel in contact with the track, assuming drag is a direct function of it and offset the attachment point proportionally to correct for it.
5. Typical pinewood derby heats last 3 seconds. Treadmill tuning sessions can last an hour. It's very easy for the graphite to burn off in just a few minutes and then the axles can score the wheel bores.
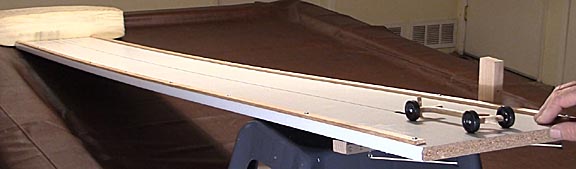
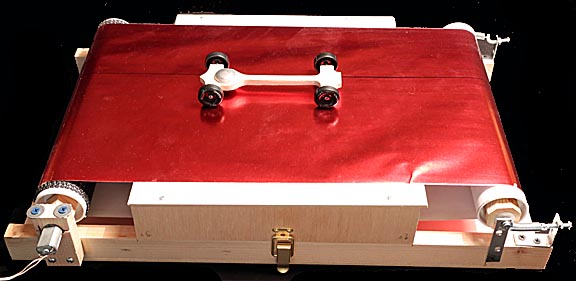
To
eliminate some of these problems I built a small battery powered
treadmill with a slick surface. It worked much better than an
exercise treadmill and could be placed on any table for convenient
use. After using it to align several cars both as straight runners
and rail riders I discovered that when runs times were compared, cars
aligned using an inclined board ran faster on average than those
aligned using treadmills.
Treadmill tuning is fun, but I believe the old fashioned technique of using an inclined board works better.
The best technique of all is to have your own track and after a rough alignment on an inclined board, fine tune the alignment on the track. Cars aligned perfectly straight on a board may still tend to run slightly left or right over the much greater length of a track. Fine adjustments on an actual track can easily trim 0.010 seconds off an already fast car. Good tracks with timers are expensive but are the most effective tools possible for producing top performing cars. And Oh yes... they're a lot of fun too. To see how to build your own track take a look at HOW TO BUILD A PINEWOOD DERBY TRACK. If you're serious about racing then you'll need a professional grade track. Try HOW TO ASSEMBLE A BESTTRACK ALUMINUM PINEWOOD DERBY TRACK for information about the best.
Once the preliminary alignment is done, and the axle heads marked, we can proceed to finishing the car.
Weigh the wheels, axles and weights. You want the total to come to 134 grams or slightly less so there is enough elbow room for glue and paint. Remove lead from the dome to do so. Use epoxy to glue the tungsten disc into place, followed by the lead dome on top of it. Fill in around the base of the dome with epoxy putty to create a smooth transition. Epoxy is used because unlike water-based glues it doesn't wet the wood and shrink, which could cause warpage. Epoxy putty works good as a filler because it sands much easier than liquid epoxy and stays where it's put.
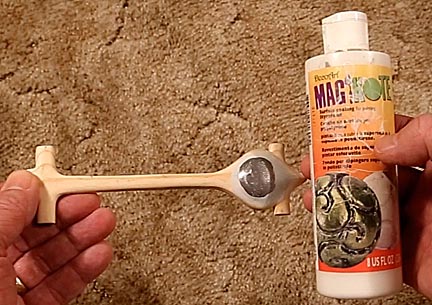
Painting isn't just cosmetic. It also seals and protects the wood, making it more stable for a longer period of time. Good paint jobs can be achieved with cheap acrylic spray paints. But higher end finishes require more work. Start by sealing the wood so that the end grain, which acts like a sponge, doesn't show up as a bunch of dimples marring the finish. I've tested many fillers and the one that works the best is Magicoat, a sealer originally designed for Styrofoam. It's available in most craft stores. Rub in several thin layers, letting each dry 24 hours before the next, so the body takes on a smooth, solid white appearance. Sand it smooth but don't sand down to the wood. Now you can spray with confidence that the grain won't show through the final finish. I've had good luck with Tamia spray paints.

This is Dark Jedi, my favorite car. One of the reasons it's also one of my fastest is that one wheel has been raised so the car runs on only three wheels. The reduction in drag can easily shave a tenth of a second of a car's time. Do it by bending the axle upward so the wheel no longer touches the track, shaving off another 0.005 of an inch off the diameter of that wheel, or drilling that axle hole a few thousandths higher than the other three.
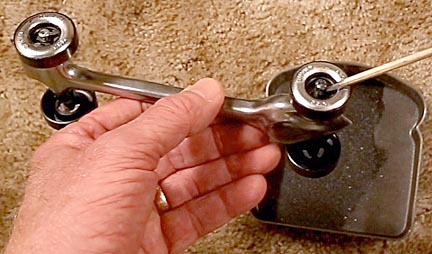
I've tested many different graphite and graphite/moly blends as well as two oil systems and none provided faster run times than Max-V-Lube graphite. (Please see AWANA GRAND PRIX RACE CARS for a detailed chronicle of these tests.) Rather than using the applicator tip supplied with it, I find I get better results by cutting a flat zone in the end of a bamboo skewer and using this to apply graphite. I start by piling graphite onto the surface of the wheel bore face and pushing up, rubbing it against the axle head. This coats both surfaces. The I add a second portion of graphite and tap the wheel to let it work its way into the wheel bore. The car is then turned over and the process repeated for the other face of the wheel. Each wheel is lubricated in this manner. (In case you were wondering, the car used for this demonstration is called the Silver Bullet. The finish is Spaz Stix Mirror Chrome spray over Testor's Model Master gloss black spray paint.)
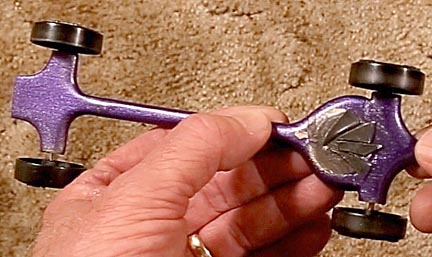
Here we have the Purple Flier (Tamia metallic glitter purple spray paint) showing trim weighs added to the bottom of the car.
After the car's painted and assembled, if all the weight calculations have worked out it should weight between 138 and 140 grams, slightly less than the 141.7 grams most Boy Scout pack races permit. I add paper thin wedges of hammered lead to the bottom using double faced tape to bring the weight up to 144 grams. Many pack scales are not calibrated and will indicate a car that is exactly 141.7 grams as being either too heavy or too light. By removing or adding wedges, which weigh 0.5 to 1.0 grams each, the car's weight can be quickly and easily to tuned to the maximum amount allowed. And by the way, while most race venues state the maximum weight is 5 ounces (141.7 grams) they usually pass cars that are 5.1 ounces. If this is the case you want to be able to take advantage of that extra weight allowance because it can mean the difference between coming in first instead of second.
The last task is to double check the alignment and you're ready to race!
Ands that's
it! If you follow all the techniques on this page you'll probably end
up spending up to ten hours making a car, but the likelihood is that
it'll be a champion. As for the car built for this page, here's how
it came out:

It is currently the fastest car in my collection. Racing against four other cars that finished first place for speed in local races, it beats them every time. From the number of cars participating in the local races this indicates it was the fastest out of a total field of 175 pack-level cars. I call it the Scarlet Screamer. It's Tamia metallic red glitter paint over metallic silver glitter paint. The sparkle effect is very subtle, giving it an impressively elegant appearance.
For a better view of this car, please watch the following video, it's one of the featured cars:
This video shows how it did racing against championship winning cars:
Finally, the following three videos present everything from this page in a more active format:
I sincerely hope you found this page interesting and that it helps you, or the child your helping, build the fastest pinewood derby car in your race. Good luck!

Return to my main page to browse 60 other subjects