EXTREME
MELON GROWING
(Techniques
and varieties for growing the ultimate in sweet melons.)
(Click here to jump down to the hydroponics section.)
(Click here to jump down to the 2011 season.)
Because
commercial melon growers select the most durable varieties of melons
for shipping and the most productive to maximize profits (instead of
the sweetest and best tasting,) and then pick them before they are
ripe, the melons available in stores represent some of the poorest
examples of these great fruits. Come with me as I explore the
challenging world of extreme melons growing: combining advanced
growing techniques and the best varieties in an attempt to discover
how to grow the world's best tasting melon. (Note: Much of what
follows is intended for the individual who only has enough space or
time for one or two melon plants.)
My comments about "where to plant" focus on location in a yard. Something that can't be controlled location-wise is the weather. I'm fortunate in that my high desert location is almost ideal for melon growing: 90s during the day, high 60s at night, bright sun, no rain (which can foster disease) and low humidity.
Location
The first step is to decide where to plant. It should be an area that has not had melons, pumpkins, squash, cucumbers, or gourds grown in it for at least five years because these might have infected the soil with diseases. It needs to receive full sun all day long, or at least as long as possible. Southern exposures are ideal.
Soil
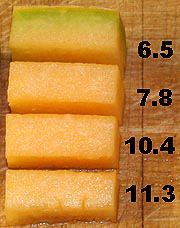
Next, find out what type of soil you have. Melons prefer light, well-draining soils classified as "sandy loams." To determine what you have take half a cup of soil from 6-inches below the surface and mix it vigorously with a cup and a half of water in a straight-sided glass. Set the glass aside for a day to let the various components settle out. Below is an example of the soil in my melon bed:
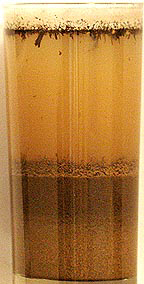
The lighter zone at the bottom is sand, next is silt, then clay (In this case mixed in with a lot of settled organic matter that gives it a corky look. The actual thickness of the clay layer without this organic material was very thin.) Floating at the top of the glass are more bits of organic matter. Measure the height of each layer, add these all together to determine the total height of the settled soil and then divide each of the heights of the layers by this total height. This gives the percentage of sand, silt, and clay in your soil. Use these numbers in the chart below to determine where in the soil spectrum your particular soil lays:
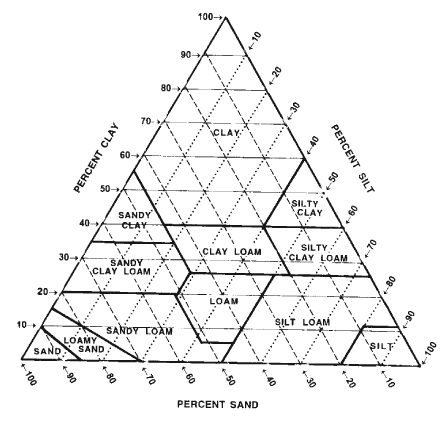
My soil tested out at 60-percent sand, 35-percent silt and 5-percent clay. This places it well within the sandy-loam zone in the lower left corner of the triangle. (This test identified the physical characteristic of the soil, not its fertility.) If your soil tests out as too sandy, add organic matter in the form of peat moss, compost, or manure. If it's too silty or clay-like, add sand (just make sure it's not ocean beach sand because that can have harmful salt in it.) Although melon roots can travel over 8-feet in radius and four feet deep, a bed 30-feet square and 18-inches deep is sufficient.
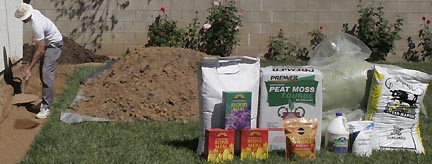
The next step is to correct the PH of the soil. (PH measures acidity: 7.0 is neutral, below 7.0 is acidic and above is basic or alkaline.) Ideal is slightly acidic, 6.5. My high-desert soil typically tests out alkaline, around 7.8. Areas with little rainfall are usually like this, while high-rain areas are usually acidic. If it's above 7.0 add peat moss (PH 3.5) to bring it down. The PH scale is non-linear (each change of 1.0 means a change in acidity of 10X.) so not much is needed. It might take as little as 10 cubic feet for 30 square foot by 18-inch deep bed. If your soil is too acidic, try adding compost or manure. These are alkaline and will raise the PH. (Most bagged soil amendments are made up of manure and compost so they are alkaline too, sometimes as high as 8.5.) The advantage of correcting the PH with organic material is that it improves the texture of the soil, drainage, primary nutrients, micronutrients and water-holding ability. I don't encourage chemical corrections such as sulfur (to lower the PH) or lime (to raise it) because these chemicals can be poisonous to important soil organisms like earthworms. (My preference is for organic gardening, but I'm not a hardliner.)
Note: Before testing your soil, be sure to test your water. If it's acidic or alkaline it could throw the soil test off and needs to compensated for. It's also a good idea to test any amendments if you're adding a large amount of them.
Finally, we need to address the question of fertility. Melons are vigorous grows that require a lot of nutrients. The only way to know for sure if your soil is prepared to support them is to send a sample to a professional lab for evaluation (I use the testing service at Peaceful Valley Farm Supply, www.groworganic.com) and follow their recommendations for optimizing you soil. (Home-test kits can provide an inkling of your soil's health, but they lack the accuracy and detail of a professional test lab.) I prefer using organic fertilizers for improving soil because in addition to the primary nutrients of nitrogen, potassium and phosphorous, they supply many micronutrients unavailable from chemical fertilizers. While the roots continually expand into new soil that's rich in unused nutrients, I admit to giving each plant a weekly boost of 2 tablespoons of water-soluble 18-24-16 food for every 5-square feet of watered surface just to feel I'm doing something to help the plant along. I don't switch to a low nitrogen mix once the plants begin fruiting because I'm not interested in producing large numbers of melons, just one excellent one at a time. Cutting back on the nitrogen slows the plant's growth. Less leaf area means the plant can't produce as much sugar and the melons won't be as sweet.
Mixing in all the amendments fluffs up the soil, which is good for the roots because it increases the infiltration of air to the root zone but it's also bad because all that fluffy soil may collapse during the first deep watering. If this collapse happens after seeding the seeds may be carried too deep and not be able to make it to the surface. For this reason I recommend a deep watering before seeding. Let the soil settle out, then rake it level. Once the bed is done, avoid walking on it because this will cause compaction that limits root growth.
The last issue is soil depth. Melons are one of the most aggressive root developers in the vegetable world. However, as the following image of the roots of a 35-day old muskmelon shows:

...their roots are concentrated in the top 12-inches of soil. While shallow, they extend beyond the reach of the longest runners. This means a mature plant can send lateral roots out as far as 15-feet in all directions. The consequence of this is that when building up soil for a melon bed it's better to go far rather than deep. (The image of the melon roots was borrowed from the outstanding Soil and Health site at http://www.soilandhealth.org/01aglibrary/010137veg.roots/010137toc.html. This URL provides links to pages providing similar images on many vegetables in addition to valuable cultural information.)
This shallow root structure indicates that frequent, shallow waterings may be more effective than widely spaced, deep waterings. For the same reason triple digging to prepare a bed 4-feet deep may not be necessary, unless it's to correct for drainage problems.
Make
all of the soil corrections the Fall before planting and let the
soil rest over the winter. This lets the earthworms improve its
texture and mix things up more uniformly. It also allows any
chemicals used to disperse so that there aren't any hot spots that
might burn roots.
Melon
varieties and types
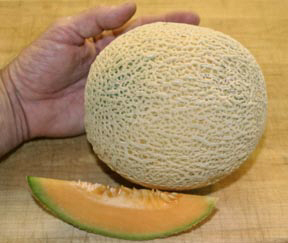
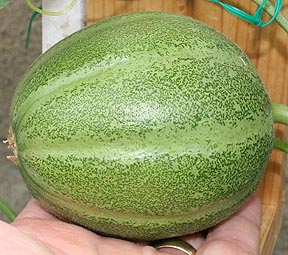
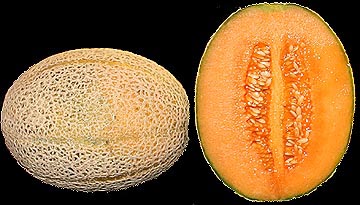
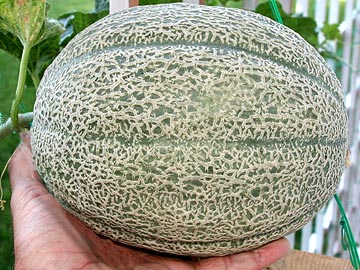
Next comes variety selection. For me the melons that produces the greatest amount of good eating are muskmelons, the type covered with a netting of cork-like scars. They are also the earliest to produce and easiest to grow. After decades of testing dozens of different varieties of western (no ribs), eastern (ribbed), hybrids, heirlooms, and Europeans like charentais and Savor (these are true cantaloupes, small, smooth-skinned and mostly round) I found the sweetest and best tasting melon to be Burpee's Ambrosia Hybrid. Second place goes to Sugar Queen. It has a slight grassy taste but is considerably more resistant to disease and more productive. Since I'm interested in extreme quality I'm willing to sacrifice some quantity for the very best melons so for me it's Ambrosia, which was released in 1975.
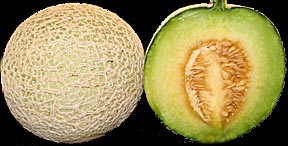
Honeydews and watermelons are great but they are less reliable than muskmelons, require much more room, take longer and their quality is more sensitive to when they are picked. (However, for the adventurous gardener the techniques that follow are equally applicable to them.)

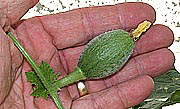
It
all starts with a few seeds. It's hard to believe that each of
these
tiny bundles of life have the ability to produce 30 pounds
of
some of the world's best eating in just one summer.
(These
are Burpee's Ambrosia muskmelon seeds.)
Planting
and growing
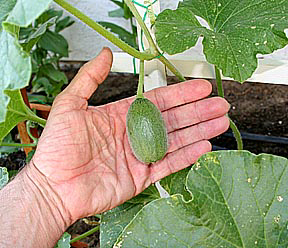
Because my summers are long I have the luxury of direct seeding into the garden. For shorter-summer areas I recommend starting your melons inside 4 weeks before the last frost date and growing them under artificial plant-grow lights left on for 16 to 18 hours a day. (Please click on FLUORESCENT PLANT LIGHTING for information about growing plants under artificial lights.) Besides getting an early start on the season, this means the plants will be large enough at transplant time to resist attacks by cut worms. The best size pot is the largest one you can handle. Consider the following image of a 19-day old Ambrosia melon seedling:

Although the above ground part of the plant is still small, the roots extend 7 to 10 inches in all directions. Planting melons in small containers will quickly lead to root binding that could seriously inhibit the plant's grow once it's transplanted into the garden. Under average conditions melon roots advance half an inch a day. In ideal situations this growth rate can easily double. I never use anything smaller than a 5-gallon pot. (Lining it with chicken wire allows the root ball to be lifted out by the chicken wire without the ball falling apart.)
For direct seeding. I dig a hole 6-inches in diameter and 12-inches deep. I fill it with sterile planting mix and push a plastic collar cut from a gallon plastic milk jug 3-inches deep around it, leaving 1-inch extending above the soil. The potting soil improves germination and reduces diseases. The plastic collar acts as a barrier to cutworms. I place half a dozen seeds in this. If the weather's warm, five days later the melons will have sprouted.
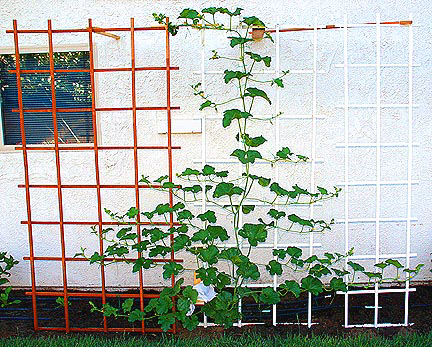
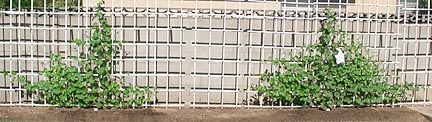
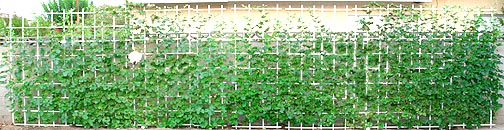
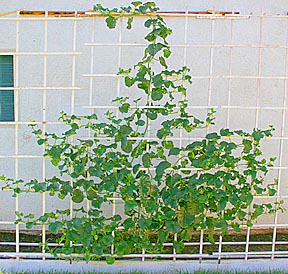
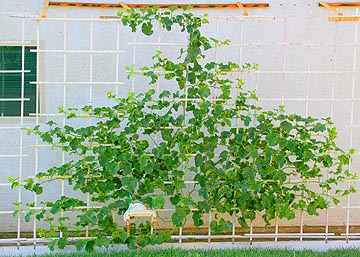
While melons are usually left to sprawl over the landscape, doing so invites a host of problems. Sprawling plants take up an enormous amount of room, a single muskmelon can easily fill a 20-foot diameter circle. Laying on the ground the leaves and vines are more likely to be attacked by insects and diseases. When the melon aphids arrive, and they always do, they often grow unchecked because it's so hard to inspect for them. This weakens the plant and reduces the quality of the fruit. With sprawled plants you have to walk in the beds to check the plants and harvest melons and this can damage vines and compact soil. finally, in areas of high wind the melon vines can be rolled up and broken loose from their roots. To address all of these problems my recommendation, and this is the first suggestion that qualifies this page as "extreme," is to grow the melon up a trellis. This prevents almost all of the above-mentioned problems. The down side is that because melons are poor natural climbers they need a daily attention to tie the vines to the trellis, and it takes a big trellis, 8-feet tall and 20-feet wide is minimum in long-season growing areas.
Trellising also enables compensating for less than ideal weather conditions. Trellised melons have greater access to drier air and more airflow, which reduces risks from diseases that prosper in humid climates. Since the leaves of melons grown on the ground pile up on each other they tend to use up all the carbon dioxide under them, where their atmospheric intake openings are located, the plants grow more slowly than trellesed melons, who have a constant supply of fresh air under their leaves. In extreme southern areas a vertical trellis reduces the amount of sun on the leaves and in so doing prevents the plant from being overstressed (melon plants grown in very hot, sunny locations can outgrow their roots to the point where the roots can't provide enough moisture to ward off dehydration on the hottest days.) In northern zones where the sun may not be bright enough for good melons, tilting the trellis backward so that it is perpendicular to the noon sun will maximize the amount of light available to the plant. If the melon is backed by a bright reflective surface, sunlight passing through the plant will be reflected back on it from behind and increase the amount of sugar-producing light available to it. Finally, trellised melons are easier to enclose in greenhouse structures, making melons possible even in the most northerly climates.
The trellis needs to be very strongly secured to prevent it from falling over from the weight of the melon plant or blown over by wind.
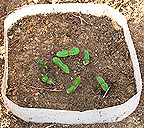
When the first set of true leaves have formed, I thin out all but the most vigorous plant. Just pinch them off at ground level. Pulling them out may damage the roots of the melon plant you want to keep. (I've never been a "hill" grower where two or three plants are grown near each other. This causes competition for water and nutrients and makes such a dense tangle of growth that working the beds without damaging vines is impossible.) I push a thin wood dowel into the soil close to the plant but not close enough to damage its roots and train the vine up it until it's 12-inches tall.
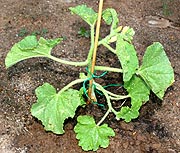
Under
the ideal conditions the plant will reach
12-inches
tall in as little as 2 weeks.
While a melon's African heritage makes it able to withstand high summer temperatures and blindingly bright sunlight, that's only after a milder Spring growth period lets it establish an extensive root system. If you plant in the middle of summer the young plants may wilt in the heat of the day because they haven't had time to establish a root system large enough to support them. Providing partial shade supplied by a layer of aluminum screen for the first six weeks of growth may help get them off to a more stress-free start.
Once a melon plant is 12-inches tall, I place a trellis behind the plant and start training the vine up it. It's at this time that growing melons on a trellis takes on a completely different feel than any other form of gardening.
Because the melon grows so fast (the main vertical leader can grow 2-inches or more in a single day) and because I'm handling the plant every day as I tie it to the trellis, it stops being a stationary thing like most plants and takes on more of the personality of a pet. It's not just a tangle of runners, but each vine is unique and has it's own growth pattern. All in all it makes extreme melon growing a more rewarding and interesting experience than regular melon growing.
I train the main leader straight up the trellis and the side shoots horizontally outward. As the side shoots near the ends of the trellis I train them upward, bending each one a little earlier than the last to fill the trellis solid. I resist pinching growing shoots off as many references recommend with the idea that this encourages the plant to concentrate more energy in ripening melons. Dr. Amy Goldman (Melons for the Passionate Grower) discovered during field testing that this doesn't work. It also doesn't make sense because it's the leaves that produce the sugars that sweeten the melon. Any action that reduces the amount of leaf area also reduces the sugar-producing capability of the plant. Besides, as anyone who's pruned a rose bush knows, snipping off the ends of plants only encourages more side shoots to form.
The only time I pinch off any part of the plant is when I see a leaf that is turning yellow. There's the potential that it's been infected with a disease and removing it may prevent the spread of the illness.
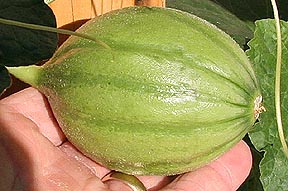
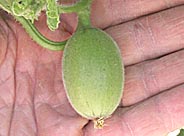
Eight weeks after germination the plant had grown to 8-feet tall and 10 wide and is starting to produce the first melons. (I was soon to learn that as big as it looks it was just getting started.) There is one melon under the white handkerchief near the bottom of the plant. The white covering protects the melon from sun scald. The sun is so bright in my high desert location that it can cook a melon on the vine. Gardeners in cooler areas may have to do the opposite: expose the melons to more sun by lifting them above the leafy canopy.
I noticed that while there were several other pollinated melons on the plant by this time, none of them were growing. Weeks later, as the first melon neared ripening, three of these small melons suddenly started to grow. I assume what happened is that the plant knew it could only support one melon and put the others on hold until the plant got large enough to support their growth. I culled all but one of these secondary melons. I only want one melon at a time to ripen. Much of the fruit's sugar content is determined in the last few days of ripening. If there are more than one ripening at the same time then the plant's total sugar output has to be divided between them, reducing the average sweetness. I prune off all except one melon every two weeks to ensure top quality melons.
Additional
Training Details
Because the stems to melon leaves quickly take on an almost permanent set, if the vines are moved the leaves may get repositioned so that the sun can't reach their top surfaces. For this reason it's best to have a training plan so changes don't have to be made later. Below is the plan I found works well:
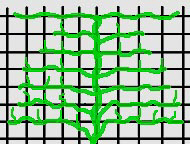
The primary runner is trained straight up the middle of the trellis. When it reaches the top I train it along the top to one side and the side runner closest in the opposite direction.
The first two secondary, or side, runners that form on the bottom of the plant are first trained up at a sharp angle then straight out to the sides after they are 18-inches above the soil. This keeps them from trailing their leaves in the dirt, the prime zone for disease and insect attack.
Any tertiary shoots that form along the secondary runners are trained straight up the trellis.
During the training process, I like to reposition any leaves growing behind the trellis so they face up and to the front so that they get as much sunlight as possible. This is for a south-facing trellis. For trellises running north and south the leaves can be left to face which ever direction they want. The leaves on a muskmelon can grow more than 9-inches across. For this reason it's best to space the runners as far apart as possible to minimize bunching (which creates ideal areas for insects to hide) and shading (which reduces the amount leaf area exposed to sunlight and thereby the plant's sugar-producing capability.)
Although melons are poor climbers, they still have grasping tendrils that need some watching. Left to themselves, they can wrap around and crush leaves and even strangle main runners.
Leave at least a thumbs-diameter open around the ties used to hold the vines to the trellis. As the plant matures the vines increase in diameter and tight ties can strangle them. If a runner is tied within 6-inches of its end, its stem is so soft that it may bend, causing the vine to bow instead of staying straight. For this reason I prefer to place ties at least 8-inches back from the growing tip. In areas of high wind, like mine, it's a good idea to place ties at least every 12-inches to avoid having the wind whip the free end of the runner around, damaging or even snapping it off. Move slowly when handling the runners, they're hollow and can be easily crimped or broken.
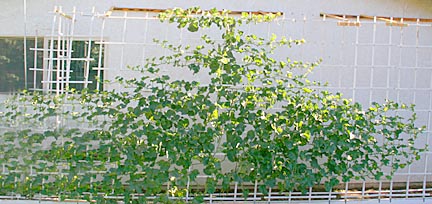
While it would be nice to have a trellis large enough to allow the melon to grow without limit, in long-seasoned areas this isn't practical. The first Ambrosia melon I trained on a frame outgrew a 7-foot tall by 18-foot wide trellis in only 4 months.
As the melon plant gets into its fourth month the high number of tertiary runners can start to crowd the outer zones so much that it's hard to find open areas in which to train them. My solution is to train them back toward the center of the plant where the number of runners is much lower.
Beware...
Leaf flop!
Because leaves grow up toward the sun, runners trained horizontally tend to be top heavy. A errant breeze or some rain may weigh down the leaves enough to cause them to tip over, twisting the runner so that the leaves now point downward. Because mature leaves are very slow to reorient themselves this situation means that a large amount of leaf area is shut down to photosynthesis and can't contribute to sweetening the melons. I keep an eye out for this and when it happens use twist-tie wire to rotate the leaves back into their proper upward facing position.
Watering
Watering melons can be tricky. Because the roots need air for good health it's necessary to space the waterings out so that the soil isn't always saturated with water. But, because the plants are very large and fast growing they also require a lot of water, necessitating thorough soakings. The problem with alternating heavy soakings with drying-out periods is that growth spurts following a watering can split a melon. My solution is to use three separate watering areas around each plant. I water one each day, always following the same sequence. This provides a steady water supply to the plant yet gives each soil zone the opportunity to drain and pull air into its structure.
Insects
Something about melon plants makes them irresistible to a wide range of insects, particularly aphids. Growing the plants up a trellis goes a long way to eliminating this problem but eventually they will attack. It's important to discover an infestation as early as possible so inspect several leaves every time you go out to train the vines onto the trellis. When an infestation is discovered, rub them out with your finger right away or spray them with some insecticidal soap. The longer you can keep them at bay the longer the vine will be healthy, strong, and productive.
It's easy to lose track of which leaves have and haven't been checked. Rather than randomly spot checking leaves, I found it helpful to check all the leaves on just one or two runners a day. Working from the bottom the plant up this ensures that the entire plant gets covered.
Because aphids are instinctively attracted to the dark undersides of the leaves, placing aluminum foil or a white surface under or behind the plant confuses them and thereby discourages attacks. My melon trellis is close to a south facing wall that's painted white. I believe that the almost complete absence of aphids on the plant may be due in part to having this bright surface so close to the plant.
Contrary to their behavior with other plants, melon aphids in my high desert location do not attack the fresh, new growth first. Rather, they prefer congregating on the undersides of the oldest leaves, perhaps because these provide the darkest shade. They also tend to cluster. If you find an infested leaf you can be pretty sure that other adjacent leaves will also have aphids.
Enlisting
some help
It's impractical to examine each leaf every day to make sure an aphid infestation is stopped before it can cause problems. Spot checks are a practical compromise but what's needed is some help. If you know of another plant that regularly gets attacked by aphids the solution may be hiding on the underside of its leaves.

The picture above is of a cluster of green lacewing eggs laid on the bottom of a leaf. When they hatch the emerging larva are the most voracious aphid predators known to man. If you spot any clusters like this pick the leaf off and move it to a safe, shady spot on your melon plant. When the larva hatch they'll scour the vine day and night devouring every aphid they come across. This isn't a one-time treatment. Repeat it as many times as you can find egg clusters.
There's a large hedge of oleanders bordering my back yard which act like aphid magnets. I search through young shoots looking for aphid colonies, which are orange and easily spotted. More often than not there will be a cluster of lacewing eggs nearby. Milkweed plants are also good attractors of aphids and therefore lacewings.
Flower
pollination and melon growth
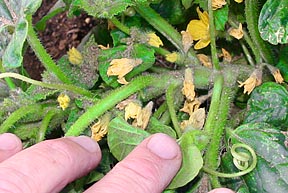
Four weeks after the melon sprouts the first flowers appear.


Female
flower...........Male
flower
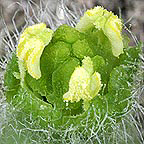
Female
flowers are "perfect" with both male parts
(the
yellow, pollen-carrying anthers on the outside)
and
female parts (the green pollen-receiving stamens
in
the middle.)
Male
flowers only have the yellow pollen-covered anthers.
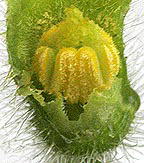
With the idea of producing the earliest possible melon, I recommend hand pollinating the first female flowers. Pull off the petals from a male flower and gently rub the yellow anthers against the green stamens in the middle of a female flower. Repeat this two or three time over the course of a day to insure the melon gets pollinated. After this first melon, hand-pollinating isn't necessary because the later melons will have enough time to be pollinated by insects. It's just that when the plant is small there aren't always enough flowers to attract insects.
Many melons will start to grow only to stall, turn yellow and fall off the vine. One sign that this may happen is the the blossom end of the melon will look slightly pointed instead of round, as in the following picture:
In
person, the pointiness of the end closest to the blossom
is
more pronounced than appears in this photograph.
But,
if everything goes as it should the melon will grow rapidly.
The
melon one week old. Note that the blossom end is
much
rounder than the melon in the previous picture.

The
melon two weeks old. By this time the melon needs to rest on a support
so
that its weight doesn't damage the vine. I screwed an L-shaped wood shelf
to
the trellis and cradled the melon on it using a soft rubber dog-chew
toy ring.
The
melon is positioned so that there is a slight constant pressure
pushing the
stem
toward the melon. Even small forces pulling on the stem can cause it
to
separate prematurely from the fruit as it nears full ripeness. Muskmelon
melons
can weigh more than 8-pounds so make sure the supports
can
handle the load.
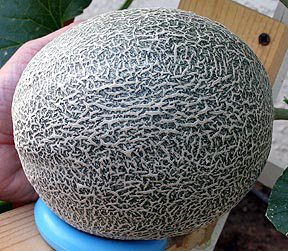
The
melon 3 weeks old. The characteristic netting of
muskmelons
is starting to appear. These are
scars
formed by the skin splitting as the
inside
of the melon grows faster
than
its surface.
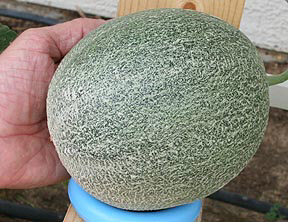
The
melon at four weeks old - almost full size. The netting formation
is
complete, suggesting that the melon is closing in on its
final
ripening stage. Also note that the skin has
turned
a darker green.
The
melon five weeks old. It hasn't changed much in the last week,
though there is a
hint
of orange just starting to show close to the blossom scar that's not
visible in
this
photo. The second melon, pollinated two weeks after this one, has put
on
a spurt of growth and is now larger than this earlier melon.
Just four days later things started happening. Overnight the melon changed from solid green to having a definite golden hue. It was at this point that growing on a trellis is radically different than normal melon growing. Because the melon is so easily observable you experience the ripening process in an intimate and detailed way that is forbidden to any other technique.
Picking day!!!
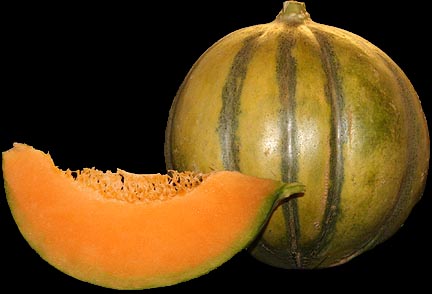
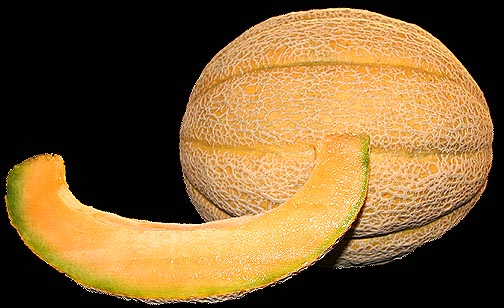
The melon was fully ripe 41 days after it was pollinated. The proof that it's ripe is that the stem slipped off the melon by itself without my having to push on it. (Commercially-grown melons have their stems forced off at the 1/4 to 1/2 slip stage - up to a week before the melon is truly ripe and far too early for the fruit to have built up its full quota of sugar.) Secondary indicators of ripeness were the deep golden color of the skin and a heady, musky aroma coming from the melon. What amazes first-time melon growers is that this aroma, which is nonexistent in most store-bought muskmelons, is strong enough to perfume the air for a good ten feet around the plant on still days. It isn't subtle, but strong, powerful and extremely pleasant. The greenish area on the right of the melon above isn't the melon's color, but caused by green light reflecting off leaves. In person it was an even golden hue everywhere.
How
good is it?
Time to find out if all the work was worth it. For comparison I went to several grocery stores and bought the ripest melon I could find.
Even this good example of a commercial melon showed green areas on the skin, proof that it was picked early. The melon was okay, as store-bought melons go, but it lacked the dazzlingly sweet flavor of a truly great vine-ripened melon. (Please note: just growing a vine-ripened melon doesn't ensure that's it's going to be sweet. The popular Super 45 or Imperial 45, of which this is one, can be ripened to a perfect golden yellow and give off a deliciously musky aroma and yet still have a sugar content of only 9-percent.)
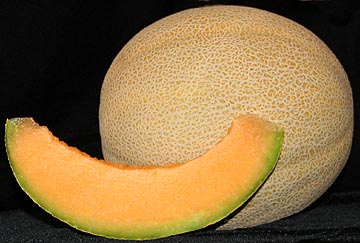
The trellis-grown melon, on the other hand, was so sweet and flavorful that it's hard to believe that they are the same fruit. In comparison, the store-bought melon tasted as dull as a cucumber. (Not to put cucumbers down. They are great... they're just not melons.)
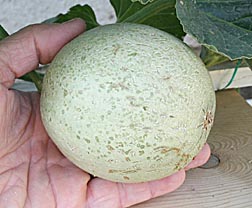
The first melon off my trellised plant weighed 4-pounds, 5-ounces (a good-sized melon) and had a sugar content of 13.8-percent, significantly higher than the 9.7-percent average for grocery store melons. The second one to ripen was over 6-pounds and had an incredible sugar content of 15.5-percent. It was so sweet and richly flavored that one bite was enough to satisfy even the most ardent melon lover's appetite for an entire season.
A top variety like Ambrosia ripened to perfection on the vine imparts upon the connoisseur a sense of well-being that no other fruit can, not even other melons.
Refractometers
One tool that adds a lot of fun to melon growing is a refractometer, a device that instantly tells you the sugar content and flavor density of a fruit. (Available from Peaceful Valley Farm Supply.)

To use it you lift the plastic cover on the left and squeeze a drop or two of melon juice (or any type of juice for that matter) onto the underlaying glass window. Drop the plastic cover back in place in top of the juice to evenly distribute it, point the refractometer at a bright light and look through the eyepiece on the right. What you'll see is a vertical scale with a white zone under a blue zone. The line between these two zones intersects the scale at the percent sugar of the juice being testing. Here are two
 ...........
store-bought................home-grown
.melon
at 10.2 ..............melon
at 15.5
.percent
sugar...............percent
sugar
Human response to sugar is nonlinear. A melon that has an 11-percent sugar content can taste twice as sweet as a 10-percent melon. What this means is that at the pinnacle of melon sweetness, 15 to 16 percent, melons become an unmatched eating experience. One catch to this is the type of melon effects the sweetness almost as much as ripeness. I've grown Charentais melons that didn't taste all that sweet even when their sugar was 16+ percent. The reason is that these melons are so packed with flavor components that are often carried in an acidic base that the acid reduces the effective sweetness of the melon.
Back to the sweetness scales:
Melons ripen from the inside out, so the zone next to the seed cavity is always the sweetest. The following image shows how sugar content decreases the closer you get to the rind:
This is a melon harvested at half-slip. Vine-ripened melons are not only sweeter near the center and rind, they also have a flatter sweetness profile so that a higher percentage of the melon's flesh is at the sweet end of the scale. For example, in the melon above the sugar content decreased 43-percent from center to rind. Vine-ripened melons may only have a 30-percent decrease.
Because of this sweetness profile, it's important when comparing melons to always take juice samples from the same zone.
Harvesting
hints
Muskmelons are the easiest of all melons to determine when to pick because they automatically separate from the vine when ripe. The hint that this is about to happen is that a crack will form all the way around the stem.

While the outside feeder tubes in the stem may have broken free of the melon, many center ones are still attached and can pump a little more flavor into it. For this reason I wait another day before harvesting the melon. By this time a sticky sap may begin oozing from the stem connection.
A deep golden rind color and sweet, musky fragrance are also good indicators of when the melon is nearing ripeness. The problem with using aroma as a guide is that a fully ripe melon that's very cold will not give off as much musky perfume as a lesser ripe melon that's warm.
Watermelons are the next easiest because the white spot on which the melon rests on the ground turns yellow. Melon growers try to fool consumers by turning the melons a week before picking to expose the white spot to sun and thereby force it to turn yellow. If you see a watermelon in a store with a large white spot with a yellow tint and a second, smaller and fainter white area roughly opposite to it, the melon has been turned to fool you. Rapping the melon with your knuckles and listening for a hollow sound is a time-honored test that is fraught with problems. Melons resonate when rapped. Larger melons resonate at lower tones while smaller melons resonate higher. Similarly, unripe melons resonate higher than ripe ones. These two opposing factors mean that when rapping a melon it's necessary to take into account its size and use experience to know how low or hollow a melon of a given size should sound when ripe. (Some references place great value on judging ripeness by the tendril at the base of the melon's stem drying out. I've never found this reliable because too often the tendril gets damaged and dies, and in so doing makes it look like the melon is ripe when it isn't.)
True cantaloupes, like charentais melons, usually have a color change when ripe and develop cracks or splits in the skin that can go clear to the flesh. Waiting for them to split isn't always reliable when water is decreased to enhance sweetness and flavor because reduced water absorption goes a long way toward stopping the rampant growth that causes splitting.
Honeydew melons are the trickiest of all because some varieties display no outward indicators of ripeness. Usually I look for a melon to feel waxy and for a slight pressure to the blossom end to produce 1/8th inch of give. Less give and the flesh will be crunchy. More and the center may be pulpy and starting to deteriorate. The problem with pushing on the blossom end is that each time it's done the melon is bruised and weakened. Consequently, a melon that's been tested this way a couple of times may have enough give to suggest that it's ripe when in reality it's just a green melon that's been bruised. Equally, a perfectly ripe but overly tested honeydew may feel too soft and overripe.
In the final analysis the only way to know when a melon is ripe to to stick with one variety and grow it several years, carefully observing and noting any and all changes to the fruit and relating these changes to the quality of the fruit when picked. Familiarity is the best tool for judging ripeness because each variety has its own peculiarities.
Varieties
I've tested:
Muskmelons
(both hybrid and open-pollinated types)
Delicious
Market
Pride
Hale's
Best
Iroquois
Harvest
Queen
Schoon's
Hard Shell
Minnesota
Midget
Creme
de la Creme
Sprint
Ambrosia (Sweetest
and best tasting)
Touchdown
Spearmelon
Super
(or Imperial) 45 (This is a popular market melon because it produces
large numbers of small, durable melons. Unfortunately the eating
quality is very poor even when left to ripen on the vine.)
Fastbreak
Honeyrock
Sugar
Queen (Second best tasting. Produces
greater numbers of larger melons than Ambrosia and is more disease
resistant. Very large plant. I rate the flavor of this melon slightly
inferior to Ambrosia because Sugar Queen has a hint of grassiness to it.)
True
Cantaloupes
Charentais
Charmel
II
Savor
(By
far the sweetest and best tasting with up to 19-percent sugar. But, its
..........flavor
density is so great that unless the sugar content is above 16-
..........percent
the melon can taste unpleasantly sharp.)
Watermelons
Charlston
Gray
Calhoun
Gray
AU
Jubilant
Allsweet
AU
Producer
Klondike
Crimson
Sweet
Congo
Dixilee
(The
sweetest and darkest red. All other watermelon flesh looks
..........gray-pink
in comparison. The seeds are confined to tight bundles that are
..........easily
cut out. Pick when the ground spot turns yellow but before the
..........melon
makes a hollow sound when rapped with your knuckles to avoid the
..........center
over-ripening to pulpiness.)
Klecky
Sweet
Sunset
Honeydew
Melons
Earlidew
Morning
Dew
Sweet
Delight
Ojo
Caliente
Spanish
Espanol
Honey
King (By Northrup King. The sweetest
and best tasting. Ripened on the vine, small surface cracks may form
on the skin. This doesn't effect quality, just looks.)
When
an Extreme Melon Grower Goes even more Extreme:
I've been working on the soil in my melon bed for several years and it's paid off. The soil is very rich. But, like most backyard garneds it's shallow: barely eight inches deep.

A
cut-away view of the soil in my melon bed. Eight inches down from the
surface
the rich topsoil turns into lifeless sand. While this sand gives
excellent
drainage it doesn't provide any nutrients to the plants.
While most of the roots of mature melons are concentrated in the top 18 inches of soil, several, like the main tap root, still reach down as far as three or more feet. Although these roots are a very small I recall reading somewhere that many plants use them to gauge the overall growth potential of the soil. Tap roots that are able to grow deep trigger plants to grow faster and stronger than those trapped in shallower soil. For this reason I decided to undertake a massive improvement of the soil in the bed.
The first thing I did was dig out the soil 18-inches deep. Then I amended the remaining subsoil with copious quantities of alfalfa meal (provides many nutrients and growth accelerators) blood meal, home-made compost, bone meal, peat moss (increases the organic matter and lowers the soil's PH, manure, Epsom salts (for magnesium) a vitamin B1 and manganese supplement, cotton seed meal (good slow-release fertilizer) and some 5-10-10 organic fertilizer. Using a pitch fork I mixed these amendments 12-inches into the bed's subsoil. One half of the excavated soil was returned to the bed and amended with the same materials. The remaining soil was then stacked on top of the bed and also amended with the same materials. What resulted was a bed filled with top quality soil 36-inches deep. It was a monster of a job but I'm hopeful it'll help me break the 16-percent sugar level in an Ambrosia muskmelon.
Additional
Thoughts:
Sadly, shortly after the second melon ripened leaves near the bottom part of the main trunk began turning yellow and wilting. Within a week half of the plant had succumbed. Two days after that it was dead. Research suggests that the cause was fusarium wilt, a fungas that clogs the water carrying arteries in the plant. That put an end to the 2006 season. But fear not. I'll be back next year with even more exotic growing techniques.
In conclusion: Extreme melon growing requires investing considerable time and expense to prepare the soil, erect trellises, train vines and hunt for insects. But, these extremes pay off in producing melons that are gastronomic gems unobtainable any other way. (Actually, a few specialty farmers in Japan grow melons using these techniques for commercial sales but a single one can cost over $200.00. They are often given as prestige gifts and highly valued as such. The varieties used are selected based primarily on tradition. It's likely that your own home grown extreme melon could be better than even these Japanese gems because gardeners aren't restricted in their choice of melon varieties and can lavish all their attention on a single plant whereas even the most dedicated of Japanese gift fruit grower has to divide his time between hundreds of plants.)
So, next time you feel like a gardening challenge, try some of these techniques and see if they don't pay off.
Annual Updates:
2007 - The Great Savor - Petit Gris de Rennes Shoot Out
Savor has repeatedly won tastes tests as the best hybrid Charentais melon. Equally, Petit Gris de Rennes takes top honors in the non-hybrid arena. I decided to match these two greats in a head-to-head comparison to see which produced the best tasting melon.
Intuition inclines one to give the nod to Savor because it has the advantage of hybridization. However, many hybrids aren't developed for flavor but for earliness, disease resistance, productivity or shippability. That Savor wins so many taste tests may simply be that while it is tops when compared to other good producer-shipper melons, it may come up second in flavor when compared to a non-hybrid like Petit Gris de Rennes that has been optimized for nothing but flavor for 400 years.
Both were planted and grown in the same soil, in an area that receives uniform sunlight both in duration and intensity, received the same amount of water and the same amount and type of fertilizer. Every effort was made to keep everything equal between them. The area used had not had melons grown in it for over ten years so the odds of it being infected with melon diseases was minimal.
Results:
Right from the first Savor showed its hybrid vigor by outgrowing Petit Gris de Rennes two to one, both in the height of the main stem and the number of runners. In this respect Savor is challenging to train to a trellis because its growth is so rampant. The density of runners is so great that overcrowding is a certainty, with increased chances of insect and disease attack.
After three months Petit Gris de Rennes (below, left) caught up to Savor (right) in height, if not overall bulk:
The white cloth on Savor (right)
covers its first melon to protect it from sun burn.
Savor again took an early lead by setting the first melon. Ten days after pollination it clearly showed the stripes or sutures that mark many true cantaloupes.
Twelve days after the first Petit Gris de Rennes melon (below) was pollinated it was slightly larger.
At this early age melons grow extremely fast so I can't say whether Petit Gris de Rennes is an inherently larger melon or if the two days additional growth is was made it bigger than Savor.
Note that at this stage the melons are chromatic opposites: Savor is predominantly light with dark sutures while Petit Gris de Rennes is dark with light sutures. As they matured Savor's stripes faded.
By the time the first Savor
ripened, 4 months after planting, the melon plants
had completely covered the 40-foot
long trellis.
The Savor melon was ripe 39 days after pollination, as shown by cracks at the blossom end, yellowing of the ribs and a strong aroma. Several days prior to harvesting I stopped watering the plant to avoid watery-tasting flesh. As cracks appeared I covered them with duct tape to prevent contamination and insect attack. Unlike muskmelons, which give ample warning as they approach ripeness, Savor's color and aroma changes were extremely subtle and easy to miss.
Although Charentais melons like Savor develop a better texture if picked and held at room temperature for three days, large cracks permit molds and bacteria to contaminate the inside of the fruit. After three days it may become spoiled. Whether or not to wait depends on the depth of the cracks. In the case of this melon they were deep enough to warrant immediate consumption. Fortunately, it was good enough to not need holding.
Beautiful both inside and out, this melon was delicious. With a Brix of 18.3 percent sugar you might expect it to be almost too sugary. This wasn't the case because Savors are so deeply flavored that this level of sweetness is required for balance. There's nothing insipid about these melons. They fill your mouth with deep, rich, complex flavors.
While I expected that allowing the plant to ripen only one fruit would increase it's sweetness, I didn't expect it to also increase the size of the melon. This beauty weighed 4-pounds, 12-ounces, almost three times the average for a Savor melon.
While this was a great melon, it nonetheless had some down sides. It gave off a sharp grassy aroma which wasn't appetizing. This is markedly different from muskmelons, whose perfume is as delicious to smell as their flesh is to eat. Savor's texture is firm, almost crunchy. I prefer melons that are tender and succulent. Finally, it's very hard to anticipate when the melon is going to ripen to cut back on water.
Thirty-eight
days after it was pollinated the first Petit Gris de Rennes melon
was ripe.

This monster weighed an amazing 5 and 1/2 pounds, almost four times the average. It was much easier to tell how the ripening was progressing than the Savor because it clearly showed color changes four full days before the first crack showed in the blossom end. The crack grew much more slowly than with the Savor allowing it to stay on the vine longer. The melon had a measured Brix of 16.6. While this is lower than the Savor's, the Petit Gris de Rennes was a much better tasting melon; while full-bodied in flavor it was heartier and considerably less harsh. The flesh was also slightly more succulent. In many ways Petit Gris de Rennes' flavor reminded me of a top-quality muskmelon.
For
myself I rate Petit Gris de Rennes the clear and obvious winner over
Savor in this shoot-out. It's better tasting, larger, the plant is
easier to train and the melon gives more warning of when it's going
to ripen. However, I rate them both inferior to an Ambrosia muskmelon
grown using the same extreme melon growing techniques. There is
something about a 15 or 16 Brix Ambrosia that imparts a sense of
wonder, amazement and well being that no other melon can. From now on
it is the prime melon I'll be growing.
The
second Savor ripened September 9. Although its sugar level was only
16.5-percent, it was mild tasting enough to enjoy. It weighed a
respectable 4-pounds, 2-ounces. The plant was exhibiting signs of
stress, probably from a minor fusarium wilt infection. I assume this
accounts for the lower sugar level and size even though the plant
itself was larger. A minor aphid infestation also may have
contributed to the lower Brix.
The second Petite Gris de Rennes melon ripened a week later. Sadly, a massive aphid infestation and Fusarium wilt infection weakened the plant so the melon's sugar level was only 14.3-percent. While this level would be good for a muskmelon, the Petit Gris de Rennes came out harsh. This second melon was another monster size-wise, weighing 5-pounds, 3-ounces.
Fighting
Fusarium Wilt
This most dread of all melon diseases struck the Petit Gris de Rennes melon two months into its growth. Fortunately it was a mild infection and I decided to fight it.
I noticed that only a few leaves showed the complete dehydrated collapse once the sun shown on them that is characteristic of this bacterial infection. This suggested that even though the infection may have infected the entire plant it seemed to be concentrated in discrete locations. Thinking that these pockets of heavy infection might serve as reservoirs of bacteria, I began a daily routine of pinching off any leaves that wilted. Typical for this disease, the first leaves were located near the main trunk. The first day I pinched of a dozen leaves. The second only half that. Each day there were fewer wilted leaves to remove until by the end of a week none exhibited the extreme collapse indicative of fusarium wilt. I'm not a plant pathologist so I can't state with authority that this actually slowed the spread of the disease, but it seemed to have a positive effect in this case.
Shortly after this I noticed that on the brightest days, and in my high desert location such days have unbelievably intense sunlight, the plant as a whole showed signs of wilting even if I'd watered it heavily that same morning. I assumed that this might be a manifestation of a low level of plant-wide fusarium wilt infection. It wasn't bad enough to cause the catastrophic dead-leave sort of wilt of a full fledged infection, just a general weakening of the plant's vascular system. Thinking that every time this minor wilt happened it further weakened the plant and that each such weakening would cause cumulative injury, I decided to cover the plant with a white shade cloth. This reduced the intensity of the sun just enough so that the plant wouldn't wilt.

Although it looks opaque, this cover permitted copious amounts of sunlight through. This cover was only in place during those periods when the sun was the strongest and directly shining on the plant. This too seemed to help the plant remain a healthy, vigorous grower.
Since the bacteria that causes Fusarium wilt clogs the plant's vascular system so that it isn't as able to pump fluids, I began watering the plant very heavily (4-inches) every day. The idea was to provide as much water as possible so the plant didn't have to work as hard to collect and use it. Fortunately the drainage in my bed is excellent so waterlogging wasn't an issue.
Finally, I began a program of spraying the plant once a week with a foliar fertilizer, (Peaceful Valley Farm Supply's Brix Mix) so the plant didn't have to work as hard to pump nutrients around all it's runners.
Again, I can't say with certainty that these efforts helped. However, two months after the first signs of the Fusarium wilt showed itself the plant is still strong, vigorously growing and producing ripe melons. In the past when the same type and level of infection showed up the melon plant would have long since have died.
Random
thoughts
and suggestions
Melon aphids always attack my plants around the 4-month mark, right when they are trying to ripen melons. Regardless of how many times I inspect the plants and spray, the infestation always gets out of hand... but not in the 2007 season. That year I decided to experiment with Peaceful Valley Farm Supply's Brix Mix foliar fertilizer. I sprayed the plants once every two weeks. While I didn't notice any improvement in growing speed or melon sweetness, I did notice that I have yet to see a single aphid anywhere on the plants. And this is five months into the season. Considering that there are milkweed and oleander bushes that are heavily infested with aphids just feet from the melons this is amazing. The Peaceful Valley people claim that the spray increases the Brix of the plant's tissues making them less appetizing to insects. While this single case hardly proves the value of this product it's certainly one I plan continuing to use. Even if it doesn't feed the plant it's worth it just for aphid protection. (This protection broke down a month later. Two sections of the trellis became infected with aphid colonies. A good soaking with a 1-percent insecticidal soap spray brought the infestation under control. Had the plants been growing on the ground there would have been no way to stop the spread of the aphids. In a week or so the plants would have become completely overwhelmed and the second crop of menlons lost.)
Training
melons up a trellis is repetitive, tedious work. Anything that makes
it easier is worth considering. I discovered that taping a bent-wire
hook onto the back of a spool of the twist tie used for the training
is a major time saver.
It allows me to hang it on the trellis or hook it on my belt after cutting off a piece of tie, enabling me to have two hands free to work the plant.
A
Trick When Spraying for Aphids
Mature plants cover the trellis so tightly that when spraying a aphid infestation it's easy to get lost and lose track of which leaves have been sprayed. I find it helpful to use the trellis as a grid, spraying all the leaves in one square before moving on to the next. Working one column of squares at a time I'm sure of covering the entire plant. If I take a break it's easy to remember where I left off.
Attack of the Nematodes!
I noticed that a late planting of tomatoes in the bed to be used for melons in 2008 seemed to slow down considerably before they should. When I dug the plants up I discovered why: Nematodes

These microscopic worms burrow into the roots of plants, creating colonies that cause lumpy growths on the roots and restrict the plant's ability to collect nutrients and water.

While there are chemical soil treatments that'll eliminate them and more organically friendly options, I decided to use SOLARIZATION to test how effective that technique is in eliminating them. I solarized the soil during the 2007-2008 winter, planted in the same bed next Spring and examined the plant roots when I dug them up to see how effective it was at eliminating the pest. I'm happy to report that there were no nodules on the roots. Solarization also eliminated the fusarium wilt problem.
2008 Season
Although the last frost-free date in my high desert location is April 17, I got a head start this year by growing melon transplants inside under lights. The large pots required for so early a start are great because they reduce root binding, but creates the problem that the soil and root ball can weight 20 pounds or more at transplant time. Such a large clump of potting soil is almost certain to break up when removing it from the pot. I avoid this problem by lining the pot with 2-inch mesh chicken wire leaving enough extending above the top of the pot to grab onto and pull the root ball out of it. The mesh folds the soil together yet lets larger roots expand without being constricted. Here's a 2-month old Burpee Honey Bun bush melon being lifted out of its pot:
![]()
This technique becomes awkward when dealing with normal vining melons because at two months of age they can be six feet tall. The trellis set into the pot for them must be sturdy or the vines may flop around and break. This may seen like a lot of hassle, but it allows the ambitious grower to extend his or her melon season by a full two months. This makes it possible to grow a top quality, melons like Ambrosia in the north where it might otherwise be impossible.
(As far as the Honey Bun bush melon is concerned, I'm not a fan of bush types because they are so compact they aren't able to collect enough sunlight to manufacture the amount of sugar needed for great tasting melons. I try one from time to time but so far have not been impressed.)
Besides
the Honey Bun, I also started an Ichiba Kouji green-fleshed
muskmelon two months before the mid April safe transplanting date for
my high desert location. This is the most popular ultra-high quality
melon grown in Japan for the exclusive and uniquely Japanese gift
fruit market. Many of these melons demand prices of $200 each. When I
transplanted it, the main vine was 6-feet tall, there were half a
dozen side shoots and it had been producing female flowers for three
weeks. Getting an early start with this variety is important because
the melons take 55 days to ripen, 50-percent longer than normal
muskmelons. I hope to harvest the first melon in late June so please
be sure to check back then to read my evaluation of this reportedly
outstanding plant.
The picture above shows how large the Ichiba Kouji was on 15 May, four weeks after transplanting. The main trunk is nine feet long and the side runners extend five feet in both directions. This variety puts out more entwining tendrils than any other melon I've grown. This gets to be a problem because they continually wrap around runners and threaten to strangle them. Consequently I'm constanting snipping them off. The plant also produces an enormous number of female flowers, many times in double and even triple sets.
By 15 May there were seven melons in the 3/4-inch to 1 and 1/2-inch size. Below is the largest.
I estimate that it was pollinated five days ago on 10 May. It's in a convenient location so if it's still growing after another week I'll pinch off all the other melons to direct all of the plant's energy into this single fruit.
In Japanese gift fruit melon farms that grow the fabled $200 Ichiba Kouji melons, farmers let three melons on each plant develop. Two weeks before picking they remove two of these fruits, keeping the one that looks the best. Perfection of appearance is critical for these melons, perhaps even more important than flavor. In this I have an advantage over my Japanese counterparts. I'm only interested in growing the largest, sweetest melon possible. It doesn't bother me if the melon's netting is too rough or nonsymetric or if the melon's shape isn't perfectly oblong. This permits me to downselect to a single fruit from the very earliest moment of the melon's development, hopefully producing larger and sweeter melons than the best growers in Japan.
As for the Honey Bun melon, it's healthy but growing so tightly that it's almost impossible to determine if there are any melons on it. It appears that what makes this variety a bush type is that the vine distance between the leaf nodes has been reduced to almost zero.
It grows as many leaves and sets as many flowers as a normal plant, but they are so tightly jammed together that the resulting plant is a solid lump of green. Protecting such a plant from an aphid attack would be impossible because there is no way to get at the undersides of the leaves with a sprayer. Also, the runners are so short, thick and brittle that training them to a trellis would be extremely difficult. By 15 May it was less than three feet across.
After growing so many large melon plants, having this oddity in the garden is little having a little gnome underfoot.
30
May:
The last two weeks in May in my high desert location average 85 degrees during the day and 65 at night, perfect for melons. This year the second half of May was unseasonably cool: highs of 65 and lows hovering around 39. Although the days were bright and sunny, the low temperatures severely slowed the plant's growth to a snail's pace. Here's what the plant looked like on 30 May:
The white cloth in the lower left covers the melon shown in the 15 may update. It continued to grow and was by far the largest fruit on the plant so I pinched off all the others. Here's how it looked on 30 May:
Unlike normal muskmelons, that produce closed, healthy-looking netting, Ichiba Kouji melons have skin that cracks and then weeps a sap that seals the cracks thereby producing netting.

The melon may end up looking fine in the end but at this early stage it appears diseased.
I hate the idea of pinching off runners because every reduction in leaf area means there isn't as much plant to pump sugar into the fruit. However, Ichiba Kouji produces over twice the runners as any other melon I've grow, forcing me to prune it or the leaves would have become so thick they would have shaded each other and created countless hiding places for aphids.
15
June:
The weather warmed up into the 90s for the last two weeks and the Ichiba Kouji responded by growing at an astounding rate.
The runners now reach twenty feet across. Interestingly, the main runner, bent over and trained to the left on the top of the frame, has all but ceased growing. The melon fruit itself seems to have stalled it's growth and although the cracks continue to develop across its surface, it has remained softball sized over the last two weeks. This is in stark contrast to other melons, which grow the fastest at this size. The fruit remains firm with a healthy color so I do not believe it's diseased.
The Honey Bun bush melon has continued its slow, steady growth and is now three and a half feet across with 18 runners.
It's set dozens of fruit, which I thinned out to the single largest one.

Burpee states that this variety produces 3-pound melons that are 5-inch long. Considering that this 2-week old melon is already three inches long I suspect it's going to be much larger than advertised.
30
June:
The plants continue to grow but there has been no change in the melons.
15
July:
Still no change in the melons. This doesn't surprise me because the Ichiba melon is sopposed to take 55 days to ripen. However, the Honey Bun is a normal type muskmelon and should have ripened by now.
20
July:
The Honey Bun melon finally ripened today, as indicated by its falling off the vine even though there was no tension on the stem.
It produced a single, small, 2-pound fruit with a brix of 12.4. Although this is better than most store melons it falls far short of a premium variety like Ambrosia. Still, it had a deeply hearty, well developed flavor that was remarkable considering how small the plant was. Speaking of which:

the entire plant at full maturity only covered a 5-foot by 3-foot plot.
I'm surprised to find myself inclined to like Honey Bun. The plant is compact, neat, and easy to care for. It doesn't produce a large number of melons so a lot of time isn't eaten up hunting for and thinning fruit. The melons may not be the best but they satisfy and do so with considerably less work than most varieties. Best of all, its small size allows it to be started indoors two months before the last frost day. Someone with a modest plot could grow a dozen of these little gems and end up with a respectable harvest. The greatest problem is that because of the density of leaves, protecting it from aphids is almost impossible unless some sort of pest barrier like a floating row cover is used.
26
July:
Shortly after harvesting the Honey Bun melon the plant withered. It didn't appear to be the result of either disease or insect infestation. It may be that this variety has a short lifetime. This detracts from its usefulness because each plant only lasts long enough to produce one melon.
I picked the Ichiba Kouji melon because after 77 days of sitting on the vine it still wasn't displaying any signs of maturing.
The 2-pound melon had no fragrance and while its 13-percent Brix showed promise, its flavor was harsh. The melon is advertised as achieving Brix levels above 18-percent after 55 days of ripening. Either there is something wrong with my environment that this particular melon doesn't like or the advertisements are overly optimistic. Even if it had ripened to such high sweetness, I still couldn't recommend it because of its long ripening time, the difficulty of training the vines, the smallness of the fruit, questionable flavor and the annoying fact that the small green melons are particularly good at hiding themselves in the plant's foliage.
Normally at this point I'd be announcing the end of the melon season. However, in early June I began having misgivings about the Ichiba melon so as a back-up I planted a Burpee Hybrid, ranked by some as superior to Burpee's Ambrosia. I'd wanted to try this melon for several years and decided this was a good opportunity.
Although it was a late planting, by the end of July the vine was eight feet tall and had a spread of ten feet. The first melons appeared in early July but I removed them to let the plant get larger before subjecting it to the strain of ripening a fruit. By 22 July the plant's rapid growth convinced me that by the time a melon ripened the plant would be large enough to produce enough sugar to make it worth the effort. I found a baby melon in a convenient location and let it grow. Four days later here's what it looked like:
Although they're not visible in the photo above, the melon has fine, gray hairs on the zones between the sutures giving it a striped appearance.
1 August:
By the first of August the melon had grown 6 inches long.
The melon is angled slightly in
the photo above making it look rounder
and shorter than it really is. In
person the melon is noticeably oblong.
Its rapid growth suggests it will be a large fruit. Burpee Hybrids are reported to weigh up to six pounds. I'm hoping for seven.
The plant's growth has slowed considerably since setting this melon, barely adding two feet in both height and breadth over the last week. This indicates the vine is putting most of its energy into ripening the fruit. Figuring the melon will need 40 days from its 20 July pollination date to ripen it should be ready to pick around August 30. I'll be posting updates on 15 and 30 August so please check back to see how things are progressing.
15
August:
As you can see the melon has grown considerably over the last two weeks. I'd estimate it weighs close to 5 pounds. Oddly, the plant itself has all but ceased to grow. It's still healthy and there is no sign of insect damage but the vines are barely making an inch of growth per week and it's completely stopped producing flowers. Since I've never grown the Burpee Hybrid variety before I don't if this is normal or not.
August
27:
A week earlier the vines started growing and flowering again. This sudden change perplexed me until I checked my records and discovered I'd over fertilized the plant three weeks in a row. The excess nitrogen had burned the roots and stunted the plant's growth until the fertilizer washed out of the soil and they could regrow.
The melon was ripe and fell off its stem on August 25.
The melon appeared very large but only weighed 6-pounds 3-ounces. The reason was that the center of this variety of melon is large and hollow. It had an unsatisfyingly light heft when lifted, like expecting to lift a bowling ball and discovering instead it was a volleyball.
A mild flavor made it a tasty melon even though the sugar content was only 11.6-percent. I enjoyed it but doubt I will ever grow this variety again.
End
of Season Conclusion:
None of the three melons tried this year come remotely close to the quality of Burpee's Ambrosia Hybrid muskmelon. While I'm certain that there are better melons than Ambrosia, for my area it has beaten out all challengers over two decades of comparison tests. Therefore, rather than invest time testing more varieties I've decided to focus on Ambrosia and figure out ways to make it produce even sweeter and better tasting fruit.
2009
Season Underway!
Over the 2008-2009 winter season I grew sweet peas in the melon bed. They did well for a while then died out. Upon digging them up I discovered their roots were heavily infected with root knot nematodes. This indicates the solarization technique used last year did not have the long range positive effect I'd hoped. It also means that if the nematodes survived, or returned, then the fusarium problem may also be present.
I found a soil inoculant called Rootshield, which is supposed to prevent fusarium wilt and worked it into the top 12 inches of the bed. To combat nematodes I fertilized the bed with 10 pounds of shrimp meal, which is supposed to encourage the growth of bacteria that attack nematodes and their eggs. Additionally, I planted the entire bed with Park's Golden Guardian marigold, whose roots are supposed to trap and kill nematodes as well as poison the surrounding soil for them. These three defensive actions will take three months to have an effect so I won't be able to plant a melon until the end of July. Since the weather in my location stays warm through mid October this might just barely give me enough time for one melon. Unfortunately I can't get an early start by planting the melon in a pot then transplanting it into the bed because there is no guarantee that the potting soil will be free of nematodes or fusarium wilt.
As a back-up plan I'm exploring hydroponics. This could be a breakthrough technique for people like myself who are restricted to backyard farming and don't have enough land for crop rotation to keep fusarium wilt and other melon pathogens at bay. Hydroponics makes sterilization simple, easy and cheap enabling melons to be grown in the same area year after year without concern for diseases. I've wanted to try hydroponics for many years to find out if plants grown in artificial nutrient tanks produce fruit as sweet and flavorful as organically grown in-ground plants. This will be my chance.
NEW!!!
Hydroponic Melon Growing
Hydroponic
melon growing poses many problems for the extreme melon grower,
primarily because of a lack of information. I found very few detailed
articles on how to grow melons hydroponically and these were all
designed for mass production where the goal was to produce the
largest weight of melons in the least amount of space. Just like
growing melons in soil, this strategy is certain to grow inferior
fruit. Consequently, much of what I'm doing this first year (summer
of 2009) is experimental.
The first step was to decide which hydroponic technique to use. I wanted something that was simple, reliable and low cost. These criteria rule out ebb-and-flow systems (pumps, timers, expensive bedding material), nutrient film systems (pumps, long tubes for the roots to grow down and whose above ground location in my desert location would heat nutrient solutions too high,) bubble systems (compressors and bubble heads) and overhead drip systems (pumps, timers and expensive media.) Some people will complain that the media used in hydroponics isn't expensive. They are correct for traditional systems where plants are grown in extremely small pots. But, as has been shown earlier on this page the leaves of a mature melon plant can cover 200 square feet. For the plant to be able to pump enough water to keep itself thriving requires a huge root system with access to an enormous reservoir of water. Such plants require many cubic feet of growing media and this can get expensive simply because of the amount involved.
The system I selected is called the AVRDC Non-Circulating Hydroponic System. "AVRDC" stands for the Asian Vegetable Research and Development Center and the non-circulating system that bears this name was developed by Dr. Hideo Imai. (Sometime after 2009, this system was popularized as the Kracty system.) This system uses no growing media and has no pumps, bubblers, or timers. The following diagram shows what it looks like:
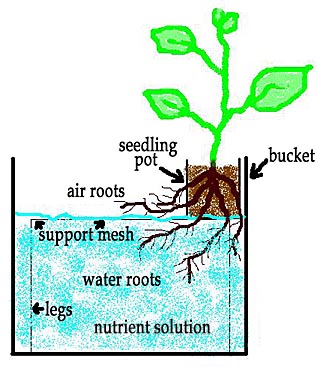
AVRDC or Kratky system
A melon seedling started in a potting container is placed on a wire mesh shelf at the nutrient level of the holding container, in my case a 19-gallon bucket. (Although not shown, the bucket is tightly covered to reduce evaporation with one small hole where the plant sticks through, which also allows for oxygen exchange.) Plants need to absorb water, nutrients and oxygen through their roots. In all other hydroponic systems, and in soil, all the plant roots collect all three. In the AVRDC system, some roots grow down into the nutrient solution to collect water and nutrients while others grow horizontally into open air to absorb oxygen. Separating the roots into two specialized groups eliminates the need for pumps and bubblers whose purpose is to insure all the roots have sufficient supplies of both liquid and air. In typical AVRDC systems the six inches above the liquid surface is dedicated to air roots while 6 to 12 inches below the surface is given to the water roots. (Note: I placed the melon close to one side of the nutrient bucket so that the vines wouldn't have to reach for the trellis as they would if the seedling pot had been placed in the center of the bucket.)
Quick cropping vegetables like lettuce are grown without adding more nutrient solution to the growing tank as the plant uses the initial charge of liquid. As the liquid level drops, water roots now exposed to air turn into air roots in 2 to 4 days. Nutrient starvation triggers the plant to extend the length of the roots to remain in contact with the nutrient solution. Container size is selected to be large enough to hold sufficient liquid to sustain the plant through its life. Because melon plants live so long and demand enormous quantities of nutrient solution this technique is impractical. Fresh nutrient solution needs to be added on a regular basis to maintain the plant.
While this system's design is what I was looking for, I could find no recommendations on how large a container is optimal for melons. For my initial test I selected a 19-gallon plastic bucket from Walmart ($15.00) and filled it with 12-gallons of nutrient solution to provide 12-inches of water root space. The air roots have 6 inches. The wire mesh/leg-support used was a kitchen rack also purchased from Walmart ($6.00) and bent to fit into the bucket. The openings in this wire rack are 1 inch square, so I have to admit that referring to it as a "mesh" is a misnomer.
I tested a couple of different seedling growing mediums such as foam and mineral wool blocks, but no matter how I prepared them (PH correction, 24-hour soakings, just water, 1/2-strength and full-strength nutrient solutions) germination rates were low and growth very slow. In the end I found the best way was to cut the sides and bottom out of a 1-quart plastic container, cover the openings with 1/8th-inch thick slices of rock wool and then fill the inside with my favorite potting mix. This container was nested inside a second quart container to prevent evaporation from the sides and bottom, which would kill off the roots when they start growing through. As soon as I could see the tips of roots sticking through the rock wool I placed the container in the bucket. The nutrient solution covered the bottom half-inch of the ssedling container.
One problem I didn't have to worry about was the optimum formula for the nutrient solution. I found several recommended formulas for melons on the Internet, all of which were close to the one I chose from Dr. Lynette Morgan, an internationally recognized hydroponics expert.
nitrogen:
215 parts per million (ppm)
phosphate:
86 ppm
potassium:
343 ppm
magnesium:
85 ppm
calcium:
175 ppm
sulfur:
113 ppm
iron:
7 ppm
manganese:
2 ppm
zinc:
0.25 ppm
boron:
0.70 ppm
copper:
0.07 ppm
moybdate:
0.05 ppm
While finding this formula was easy, reproducing it wasn't. The hydroponics supply store in my town carried no such formula nor could one be found on-line. I had to work through dozens of different concentrates to find the ones that had the nutrients I needed. This was frustrating and time consuming but finally resulted in my purchasing three 1-quart bottles of concentrates for a total of $50.00: Dyna-Gro Liquid Plant Food (7-9-5), Grotek Cal-Max (2-0-0), and General Hydroponics FloraNectar Pineapple Rush (0-0-1). On the work sheet these were the only concentrates that when combined, could provide all the nutrients required. I tried finding better options on the Internet but so far have not been able to do so.
Once I got the concentrates home I dug into the mathematics of converting percentages on the bottles to parts per million and then working out how much of each was needed to reproduce Dr. Morgan's recommended formula. This took two full hours and in the end I had to make several compromises. The problem was that in order to get certain nutrients up to specific levels other nutrients ended up being too high. In the end the best formula I could devise used 3 teaspoons of Dyna-Gro, 6 teaspoons of FloraNectar and 2 teaspoons of Cal-Max per gallon of water. The nitrogen is 33-percent higher that it should be but most of the other concentrations are within 10-percent of ideal. (If this preliminary experiment succeeds, I plan on researching other sources of nutrient concentrates to find a cheaper set that provides more control over the concentrations of individual elements.)
Three weeks after planting the seedling was 4-inches tall, growing strongly and the tips of its roots were just beginning to poke through the sides of the container. It was time to move it to the main growing bucket. (By the way, the 4 holes on each side and bottom the plastic seedling container were 2x2-inches. This is large enough to allow the main roots to expand to their normal full size of 1-inch in diameter without constricting them. Thin slices of rock wool were used to cover these holes because they were stiff enough to hold back the potting soil yet flexible enough to allow growing roots to push the fibers aside easily.)
The solution bucket had been placed in the main melon bed so that the plant would have the same sunlight exposure of soil-grown plants. I dug the bucket down into the soil and firmly packed soil around it so that the bucket was in full contact on both the sides and bottom. This was important because while air temperatures in my desert location can top 105 degrees, 6-inches below grade the soil remains a cool 68-degrees. This will keep the nutrient solution cool, which in turn reduces evaporation and provides the plant roots with a growing temperature they would normally have if grown in soil. The lower temperature also significantly retards bacteria growth. After filling the bucket with 12-gallons of nutrient solution, adjusting the PH to the recommended 6.3 using vinegar, positioning the wire mesh support and placing the seedling container on it, I camped a layer of aluminized insulating bubble wrap over the top of the bucket to reflect sunlight and insulate the interior from the heat of the day. The final setup looked like this:
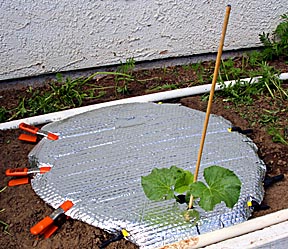
For size reference the cover is 24-inches in diameter. The plant has full southern exposure. On this day the weather was mild for early July in my area: 95-degrees, 12-percent humidity, crystal clear skies and blisteringly bright sunlight. One week later a record setting heat wave struck and in one day I became a fan of hydroponics.
That day was July 18. The plant had been in the big bucket for only eight days so I hadn't expected the roots to have grown enough to support even a small plant for what it had to endure on that day. The air temperature topped 108-degrees and the sun was bright enough to make cement surfaces hot enough to burn bare feet. The plant was also exposed to additional light reflecting off the white wall immediately north of it and from light reflecting off the foil cover onto the bottoms of the leaves. It is not exaggerating to say it was trapped in a solar oven. The result? The plant never wilted the least amount. The leaves were bright and green and firm all day long. Even more amazing was the growth spurt the plant put on. It seemed to be able to thrive under conditions that challenged every other plant in the garden, including those that had only half-day exposures to sunlight and had been heavy watered. On days such as this I'm used to significant wilting on soil grown melons even if they were heavily watered that same morning. This melon plant's ability to thrive under such extreme conditions prooved to me that hydroponics has an enormous potential.
But the heat wave wasn't just one day. It lasted over a full week and even then barely dipped to 102 in the shade. Here's what the melon looked like after this thermal torture:
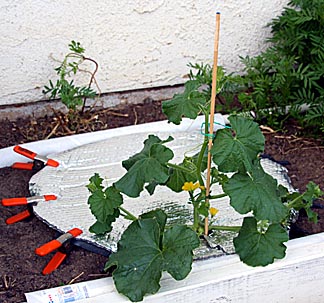
Only 12 days had passed since the first picture. In addition to shooting up to 16-inches tall, it also has four strong secondary vines and has already pumped out half a dozen male flowers. I'm used to melons growing fast but this is spooky.
Removing the cover showed that the surface of the nutrient solution was covered with a thin layer of foam.
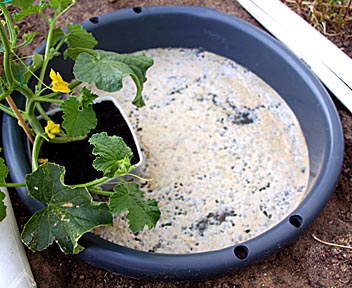
Because this is my first experiment into hydroponics I have no way of knowing if this is normal. Pushing the foam to one side showed the roots.
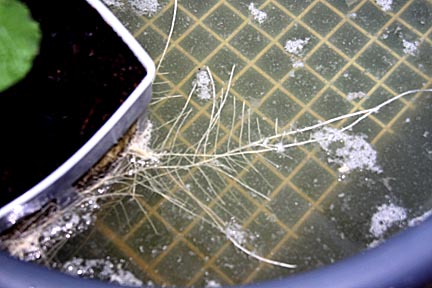
I have to admit that they weren't as extensive as I'd expected. Also, there were very few air roots. However, as long as the plant looks healthy and continues its explosive rate of growth I'm not going to change anything.
There are two ways water is lost from this system: evaporation into the air and absorption by plant roots. If I kept adding nutrient solution to maintain the constant liquid depth the AVRDC requires, evaporation would slowly cause the growing solution to become more and more concentrated. The solution is to add clear water to make up for the amount lost to evaporation. During the first week the system was in place I used a dip stick to carefully measure water depths and compared these to air temperatures. What I found was that on days where it was 95-degrees the bucket lost 1/16-inch of water (1 cup) per day. This doubled when the weather was 105-degrees. During this test the amount taken up by the plant was negligible. These two data points tell me how much clear water I need to add as a function of air temperature. Any additional liquid loss can be attributed to what the plant absorbed and will be compensated by adding nutrient solution. It is important to note that these estimates of evaporative losses are strictly applicable only to my system. Different growing buckets with different surface areas and weather with higher or lower humidities will change evaporation rates as will the temperature of the nutrient solution. Anyone attempting to repeat these experiment will have to determine the evaporation rates for his or her own setup.
Most hydroponic systems use small amounts of nutrients that are exposed to dense root systems and high levels of aeration or large liquid/air surface areas. These can lead to large fluctuations in electrical conductivity (EC) and total dissolved solids (TDS.) (Actually, they are related.) Hydroponic gardeners monitor these quantities using expensive ($80.00 - $120.00) meters. According to what I've read about the AVRDC system, the large volumes of liquid used and the small liquid/air interface results in the growing solution being so stable that these quantities need not be monitored. Similarly, PH is also more stable than in other systems. Consequently I will not be monitoring EC or TDS. However, I will keep a close eye on the plant and if it starts to show distress will immediately drain the bucket and replace the nutrient solution with a fresh mix. (Two weeks into the experiment I checked the PH of the nutrient solution. It was still 6.3.)
One of the attractions of the AVRDC system is that the bucket and mesh can be sterilized easily with bleach after use. There is no growing media to try and sterilize (difficult when dealing with the large quantities needed for extreme melon growing) or dispose of. The proof of the system, of course, is in the eating... specifically: a vine-ripened melon. The fact that the plant is strong enough to produce flowers makes me hopeful that it's getting everything it needs to fruit.
July
25 Update:
The melon is now 24-inches tall and has produced its first three
female flowers. It is common for the plant to drop the first
pollinated flowers because it knows it will not be large enough to
ripen fruit. I will not be concerned if they fall off. The plant
continues to look and grow better than any soil-planted melon I've
planted, in spite of daytime highs well into the 100s. In the past
week I've discovered that one of the perks of hydroponics is that
it's safe to stand on the soil close to the plant. In soil grown
melons this is dangerous because it's easy to damage their shallow
roots. Weeding is also eliminated not because weeds don't grow in the
surrounding dirt but because it doesn't matter if they do: they can't
draw water and nutrients away from the melon. Finally, there are no
concerns about whether the melon has enough water, needs more or is
getting too much. Much of the credit for this is because of the
simplicity and robustness of the AVRDC. One trick I've learned is to
once a week water the soil around the bucket even though none of this
water goes to the melon. The reason is that damp soil cools itself
through evaporation, helping to maintain the cool temperature in the
nutrient solution. If the soil completely dried out it would begin
collecting heat and transfer this to the solution.
I've been pondering how to determine how many gallons of nutrient solution will be needed for a full sized plant. What I've decided to to watch the plant and if at some point it starts wilting on hot days, I will calculate how many square feet the plant's covering and divide this by 12 gallons: the volume of the existing nutrient solution. This will tell me how many square feet of green top growth can be supported by one gallon of solution. Dividing this into the 200 square feet a mature muskmelon plant achieves will indicate how large a container will be needed next year. I'll then select a container slightly larger to provide a safety cushion. Of course, the effects of temperature, humidity and amount of sunlight will be taken into the calculations. This is the most important result I hope to get out of this year's experiment. I'm assuming the 12-gallons of solution available this summer will not be enough for a full-sized plant to ripen a fruit properly so I will not be judging the success of hydroponics by this test.
July 28 Update: Although it's only been three days since the last update, some interesting results have presented themselves that people considering hydroponic melon growing would appreciate. First and foremost, the melon continues to grow at an explosive rate. It's now 39 inches tall, 58 inches wide and the main leader is growing 3 inches per day. More importantly, the plant stems are thick and strong, the leaves solid dark green and the plant is constantly producing both male and female flowers. Additionally, the leaves have a healthy, glossy sheen I don't recall seeing on any of my previous melons... and all this is in spite of a mistake I made in the nutrient mixture.
Recent studies have linked potassium levels to fruit sweetness. Dr. Lynette Morgan's formula for growing hydroponic melons reflects this. While rechecking my formula I discovered I'd shorted it on potassium. This has been corrected by adding 3 teaspoons of Groteck Pro-Silicate (3-percent potassium) to each gallon of water. I corrected the 12 gallons of solution in which the plant is growing and will use the new formulation from now on.
The important news is that the plant is already indicating how much nutrient solution it's absorbing per day. Total liquid loss averaged over the last two days has been 15 cups per day. Subtracting the 2 cups lost to evaporation (air temperatures both days was 104 degrees) yields 12 cups of nutrient solution. Dividing by the average area of the plant (7 square feet) suggests an absorption rate of approximately 1.85 cups per square foot of plant area. (This may seem high but note that the leaves are dark and orient themselves as much as possible to be face-on to the sun, meaning that they are aggressive solar collectors. Broken off the plant, their temperature quickly rises to over 120 degrees. The only way they can survive is for the plant to pump enormous amounts of water into them so they can be cooled through evaporation.) Extrapolating the 1.85 cups per square foot rate to a 200 square foot plant means that I may have to add as much as 25 gallons per day. In as much as the bucket only holds 12 gallons I appear to have a problem. Hopefully the absorption rate will decline as the plant gets larger.
There is a second problem with such high absorption rates: daily fluctuations in the nutrient level. Air roots and liquid roots grown using the AVRDC system are fundamentally different in structure and don't tolerate changes. Liquid roots no longer immersed in water for 2 to 4 days turn into air roots. Air roots immersed in water rot. While each can tolerate changes for short periods of time, subjecting a significant percentage of them to daily liquid level changes can cause problems. Consequently either a very large container must be used to minimize daily changes in water level or an automatic nutrient solution supply system has to be installed. This latter option introduces a level of complexity and cost I prefer to avoid. My intention with the current test is to monitor liquid levels and manually add nutrient solution as needed to keep the water level to within one inch of the top of the wire support mesh.
One final point about absorption rates: As with all of my previous melon plants, this hydroponic melon is trained on a vertical trellis. At my latitude this means that the sun strikes the trellis at an angle to 22 degrees, greatly reducing the actual area of plant exposed to the sun. A 200 square foot plant only collects the sunlight striking 80 square feet of horizontal ground. The implication is that if someone wanted to grow a melon hydroponically and let its vines ramble over the ground, the same 200 square foot plant would be exposed to 2.5 times as much sunlight. This means it may require 2.5 times as much nutrient solution.
It may be hard to accept that a soil grown plant could ever collect as much water as it needs. Melons roots typically extend five feet farther than the reach of the vines. This means that a 200 square foot plant will have a root system covering almost 600 square feet. Assuming a good watering brings the moisture level in the top 12 inches of soil up to 10-percent, that represents almost 450 gallons of water, enough for 6 days in my location to weeks in milder climates.
July 31 Update: In the last three days the main leader lengthened to 52 inches for an average of 4.3 inches of growth per day. The plant's appetite is increasing at a similar rate; it's up from 12 cups per day (doesn't include evaporation loss) to 24.5 cups (again, this doesn't include the cup and a half lost to evaporation.) The rate per square foot is close to 1.45 cups per square foot. Temperatures are remaining in the 100-104 degree range so I wouldn't expect to see a decrease until the weather cools.
I discovered I'd been making a mistake when mixing new nutrient solution. While I had correctly adjusted the PH of the initial load of solution in the bucket but I haven't been correcting it in the mixes used to replenish it. If this hadn't been caught the 7.8 PH of my tap water would have slowly changed the PH of the solution in the bucket to a higher and less desirable level.
One interesting thing about the Groteck Pro-Silicate concentrate is that when mixed with Cal-Max a white precipitate forms. I assume this is a chemical reaction that produces an insoluble form of either silicon or calcium. Either way it's bad because the nutrient is no longer available to the plant. Thoroughly mixing the Pro-Silicate into the water first and the Cal-Max last seems to eliminate this problem. (I later discovered that the precipitate forms when Pro Silicate is mixed with any acidic liquid.)
There are ten female flowers whose embryonic melons are starting to swell. Hopefully one of them will continue to grow. If so I could be feasting on an extremely good-tasting melon in 41 days.
August 2 Update: It is now 44 days since I planted the seed and the melon plant, a Burpee Ambrosia muskmelon, is now five feet tall and 8 feet wide.
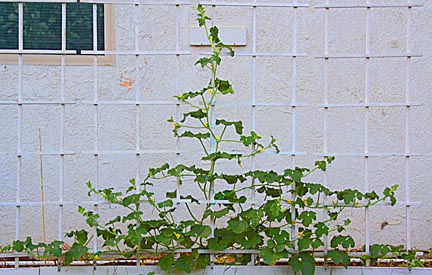
This growth rate is every bit as good as that for the best soil-grown plants I've raised. Curiously, it's growing wider than most of the Ambrosias I've had. This might be a peculiarity of this particular plant.
The plant has eight small melons that all appear to be viable.
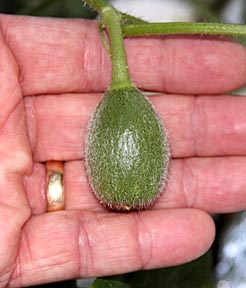
The production of so many fruits indicates the plant is getting everything it needs. I have picked off all but one of these and will clean the plant daily to insure all its energy goes into this single melon.
I had considered picking off all the melons for another month to allow the plant to grow larger. However, I'm still concerned that the bucket in which its roots are growing is going to end up being far too small. Delaying fruit ripening could mean the plant could fail before the melon ripened.
The weather has cooled over the last three days from 104 to 95. As it did, the plant's consumption of nutrient also decreased: from 1.6 cups per day per square foot at 104, to 1.35 cups per square foot at 98 to 1.25 cups at 95 degrees. The sky has remained brilliantly clear so the amount of sunlight striking the plant has been the same so I'm assuming the decrease is strictly the result of cooler temperatures. The net result of the reduced nutrient absorption per square foot is so significant that even though the plant is three square feet larger, its total liquid update has reduced from 24.5 cups per day to 21.5 cups. This bodes well for the amount of liquids to be added every day as the season wears on and temperatures eventually decrease. I say eventually because they usually remain around 100 through the middle of September.
I usually plant melon seeds on the first of April. These are transplanted into the garden on 15 May. By July 15 the first melon is ripe. Because I keep all the other fruits picked off until the last week before the first one ripens, then second melon ripens around August 21. Most of the time bacteria, viruses, nematodes and aphids are weakening the plant by this date and even if it lasts long enough to ripen a third fruit the quality is so poor that's it's not worth the effort. But, if hydroponics eliminate bacterial, viral and nematode problems then it may be possible to keep the plant in production until the weather turns too cold for melons, around October 15 for me. Assuming five weeks between each melon, this suggests it may be possible to harvest two more fruits. More importantly, these late melons would be growing on a plant that is much larger than the first two. The sugar levels in these late melons should be significantly higher than the earlier fruits. It's early days yet so I'm trying not to get to hopeful but I can't help getting a little excited about the possibilities.
August 6 Update: I had two days of uncharacteristically cool weather: 91 degrees with very light overcast. Nutrient consumption dropped to 1.05 cups per square foot. The daily highs returned to the mid nineties and as expected, liquid consumption jumped back to around 1.35 cups per square foot of plant. The melon pictured above has continued to fatten up at a satisfying rate. It's now 3 inches in diameter, the size of a large plum. This growth rate appears slightly faster than soil grown melons. While this sounds promising it may very well be that this melon is mostly water, which brings up a negative point for hydroponic melons.
Starving melon plants of water for a week before picking is a common technique used by high-end growers to boost sweetness. It also helps crack-prone varieties such as charentais from developing unattractively large cracks. The principle is that as the plant is stressed, it focuses all of its resources to ripening the fruit. Also, it's thought that reduced water availability prevents the fruit from becoming watery. This is a technique that can't be applied to hydroponic melons. Balancing this is the advantage that the plant never goes through the wet/dry cycles of soil grown plants thereby improving plant vigor and, supposedly, melon quality.
The high rate of nutrient solution uptake may seem to be something that would be good to reduce. For example, a mister or fine water spray would significantly reduce leaf temperatures and therefore transpiration resulting in reduced nutrient uptake. But, it has to be remembered that the higher the rate of nutrient absorption the faster the plant grows. So, while high absorption rates may be a hassle they are actually good for rapid growth.
Speaking of uptake rates, on 5 August the plant took up 36 cups of nutrient solution between 6 AM and 7 PM. That's 2.4 gallons. I add nutrient solution four times a day to keep the liquid level as constant as possible: 9 AM, 12 noon, 3 PM and 7 PM. Making so many trips may seem like a hassle, and it is, but growing extreme melons is a time consuming hobby. Anyone interesting in trying it but unable to feed their plant several times a day may want to consider a much larger bucket, as I will use next year, or an autofeeding system. For myself I enjoy checking up on the plant several times during the day. Plants grow so slowly it's sometimes difficult to view them as much of a spectator sport. But, seeing how much nutrient solution it takes up as the day progresses emphasizes that this really is a growing, dynamic living entity.
In case anyone was wondering, during the cool night time temperatures of 65 degrees the plant only takes up 2 cups of liquid.
(Repeat visitors to this page may note that previously reported nutrient absorption rates have been cut in half. The new numbers are correct and fix a mistake I had been making in calculating the plant's square footage.)
August 14 Update: Since the melon is two weeks old I thought it would be interesting to compare pictures of it to the two week old soil-grown melon featured earlier on this page.
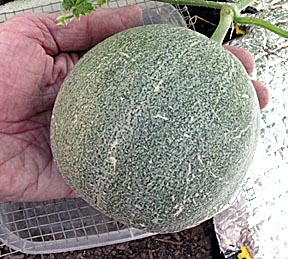 ..................................
Two
week old hydroponically grown Ambrosia muskmelon ......................
Two week old soil-grown Ambrosia muskmelon..........
The soil-grown plant was larger and was growing in ideal weather conditions in early May, whereas the hydroponic melon had to endure the full fury of my high desert's August inferno. In spite of these disadvantages the hydroponic melon clearly outgrew the soil-grown melon. It's about the same length but much fatter. The first signs of netting are showing up suggesting the melon is ripening faster as well.
The hydroponically grown plant continues to look stronger and healthier than any soil grown melon plant I've raised. Typically by this age soil grown plants are already showing some signs of stress from fusarium wilt: the first leaves that formed around the base of the plant are starting to shrivel and the plant has increased periods of daytime wilt. The hydroponic melon exhibits none of these.
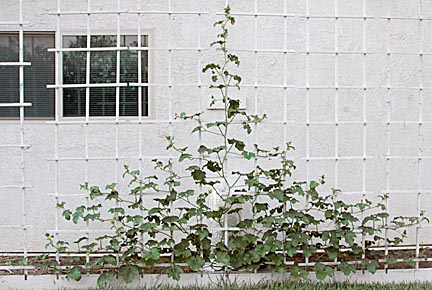
Fifty-six
days after planting seed the melon plant is 7 feet tall and 12 feet wide.
While the plant continues to do great I discover that as a hydroponic gardener I leave much to be desired. Previously, I admitted to committing a math error in calculating the area of the plant. Today I must confess to a second mistake, though this one is more an error in trust than a deficiency on my part. I use a one gallon pitcher graduated in one cup measurements for mixing the melon plant's nutrient solution and assumed that it was accurate. As the plant got larger I began preparing extra quantities and storing them in used one gallon plastic milk containers. Oddly, the mix never filled the container. I checked the graduated container with a one cup measure and discovered that when the container said it had 16 cups (one gallon) it was only holding 14.5 cups. This had two effects on my hydroponic system: the nutrient solutions were stronger than they were supposed to be and the calculations of the cups per square foot absorbed by the plant were too high. I'm not going to change how I mix the nutrient solution because the plant has been doing so well on it as is. For the second issue, I've gone back and changed the absorption rates per square foot to the correct values.
There was one unbelievably cool day: 79 degrees. This is near record-setting for my desert location. On this day the melon plant's cups-per-square-foot nutrient absorption dropped to 0.95.
Early on this page I mentioned that one of the advantages of extreme melon growing on a trellis is that it forces the gardener to visit his or her plant at least once a day and in so doing enables them to notice how dynamic the plant is. Going to hydroponics does the same thing in spades. Seeing that the main leader has grown 3 inches in one day may be exciting to a gardener but one has to admit that it is a small amount of change. But, pouring gallons of nutrient solution into the hydroponic tank every day emphasizes just how busy the plant is. Since venturing into hydroponics I've developed a greater appreciation for how much work melons do every day pumping huge amounts of liquid into their leaves and using it to grow.
So far I've voiced a lot of praise for hydroponics. However, there is one glaring fault with hydroponics and that is that as an industry it is rife with snake oil advertising; in other words: making claims that are not supported by scientific research or failing to provide complete information. The following are a few of the many examples I've noticed:
1. Bottling the exact same formula under several different labels.
2. Claiming that one particular additive or another contains special enzymes, bacteria, etc. that boosts plant vigor without support references.
3. Failing to provide complete lists of ingredients. For example, some will list the micronutrients and their sources, but fail to mention the concentrations of important elements, like sulfur, which is obviously present because it's present in the chemicals used. Many mixes have micronutrients but fail to mention their concentrations.
4. Selling extremely dilute concentrations of N, P, or K (Like 0.1 percent) at exorbitant prices while other labels sell concentrations 20 times higher more cheaply. Some of the low-concentration formulas claim to have other beneficial factors but no references are provided to support these claims.
5. Giving products artificially catchy names in an effect to capture a sale through hype. For example: "Sugar Peak Briximus Maximus" and "Earth Juice Microblast." I'm not saying these are bad products. They may be great. It's just that marketing them with such a transparent trick is insulting. It makes me feel like they are trying to convince young children to buy toys.
I
admit that these same sort of problems can be found in soil-based
gardening products but they seem to be more common in hydroponics.
Earlier
on this page I mentioned that the AVRDC system as described by Dr.
Imai does not need to have its EC (electrical conductivity)
monitored. I was willing to go along with this until the problem with
the incorrectly-marked measuring container came up. It made me
cynical. If you can't count on something that simple being accurate
then is it wise to trust a stranger for the health of a melon plant
I've invested time and money to mature? I decided to purchase an EC
meter to make sure the AVRDC system was functioning as advertised. It
was a good thing I did.
After reading many positive endorsements for the Truncheon EC/CF/PPM meter by Blue Lab, I purchased one and immediately tested the melon's growing solution.
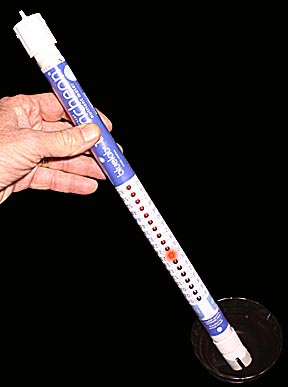
When
dipped in a nutrient solution, the meter flashes a red light
indicating the solution's EC.
Three
other scales parallel the EC scale so the same reading also provides
CF and 2 different ppm readings.
The melon's nutrient solution was supposed to have an EC of 1.8 to 2.4. My solution registered a root-scorching 3.4. The fact the the plant not only endured such a strong solution but thrived on it is a testament to its toughness. Nonetheless, the situation was far from ideal and in time was certain to damage or kill the melon. I drained the tank, rinsed the roots and tank with clear water and refilled it with all new nutrient solution set to an EC of 2.0. This also gave me the opportunity to correct the solution's PH to 5.8, which is supposed to be ideal for melons. This was accomplished before dawn. Attempting to do so when sun light was on the melon would have caused it to quickly pump all the liquid out of the roots and when that was gone the entire plant would have immediately wilted and probably died.
There are several reasons why the EC went so high. I may have been mixing the nutrient solution too strong. I may not have been adding enough water to compensate for evaporation. The plant may not have been absorbing the nutrients at the same rate it absorbed water. Now that I have an EC meter I'll be checking the bucket's solution every day as well as each new batch of mix.
When I first got the Truncheon, I was confused by the four different parallel charts printed along its length. A hour's Googling enlightened me. Here's what I learned:
1. All nutrient concentration meters work the same way. They pass a small electric current through the solution via two electrodes on the bottom of the meter to measure the resistance of the liquid. Water that has a lot of salts dissolved in it has many positively and negatively charged molecules in it that can conduct electricity so more electricity passes from one electrode to the other and the meter gives a high reading. Water with little material dissolved in it doesn't let much electricity through so the meter gives you a low reading. The range of most meters is from 0.4 to 6.0. "EC" is short for electrical conductivity, or simply how much electricity the solution conducts. Most young plants prefer ECs of 1.8 increasing to 2.4 when they are mature. "CF" means conductivity factor. It's simply the EC multiplied by 10. Why? It gets rid of the decimal point, which confuses some people. "PPM" stands for parts per million. More specifically: parts per million by weight. For example: if I mixed one pound of salt with 1,000,000 pounds of water I'd have a concentration of 1 ppm salt. The tricky part is understanding why there are two different ppm scales on the Truncheon.
Nutrient solutions are usually made by calculating how much concentrate to add to a certain amount of water to end up with the appropriate percentage or ppm of nutrients. Once the solution is mixed, it's automatic to think of its concentration in terms of ppm. Meter manufacturers realized they'd sell more meters if they calibrated them to provide ppm values in addition to or in place of EC. Since high EC means high ppm readings it's possible to use a simple multiplication factor to convert an EC reading into a ppm reading. The problem is that the net electrical conductivity of a solution is determined by the effect of "all" of the stuff that's dissolved in the water. In the case of hydroponic solutions, there can be several dozen different salts used to provide all the elements needed to grow a plant. It would be impractical for manufacturers to formulate reference solutions for calibrating their meters using such complicated mixtures. Instead what some do is use a nutrient conversion factor is the same as the one used for pure sodium chloride solutions: table salt in water. This conversion factor is 500. Multiply EC by 500 and you have an estimate for ppm. Other manufacturers attempt to make their calibration mixtures more representative of hydroponic solutions by using a weighted average of three different salts: sodium sulfate, sodium bicarbonate and sodium chloride. The conversion factor for this system is 700. Multiple EC by 700 and you have the ppm based on the three-salt system. Each system has a dedicated following. I could not find any scientific criterion on the Internet for which is better.
So, whether you have an EC, CF, ppm(500) or ppm (700) meter, what you really have is an EC meter with one of three simple multipliers applied to the EC value. I prefer checking nutrient solutions using EC values. There are too many ambiguities in dealing with ppm systems. Having said all this, I must confess that the Trucheon is fun to use. I find myself looking for excuses to test one nutrient solution or another.
While working with the Truncheon, it occurred to me that it was really just a high-priced Ohm meter, the same as an inexpensive multimeter from Radio Shack. To test this idea I set my Radio Shack multimeter to Ohms, held the probes in one hand so their electrodes were half an inch apart and stuck them in a sample of nutrient solution. The reading was 75,000 ohms from a solution with an EC of 2.0. An Ohm meter could very easily be calibrated to act as an EC meter. All that's needed is an EC meter to compare it to or a set of know ppm samples.
While changing the melon's growing solution in the tub I discovered two interesting things. First, the sides and bottom of the nutrient tank were covered in fine sandy granules. Because the tight cover prevents sand from blowing in I assume the sandy material was a salt that precipitated out of the nutrient solution. These crystals don't dissolve in water, even if the water is heated to almost boiling. They are gritty, yet can be ground up into finer particles between two fingers. Regrettably, I'm not a chemist so I don't know how to identify what the crystals are. Second, although the plant is currently absorbing over 40 cups of liquid per day, the volume of the water roots is remarkably small. The air roots form a near-solid mat covering the mesh but the water roots barely hang down into the nutrient solution 4 inches. Most water roots are less than two inches long. The implication of this is important.
If the water roots average only 2 inches long, then if the plant drinks enough water to lower the level of the nutrient solution by 2 inches the plant will shrivel and probably die. Adding water two or three times a day may not be good enough because on hot days the plant can create a 2-inch draw down in as little as 6 hours. Clearly, this means that some sort of automated system has used to maintain the nutrient solution at a constant level. On the positive side, the shortness of the water roots means that the liquid depth only needs to be 6 inches. Additionally, while Dr. Imai stated 6 inches was needed for the air roots, the photo suggests this height could be reduced to 3 inches.
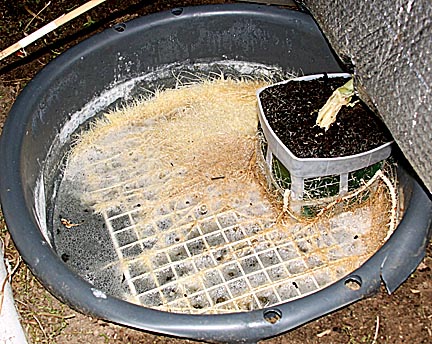
The
root system 56 days after the seed was planted. All that can be seen
is the mat of air roots
on
the surface of the nutrient solution. Water roots hang down from the
air roots and extend only 4 inches into the liquid.
It's
amazing that such a small root mass can absorb close to three
gallons of nutrient solution in 10 hours.
Dr.
Imai recommends a mesh to support the air roots that has 3mm
opening. Such small holes encourage the development
of
an extensive air root mass. The 1-inch square holes in my system are
8 times larger but seem to work well for melons.
An
Auto-Feeder:
On a hot day the melon plant can easily absorb three gallons of nutrient solution. Making half a dozen trips into the garden to top off the growing bucket every two hours gets to be a hassle. What I needed was something that would maintain the liquid level with little or no drawdown yet was simple and inexpensive. Ball-valve systems have been around for decades. The problem is that they take up a lot of room in the nutrient tank, allow liquid levels to drop by two or more inches before they trigger and because they are exposed to the murky liquid in the bucket, may clog. Electric valves have also been used for a long time but require power and expensive sensors. My solution was to build a giant hummingbird feeder.
The most common type of hummingbird feeder consists of an inverted jar stoppered by a cork through which a tube carries hummingbird nectar out of the jar to where the birds can get to it. The weight of the liquid creates a partial vacuum in the top of the jar holding the liquid back from dribbling out the tube. As a hummingbird drinks the nectar he creates a bubble that travels up the tube and releases an equal volume of liquid. The same idea works on a much larger scale.
I took a 5-gallon plastic water cooler bottle and used hose fittings to connect a 3/4-inch tube to the screw-on top. I then drilled a hole near the lower corner of a small bucket, struck the tube through it after filling the bottle with nutrient solution and inverting onto onto the bucket. The end of the tube extends into the nutrient solution bucket and is cut off so that it's right at the level I want to maintain. The yellow arrow in the photo below points out the tube that carries the nutrient solution from the bottle to the bucket.
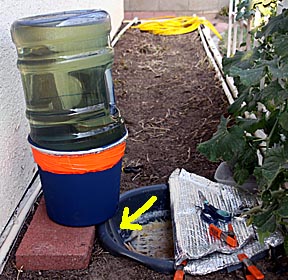
As the plant absorbs liquid from the bucket, the water level drops. As soon as it gets lower than the end of the tube, air bubbles up it and into the bottle, releasing nutrient solution into the bucket until the liquid level in the bucket rises to the level of the end of the tube. The nutrient solution prevents any more air from entering the tube so the flow stops. (This also works the same are water bottles used for hamsters.) Sunlight shining on the bottle would quickly heat it. To prevent this I wrapped a double layer of insulating bubble wrap around it.
It works great. At the plant's current size, as long as the daily high is below 95 degrees the 5 gallon bottle holds enough solution for two days. As the plant gets bigger I will add a second or even a third auto feeder to keep up with the melon's insatiable thirst. If I had to do it over again I'd look for a three-gallon bottle. The 5-gallon is difficult to maneuver into position.
Important
Truncheon Meter Announcement:
In case anyone is thinking about purchasing a Truncheon TDS meter based on my mentioning it on this web page, I must warn him or her of two serious problems I had with mine the first week after I got it.
The first two or three readings I took with the meter seemed to be correct based on calculations of what the nutrient solution EC should read, though perhaps a little low. The next day I noticed the EC reading for the main growing bucket had declined by 0.3 points. The second day showed another 0.2 decline. The third day had another 0.2 decline. Fearful that the plant was somehow managing to absorb more nutrients than water and thereby weakening the solution, I attempted to mix up a strong boost batch to add to the bucket and get the readings back up where they belong. To my dismay, a mixture that should have had an EC of 2.2 was only indicating 0.8 on the meter. Something was wrong and getting worse with every test.
I went back to the store from which I got the meter and purchased a cleaning/test kit. The first thing I did was use the reference solution (EC=2.7) to test the meter and was stunned to see it read only 1.0. Was the meter wrong or was the reference solution improperly mixed? Using a digital scale rated to be accurate to 1 gram +/- 5-percent, I mixed up an NACL (table salt) solution that by calculation should have had an EC of 3.1. It read 1.1. This suggests that the reference solution was correct and that the problem was with the meter. I changed the batteries with brand new ones. It didn't resolve the low reading problem. Next I used the cleaning materials from the calibration kit to clean the electrode. This time the meter read 2.0 in the reference solution and 2.2 in the NACL solution. Better, but still far too low. Thinking that the meter might be working properly but had been miscalibrated, I prepared a NACL mixture which by calculation should have had an EC of 5.7. It read 3.8. A plot of calculated versus actual test ECs showed a nearly perfect linear relationship. This suggests that the meter is indeed working correctly but had been miscalibrated at the factory.
After crunching all the numbers for the last paragraph, I retested the meter in all three reference solutions to verify the results. To my surprise all three values were significantly lower. Disgusted, I put the meter aside. An hour later I came back and repeated the tests a third time and discovered that the readings had once again decreased. In the reference solution that came with the kit the initial result immediately after cleaning the electrodes was 2.0. Half an hour later is was 1.8. An hour after that it had decreased to 1.6. Thinking that the electrodes began aging immediately after being cleaned and that this aging was causing the readings to decrease, I conducted a test where the electrodes were cleaned and readings taken every two minutes for 40 minutes. Here's what I got:
time = 0 (immediately after cleaning) EC = 2.0
time = 2 minutes, EC = 1.9
time = 4 minutes, EC = 1.8
time = 6 minutes, EC = 1.8
.
.
time = 20 minutes, EC = 1.7
.
.
time = 40 minutes, EC = 1.6
I
repeated this test three times and got the same results each time.
Further checks of the readings from the EC = 3.1 and 5.7 NACL
solution showed similar results. The problem appears consistent
across the range of the meter.
In all these experiments I was careful to follow exactly the manufacturer's recommended handling instructions for using the meter, using the cleaning materials, electrode care, and keeping the reference solution pristine.
What this tells me is that for my meter, serial number 6147, the instruction to clean the electrodes weekly is completely wrong. They need to be cleaned immediately before to every use. Additionally, the factory calibration is off by a factor of negative 26-percent. It took an entire day to conduct these experiments. I would return the meter but did not have the good sense to keep the original packaging. Now that I have developed a test procedure and calibration curve that allows me to use the meter to test my nutrient solutions I can use it. However, in my opinion all this home testing and calibration is something no customer should have to do.
Update: After trying several different cleaning methodologies I discovered that if I used the recommended cleaning solution and tool and scrubbed hard for a full 40 seconds before rinsing the electrode off, the probe reads a commercial test solution to within 3 percent if the test is completed within one minute after cleaning.
August 17 Update: DISASTER!!!
Sometime during the night of August 16 the feeder tube from the 5-gallon bottle worked loose from its holder and dumped 4 gallons of nutrient solution into the growing bucket. All the air roots were under water for 12 hours before I discovered the problem. It was too late. By mid afternoon the melon plant was wilting, many of the leaves had a sickly yellow hue and several had dark brown patches. By evening the entire plant was hanging limply on the trellis. The air roots looked like brown mush. So ends the 2009 melon season for me and for the first time in many years I didn't get a single vine-ripened melon to enjoy.
However, the season wasn't a complete write-off. I learned many things that I will be applying to the 2010 season:
1. Hydroponics works for growing melons, though the amount of nutrient solution required is enormous: on the order of 200 gallons for the first melon. That adds up to $300 for the concentrates to make the nutrient solution. The second melon would be an additional $200, the third $300 and the fourth $400. Clearly, $1200 for 4 melons is unreasonable. Before hydroponics becomes practical for extreme melon growing a much cheaper source for nutrients has to be found. Fortunately, Dr. Lynette Morgan was kind enough to respond to an email I sent her and she mentioned a company named Cropking, which sells individual fertilizers salts much cheaper than the liquid concentrates I had been using. This is an option I will explore. One alternate source is using a dry fertilizer by General Hydroponics named Floramato 10-6-18. The N-P-K ratios are almost perfect for melons and this dry fertilizer claims to contain all the secondary and micronutrients required for healthy growth. Purchased in a 16-pound bucket for $118, this very concentrated fertilizer calculates out at $7.34 per 60-gallons of nutrient solution. That's still crowding $30 for the first melon, but as the expense for over three months of hobby fun that's not too bad. (Another cost-saving strategy would be to follow Dr. Mordan's recommendation to start plants on weak solutions with an EC of 1.8 and gradualy increase it to 2.4 as the plant matures. That could reduce the first-melon nutrient cost to $20. The problem is whether or not this single fertilizer will supplu everything the plant needs. It's description claims: FloraMato Dry is a stand-alone combination of primary, secondary and micronutrients. The "stand-alone" claim suggests it contains everything required for healthy plant growth, though it doesn't list zinc, nickel or sodium in its ingredients.
To test how good FloraMato works, I purchased a 1.5-pound container of this fertilizer and will use it to grow a melon started two weeks ago as part of a germination experiment. It's too late into the season to get a melon out of it, but the plant should have enough time to fill most of the trellis. If it does and looks healthy I'll assume this fertilizer really is a stand-alone nutrient. If not, I'll look into using an inexpensive micronutriet amendment to bring it up to speed. I hope it works. Unlike the brew I had been using, it doesn't seem to go sour. I believe the FloraNecter solution was causing the previous mixes to go bad.
2.
The basin in which hydroponic melons can be grown only needs to be
8-10 inches deep, half for water roots and half for air roots. From
the size of the root mass of my melon plant I estimate the basin
should have a surface area of four to six square feet.
3. Contrary to one paper I read on hydroponic melons grown using the AVRDC system that claimed melon roots were hairy enough to float, my Ambrosia melon plant roots weren't and didn't. The 1-inch openings in my system provided enough support but attention has to be paid to the sides of the mesh. Roots growing along the edge can fall off and begin to rot.
4. Hydroponic melon roots are extremely fragile. Even the slightest movement can tear them loose causing the pieces to rot and foul the nutrient solution.
5. Although tedious, the process of hand watering the plants is by far the safest and most satisfying.
6. Autofeeders can fail, resulting in the plant either drying out or drowning. Extreme care in the design and construction of an autofeeder and constant monitoring is critical and even then disaster can still strike.
7. Dr. Morgan's nutrient recipe appears to work very well, though regrettably I don't have a ripened melon to prove how sweet a melon it produces.
8. An EC meter is an important piece of equipment. But, establishing that it is properly calibrated and learning how to make sure it holds its calibration can be challenging.
9. An inexpensive Ohm-meter can be used as an EC meter. Simply mount the probes in a holder so that their distance apart is held constant, make sure they are inserted into the solution the same distance each time and calibrate the unit with table salt solutions to establish a calibration profile. (2.5 grams of salt in 3500 grams water = 700 ppm or EC = 1.4, 5.0 grams salt gives 1400 ppm or EC = 2.8, 7.5 grams gives 2100 ppm or EC = 4.3 and 10 grams salt gives 2850 ppm or EC = 5.7)
10. It's sometimes necessary to completely drain the growing tank. Dipping out nutrient solution knocks roots around enough to damage them. Set the growing container at a slight angle so that there is a low point towards which the liquid will drain and leave room for a syphon tube to remove the nutrient solution gently.
Curiously,
one of the most important things I took away with me from this foray
into hydroponic melon growing is a greater appreciation for the
convenience and forgivability of soil-based gardening.
HYDROPONIC MELONS VERSION 2.0!
August 17th is too late to start a melon in my zone and hope to harvest fruit before cold weather hits. Nonetheless, I've rebuilt my hydroponic melon system and started a new melon plant in it to test how the new system works. This will provide one more iteration before the 2010 season. Fortunately, I'd planted a seedling on August 3rd for a germination test. This gave me a headstart.
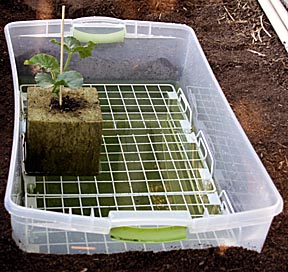
I replaced the 19-gallon bucket with a 30-inch long by 18-inch wide by 10-inch deep plastic storage container. The size was largely determined by the dimensions of ready-made racks that would fit inside. I compared many container/rack combinations and this was the best, though I still had to cut down the racks. They were the perfect length but too wide for three to fit next to each other to cover the entire container. This combination provides 5-inches of liquid depth and 5-inches of air space. The racks completely fill the container so there shouldn't be any problems with roots falling off the sides and drowning as there were with the previous setup.
As in the first attempt, the container was filled with nutrient solution so the bottom 1 and 1/2-inch of the rockwool cube in with the seedling was started is immersed. The solution will be allowed to draw down until it is at the level of the rack, at which point the automatic feeder will take over and maintain the liquid level.
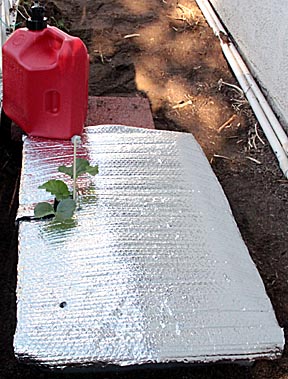
The plastic container comes with a cover, which made protecting the solution easy. As before, the cover was insulated with aluminized bubble wrap, though this time the center was built up so that water from rain or sprinklers will run off instead of into the nutrient container. As this picture above shows, the 5-gallon water bottle has been replaced with a 2.5-gallon gas can. The smaller volume makes it much easier to carry and fit into the growing container. Its rectangular shape also allows for more efficient use of the limited space around the plant. As many as eight can be placed around the container to feed the plant. What can't be seen in the photo is a 1/2-inch rigid PVC tube screwed into the bottom corner of the can and extending down into the nutrient solution. This feeder works on the same principle of the previous feeder, but with greater reliability.
I'm also testing a new nutrient system. The previous system was too much of a hassle mixing and matching four different nutrients to get the correct ratios of N-P-K. It was also far too expensive and the solution tended to go sour. This time I'm using a single dry fertilizer named FloraMato by General Hydroponics.
This all-in-one mix has the perfect N-P-K ratio as recommended by Dr. Morgan. Additionally, it's only $12.49 for 1.5 pounds (enough for 130 gallons, which comes out to $20 for the first melon) and comes PH buffered to adjust the PH of the solution down into the optimum range. As great as this sounds, I ran into problems with it.
The instructions recommend 1.25 teaspoons of FloraMato per gallon of water for fast-growing plants. The problem is that the amount of acidifier in the dry nutrient was determined for PH = 7.0 water and a mixing rate of 1 teaspoon per gallon. On the day I made my solution the water was running at PH = 6.8. Combine this with the fact that I was mixing a stronger solution and the net PH ended up down around 5.4. Since melons do best at 5.8 I had to adjust the PH up with a little baking soda. The next issue had to do with parts-per-millions recommendations and EC values, though this isn't the fault of the plant food.
Dr. Morgan recommends potassium levels of 343 ppm. She also states the EC for young plants should be 1.8 while for mature plants it should be 2.4. I'm new to hydroponics so maybe I don't understand a lot of things but I don't see how you can maintain a 10-6-18 nutrient ratio and a fixed potassium level yet have changing ECs. I suspect the ratio of nutrients remains constant and that their ppm varies as the EC increases. The problem is that Dr. Morgan never stated if the 343 ppm number was for the 1.8 or 2.4 EC. All this is very confusing to a newcomer like me.
A similar problem crops up when I try to calculate how much FloraMato I need using her recommendations. She wants 343 ppm potassium. That means if there is 3785 grams of water in a gallon, then to get a concentration of 343 ppm I need to add 343 x 3785/1,000,000 = 1.3 grams of potassium to one gallon of water. Since FloraMato is 18-percent potassium, that means it takes 1.3 grams/0.18 = 7.2 grams of fertilizer. This is almost 1.75 teaspoons per gallon, 0.25 teaspoons more than their highest recommended dosage of 1.5, which comes with warnings that it may burn roots. To make matters worse, if I mix 7.2 grams of Floramato in 3785 grams of water I end up with a total ppm of 1900, corresponding to an EC of 2.7 (x700 scale) or 3.9 (x500 scale,) both of which are far above Dr. Morgan's maximum of 2.4. In the end I decided the best thing to do was quit trying to think so much and just go with the suggested mixing ratio of 1.25 teaspoons per gallon, which gives me an EC of 2.5 on a freshly cleaned meter.
Between my Truncheon being miscalibrated, learning how quickly its sensitivity changes and ambiguities in ppm/EC mixing instructions/ratios I've become cynical about the usefulness in an EC meter for preparing nutrient solutions. All I'm using now is to measure changes in the main tank's nutrient concentration. If it goes higher I'll add water, if lower I add a more concentrated nutrient solution. I'm not going to worry about what the absolute numbers mean.
Speaking of the truncheon, I emailed the company that makes them, explaining how I tested it to verify it was out of calibration. I never heard back from them. Truncheons may be the best EC meter on the market and I just got unlucky. Maybe the company usually responds with great support and my email somehow slipped through the cracks. I've also never used any other EC mater so maybe they all act like this. All I know is that if I had to do it over again I'd go with a different brand.
But, let's not dwell upon sour grapes. There is a brand new hydroponic system cooking away in the garden, it's filled with a new, cheaper, non-souring nutrient solution that's not costing me an arm and a leg, and there's a two-week old melon plant soaking up fertilizer and growing like mad. What more could a gardener want?
September 3 Update:
Two and a half weeks after moving the seedling into the second hydroponics system, the plant has grown as quickly as the first attempt. If the plant looks a little strange for a young melon, it's because one side vine has taken off and seems to be dominating the plant's growth. The main leader is growing steadily, but not as fast as the side shoot. Still, the leaf count, size and color are all excellent so I'm more than satisfied. I decided to pull the lid to see how things were going and got two surprises... one that almost killed me.
When I stuck my hand under the lid to lift it, I felt a slight tickle. The automatic reaction to jerk away may have saved my life. A second later a black wider spider the size of a dinner plate crawled out from where I'd just had my hand. The fact that I'm writing this update rather than languishing in the emergency room of the local hospital suggests the little beastie didn't bite me. The lesson I learned from this unwanted surprise is that outdoor hydroponic systems have many nooks and crannies that are irresistible to many of our more dangerous garden denizens. From now on I'm wearing gloves when uncovering the growing tank.
The second surprise was that the surface of the nutrient solution was covered with a tissue paper thin sheet of crystallized salts.
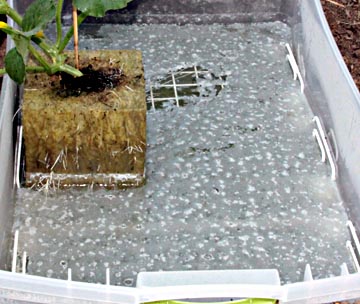
This shell broken up with the slightest touch, most of the shards falling to the bottom of the tank. I assumed the shell formed as water evaporated. If so then the EC should have gone up. In fact it was still 2.5. I cleared the shell away for a look at the roots.
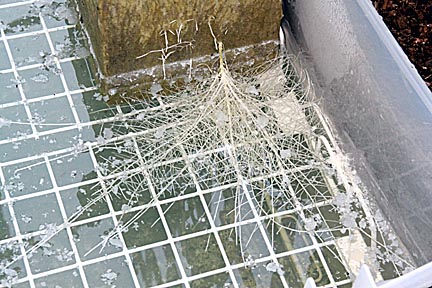
The solution is remaining clear and has no sour odor. This is a marked improvement over the first nutrient solution.
The first male flowers are forming so everything is proceeding as hoped. I expect the first female flowers in two weeks. There is a slim chance the plant might manage to ripen a melon before the first frost. Unfortunately, the large size of the plant by then prohibits covering it at night for protection.
Expect bi-weekly, or sooner, updates so come back often. There's at least two good growing months left in the 2009 season and who knows, maybe this melon will provide some surprises.
September
19
Update:
The race is on!
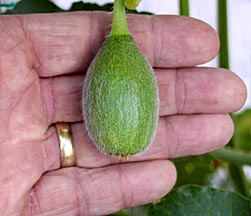
I estimate this melon was pollinated on September 14. Typically, a melon requires 41 days to ripen. That places the picking date for this little guy around October 25. While temperatures in my location hover in the mid 90s through September, by October they start falling quickly. Frosts have been known to hit as early as mid October. Will this melon make it? Check back at the end of October to find out!
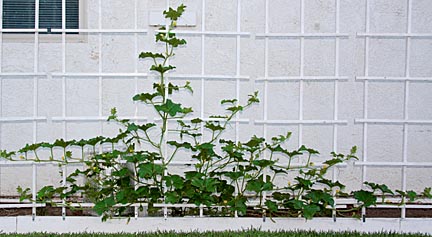
The plant continues to grow lopsided, with the first right-hand runner out-growing the main vertical leader. The plant is also bushier than usual, with many runners growing out of the lowest part of the main trunk. I assume this is a peculiarity of this individual melon and not an effect of hydroponic culture. The plant is 5 feet tall and 10 feet wide.
Aphids have started showing up so much that I have to check all the leaves every day to hit new colonies with a spray of insecticidal soap. It's amazing how quickly a colony can grow.
I almost lost this plant to flooding the roots as I did with the first plant. It turns out that the constant vacuum created by the weight of the nutrient solution in the gas can is sufficient to pull air in very slowly through what appears to be a tight seal in the cap. Over night, one such leak was enough to empty the can into the growing tank. Fortunately, I was able pump the excess nutrient out before it damaged the roots. The cap has been epoxied in place to insure there are no more slow leaks. A small funnel enables the can to be filled through the drain tube.
On 100-degree days, the melon plant can empty a can in two days. To reduce the frequency with which I have to refill it, I made a second can. It was tricky adjusting the length of the second can's feeder tube so that it matched the nutrient solution level set by the first can. I managed it by fitting the end of the feeder tube to the new can with an adjustable sleeve so its length could be varied until both cans maintained the same liquid level.
Unlike the first hydroponic melon, most of the roots of the second one are water roots and appear much stronger. I attribute their increased durability to a healthier, non-spoiling nutrient solution.
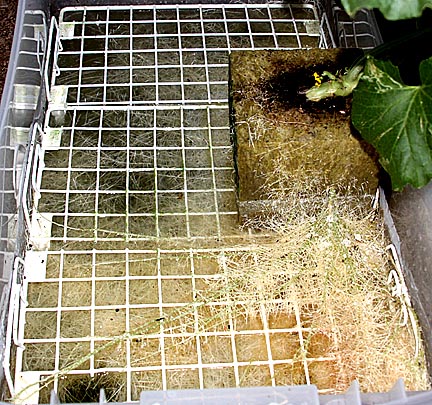
Although it's not obvious in this image, the 12-gallon volume of the nutrient solution is occupied by a near solid mat of roots. I expect this root density to increase as the plant matures. It'll be interesting to see if this crowding leads to problems. I'm also concerned that there aren't as many air roots as the plant may require. Unfortunately, I haven't found a reference for the AVRDC hydroponics system that states what percentage of the total root mass should be air roots. My impression is that the 1-inch square openings in the support mesh and the lack of primary roots coming out of the side of the rockwool block are letting too many of the roots become water roots. If I could do it over I'd have placed the rockwool cube on short legs over a solid surface the same area as the bottom of the cube that would force roots to grow out horizontally to force the development of more air roots. Still, the plant continues to grow strongly so perhaps everything is working okay as is. It could be that many of the roots just below the surface of the nutrient solution are in liquid that is oxygenated enough for them to contribute to the plant's needs.
The floating shell of crystalized salt that covered the surface of the nutrient solution the first time I uncovered it no longer appears to be forming. I suspect that the plant is taking up so much solution that the constant replenishment creates currents that keeps the solution mixed up.
September 25 Update:
The 1/2-inch diameter dispensing tubes in the nutrient supply tanks turned out to be too small to fill easily so I remade them with 3/4-inch tubes. This works much better.
The plant covers 40 square feet and is drinking 4 gallons of nutrient solution a day on 95-degree days. I made two more feeding tanks and while installing them figured that as long as the main growing tank was uncovered I might as well check the EC and PH of the solution. While the PH had increased slightly from 5.8 to 6.2, the EC had shot all the way up from 2.5 to 4.2. My immediate impulse was to pump the main tank dry and replace all the solution. This would correct the EC, PH and address any salt imbalances that may have built up. The problem with this plan was that as previously mentioned, the roots are poorly supported. Draining the tank could result in the entire root mass collapsing and tearing loose from the plant. My melon hydroponics system version 3.0 will address this problem but I needed to fix the immediate problem as quickly as possible.
I decided to stop feeding the plant nutrient solution and instead provide only water that had its PH corrected to 5.4. Over the next 36 hours the plant should take up close to 6 gallons of water, which is half of the main tank's volume. This should bring the EC down to a more appropriate level.
As mentioned in the first hydroponic melon experiment, which also had a spike in EC, it's amazing how tolerant melon plants are of over concentrated nutrient solutions. I'm sure the high EC has been an issue for at least two weeks yet the plant has continued to grow fast and strong. As for the melon itself, the image below says it all. In just six days it has increased its volume by over a factor of ten.

Note: by comparing the size of my hand it's obvious both this image and the first one of the melon are at almost the same scale. The growth of the melon as shown is not just because the image is larger. This high growth rate begs a question: Is the melon growing too fast? It could be that it's being pumped up with a lot of water and not much flavor. Only tasting will tell, which has to wait at least another three weeks.
Temperatures are remaining very high for this time of year. September 25 hit 101 degrees. A cooling trend is forecast down to 88 degrees over the next week, which would put things close to normal for my high desert location. Weather changes quickly in October so even as hot as it was today there's still a good chance an early frost will take the plant. Be sure to check back often to see who wins: the melon or an early frost.
October
4 Update:
Although I kept feeding the plant pure water for 4 days, during which time it drank over 11 gallons, the EC of the growing tank only dropped to 3.6 and appeared to stabilize at that level. The cause may have been that excess salts precipitated out of solution and are acting as a buffer. Adding water only allows these excess salts to dissolve and maintain a high EC. If so, in time the EC eventually will start coming down but that could take so long that the high salt levels could damage the plant. I decided to gamble on a complete nutrient solution replacement. The tank was pumped dry, roots and tank gently hosed down, pumped out again and refilled with all new solution, this time set to an EC of 2.0. The lower EC should give the growing solution a little more room to climb before reaching dangerous levels. While no roots appeared to break off, most of them sagged considerably and didn't appear to return to their original level. This could mean that some air roots are submerged and may rot. However, so far the plant appears to have survived the procedure and the EC is holding at 2.0.
I believe the cause of the EC spike was evaporation. The new hydroponic system has many more holes in the cover to the growing tank so much more air circulates through it. This could easily triple the evaporation rate. Next year's hydroponic system will address this problem.
Using a dip stick is an awkward way to check the level of the nutrient solution. It's been replaced with a constant-read liquid level indicator made out of a clear plastic tube, a bamboo skewer and two ping pong balls.
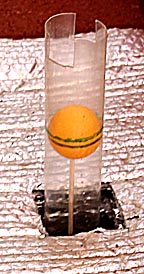
The plastic tube is a sleeve sold in hardware stores to protect florescent bulbs. The best feature of this indicator is that it is easy to read at a distance so checking the level is quick and easy, increasing the odds that I'll spot a problem before it damages the plant.
My major concern at this date is a light mottling of the youngest leaves.

Overall plant growth is good so I assume it's not a nitrogen deficiency. As the leaves age they turn solid green and continue to grow in a completely normal way. The leaves are not misshapen in any way. While iron is a usual suspect, I'm also suspicious of sulfur, potassium or manganese deficiencies. Several dozen Internet searches failed to provide a solid diagnosis. Worse still, they introduced the concepts that it might not be a single deficiency but the effect of several marginal deficiencies or even an excess of one or more minerals. Rather than jump into experimental dosing, which could cause more problems than it cures, I'm going to let things run their course. If the melon ripens and tastes good, I'll assume the problem is not a serious one. This course of action also has the virtue of validating the Floramato's claim to be a stand alone food.
As predicted, October brought much cooler weather. In the space of one week the daily highs dropped from 100 to the low 80s. More importantly, nightly lows hover around 50 and have even crept down to the high 40's on two evenings. These lower temperatures suggest slower ripening for the melon, making it very problematic that it will ripen before the first frost. On the positive side, because the melon is trained up a vertical trellis, as the angle of the sun decreases because the season's progress, it strikes the plant more face on. As odd as it sounds, the plant is actually able to collect more total light now than it could two months ago in the peak of summer when the sun was so high most of the plant was in shade from the upper leaves.
As previously mentioned, I cover melons in summer with white cloth the prevent sun scald. Since it's now October, the temperatures are low enough and sun light weaker so that I'm dispensing with the protective covers. In fact I've pinched off any leaves that shade the fruit to expose it to as much warmth as possible to encourage ripening.
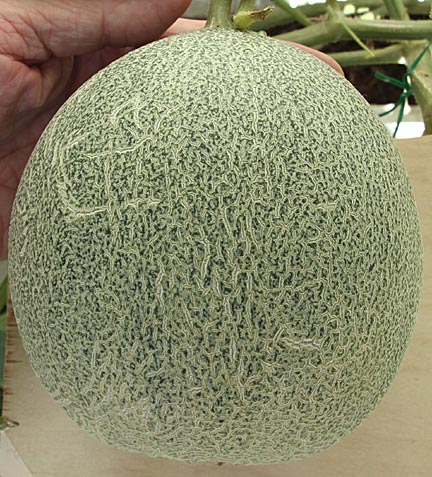
The melon is maturing on schedule. It's 5.5 inches long and 5 inches in diameter. The color and extensive netting suggests it's one to two weeks from being ripe.
October 8 Update:
On October 6th I woke up and looked out of my bedroom window to discover a fine layer of frost covering half of the lawn in the backyard. Fearing the worst, I rushed out to check the melon. I'm happy to report that its upright position and closeness to the south wall of the house provided enough protection so that the frost didn't damage it. The weather forecast predicted a warming trend over the coming week but the next two nights were going to be cold. With the melon potentially within days of ripening I wasn't about to loose it to a freak cold snap. To provide additional protection I decided to cover the outside face of the melon plant every night with a large table cloth.
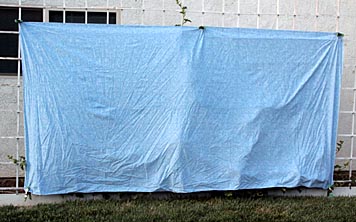
Normally a melon this mature would be far too large to cover. This plant is smaller than normal allowing a cover to be effective. The cloth and heat radiating from the south wall should provide at least five degrees of frost protection. Between this and the coming week of warm weather (perhaps as high as 89 degrees) there is still hope the melon will ripen. On 8 October I thought I detected the first hint of gold in the melon's rind. Time's running out so I hope it wasn't wishful thinking.
November
5 Update:
In spite of covering the plant every night and using 300 watts of incandescent lighting to keep frost a bay, on 4 November the plant finally succumbed to a 26-degree cold snap. The melon was still green with just a hint of gold in one small area. Forced to pick it I carried it inside where my trusty refractometer waited to pass judgement on the melon. When I cut it open I got my first surprise:
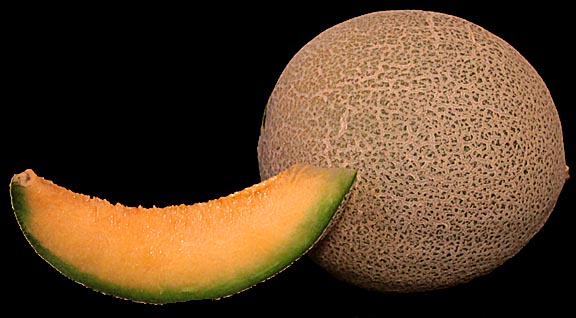
...the inside looked ripe! Squeezing a drop of juice onto the refractometer produced an even greater surprise: it had a Brix of 14.6. Considering that this was the plant's first melon (which are usually down around 13.8) the plant was small (barely 50 square feet, half the normal size for a first melon) it was suffering from several micro nutrient deficiencies (most seriously it was only getting one-third of the iron it needed) temperatures were far too low for melons and the day length was too short, this is an outstanding melon. It's flavor was very rich and deep. With all that this poor plant had to endure and the fact that the melon hadn't fully ripened, the excellent quality of the fruit validates both the use of hydroponics for growing melons and Dr. Morgan's nutrient formula.
This outstanding result has convinced me to continue improving my hydroponic melon system. Hydroponic System 3.0 is already on the drawing board and I'll be posting pictures of it within two weeks.
Hydroponic
Autopsy:
Version 2 of my hydroponic melon growing system produced a melon, but considering everything that went wrong it would fair to state that the melon plant produced fruit in spite of my hydroponic efforts. Let's see what can be learned by taking a close look at the plant as the system was disassembled.
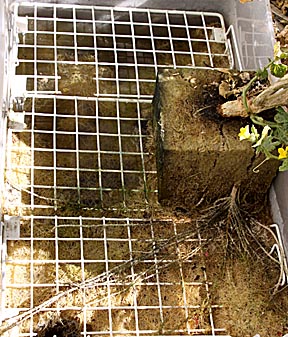
First up is the overall appearance of the plant roots. Very little of the root system was exposed to air yet the plant grew extremely well. That suggests that while air roots are important, less than 5-percent of the root system needs to be exposed to air for healthy growth. A significant portion of the air roots appeared dried out. This was caused by all the openings I'd cut into the top of the nutrient basin for liquid level indicators, solution replacement tubes and an exit for the main plant trunk. These allowed too much air circulation, which reduced the humidity enough to allow roots to dehydrate. Melon hydroponic system 3.0 will have fewer holes and they will all be gasketed to keep the humidity at 100-percent. This creates the problem of preventing fresh air in to satisfy the roots oxygen requirements. To solve this problem I intend to install a bubble system. I admit this is taking a step backward from my simplest-solution principle, but the bubbler will also address other problems that will be mentioned later. That means version 3 will not be an AVRDC hydroponic system but rather a deep water system.
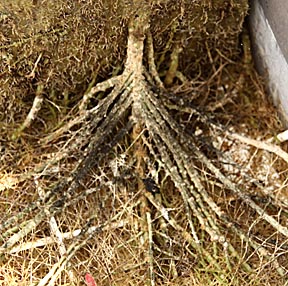
Every melon plant I've grown in soil has had several large, 1/2-inch diameter roots connecting to the base of the main trunk. The melon grown in hydroponic system version 2.0 had main roots that were a most 1/4-inch in diameter at the trunk. Additionally, several main roots branched immediately after the root was outside the 6-inch mineral wool growing block used for the seedling. These two observations suggest that the block resisted root expansion so much that roots inside the block were constricted. Version 3.0 will use a mineral block that is cut down to have walls that are only 1/2-inch thick.
Many of the main surface roots had turned green and there were a few spots where algae was beginning to grow. This indicates too much light was getting into the nutrient basin. The tighter lid that will be part of version 3.0 will take care of this.
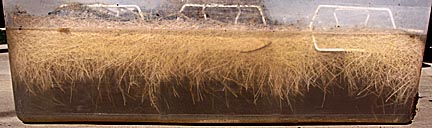
Cutting the plant away from the roots allowed the nutrient basin to the lifted out to see the roots. As the picture above shows, they only grew down a maximum of 4 inches with 90-percent of the roots only extending 3 inches into the solution. Contrary to an earlier statement, melon roots float, though just barely. This photo also shows that the layer of air roots is only one inch high. I experimented with the effect of bubblers on the roots and as expected, they cause roots to be concentrated in the top inch or two of the nutrient solution. This means a much shallower basin can be used in next year's system. Roots filled the surface of the existing basin, in some areas to the point of forming a thick mat. To alleviate this problem the 2010 season system will use a basin with 50-percent more surface area. The maximum length of the primary roots reaching out into the nutrient basin was 14 inches (35 cm.) Since the seedling block is placed close to the middle of one side of the basin, this suggests the best dimension for the basin is 14 inches (35 cm) wide and twice as long.
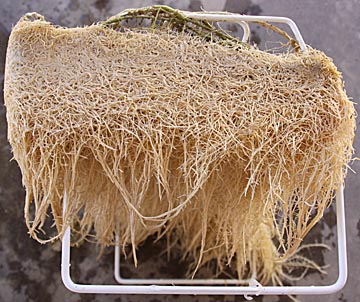
Melon roots have a natural springiness that tends to make them spread out when left floating free in water. When they encounter a fixed structure, such as the grid that was supposed to support the air roots, they tangle to form a dense mat. My first inclination was that the liquid captured in such a mat would grow stale and cause roots to putrefy. This is not the case. The thick mat above was perfectly healthy. The reason rotting doesn't occur is the that melon's voracious appetite for liquid means that fresh nutrient solution is constantly and quickly being drawn into root mats so that there is no chance for stagnation to take place. This doesn't mean the matting is acceptable. During periods when the plant is absorbing large quantities of water, nutrients left behind will get concentrated in such mats to the point where they could burn the roots. The high flow of water into the mat inhibits diffusion of the concentrated nutrient solution back out into the main nutrient basin. Matting also blocks currents within the nutrient solution from balancing out nutrient hot spots. For these reasons version 3.0 will not use a grid to support the roots. They will be left free to spread unhindered into the nutrient solution. Their natural buoyancy, combined with the lifting effect of the bubblers, will cause enough of them to be lifted up slightly into the air or maintained in the very thin top layer of the nutrient solution, which is naturally highly oxygenated. Bubbles breaking through the root mat will burst and bathe the top roots with a constant rain of nutrient solution, creating an effect similar to a nutrient film system or an aeroponic system. Finally, the bubbles will help oxygenate the nutrient solution so even completely submerged roots will have access to it.
Unlike
roots in the first hydroponics system, which were extremely fragile,
roots in the 2.0 system were strong and didn't break even under firm
manipulation. This means a support system isn't required to keep them
from stretching and breaking when draining the nutrient tank.
I've learned that complete nutrient solution replacement every few weeks is a fact of life. The manual pump used in the past was messy and created large surges in the solution that could damage roots. To make draining easier and less stressful, the basin for version 3.0 has a plugged hole at its lowest point. Because the basin itself is half the depth of the 2.0 basin, it will be possible to dig a drainage channel and drain the basin simply by pulling the plug.
One of the most important lessons learned from the second hydroponic system was that in spite of its being advertised as "a complete" food, General Hydroponics' FloraMato food is not sufficiently complete to grow melons. In particular, even at the highest recommended mixing concentration the iron levels are one third the recommended level. In fact all of the micronutrients were 1/2 to 1/3 what's recommended. Calcium and magnesium were also far below required levels. This can't be corrected by adding supplements, but this increases cost, complexity and drives EC levels up so that primary nutrients have to be reduced. I've tried figuring out several different fixes for FloraMato and so far haven't found one that's acceptable. I'm beginning to see the wisdom in Dr. Morgan's suggestion to purchase primary salts and mix my own nutrient solution.
Winter Hydroponic Nutrient Tests
Growing melon plants under artificial lighting during the winter allows me to test how well various nutrient solutions work so that when the real melon season starts I know what works and what doesn't. It was a good thing I did.
The first nutrient solution tested was 3/4 teaspoon of General Hydroponic's Maxigrow (a 10-5-14 dry concentrate marketed as being a complete, all-in-one hydroponic food) and 1/2 teaspoon of Grow More's Fert-All sulfur, boron, copper, iron, manganese, molybdenum and zinc supplement in 1 gallon on water resulting in a solution with an EC of 1.8 and a PH of 5.9. Although structurally the plant grew tolerably well, reaching 18-inches in 46 days, the leaves told a different story.
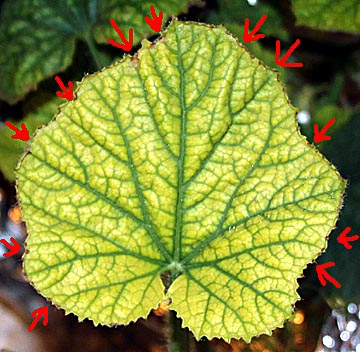
The pale midvein zones and burnt leaf tips (red arrows) suggest a severe nutrient deficiency. The following references:
http://www.ghorganics.com/page32.html
http://gardening.about.com/od/gardenproblems/a/NutrientDeficie.htm
http://www.smallgrains.org/Techfile/Franzen.htm
http://www.phoenixtropicals.com/vitaminNutrientDeficiencySymptomsPlants.html
http://www.highnutrients.com/nutrient-deficiencies.html
...collectively suggest that the most likely problem is an iron deficiency. A nutrient analysis:
Required Nutrient Levels: ............................. Actual Nutrient Levels:
nitrogen:
215 parts per million (ppm).................................99
phosphate:
86 ppm........................................................50
potassium:
343 ppm.....................................................138
magnesium:
85 ppm.......................................................20
calcium:
175 ppm..........................................................60
sulfur:
113 ppm.............................................................45
iron:
7 ppm..................................................................13
manganese:
2 ppm.............................................................4
zinc:
0.25 ppm..............................................................12
boron:
0.70 ppm.............................................................2
copper:
0.07 ppm...........................................................1
moybdate:
0.05 ppm..........................................................2
...indicate almost everything except iron is deficient. Increasing the amount of Maxigrow by a factor of 2.5 would solve most of the short falls but the resulting nutrient solution would have an excessively high EC. However, the nutrient solutions in the garden melons repeatedly climbed to above 4.0 for weeks at a time and the plants appeared to grow very well. To test if increasing the nutrient concentration solves the deficiency problem, without the high EC killing the plant, on 20 December I completely changed the nutrient solution to one with 2 teaspoons of Maxigrow and 1/2 teaspoon of Fert-All per gallon of water. This resulted in an EC of 3.6. It also gave the solution a root-burning PH of 4.8. That's great if you're growing blueberries but not so good for melons. One-eighth teaspoon of baking soda per gallon of solution brought the PH up to a more comfortable 6.0. Here are the new nutrient concentrations:
Required Nutrient Levels: ............................... New Nutrient Levels:
nitrogen:
215 ppm...........................,............................257
phosphate:
86 ppm.......................................................130
potassium:
343 ppm......................................................359
magnesium:
85 ppm........................................................52
calcium:
175 ppm.........................................................156
sulfur:
113 ppm.............................................................93
iron:
7 ppm..................................................................15
manganese:
2 ppm.............................................................4
zinc:
0.25 ppm..............................................................14
boron:
0.70 ppm.............................................................2
copper:
0.07 ppm...........................................................1
moybdate:
0.05 ppm..........................................................2
This still isn't perfect but it's enough closer that if the plant responds in a positive way I'll know I'm on the right track.
As an aside, I've been using a scaled down version of the third generation hydroponic system to see how it works. This one uses and aquarium bubbler pumping air into the nutrient solution. In spite of the nutrient deficiency problem, the plant is growing well. The roots are pure white, healthy looking and extremely tough. Surprisingly, the constant flow of air bubbling up through the water does not cause any significant evaporation. Tests with and without the plant indicate the amount is negligible. Roots in the air above the solution are plump and healthy, showing no signs of dehydration or discolorization. Both are good signs that air bubbling through the water creates an atmosphere of near 100-percent humidity, which helps sustain the air roots. The plant support grid was cut back to just barely support the 2-inch diameter mineral block plug in which the seed was planted. As hoped for, this much smaller support eliminates the root matting that was a problem in the earlier systems. Free to move, the roots' natural springiness pushes them away from their neighbors preventing tangles and matts.
I found that MaxiGrow doesn't disolve in water very well. I have to use a blender to get it to completely dissolve in a few cups of water then add more water to bring it up to one gallon.
Can the plant take the high EC? Will this solve the yellowing/tip-burn problems? Check back soon for the results.
December
26 Update
Increasing the nutrient concentration failed to improve the plant's appearance. After a week I decided to give up on Maxigrow. It's impossible to tell if there was something wrong with the batch I purchased or if there is something incorrect with the formulation of this hydroponic food that makes it inappropriate for melons.
I switched to 1 and 1/4 teaspoons of FloraMato (the maximum recommended concentration) and 1/2 teaspoon of Fert-All in one gallon of water. This nutrient solution had an EC of 1.9 and a PH of 5.7. Here's how the numbers compare:
Required Nutrient Levels: ............................. Maxigrow + Fert-All Nutrient Levels for EC = 1.8:......... FloraMato + Fert-All Nutrient Levels for EC = 1.9:
nitrogen:
215 parts per million (ppm)...................................................99.....................................................................150
phosphate:
86 ppm..........................................................................50......................................................................90
potassium:
343 ppm.......................................................................138.....................................................................270
magnesium:
85 ppm.........................................................................20.......................................................................30
calcium:
175 ppm............................................................................60.......................................................................90
sulfur:
113 ppm...............................................................................45.......................................................................69....(16
from Fert-All)
iron:
7 ppm.....................................................................................13............................................................150......15....(13
from Fert-All)
manganese:
2 ppm............................................................................0.4.......................................................................4.4..(4
from Fert-All)
zinc:
0.25 ppm................................................................................12.......................................................................13.....(13
from Fert-All
boron:
0.70 ppm...............................................................................2.........................................................................3.....(3
from Fert-All)
copper:
0.07 ppm.............................................................................1..........................................................................1.5..(1.5
from Fert-All)
moybdate:
0.05 ppm..........................................................................0.2.......................................................................0.5..(0.5
from Fert-All)
Within three days the plants showed marked improvement. The youngest leaves lost their yellow pallor in favor of a healthy green and the pale areas between the veins of older leaves also started darkening. Why FloraMato works so much better than Maxigrow is a complete mystery to me. One possibility is that the nutrient percentages listed on the sides of the packages don't always reflect everything that's in the mix. For example, the nutrient concentrates for FloraMato do not say how much Zinc it contains, yet zinc sulfate is listed as one of the ingredients. Perhaps FloraMato contains something Maxigrow doesn't.
I'm still concerned that the magnesium, calcium and sulfur levels are half what they should be. Doubling the concentration would solve that but then the EC would be too high. After a few more days the plant continued to improve, but had suffered so much permanent damage from Maxigro that it would never completely recover. I decided to replant using FloraMato and Fert-All from the beginning.
NEW!!!
The
Great Race!
December 28 Update
Since I was starting over from scratch, it seemed a good opportunity to compare germination rate, speed and overall growth to soil-grown melons and so the great race was born. It's goal is to determine which grows faster and healthier, hydroponic or soil grown melons.
After conditioning a mineral wool block I planted nine Ambrosia muskmelon seeds in it. I did the same for a large pot filled with my favorite potting soil. (Please click on POTTING SOIL to see what it was and why I like it.) All the seeds came from the same package. Both growing containers were covered with clear plastic and placed in the light box used for transplants. Extreme care was taken to ensure that both were kept at the same temperature, including the initial planting temperature determined by the water used, and received the same amount of light.
The planting took place on December 28. By January 2 all nine of the melons planted in potting soil had germinated. Two days later a single melon in the hydroponic container germinated.
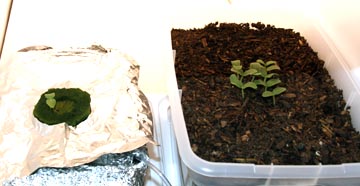
Although
the hydroponic container on the left was covered with aluminum foil
to inhibit algae growth,
the
surface temperature of the mineral wool block was the same as the
soil-grown melons on the right.
As of 5 January the hydroponic container had still produced only a single sprout. I've thinned out all but one plant in the soil filled pot. Will the easier nutrient availability of the hydroponic system speed its melon to faster growth? Or, will the more complex mix of nutrients in the potting soil overpower the chemical purity of hydroponics? Updates will be posted regularly over the next six weeks so check back often to see which system is the winner.
January
18 Update
After three weeks the race is a tie, at least as far as the rate of growth is concerned.
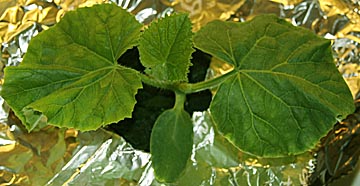

Hydroponic
melon ................................................
soil-grown melon
Both melons measure 9-inches across and appear healthy. The soil-grown melon is slightly ahead in the development of its third true leaf, but then it's two days older. However, I must confess that I haven't been as diligent with watering the soil-grown melon as I should have been. Its growth may have been slowed by lack of water. From now on I will provide bi-weekly waterings as is my custom.
The hydroponic melon is a lighter green than the soil-grow plant and exhibits a hint of light mottling, similar to that seen when using MaxiGrow. The degree of mottling is much less and there are no signs of leaf tip burning. I've increased the iron-providing Fert-All from 1/2 to 1 teaspoon per gallon to see if the mottling goes completely away over the next two weeks. If so then this points to an iron deficiency being the problem.
Over the last three weeks two additional sprouts appeared in the hydroponic system, bringing its total to three or 33-percent. This is significantly less than the soil-grown's 100-percent.
NEW!!! January 26 Update
After only eight days of correcting the watering routine of the soil grown melon the difference between the two plants is obvious.

Hydroponic melon ................................. soil-grown melon........
It's obvious that the soil grown melon is quickly outrunning the hydroponic melon. Additionally, the hydroponic melon is beginning to exhibit many of the problems the melon grown on MaxiGrow had. I'm beginning to suspect there is something wrong with the Fert-All supplement so I switched to a Lilly Miller iron supplement. If this doesn't work then this may mark the end of my hydroponic melon growing. If I was a large company with a PhD on staff to solve these problems and tons of money to purchase individual chemicals I'm sure I could grow great melons. But, for the home grower the expense of making so many hundreds of gallons of nutrient solution using the higher end concentrates needed for healthy growth is far too expensive. All the problems associated with hydroponic melon growing suggest that it may not be a good choice for a hobbiest. However, all hope is not lost. If Lilly Miller comes through and the plant starts growing again I may change my mind. But, as things stand now it looks like I'll be growing in soil this coming season. That isn't all bad. It means I will be able to finish the research into conquering fusarium wilt infestations in soil.
Hydroponics is Dead!!!
No matter what I did, the hydroponic melon continued to deteriorate while the soil grown melon flourished. Adding up all the lessons learned from experimenting with growing melons hydroponically provided the following:
1. Hydroponics can grow good melons, but none of the inexpensive nutrients mixtures I tried worked.
2. Using better nutrients drives the cost up to $100 or more per melon. This is too expensive for me.
3. Bulk purchasing individual nutrients to mix optimum nutrient solutions has an initial buy-in cost of hundreds of dollars and requires complicated mixing procedures.
4. Well watered soil-grown melons grow faster and healthier.
5. Hydroponic systems have more catastophic failure potentials than soil-grown systems. I found that if it can fail... it will.
6. Hydroponics is a precise science in which there is little margin for error. Soil provides a buffering effect that enables plants to adjust so that minor problems do not cause catastrophic problems.
For
these reasons I'm am electing to discontinue all further hydroponic
research. Instead, I will explore ways to overcome the problems
related to soil-borne diseases that got me started on hydroponics.
2010 SEASON!!!
February 1, 2010 Update:
Last summer the melon bed was inoculated with Rootshield, a micro-organism that grows in the roots of plants and helps them fight off the diseases like fusarium wilt. This season I will repeat this with the planting of the first melon to see if it prevents the total collapse of the plant about the time the first melon ripens.
Since the soil grown melon from the great race is growing strong and healthy, I decided to see if I could transplant it into the bed and using insulating covers and heat lamps, keep it alive for the next two months in spite if nightly frosts. If this is successful, it'll mean that I'll be able to start melons three months before the last frost date and get an incredible jump on the season. This is an Ambrosia melon, which has been susceptible to fusarium wilt so it's a perfect subject for testing Rootshield.
As always, there will be updates with photos on a regular basis so be sure to check back often.
March 1, 2010 Update:
Last week I uncovered the melon too early in the morning and even though the sun was on it and the air temperature felt warm, the plant died within three hours. I suspect it wasn't the cold of the night but rather the sudden transition from cold to warmth that took it off.
One thing I learned about this effort was that even while it worked, the melon grew every slowly, on the order of one-forth the summer growing rate. That means a month's growth only equals one week's growth under ideal conditions. It could be argued that so much effort for so little result is a waste. This is not to say early planting is a bad idea, only that it needs to be streamlined.
I got the idea of burying soil heating cables 3-inches below the seedbed
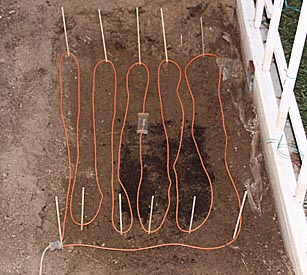
to keep it warm enough for melon seeds to germinate. The thermostat keeps the wires at 76 degrees F. Next I placed a 35-watt incandescent spot light over the area to be seeded to help warm the surface of the soil and leaves of the plants and in so doing prevent frost damage.
I planted 7 seeds on 3 March and by 11 March they had all germinated, even though the night time average temperature was in the low thirties with several nights in the mid twenties. By 16 March the seedlings had survived one 25-degree and one 29-degree nights so I'm considering this a success. The nice thing about this technique is that it doesn't require twice-daily visits to the garden to cover and uncover the plants. The last frost date for my area is April 17 so we have a long way to go yet, but so far it seems to be working.
The melon I'm growing this year is a new variety from Park Seeds called "Dove." At 70 days it's a very early melon. This concerns me because all of the other early melons I've tried have been disappointments. However, Park claims it has a Brix od 15.5, which is extremely high. This is a white-fleshed melon with a core that turns rose if left to fully ripen on the vine. Unfortunately the Park seed catalog doesn't say what type of melon it is or show enough of the outside to make a guess. The thin sliver of skin that is visible in the catalog photo appears very smooth, suggesting a Galia of Charentais type melon.
To help get a leg upon any fusarium wilt lingering in the bed, I'm watering the seedlings with Rootshield dissolved in the water. Only time will tell if it works.
As soon as this plant starts ripening it's first melon I'll plant a second variety as a late season melon so I can test two in one year. The second melon will be Sugar Queen, the second best tasting melon to Ambrosia. I've never grow a Sugar Queen using my extreme melon growing techniques so it will be interesting to see how it good it gets. I'm apprehensive about this experiment because I remember Sugar Queen as being an extremely fast and aggressive grower that covers a lot of territory. The melon trellis is only 8-feet high and 27-feet long and may not be large enough to contain such a large plant.
April 19 Update:
The heating-cable/outside-lamp growing technique was a complete failure. Although the plants germinated and survived many frosts, their grow rate was so slow that six weeks later the vines were barely 3-inches tall. I believe the cause is that as we learned in the hydroponics experiments, melon growth is driven more by temperature than light. Although the sun was bright in March and April, the cool, 65-degree average daily temperatures were too low to encourage rapid growth. Growing large transplants inside under lights until the outside weather turns warm is a much better option for getting early melons.
Although the melon plants are still small, they are healthy so the 2010 melon is well underway. I've thinned them out to the three strongest plants and assuming at least one of these survives the cutworm attack that's sure to come once the temperatures increase, somewhere around the first of July I should be picking the first Dove hydrid melon.
May 14 Update:
The
melons planted early in the Spring finally lost the battle against
foraging insects. The plant's growth was so slow that after two
months of growth the largest had only two mature leaves and the plant
was barely three inches tall. I removed them and replanted new DOVE
melon seeds on May 7th. A week later they had germinated so
we're back in business, though the first melon probably won't be
picked until early August.
Regardless of
the late start, the good news is that we're off on a new melon season
with a brand new variety and the promise of finally conquering
fusarium wilt. It promises to be a great year and I hope you'll check
back often. As always, I'll be posting updates with pictures on a
regular basis.
July 2 Update:
Six weeks of extremely cool weather slowed the growth of the melon planted on May 14th. But by the end of June temperatures were up to their more typical 90s and the plant took off.
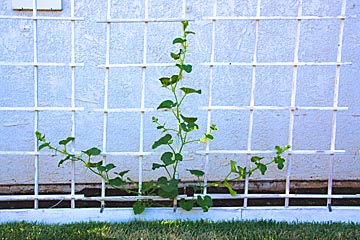
It's now 4-feet tall and growing six inches a day. I've spotted four female flowers and one of them may be fertilized. If so, allowing 40 days for ripening it should be ready to pick on August 10th.
July 12 Update:
The plant is growing so fast that in just 10 days it's shot up to over 7 feet tall. It appears very healthy and so far there's no sign of aphids. Dove doesn't seem to produce a lot of branches off the side of the main trunk but these seem to be sending up a large number of tertiary tendrils. These are being trained vertically while the main side tendrals are trained horizontally. The plant's beginning to look like a net.
Here is the Dove's first melon:
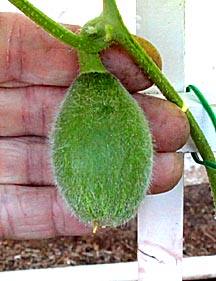
From it's size I estimate that it was pollinated around July 5th. If so then the picking date needs to be extended to August 15th. Now comes the hard part... waiting!
July 16 Update:
With temperatures in the 100s and blindingly bright sunlight the melon's growth has been explosive. In just four days the plant has shot up another two feet.
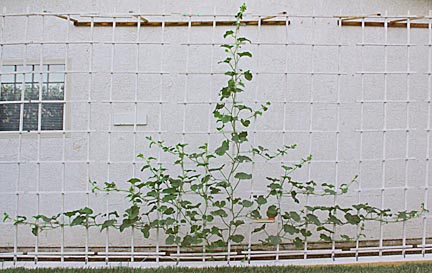
And the melon quadrupled in size.
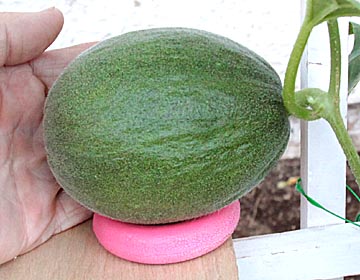
Taking a lesson from the amount of water the plant can absorb from the hydroponics experiments I've taken to watering every other day and fertilizing twice a week.
Growth rates are usually quoted for the main trunk. Thinking that it represents only one of many tendrils and may therefore not represent the total growth of a melon plant, I marked the positions of all 24 vines on the Dove melon and measured how far each had grown by the next morning at the same time. The result was that the total growth was a staggering 71 inches in 24 hours. Bamboo is considered one of the fastest growing plants in the world and it's doing good to squeeze out 24 inches a day. My respect for melons just doubled.
July 25 Update:
The melon plant has continued to grow at an explosive rate.
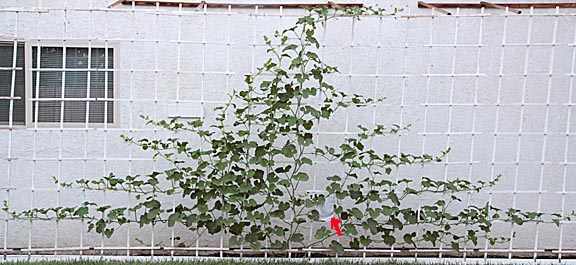
Eighty days after seeding, the Dove melon plant has a main leader that's 10 feet long with side shoots reaching 14 feet across. The melon itself is almost perfectly spherical and 6 inches in diameter. The red arrow shows the melon's location, covered with white cloth to protect it from sun scald and promote even ripening.
It has a massive appearance that the image above fails to convey. Netting started to appear on the 23rd so we're approaching the final ripening stage, which means we're shortly going to have to deal with a critical problem: when to pick.
Dove is an ananas melon, which means it doesn't slip from the vine when ripe. The skin turns yellow-orange and the melon should take on a pineapple-like fragrance when ripe, but these signs can appear a day or two before it's completely ripe. The problem is that if left on the vine one single day too long the melon will overripen and become mushy. Pushing on the blossom end for a slight "give" is the traditional test for such melons but is frought with problems. How much "give" is enough? How much is too much? Previous pressings soften the area around the blossom end so how is this softening to be taken into account? And finally, since Dove melons are brand new in 2010 there isn't any available information about how this particulary variety's ripening indicators relate to those of other known melons.
Because I dislike mushy melons I'm going to err on the side of caution and pick as soon as the rind changes color. If Dove melons are good enough to compete with Ambrosia melons then this one will show some of this greatness even if picked slightly early.
August 1 Update:
The melon's netting has fully developed and the fruit is now 6.75 inches long by 7.25 inches in diameter. The main leader on the plant itself is 12 feet tall and the secondary vines reach 22 feet from left to right. There is no sign of disease and to date I haven't seen a single aphid. The days are bright and in the 90s while the nights cool down to the 60s. All of this is ideal so I'm hopeful that this could be a great melon. I must confess I find myself wandering out into the garden several times a day to check the melon for the first signs of ripening. As soon as they appear I'll stop removing new melons to start the second fruit of the season on its way.
I've changed the watering routine in response to the brilliantly bright sun, high temperatures and low humidity typical of my high desert location from 20 minutes every other day to 10 minutes every day. The water is given at 10 AM before the plant can get stressed. This seems to keep the leaves stiffer all day long. Before they would droop a bit around three. Drooping is bad because it means the vascular system in the plant is collapsing. My concern is that continuing such steady watering throughout the ripening process may produce a watery melon. For this reason I plan on stopping all watering as soon as the first signs of ripeness appear.
August 5 Update:
Melon aphids made their first attack today. Although there were just a few on six leaves my response was immediate and merciless: I drowned them in insecticidal soap. Actually, I didn't spot the aphids at first. What caught my attention was ants loitering on the undersides of the leaves. This is a sure sign aphids aren't far away. They weren't. A closer look turned up half a dozen small colones.
Although the plant continues to grow very fast and is both strong and healthy, the melon itself hasn't changed in the last four days. I hope it gets going pretty soon because impatience is really eating at me. I've started letting a second melon developing, thinking that the first one is so far along that another young fruit won't slow its ripening.
August 7 Update:
The Dove melon finally started to ripen, 92 days after planting the seed or 33 days after pollination. The first signs are several faint streaks of golden orange extending from the blossom end of the melon.
August 12 Update: HARVEST!!!

Parks describes Dove melons as averaging 3.5 pounds, 5.5 inches in diameter with Brix levels up to 15.5. The first Dove I harvested weighed a whopping 7.25 pounds, was 7.5 inches in diameter and registered an incredible 18.2 Brix on my refractometer. While these numbers validate the power of the extreme melon growing techniques, I regret to say that flavor-wise the melon was a big disappointment. While the high Brix suggests it was going to be a very sweet tasting melon, in fact it was a little harsh. It was very good compared to most supermarket melons, but like charentais melons the flavor compounds are so strong that they overpower sugar levels less than 20-percent. Another problem is that in spite of the apparent thickness of the flesh, only the inside 3/4 inch was worth eating. The light colored zone was unpleasantly firm and sugar levels dropped off very quickly as you get closer to the rind. The basic flavor was indistinct, like it couldn't decide if it wanted to be a muskmelon or a honeydew.
Although I found one reference suggesting that this was an Ananas type melon, I found no similarities with that class. Ananas are oblong, Dove is spherical; Ananas don't slip when ripe, Dove does; and finally Ananas are only slightly netted, Dove is heavily netted.
In spite of being careful to avoid over watering, a small crack developed in the blossom end. This characteristic suggests that there is some Charentais in its parentage. Cracking is bad because it attracts ants, which use them as an entrance to burrow into the melon's flesh and carrying mold spores that can ruin a melon in short time during the warm days of summer. To avoid this I harvested the melon a day earlier than I would have normally. I'd estimate the melon was at 3/4-slip.
The second melon is at least two weeks old and 5 inches long. I expect it will be ripe around September 5th. I plan on sealing any cracks so the melon can remain on the vine until if falls off by itself.
August 19 Update:
As can be seen by the yellow leaves dying from the core of the plant outward, fusarium wilt has once again raised its ugly head. The melon has at least two more weeks of ripening so I'm doubtful that the plant will last long enough to harvest it. The plant stretches 25-feet from side to side and the main running is 14 feet long. Either because of the wilt or from the stress of ripening fruit the plant's growth has slowed to little more than an inch per day per runner. There has only been two very minor aphid attacks and I caught both of them before they spread to more than a couple leaves.
September 5 Update:
The second melon was fully ripe and slipped from the vine on 5 September. It weighed 5 pounds, 7 ounces and was a beautiful golden yellow. Unfortunately the flesh only tested out at 16.0 sugar. It tasted okay but was a far cry from the delectable melons extreme melon growing usually produces. The reason was that the plant had almost completely succumbed to fusarium wilt. Either Dove muskmelons are particularly susceptible to it or the innoculant used was ineffective at preventing an infection. Without information on the disease resistance of this variety it's impossible to say which is the case.
Because the plant was healthy while the first melon ripened and that melon wasn't sweet enough, didn't have an outstanding flavor and was far too firm, I'm afraid I have to say that for me Dove isn't a melon worth growing again.
2011 Season!!!
I had intended planting disease-resistant Sugar Queen melons because my soil has become infected with fusarium wilt and nematodes. The problem with this plan is that while Sugar Queen is good, it isn't a great melon like Ambrosia. But, Ambrosia has very poor disease resistance. One possible solution to the soil problem is that if the soil isn't good... then replace it. To test this idea I dug an 18-inch deep by 4-foot long by 3-foot wide hole, lined it with plastic and filled it with 18 cubic feet of Supersoil potting mix.
A 5-week old Ambrosia melon in a special growing box.
While such a large planter would be more than large enough for anything other that a tree, I'm concerned that the melon's voracious thirst is going to be greater than the potting soil's water holding ability. Supersoil's excellent drainage has already created a problem. Water drains through very quickly and collects in the bottom few inches, where it putrefies. The black tube in the far left of the planter allows me to remove this spoiled water, but it's a hassle that has to be repeated daily. As the melon matures it may start absorbing water from the potting soil before it has a chance to sour. The plastic liner causing this water-accumulation problem is essential. Without it soil pathogens would quickly percolate into the potting soil. If I attempt this technique again I'll support the bottom of the potting soil with a fine screen positioned a few inches above the normal soil bed. This air space will permit excess water to drain away while making it hard for pathogens to climb up into the potting soil. The problem with that idea is that overwatering could fill the void and allow pathogens to work their way into the soil. A better idea might be to contour the bottom of a completely closed growing box like this year's so that an automatic sump pump could be installed.
I selected Ambrosia not only for its superior flavor but because I'm familiar with its susceptibility to disease.
While I don't know that the Supersoil mix is free of viruses and nematodes, I know for a fact that my soil is infected. For this reason I recognize that it's a gamble. Even if this batch of purchased soil is clean there is no guaranty that the next batch will be as well. Still, it's an interesting experiment. While the cost of the potting mix is too much to replace every year (the 18-cubic feet cost me $55.00) if it works I might be able to get two or three years out of it before it breaks down. At that time it would be transfered to the rest of the garden as topping.
I may replace the potting soil next year whether the concept works or not. This boxed-melon idea has possibilities beyond the use of potting soil. One thought is that if I made compost from materials that are removed from the environment compatible with soil diseases and nematodes then I'd be assured to starting the 2012 season off with clean soil. I'm considering composting clean, freshly fallen leaves in a bin that prevents ground contamination and using this for next year's planting. Leaves are so far from the life cycle of soil-borne pathogens that they would seem to be a safe choice, unlike grass clippings or other garden refuse which could very likely be infected. I'd use an artificial source of nitrogen, such as Miracle Grow fertilizer, to ensure that no diseases sneak into the pile from the nitrogen source, which is necessary for low-nitrogen materials like leaves. The problem is that producing 18 cubic feet of finished compost is a lot of work. Still, if it produces a perfectly clean source of soil then it might be worth the effort.
The melon in the picture is an Ambrosia, planted on 1 May. Unseasonably cool weather slowed its germination and growth, but as of 10 June we're experiencing highs in the mid-80s with sunny skies and it's now developing at a normal pace.
As a secondary experiment, the melon will be fertilized with the Floramato mixture used in the hydroponics experiment. While it failed there, I'm hoping the potting soil will work as a nutrient buffer to compensate whatever is wrong with the fertilizer. If the symptoms of nutrient deficiencies do not appear, then it appears Floramato is missing something. If they appear anyway, then that would suggest that there is something in Floramato that melons don't like.
So, the 2011 melon season's off to an interesting start. I hope you'll come back often to see how it progresses. As always, I'll be posting updates with pictures on a regular basis.
July 10 Update:
It's hard to believe that in one month this:
Has grown into this:
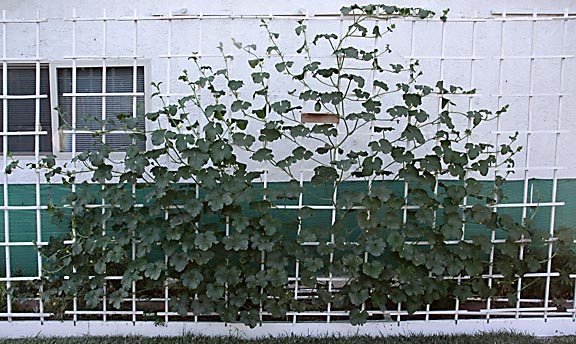
...and has already begun ripening its first fruit.
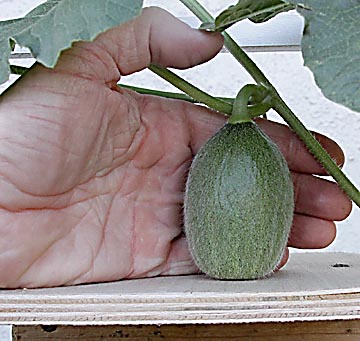
As
close as I can figure this melon was pollinated on 4 July. This
image was
taken
on 9 July so it's easy to see that it's growing very rapidly.
Will
this finally be the 16-percent sugar Ambrosia I've been
dreaming
of for ten years? We should know by 9 Aug.
The plant is extremely hardy with no sign of disease. So far its rate of growth suggests that the size of the box has not yet inhibited the plant. With daily highs averaging 95 degrees, the plant consumes six gallons of water a day. This will increase as the plant continues to grow.
Structurally, this particular Ambrosia muskmelon is unusual. This variety typically has a main trunk and two strong secondary shoots near the base. Tertiary shoot grow out of these three main vines. This plant's a two-headed mutant. Instead of a single main trunk it has two. Instead of two secondary shoots it has four. The resulting effect is like having two plants growing close together. This creates problems with finding enough space on the trellis to arrange the vines out so that leaves don't crowd together, an invitation for aphids to move in. To prevent this I've had to resort to pinching off leaves that are perpetually in the shade as well as three tertiary vines that I simply didn't have room for. I hate doing this because every leaf is a sugar factory helping to pump sweetness into the melon.
I've found that the Supersoil potting mix can only hold four gallons of water at one feeding. More than that and most of it drains away to the bottom of the box. My solution has been to water the plant twice a day, once at 10 AM and again at 2 PM. I'm beginning to suspect that some of the melons' roots have reached the bottom of the planter. Three times I've checked the water level in the pipe at 11 AM and saw that there was at least an inch of water sitting there. Three hours later the sump hole is dry. This makes it tempting to overwater and let the plant pull up as much as it needs from the excess that collects in the bottom of the box. The problem is that this absorption could take several hours, more than enough time for some roots to drown. For now I'm sticking with the twice-a-day water scheme. It's working very well because even on days above 105 degrees, the melon leaves don't wilt.
I had intended raising the plant only on Floramato. However, because it costs five times as much as Miracle Grow I decided to compromise. I used half strength Miracle Grow Tomato Food (18-18-21) until the first melon looked like it had successfully been fertilized, then I switched to full strength Floramato (10-6-18) for daily watering. This mixture of 1.25 teaspoons per gallon of water is what is recommended for rapidly growing plants. I can attest that this melon plant certainly qualifies as "fast growing."
We're entering the dangerous part of the plant's growth cycle, where diseases start appearing. The next 30 days should tell the story. Please check back to see if the plant remains free of diseases and how the first box-grown melon tastes.
July 18 Update:
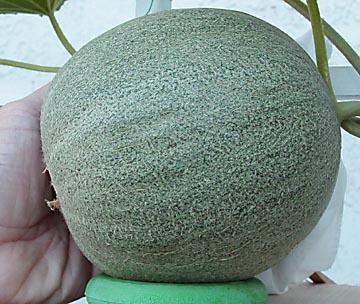
As you can see, in just eight days the melon has grown enormously. The plant's continuing to grow at an explosive rate and now covers well over 120 square feet of trellis... which is starting to create a problem.
Measurements from the hydroponics experiments disclosed that on 95-degree day with bright sun a melon plant requires 1.5 cups of nutrient solution per square foot of vertical plant area. Do the math and the current plant should be sucking up around 12 gallons per day. Since the potting soil only holds four gallons at a time I'm having to water several times a day. I've found that I can push the soil a bit and give it six gallons at 10 AM. By then the plant has drawn most of the water out of the soil but hasn't started the be distressed. The soil is slightly on the dry side and can take up five gallons. The remaining gallon drains to the bottom. By 2 PM the plant has taken up all the water in the soil and the water in the bottom of the planter has also been drawn up. At that time I give it another six gallons, which lasts the rest of the day and night until the following morning. I'm uneasy about any roots at the bottom of the planter being killed because they are totally immersed for longer than they can stand. An additional problem is that the plant is continuing to grow and by August 1st will need 20 or more gallons of nutrient solution a day. Do I increase the number of waterings a day to keep up with it or increase the amount of overwatering so the plant has a larger reservoir of nutrient solution from which to draw? This is a question I have yet to answer.
Speaking of nutrient solution, at the rate of 1.25 teaspoons per gallon of water the plant's burning through $1.80 per day of Floramato fertilizer. That puts the fertilizer cost for the first melon at $70.00, and that doesn't include the price of the supersoil potting mix. Unless this melon smashes the 16-percent Brix barrier and tastes out of this world, I'll be switching back to the much cheaper Miracle Grow fertilizer.
Ignoring for the moment the issues of multiple daily waterings and costs, the fact is that I'm enjoying this melon more than any other I've grown. The combination of optimized watering, uninfected soil and a steady supply of proper nutrients has created an unprecedented growth rate. Both the plant and melon are growing at twice the speed of any other melon in my memory. If its fruit quality matches its growth rate this plant could produce fruit that's well worth the hassle and cost. Assuming the melon takes 41 days to ripen, I'm revising the estimated picking date to August 14th. By that time the plant should have completely filled the 27 x 8-foot trellis, making it the largest Ambrosia I've ever grown. Based on the principle that larger plants produce sweeter fruits, this melon could be amazing. Please be sure to check back to see if reality matches the prediction!
August 1 Update:
The melon plant now completely fills the 27-foot by 8-foot tall trellis. Adding the lengths of the two main trunks and 35 secondary runners gives an overall length of 498 feet... and it's still growing like a maniac. I've decided to name it The Beast. Because it's run out of growing room I'm having to pinch off the tips of the runners. I hate doing this because it reduces the amount of leaf area available to sweeten the fruit, but if they were't pinched back they'd flop and tangle, creating a perfect environment for aphids to breed.
The plant shows no signs of disease and although I check every day, I have yet to spot a single aphid. The melon fruit looks bigger than any other Ambrosia I've grown. As always all other melons are mercilessly pinched off to concentrate the plant's entire fruit production into this one melon.
One small problem cropped up. I've been using 1.25 teaspoons of FloraMato fertilizer per gallon of water. Normally this would produce a balanced nutrient and PH correct solution starting with my local tap water PH of 7.8. (Yep, it's that alkaline.) The problem is that unbeknownst to the local water district fixed the high PH problem with the result that the tap water is now averaging 6.7. When mixed with the FloraMato the resulting solution now comes out to a root-burning 4.5. It's amazing how well the plant's been growing considering it's been drinking up 16 gallons of this a day. I suspect the soil provided a buffering effect. When I tested the soil, which started off at 7.0, it's now reading 6.0. Adding 1/4 teaspoon of baking soda per gallon of nutrient solution raises the PH to a near perfect 6.5. I now test the water before every mix to make sure it doesn't swing back to alkaline again.
Speaking of watering, it takes four hand waterings a day to satisfy the melon's unquenchable thirst. This is too much work even for an extreme melon gardener like myself. If the system works I intend developing an automated system that applies water as needed.
One surprise benefit of constant watering is that the plant roots completely fill the growing medium including the top 1/8-inch of the soil. Let the soil dry out a bit and gently blow the top layer aside and the surface is completely filled with a tight netting of fine roots. Normally, the top three or four inches of soil dries out so often that roots can't survive. Discovering these surface roots is important for container melons because it means all of the soil can be used, reducing the depth required.
Although the melon is fully netted it hasn't started to color yet so I looks we're still on track for an August 14th picking day. If things develop sooner I'll be sure to post an update.
August 7 Update:
A week has gone by and while the melon still isn't showing any color, it's stopped expanding indicating it's nearing the end of its ripening cycle. Measuring it while still connected to the vine is difficult, but the ruler puts it close to 7-inches long and 7.25-inches in diameter. This is huge for an Ambrosia. I wouldn't be surprised if it took longer to ripen because of its size.
While waiting for the monster to ripen I spent some time calculating costs of extreme melon growing. For individuals fortunate enough to have soil free of pathogens the cost is only the small price for water and a little fertilizer, total around $10.00 per plant. The cost per melon depends on how many melons you let the plant ripen. Pruned to produce a single excellent melon at a time expect three melons over a six month season this comes to $3.33 per melon... cheaper than you can buy inferior melons in grocery stores.
However, for the rest of us poor souls with over-gardened soil teaming with viruses and nematodes it's a different story. Even the most virus resistant melons will suffer in infected soils and most of these are poorer tasting varieties. The only way to grow the best melons under such conditions is to use a top variety like Ambrosia and pay the price of either replacing the soil completely as in this year's experiment or going to hydroponics.
Much to my surprise, the cost of the mechanical systems (container and 20-cubic feet of potting soil for the soil-replacement system) or containers and pumps for a hydroponic system was the same for both: $100.
The second cost is the price of nutrients. Using FloraMato purchased from a local hydroponics store ($10.00 per pound) means my replaced-soil system will cost $260.00 for the 2,000 gallons of nutrient solution the plant will drink over my 6-month season. If I get three melons that means they'll cost me $120.00 each. (Ouch!) Buying FloraMato in bulk cuts the nutrient cost by half, or the overall cost to $75.00 per melon. (Still an ouch.) Using an inferior fertilizer, such as Miracle Grow All Purpose for $13.00 per 7.5-pounds at WalMart, reduces the cost for three melons to $30.00 for fertilizer. Overall cost would be $43.00 per melon. (The question with this system is: "Does Miracle Grow grow melons that are as good as FloraMato?" This is one question I might tackle in 2012.)
The cost per melon for a hydroponic system comes out to $140.00 per melon for the three-melon season if FloraMato is used with added supplements to make it appropriate for melons. Bulk buying reduces this to $90.00. Purchasing bulk primary mineral salts on-line and mixing your own fertilizer from scratch comes to $375 or $125.00 per melon. One advantage is that the resulting mixture can be optimized for melons, and in so doing perhaps grow slightly better fruit. A significant disadvantage is that locating the cheapest sources for these materials is a time-consuming, frustrating experience. If you take this route be sure to compare prices "with shipping." Many sellers lure customers in with low product prices then nail them with high shipping and handling fees. Using Miracle Grow as the primary nutrient source and doctoring it with low cost additives like Epsom Salt (for magnesium), Plaster of Paris (for calcium) and Grow-More Maxi-Plex (for micronutrients) produces three melons for $70 each. The problem is that the resulting nutrient solution is a little low in potassium (168 ppm instead of 343) and high in sulfur (228 ppm instead of 113). What effect this has is yet to be determined.
Increasing the number of melons per plant to 12 reduces all of these cost by a factor of four, a range of $11.00 to $35.00 each.
The reason I'm dumping all these numbers on you is to emphasize that extreme melon growing can be an expensive hobby. On the other hand you get to taste melons of such high quality that are unobtainable for most of us.
That's all for this update. Hopefully on August 14th I'll be posting a picture for the largest, sweetest, best-tasting melon I've ever grown. Wish me luck!
August 11 Update:
Here's what The Beast has looked like for the last two weeks:
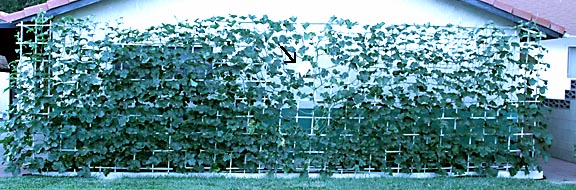
This single plant completely covers the entire south end of the house. This is as big as it's going get because there is no more room into which it can expand. Instead of spending half an hour every morning tying up runners, I spend it pinching off their tips.
The black arrow is pointing to the melon, which still hasn't started showing any color. I'm beginning to suspect its extremely large size is going to lengthen the amount of time it takes to ripen beyond the August 14th prediction.
The Beast drinks 18 gallons of nutrient solution on days with 90-degree highs. If it hits 95 it takes 20 and 100-degrees creates a 24-gallon demand. I suspect much of this is the result of our low, 15-percent, humidity. Moister locations may see smaller uptakes.
One thing I'd hoped for has happened, the melon plant drinks up any residual nutrient solution that drains to the bottom of the box. Either there are roots down there soaking it up or as the main body of soil gets sucked dry this drain water is carried upward by capillary action. Either way it means I don't have to worry about pumping it out if I overwater.
Having to feed it five and six times a day has given me an appreciation of how much a melon plant requires for good growth. It suggests I may have been starving previous soil-grown melons. Typically, I'd water them every other day and once a week or so give them a few gallons of water with a couple of tablespoons of Miracle Grow mixed in. While it's true that much of the plant's nutrient needs were met by the soil, if the nutrient quality of the soil wasn't up to the melon's high requirements then the plant wouldn't have grown as fast as it could. The fact that this melon is the fastest grower ever suggests this is case. Consider: it's soaking up the equivalent of 4 tablespoons of all purpose Miracle Grow every single day! I've never fed a plant that heavily before. I also never monitored how much water I gave the plant. I'd soak the ground and then wait for the plant to wilt, telling me it needed another soaking. This thirst-and-drown procedure hardly seems like it serves the plant well, particulary when compared to how much better this year's plant is doing with constant feeding and watering.
Regardless of the outcome of this boxed melon scheme, using this melon's requirements as a guide from now on I'm going to be more diligent in making sure my melon plants get all the water and nutrients they need.
August 16 Update:
Having invested hundreds of dollars and hundreds of hours nursing The Beast it's understandable that when the expected ripening date of August 14 came and went with no sign of the melon maturing I became anxious. Logic told me the melon's large size was delaying its ripening. Emotionally I began thinking that I was watering it too much, or too little, or giving it too much fertilizer, or again, to little, or the wrong type of food, or some undetectable virus had infected it, or a new strain of invisible aphids were sucking the plants life fluids out of every leaf. Such are the terrors that haunt an extreme melon grower's nightmares. Fortunately, it was all unfounded.
On the morning of August 16 I was working the vines near the never-going-to-ripen melon when I caught the delicious aroma of muskmelon. I immediately checked the fruit and sure enough, near the blossom scar was the slightest hint of yellowing... promise of the golden goodness to come. The rest of the melon was still solid green. The color change was so subtle I had to check it three more times over the next hour to make sure it wasn't imagined. Twelve hours later there was no doubt. A yellow mottling covered the entire muskmelon and the heady aroma of ripening fruit filled the air.
Based on previous Ambrosia ripening speeds I'd estimate this melon should slip free from the vine in after five days from the first hint of color, around August 22. However, the speed at which the yellowing is spreading over the fruit suggests it could be much earlier. Either way, expect the next update to be within a week. It'll have both photos and Brix measurements of the largest, healthiest and most expensive extreme melon I've ever grown.
August 17 Update:
Another day's ripening has given the melon an almost complete golden hue. Only a few small zones are hanging onto a hint of green. More importantly, the crack around the stem has not only appeared but progressed all the way around where it connects to the melon. It's at this point that trellis grown melons have yet another advantage over melons grown on the ground.
Left to ripen on the ground, as the melon expands it puts tension on the stem. As soon as the circumferential stem crack appears this tension pulls the melon off the vine before it's completely ripe. Trellis grown melons can be positioned early so that as the melon expands it pushes against the stem, keeping it securely in place and thereby increasing the ripening time. This allows the melon to build up a higher sugar level.
As fast as the ripening is taking place I wouldn't be surprised if the melon came off the vine tomorrow.
After checking the melon, I stood back to get a better idea of just how large the plant itself had gotten and how much larger it could get under ideal conditions. The result shocked me.
The main trunk is now 18 feet long. Ignoring the secondary trunk, the next largest vine runs from the base of the plant 3 feet to the trellis, then stretches 13 feet to the end of the trellis, up another eight to the top, then reaches another three feet along a support rod. That gives it a total length of 27 feet... and it's still growing strong. At a very conservative growth rate of 2 inches per day, and realizing that there are a good 60 days left to my season, means that this runner and its counterpart on the opposite side of the plant, could reach an eventual length of 37 feet. Left to grow on the ground with the runners spaced evenly out from the main trunk, this single plant would form a triangle 28 feet tall (the main trunk would continue to grow another 10 feet) and 74 feet wide at the base. That's over 1,000 square feet for one plant. And remember, this was a late planting. Started early in a large pot and transplanted into the garden after the last frost it could achieve twice this size. Truly, these are huge aggressive monsters of the plant world. (And if you think that's big, remember that Ambrosia is not rated as a particularly large or aggressive member of the melon family. Imagine what a large watermelon might become.)
As an aside, I'm happy to report that there are no signs of the leaf mottling that plagued last year's hydroponic melon grown with FloraMato. This suggests that the problem was some sort of deficiency, not something bad in the fertilizer. Whatever the problem was, growing the melon in a large box of potting soil seems to have solved it. In a way, the current system is much like an ebb-and-flow hydroponic system where I provide the "flow" every time I water it and the plant creates the "ebb" by very quickly drinking up what it's given. The potting soil is acting as both the medium and a supplemental nutrient source. I acknowledge that it's not purely hydroponics, but considering the small volume of soil and large amount of nutrient solution used it's not that far away from it.
So, please check back tomorrow to see if the melon finally slips from the vine and if it does, how big it is, what it looks like and most importantly what it tastes like!
NEW!!! August 19 Update: PICKING DAY!!!
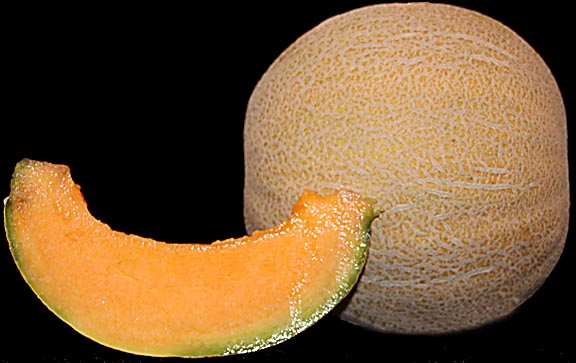
Forty-six days after is was pollinated the melon finally pulled free from its stem. It weighed 6-pounds, 9-ounces and had a disappointing Brix sugar level of 15.0. I say disappointing because considering the investment in time and expense and the fact that the plant appeared to be the healthiest I'd ever grown I was expecting better. Even more disappointing was that although a 15-percent sugar content would normally yield a very good tasting melon, this one had a flavor that bordered on harshness.
These poor results from what has always been an outstanding variety suggests something went wrong. Perhaps the FloraMato isn't good for melons even when all deficiencies have been fixed. Maybe I gave it too much, or too little food. Changing the PH of the nutrient solution may have been a mistake. The melon might not like growing in an all-Supersoil potting mix, or it may have resented having its roots confined.
There are too many possibilities to list. All I can say for sure is that I have grown better tasting Ambrosia muskmelons in diseased, nematode-infested soils than this one.
Immediately after harvesting this melon I began watering the plant with a nutrient solution of one teaspoon of Miracle Grow 24-8-16 all purpose fertilizer per gallon of water to see if using a different, and much cheaper, plant food affects melon flavor. The next melon is already the size of an egg so I should be able to post the results of this test around September 27.
September 23 Update:
Disaster struck one week after the first melon ripened. The plant completely collapsed in three days in a manner similar to past fusarium wilt attacks. So, the boxed melon experiment is complete and a failure. While using a soilless potting mix might avoid disease problems, I've decided this isn't a robust enough growing technique. Over the months I nurtured the plant I watched countless bugs and large quantities of wind-blow plant debris contaminate the top of the planter. This suggests that even if a sterile medium was used in time it would become just as infected as the soil around it.
Does that mean I'm done? Not by a long shot.
Phoenix-like from the ashes of previous failures rises HYDROPONICS 3.0!
Yep... I'm going to take one more swing at creating a viable hydroponics system for melons. First up: reducing the cost of the nutrient solution.
I decided to base my new hydroponics formula on the cheapest water soluble plant food I can find: All Purpose Miracle Grow. I can purchase 7.5-pounds of this at Walmart for only $13.00. That's less than one-fifth the cost of the same weight of Floramato. However, because Miracle Grow isn't a complete plant food it needs to be supplemented, particularly for sulfur, calcium, magnesium and many trace nutrients. Taking up a calculator, a thick pad of paper and pencil with an industrial strength eraser I began cranking numbers for various cheap, and not-so-cheap, supplements to develop the cheapest overall complete formula. In the end I found that for one gallon of water, a scant 1 teaspoon of Miracle Grow (provides nitrogen, phosphorous and potassium), 1/6-teaspoon Maxi-Plex Micronutrient Supplement by Grow More, Inc. (iron, manganese, zinc, boron, copper and molybdenum), 1/2-teaspoon Epsom Salt (magnesium and sulfur) and 1 teaspoon of Plaster of Paris (calcium and sulfur) provides the following nutrient profile:
Required Nutrient Levels: .......................... ... ... My Mixture:.........
nitrogen:
215 parts per million (ppm)...................................................224...............................................................
phosphate:
86 ppm............................................................................72.................................................................
potassium:
343 ppm.........................................................................144..................................................................
magnesium:
85 ppm...........................................................................85...............................................................
calcium:
175 ppm.............................................................................175....................................................................
sulfur:
113 ppm................................................................................244...............................................................
iron:
7 ppm........................................................................................7............................................................150...
manganese:
2 ppm..............................................................................7..............................................................
zinc:
0.25 ppm...................................................................................4.................................................................
boron:
0.70 ppm.................................................................................1....................................................................
copper:
0.07 ppm...............................................................................3..................................................................
moybdate:
0.05 ppm...........................................................................2.........................................................
The E.C. comes out to 2.2 and the PH 6.0 when using 7.2 water.
The two biggest problems are that the potassium is low and sulfur is high. However, these ingredients are tied into others so this is the best compromise I could come up with. For cost comparison I calculate that this comes out to $80.00 for 2,000 gallons, which should be more than enough to get to the first ripe melon. The same 2,000 gallons based on Floramato was well over $300.00. Eighty dollars isn't that bad as a hobby expense lasting four months.
For the hydroponic system I decided to resurrect the bubble system used in the winter 2010 version 3.0 system. A bubbler drives air through five 15-inch long bubble wands suction cupped to the bottom of a 16-inch wide by 28-inch long by 7-inch deep plastic storage bin, the type used for under bed storage. The container is filled to a depth of 4 inches, providing 12 gallons of solution into which roots can grow. The bottom inch of the rock wool block used to germinate the melon is in the solution and the remaining three inches are above it. Because the block is completely enclosed by the growing tank, except for a small hole through which the melon grows, the entire environment around it consists of fresh air from the pump that is at 100-percent humidity. This allows air roots growing out of the block to flourish. Interestingly, the amount of water roots is surprisingly small.
The big questions are: Is the nutrient formula sufficient and does the version 3.0 grow healthy melons? As the picture below show, the answer to both questions is a resounding "Yes."
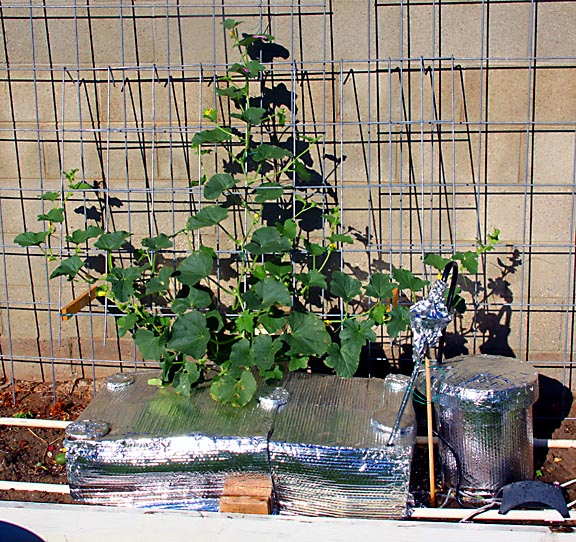
The foil bubble wrap reflects sun away so algae doesn't grow in the tank. The bucket to the right is a nutrient solution reservoir. A microswitch in the growing tank is located above a float. When the liquid level drops more than 1/8-inch, the float falls turning on the switch turns which in turn turns on a small pond pump in the bucket to replenish the tank. To prevent backflow and siphoning problems there is a air break in the supply hose (black) as it empties into a funnel (wrapped in foil) then carried into the tank through a second tube. The system has proved completely reliable.
The melon was planted on August 1st. Seven weeks later it's three feet high and five wide. The reason it's not growing faster is that it's located on an east facing wall and only gets sun for five hours a day. Also, temperatures have dropped as we enter Fall, significantly slowing growth. The most important thing to note is that the plant is strong and healthy with no signs of the mottling or discoloration that plagued my earlier hydroponic attempts. I believe the reason is that I've discovered that bubbling air through the nutrient solution drives it into becoming alkaline. The same solution in the bucket, which doesn't have air bubbled through it, remains at a fixed PH of 6.0. The solution in the growing tank climbs from an intitial 6.0 to 6.8 in one day. Left unchecked it quickly rises above 7.5. I found that I can counter this by adding 1/2-cup of vinegar a day. This is very cheap and since I need to add that much water anyway to compensate for evaporation it's no additional work. I've looked into various PH-Up additives and found that they are much more expensive and tricky to use. Vinegar is cheap and so safe you can drink it.
In spite of the late planting date and less than optimal positioning the plant has already produced a ripening melon.
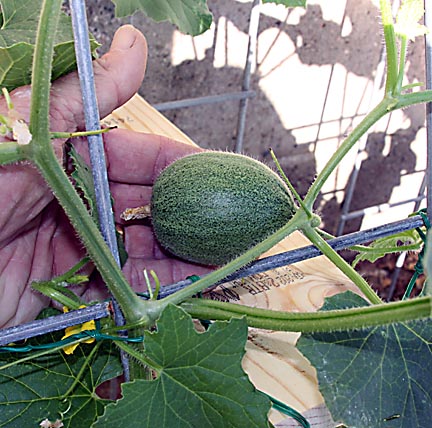
It's doubtful that this melon will ripen within the scant five weeks left to the growing season, but there's always hope. So please check back often to see how it's getting along.
NEW!!! October 3 Update:
Regretably, the weather turned cold, the days got too short and a mold took over the growing tank so I was forced to terminate this hydroponic melon experiment before it could ripen. Thgis also means that I can't claim that the new nutrient formula works. The plant appeared to grow well so if there are problem with the mix they can't be too serious. Anyone trying it will have to fine tune it but at least this should get them off to a good start at an inexpensive hydroponic mix for melons.
This may be my last melon reporting for a while. I've pretty much exhausted all my ideas. From now on I'd just be repeating what I've already done. To all my fellow extreme melon growers I thank you for visiting this page and wish you all:
Happy Gardening!
![]()
(Click on main site to browse 70 other topics ranging from exotic kaleidoscope designs to the strange world of lucid dreaming. There you will also find several other pages dealing with chocolate.)