Photographic Product Reviews: A close look a various pieces of photographic equipment to see how well they work
NEW!!!
The Darkest Backdrop Material
Most
people assume that black velvet is the most light absorbing material
readily available. They're half right. From my extensive
experimentation with light-absorbing materials for telescope making,
I know that a good black velvet absorbs more light than anything
else, thereby providing the darkest backdrop. The only thing that is
darker is...
...black
velvet itself used in a slightly different manner. Consider the
following image:

On the left is a top-quality black velvet. It's new and freshly cleaned. While it may look gray is truly is very dark black. To get it to show up at all I had to use a flash, set the camera at ISO 3200, move to 12-inches away from the cloth and even then increase the lightness and contrast in Photoshop to get it to show up. But, even with all that it's obvious that the right side is even darker. What is it?
It's the same black velvet but positioned so that it's at a 45-degree angle to the camera. What this does is prevent the ends of the individual velvet fibers and the base material to which they are connected from being illuminated, which reduces the reflection considerably. In fact the right side is absolutely black. The little light seen in the image is mostly noise from the high ISO setting and processing. For the best results always stretch the velvet tight to remove any wrinkles and sweep it with a sticky roller to remove any lint, both of which can cause light to be reflected back to the camera.
Granted, it's unlikely that anyone will ever need anything darker than normal velvet, but it some cases where the object itself is extremely dark this might be a useful technique.
NEW!!!
Canon i9900 Printer
Since I am far from being an expert in digital photography or printers the following review should be viewed as what an average person would see in comparing the output of a better quality wide-format printer like the Canon i9900 (or it's newest replacement, the Pixma Pro9000) to a run-of-the-mill printer like my old HP Deskjet 932C.

The Canon i9900 color printer
I purchased the printer from Adorama for $350, $150 less than local stores. It arrived in only 5 days in good condition. The set-up instructions were as clear as any I've read and installation went smoothly and just as the instructions directed. Usually, when installing new hardware and software, there are one or two glitches where the instructions don't match what happens during the install process. Thankfully, this was not the case with this printer.
The printer weighs 25 pounds, is 27-inches long and 12-inches wide... almost twice the size of my old HP. In operation it's no noisier than the old HP and when not printing is absolutely silent. The noise level during printing is very low and not at all objectionable.
Print speed seems to be very fast, turning out a high resolution 13x19-inch print in three minutes. Eight by ten-inch prints come out as fast as with the HP, which is remarkable because the Canon has four times the resolution.
I fed each printer the same image of some flowers to test which provided the more accurate color rendering. The output of each was scanned at the same time to produce the following image:
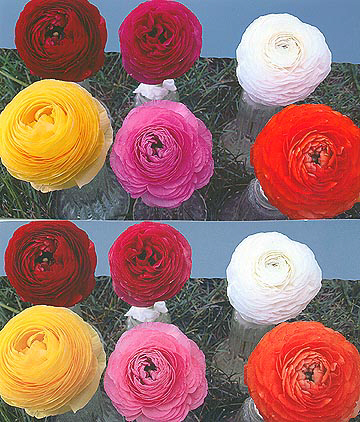
The top half of the image was printed by the Canon and the bottom by the HP. The Canon caught the yellow and orange flowers perfectly, the HP showed them slightly washed out. The Canon was also much better on the light pink flower. (The differences are more obvious than these reduced-resolution images suggest.) The white, dark pink and red flowers were almost identical. The only difference is that I could barely detect a slight orange tint to the red flower, though this was so slight that I may have imagined it. This was odd because the Canon has a separate red ink and doesn't have to make red out of other colors like the HP has to.
With a pair of close-up glasses there is a noticeable graininess to the HP's print. The Canon's image is much smoother and sharper.
One oddity about the marketing of this printer is that's advertised as being able to produce borderless prints. It can but the border on its normal prints can be as small as 1/8-inch so I have to wonder why bother mentioning it?
Overall I'd say that the Canon is obviously the better printer, even ignoring the fact that it can make 13x19-inch prints and the HP can only make 8x10s.
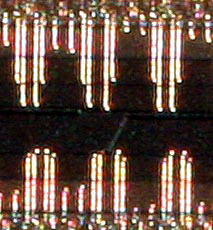
The following image is of the ink jets of the Canon's print head. I took it before installing it using a Canon 65mm 1-5X Macro Photo lens set to 5X magnification:
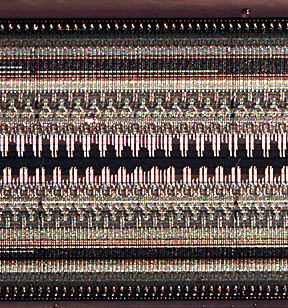
The jets are arranged in rows and these rows collected into two rectangular blocks measuring 1x1/2-inch. I assume the two rows of "teeth" facing each other are really rows of ink jet nozzles. Here's a closer view of them:
Eleven years later this great printer died. I replaced it with a Canon Pro-100. It's bigger, much slower and the color rendering isn't nearly as good.
Canon's Angle Finder C
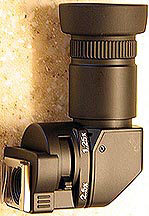
Slip the rubber eyeguard off a Canon camera and slide this finder on and you can select a magnification of 1.25X or 2.5X to allow for more precise focusing. It also rotates to either side so that the viewfinder can be viewed from a more comfortable angle. ($160 to $220)
I had several problems with this finder. First, the magnification increases the size of the image as well as the graininess of the viewglass. This makes the image larger but harder to see. Much of the exposure information in the viewfinder is outside of the field of view. I had to set the exposure up without it then switch to the angle finder. Also, the angle finder only holds at a few detented positions, you can't place it anywhere you want. The detents in mine aren't deep enough and the finder often slips out of position.
All in all I haven't found this to be worth the hassle and expense.
(For a discussion of using thhe Angle Finder C in macrophotography, please see my CANON MP-E 65 mm 5x MACRO LENS GUIDE page.)
Tokina AT-X 400mm F5.6 Prime Lens
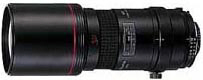
This lens is rated 2.9 out of a possible 4.0 by Photodo.com. Comparing test pictures taken with it to those from my Sigma 18-200 set to 200mm and mounted on a 25mm tube extension, the Tokina provided images that were only barely delectably sharper than the Sigma. (F8.0 in both cases. The object was a bird feather 8 feet away.) The differences were so small that the images had to be magnified 4X to see it. Small focusing errors, inevitable when working with wild live subject close up, would wash out any differences.
Since I would only use this lens for close-up photography of hummingbirds I decided the price ($250 used) wasn't worth it.
The Better Beamer Flash Extender
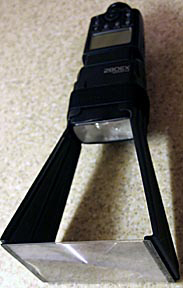
The Better Beamer ($40) is an extremely lightweight, collapsible attachment for flashes that uses a small Fresnel lens to focus the beam so that it doesn't diverge with distance as fast a the beam from the flash by itself. It's ideal for fill flash of objects set against bright backgrounds which are too far away for even the highest powered flash units to illuminate. It typically enables two stops faster aperture settings.
The unit consists of two rigid plastic side panels, and Fresnel lens which attaches to them with Velcro strips glued to the edges of the lens, and a Velcro strap that holds the unit on the flash. It comes apart and assembles very easily and stores flat. The build quality is excellent.
By setting the angle of the flash on my Canon 580 flash to its lowest setting (below the last detent) I can get the beam to illuminate the center of the field of view at 4 feet. Any closer and the beam is too high, further away and it's too low. At the lowest detent position the camera has to be at least 12 feet away for the beam to illuminate the center of view. A remote shoe eliminates all these aiming limitations.
The beam spread of the flash is reduced from 40 degrees to 7 degrees with the Better Beamer. That equates to a 16 by 8-inch rectangle at 4 feet and a 36 by 18-inch rectangle at 12 feet.
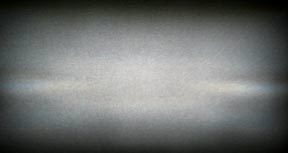
There are two shortcomings of the beamer. First, the small Fresnel lens only captures 60 percent of the flash's beam. The rest is lost. A slightly larger lens would increase it's efficiency. Second, the illumination isn't uniform. At 12 feet here's what the light pattern looks like:
Flash focusers are easy and inexpensive to make (please see BUILD YOUR OWN FLASH FOCUSER for how to do it) but after several experiments I found the Better Beamer to work better, was lighter and more durable than the homemade varieties. All in all I'd say it was a great investment. They can be purchased from:
http://www.birdsasart.com/accs.html
http://www.naturephotographers.net/gs/gsbb.html
http://rpphoto.com/products/xtender/default.asp
![]()
Return
to the mainpage and browse 90 other
subjects including several other pages related to cameras, lenses and photography.