Canon MP-E 65 mm 1x-5x Macro Lens Guide The strengths, weaknesses, and how to use this unique close-up lens for super-macrophotography.
Everyone at one time or another has dreamed of having super powers: invisibility, super strength, or that perennial favorite of teenage boys: X-ray vision. I mention this particular power last because for anyone willing to pay the price, something very much like it is available.
Just as X-ray vision makes a hidden world visible, so Canon's MP-E 65mm 1-5X macro photo lens opens the door to a world that's invisible to the human eye. With its unique capability of providing true 5X macro photography, it enables users to capture images of the almost microscopic world that surrounds us. The head of a pin can be enlarged to 20 inches in diameter without loss of sharpness. Tiny insects that look like mere specks become monsters of unimaginable strangeness. The edge of a sheet of paper can be expanded to the point where it looks like the side of a 2x4. This sounds great and it is, but there are two prices that must be paid for this power.
The first is the expense of the lens. In early 2006 I paid $1,000 after taxes for mine from a local camera store. The cheapest price I found on-line was $900.00 after taxes and shipping but that was from the lowest cut-rate source and one has to worry about gray-market issues in such cases. Making this price even harder to swallow is that unlike most lenses, which can be used for a variety of tasks, the MP-E is strictly single-use: to make small things look huge.
The second price is patience. The MP-E 65 mm macro lens is not easy to use. Focusing is difficult and the vanishingly short depth of field makes image stacking necessary to create images of extended objects if you want the entire object in focus. At 5X the lens magnifies camera movements so severely that even the stabilest tripod is insufficient. While hand held photos taken at 2X by gifted (or lucky) photographers is possible, for most people a special mount is recommended, especially at higher magnifications.
For anyone willing to pay these two costs a new and fascinating world awaits them. This page chronicles my efforts of learning how to use Canon's MP-E 65 mm 1-5X macro lens and presents some of the results of doing so. I sincerely hope you find it interesting.
MP-E
65 mm 1-5X
Macro Photo Lens Description:
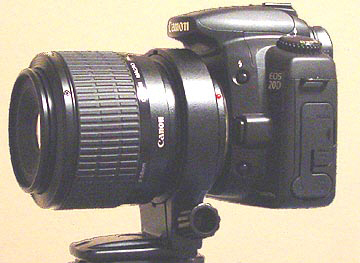
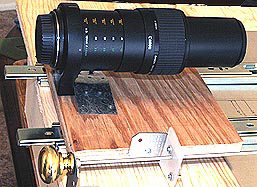
The MP-E weighs in at 30 ounces, just under two pounds. It comes with a lens ring which places the mounting point close to the center of balance for the camera/lens combination. Set to the 1X position (as shown above) the lens is 4 inches long and the camera/lens combination is almost perfectly balanced.
Turning the rubberized central ring clockwise expands the lens through its power range to the 5X configuration.
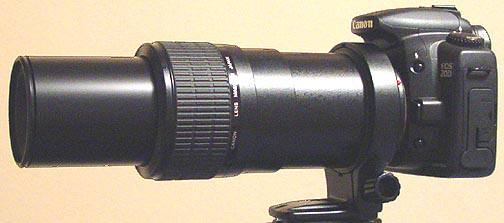
The lens is now 8.5 inches long and if using the mounting ring the camera/lens combination is slightly nose heavy. The movement is velvety smooth with no detectable backlash. The lens is extremely well built and even fully extended there is absolutely no play in any of the lens's four segments.
A twist of the tightening knob on the lens ring loosens it enough to rotate the camera, a useful feature providing an additional degree of orientation freedom.
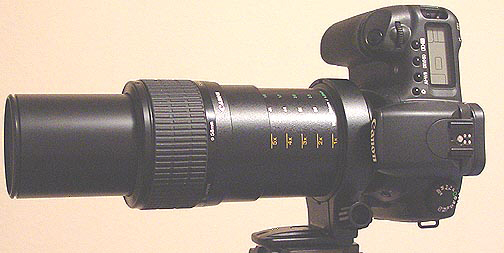
This image shows the yellow magnification scale on the top of the lens. The working distance (distance from the front of the lens to the subject when in focus at that particular power) is given in millimeters (white) and inches (green.) There are no annoying detents in the motion as the the lens is expanded through the 1X, 2X, etc. positions.
The manual (in six languages) provides easy-to-understand instructions on how to use the lens and several tables that provide information on depth-of-field and exposure compensation.
The following table provides a sampling of the depths of fields and working distances:
1X
at f2.8 has a DOF of 0.396mm at a working distance of 101mm (4 inches)
1X
at f16 has a DOF of 2.240mm at the same working distance
5X
at f2.8 has a DOF of 0.048mm at a working distance of 41mm (1.6 inches)
5X
at f16 has a DOF of 0.269mm at the same working distance
As this table shows, the MP-E's depth of field can be very small. This is not the result of poor lens design but the inescapable penalties associated with extreme magnification and short working distances. Dealing with such short DOFs is one of the hardest aspects of learning to use this lens.
Using
Canon's MP-E 65mm f2.8 1-5X Macro Photo Lens:
Using Canon's MP-E lens is painfully simple. You simply adjust the lens to the magnification you want, move the camera closer or farther away from the subject until it's in focus and snap the picture. Equally, you can set the working distance and use the power adjustment ring as a focusing adjustment and turn it to bring the object into focus. There are no separate power adjustment and focusing capabilities.
There is no autofocus, this is strictly a manual lens.
Looking through the camera's eyepiece with the MP-E is like looking through a low power microscope. At 1X the object appears magnified 20 times. This ratio continues to increase up through the maximum 5X setting where objects look 100 times their actual size. Viewing images on a monitor at the "actual pixels" setting with the monitor's resolution set to a default of 72 ppi generates images that are 300 times the actual size of the object when the camera is similar to Canon's 8.2 MP EOS 20D (if the image was taken at 5X.) There are no digitation artifacts at these settings so there is room for further enlargement.
The nature of the lens makes exposure compensation tricky. The easiest thing to do is use a Canon flash such as the Canon Ring Flash or its dual-head flash attachment and let the camera's through-the-lens system (ETTL) set the exposure. Even then several test shots may be necessary to eliminate hot spots that may not be visible under ambient light. Be aware that either of these units will set you back another $500 or more and add a lot of front-end weight to the camera. Using ambient light for the exposure is another option, though the f stops needed for practical depth of fields and the dimming factor resultant from the magnification requires a lot of light and/or long exposure times. I use a Canon 580 flash on an extension cable so that I can position it to any angle I want for outside use and ambient light with long exposures for posed shots inside.
At 5X the MP-E is so sensitive to camera movement that even a sturdy tripod on a hard surface makes focusing a challenge. Turning the lens magnification adjustment ring causes enough flexure in the tripod that the image constantly moves in and out of focus. This problem is so bad that even the small relaxation of the tripod's rubber foot caps can cause the object to slowly move off center. My solution to this was to build a special mount for holding the camera and object (please see below.)
This sensitivity to movement can throw the image out of focus from the simple act of tripping the shutter. Mounting everything on the mount discussed below solves this problem. When the camera is on a tripod I always use a time release or a remote release to prevent the camera from shaking.
Using the adjustment ring to focus the image at the higher magnification is impractical because the motion is too coarse. It's easier to mount the camera on a screw-driven rack and move the camera to good focus by turning the screw. Again, even a smoothly operating and well-greased rack may cause position shifts that make fine focusing a challenge.
With such short depths of fields, focusing becomes extremely critical. Canon makes an a camera attachment called an Angle Finder C, which provides 1.25 and 2.5 magnifications of the viewfinder to make focusing easier. This sounds good in theory but I've found that the dimming caused by the additional magnification, the magnification of camera movement and the magnification of the grain of the focusing screen actually makes focusing more difficult and less accurate when using the Angle Finder C. (Please visit my page titled PHOTOGRAPHIC PRODUCT REVIEWS for a longer review of the Angle Finder C.)
At higher magnification factors the object as seen in the viewfinder appears so dark under normal ambient lighting conditions that it is impossible to focus. Additional lighting, even if you're using a flash, may be necessary. For example: at 5X a white wall in a brightly lit room appears almost black.
Important:
Please don't interpret any negative comments above as
criticisms of this lens. They are simply the inescapable facts of
life when dealing with such extreme magnifications. Also, most of my
discussion has focused on using the MP-E at its highest macro setting
where problems are the greatest. This is where I do most of my work.
Shooting at lower magnifications lessens these problems
significantly. My personal opinion is that the Canon MP-E 65mm 1-5X
macro photo lens is a great lens and I get more pleasure working with
it than any other type of photography. I highly recommend it for
anyone interested in very high magnification macro work.
Also, I wrote this page as I learned how to use the MP-E, consequently many of the photos in the following articles are not the highest quality and should not be considered as the best the lens can provide. I'm leaving them in to show how things looks when something goes wrong.
My
Mount for the MP-E:
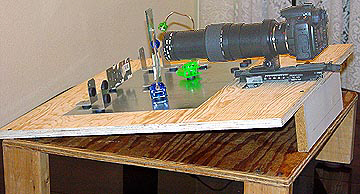
The mount I developed for staged macro work is an inclined table that holds both the camera and object. The height and angle of the table is set so that while sitting in a chair the camera's viewfinder is at a comfortable position and orientation. The camera's mounted on the worm-driven rack for precise focusing. This rack has two additional metal guides screwed into the table to make sure the camera doesn't shimmy from side to side when the screw is turned. The object and required lighting for it is held in place by angle iron pieces that are held onto the table by magnetic mounts. This allows the pieces to be moved very easily wherever needed. Lighting is provided by three battery powered gooseneck lights.
This picture shows the lens in its 7.5X configuration (close-up lenses and extension ring added to the lens) in preparation for capturing an image of the iridescent portion of a hummingbird's throat feather.
UPDATE!!! While the Manfrotto focusing rack is okay for 1X and 2X work, at 3X and above it's distance adjustment is too coarse, the guides move too much (even with side bracing), and the brass-on-brass drive screw and nut (even when heavily greased) grab and break loose far too often. At 7.5X it's a nightmare.
My solution was to build a new focusing rack:
The new rack is shown above with the MP-E in its 5X configuration but without the camera body attached. At the bottom of the image you can see the brass knob attached to the 12-inch long, 8/32 threaded rod used for adjusting the position of the mount's bed. This fine thread allows for extremely precise focusing. One-eighth of a turn moves the bed only 1/10 of a millimeter. This amount of positional accuracy is essential for 5X image stacking to increase the depth of field. The large brass knob is much more comfortable than the Manfrotto's small, cylindrical, knurled knob. The threaded rod is interference-threaded into a sheet of nylon providing a no-backlash adjustment. The heart of the rack consists of the two ball-bearing shelf guides. They run very smoothly yet are rock solid as far as side-to-side of vertical shimmy is concerned. The entire rack only cost $17.00 to build.
Using it is a dream to use, with stability, comfort and precision impossible with the Manfrotto.
Lighting
Issues:
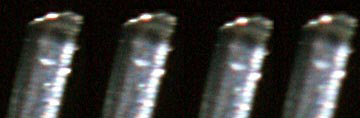
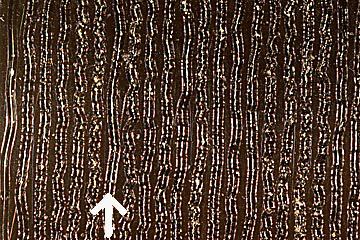
From the design of Canon's ring light and two-head macro lighting systems one gets the impression that the goal in macro lighting is to achieve the most even and uniform lighting possible. I've found that in many cases light coming from only one direction creates shadows which help bring out the textures of surfaces and increases the image's interest. With omnidirectional lighting, as is provided by the ring light, much of this surface texture can be lost. Consider the following images of the end of a particle board at 5X:
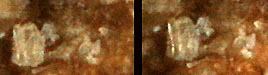
The picture on the left was illuminated evenly whereas the one on the right had light mainly coming in from one side. The one on the right clearly shows more detail.
For setting up photos at 5X or less I use three small lights with flexible goose-neck cables between the battery pack and bulb. These allow to experiment with the evenness and direction of lighting to create the most interesting image possible. This saves time over trying to translate the positions of the goose neck lights into an equivalent configuration using a flash or flashes. Because the mount I use for the camera and object holds them rock steady, exposures of many seconds is not a problem.
For shooting at 7.5X the front of the lens is only 3/4-inch away from the object and there isn't enough of an opening to get light in from the side. For this situation I use what I call an octopus light.
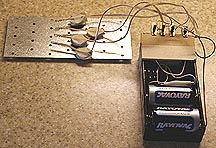
This is a 4 D-cell holder wired through four switches to 4 minimaglite bulbs. The bulb wires are taped to magnets, which hold them securely to the same metal base on which the object is held. The magnetic mounts allow the lights to be positioned as needed to provide the perfect illumination. Varying the number of lights, how close they are to the object and how many D-cells are in the cell holder I can control the brightness of the illumination. This means I can set the f-stop and shutter speed at the optimum settings for maximum sharpness and minimum vibration effects (please see the Vibration Issues article farther down.)
Magnification
scale and common errors:
I took the following photos one day after getting the lens. It shows the sorts of magnifications the lens provides. Originally I wasn't going to post it because it displays so many errors, but then I thought it might be illustrative of the sorts of difficulties a newcomer like myself can experience with this lens.
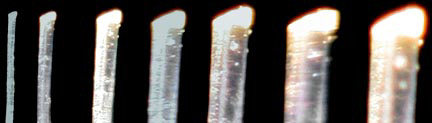
1X...2X.........3X........4X.........5X...........6.25X..........7.5X.....
The object is the end of a strand of human hair, 0.0025 inches in diameter. (Please see the "Gilding the Lily" article farther down this page to see how the 6.25 and 7.5 magnifications were achieved.)
The most obvious problem is that none of the images is in sharp focus. This was in spite of the camera and object being held in a solid mount and a screw rack used to provide the sharpest apparent focus in the eyepiece. What this taught me is to always take a range of pictures around the apparent focus and select from them the one that's sharpest.
The second problem is that several areas are overexposed. Part of this was caused because in the viewfinder the hair was so small that lighting issues like this are difficult to see. Additionally, even with the camera's exposure mode set to center weighting the smallness of the object caused the camera to discount it in favor of the dark background immediately around it.
Third, the focusing problem increases as the magnification factor increases.
Fourth, a couple images have color shifts toward the blue.
The first thing I did to correct these errors was to go to manual on the camera, instead of aperture mode, and take several test pictures at different shutter speeds. While in aperture mode the camera decided that with the lighting I was using a shutter speed of 1.3 seconds was required. I found that 0.25 seconds eliminated the overexposed areas. Next I took a series of photos from slightly inside to just outside the apparent sharpest focus to find the position of true sharpest focus. Here's what I got:
The sharpest image is the one on the left, which was taken with the lens very slightly farther away (0.01 inches) from the object than the position of apparent sharpest focus, which is the third image from the left. While these are much better than the 7.5X image in the previous image, I'm still not satisfied. Granted, these images represent a magnification of 300X and there's only so much that can be asked from a lens, but I was hoping for razor sharp images at any power. I acknowledge that this is unreasonable and physically impossible, but spending $1,000 for a lens tends to make me that way. Still, the image on the left captures details which measure only 0.050 inch in diameter on the picture, corresponding to 1/10,000 of an inch in actual size.
Another source of unsharpness could be distortion caused by the close-up lenses and extension tube used to boost the power to 7.5X. Removing them lowers the magnification of the lens, meaning that there are fewer pixels on the image to record fine detail, but if the distortion is reduced more than the loss of resolution due to fewer pixels the overall image may be improved. I tested this and found that because the distortions caused by the lenses are the inverse of that caused by the extension tube the amount of distortion is not an issue as long as the image fills only the center 75-percent of the frame. Outside this circle the image may become a little soft.
Field
Curvature:
To find out if Canon's MP-E macro lens has any field curvature or other distortion issues I took the following photo of a grid of squares at 5x:
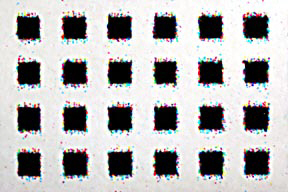
Although the image appears slightly blurred, that is the result of processing it for this webpage. In its original form every detail appears sharp.
What this image showed me is that there is no detectable field curvature at 5X across the entire frame. Another thing I learned from this experiment is that trying to get a flat object perpendicular to the optical axis of the lens so that the entire image is in focus at 5X can be difficult because of the lens's shallow depth of field.
While taking the picture for this experiment I noticed that the squares were surrounded by a random speckling of colored dots. Cropping and enlarging one square yielded the following image:
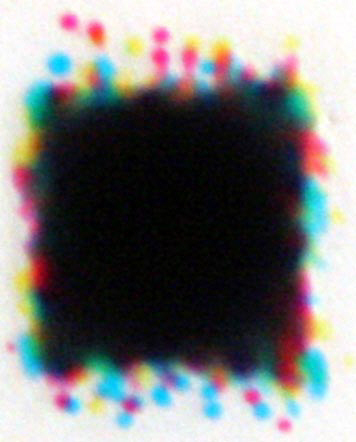
This is a single pixel (0.010-inch square) and appears perfectly square and clean under a 10X jeweler's loop. At 5x, Canon's 1-5x macro photo lens produces a 72 ppi image that is 3-inches across when using an EOS 20D camera, or a magnification of 300 diameters. Each individual colored dot, which I assume to be individual droplets of errant ink or splashes from ink hitting the center square, shows up on this image as 0.2-inches in diameter, or 0.0008-inches actual size.
This was interesting so I repeated it with a 300 ppi pixel:

Depth of Field Versus Diffraction Losses:
While higher f stops increases the depth of field, eventually the point is reached where the aperture is so small diffraction effects blur the overall image. You end up losing more than you gain. The cropped but otherwise unmagnified images below are of one square of a small printed grid photographed, from left to right, at f5.6, f8.0, f11, and f16:
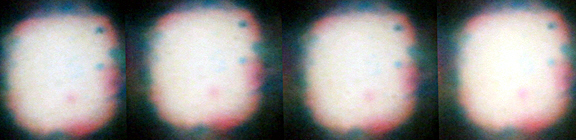
While the overall sharpness decreases in each image, it doesn't become objectionable until the far right at f16. In these images the f8 setting appears to be the best compromise between overall sharpness.
If these images look shockingly poor, note that the squares are only 0.009 inches across. The small blue speck in the upper right hand corner is a mere 0.0008 inches in diameter. The edge of a sheet of typing paper would fill half of one of the squares. The full frame image was 11 squares wide and 8 high. At the camera's native resolution of 72 ppi a full frame prints out at 48 by 35 inches for a magnification factor of 545 diameters. Such extreme magnifications are inconsistent with razor-edged sharpness.
Below is a more detailed test of the depth of field versus overall sharpness comparison. Regrettably, the image scale was much larger than the previous test and reducing the image for the Internet lost much of the detail.
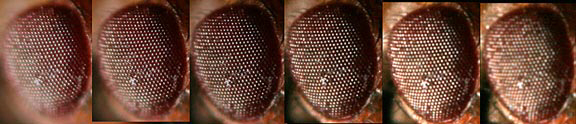
These images are of the eye of a fruit fly, which is much less than 1mm in diameter. From left to right the apertures were f2.8, f4.0, f5.6, f8, f11, and f16. The first two pictures on the left clearly show blurring around the perimeter of the eye caused by insufficient depth of field. The two on the far right show the overall blurring caused by the aperture being so small that diffraction effects are present. To my eye the optimum aperture is somewhere between the f5.6 and f8 images in the middle. F7.1 would be a good compromise. For very flat objects f-5.6 seems to be the sharpest.
Vibration Issues:
While attempting to take an extreme close-up image of a one-pixel square I found that the individual droplets had an elongated and blurred appearance.

While retaking the picture to see what was going on I noticed that there was considerable image shaking immediately after the frame was snapped. It turned out that the problem was being caused by the movement of the mirror as it snaps up out of the way to expose the camera's CCD chip to the image. I discovered two ways to eliminate this problem.
The first is simply to evoke the camera's mirror lock-up option to stop its movement from shaking the camera. The second was to change the shutter speed in case part of the problem is the mirror's motion triggering the natural resonant frequency of the camera/lens/mount system.
Unfortunately, locking the mirror up didn't solve all of the vibration problems as the following photo shows:

The top half was taken of two 300 ppi pixels at 5x without the mirror being locked up. The bottom half was taken with the mirror locked up. The vibration on the bottom, as shown by the shortened length of the elongated blurs of the bright spots, is much less and the overall image sharper because of it. But, there is still some elongation of the bright spots so vibration is still present. The difference between the top and bottom blurs is a factor of three improvement. I estimate that if I can eliminate the remaining vibration the image should be about twice as sharp.
The images above, from a laser printer printing onto bond paper, were taken at 1/30 second. Although I've tightened everything down on the mount I'm guessing that a harmonic response is still shaking the camera. To test this theory I took pictures of the dots at four different shutter speeds.

The upper left frame was taken at 1/25th of a second, the upper right at 1/20th, the lower left at 1/15, and the lower right at 1/13th. The reduction in the elongation of the bright blurs is obvious as the shutter speed decreases. Below 1/13th second the blur begins to increase again, I assume from the exposure being so long that other vibrational modes are being recorded.
What this tells me that for any given camera/lens/mounting configuration there may be an optimal shutter speed at which blurring caused by vibrations are minimized. This is critically important and useful to anyone working in the extreme macro zone of 5X or greater.
I placed the may above in italics to emphasize the point that mount resonance might not always be a problem. When I built my own focusing rack to replace the Manfrotto I'd been using, I noticed that the resonance problem was no longer an issue. However, I ended up with a new vibration problem.
 .......
  .......
The image above on the left is what the camera recorded without locking up the mirror, it's a vibrational mess. Locking the mirror up, center image, greatly reduced the shaking but there was still some vertical elongation indicating there was still a vibration problem. This amount of blur did not increase or decrease when the shutter speed was varied from 1/8 to 1/30 second as it had with the Manfrotto mount. The final picture on the right shows spots that are almost perfectly circular, indicating minimal shaking. This was achieved by placing a block between the lens and the mount, then stacking three pounds of soft weights on top of the lens.
The images are of a solid black block printed on bond paper by a laser printer. A light was set up at a grazing angle so that irregularities in the paper resulted in a field of very fine points of light. The settings were 5X macro, f5.6, 1/15-second, and ISO 800. The smallest dots on the image measure less than 0.001-inch in diameter.
What
I learned from this is that anytime a change is made to the camera
system I need to perform an image test to make sure the camera/mount
system isn't haunted by a vibration problem that will soften the image.
Magnification
and fine detail:
Because the depth of field so is much greater at 1X than 5X it's tempting to take everything at 1X and upsample it to whatever size is desired. To see what resolution cost this strategy evokes, consider the following images of the head of a beetle, 0.050-inches across, taken from left to right at 1X, 2X, 3X, 4X and 5X and then cropped and resampled to create the same image at the same 2-inch width:
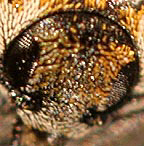
As expected, maximum detail is captured at the highest magnification, but its limited depth of field is a real killer.
Scaled
image comparison:
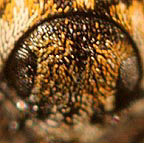
The following images of the same beetle head show the relative scale of the MP-E's different magnifications:
![]()


...1X......2X............3X...................4X........................5X.............
After careful comparison of the above two sets of images I'm beginning to think that 4X is the best trade-off between magnification, sharpness and depth of field.
Image
Stacking to Increase the Depth of Field:
Image stacking is the process of copying and pasting together the in-focus parts of several images of the same object to extend the depth of field. (A detailed explanation can be found at: HOW TO STRETCH THE DEPTH OF FIELD IN A PRINT.) This is a particularly useful technique for macro photography because it overcomes the painfully shallow depth of field one has to deal with at higher magnifications.
The following example shows what it can do. The collection of 9 images are of the head of a fruit fly taken at 5X.
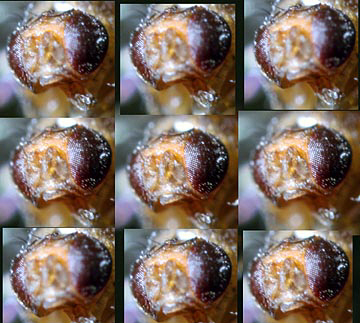
As can be seen none of them show the entire head in focus. By combining the in-focus zones from each image to create a single picture, the entire head is more closely in focus.

There are several problems with this technique. First, the depth of field at high magnifications is so shallow that to make a composite image with a extended object in-focus may require dozens of images to be stacked. This can be a lot of work. Second, because the lens is going to be moved closer to the object with each adjustment, the image scale will increase slightly. This makes resizing all the images to the same scale necessary to maintain accurate proportion and perspective and make each section match the segments before and after it. Third, it's critical to maintain the same lighting for each exposure or the brightness and shadows will shift, creating inconsistencies that will have to be hand-touched out of the final image. Finally, it isn't practical to apply it to objects like fuzzy caterpillars with complex surfaces where the texture of the surface exceeds the depth of field.
I usually take twice as many photographs for compositing as I think I'll need to provide insurance against missing a certain area because none of the images of it were in focus. For example: only four of the nine original images were used to create the the composite above.
This technique takes practice to master. The inaccuracies in the image above are the result of my being new to both it and the difficulties of 5X macrophotography.
The
Heartbreak of Diffraction
Blurring:
When light passed close to an object the wave nature of the light causes it to bend slightly around whatever's blocking it. This is called diffraction and is an inescapable fact of life. No lens, regardless of how perfect the design, how many pieces of exotic glass, or how exact the surfaces are ground, can prevent it and the blurring it causes.
In normal photographs diffraction is seldom a problem unless extremely small f-stops are used and even then the problem may not be objectionable unless the goal is to produce extremely large, razor-sharp prints. Not so with high-power macrophotography.
At magnifications of 5X and above the amount of image magnification is so great that the evils of diffraction blurring haunts every picture. Consider the following image:
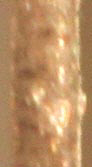
This is a cat hair, 0.001-inch in diameter. On most monitors it will appear 1.1-inches in diameter for a magnification factor of 1100X. At this scale diffraction blurring, which is normally so small as to be invisible, has been magnified to the point where it softens the focus. Printed out at this same scale the picture has a soft look that many people will find objectionable and may misinterpret as being out of focus. For scientific purposes there is nothing wrong with such prints because they allow the maximum of detail to be seen. But, for artistic purposes such soft detail may be unacceptable. After several experiments I found that to keep diffraction blurring small enough on prints so that it can't be seen at a normal viewing distance of arm's length, the overall magnification should be limited to a maximum of 250X. Even then individuals with keen eyesight (or very short arms) may be able to spot it.
Gilding
the Lily:
Considering that every other macro lens on the market only achieves 1X and the MP-E does five times better than this you'd expect that I'd be satisfied. You'd be wrong.
Always one to push the limits, I connected the MP-E to the camera via a 25mm extension tube. The result was that the magnification increased to 6.25X with a working distance of 1.5 inches. Taking things even further I screwed on a stack of close-up lenses with a total power of 7 diopters. This increased the magnification to 7.5X with a working distance of 0.75 inches. At such extremes the problems of focusing and the vanishing small depth of field are difficult to deal with, but doing so opens the door to unprecedented detail.
(For more information about the effect of extension tubes and close-up lenses on image scale and quality and how using both at the same time can correct the distortions that would normally be caused by either one alone, please see my EXPERIMENTS WITH CLOSE-UP LENSES AND TUBE EXTENSIONS page.)
Focusing:
The drive to make something small look very large can be seductive, so much so that I confess I'm always over-enlarging my prints. Doing this makes the sin of a slightly out-of-focus image impossible to ignore. When the camera was on the Manfrotto mount accurate focusing at 5X and higher was hit-or-miss because the screw's drive was so coarse. The much finer and smoother-running threads of my homemade mount eliminates this problem. The issue then is how to achieve the sharpest focus when the view finder isn't sensitive enough to indicate it?
After experimenting with several strategies I have to confess that I could not come up with a reliable way to achieve sharp focus while looking through the eyepiece. The shallow depth of field at 3X and above simple make it a hit-or-miss situation. I always take several pictures around the point of sharpest apparent focus and during processing select the one that captures the finest detail.
Putting
it all together:
The following checklist summarizes everything I learned from experimenting with Canon's MP-E 65mm 1-5x macro photo lens at 4X and higher:
1. Use a mount to securely hold both the camera and object.
2. Mount the camera on a screw rack for accurate positioning. (At 5X the lens power ring is too coarse fo focusing and causes too much shaking.)
3. Always use a remote release to avoid shaking the camera during the exposure.
4. Always use the "mirror lock-up option to reduce vibrations. Also, wait a few seconds after triggering the lock-up to let vibrations from its movement die out.
5. Use the highest macro factor possible within the depth-of-field constrants. (The more pixels covering the image the sharper it'll be, everything else being equal.)
6. Use constantly-on light sources like gooseneck flashlights to set up the exposure whenever possible. (This lets you see how lighting enhances surface details and identifies areas that may be over exposed.)
7. Test your mount to see if it has a vibration problem and if so, use blocks and weights to correct it. Also check to see if shutter speed evokes a resonance problem in the mount.
8. Take several pictures around the point of best apparent focus and during processing select the one that's sharpest.
9. If needed, use image-stacking to extend the final image's depth of field.
10. Avoid losing detail by over sharpening. (This is an easy temptation because at the "actual pixels" setting there will almost always be some blur detectable. Trying to eliminate it by over sharpening can increase the contrast so much that besides making the image look harsh, it can actually reduce the amount of fine detail visible.)
11. Avoid printing a magnifications over 250X. Doing so will magnify the unavoidable softening of edges caused by diffraction effects.
Semantics:
When I first entered into the world of macro photography I was confused by the use of the term macro. After all, the objects being imaged were very small. It seemed that the term micro would be more appropriate. Then I realized that photographers aren't focused on the object as much as the image of that object on their camera's sensor, whether it is a strip of film or CCD. From that point of view normal, every day photography is actually "micro" photography because the image of the projected image of the object being photographed is many times smaller than the object itself. On the other hand, with "macro" photography the projected image is at least as large as the object and in the case of super-macrophotography many times larger. Form the point of view of image size, the "macro" term seems quite appropriate.
Another reason why the term macro may have been coined to refer to extreme close-up lenses is that in the bigger-is-better society in which we live, referring to a lens as a "micro" lens makes it sound small or diminutive. Calling it a "macro" lens makes it seem larger and more impressive, and therefore more desirable. With this in mind perhaps the reason the lens manufactures decided to use the term macro was simply that it was more up-market.
By the way, officially macro photography refers to photography where the size of the image is the same or larger than the size of the object: 1X or larger. Many cameras advertised as having a "macro" setting, like the Sony 707, really don't, they only go to around 0.5X.
Enough
talk! _Let's
see what this lens can do.
This photo is probably the most unimpressive image you're ever likely to see, yet it's amazing once you find out what it is.

The white specks aren't noise, but a few of the individual droplets of water that make up fog. Each one is 0.0001 inches in diameter. To capture this image I set the camera up so that the exhaust from a fog machine slowly drifted up across the front of the lens. The lens was set to 5X and had both close-up lenses and an extension tube mounted on it for a total macro factor of 7.5X. A flash directed perpendicular to the lens's axis and set to 1/32 power stopped the motion of the fog particles. The f-stop was 7.1, the shutter 1/13 second, and the ISO to 1600. Focusing was not an issue. Because the depth of field is so small, anything inside or outside of it quickly blurs into invisibility. Only those few particles that were at the correct distance to be in focus showed up on the print. The actual size of the frame above is only 0.01 inches wide. However, the droplets exhibit the telltale horizontal bluring that results from shutter vibration. The image was captured with miror lock-up so this smearing must be the result of a resonance problem as discussed in the "mounts" section.
Next
let's take a look at the glowing filiment of a mini-magnite bulb:

This image was captured at macro 7.5X, f7.1, 1/13-second, ISO 100. The segment of the filiment visible is 0.050-inches long. At this scale the tungstem wire used to make the coiled filiment is 0.0015-inches in diameter, half the diameter of a human hair. Note that the filiment is brightest near the center of the coil. That's because the mounting at either end acts as a thermal sink, drawing heat out of the filiment near it, lowering the temperature in and therefore the brightness of the glow.
The coil diameter is 0.25-mm, four times the depth of field for 7.5X, which explains some of the image's softness. Image stacking was not used to sharpen the image. Also, this picture was taken before my new and more accurate mount was made.
Can you guess
what the following image is?
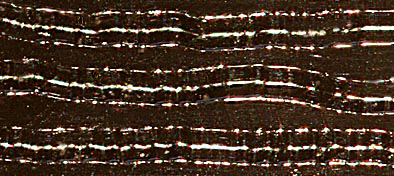
Each set of three parallel lines is one groove on a 45-rpm record. The middle line is the bottom of the "V" of the groove. The bright shadow lines running parallel to and very close to some of the lines are not over-sharpening halos but diffraction effects from the wave nature of light. Each groove is 0.008-inches across.
By calculating the velocity of the track indicated above by the white arrow, and determining the distance of the wavelength associated with it I was able to estimate that its "wiggle" corresponds to a frequency of 160 hertz: a very low base.
The
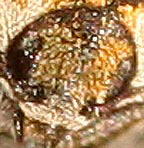
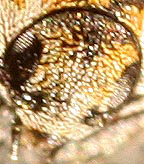
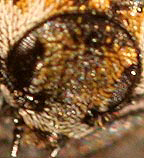
following picture is of the stuff of which nightmares are made:

It's the head and forebody of a spider. This little guy was tiny: stretched out flat his legs barely covered a dime. This was taken at 5X and F7.1. Images such as this, which show details otherwise impossible to see, is what makes the MP-E such an interesting lens with which to work. For example: I would never had guessed that this spider had hairs scattered over its body. Why are they there? They aren't thick enough to offer protection from predators or weather and are in locations that make them useless as sensors. Also, why are six of his(?) eyes black and the two large, forward-facing eyes opalescent? (This image shows the spider at a magnification of 125X.)
More
images coming soon! Please check back often.
![]()
Return to homepage to browse 90 other pages covering everything from metal detectors and Knitting Nancies to the strange world of lucid dreaming.