Wayne Schmidt's Addams Family Game Malfunctions The ways my TAF broke and how I fixed the problems.
This
is a log of all the problems my TAF (The Addams Family pinball game)
had, when they occurred and how I fixed them. I'm posting it as a
resource to anyone who may have had similar problems and is looking
for solutions or anyone thinking of purchase a TAF and wants to know
what may be expected of them maintenance-wise. Please note that based
on a survey I made of other Addams Family pinball game owners, my
machine has had many more problems than the average. This doesn't
surprise me. After bouncing around Europe for over a decade before
being shipped back to the states, I purchased it unshopped
(unrestored) from a private individual. Such machines are more likely
to experience problems than those undergoing professional
restoration. Even then, unexpected problems are bound to occur. After
all, no restorer or owner, no matter how knowledgeable or talented,
has x-ray vision or can see the future to know which components are
going to break ahead of time. I must also confess that several of the
problems were caused by my not being careful when working on the
machine. This chronicle began when I brought the game home: February
of 2007.
Ball Hanging up on the Lowest Jet Bumper
Right from the start I noticed that a ball would regularly get stuck against the lowest jet bumper in the graveyard area right before draining in front of the Thing flipper. Taking a close look at the area I discovered a thick residue of wax or cleaner.

Removing this residue solved the problem.
Battery
Reset Problem
This wasn't really a malfunction, but was certainly disturbing as one. One week after buying my TAF I decided to change the batteries to make sure fresh ones were in place. (Old batteries can leak.) As this was at the beginning of the year it seemed a good idea to initiate a battery change at the beginning of every new year to prevent this.
What I didn't know is that although the batteries appeared to be installed in parallel so that removing one should not cause a power disruption, it did. In spite of replacing them one at a time, when I turned the game on the power break from changing the batteries resulted in the game chips resetting to the original factory settings. Since this particular TAF had been manufactured for the German market this meant that the words on the dot matrix display were all in German. Although the manual explains how to correct this problem, because the menus were now all in German it was very difficult to work through them. How I corrected this was to remember enough of some German I'd studied 30 years ago to eventually wander to the correct command to change the language back to English. If I hadn't been able to do this, I'd have written down the menu options and used an on-line translator to figure out what they meant. Considering the weakness of my memory this might have been faster.
The next time I do this I plan on using jumper wires and an external battery holder to make sure the power isn't interrupted.
Broken
Bookcase Optical Sensor
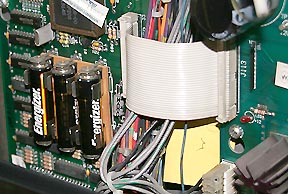
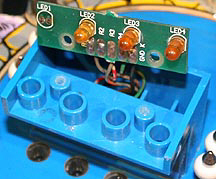
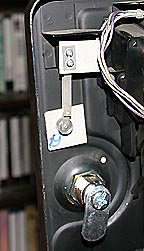
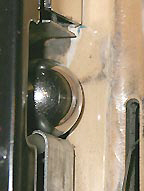
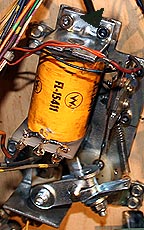
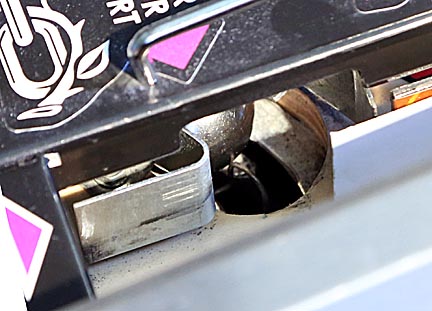
Two weeks after I bought the TAF, an amber dome-shaped object suddenly appeared on the playfield. After a good deal of looking around I discovered it had fallen out of the far left hand side of the underside of the bookcase cover. It was one of the four infra-red transmitters (LEDs) used in the optical sensors used to record bookcase hits.
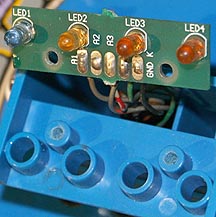
Both wires coming out of the LED were broken off flush with the base, so reinstallation wasn't an option. Studying the Internet turned up the fact that Radio Shack carried part number 276-143, a replacement for it. I purchased one and installed it using the orientation of the others as a guide. It didn't work. It seems that the construction of the Radio Shack LED is different than the originals. Whereas they were arranged with the flag pointing to the left, the correct orientation for the Radio Shack LED had its flag pointing to the right.
Part of the confusion for this came from an error in the printing on the back of the LED case. It shows the cathode lead coming out of the side with a flat spot and a long lead. In the actual LED a short lead is coming out of the flat spot.
I tried using copper desoldering braid to remove the old solder from the circuit board holding the LEDs but while it removed the surface solder it didn't have enough drawing power to pull the solder out of the hole itself. To get that out I had to purchase a bulb-type solder sucker.
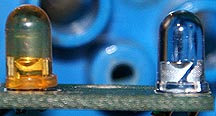
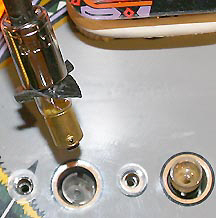
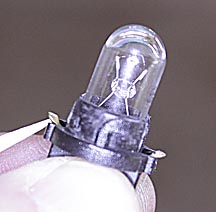
The picture above shows the new LED (although it's blue it's still an infra-red LED) in place.
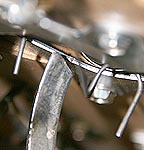
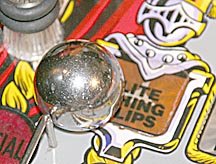
It's easy to see if the LEDs are working using a digital camera. Get the LEDs operational and take a picture of them. If they are working they show up as a dim violet glow, as the photo below shows.
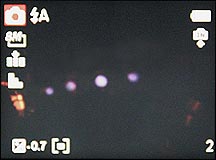
Even easier is to look directly at them in a completely dark room. There will be a faint reddish-brown glow from the center of the LEDs.
My
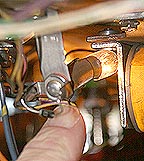
Thing has Dropsy
One week later I noticed that the magnet in Thing's hand started releasing the ball a little early. It wasn't very often so I didn't worry about it. Then is started happening more often, particularly when I'd collected a THING award and Thing was supposed to return the ball to the playfield. Instead it fell down into Thing's box and got shunted into the swamp. Before long it was happening almost every time it picked up the ball. Then it started failing to even pick up the ball.
The pattern of this malfunction clearly suggested a wire had slowly been degrading and finally broke. Upon looking inside I discovered one of the two wires leading to the magnet had a sharp kink in it but the insulation was still intact. I straightened the wire and made sure when I reinstalled the cover over the Thing mechanism that I didn't kink it again. Thing's worked perfectly ever since. I'm assuming the wire is broken inside the wire at the kink but that the insulation is holding the broken ends together tightly enough so that reliable contact is maintained.
If the magnet starts acting up again I'll start trouble shooting by stripping the insulation away from this point and resoldering the wires.
Balls
Lock Up between
Thing and the Swamp
Immediately after completing the previous fix, I noticed when Thing dropped a ball to transfer it to the swamp, it usually ended up getting stuck. Upon looking at the ball track I noticed I happened replaced Thing's protective box in exactly the same place it had been with the result that the out hole from the box didn't line up with the in hole to the track to the swamp. The result was that a blockage was created. I reset the protective cover and the problem went away.
Permanent
Slam Tilt
One day after working on the coin door, when I turned the game on all I got was SLAM TILT displayed on the dot matrix display. After investigating I discovered that I'd managed to bump against the slam tilt sensor on the door hard enough to bend the leave switch so it was always "on."
Bending the leaf back into place fixed the problem.
Slingshot
Switch Warning
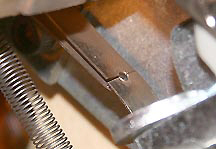
One month of use I decided to clean up the playfield. After doing so, when I turned the machine on I got a test warning on the dot matrix display. Pressing "enter" told me that the left slingshot switch was malfunctioning. I removed the plastic cover and looked at it...
... but couldn't see anything obvious. So I put on my pair of close-up glasses and compared the upper and lower switches at 5X power. What I discovered is that the lower switch looked like this:
whereas the upper looked like this:
Evidently I pushed against the switch hard enough to bend one of the contacts so that it was always "on." Pushing a pencil down between the leads bent it back so now it works as good as new.
Ball
Hangs up in the Swamp
This is one of the most common problems with TAF games. In my case it turned out that it would come to rest behind the swamp eject.
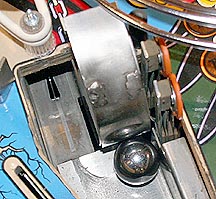
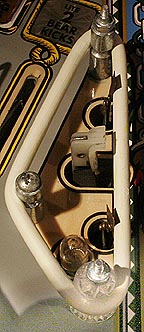
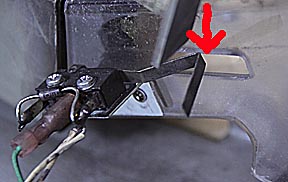
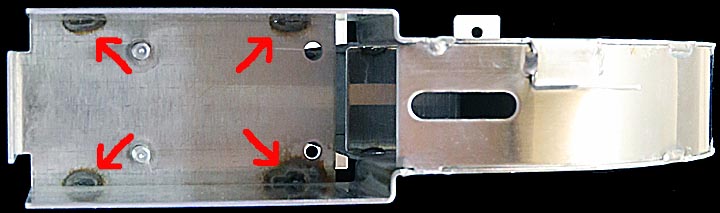
My solution was to add a piece of metal to block off this area. The problem was getting to it. The first step was to remove the playfield plastics covering the swamp. I assumed that all I had to do was remove the three nuts indicated below by the arrows.
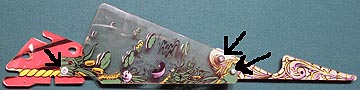
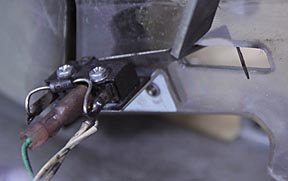
Wrong. These nuts hold the swamp cover to two other pieces of plastic. You have to remove the nuts holding these down and the entire section comes off as one unit. Once I figured out that I was able to install an angle deflector using weatherproof carpet tape and aluminum tape. I've used both before in long term applications and have confidence in their ability to handle this job.
Since the installation I haven't had a ball hang up in the swamp a single time.
Giving
Thing a Manicure

I've only seen two Addams Family pinball games in my life but they both had ugly black streaks running down Thing's middle finger. These are caused by the center rib of the red plastic box rubbing across the finger as Thing comes out. Why red plastic sliding over flesh-colored plastic should produce black streams is beyond me. (The friction is too low, pressure too light and speed too slow for any heating effects.) I fixed it by activating the Thing motor in the Test menu and stopping it when the hand was fully deployed, then scraping it off with the tip of an exacto knife. The black marks may look like grease but were hard and brittle. Once they were removed I used a water based felt marker to touch up the wrinkles that had lost some of their coloring. Here's how it came out:
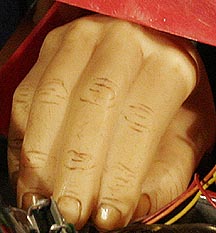
Unfortunately, after a couple of hundred games I noticed the streaks were returning. It looks like this is something I'll have to clean up from time to time, unless I can come up with a way to line the box's rib with a flat piece of Teflon.
Missing
"I"
![]()
Five weeks after getting my TAF the "I" in THING between the dot matrix display and the playfield quit working. I lifted out the lower cover module of the back panel and laid it down on the playfield.
The lamp turned on. I put the module back and it went off. This suggested a loose connecting wire. After studying the wiring to the lights in that area I determined which went to the bulb in question. It turned out to be the one on the far left.
Somehow the wire had worked loose from the push connector. I tried bending it so that it would remain in contact but the light kept going out so I ended up removing the wire (difficult to do because the push connectors have one-way wire grabs), cut the end off the wire to start with a fresh section and pushed the wire back in place. It's worked without fail ever since.

Dim "Shoot Again" Lens

The bulb lighting the "Shoot Again" lens appeared dim and off center. This wasn't a game stopper but it didn't look good. I lifted the playfield and discovered that the bulb holder for this lens was bent so that the bulb was way off to one side.
I pushed it back in place and the lens lights up much brighter and uniform now.

This wasn't quite as easy a fix as it sounds. The hole to the lens is partially blocked by the frame to a coil, making it difficult to place the bulb so that the maximum amount of light reached the lens.
Nonsymetric
Tilt:
I began noticing that I could nudge the machine quite a bit farther to the right than I could to the left. Upon examining the tilt sensor:
I discovered that the plumb bob wasn't hanging in the center of the sensor ring. By bending the copper arm the bob hangs from I was able to get it properly centered.
Confused
Sound Effects:
Six weeks after getting the machine the sound effects started getting confused. Sometimes when I turned on the machine it would work fine. Other times the music and voices were replaced with random sound effects like door slammings. Something about the erratic nature of the problem made me think is had to do with an IC not booting up correctly or a loose IC pin. The next time it happened I turned off the game, opened the backbox and firmly tapped every IC I could find. It worked. The problem never came back. In a way it's a shame it didn't because I was looking forward (sort of) to tapping fewer ICs each time until I isolated the one causing the problem.
Upper
Right Flipper Bounces Out When Hit
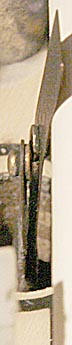
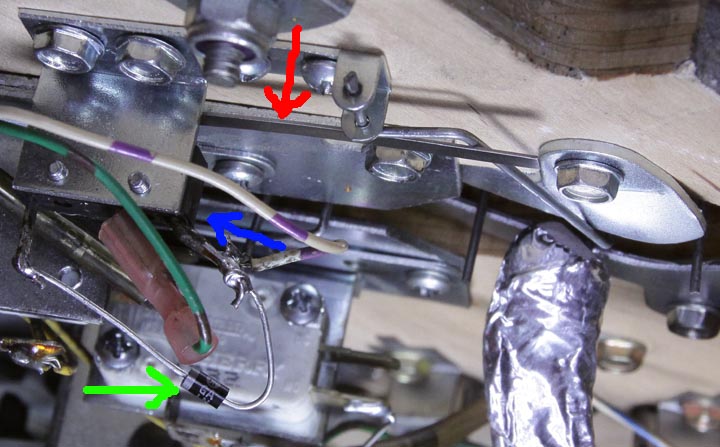
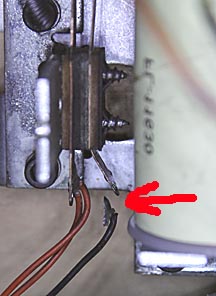
Six and a half weeks after getting the game I noticed the upper right flipper would bounce outward a fraction of an inch and stay there if a ball hit it. Lifting the playfield I discovered the flipper return string had broken off at one end and was hanging loose, as indicated by the black arrow in the picture below.
Since it was just the end that had broken off I bent one loop into a new hook and resecured the end of the spring to the flipper arm.
Problem solved!
Lowest
Jet Bumper Stopped
Working
The same week that the flipper spring broke, I noticed that the lowest jet bumper in the graveyard stopped working. Lifting the playfield, I compared the switch to the other jet bumpers and it appeared to be okay. I used an Ohm meter to test for continuity and it seemed to work fine. Then I checked a different bumper and noticed a slight difference. Whereas the second bumper sent the Ohm meter's needle immediately over to "short," the failed bumper did so after a moment's hesitation. I reasoned that there was some contamination between the contacts that was just enough to slow the response of the bumper down so that it wouldn't fire.
I used a piece of 600-grit sand paper to very lightly clean the contacts. Now it Ohmed out as fast as the other bumpers and when the game was turned back on, operated as it should.
Black
Monday
Remembering this day make me cringe for a long time. As soon as I fixed one problem something else broke. It's days like this that make me wonder why I ever bought a TAF... until I start playing again that is.
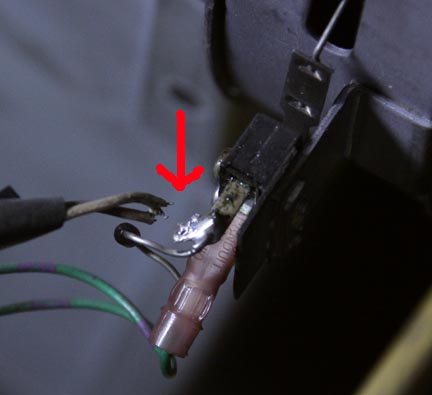
It all started on the anniversary of the second month I'd had the game. I fired it up for a quick game in the morning and got an "Upper Right Flipper EOS Switch" test warning. Investigating, I discovered that the copper contact button had fallen out of the End of Stroke (EOS) switch. Worst still, the leaf spring on which is was mounted was almost cracked in two, probably a fatigue failure. When activated, the EOS wasn't being closed. I searched the bottom of the cabinet for the contact button but couldn't find it.
The only solution was to order a replacement switch, which I did immediately. I wasn't happy about the prospect of not being able to play for two weeks while the part arrived so I looked around the garage for a way to patch it up. What resulted is ugly to the point of being evil... but at least for the short term it works.
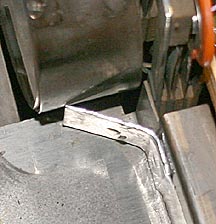
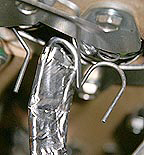
I found an old bit of brazing rod and pounded the flux coating off it. Then I hammered it as thin as I could. All that cold working made it too hard to bend so I softened it by heating it over in a flame of the kitchen range and letting it cool slowly. After a sandpaper cleanup, I crimped it around the switch leaf to act as a new contact point. Unfortunately, while doing this the end of the leaf broke off. Because it's stainless steel wending and soldering where out. I headed back to the garage for more inspiration.
I dug through the junk drawer until I discovered a piece of galvanized steel sheet. Using tin snips, I cut a thin strip and used aluminum tape to connect it to the remaining length of leaf. After trimming the steel to length and bending it to make contact as it should I had the EOS switch repaired and working perfectly. Hear's what it looked like:
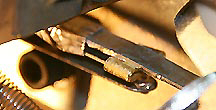
(I warned you it was an ugly fix.)
I no sooner
got that problem fixed when I noticed that three general illumination
lights in the lower right of the playfield were out. I replaced them
and learned two things: First, these bayonet bulbs are hard to get
back in and second, that they weren't the problem.
There was so little of the bulb to grab when pushed that two of them were impossible to reinstall. What I did was cover the end of an 11mm socket with a piece of rubber tape and used this as an extraction and insertion tool. Worked great.
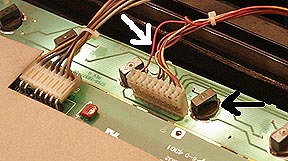
Tracing the lighting problem turned out to be an arduous process. Using an AC volt meter I was able to figure out right away that the problem was that all three of these lights were interconnected in a single circuit and that this circuit wasn't getting any power. All of the wires and connections appeared to be sound. The primary leads were solid purple and white with purple stripes. I tried following them back but quickly lost them in the large wire bundles that go up into the backbox. The TAF manual was useless because it doesn't provide complete wire schematics. Hoping for a break I opened the back box and got it.
Down at the bottom of the lower, center circuit board was connector J121 and it had a purple wire and a white-with-purple stripe wire. Hoping that these where the same as the wires I needed, I noticed that there was also a white with brown stripes wire going into the connector. A similar bank of general illumination lights had just such a wire so I had good reason to think I was on the right track. The white and brown wire tested out at 6.3 volts: same as it had on the playfield. The white and purple wire was dead. Examining the connector, I noticed carbon scoring all over the area where the white and purple wire connected to it.
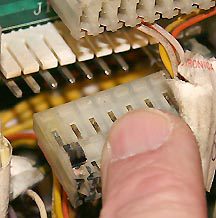
I pulled the plug out and tested the pin to the white and purple wire. It had power so this told me there was probably an overheat problem and the wire got burned. I wiggled it around in the connector to remake a metal-to-metal contact, replaced the connector and sure enough, when I turned the machine on the lights came on. If it hadn't worked my next step would have been to remove the wire, cut the end off and reinsert it after making sure the connector itself had good conductivity through the plug.
But Black
Monday wasn't done with me yet.
I started to
play a game and noticed right away that the "D" in GREED
wasn't lighting up. I sighed and lifted the playfield to work on yet
another problem. I traded the bulb with a neighbor that was working,
a good tactic because if you also change the bulb holder as I did it
tests several contacts at one time as well as the bulb. That didn't
fix it so I replaced the bulbs and suddenly it started working again.
Good news? I don't think so because what probably happened is that
there is a lose connection that I nudged back into place. It's still
broken and just waiting for a chance to go out. Knowing there's a
weakness in the game makes it difficult to relax and enjoy it... sort
of like living with a time bomb and not knowing when it's set to go off.
Okay, so I
start to lower the playfield and as I'm doing so I nudge the lower
left flipper frame and felt it move. At first I thought this was a
bit of good luck because it explained why sometimes after working
under the table the balls stopped bouncing off this flipper the same
way. I tightened it up and thought another problem had been solved.
Little did I know I'd created an even bigger one.
Each Addams Family pinball game, or any pinball game for that matter, is unique in how the balls bounce of the paddles. These bounces are determined by the complex relationship of the paddles' angles. After two months with the game playing a certain way, tightening the left flipper's frame completely changed the way the balls bounced off the paddle. The new bounce pattern was a nightmare so I began trying adjusting the frame to get it back to where it was. After three hours I gave up. If I got one bounce corrected, another was messed up. I couldn't figure out any way to get the machine playing the way it was.
After two days of adjustments I finally managed to get the balls bouncing the way they had originally. So ended the saga of Black Monday, a day that'll haunt me for a long time.
"D"
in GREED Lights Doesn't Light
Less than a week after Black Monday the light under the "D" lens in GREED went off again. I switched bulbs with one next to it and the light still didn't come on. Jiggling each of the wires on the connector to this string of lights hit pay dirt when I reached the last one on the left. The light came back on. This malfunction is the same as the earlier one that knocked out the "I" in the THING award lights, which used the same type of wire connector. Perhaps this is a problem with all the push connectors of this type.
The problem with the "D" came back to haunt me two weeks after this fix above. The light went out and while jiggling the wire would make it come back on momentarily, it invariably went out again within a minute or two. The wire between the two knife contacts in the connector had worn away so that the blades not longer made reliable contact with it. The wire needed to be removed and pushed into the connector on a fresh area of the wire. To do this I had to pull the plug out to work on it. Bad idea. Three of the connector pins soldered to the circuit board the play seats on came out with the plug. I was able to solder them back in but the situation could have turned very ugly had the board been damaged.
Fortunately, the fix worked and the "D" has burned brightly ever since.
"Extra
Ball" Light in the Mansion Went Out
The same day "G" in GREED went out the light under the "EXTRA BALL" lens in the mansion stopped lighting. Fortunately, it was only a burned out bulb.
Ball
Locks Up in Shooter Eject
The seventh week for this Addams Family pinball game started with balls hanging up in the outlet that feeds the shooter.
A little scrubbing with a Magic Eraser cleaned up the dirt build up and the sticking stopped.
Mansion
Room Light on the Electric Chair Stopped Turning
On
Two days later the yellow light on the left side of the chair stopped lighting. I thought it might have burned out by it had simply shaken loose. Pressing it back all the way into its holder fixed the problem. (Don't we wish all problems were all this easy to fix?)
Ten games later it went out again. This time reinserting it didn't help. I pulled it and could see that the filament was broken. A new bulb fixed the problem.
Bulb
Burned Out in the Lower Left Inlane
Guide
This occurred three months after purchasing the machine. Fortunately, it was just a burned out bulb.
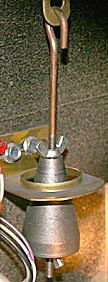
Ball Ejector Doesn't Push Balls Far Enough to Fall into the Shooter Lane
This problem developed early in the third month of owning this particular TAF. It was progressive in that over a period of one week it went from happening very rarely to almost a quarter of the time.
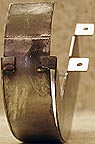
Inspecting the curved ejector finger...
...clearly showed that the end was worn. I figured the problem was simply that the wear associated with 15 years of use shortened the finger enough so that it doesn't push the balls far enough out into the shooter lane for them to fall. I used aluminum foil tape to secure a piece of steel wire over the end of the finger to make it a little longer.
This fix may look ugly but it worked.
Burned
Out Blubs
After 6 weeks of nothing going wrong, two bulbs in the mansion burned out. Changing them fixed the problem.
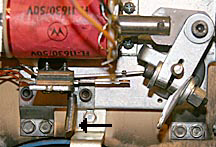
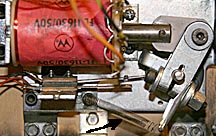
Electric Chair Ejector Fires Balls Out at Odd Angles
I noticed that the balls coming out of the electric chair ejector covered such a wide range of angles that sometimes they'd strike the bottom corner of the slingshot and other times the ball would sail up and completely over the top of the slingshot. The cause turned out to be that one of the welds near the top of the metal guide broke and that side of the ejector had drifted outward so balls were no longer being guided.
I solved this problem by cleaning up the area around the weld with a wire brush, clamping the side panel back in place and brazing it. The problem instantly went away.
Around
the time I'd had the game four months the light under the Tunnel
Hunt mansion room went out. I was a burned out bulb and easily fixed.
The
very next day I noticed the light in the left slingshot as well as
the three lights in the left inlane guide were out. From a previous
problem I knew that this string of lights was powered by a brown and
white-with-brown-spots wire from pins 11 and 5 on connector J121 in
the backpanel. After several tests I determined that pin 5 had gone
dead. Unfortunately, going any further requires removing the entire
power circuit board and rigging a series of connector extenders so it
can be run while out of the machine. This is too dangerous for me at
this time so I cheated. I moved the brown and white wire from pin 5
to the unused pin 4, which has the same voltage applied to it as pin
5. This fixed, or at least bandaged, the problem.
Unfortunately, while all this was going on the slingshot and inlane guide lights on the right went out. There aren't anymore pins with power on them to use so until I figure out how to fix these problems the game will have to be a little dark in that area.
While working these problems it appeared that pins 1, 6, 7, 9, and 11 are grounded. Pins 2,3,4,5 and 10 are hot (or in 5's case supposed to be hot). Pin 8 is missing.
While
opening the illumination panel behind the backglass, I noticed that
one of the two strings of lights that light up the back panel was
out. These may have been like this from the day I purchased the
machine. I traced the power source to connector J120, immediately
above J121.
The fact that J120 and J121 both have 11 pin locations, both have pin 8 clipped off, and both appear to provide 6.5-volt AC power for lighting suggests they may be powered by the same circuit on the back of the circuit board. One string of lights on the back panel light board (sometimes referred to as the insert) connects to pins 3 and 9. This string works. The other, connected to 4 and 10, doesn't. I jumpered the connectors at pins 9 and 10 together and both strings lit up. I suspect the problem was with pin 10.
In the last two problems I think what might have happened is that the trace, a thin connector that passes through the circuit board from the back to the front where the pins are soldered, broke from vibration. If and when I get the courage to pull the board I will be sure to check the continuity of these traces and fix them if there's a problem.
These trickier problems are extremely difficult to troubleshot without having a complete set of wiring schematics. I found such a set online and ordered it. Hopefully it will have more information that the meager diagrams supplied with the manual.
Seven months after purchasing this TAF the single, upper, round, orange target above the Swamp disappeared. Upon lifting the playfield I discovered that the L-shaped mounting bracket on the front of this target had broken in two. I ordered a replacement ($9 in 2007 plus $9 shipping) and replaced it. The new target worked, but it was quite a bit stiffer than the others. I'm a little concerned that it may be so stiff that when the Thing flipper misses high and the ball strikes this target it may not fire to send an aiming correction to the game. Only testing during play will tell.
Broken
Bolts
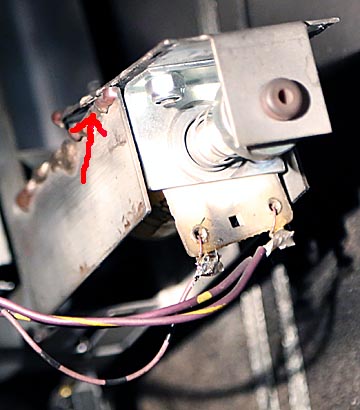
Nothing went wrong for two months then around the ninth month the lower left flipper jammed in the "up" position. Lifting the playfield disclosed that one of the two bolts that secures the end block had sheared off allowing the block, and the shaft on it that guides the plunger, to cant off at a sharp angle.
The
arrow points the bolt that broke.
Here
it's already been replaced.
The end of the bolt left in the mounting bracket had to be removed before a replacement bolt could be screwed in. There was no way to get a grip on it to screw it out so I decided to use a dremel tool to cut a groove in it so I could use a screw driver to back it out. The vibration of the dremel tool rattled the bolt end enough so that it rotated freely... in the wrong direction: it screwed itself further in rather than out. The solution was to remove the four bracket screws from that end of the flipper assembly, lift the entire assembly, then use the dremel again to vibrate the bolt end all the way out of the bolt hole.
Inspecting the other flipper units I discovered the Thing flipper also had a sheared-off bolt. The replacement procedure went the same as above. This flipper hadn't jammed because the remaining bolt had been fitted with a lock washer. In the flipper above it hadn't and that allowed the end bracket to rotate.
Start
Light doesn't light
I couldn't get the back of the Start switch to twist out so I couldn't replace the bulb to see if that was the problem. So, I pulled the leads to the bulb off, the ones on the sides of the back of the switch body, and applied 12VDC to them from a battery pack. The bulb lit so that wasn't the problem.
Next I tested the voltage across the bulb's connector. There wasn't any. So I traced the bulb's red-and-grey and yellow-and-grey wires back to jacks J-138 and J-133 on the backpanel. They had the correct voltage (varying 10-20 VDC to make the bulb flash while in attract mode) so I ran a jumper wire to replace the yellow-and-grey wire. The bulb still didn't light. I repeated this step for the red-and-grey wire and it did light. This wire goes through a connector close to the door. A jumped the wire from the backpanel to this connector and the light lit.
The red-and-grey wire connects to no other points between the backpanel and the connector close to the door so there must be a break in the wire somewhere between those two points. (I checked the jack connections and they were all good.)
The final fix was to solder in a replacement wire. Problem solved!
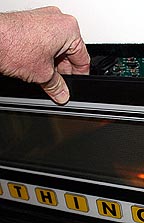
Airballs Galore!
Before I had my TAF restored, shooting balls up the left ramp never produced an airball: a ball that's thrown up into the air, usually slamming into the underside of the cover glass and ending up stuck somewhere so you have to open up the game to free it. After the Restoration from Hell, half of all balls shot up the left ramp were airballs. Not a good situation.
I discovered the problem was caused by the new ramp that had been installed. The plastic lip at the entry point to the left ramp was thicker than the original ramp. This created a slight ridge in the middle of the overlaying metal entry ramp, which knocked the balls up in the air almost every time they hit it. (You could feel this ridge by running your finger over it.) The arrow below shows the too-thick plastic edge to the ramp.

The solution was to use a cone-shaped grinding bit in a Dremel tool to grind a little plastic off this edge. The result was 12 left ramp shots in a row without a single airball.
Flasher
out
Within a very few games of getting the game back from a restorer, the flasher on the lower right, just below the Swamp, burned out. I replaced it with a 194 lamp from Radio Shack that got it flashing again like new.
An additional result from this problem is that I learned the pros and cons of using 906 versus 194 lamps as flashers. The standard 906 lamps are brighter and work effectively in flashers located at the top of the playfield. But when used in either the Swamp or Thing flipper, they are so bright they momentary blind players, making it hard to track and control the ball. The 194 lamps are slightly dimmer and much easier on the eyes. Additionally, because they are rated at 14 volts they use less current and will last longer.
"Light Thing Flips" light out
One day after the lamp burned out in the previous malfunction, the lamp that illuminates the "Light Thing Flips" on the lower left of the playfield burned out. A simple replace fixed it.
Got
Rattles?
I discovered 90 percent of the rattling sounds coming from the cabinet were caused by the playfield prop bar on the inside right side of the cabinet. The problem wasn't with the loose end but with the pivot end. To allow it to rotate up it's screwed to the side loosely, so much so it rattles. I found that jamming a handkerchief between the bar and the cabinet near the pivot point eliminated all of this rattle and quieted the machine considerably.
Balancing
Act
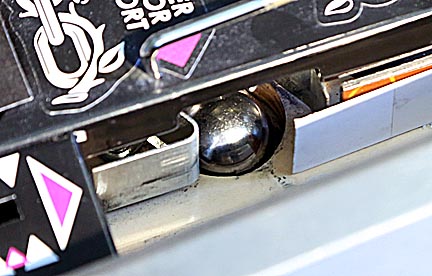
Once every ten games a ball somehow managed to balance itself on the top of the wire guide on the left side of the "Lite Thing Flips" inlane.
Half of the time a firm bump to that side of the cabinet dislodged it, usually to fall down the outlane but sometimes down the inlane and back into play. It was one of those problems which, while annoying, don't happen often enough to bother fixing.
Then one night I was halfway through a Tour of the Mansion with $50,000,000 in bonus loaded when the ball got itself balanced on the wire. I tried the "bump" routine and it wouldn't budge. A second harder bump finally broke it loose but also gave me a tilt, loosing all those delicious points and the ball to boot. Rats!
Something had to be done.
I discovered that the lower left corner of the "Lite Thing Flips" window was very slightly raised, just enough to hold a ball stalled on the top of the guide wire. I sanded it down with 1500 grit emery paper, smoothed it with Novus 2 and polished it down with Novus 1. The result: I couldn't get the ball to balance there to save my life. Problem solved! (I just wish I'd taken care of this sooner so I wouldn't have lost those bonus points. That cost me breaking my $2 billion high score.)
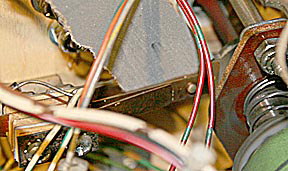
Helpful
Hint:
Because there are so many tiny screws that have to be fitted into impossibly tight locations under the playfield, it's easy to drop one and lose it in the wires or gadgets mounted on the playfield. To reduce the chances of this happening, I always tuck a bib under the area I'm working.
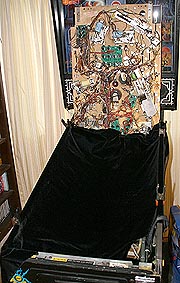
In the photo above the bib is a piece of black velvet. Anything dropped gets caught on it and is easy to recover. Any piece of cloth will do, ever small ones snugged in just below the work area.
"Switch 64" Warning
One day I started getting a "Check Error Report" when I turned the game on, even though it appeared to be operating correctly. Opening the error report told me that the normally open switch number 64, right ramp entry switch, was trapped in the closed position. This confused me at first because while there is a left ramp and center ramp I didn't think there was a right ramp. It turns out the center ramp is sometimes referred to as the right ramp. Upon investigating I discovered that the switch wire, which is shaped like a "U" and hangs down in front of the ramp, had be knocked up by the ball and gotten stuck on the end of the clear plastic base on which the bear over the bear kick ramp is mounted. The fix was simply to dislodge it and shift the bear far enough to one side so that this couldn't happen again. (I wish they were all this simple.)
No Magnets!
One day I noticed the magnets hadn't given me any trouble in a very long time. Upon inspecting them I discovered the the restorer who had installed the fuses in line with each magnet had used 1-amp slow blow fuses. These are so grossly underpowered that they'll blow after only a few normal pulses. I tried 1 and 1/2-amp fuses. They lasted one full Seance round but blew half way through the second seance round. Two amp slow blow fuses appear to be the lowest rating that will work.
Upper left Thing Flipper Swings Loose
Around 200 games after the restoration, or almost two years after purchasing the machine, one end of the return spring to the upper left flipper broke. I didn't have a new replacement so I used needle nosed pliers to bend the last loop of the spring into a new hook and reattached it. Works great now.
Game
Losses Power and Restarts
Three months ago the game started turning itself off and restarting. My first instinct was that a power transistor had blown. But then it struck me as odd that one would fail after so many years of consistent performance. I checked a few pinball troubleshooting sites and they stated that this problem can be caused by low voltage to the machine. I checked the line voltage where the TAF plugs into the wall and it measured 118 volts. I played a game and sure enough, it reset while I was on my third ball.
While hunting for something to correct the low voltage problem I continued playing the game and noticed a pattern. At 120-122 volts the game plays without resetting. At 118-119 volts it will reset only during peak power demands, like triggering both flippers right after winning a multiball and all the lights are flashing. If the voltage is 116-117 volts, hitting both flippers at the same time will often cause a reset, even if nothing else is going on. At 115 volts the games resets if you trigger a single flipper.
I discovered the solution is to purchase an automatic voltage regulator. The problem is that all the devices I found only kicked in if the voltage dropped below 108 volts and even then only guaranteed 120 +/- 10-percent. (An example of one such unit is the Tripp Lite LC1200 Line Power CVonditioner.) I needed some more sensitive and accurate.
I found it in a device called a Variac, an adjustable autotransformer. This is coil with the insulation removed from the top of the winding. A commutator is spring loaded against the coil. Turning a large knob on top moves the commutator across the coil allowing the output voltage to be adjusted from 0 to 150 volts.
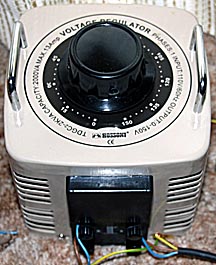
Variac
While these beauties usually sell for $300 or more, I found one on Amazon.com for $98. The complete nomenclature was 2K VA Variable Transformer Variac 2000VA 1-150V sold through Amazon by Acifica, Inc. Its 2,000-watt rating should be enough to handle my TAF.
I spliced it into the game's power line, used it to boost the voltage at the time from 117 to 121 volts and played several games without a single reset. Since then I've logged a dozen more games, including a marathon 1.14-Billion game, and still not had a single reset. I'm counting this problem as solved.
There are two problems with this solution. First, because my line voltage varies I have to check the voltage out to the machine before each play session. Failure to do this might result in exposing the game to damagingly high voltage. Let's say the day before the line voltage was 116 volts and the regulator was set to provide a 5-volt boost to 121 volts. The next day the voltage is running high, say 122 volts. The boost is still in effect so the game will see 127 volts. I don't know if this is too high but I'm not willing to chance it. I check the Variac's output voltage before turning on the game. Second, because the Variac has no built-in power plugs, the leads are somewhat exposed. Everything is grounded so touching the case should be safe, but just the safe I keep a close eye on things when the children are playing around the game to make sure they stay away from the Variac.
Lower
Left Flasher Burned Out
This was a simple fix. I just replaced the bulb with a new 194. The only problem I had was that like so many things with pinballs machines, it's not easy to figure out how to get to the unit that requires mending. Take a look at the playfield assembly that holds the light:
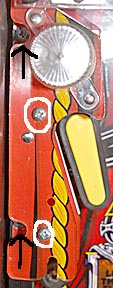
It would seem obvious that you undue the two screws circled in white and lift up the top plastic to get at the bulb. Wrong.
If you do that you will discover that this upper level plastic is attached to a lower level plastic by nuts that will fall off and be impossible to retrieve. Instead what you need to do is loosen, but not remove, the two hidden wood screws indicated by the black arrows. Then slide out both levels of plastic still attached to each other, replace the bulb and slide the assembly back in place.
There are many multi-layer traps like this on the playfield and as far as I've been able to discover, no written guide on how to work with them.
My advice: look carefully from as many angles as possible before attempting to take something off the playfield. Doing so may show which screws to remove and which to leave alone.
MY TAF PASSED ITS 2-YEAR MARK!
It is now February, 2009: two years since I brought this Addams Family pinball game home. Over this period of time I've had to deal with 38 problems, an average on one every 2 & 1/2 weeks. If you are thinking about purchasing a pinball machine take another look at all the problems I've had and use that to decide if you want to commit to so much work. Sure, some were minor but many were horrific. For myself, every time something new goes wrong I wish I had never bought it. But, as soon as it's fixed and the lights are all flashing I'm glad I did.
The Addams Family pinball game is considered to be a solid reliable machine. Some pinball machines have better records and some, like the notoriously problem-prone Twilight Zone game are much, much worse. If you want a used pinball machine and don't care about what it is, consider researching the reliablity of them before purchasing. Better still, buying a brand new machine will almost certainly save you many years of frustrating repairs.
THREE
PROBLEMS
AT ONCE
As if to punish me for advertising that my TAF breaks down every two and a half weeks, right on schedule it broke but not once but in three different ways: the flasher behind Cousin It in the backbox burned out, a general illumination bulb marking the left outlane died and the game started resetting again.
The first two problems were quickly fixed by replacing bulbs. The reset issue turned out to be more serious and although it's fixed, I'm fearful it may return.
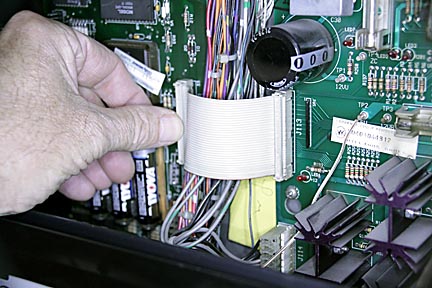
The best resource I've found for resetting problems is at http://www.pinrepair.com/wpc/index2.htm#reset. This article explains that there is a watchdog circuit on the CPU board that resets the game if the 5 volt logic voltage drops below 4.92 volts. This can be caused by a number of problems. I printed all 28 pages about this issue and started at the beginning, which was to check the voltage at test point 2 (TP2, cyan arrow on the following image) on the power board.
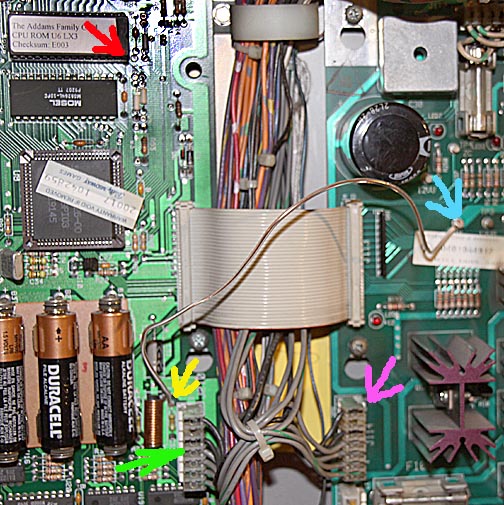
It should be somewhere between 4.92 and 5.1 volts. It read 4.98 in attract mode and dropped grudgingly to 4.96 during play when everything was firing including both flippers being simultaneously triggered. This is the 5 volts supplied by the power supply to the CPU board to power the logic circuits.
Next I checked the voltage at pin 32 of the game ROM (red arrow.) This voltage should be close to test point 2. It read 4.94 volts in attract, or unloaded, mode. When under extreme load, like both flippers being triggered at the same time that the magnets, lights, etc. are all firing, the voltage dropped below 4.92 causing a reset.
Starting at TP2, I traced the 5 volt voltage signal as it worked its way to the CPU board to discover where the loss was occurring. It was 4.98 at TP2, 4.97 at J114 (magenta arrow) as it left the power board, 4.96 as it entered the CPU board through J210 (green arrow), 4.95 as it got to the entry point to a capacitor-inductor-capacitor voltage smoothing circuit (yellow arrow) and finally 4.94 at pin 32 of the game ROM (red arrow.) Unplugging and replugging J114 and J210 several times did not clean up potentially dirty connectors and reduce the voltage drop across them.
The gradual voltage decay suggested that there wasn't a single source for the voltage loss. Rather it was the collective effect of many small losses. Pinballrepair.com recommends repinning J114 and J210 to correct this problem. The issue I have with this is that half of the voltage loss occurs away from these connectors so repinning might not be enough. Besides, tearing into both the main power and CPU boards in such an old game is likely to create more new problems than it fixes.
My admittedly quick and dirty solution was to attach a jumper wire from test point 2 directly to the input of the voltage smoother on the CPU board. This wire is easily seen on the picture connecting the cyan and yellow arrows. This fix increased the voltage at the input to the smoother (top of C33 which connects to L1) to 4.96 volts, enough to provide the needed elbow room for the small voltage drops that occur when the game is heavily loaded.
The fix worked. I've since played dozens of games without a single reset.
But...
What happened to cause this problem all of a sudden after the game had been working perfectly for so long? It's easy to conjecture that aging wires, connections, connectors, etc. finally created enough resistance to cause it, but that seems weak. I suspect that the real problem is that the bridge rectifier for the 5 volts system (BR2) and/or its associated electrolytic filter capacitors (C4 and C5), or the voltage regulator U1 (LM323) are getting weak. Testing and replacing these components is fraught with many dangers any one of which could destroy the game. For now I'm going to adopt a wait-and-see attitude. If the game starts resetting again I'll recheck the voltages. It TP1 has dropped to 4.96 or lower when the game is in attract mode it'll be a solid indication that a component is slowly going bad. My first suspects would be the electrolytic capacitors C4 and C5. The electrolytic compound inside them dries out over the years and is the best explanation for a slowly failing component.
BURNED-OUT
FLASHER AND POWER LOSS
The game worked great for a full month then hit me with two minor problems. First, a flasher under the top-most pop bumper burned out. This one's tough to fix because to get at it you have to remove the entire clear plastic ramp assembly. The second problem seemed serious but wasn't. The game lost all power. (Naturally, this happened just as I was about to close out my third tour of the mansion.) It turned out the 3 amp slow blow fuse connected to the main power line into the game blew. Once replaced the game worked perfectly again. This wasn't really a game malfunction because the fuse blew right when the house's air conditioner turned on. I assume a surge overloaded the fuse.
Luckely, to replace the bulb in the pop bumper the ramp doesn't need to be completely removed, only freed up enough to get at the cap screws on the pop bumper. Here's how I did it:
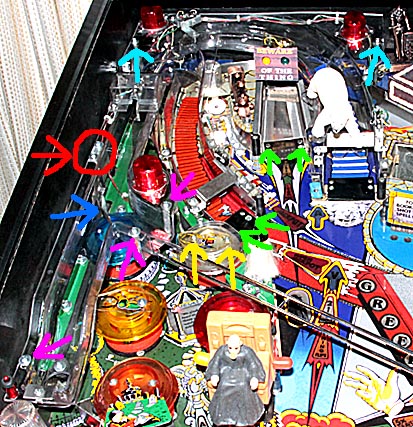
First I tackled the easy screws. The three indicated with magenta arrows came off easily with a standard Phillips screwdriver. Next I used a large jeweler's Phillips screwdriver to remove the four screws, indicated with green arrows, at the entry of the two ramps. Third, the two screws with cyan arrows came out using a shorty Phillips screwdriver. There's very little clearance above these screws so the shorty needs to be an inch long or shorter. Now we come to the problem screws.
There are two screws, indicated with a red arrow, on the left side of the ramp.

They appear innocent enough. One would assume they just screw into threaded holes in the bracket. They do... sort of. I started unscrewing them using a standard Phillips screwdriver and as soon as the screws were loose noticed that I could turn them all day and they never unscrewed any more. It seemed as if they were held in by nuts which, once they were loose, could rotate freely. If correct, this would be a nightmare because not only would the nuts fall down into the machine if I managed to unscrew them, there is no access to the underside of the bracket so I wouldn't be able to hold them in place to reinsert the screws. The only way to get at the underside of the bracket is to lift the entire playfield out of its mount. The great weight of the playfield and the delicate wiring under it makes this extremely dangerous. After many Internet searches regarding this problem, all of which came up empty, I decided to remove the screws all the way and if they wouldn't go back in, rely upon the other screws to secure the ramp.
I found the screws could be removed by applying a lot of upward force on the washer under the screwhead with a flat headed screwdriver. This created enough drag on the nut to prevent it from turning. As I rotated the screw the last turn before it came out I slowed down, waiting the hear the sickening tink of the nut falling into the guts of the game. The screw popped out and... no tink! Nothing fell. I repeated the process with the other screw and once again, nothing fell. I lifted the playfield to look along the left edge to see what was going on under the bracket but couldn't see anything. It looks like a flat piece of metal. There has to be some sort of captured nut under there, but I couldn't see it.
Now that the ramp was free I gently pulled it up. Nothing. It was loose but wouldn't come up. I discovered that on my particular game the white cap to the pop bumper near the Million Dollar ramp (or left ramp) hung over the edge of the ramp enough to hold it down. I removed the cap, screws are indicated with yellow arrows, to free it.
Once again I pulled and still nothing. Then I noticed that the ramp diverter, blue arrow, was blocking the ramp's upward movement. Pushing it back allowed the ramp to be lifted about six inches, enough to reach the screws on top of the pop bumper, remove its cap and replace the bulb. Note: the ramp's two entries fit very snuggly between rubber-shod posts and created considerable drag when lifting the ramp.
Easing the ramp back down, I checked the alignment of the screw holes and replaced the screws starting with the one that was furthest out of line. I figured this would be the hardest one to get lined up and would be much harder if all the other screws had been put in first, locking the ramp in place and out of line for this screw.
The last two screws were the weird ones from the bracket on the left side of the ramp. They started easily enough but wouldn't tighten. I used upward pressure to lock the nuts, or whatever they were, in place and managed to snug the screws down almost, but not quite, tight. Nothing I could do would get them to completely tighten. Fortunately, all the other screws secure the ramp so well that there is virtually no movement even with these last two screws loose.
All totaled it took me one hour to replace that single lamp. Most of that time was lost to the mystery bracket and its two screws. I'm sure there is an easy way to deal with these screws but I couldn't find it. I sure would like to meet the man who designed the playfield and ask him why it was designed to be so unfriendly to repairmen.
A FRUSTRATING NON-PROBLEM
What's a non-problem? That's when the machine starts acting up without anything breaking. The particular non-problem that's the topic of this article is: bad bounces out of either the swamp or electric chair kickout. I spent a lot of time tuning paddle angles to make sure when the ball comes out of either kickout it bounces so that it can be captured. In the case of the swamp kickout, that means with the lower right paddle locked up the ball bounces off it straight up and comes down for the capture. If the paddle is down, then the ball bounces off it and over to the lower left paddle and up for the capture. My TAF pinball game does this consistently 96-percent of the time. But, once in a while something changes and all night long the ball comes out of the swamp kickout just fast enough mess up both bounce options, with the result that the ball usually ends up going down the center drain. The next day everything will be back to normal. What's going on?
For a long time I assumed it was something to do with temperature, humidity, fate or the evil pinball gods frowning on me. Then one night when it was doing it, I got the thought that it might be do to voltage fluctuations in my house's power. Since I'd added a voltage regulator and voltmeter in-line with the game's power plug this was easy to check. Sure enough, the voltage was 127. Adjusting it down to 121 eliminated the problem completely.
So, if one day your TAF starts throwing balls out of its kickouts much faster than usual, it might not be the game acting up but the local power company stepping up the voltage a bit too high.
BURNED OUT LAMP AND BAD BOUNCES:
It is now September of 2009 and I've had this Addams Family pinball game for 2 years and 7 months. Over the last couple of months we haven't been to play much, consequently the duration between problems has increased. I'd estimate the game only sees half an hour of action a day. The first new problem in a month was a minor one: the lamp under the Six Million mansion room window burned out. Replacing it corrected the problem. The second problem was my fault and easily fixed, but interesting nonetheless.
After replacing the lamp, balls ejected out of the swamp kickout would no longer bounce straight up and down to be captured by a raised flipper. Instead, they drifted to the left and went down the center drain. The cause was that after replacing the lamp and lowering the playfield back into place, I forgot to make sure both metal fingers that hold it level were firmly seated. The one on the right was held up a fraction of an inch, tilting the playfield. Pushing the finger firmly down to seat it fixed the problematic bounces.
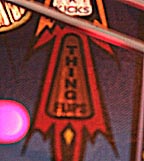
TWO
MORE BURNED OUT LAMPS
September 13, 2009: I noticed that the lamps under the Lite Thing Flips sign on the far left of the playfield and the Thing Flips arrow in the upper middle of the playfield weren't flashing when the game was in attract mode. Replacing the lamps fixed the problem. These lamps may have been out for weeks or even months and went unnoticed. While playing,my attention is on the ball and not what windows are or aren't lit. Consequently, unless a lamp lights a particularly important window, it's likely to go unnoticed for a long time. I wouldn't be surprised if most TAF games have at least one burned out bulb that the owner isn't aware of.
COUSIN
IT MANSION ROOM LIGHT BURNED OUT
December 2, 2009: I replaced the bulb and everything was back to normal. If you have the same problem but after installing a new bulb it's very dim, the odds are you put in a 194 bulb instead of the required 555. They are identical and easily mixed up. At least that's what happened to me.
COUSIN IT MANSION ROOM LIGHT BURNED OUT --- AGAIN!
December 26, 2009: Replacing the bulb fixed the problem but having the same bulb go out within such a short time makes we worry there's something wrong either with the batch of bulbs I'm using or something has changed in the circuit that's driving too much current through the bulb. I doubt the latter because it doesn't appear to be burning any brighter.
SIX MILLION MANSION ROOM LIGHT BURNED OUT
February 18, 2010: Replacing the 555 bulb fixed it.
COUSIN IT MANSION ROOM LIGHT BURNED OUT --- for the third time!
21 March, 2010: I suspect there is something wrong with the box of 555 bulbs I've been using for them to burn out so quickly. Next time this happens I'm going to move a bulb from one of the other rooms into this spot to fix it and use the new bulb in the first bulb's place. If the new bulb burns out before the old one it will indicate that it was from a bad batch.
RED ELECTRIC CHAIR LIGHT FELL OUT
21 March, 2010: It wasn't knocked out by an air ball, it just fell out from years of vibration. It easily snapped back in and worked. (I wish all TAF problems were this simple.)
THING FLIPS LIGHT ERRATIC
23 February, 2011: I noticed that the Thing Flips light would sometimes work, sometimes not, then start again.
Two bulb changes failed to fix the problem. However, I noticed that when it wasn't working many times it would start again after twisting the socket that holds the bulb.
Thinking the problem was a weak connection, I used a toothpick to push up the contact tabs on both sides. That helped but didn't completely solve the problem. In the end it turned out that the wire connectors that make contact with the base of the bulb were also bent in far enough to sometimes break contact. By using a small jeweler's screwdriver I was able reach down inside the holder and bend them out to make solid contact. That fixed the problem. These bulb holders may be available in auto parts stores.
WHEN THE GAME IS TURNED ON, IT GIVES A "CHECK SWITCH 17, BALL RELEASE SWITCH"
3 July, 2011: The game started giving the following test warning when it was turned on:

Switch 17 is the last switch in the trough that holds balls that will eventually be pushed out into the plunger lane. It tells the game that there is a ball there available to be put into play. The switch itself is indicated by the blue arrow in the following image:
During troubleshooting, two problems became apparent. First, when the 3-inch long switch arm (red arrow) was depressed I could not hear the switch click closed. This click was obvious on all other similar switches. It turned out that over time the 3-inch level had slowly bent out of shape so that the switch was being held on all the time. I bent the lever arm upward close to the switch and this gave it enough distance to turn off when a ball was not in position. In doing this it's important to make sure that when a ball is present the lever moves down far enough to close the switch. Second, there was considerable charring around the diode (green arrow.) I unsoldered one end and tested it with an Ohm meter. One direction it read 265K Ohms and open in the other. Normally, these 4004 diodes read 6M Ohms in one direction and open in the other. I cleaned off the charring and replaced the diode, being careful to hold the wire with needle nosed pliers between the diode and soldering iron to avoid overheating the diode. This fixed the problem.
It could have been the switch itself. To test it I unsoldered the diode on the left in the image above and pulled off the center connector. With the lever up (in the off or open position) the two outer most leads (far left and far right) should read as a short. If the switch lever is pushed down to close the switch these leads should read open. In the orientation of the image above, the right two leads (center and far right lead) are always open, regardless of the switch position. The center and far left leads are normally open. When the lever is pushed down to close the switch these leads should be short.
Note: Both of the last two problems were caused in part because over the years metal parts slowly bent out of position. This is one of the aging problems old games experience.
BALLS BOUNCE BACK INTO BALL RELEASE LOCKING UP THE GAME.
12 January, 2012: Balls ejected from the ball trough into the plunger lane started bouncing off the metal side of the plunger lane so hard they would go back into the ball trough. If another ball had already moved into place the ball that bounced would lean against it and, because it wasn't triggering any swithches, be sensed as a missing ball.
I assumed the problem was that after years of being hit, the metal on that side of the plunger lane had gotten hardened and caused balls to bounce off it harder. My quick fix was to use super-strong indoor/outdoor double faced tape to attach a strip of thin plastic that gave each ball a slight push down toward the plunger.
This fixed the problem.
SWITCH WARNING
27 October, 2012: I started to get this warning when the game came on:

It turned out a wire had broken off the E.O.S. switch.
Soldering it back on fixed the problem.
THING RELEASE WARNING
2 March, 2013: The game started giving the following warning:

When Thing drops a ball inside his box it falls into a kickout, which ejects it into the Swamp. Like the last problem, resoldering a broken wire at the switch fixed it.
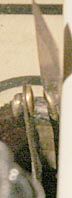
VAULT SWITCH HANGING UP
2 March, 2013: While working on the last problem, I noticed that the vault switch lever arm was hanging up on the side of the opening cut for it.
Using an Exacto to cut a bevel into that side of the plastic ramp and bending the lever a little away from it solved the problem. You can see the trimmed area as being lighter than the rest of the edge in the image below:
I never saw a warning for this switch so this must have been a problem that was erratic enough to not warrant a warning.
THREE SOLENOIDS NOT FIRING
15 September, 2013: In August I noticed that balls would occasionally hang up in the Swamp. They wouldn't clear when the game went into its ball-finding routine. I had to fish them out with a magnet. The problem didn't happen very often so I didn't worry about it. Shortly after that balls started hanging up in the ball release to the plunger lane as well. Again, it didn't happen often so I ignored it. Over the next three weeks both problems happened more often until finally these two releases stopped working altogether. I ran through a solenoid test using the coin door switches and discovered that neither were firing as well as the center right jet bumper.
The first thing I checked was that all three solenoid armatures and the attached mechanisms moved freely. They did. Next I checked the voltages on both sides of the solenoids to ground. They all read 80 volts, indicating that they had good power and that the solenoids weren't burnt open. Next, with power off I checked the resistance across each solenoid. The ball release read 0.4 Ohms, the jet read 0.4 Ohms and the Swamp release read 0.1 Ohms, all correct so none were shorted. Then, with power on and the coin door closed, I shorted the single-wire side of each coil to ground. Each fired as it should. Lastly, I measured the resistance from the connector pins in the backbox to the single wire side of the coils. They all read good so the problem wasn't an open wire. That meant that the problem was somewhere in the backpanel's circuit boards.
Afraid that I might do more harm than good trying to trouble shoot the boards, I hired a professional to make a house call to fix the problem. When he arrived he very patiently listened while I described the problem and all I'd done to trouble shoot it. He nodded once, reached in a pressed the main connector from the computer to the power panel...
... and it was fixed. I groaned - he laughed. It turned out the problem was a loose connector. It appeared to be fully pushed in but in fact vibrations had caused it to wiggle just a little loose. Apparently, the signals to these solenoids passed through pins that were ever so slightly smaller than the rest of the pins so that when the connector came loose they no longer made contact. The period of time over which the solenoids would sometimes work was when the connector was far enough in so that the connections were erratic. Eventually it worked its way loose enough to break the contacts altogether. He explained that this is not an uncommon event in older machines.
Extra Dots on the DMD Display
Shortly after the above repair, I noticed there were occasionally extra dots in the lower right corner of the dot matrix display.

The pattern was erratic. Sometimes it would be just a few like the image above, other times it would be half of the bottom line and a few dots in the second and third line. Most displays were clear but 30-percent had these artifacts. They also appeared in some, but not all, of the T11 display test, when a vertical column progressed from left to right across the display. During this test a trail of extra dots followed the bottom pixel of the column. I began researching dot matrix display problems and suddenly remembered that the last problem turned out to be simply a loose connector. Hoping to get lucky, I pushed in on all the connectors on the backpanel's circuit boards. Luck was with me. Although they all felt solidly seated, when I looked at the display the problem was gone. Either one of the connectors had vibrated loose over time, had gotten knocked loose during the repairman's inspection or a weak connection was strengthened by pushing on all the connectors.
NEW!!! 3 Million light Burned Out
3 June, 2014: After almost a year with no problems this light in the mansion burned out. Feeling lazy, I let it ride until something more important went wrong.
NEW!!! Cousin It light Burned Out
18 June, 2014: Another mansion room light died.
NEW!!! Complete Power Failure
29 June, 2014: Suspecting the same 3-amp slow blow fuse in the lower box that caused a similar problem last year, I checked it an learned it had blown. I replaced it as well as the two bulbs and everything's back to 100-percent. I suspected the fuse problem was a power surge as the air conditioner turned off or on. Then I noticed that the output voltage of the variac was way up at 134 volts. I suspect the control knob had gotten bumped. This high voltage may have pushed too much current through the fuse.
Ball Falls Into Lower Cabinet From Thing
1 July, 2014: This is the forth thing to go wrong in two weeks and I'm fearful the game is entering one of its problem cycles. This latest problem is serious.
All of a sudden everytime Thing picked up the ball and dropped it down into the Thing box it fell out of the game table and ended up in the lower cabinet. Examining the area around the Thing kick out disclosed the problem.
The plate that holds the kickout solinoid had broken loose from the body of the kickout. It appears this had happened before, been brazed together and after years of corosion had broken loose again. Fortunately the repair brazing was very rough so that when the pieces were fitted together there were many nooks and crannies that meshed, locking it in place. Two heavy duty twist ties are holding it together until the replacement part arrives. It cost $93 from Marcospecialties. This is going to be an involved replacement because the Thing kickout is located at the very bottom of the playfield, limiting access, and is tied to the Thing box which may require removal in its entirety. Repair projects this big can end up breaking more then they fix. Wish me luck... I'm going to need it.
UPDATE!!! While researching a different problem, I came across a Youtube video that showed a Thing eject broken the same way as the one above, suggesting this is a common problem. Like me, the owner's fix was to use two zip ties to hold it together. The heavy layer of dust on them indicated that this fix may be an easy and reliable long-term solution.
The solenoid mounting plate on the new Thing eject I purchased...
...is held in place by four very light spot welds. I'm not surprised they break.
Balls
Hang Up In Ball-Ejector-to-Shooter
Lane
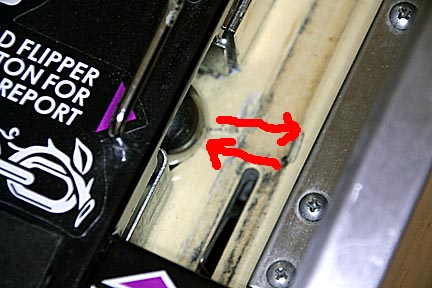
When just one ball is in the trough that feeds to ejector into the shooter lane, once out of every ten times instead of it resting at the end of the trough like this:
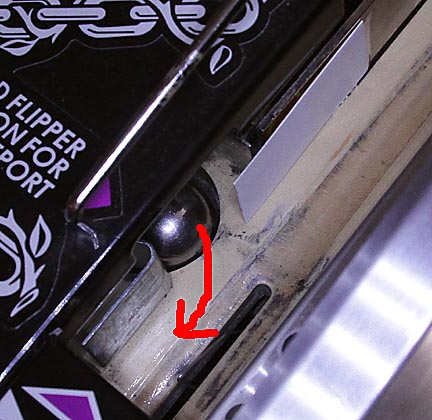
It hangs up behind the ball sensor wire like this:
Because the sensor wire isn't depressed the machine registers this as a missing ball and starts the ball-clearing process. Since there's no activator to push the ball forward this doesn't clear the problem. I have to take the cover glass out and clear it manually.
The problem turned out to be related to the fix halfway up the page where I added a piece of wire to help the ejector push the ball into the shooter lane. Evidently the wire was too thick and once in a while the ball would bounce off the end of the trough to fly back behind the ejector and the tip of the ejector prevented it from rolling forward again. Balls hanging up immediately after that fix didn't happen often enough to worry about. It got serious enough over time to bother fixing because the wood hardened with age and impacts to the point where balls were more often bouncing back to where they could get trapped. Filing down the tip of the ejector a few thousandths of an inch fixed the problem.
"Missing Ball" Warning Prevents the Game from Starting
2 August, 2014: My grandson had played for an hour and was about to start a new game when all of a sudden the "missing ball" warning appeared on the DMD. All three balls were in the bottom trough that feeds the shooter lane so the problem had to be one of the three switches failing to sense that there was a ball on it. I went to the single switch test and ran through them until I got number 15: left trough switch. It indicated "closed" as it should because there was a ball above it. Number 16 (middle trough) also indicated "closed" as it should. Finally, switch 17 (right trough.) This is the ball you can see that's about to kicked out into the shooter lane.; It indicated "open" even though there was a ball there. This told me the problem was with this switch. Next, I removed the left and middle balls and made sure the right ball was pushing the wire connected to the switch far enough down to close the switch. It was. Also, the fact that I could hear the switch click as it closed suggested that mechanically the switch was good. Then I lifted the playfield to inspect the switch. The diode and wires appeared to be in place and there wasn't any charring. I started to connect an Ohm meter to the switch to check it when the white and violet wire connected to one end of the diode moved freely out of the way. The problem turned out to be only a broken wire. I didn't spot it at first because the wire's spring tension held it in what looked like its proper place. At first I assumed I had failed to solder it properly during the earlier fix mentioned halfway earlier on this page. But closer inspection indicated that corrosion had eaten through the wire close to the soldered joint allowing the wire to break free. Now, I live in southern California's high desert, which is known for low humidity, so this finding was surprising. When I removed some insulation to make a new soldered joint, I noticed green corrosion coating the wire under the insulation. I suspect the years the game lived in Germany prior to my purchasing it allowed humidity to creep up under the insulation from the end. I stripped off another 1/4-inch and found clean wire. My concern is that potentially all the wires may be slowly corroding away from this residual humidity.
"3
Million" Lamp Burned Out
2 August, 2014: Actually, it went out a week ago but I let it go until something more serious popped up to justify raising the playfield. Every time I do so increases the risk of fatiguing a wire to the breaking point. A new 555 lamp fixed the problem.
UPDATE!!!
From 2014 to 2017 not much went wrong other than a few bulbs burning out. This low-problem rate was due to the game only being played a few times a month. Then, in mid July of 2017 the grandchildren rediscovered it and played it for several hours. The next day I noticed three problems.
NEW!!!
When The
Machine Is Turned on, the DMD States the Upper Right Jet Bumper
Needs Checking
The problem was that the switch was erratic. Sometimes it would trigger. Most times it wouldn't. This problem was fixed with a few strokes of fine sandpaper across both switch contacts.
NEW!!!
Both Upper Red Flashers Either Don't
Flash or Flash Irregularly
At first, replacing the bulbs seemed to help. But the lights would still fail to flash most of the time. The problem turned out to be that the soldered joints had broken loose from the bulb holders but the wires had enough spring in them to hold the ends in contact with the holder leads. Vibrations caused the wires to move away, breaking the connection while more vibrations sometimes brought them together again to function normally. This was a difficult problem to troubleshoot because all the wires looked to be in place. It was only evident what was wrong by touching the leads and finding out they weren't connected. Resoldering them fixed the problem.
NEW!!!
Upper
Left Flipper Doesn't Move
One of the wires to the solenoid had broken off. The solder didn't fail. The wire itself broken. I suspect this sort of problem will become more common as the years go by. The machine is already 25 years old and vibrations are weakening many of the components. Resoldering the wire fixed the problem.
That's
it so far! I'll continue updating this page every time something
goes wrong so prospective TAF buyers can get a feel for how often
they can expect problems with their games. Remember:
Every Addams Family pinball game in existence is close to two
decades old. Many of these aging soldiers have endured years of heavy
commercial use. They are beat up and tired. Under these circumstances
repair issues like the ones I've chronicled on this page are not
unreasonable for anything this complicated. Rescuing one of these
games and preserving it for future generations is worth the effort.
![]()
(Click
on main site
to browse 70 other topics ranging from exotic kaleidoscope designs to
the strange world of lucid dreaming. There you will also find several
other pages dealing with the Addams Family pinball game.)