Wayne
Schmidt's Best Pictures Samples
of my best photographic work
This page
showcases my best photographic work. I make no claims that these
images are great or even good on an absolute scale, only that they
are the best I can do. I hope to add several pictures a month so
please check back often.
The images displayed on this page are greatly reduced from the original in the interests of keeping bandwidth usage below my site's monthly limit. All of these photos were taken with a Canon 20D, 8.2MP camera set to maximum resolution RAW mode, then converted to TIFF for processing.
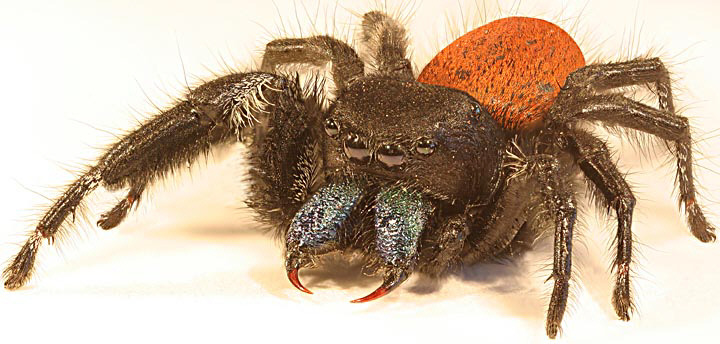
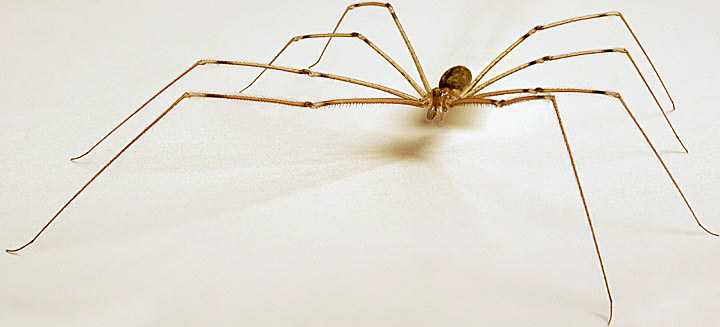
Male Phidippus Johnsoni (Red-backed jumping spider)
This first
image is a composite of 200 sections taken from 45 images of a
jumping spider as the focus was racked from his furthest leg to the
nearest. This technique enables the creation of a single image with
the entire spider in focus. (Please see my HOW
TO STRETCH THE DEPTH OF FIELD IN A PRINT
page for how this compositing technique increases the depth of field
of an image.) The lens was a Canon 65mm 1-5x Macro Photo lens set to
a macro factor of 3X at F6.3, the sweet spot for the lens at this
macro setting. The camera and lens were mounted on a special focusing
rack (please see my CANON
MP-E 65mm 1-5x MACRO LENS
page for details of this rack) driven by a 24 thread-per-inch screw
turned in 1/3-turn increments. Mirror lock-up and a remote release
were used to eliminate first-order vibrations and the lens/camera
system was blocked to reduce second order vibrations. Set-up took two
hours, taking the photographs took 10-minutes, compositing took
12-hours while final touch-up and processing took two-hours. This
single-frame image (23.4 MB in TIFF) can be printed 16-inches wide
without noticeable grain. The 81 KB version posted here barely hints
at the detail present in the original. Particularly striking is the
blue-green iridescence of the huge mandibles contrasting with the red
of the fangs. Also noteworthy is that the abdomen is completely
covered in tiny orange hairs. In reality this spider is only 3/8-inch
in diameter. (This pictures makes me thankful that these things don't
grow larger.)
![]()
This is its actual size.
The following
is image number 34 of the 45 taken of the spider and provides an idea
of what a normal image looks like. At 3X the depth of field is a
fraction of a millimeter. In the case of this image the only parts
that are in focus is a narrow band across the back of its head, a
small section near the middle of the right front leg and a small
section of third leg back on the left side.


The Gazania Rigens (Treasure flower) above is a composite of 12 RAW images converted to TIFF, again, to stretch the depth of field so the entire flower is in focus. I used a Sigma 18-200mm lens at 200mm, F8.0. This lens has a semi-macro focusing ability allowing the images to be taken 9-inches away from the flower, which is 3-inches in diameter. The original image (from which this 71 KB image was taken) is 19 MB and can be printed 17-inches wide without sensor granularity becoming visible. The darkening of the petals to yellow near the center of the flower is real and not an effect of underexposure.
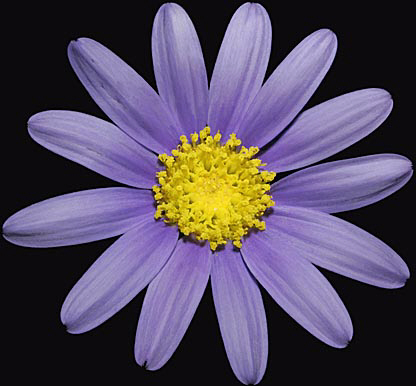
The master image from which the above picture of a Felicia Amelloides (Blue Marguerite Daisy) was reduced is a composite of 30 RAW images stitched together to increase the image size from 3504 x 2336 pixels to 5111 x 4800 pixels and layered to increase the depth of field so the entire flower is in focus. The resulting single-layer TIFF image consists of 24.5 megapixels (larger than the 22 megapixel count from a medium format camera) and takes 70.5 MB of storage. It prints out very cleanly up to 24-inches wide.

Actual flower size.
All images were taken using a Canon 100mm macro lens at a working distance of 11 inches (0.9X) at f16. The camera was mounted on a tripod, set at ISO 200, custom white balanced, used Adobe RGB color space and triggered with a remote release. Two images of each petal were taken, focused on first on the top and then the bottom of the petal. These image pairs were composited to create a sharp image of the entire petal, then this image copied onto the master image. Additional images of the center were taken to form the initial master image. Compositing took three hours and touch-up two hours.
This image taught me several compositing techniques. First, small changes in each image resulting from changes in focusing, orientation, or position requires that it may have to be rotated and resized to fit into the master image. Second, for some reason the very small changes in camera position to capture each petal caused a slight exposure shift in 40-percent of the images even though the lighting on the flower was constant. This was easily corrected by adjusting the brightness 2 to 4 percent. Color shifts were not an issue. Most importantly, the parts of the image to be copied onto the master image have to be small. Large sections do not scale properly because the scaling effect is proportional across the section being changed whereas what's required is a linear change.
This was an exciting image to process because it was the first time I'd combined image stitching and layering. By stitching images together there is no limit to the pixel count an image can have. The only price required is the time it takes to combine the images.
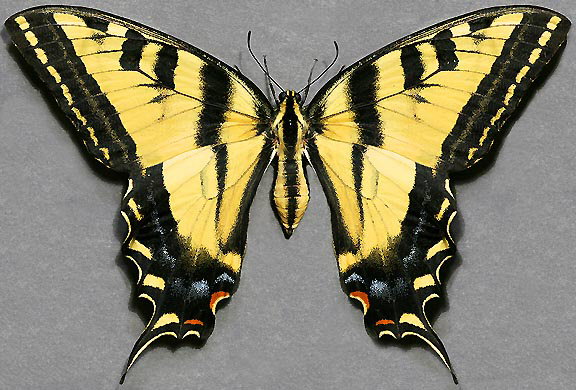
Papilio
Rutulus
(western
tiger swallowtail butterfly)
This is a composite of 28 RAW images combined to make a final image that's 10,371 pixels wide by 7,031 pixels high (73 megapixels without resampling.) The resulting TIFF image is a 209 MB file. It can be enlarged to 50 inches wide without graininess. The 28 images were taken using Canon's EF 100mm macro lens at F16, custom white balanced against an 18-percent gray card, and in Adobe RGB color space. I was uneasy about shooting at F16 because the sweet spot for this lens is F6.3. I was concerned that diffraction blurring would cause problems but there were ripples in the wings that required the smaller aperture to provide the depth of field needed to keep everything in focus. Fortunately, the low magnifications required for large images prevented diffraction blurring from being a problem. Enlarged to 40-inches wide the wing scales, which are only 0.008-inches wide, can be clearly seen. Also, each hair on the butterfly's body is sharp and clearly defined. (Note: in the picture above the sharpening halos around the antenna were caused by the automatic image processing associated with the software used to create this page. It doesn't exist in prints of this image.)
One problem with making prints larger than 24-inches wide is that because each scale can be clearly seen, it creates a rough look that can be misinterpreted by anyone unfamiliar with butterfly wing architecture to be digital graininess.
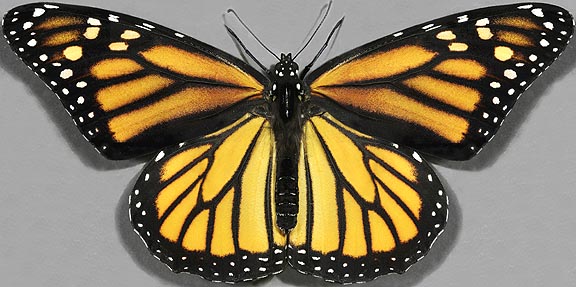
Danaus Plexippus
(Monarch Butterfly)
The image above was created using the same techniques of the tiger swallowtail butterfly picture except I started with 32 RAW images. The final unresampled TIFF image is 14,890 x 10,061-pixels (150 megapixels) and takes up 429 MB of space. Although this much-reduced copy of the final image doesn't show it, the master file captures even more detail than the swallowtail picture.
This is a female monarch. Males have a more even, and uninteresting, orange coloring and two black dots in the middle of the bottom pair of wings. Monarchs get more press but for my money I'll take the swallowtail: it's bigger, brighter, and has a more interesting wing shape.
Pholcus Phalangioides Pholcidae
This image of a male Daddy Longlegs spider is a reduction of a composite of 67 images taken at 0.8X using a Canon 100mm macro lens. The actual TIFF unresampled image is 3313 x 1601 pixels (15.2 MB.) The problem with this subject is that his legs are so long that to get all of him in the frame there were too few pixels on the face and body to capture fine detail. To correct this I took a separate series of 2X pictures of only his body, layered them to extend the depth of field, then pasted them onto the main image.
![]()
Actual size:
1.5-inches across.
His lack of coloring makes him much less attractive (?) than the jumping spider at the top of this page. Still, printed out at 19-inches across the detail in the joints make him interesting.
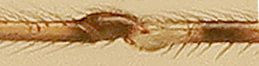
If the detail of the leg joint shown above as it appears on 30-inch prints is less than stunning, please remember that it was taken at only 0.8X so the entire spider could be captured at once. Using a higher "X" would show significantly more detail. Also, consider that the largest diameter of this leg is only 0.004-inch, about the thickness of a sheet of paper. The hairs on the leg are less than one ten-thousandths of an inch thick. I considered going to a higher "X" factor but the depth of field would have been so short that each leg would have taken 30 to 40 exposures... and there are eight legs. That's too much work without an advanced commision.
Myrmeleontidae Myrmeleo

Because it remains buried most of its life, the common ant-lion is all but invisible. Brought to the surface it reveals itself as one of the strangest creatures imaginable. This resampled and reduced image is from a composite of 45 frames taken with a Canon 1-5X macro lens set at 3X. Enlarged to 19-inches wide it is a terrifying image.
![]()
actual size
NEW!!! Pretty Girl with a Pretty Smile
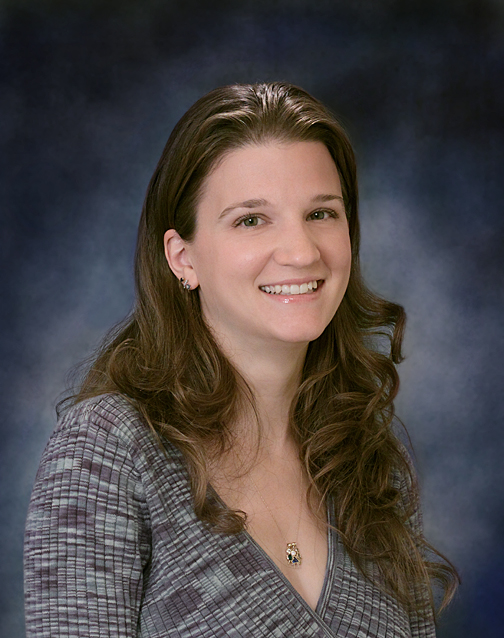
Any professional portrait photographers who happens to come across this image will scream in agony at all the things I did wrong. In my own defense this is my first attempt at taking a formal portrait.
I took the image above using my new Canon 50D, 15 megapixel camera, fitted with a Canon EF 100mm f 2.8 lens. The lighting was simply two 100-watt incandescent globe lights placed one above each other, 30-degrees off to her left and half way between her and the camera, which was 13-feet away. The room was small and the walls white enough for reflected light to provide the fill light I desired. There was also a 100-watt incandescent light on the center of the ceiling and a small homemade spot to throw some highlights onto her hair. The exposure was taken in RAW, processed on Photoshop as TIFF, custom white balanced using an 18-percent gray card, 1/60th second, f7.1 (the sweet spot for this lens) and ISO 1600.
Yes, I said 1600. Why so high? It has to do with smiles.
Great smiles, where the entire face lights up with joy, are transient things. They come and go in the blink of an eye and are therefore very difficult to capture on film. The technique I use to increase the odds of recording them is that I set the camera shutter on drive so it takes pictures at 4 frames per second. I start the drive just before I hit the subject with a tease line intended to bring out a heart-felt smile and leave the drive on for several seconds. What I get is the full range of expressions as the subject's smile evolves from formal pose, to smile, laughter, and back down again. From these dozen images I always get at least three worth keeping. Doing this four times insures I get at least one image that has the perfect smile.
The problem is that I can't afford $1,000 for a high-end flash system that can run off 40 flashes a minute so I have to use constantly-on lighting. Even if I did, the constant flashing would se distracting it would ruin the subject's expression. Studio lights would be great, but are also too expensive. My solution was to use cheap incandescent lights in spring clamps, custom white balance the exposure to correct the color shift and what seems like a ridiculously high ISO to get a proper exposure under what for portraiture is a very low light level. Normally an ISO 1600 would have far too much noise to produce a useful image. But then the Canon 50D isn't a normal camera. Its new chip design and internal noise reduction software combine to enable shooting at ISOs previously impossible. Yes, shooting at 400, 200 or 100 would have produced a better image. But the fact is that the master 40 MB TIFF image from which the above image was reduced prints out at 11x14 inches so fine that even with close-up glasses sensor noise is impossible to detect. I took the finished portrait into the camera shop where I purchased the 50D and the owner, who has a long lifetime of professional photographic experience, could not believe the quality of the print.
I didn't mean for this to sound like a sales pitch for this camera. I'm only trying to point out that some of the newer generation (as of late 2008) cameras can have chip noise levels so low that they can be used at higher ISOs than previous wisdom suggests.
Cosmos Bipinnatus
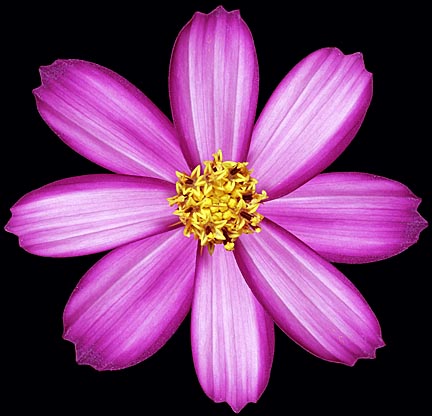
Hard though it may be to believe, the color shown in this image of a common cosmos is very close to that of the actual flower: a shocking magenta. The master image is a 5990 x 5771 pixel (98.9 MB TIFF file) composite of 11 RAW images taken at F13, ISO 200, using a Canon 100 macro lens. One disappointing feature is that the lighter edges on some of the petals aren't sharpening halos, but a fine powder adhering to the petals. Printed out at 13 x 13 inches the true character of these borders is apparent, but on small resampled images like the one above they give the impression the image was oversharpened.
![]()
Return to my homepage and browse 20 other photography pages or 80 different general interest pages: everything from metal detectors to the strange world of lucid dreaming.